Make the Back Squat Feel and Look Better
I’m currently in the throes of jet-lag sucktitude.
I’ll be back on my writing content horse next week, but I’ve got a treat for you today. TG.com regular contributor, Dr. Nicholas Licameli, is subbing in for me today and he went to TOWN in today’s guest post.
This is one of the most thorough articles I’ve read in a while on the topic with a metric shit ton1 of information with many additional links to help you nerd out a bit more if you so choose.
Enjoy!
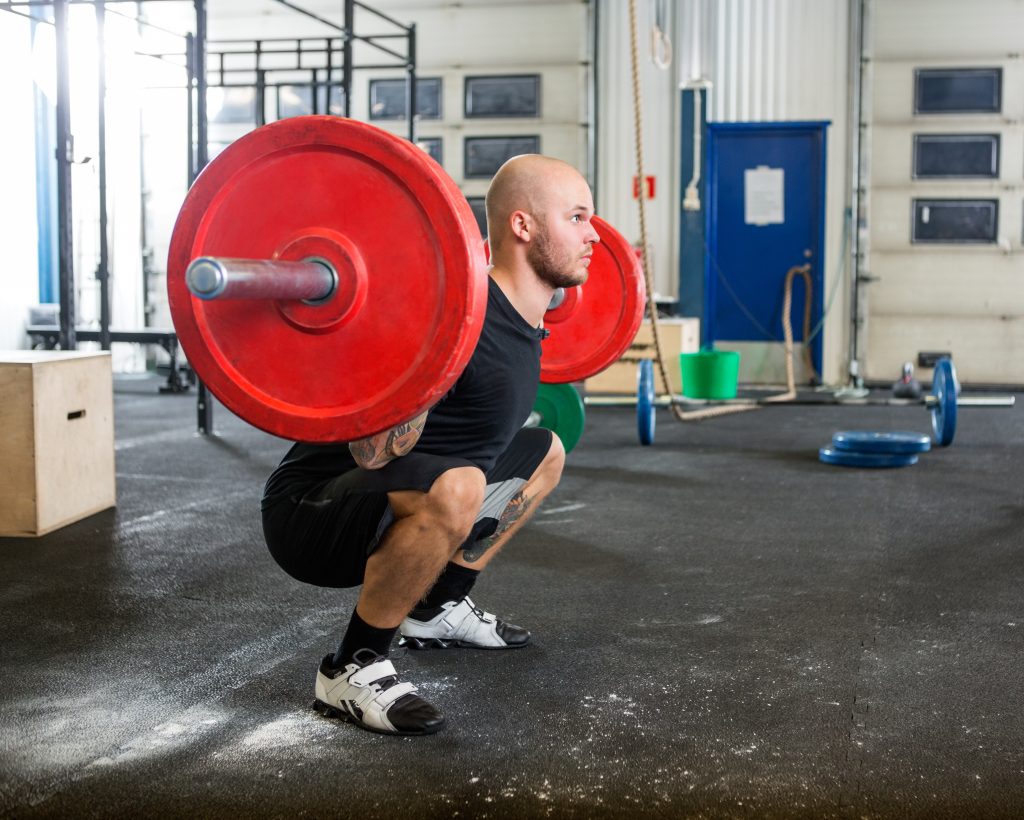
Copyright: leaf / 123RF Stock Photo
Make the Back Squat Feel & Look Better
The squat is a topic that has gotten a great deal of attention among many fitness and medical professionals since mankind first started lifting heavy things against gravity. Since then, much of the conversation has changed (with the advent of civilizations, roads, running water, Instagram.
However much has stayed the same.
I understand this isn’t the first article written about the squat.
Some of the greatest minds in fitness and strength and conditioning have written on the topic, and I encourage you to dive into the multitude of references that I’ve provided.
My goals for this article are to help make your squat look and feel better, improve performance and effectiveness, un-complicate the complicated, and give you the confidence to perform this foundational movement without fear.
Should You Squat?
The short answer is yes.
Unfortunately, there are those that say to avoid squatting.
As a physical therapist, I have to apologize because much of that flawed thinking stems from misinformed and unqualified professionals in the medical field that are pleasantly ignorant to current practices.
The squat and hip hinge are foundational to basically all movements in and out of the gym.
Whether you’re hitting a PR on the platform or sitting down on the toilet, you are squatting and you better be using proper technique. I’ve treated injuries as a result of poor squatting in both of those previously mentioned instances. Why avoid the squat in the gym if we’re going to do it constantly throughout our day anyway?
I say train it rather than avoid it.
Why not be prepared and do it right?
The squat and hip hinge require total control of the deep abdominals as well as the hips, pelvis, and entire spinal column. We can all agree that teaching proper abdominal bracing, pelvic positioning, and proper lifting mechanics are of utmost importance for the treatment of musculoskeletal injuries including knee, hip, and low back pain. For some reason however, we don’t all agree that squatting is necessary.
Newsflash…when done correctly, THEY’RE THE SAME THING!
As both a doctor of physical therapy and professional natural bodybuilder, it should come as no surprise that in my opinion, people of all ages and from all walks of life should be squatting. This includes the young athlete just starting his/her training career, those recovering from injury, those trying to prevent injury, and even (and especially) the elderly.
No matter if you are an athlete or a great grandparent, we are all essentially “squatting” multiple times throughout our day, so why not train it, strengthen it, and perfect it?
You can release this muscle or stretch that muscle but if patients and clients don’t know how to squat and hip hinge, we are spinning our wheels and wasting valuable time.
How to Squat
While this isn’t a step by step “how to squat” article, here is a quick and dirty rundown of some things to keep in mind.
There is a plethora of information out there about thoracic spines, knees, ankles, spinal positioning, foot placement, etc., and sometimes it can complicate things, make people fearful, and mystify the movement.
Basically, a proper squat and hip hinge starts (obviously) at the hips with the spine in a neutral position (more on this later). After a breath in, tension should be kept throughout the body and throughout the movement. The entire spine, including the neck, mid back, and lower back, should be kept in a relatively stable and neutral position. The feet should remain actively planted on the floor with the weight evenly distributed.
More on all of this to come.
In the beginning of my lifting career, I struggled with finding the “groove” of the squat. This is partially due to improper mental cueing during the movement. Some of my mental cues during the squat were:
“Arch the back hard to avoid spinal flexion.”
“Keep the head and chest up so they remain in line with the horizon.”
“Sit back and push through the heels.”
“Always squat below parallel.”
While there could be worse things, especially considering that, like most beginners, my sources of information were muscle magazines and of course the biggest guy(s) at the gym, I think these cues can be quite misleading and detrimental to squat technique.
Here’s why.
“Arch the Back Hard to Avoid Spinal Flexion.”
Avoid a hard arch in the lower back.
Don’t let the lower back round of course, but rather maintain the natural arch of the lumbar spine.
Hard lumbar extension will crunch down on the delicate structures of the spine, put the glutes in a less than optimal position to stabilize the pelvis, and place the hip in slight flexion before the movement even starts.
Starting in hip flexion will cause the femur to run out of room in the acetabulum for hip flexion when you want it most…at the bottom range of the squat. This could result in femoral acetabular impingement (FAI) and labrum pathology.
Get out of that hard arch and find your neutral.
“Keep the Head and Chest Up So They Remain in Line With the Horizon.”
Keeping the head and chest up isn’t necessarily a bad thing, however if we achieve that position by hyperextending our backs and flaring our ribs forward, it becomes problematic and essentially unstable.
Cueing a slight posterior pelvic tilt prior to un-racking the weight and maintaining that position throughout should do the trick. This will place the spine and ribcage in more of a neutral position.
We maintain the position by taking a breath, contracting the upper back, lats, mid section (as if putting on a tight belt or walking into cold water up to your navel), pelvic floor (as if holding in gas or urine), and even the feet (more on this to come).
Check out my explanation of what it means to “contract your core” right here. Tony does an awesome job of explaining this here, as does John Rusin here. Quinn Henoch and Ryan Brown also hit the point home here. Eric Cressey nails the upper body and lat set up here.
“Sit Back and Push Through the Heels.”
It’s true that we don’t want to push through our toes and allow our heels to rise off the floor, however it is also true that we don’t want to shift our weight so far backward that the toes lose contact with the floor and most of the force goes through our heels.
Yes, we want to descend slightly backward, but the focus should really be on descending down between our hips.
When we say we put an adversary on “his/her heels,” we are saying that we put them in a vulnerable position and on the defense, which will likely lead to a step backward. Why would we want to put ourselves on our own heels while squatting?
A better cue is to have an “active foot,” evenly maintaining 3 points of contact with the floor: base of big toe, base of little toe, and heel. Tony explains this really well here. This foot position will help stabilize the hips and knees, as well.
Mastering the “active foot” takes practice, but once you feel it, there’s no going back.
For everything you (and your children and their children’s children) will ever need to know about squatting, check out this bad boy by Greg Nuckols.
Find Your Squat
Hey fellow millennials!
Remember what our mothers taught us…we are all special, we are all unique, everyone is a winner, Mufasa died of natural causes, and most importantly, we are all different!
When it comes to the squat, this last point is key.
We are all structured differently, which is why there is no particular squat that is perfect for everyone. Things like foot position, stance width, and squat depth will all be impacted by things like the size of our torsos, length of our femurs, and the structure of our hips and pelvis. We need to find the squat variation that best “speaks” to us.
The classic example of this is hip flexion range of motion and lumbar compensatory spinal flexion.
Much has been written about this topic, and to avoid making this more like a Harry Potter book rather than a guest post, I’m going to refer you to some excellent articles down below.
Keep in mind that a range of motion measurement taken while lying on a treatment table DOES NOT always necessarily correlate to what we observe during an actual movement pattern like a squat and vice versa.
That being said, a 2008 study (stolen by me from a fantastic article by Bret Contreras) showed a 60 degree difference in hip flexion range of motion between the least flexible (80 degrees) and most flexible (140 degrees) subjects out of a total of 200 hips.
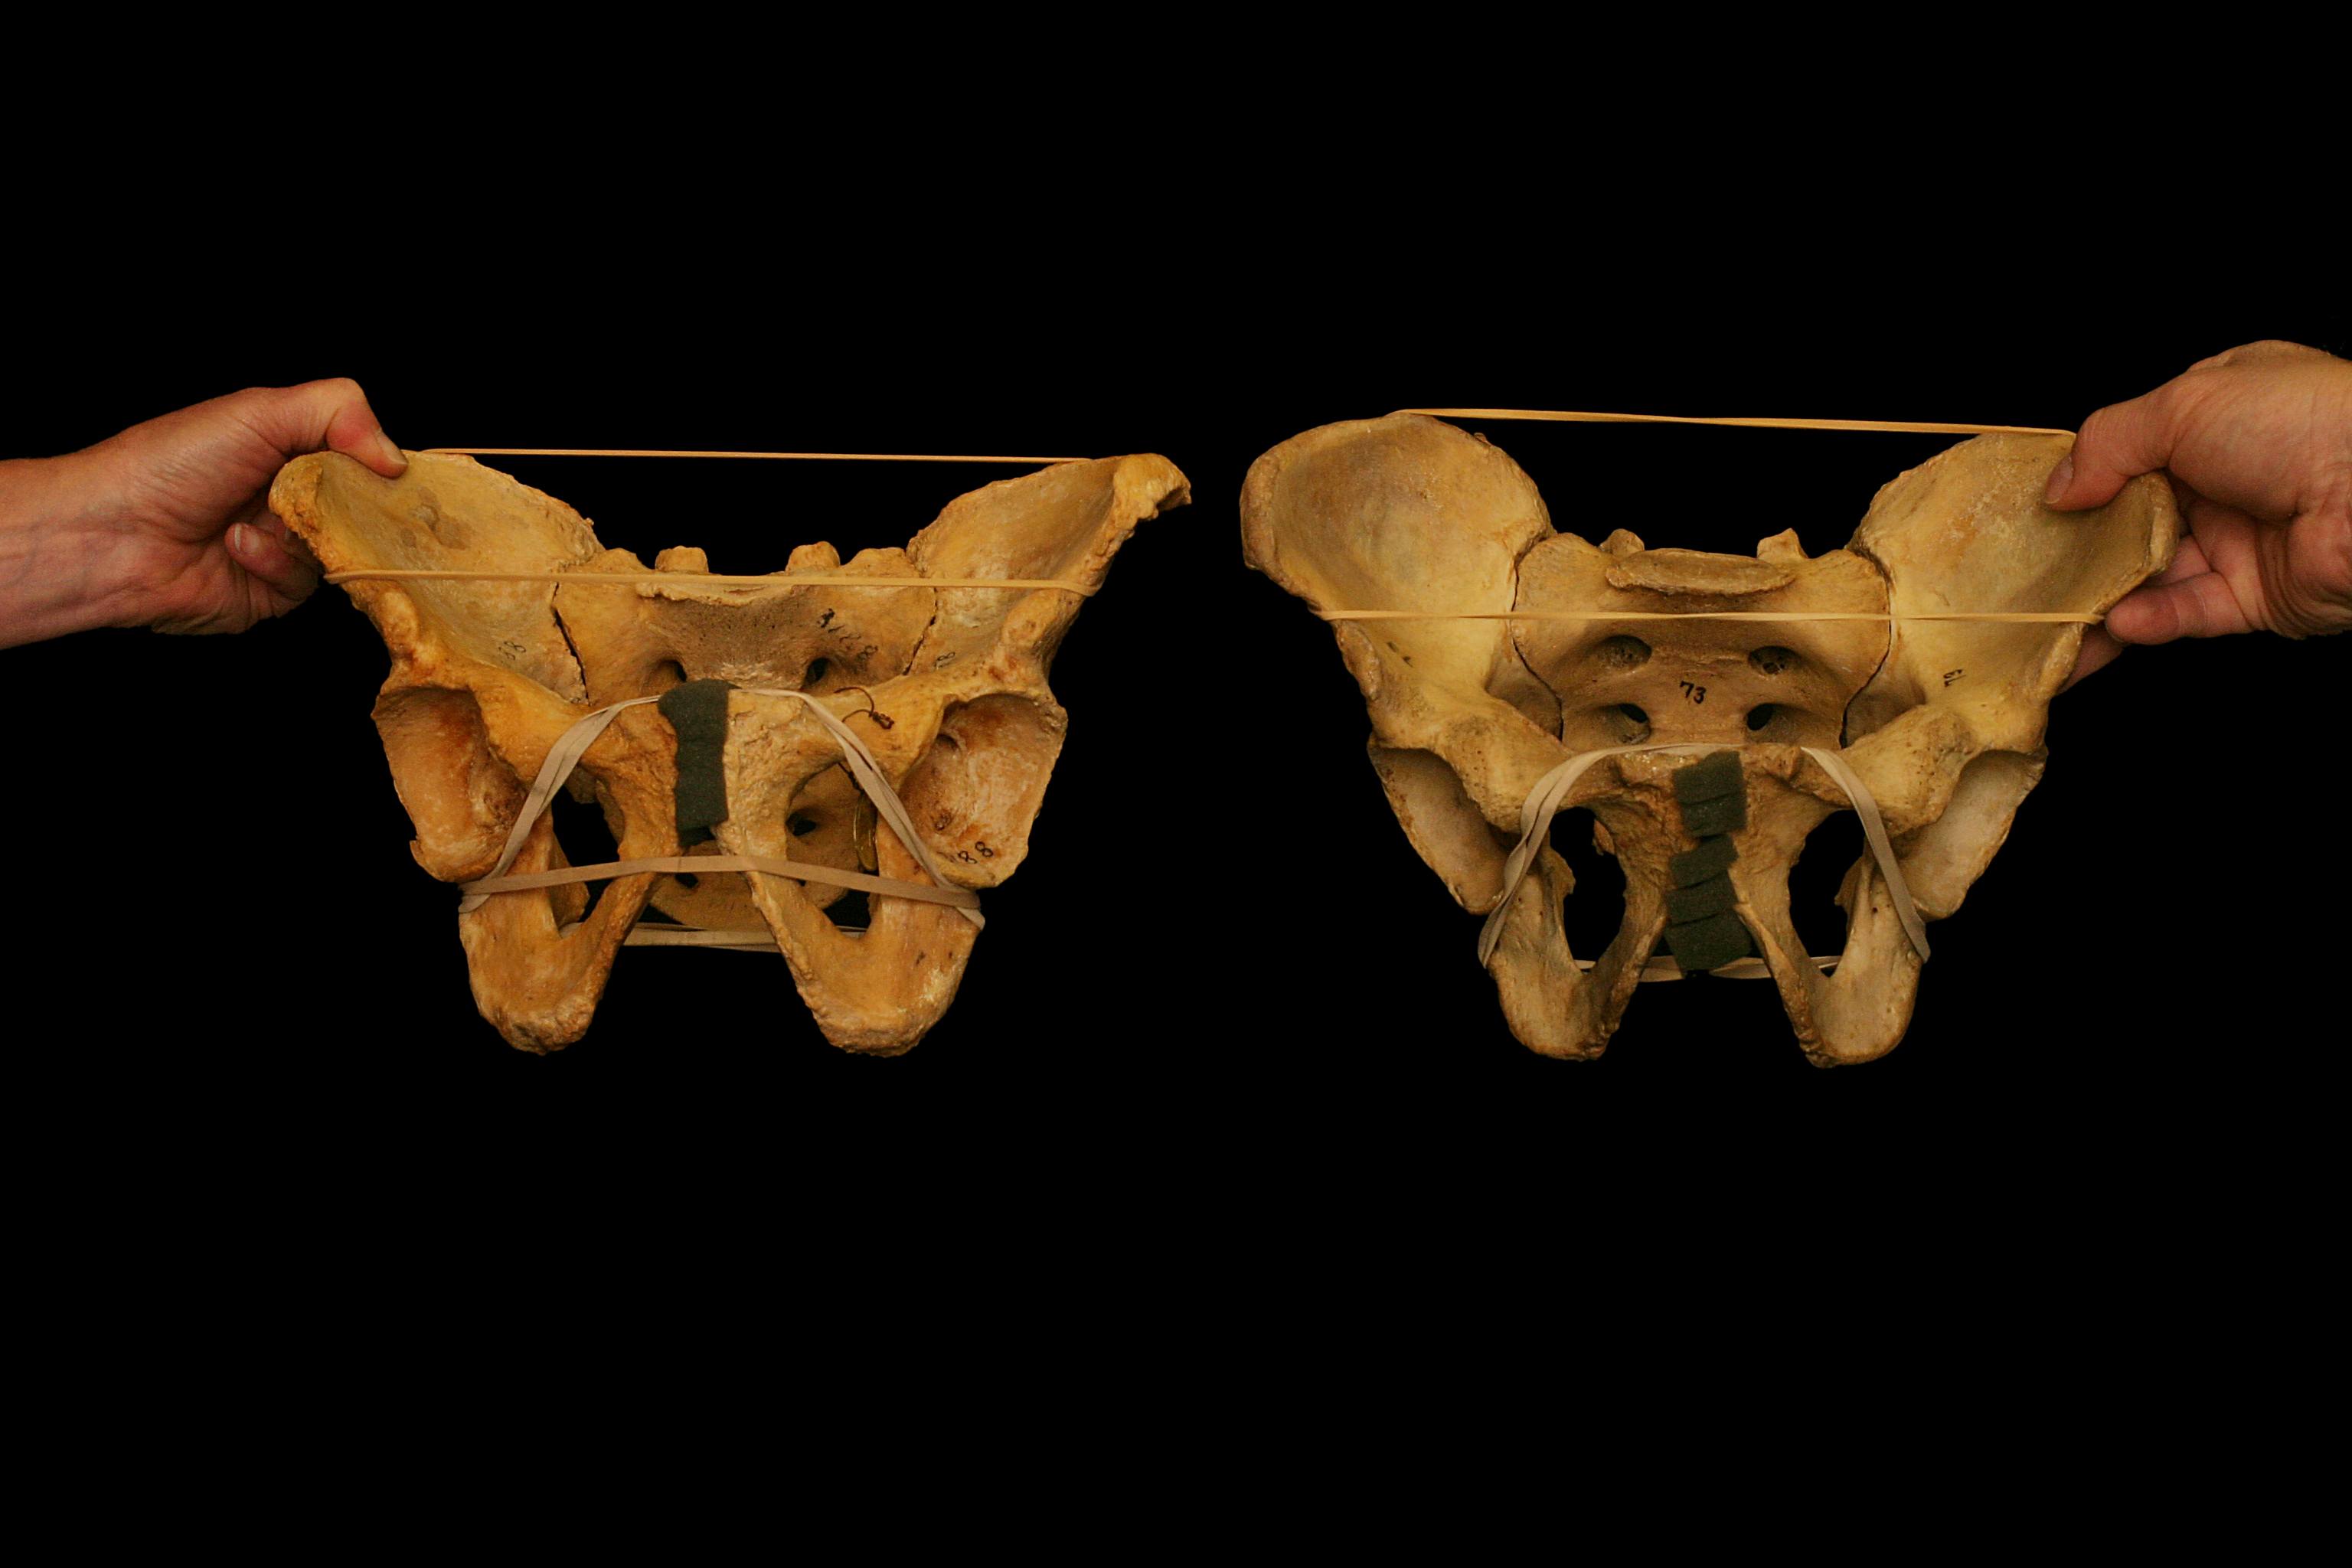
That’s quite a large difference, considering exercises like a deep squat require about 120 degrees of hip flexion. Differences in femoral anteversion/retroversion (how much the head of the femur faces forward or backward), acetabular anteversion/retroversion (how much the the hip socket faces forward or backward), and inclination angle of the femoral neck (angle of the neck and shaft) are seen from individual to individual as well as from hip to hip within the same person.
These genetic structural differences all change an individual’s ability to squat.
Thanks Mom and Dad…
Pushing past end range hip flexion in the descent of a squat for the sake of going deep will cause compensations up and down the chain, particularly flexion of the lumbar spine, AKA the dreaded “butt wink” (cue the tire screech and screams).
While some amount of lumbar flexion and “butt wink” is acceptable (we’ll get to that in a minute), too much, too often, in an uncontrolled manner, can be problematic.
So you can see why being married to a certain squat variation can be inappropriate.
If you are an individual that is unable to squat deeply but force yourself to perform deep barbell squats because your lifting partner says so, you’re setting yourself up for injury and a faulty and uncomfortable squat.
When it comes to varying your squat type, be sure to know your goal.
- Why are you squatting?
- To improve overall strength?
- Hypertrophy?
- To get a stronger squat?
- To impress a member of the opposite sex (spoiler alert, they don’t care)?
- To be able to pick up your child without pain?
There are many variations of the squat.
The conventional barbell back squat is just one option and unless you are training for a powerlifting meet, where you will be required to perform the conventional barbell back squat, there is no reason to lock yourself into only one type of squat.
Why not try a goblet squat? Or a sumo squat? Or a front squat? Why not use dumbbells or kettlebells instead of a barbell? If structured correctly, any variation of the squat will improve strength and hypertrophy as well as train the hip hinge and proper bending/lifting mechanics.
What’s the take home? We are all structurally different and it is important to find the squat pattern that works best of us.
Here are some great resources that will help you find the squat pattern that works best for you and your anatomy:
Dean Somerset’s 3 part monster part 1, part 2, part 3, Ryan DeBell, Stuart McGill, Quinn Henoch, and of course, Tony.
Note From TG: Nicholas is kind to include me amongst such elite company (Note to Self: you owe Nick 1000 Predator handshakes), but mine is easily the least pithy of the bunch.
Neutral Spine…Does It Exist?
Yes and no.
Research has shown that lumbar flexion, particularly at the bottom of a squat (the previously mentioned butt wink), is quite natural in a squatting pattern, particularly at the point in the movement where the hips start to run out of space for further flexion.
I agree with Quinn Henoch that neutral spine is more of a range rather than a set position, so don’t lose sleep over a little spinal flexion.
How much excursion is too much?
You knew the answer before you asked it.
It depends!
That being said, you definitely want to avoid movement at the spine and pelvis as much as possible. A moving base causes leaked energy and therefore less stability and built up tension. This means less force produced, less strength, and less Instagram pictures with a bumper-plate loaded bar on your back.
Don’t Stop Squatting Because You Have Pain Or Feel Restricted
If you experience pain during a squat, SEE A QUALIFIED HEALTHCARE PRACTITIONER.
You want someone that will question the type of squat that hurts, ask when in the range of motion the pain occurs, analyze your squat pattern, ask about weekly volume and load, inquire about recovery and sleep, and do everything in his/her power to keep you squatting.
There are always ways to modify the squat in order to keep training this key movement pattern while training with an injury.
Sharp pain at the bottom of a squat?
Try using a more neutral spine with slight flexion using a goblet squat to free up some space in that acetabulum.
No good?
Try adding a band around the knees during a few warm up sets.
Still no good?
Add a box to squat to at a level just above where the pain is felt.
The point is, you deserve better than a rushed, “Stop squatting for 4 weeks, take these anti-inflammatories, and see me in a month.
Oh, and if that doesn’t work, try foam rolling, cupping, turmeric, an oxygen deprivation mask, and VooDoo floss bands in a bath of apple cider vinegar and creatine.”
Fixing the symptoms with things like medication and surgery without considering the cause is an all too common theme.
These things have their place, of course, however they must be used appropriately. For example, surgery to repair a labrum that was damaged after repetitive impingement due to faulty lumbo-pelvic mechanics would be like fixing ceiling tiles in your living room instead of fixing the leaky roof.
After the surgery, if the individual returns to squatting with the same mechanics that got him/her under the knife in the first place, what good has been accomplished? Doesn’t make sense to repair, install, and paint shiny new ceiling tiles without fixing the roof first. Check out a video I made on this a while back right here.
So What Can We Do To Improve How The Squat Looks And Feels?
This is a tough question, because, as you probably guessed, everyone is different and it depends.
I recommend seeking out a qualified healthcare practitioner that will assess, reassess, and give you the tools to improve your individual squat.
Gone are the days of performing long, drawn out warm ups in the name of injury prevention, mobility, and movement optimization. A warm up should increase your heart rate and mentally and physically prepare you for the specific movements of the day.
The warm up should be active, specific and purposeful, not a cookie cutter series of activities like flailing around on the dirty gym floor or jamming a lacrosse ball into your sciatic nerve in hopes to break up adhesions in your piriformis.
Things like static stretching and foam rolling are passive activities.
In contrast, light cardio, dynamic stretching, loaded eccentrics, and actually getting under the bar and grooving the squat movement with sub-max loads are all active.
Passive activities like foam rolling do have their place, but they should be used appropriately. The benefits of foam rolling are short-lived, so if you’re going to foam roll, I’ve found it best to do it in between warm up sets. Of course, the specific muscles you target will be individual to you, your body, and your squat. For more on this, check out my article and video as well as this fantastic episode of Mobility Myths by Quinn Henoch.
Don’t feel obligated to use cardio as the only way to increase heart rate.
A dynamic series/circuit of exercises, combined with specific mobility work using active techniques such as loaded eccentrics and reciprocal inhibition (here and here), followed by some squatting with bodyweight or just the bar, will increase your heart rate just fine, not to mention both physically and mentally prime your system.
You get more bang for your buck.
For more on a proper warm up, including explanations of how to put it all together, check out my current lower body warm up right here as well as a great hip mobility exercise not in included in my warm up video.
Also, Quinn Henoch (<— can you tell I have a little man-crush on him?) nails it in this episode of Mobility Myths about stretching.
And That’s That
I hope this helps in your journey to finding and perfecting your individual squat.
Remember, there is nothing to fear about the squat and there is no need to overcomplicate this foundational movement. Don’t forget to take advantage of all the resources provided in this article, as they are from some of the greatest minds this field has ever seen. Happy squatting!
Oh, and one more thing…knees drifting over toes is OK.
About the Author
 Nicholas M. Licameli
Doctor of Physical Therapy / Pro Natural Bodybuilder
Youtube: https://www.youtube.com/channel/UCAWFe5BmaJ_WFAh2aqsOg8g
Instagram: https://www.instagram.com/nicklicameli/
Facebook: https://www.facebook.com/nicholas.michael.58
Every single thing he does, Nick believes in giving himself to others in an attempt to make the world a happier, healthier, and more loving place.
He wants to give people the power to change their lives. Bodybuilding and physical therapy serve as ways to carry out that cause. Nick graduated summa cum laude from Ramapo College of New Jersey with his bachelor’s degree in biology, furthered his education by completing his doctoral degree in physical therapy from Rutgers School of Biomedical and Health Sciences (previously the University of Medicine and Dentistry of New Jersey) at the age of 24, and has earned professional status in natural bodybuilding.
His knowledge of sport and exercise biomechanics, movement quality, and the practical application of research combined with personal experience in bodybuilding and nutrition allows him to help people in truly unique ways. Love. Passion. Respect. Humility. Never an expert. Always a student. Love your journey.


Comments for This Entry
Strength and Conditioning Stuff You Should Read: 7/13/18 | Eric Cressey | High Performance Training, Personal Training
[…] Make the Back Squat Feel and Look Better - This was an outstanding guest post from Dr. Nicholas Licameli for Tony Gentilcore's site. It's a longer read, but well worth it, as it's super thorough and links out to some good additional reading/viewing. […]July 13, 2018 at 7:33 am |
One of My Favorite Core Exercises: The Lying Overhead Pullover | Fitness News
[…] soccer ball, better get out on that field and kick! If you want to improve your squat, better read this article and of […]February 6, 2019 at 11:52 am |