CategoriesProgram Design Strength Training

Superhero Strong, Superhero Bod: A PowerBuilding Program

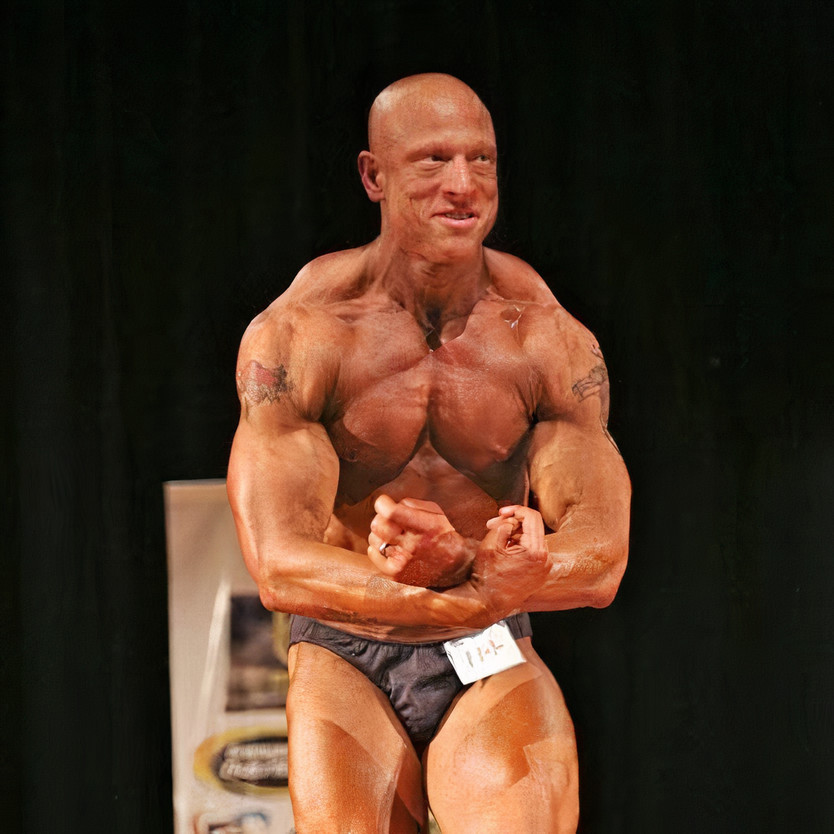
Today’s guest post comes courtesy of NJ based personal trainer and strength coach, Chris Marzarella. When it comes to best practices for getting both strong and ripped you have those who feel powerlifting is the best way, and those who feel more of a bodybuilding approach is the key.

Why not use elements of both at the same time?

I.e., PowerBuilding.

Check out Chris’s program below and maybe give it a go!

Copyright: Aleksandr Elesin

Superhero Strong, Superhero Bod

Train like a superhero to get that superhero physique.

This is a high-volume training routine.

It keeps elements of powerlifting and bodybuilding, two of my favorite things aside from NJ pizza, Guinness beer, and a Cohiba Black.

Note From TG: I had a Guinness once. Key word: once…😂

I am offering you a way to keep both in a program.

You will continue to make gains using both methods.

You do not want to do this program on a cut or during a dieting phase. It is demanding. I do not suggest staying on this program for more than 16 weeks.

It…is…demanding.

You need to have calories. I would prefer you to have 35% protein, 35% carbohydrates, and 30% fats. For a quick and dirty calculation, multiply your body weight x 12. This will give you enough calories. If you fare lower with less carbs, adjust the ratio, but don’t expect to make (as much) progress with a low(er) carb approach.

And please, for the love god, do not attempt this program following a keto approach.

Higher volume requires more calories for optimal recovery. If you try to do this cutting a dieting phase, you are shortchanging your results. Why put yourself through hell and not have enough brick and mortar to build that house of your dreams?

Conjugate Method

The conjugate method is born out of both Soviet Union and Bulgarian training systems. It was popularized by legendary powerlifter and coach, Louie Simmons of Westside Barbell.

The foundation of this program is centered around selecting a compound move and trying to progress each each week by even a small amount of weight.

The format of the conjugate week looks like this:

  •  Maximum effort upper (Bench Press variation)
  •  Maximum effort lower (Squat / Deadlift variation)
  •  Dynamic effort upper
  •  Dynamic effort lower

In this program you will stay on a lift for a period of one to three weeks.

Even if it’s a 2.5 lb. gain, it’s STILL progress.

Another thing to consider, and something that’s often glossed over, is FEEL of a set. Technically, you can stay with the same load for multiple weeks and just focus on making that load feel less effortful.

That’s progress too.

However, the main concept to anchor in your mind is that even a seemingly small increase is still an increase.

To that point, you may want to consider purchasing a cheap set of fractional plates.

After one to three weeks, you’ll change a small component of the lift.

From there you will want to consider varying your lifts slightly every few weeks.

If you did a competition bench press, change the grip to a narrow grip or something that makes it different. If you did a competition squat with a belt, train without a belt. Change the first bench press into an incline bench press. A back squat can now become a front squat.

The choices are endless.

The Format

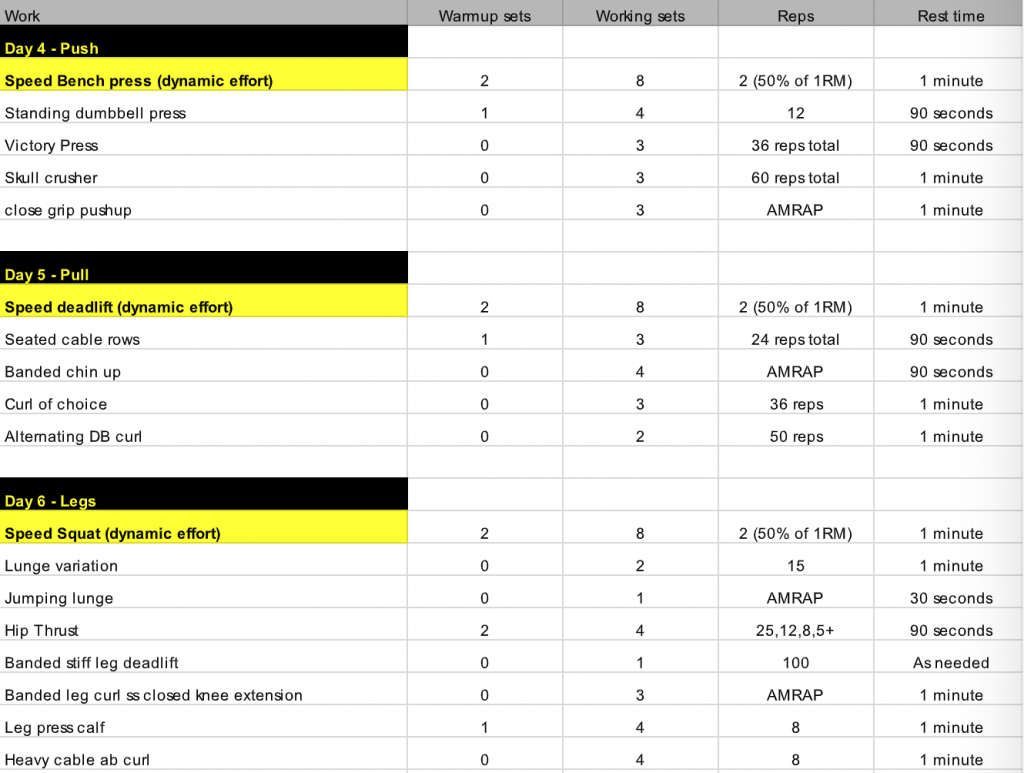
We will keep the two max effort days the same. We are going to use higher volume with a push-pull-legs format for the latter half of the week so that it looks like this:

  •  Day 1: Max Effort Upper
  •  Day 2: Max Effort Lower
  •  Day 3: Rest and Recovery
  •  Day 4: Push
  •  Day 5: Pull
  •  Day 6 : Legs
  •  Day 7: Rest and Recovery

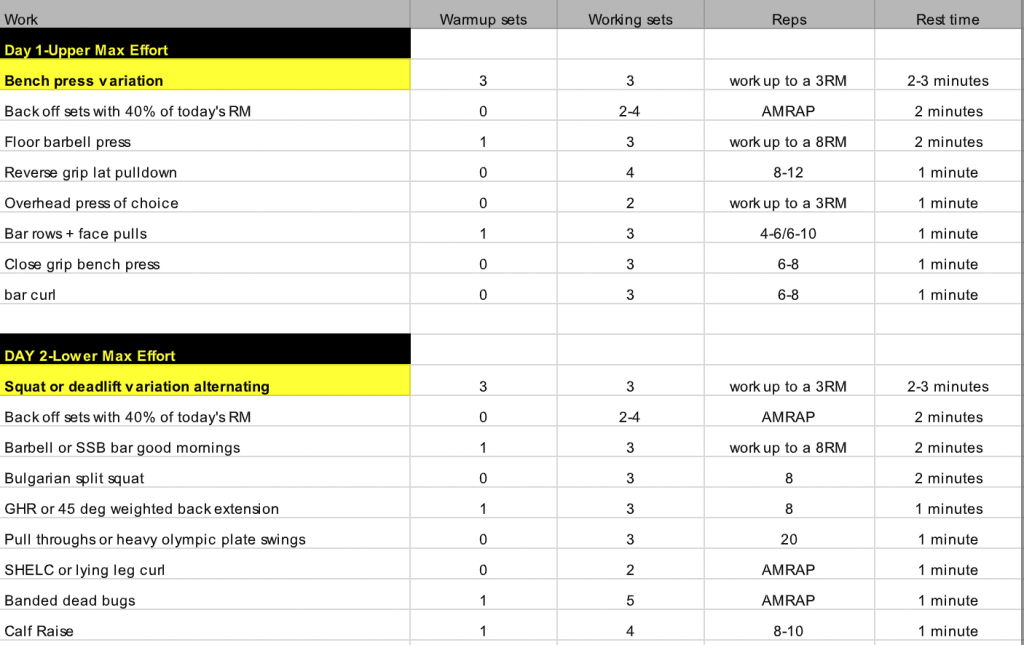
The Program

Recovery Day Options

Warm-Up: 3 Minutes on bike, elliptical, or walk outside.

Agile 8: HERE

15 Minutes HIIT: Choose one of the following modalities:

  • Tire flip: Set timer for 15 minutes, and flip the tire. Rest only as needed.
  • Sprints on Elliptical: Warm-up two-minutes, high burst intensity for 20 seconds/low intensity 40 seconds, repeat ten times, cool down for three minutes
  • Ball Slam – 15 seconds slam the ball/45s rest – repeat 15 times.
  • Sled Push – Set a timer for 15 minutes. Walk with bodyweight amount on sled. Rest as needed.
  • Battle Ropes – 20 seconds high intensity/40 seconds rest – repeat 15 times.

Workloads in the beginning of the week will focus on the compound lifts and getting you stronger. So, think: squat variation, deadlift variation, and bench press variation.

Your accessory work (subsequent exercises) should focus more on your weak points and/or technique flaws with the main lift(s).

For example, if your glutes are weak, select an exercise (after the main lift) that targets that weakness. If your shoulders are the weak point on your bench press, select an overhead press variation.

The program above should serve more as a template than something that’s set in stone.

Variations

Don’t go so far away from your primary lift movement pattern that you use three or more modes of overload.

Don’t use a Swiss ball, plus bands, plus a barbell, while using a Slingshot to vary the basic bench press. What do you think this is…

…Instagram?

Instead, change your grip, use a different range of movement like an incline bench. Change the rep tempo, pause inside of the rep.

Anything can work to continue training the basic movement.

One small tweak is all you need to count as a variation.

If you squat with a belt, spend three weeks squatting without a barbell. Maybe consider performing a Pin (or, Anderson) Squat.

Paused squats, slight changes.

As far as deadlifts are concerned, you can choose to deadlift off blocks. Deadlift with a squat shoe, use a Trap Bar, deadlift with a band around your waist and planted into a power rack.

How about Slow Start Deadlifts?


Changes need to match the lift.

Getting Stale On Accessory Movements

Change a little something about the lift.

For example, if you are doing a good morning, but not progressing, change the movement to a stiff leg deadlift. You still have that hip hinge, but you are changing it enough to create a new stimulus.

Give the exercise time to work.

Do not change it every three weeks. Stick to it for 4-6 weeks.

Final Details

  • Where you see AMRAP sets, stop one or two reps shy of failure. Don’t go bananas. You are risking injury.
  • Where you see total rep numbers, I like to get as many reps as possible on the first set. Then whittle it down to a total of reps needed.
  • Unsure of when to move up the weight? Use auto regulation. Do the required amount of reps for the sets. On the final set, take it to failure. If you get 2-3 additional reps, add 5 lbs next time. If you get more than that, add 10 or more. Choose wisely or you risk injury.
  • Plan a recovery workout. It should include a HIIT training session, a series of stretches, mobility work and a cool down period.

Give this program all you have for twelve weeks.

Remember: Treat it as a template. I encourage you to change things to fit your injury history and ability level. The important thing here is the structure.

Seriously, twelve weeks.

Go hard, but be smart (and consistent). Boring often works the best anyway.

You’ll be strong AF and looking like Batman (the Affleck Batman, not the puny Keaton one) in no-time.

About the Author

Chris Marzarella is a trainer and strength coach and owns a studio located in Brick, NJ. He is available online and in person in Ocean and Monmouth County NJ.

He runs a dry land strength and conditioning camp in Tinton Falls at Rock Sports Club. The program is for young swimmers with the NJ Racing Team. He has trained clients and athletes for over 25 years. He is also a competitive NPC classic physique athlete.

He can be reached at www.marzarellafitness.com
Categoriesmindset Program Design psychology

10 Suggestions On Your Quest For Sustainable Fitness

Fitness is an individual endeavor.

Everyone has different goals, aspirations, pacing, expectations, and Spotify playlists that get them revved up to exercise.

Today’s guest post, written by Westchester, NY based personal trainer Elaine Studdert, highlights the concept of sustainable fitness and strategies people can use to attain it.

Enjoy!

Copyright: Andriy Popov

10 Suggestions On the Quest For Sustainable Fitness

Sustainable

NOUN

  1. the ability to be maintained at a certain rate or level.

What is sustainable fitness?

Sustainable fitness is a mindset rather than a program. Having the right mindset is the difference between reaching your goals rather than continually chasing them. This is something you can practice for life, at any phase, at any age, at any fitness level.

Sustainable fitness is not a quick fix.

It’s not about getting results in six weeks.

It’s slow and steady versus a quick fix. It’s reasonable and maintainable over the long haul. It’s fitness you can stick to and get lasting results with.

It means working hard but working smart.

Taking this approach doesn’t mean you can’t have hardcore abs, get shredded, or ripped.

Quite the opposite, because if you stick to a plan the sustainable approach works. Any program that promises quick results is probably too good to be true.

Would most of us rather lose 40lbs in 40 days?

Absolutely! The problem with that is what happens after the 40 days? Programs making false promises can lead to burnout or injury.

If the program claims to be insane, it probably is.

Discovering what will work for you is a process, but worth the effort. The potential for achieving your goals grows exponentially once you figure it out.

Here are things to focus on while you search:

1. Consistency Is the Key to Finding Sustainable Fitness

If you attempt to keep up a pace that allows little time for anything else in your life it will be almost impossible to maintain.

Keep a schedule that is manageable with your lifestyle. And once you find it, do your best to stick to it.

2. Expect Ups, Downs, and Bumps In the Road Ahead

Don’t be derailed by an “off day” or a “missed workout.”

In the long run the trajectory will be on an upward trend if you stick to a consistent plan rather than a quick fix. This might sound boring but consistency is the way to success. If you miss a workout don’t try and make up for it and work extra hard next time.

Just move on!

3. Appreciate the Little Things

Take time to celebrate small successes and don’t expect changes to happen overnight.

You are in this for the long haul. Little changes add up over time and compound. Similar to money invested in the stock market, your strength will build over time. Short term gains might be easy to attain but those gains can be quickly lost if you don’t sustain them.

Add a little bit to your portfolio each week and watch yourself get stronger.

4. Work At a Level That Is Easy to Maintain.

If you are at a level 10 for every workout it will be hard to keep that up.

That is not to say you should never go all out and push limits.

However, the majority of your workouts should be reasonable and not leave you so sore that you have to take days of rest to recover.

Think moderation!

5. Keep It Simple

Focus on mastering basic skills.

Try not to be enticed by every new program or exercise that you see. Just keep your blinders on and stick to what works.

That doesn’t mean you should repeat the same workout forever, but mixing things up all the time doesn’t allow for progression.

6. Be Authentic to Yourself

If you have never picked up a weight before then seek guidance from a friend or fitness professional. Don’t try to jump into a fitness challenge that you are physically not ready for.

Build up to it.

7. Know Where You Are and Accept It

Something you did in the gym ten years ago may not be relevant today.

If you are getting over an injury or getting back to the gym after a long hiatus, start where you are at the moment, not where you were in the past.

Be honest and patient with yourself.

8. Move Every Day

Not every workout takes place in a gym.

Take a walk, a bike ride, play a sport, or just do mobility work.

Everything adds up.

9. Find Your Tribe

Being with like-minded people is a huge help in keeping yourself on track.

10. Lastly, Pay Attention to Your Nutrition and Recovery.

Exercise is just one part of the equation. Don’t ignore everything else.

The most important thing to keep in mind while finding your sustainable fitness is to be flexible. Remember that life will throw challenges at you and you need to adapt. If you stay true to practicing the above, you will have the tools you need to be able to navigate anything life throws your way.

About the Author

Elaine Studdert is an ACE Certified Personal Trainer based in Westchester, NY.

She trains clients virtually and in-person at HealthyFit in Mamaroneck. Elaine specializes in functional movement and kettlebell training. She loves to work with clients who are looking to improve their quality of life through movement.

See her most recent article on virtual fitness training at Larchmont Loop.

Follow Elaine on social media: Instagram: HERE

Categoriespersonal training Program Design

The Best Approach to Writing Effective Programs When You’re a New Trainer: Trial and Error

Copyright: Johannes Mattern

Trial and Error = An Underutilized Way to Learn

About a two weeks ago I received an email from a newly minted trainer in the industry who had read THIS article on program design I wrote not too long ago.

Sheepishly, he admitted that program design was one of his weak points and that he felt he was ill-prepared to write effective one’s despite having recently completed the certification process.

I could relate.

I recalled how in the first few months of my personal training career I felt like an abject failure when it came to writing programs for my clients.

Here’s how it went:

Client: “Hi.”

Me: “Hi.”

Client: “Can you write me a program to help me reach my goals?”

Me: “Brb.”

(cooly turns around and heads off to the back room to hyperventilate into a paper bag)

(10 Minutes Later) Me: “Yes, I can do that.”

In the time between those initial few months and now I’ve written roughly, I don’t know, 5,000-7,000 (+/- infinity) programs for a menagerie of individuals and backgrounds. Many have been influenced by books I’ve read, lectures I’ve listened to, and/or conversations I’ve had with other colleagues of mine.

Moreover, many have their roots in me just spit-balling and experimenting with an idea of concept. There’s a thought process behind them of course; I’m not just blindly tossing things at the wall and seeing what sticks.

However, I’d be remiss if I didn’t just come right out and say that a portion of my program writing process is me just saying to myself, “let’s see what happens if I do this.”

No one has died or lost an appendage yet…😉

More to the point: I’ll be the first to say that NONE of my programs have been perfect. Even today I am constantly x’ing stuff out, changing this exercise to that, adjusting loads, regressing, progressing, or otherwise flat out changing my mind.

Sometimes I’m overzealous, sometimes I’m too reserved.

Sometimes I’m wrong.

I’m not scared to admit it.

Nevertheless, the point is: I am always leaning into the process and accepting the fact that I am (and will always be) thiiiiiiis close to grabbing that paper bag.

Which brings me back to the new trainer from above.

As he and I were corresponding back and forth he proposed something to me. He wanted to see if I could help him find another coach to mentor him and to possibly write programs for a few of his current clients.

  • He’d provide the details.
  • The other coach would write the program
  • Then he’d want to “dissect” the program with the other coach to ask more of the why’s and how’s behind the program.

I gave him two pieces of advice:

1. To seek out a local trainer/coach that he could shadow/observe on a semi-regular basis. This is something I wish I would have done earlier in my career.

It would have helped tremendously.

There’s an abyss of value in having the ability to watch another coach in real-time do his or her thing and to also have the opportunity to ask questions.

Most coaches are more than willing to have people stop by and shadow.

2. JUST DO IT.

Oftentimes the best way to learn or get better at something is by doing.

  • If you want to get better at playing chess you play chess.
  • If you want to get better at a particular type of dance you do that dance.
  • If you want to get better at not getting laid, you go to Anime conventions.
  • Juuuuuuust kidding.1

I reminded him that he won’t write perfect programs. That’s an awful expectation to put on himself. I reiterated to him that his client’s wouldn’t need “perfect” programs, but rather just some semblance of progress.

Let’s be real: Most people see improvements in spite of what their program has them doing.

It’s more about being consistent with something, anything than it is whether or not they’re following an undulated, block periodization plan centered around quasi-isometric eccentrics.

If you’re a new trainer the best way to learn how to write programs is to jump in and do it.

Trial and error is a great learning tool.

CategoriesProgram Design

Putting on a Show vs. Just Coaching

A few weeks ago my good friend, Luke Worthington, and I were texting back and forth on why I hate him so much because I’m not him (6-4, 230 lbs, ripped, smart, British, pfffft whatever Luke) programming and coaching.

Specifically, we both commented on the facade that some (not all) fitness professionals seemingly lean into on social media

Even more specifically, we attempted to excavate the difference between what I would refer to as “putting on a show” and actually coaching people.

Copyright: tonobalaguer

Circus Tricks

Our conversation took root when we brought up something we had both observed on another colleague’s Instagram account and the abject silliness it projected.

Now, I’m not going to name names; it’s not my nature to do so. And, to be honest: I try to always keep an open mind whenever I see something eyebrow raising from other coaches.

I mean, who am I to say what’s a legitimate exercise/drill for their client?

  • I don’t know their client’s injury history.
  • I don’t know their client’s goals.
  • I don’t know their client’s ability level.
  • I don’t know the purpose of that day’s session.
  • Maybe there’s a perfectly fine rationale for that particular exercise (even though running over their right arm with a Prius for AMRAP would have been a better use of their time).

I keed, I keed.

Nevertheless, Luke is based in London and works with a number of high-profile people ranging from Hollywood actors/actresses, models, magazine editors, and various professional soccer players.

During our chat he mentioned he had started working with a well-known actor who’s currently prepping for a rather significant action role.

Nope, not Jason Bourne.

Alas, not James Bond.

In the name of discretion, I can’t reveal the actor’s name. It would be uncouth for me to do so, and I certainly wouldn’t want to divulge anything that Luke himself hasn’t divulged.

Negative, not him either. But OMG, I wish.

I haven’t come close to working with the same volume of “high-end” clientele that Luke has worked with in his career. That being said, I’ve worked with many professional baseball players throughout the years (especially during my time at Cressey Sports Performance), and did happen to rub elbows with Hollywood recently.

And I have to say…

…it’s hard not to put on the facade.

To quote Luke:

“When you were working with Rosamund (Pike) did you find it hard not to put on a show? Did you feel you had to impress her with new and innovative exercises? That you had to provide more of wow factor? I find it exhausting sometimes working with people in the entertainment industry.”

At first, yes.

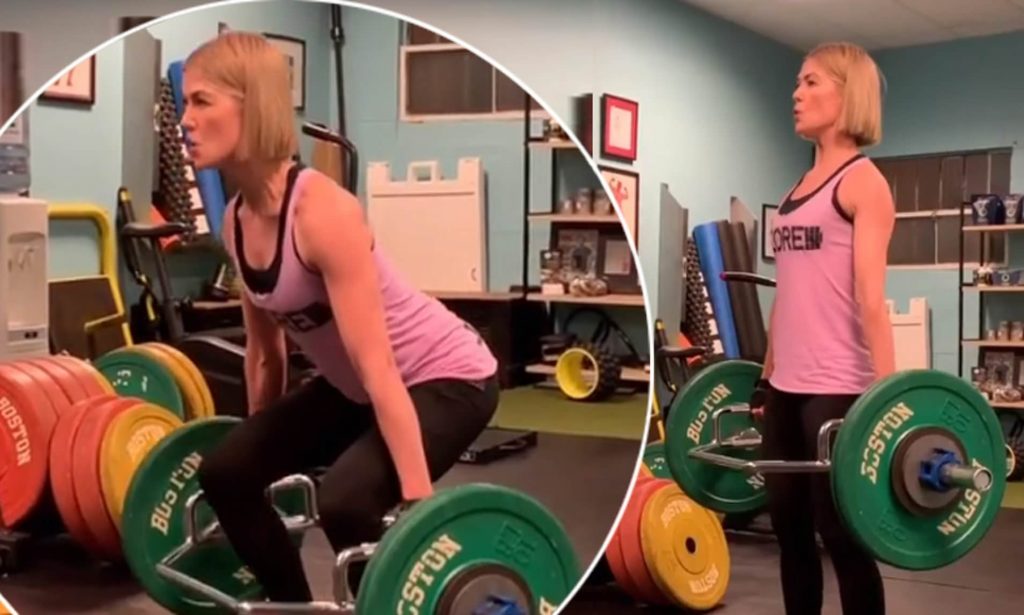
Rosamund joining the 100 lb deadlift club working with me at CORE.

But then I realized that she was just a person like everyone else and needed the same shit as everyone else.

Moreover, once I understood that all she was looking for was a solid training session where she could have an hour to herself to be away from the movie set and away from the chaos, it became much less daunting to me.

I kept things simple.

  • She deadlifted.
  • She squatted.
  • She carried stuff.
  • She hoisted stuff.
  • She threw stuff.
  • She listened to sick techno beats.

All I did was to ensure the exercises were coached well and that they matched her ability level.

I didn’t feel the need to put on a show.

And she and I had a lovely time together.

Back to Luke, though.

In addition to texting back and forth about the pressure to perform and avoid reneging on our mutual intuition to just keep things simple, we also went back and forth a bit on his client’s programming.

Luke noted that his client’s role will require a number of shirtless scenes and that the expectation is that he must look the part; broad shoulders, pecy pecs, cut arms, etc.

The caveat, however, is that this client also has a number of shoulder issues that limits his ability to perform certain exercises pain free.

Luke’s a more than capable coach to devise a suitable trainable menu for his client. That said, he and I were going back and forth on some ideas when he noted that during a prior session he had his client perform a double landmine press.


For most coaches this exercise is quite standard or even inane. It’s nothing extraordinary or flashy (especially by social media standards).

However, Luke’s client loooooooooved it.

It targeted parts of his body he needed to bring up for the role AND he was able to perform it pain free. Luke could have easily made the exercise more sexy by setting the barbells on fire, or, I don’t know, having his client press with one arm while juggling a chainsaw on the other.

Instead, what Luke did was be a coach.

And, frankly, that’s what most people need whether they’re Thor or Tina.

CategoriesProgram Design Strength Training

Why You Should Lift Heavy Weights. Yes, Even In Season

I tend to avoid certain things at all costs:

  • Making eye contact with my cat.
  • Pineapple upside down cake (don’t ask).
  • Uttering the phrase “looks like someone has a case of the Mondays.”
  • Cocaine
  • Partaking in social media drama, buffoonery, and general hijinks.

For me there’s a cost/benefit to all of the above. Take my cat, Dagny, for example. I love her to pieces. But I still get the feeling, whenever she looks at me for more than three seconds, she’d murder me in a nanosecond with a machete if only she had opposable thumbs.

I have my reasons for the other stuff too.

With regards to the latter, however, I was recently lured in like a moth to a flame when I saw a Tweet from a well regarded and highly respected fitness professional commenting on “lifting heavy” and playing sports…

…and how people should avoid the former if participating in the latter.

Copyright: Jesus Trillo Lago

What in the What?!?!

In the name of full transparency here’s the actual Tweet:

I have to say, before I dive into my own thoughts on Dan’s thoughts, reading the subsequent comments was quite entertaining.

They ranged from people agreeing to the statement2 to what can only be described as a few peacocks spreading their feathers.

I.e., Triggered!

A few coaches read the comment and reacted as if someone informed them creatine was the same as steroids or, I don’t know, one of their athletes didn’t squat to depth.

I could just smell the inflated lat syndrome emanating from my screen.

Admittedly, I too rolled my eyes a bit.

That said, I felt the initial statement was a bit too ambiguous. To me, it was more about garnering eyeballs & drawing attention to his funnel link than providing anything of real substance.3

  • What sports are we referring to? MMA? Lacrosse? Backyard wiffleball?
  • What level of sports are we referring to?
  • What’s the ability level & experience level of the athletes in question as it relates to the weight-room?
  • What’s considered “heavy.”
  • Is there no such thing as in-season and off-season training modifications in this mysterious world where athletes shouldn’t lift heavy things?

To Dan’s credit, he did elaborate further:

“The reason is because both are taxing to the nervous system. Mind you when I talk “sport” I mean one played at a high intensity (ie. basketball, soccer, surfing). Trying to play your best while chasing PR’s will likely cause injury.”

I didn’t quite understand where he was going with his sport examples. I’d make the argument that any athlete of any sport – particularly if it’s being performed at a high level – needs to be prepared for that sport. I don’t care if we’re talking about soccer or bowling.

Okay, maybe bowling is a stretch…;o)

Much of that preparedness comes from a well-rounded, properly progressed IN-SEASON and OFF-SEASON strength & conditioning program.

Off-Season Training = Initially focuses on recovery to combat a long competitive season as well as to address any deficits/weaknesses that accumulated along the way. That then transitions to a more traditional strength & conditioning program catered to helping the athlete improve strength, speed, movement capacity, ROM, ability to run through a brick wall, etc.

In-Season Training = Reducing training frequency/volume – depending on playing time (starter vs. 10th-11th man off the bench in basketball), position (everyday player vs. pitcher in baseball), game schedule (football vs. softball) – albeit under the guise that the objective is to LIMIT as much drop off as possible of the gains made in strength, speed, etc during the off-season.

Not to mention, in-season strength training is a splendid way to help reduce the incidence of injury as a season progresses and fatigue and wear-n-tear on the body accumulates.

KEY POINT: Reduction in frequency (volume), not intensity.

It’s my experience – and that of many other coaches – that intensity (as a percentage of one’s 1-rep max) is far less taxing on the CNS than volume (sets x reps x frequency). In fact, it behooves most athletes to keep intensity somewhat high during SOME of their in-season training.

As Vladimir Zatsiorsky states in his seminal book, Science and Practice of Strength Training:

“Training with weights ~90% of one’s 1-rep max (I.e., heavy, but no anywhere near PR heavy):

  1. Recruits the maximum number of motor units.

  2. Ensures the fastest MU’s are activated.

  3. Discharge frequency (rate coding) is increased.

  4. Activity is synchronous.

  5. Improves coordination between synergistic muscles.

  6. Increases potential for future hypertrophy gains.”

Moreover, Zatsiorsky notes that from a velocity standpoint, it’s been shown that power output increases as the weight lifted decreases from 100% of 1RM to 90% of 1RM. In fact, for the back squat and deadlift, power output for a load at 90% 1RM may be twice as high as the 1RM load due to the large decrease in the time required to complete the exercise with the lighter load.

In other words: Lifting light(er) loads faster = best of both worlds?

Additionally, strength “lingers.”

You don’t have to do a lot of it in order to maintain it.

In his book, Block Periodization, Dr. Issurin notes that maximal strength has a “residual duration” of 30 +/- 5 days.

In non-Klingon all this means is that, in order to maintain strength, you only really need to remind the body every 2-3 weeks (or so) of what it takes to keep it. This is splendid news for in-season athletes.

This means that 2-3 heavy(ish) sets of 2-5 reps (in the 85-95% range) every few weeks is enough to maintain most of their strength levels.

Australian strength coach, Nathan Kiely, sums things up nicely:

“Maintaining neuromuscular strength in-season is critical. And a load that wouldn’t have developed it in the first place, won’t do enough to retain it either.”

To that end, NO COMPETENT COACH is chasing PR’s in-season. I just wish Dan would have said THAT initially instead of the blanket statement of “if you play sports you shouldn’t lift heavy.”

Because, I agree – it makes zero sense to max out or chase PR’s during a competitive season.

As one commenter commented:

“Chasing PRs and 1 RM in season are pointless. But if you program correctly and tailor workouts to your athletes sport intensity, schedule and allow recovery time. PRs are just going to happen organically.”

The statement reminded me of something I heard renowned strength & conditioning coach, Buddy Morris, say during a presentation years ago:

“Tony, can we be BFFs? Whenever an athlete of mine hits a PR – especially in-season – I shut em down for the day.”

Word.

In Short: When dosed intelligently you can do both.

Play sports AND lift heavy.

CategoriesExercise Technique personal training Program Design

2 Side Plank Drills to Perform That Don’t Have the Words Side Plank In Them

I’m not here to hate on the side plank.

Truth be told: It’s a rare occurrence that I start working with someone and (s)he can perform it well. It’s a staple exercise with myriad benefits in both rehab and traditional strength training to target the core musculature – particularly the obliques.

Too, it’s also no coincidence, thanks to Dr. Stuart McGill, it’s considered one of the “Big 3” with regards to spinal health and working around and managing low-back pain.

When done correctly, the side plank can be a very challenging and worthwhile exercise to include in most programs.

  • Check out THIS article for particulars on common mistakes and how to progress the side plank.
  • Check out THIS article for other plank variations you should consider.
Copyright: Sebastian Gauert

But Seriously, Do These Instead of Side Planks

I find the side plank to be the exercise of choice for lazy trainers. It’s the sort of exercise a shitty trainer will prescribe for their client when there’s 5-10 minutes left in a session and the trainer just wants to run out the clock.

“Okay Hank, we’re going to finish with Side Planks today. Three minute holds per side. Blindfolded. While reciting the Elvish alphabet backwards. Go!”

And then, of course, Hank loses all the perceived benefits of the exercise because his technique has been compromised after 15 seconds.

“Come on Hank, 2 more minutes, keep reciting, Ampa, Anto, Hwesta…”

To be clear: I think everyone should take the time to master the side plank. It’s an important drill. It’s just that after a certain point there’s a rate of diminishing returns.

Personally, if someone can perform it perfectly for a minute per side I’d rather go a head and make the exercise more challenging than force someone to go for longer periods of time.

More to the point, can I just go a head and say it?

The Side Plank is just a boring exercise.

I’d rather spend the same amount of time scooping up my cat’s fur vomit.

To that end, here are two exercises that mirror all the benefits of the Side Plank but don’t make you want to commit seppuku when you actually do them.

1. Chaos March


Take a kettebell and wrap a band around one end. Grab onto the other end and hold it to your side as if you were holding a suitcase.

While maintaining a completely upright posture (no leaning!) march in place and try to keep the kettlebell “quiet.”

Also: In case it wasn’t obvious by lurking at my bookcase in the background: My kid loves puzzles.

Also (Part II): That’s Molly Galbraith’s book, Strong Women Lift Each Other Up, that’s upright and facing the screen.

That wasn’t done on purpose. But it IS a great read and you should check it out.

2. Offset Farmer Hold


1. Grab a Trap (Hex) Bar, or even a standard straight bar, and load one end with a plate.

2. Stand upright.

3. Don’t tip over.4

Even though nothing is moving, I find this drill much more palatable for the bulk of my clients because it simply looks badass.

WU-TANG!

Categoriescoaching personal training Program Design

Putting the Pro In Fitness Professional

What does it mean to be a fitness professional?

The definition (or more to the point, the expectation), admittedly, has gotten a bit less clear cut in recent years.

Copyright: Lupin ALEKSANDER

Putting the “Pro” In Fitness Professional

I could sit here and wax poetic that what separates a “true” fitness professional from someone who’s pretending to be one is that the former actually practices what they preach.

Meaning: They 1) actually workout and/or 2) actually DO the workouts and exercises that they espouse on their respective websites and social media feeds.

Or they don’t.

I mean, I could make the case that a “true” fitness professional is less likely to post asinine videos of circus-act like exercises (that they’d never do themselves) in the name of accolades and attention.

You can spot the fake trainers from a mile away. They write the most ridiculous looking routines.

A Competent Trainer’s Program

A1. Trap Bar Deadlift: 3×5
A2. Pallof Press: 3×10/side
B1. Goblet Step-Through: 3×12,10,8/leg
B2. Pull-Through: 3×12-15
C1. Goblet Squat (50 lb): 2xAMAP (up to 20)
C2. Suitcase Carry: 2×40 yd/arm

An Instagram PhD’s Program

A1. Trap Bar Deadlift Contrast Tempo Set vs. Chains (From a Deficit): 5×10
A2. 1-Arm Landmine Press w/ Contralateral Ossillatory Facilitation: 5×10/side


B1
. Barefoot Walking Lunges Over Broken Glass: 2×400 m
B2. Or Until Your Pancreas Fails (whichever comes first)
C1. Pull-Ups: 10×10
C2. Ice Bath: 10x30s

I’m obviously going out of my way to be facetious here, but therein lies my point.

As my friend and colleague, Nick Tumminello, has so succinctly stated in the past:

“A master trainer (I.e., someone who’s a “pro”) can also be referred to as an Exercise Prescription Specialist.”

He or she has a high level of expertise doing the following:

  • Exercise Individualization
  • Exercise Application 
  • Exercise Prioritization 

1. Exercise Individualization

This can simply be boiled down to figuring out the correct stance for someone on their squats. For example, despite what most textbooks would insinuate, not everyone is going to have the luxury of having the “correct” anatomy to squat with a narrow stance and their toes pointing straight a head.

NEWSFLASH: People don’t live in textbooks.

Hip anatomy tends to have the most variance given a broad swath of the population. Things that come into play are:

  • Hip socket depth
  • Hip socket orientation – retroverted (outward facing) or anteverted (forward facing).
  • Femoral neck orientation (retroverted vs. anteverted)
  • Femore neck angle
  • Femur length
  • Amongst other things

There are a bevy of variables to consider and to expect every person to fall into one set pattern or way of executing a lift is a bit of a stretch.

In fact, there’s a number of permutations that manifest when you allow for individualization of squat stance.

Exercise individualization can also come down to figuring out the correct grip for someone to use during their bench press. Someone with sub-acromial pain syndrome (SAPS) will often have pain in the front of their shoulder. Conventional wisdom would suggest that such an individual should adopt a narrow(er) grip during the bench press to “protect” the shoulder.

However, a narrow grip will require more glenohumeral extension, which for these individuals can be problematic. Instead, a wider grip may be more germane to reduce the amount of GH extension required and to place more stress on the pec muscles.

A “pro” leans into and pays more attention to these sort of things.

2. Exercise Application

Should everyone squat to the same depth?

Short Answer: No. Tha fuck outta here.

A Less Short Answer: As I noted above, hip anatomy varies person to person and it shouldn’t be your expectation that everyone, all the time, with no exceptions, should squat to the exact same depth.

I have some clients who squat ass to grass.

I have others who squat to parallel.

And, indeed, I have others who squat above parallel.

Come at me, bro.


They all still count as a squat.

Depth is more or less arbitrary and is contingent on one’s goal(s), unique injury history, ability level, and, in case you haven’t picked up on the theme, individual anatomy.

No one should get demerit points because they don’t fit some fictional standard.

Moreover, what about when the conversation switches to sets and reps?

  • What’s the determining factor between prescribing 3×10 for any particular exercise or 5×5?
  • What about 8×3? 6×4?
  • 4×6?

Are you using a dartboard to ascertain a client’s set/rep scheme or intelligent program design catered to the needs/goals of the athlete/client?

A “pro” knows the difference.

3. Exercise Prioritization

Which exercises should be done first in a workout?5

Which ones should be done last?6

Which exercises should be performed most often?7

The eloquent answer is past the scope of this blog post. However, a fitness professional can easily provide a “why” for each example.

In Short

What really separates a true fitness professional from the IG PhD is that the former knows how to DESELECT things. What makes a great chef isn’t the fact they have every ingredient in the bowl.  They’re great because they know what ingredients to (de)select, they understand what order they need to be applied, and they know how much of each to use.

CategoriesMotivational Program Design

A Foolproof Plan For Starting an Exercise Program

Today’s guest post comes courtesy of TG.com regular contributor, Shane McLean and touches on a topic that may resonate with many reading…

…Top 10 keto recipes that don’t taste like sawdust.

LOL – just kidding.

How to finally conquer that hurdle of starting an exercise program.

It’s not quite as daunting as you think it may be…;o)

SIDE NOTE: Be sure to check out Shane’s latest resource, his six-week ‘Back in the Saddle‘ program; perfect for beginners or anyone who’s stuck in a rut and needs some direction.

Copyright: andreypopov / 123RF Stock Photo

A Foolproof Plan For Starting an Exercise Program

No one wants to look like a fool, especially when you’re starting an exercise program with the will and determination to finally get in shape.

You want to know what you’re doing or at least fake it until you make it. And If you’re NOT confident, you’re less likely to start and finish. Then you’ll (maybe) chalk it up to another failure which you’ll add to your ever-increasing list.

Am I the only one who keeps track?

How Do I Know This?

Because I tried and failed several times when I started exercising and now I’ve been a trainer for 13 years and have seen people start, stop, and fail with the greatest of intentions.

I’ve trained clients who have made great progress to only then see them fall off the wagon when their accountability disappears, or life gets in the way.

Plus, I’ve watched the gym flood with new year’s resolution goers who are eager to put all their failures behind them to finally lose the flab.

But slowly and surely, they drop by the wayside when their motivation wave crashes.

Your health and fitness requires time and an emotional commitment, not a six-week shred. Instead of crashing and burning in your fitness quest, use my advice below to avoid adding another failure to the list.

1. Starting Easy

There’s a plethora of health and fitness info on the worldwide web. Enough to have your brain spinning around and around. You should try to avoid this analysis by paralysis by

  • Just starting
  • Picking something doable

If you don’t understand the article or program with the big fancy words then move on to something else. Because when you’re starting something, complicated things don’t work because this leads to confusion. Then this confusion may lead to throwing in the towel.

You know what does work? Starting easy.

2. Start With The Basics

There are fundamental human movements which were installed in your brain before you were born.  These are squats, pushing, pulling, locomotion (walking, running, carrying), hip hinging and groundwork (rocking, rolling, crawling and everything else).

Don’t believe me? Ever seen a baby drop into a deep squat without a coach yelling in their ear?

And when you’re starting out, these need to be your focus and not walking on a treadmill or watching yourself do curls.

Although there is nothing wrong with either because something beats nothing every time, training the fundamentals will reestablish neglected movement patterns and get you where you want to go faster.

3. Don’t Program Hop

And once you’ve chosen a program, it’s natural to think the grass is greener on the other side. After all, you’re saturated with new exercise fads and their results look incredible. Besides, your program sucks and you’re not making any progress anyway.

However, change is not always a bad thing.

Change may be needed if you’re plateauing or when your routine (or you) is stale. But too much change doesn’t give your body a chance to adapt to your current program because not everything happens right away.

There is plenty of room in the middle of these two extremes.

My general rule of thumb is finishing the program first and then evaluating whether it worked or not. For example, loss of body fat, smaller waist, or bigger muscles. If you have not seen any positive changes after 6 weeks, then it’s okay to try something new.

4. Schedule Your Training Time

During the COVID-19 pandemic a lot of us have more time on their hands than usual. And finding time to exercise is not a problem but it’s not always going to be this way.

Regardless of how much time you have scheduled, treat your exercise like you would any important appointment. Setting aside time for training will help get you in the right mindset and not another thing you can blow off on your to-do-list.

For example, I train Monday, Wednesday and Friday at the same time and is scheduled in my Google Calendar which reminds me 30 minutes before go time. It’s now a habit I follow through on even when ‘I don’t feel like it.’

Which leads me to my next point.

5. Showing Up And Being Consistent

Nothing gets done without being present, so ‘show up’ even when you don’t feel like it. 99 % of anything you do (based on scientific fact 😊) needs you showing up and being present.

Without it, it’s pointless.

It doesn’t matter if you exercise 2, 3 or 4 days a week, pick a day, schedule a time, show up and get it done. Then do this over and over for the foreseeable future. Yes, life is going to get in the way and when exercise is the furthest thing from your mind.

However, finding a way to stay active, even when the odds are stacked against you does wonders for your health and sanity. Being consistent is not about being perfect, it’s about showing up.

Wrapping Up

These five suggestions will hold you in good standing when starting and continuing any exercise program. Because exercise isn’t just for a six-week burst to lose the fab, it’s for life and your health.

If you’re looking for an exercise program to start after a layoff or if you’ve never resistance trained before, I have a 6-week program called ‘Get Back In the Saddle’ that will give you a fantastic exercise foundation to build on.

It can be purchased HERE.

CategoriesProgram Design Strength Training

1-Minute Deadlift Tip: Use Squats to Build Your Deadlift

I’ve always been painfully slow off the floor when I deadlift.

Like, you could be watching the movie Titanic and I’d juuuuust be getting the barbell off the floor by the time you got to the part where Rose lets go of Jack.

If this sounds like you, you may need some more squats in your life.

Copyright: spotpoint74 / 123RF Stock Photo

Squat to Build Your Deadlift

A few years ago I made a concerted effort to prioritize my front squats (and upping my squatting volume in general) and was finally able to conquer a 600 lb pull.

The additional squatting undoubtedly helped improve my quad strength and ability to push away from the floor when I initiated my pull.

Heed my warning, though. If your deadlift volume is up it’ll behoove you to opt for more front squats or high-bar back squats since both will allow you to maintain a more upright torso (less shearing on spine). If your deadlift volume is on the low end, feel free to implement more low-bar back squatting.

👇👇👇 Check out a sample training split below (after the video) 👇👇👇

Here’s a quick example of how I’d structure the deadlift to squat ratio based off deadlift frequency:

Deadlift 1x Per Week (2 Lower Body Sessions)

Day 1:

A. Back Squat: 5×2 @ 60%, 60s rest

B. Deadlift: 2×2 @ 85%

C1. Deadlift – For Gainz: 4×4 @ 70-75%
C2. Deadbug Variation 4×5/side
C3. Stab Someone in the Face 4×3

D1. Goblet Split Squat 3×12,10,8/leg
D2. 45 Degree Back Extension 3×12-15

E. Carries or Sled Work

Day 2

A. Back Squat: 1×2 @ 85%

B. Anderson Back Squat: 5×1 @ 80%, 60s

C1. Pause Back Squat: 3×5 @ 70-75%
C2. Deadstart DB Row: 3×8/arm

D1. Pull-Throughs: 4×10-15
D2. Reverse Nordics OR Sissy Squats: 3×8-10

Deadlift 2x Per Week

Day 1

A. Pull-Through: 2×10

B1. Deadlift – Rest/Pause: 3×3/2/1  (use a load you KNOW you can do for 5 reps. 3 reps, rest 15s, 2 reps, rest 15s, 1 rep)
B2. Bear Stance Belly Breath: 3×5

C1. SSB Squat: 3×8 @ 60-65%
C2. Stationary Spiderman w/ Reach: 3×5/side

D1. DB Reverse Lunge 3×12,10,8/leg
D2. Pallof Press 3×10/side

Day 2

A1. Front Squat: 3×5 @ 65-70%
A2. Pull-Ups: 3xAMAP

B. Deadlift – Speed/Technique: 6×3 @ 60-65%

C1. 1-Arm, 1-Leg RDL: 3×8/leg
C2. Split Stance Cable Chop: 3×8/side

D1. Barbell Glute Bridge: 3×10
D2. Eat a Ham Sandwich: 3xinfinity

Long story short: Don’t neglect your squats.

CategoriesExercise Technique Program Design Strength Training

Top 3 Single Leg Exercises For Yoked Ass Legs

Coincidentally enough I choose the picture for today’s guest post before actually reading it. 

Oops, a minor editorial mistake.

You see, as you’ll learn below, placing a barbell on your back during single leg exercises – while not a wrong strategy to partake – does have a distinct disadvantage.

HINT: More load isn’t always the “x-factor” with regards to making exercises more challenging.

Suffice to say, lesson learned (but I’m too lazy to go back and find a different picture).

I hope you enjoy this excellent piece by two colleagues of mine – Dr. Michelle Boland (a phenomenal local coach here in Boston) and Tim Richardt (a former coach at CORE who’s now located in the Denver area) – that gave me a few Ah-HA moments.

Copyright: serhiibobyk / 123RF Stock Photo

Top 3 Single Leg Exercises For Yoked A$$ Legs

Quarantine have your legs and butt looking skinnier than Gollum’s?

An excellent example of commitment to a singular goal, but not of muscular development. 

Get your quads, glutes, and hamstrings looking more bountiful than a post-Mordor-crumbling Shire feast with these single leg exercises!

We’re done with the Lord of the Rings references now, we promise.

We’ll explore loading options, body positioning, front versus rear foot elevation, and direction of center-of-mass (COM) movement to help you taste those sweet, sweet single-leg gains.

Let’s get right to it…

#1 Front Foot Elevated Zercher Split Squat

Load Position Advantage 

Holding the weight in the crook of your elbows allows for more relaxation of muscles on the backside of your trunk, enabling increased depth WHILE circumventing grip strength as a potential rate-limiter for loading.

A barbell placed in the traditional “back rack” may rob you of comfortable hip range-of-motion (ROM) due to compression of muscles on the backside of your trunk.

Loading in the Zercher position lets you maintain more VERTICAL displacement throughout the movement, and more pure-up-and-down displacement means more stimulation of muscles that DO vertical displacement (i.e. glutes and quads), leading to more gains and more eventual jealousy from your high school ex after they see your jacked wheels on Facebook.

No barbell? We can accomplish a similar effect with 2 DBs. 

https://www.youtube.com/watch?v=WlVELvq-ijg&list=PL2C3q7iaQQIVqmCkqxRFaIpiHffq-YcrQ&index=1


Vertical displacement whilst keeping a STACKED position during a split squat, vital to loading muscle tissue (yay!) and minimizing joint strain (boo!), is reviewed,
HERE. 

Why Front Foot Elevation?

Elevating the front foot shifts your COM backwards, meaning the muscles of the front leg can relax to a greater degree to allow for more depth during the lowering (eccentric) portion of the movement. Additionally, raising the front foot shifts the trained range of motion into deeper degrees of hip flexion, leading to greater mechanical stress placed on the musculature that extends the hip (dat booty). 

Bonus; Heel Up?


Try
elevating your front heel to enable increased loading of the knee and hip whilst maintaining the “vertical stack” during this drill.

Be sure to maintain heel contact and allow your knee to drift forward over the mid-foot to allow for more hip and knee flexion.

#2 Staggered Stance Retro RDL

Why Backwards is Better…

The Staggered Stance Retro RDL allows you to use the front leg to push your COM backwards towards the leg that’ll be doing all the work. This exercise HAMMERS glutes and hammies, and is a great stepping stone towards an eventual unassisted SLRDL.

The KEY distinction between the conventional RDL (or Heels on Wall Variation) and the staggered stance retro RDL is the direction of your COM travels. In the rear foot single leg deadlift, your COM translates forward, whereas in the staggered stance retro RDL, your COM migrates backwards. 

Going front foot supported allows for more of a sit “back” scenario encouraging a more advantageous orienting of the hips to access ROM (remember: more ROM, more loading, more gainz) as well as reducing the challenge of NOT falling forward onto your (pretty) face.

Why Single Arm Loading?

We love a single KB held in the opposite hand (in reference to the back leg), as this encourages rotation of the ribcage TOWARDS that rear leg. Rotation towards the side we’re loading means we’re able to load muscles of that hip to a greater degree, and the combination of an opposite hand reach AND a front foot support ensure we’re loading the back leg’s hamstrings and glutes as much as we possibly can.

Technique 

Some pointers with the Front Foot Supported Single Leg Deadlift:

  1. Position the non-working leg in front of the working leg and use the front (non-working) leg to push the back (working) leg backwards. This results in a hip “shift” TOWARDS that back leg.
  2. The arm opposite the working leg holds the KB and maintains a path over the big toe of the back foot. That reach further supports the shift you obtained in step 1.
  3. Sit your hips back in space, feeling loading on the heel, base of the big toe, and base of the little toe. Reverse this motion by pushing through this “tripod foot” back to the starting position.

#3 Rear Foot Elevated Split Squat

Jack Up That Back Foot

The Rear Foot Elevated (RFE) Split Squat is a variation that places greater emphasis on the front leg. This exercise is also a good progression towards a strict single leg activity, such as a single leg squat. 

While performing a boring ‘ol split squat, the load is fairly evenly distributed between the front and back legs. However, elevating the rear foot shifts your center of mass forward, dramatically increasing the loading of the front leg. Train this sucker and that leg’s getting more yoked than a Marriott Courtyard omelette bar. 

The RFESS is #3 on this list because it trains a little like a cross of exercises #1 and #2.

It’s a vertical movement (like our FFESS), but the forward lean created by the elevation of the rear foot enables some degree of forward/backwards COM displacement (like our deadlift variation). The result is an unholy cross of glute and leg destruction.

Placement of Load

To optimize loading with this drill, we recommend dumbbells in each hand- like THIS. As we mentioned previously, a barbell placed in the traditional “back rack” position tends to compress muscles on the backside of the body, robbing the body of hip flexion availability and trainable range of motion. 

The distance between your front and back legs- your “stride length” during a split squat- also matters.

A short stride length (front foot closer to back foot) will bias hip musculature (glutes). If you elongate the stride length you’ll shift the loading to more quads, leading to more yoked legs with which to better fill out those new early-Christmas jeggings. 

And Now, This…

You can check out these three extra loading variations that target different planes of motion in the RFE split squat: RFE Split Squat Planes of Motion Variations

Bonus Yoked-Worthy Exercise: Walking Toe Touch Lunges

Muscle Recruitment 

Walking Lunges with an opposite arm reach facilitate more high hamstring recruitment by biasing a posterior tilt of the pelvis. High hamstrings fix the position of the pelvis, enabling greater loading of the hip extensors (butt), making this drill an excellent choice for a “finisher” after your main exercises. To quote our good friend, the wise and powerful Tony, after performing a set of these, “I FELT it in my soul”!

DISCLAIMER; Michelle and Tim are NOT responsible for any Soul-Delayed-Onset-Muscule-Soreness (SDOMS) experienced after performing this drill.

Technique

Big pointers with the Walking Toe Touch Lunges

  1. Maintain up/down motion by keeping your head stacked over your chest and stacked over your hips… put simply “mostly elevator, a little escalator”
  2. Reach your opposite arm to your front big toe keeping your breastbone pointed straight ahead and letting your shoulder blade reach around your ribcage
  3. “A little” hinge at the hips is necessary to stay moving FORWARDS, but “a little” is all you get
  4. Be nice to your back knee, a soft surface is ideal with this drill
  5. Focus on turning into your abs on the same side as the front leg 
  6. Stand up by pushing the ground away with the front foot (that same tripod foot as we discussed previously)
  7. You get no bonus points for lunging LONG- keep your stride length short and controlled

Summary

  • Choosing single leg exercises that will allow you to achieve the greatest ROM while moving heavy loads are key to targeting more muscle mass. Gettin’ more yoked than a 12th century plow animal is all about moving load over ROM. 
  • Intelligent holding positions, such as DBs at sides and zercher, beget more motion availability. 
  • The positioning or elevation of your feet relative to one another is VITALLY important in ensuring we’re loading the target tissue through as large of an available range as we can muster.

Now go get those legs so HUGE that grandma’s gonna have to buy you new Christmas stockings.

About the Authors

Michelle Boland

Tim Richardt