CategoriesExercises You Should Be Doing

Exercises You Should Be Doing: Bench Assisted ValSlide RDL With Reach

I know the name of today’s Exercise You Should Be Doing seems like a mouthful, but I promise it’s easier done than said.

More cogent to the point is that it’s one of my new favorite drills to help trainees groove the Single Leg RDL.
Copyright: gekaskr / 123RF Stock Photo

I’ve Written About This Shit Before

I view the Single-Leg RDL as a valuable movement to master. I think it behooves1 most people to be able to do it, and do it well.

And while I’d like to sit here and say that mastering the 1-Legged RDL will help you jump seven inches higher, run a sub-10s 100m dash, shed 25 lbs of fat, add 50 lbs to your squat, and help cure male pattern baldness…it won’t.

But it’s still a pretty fuckin important movement pattern to add to your training menu for a variety of reasons.

Off the top of my head:

    • Helps improve posterior chain strength (glutes, hamstrings, erectors).
    • Helps correct left-right strength and size asymmetries.
    • Can be used in both a rehabilitation AND strength training setting.
    • Phenomenal for hip stability and strength.
    • Challenges the body in a multi-faceted way – namely proprioception and balance.
    • Trains the feet (you learn how to “root”” your foot into the ground).
    • Also, and maybe most important of all, improves your Fortnite Dance-off prowess.

All that said, even for people with a fair amount of experience in the weight room, Single-Leg RDLs are about as advanced as they get as far as single leg movements go.

Here, a lot of things have to harmoniously come together (core stability, hip stability, upper back strength, balance, hip hinge, etc) in order to perform the movement effectively, and in a fashion that doesn’t make me want to throw my face into a brick wall.
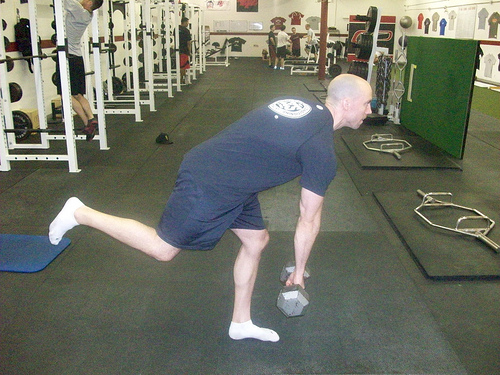
The LAST thing I’m going to do with the bulk of people I start working with – especially in the beginning stages – is to put weights in their hands and have them RDL to their hearts content.

A lot of things need to happen first.

As with any exercise, there’s a right of passage and a natural progression that needs to take place.

Oh, and it just so happens I wrote an article a few months ago detailing many of the Single-Leg RDL progressions I use with my clients/athletes HERE.

It’s pretty good. I believe it’s up for the Pulitzer.2

To that end I wanted to share with you another viable RDL progression I learned recently that you can add to the mix.

Bench Assisted ValSlide RDL w/ Reach


Who Did I Steal It From? – My friends over a Warhorse Barbell Club in Philadelphia, PA.3

What Does It Do? – Using a bench as a support helps to keep the backside “stable” as one extends their moving leg back. In addition it helps to prevent the pelvis from rotating to one side or the other.

Also, the reach forward is important here because it inspires a posterior weight shift which many trainees have a hard time with out of the gate.

Key Coaching Cues – The beauty of this drill is that it’s proper execution keeps people honest. If the hips rotate, the ValSlide falls off the side of the bench, the “sliding component” helps to groove a long (and stable) backside, and the reach helps prevent excessive rounding of the upper back.

I like to stick with a med ball for a few weeks, and once someone feels competent with that I can then add a pair of dumbbells or kettlebells as a progression.

Categoriescoaching Exercise Technique Program Design

A Few Ways to Progress and Groove the 1-Legged RDL

I know, I know.

Talking much less writing about the 1-Legged RDL isn’t the most exciting thing in the world. Here’s where it ranks on my “Stuff That Gets Me Really Excited About” List:

1: Ice cream.
2-717: Reading Wikipedia pages for every Wu-Tang Clan member.
718: Cleaning up my cats weekly furball vomit.
719: Valentine’s Day.
720: 1-Legged RDL’s.
721: Poodles/Ebola.

But hear me out…this is important shit.

Copyright: peogeo / 123RF Stock Photo


While many may echo the same sentiment above, it’s hard to downplay the importance of the 1-Legged RDL.

Being able to access the hip hinge (and being able to perform it on one leg) is crucial for a variety of reasons: Ranging from improved joint health (specifically dissociating hip movement from lumbar movement) and improved movement quality to improved hip/rotary core stability and enhanced athletic performance.

BONUS: And, for what it’s worth, I’m pretty sure “good hip hinge” is one of the top criteria people search for when puttering around on Tinder.

Even if that’s not the case I’m willing to bet if you put something like “Hip Hinging Is Hot” as your profile heading and followed suite with some candid pictures of you deadlifing a variety of things like a barbell, a bag of groceries, a litter of bunnies, you’d get more matches.

Do it.

DO IT.4

via GIPHY

Getting back on task, today I wanted to highlight some of my favorite exercises and drills to help groove and progress the 1-Legged RDL.

I find a lot of trainers/coaches are quick to add these into a client’s program, when the fact of the matter is…they’re a rather advanced movement.

Taking the time to properly progress someone based on their current ability level (and needs) will go a long ways with breeding success and rapport with your clients.

Lets dive in.

But First: Some Universal Coaching Cues

Two common technique flaws I see with most people are:

1. Helicopter Hips
2. Letting go or “losing” their shoulders.

Helicopter Hips

This is where you’ll see someone’s hips kinda rotate upwards towards one side as they hinge back into their leg.

No, no, no, no, no, no, NO.

Don’t Lose Your Shoulders

This is probably the most common snafu with the 1-Legged RDL. Simply put this is where someone will round their shoulders/upper back as they hinge back.

I said, NO.

Progressing the 1-Legged RDL

For most people I think it’s smart to start from the ground, work to standing variations, and then add movement/load after that.

NOTE: What follows isn’t an exhaustive list, but will get the job done for the bulk of people.5

Handcuff Hinge

I feel it only makes sense to start with BOTH hips. We have to master the bilateral hip hinge before we have any shot at mastering single leg variations.

I think Dan John was the first to popularize this drill. There’s just something about this variation that provides the requisite feedback to “feed” the hinge.

NOTE: I also think your standard variety Glute Bridges and Hip Thrusts work well here too.

Split Stance RDL

I also like to call this one a “Fake 1-Legged RDL.”

While still technically bilateral, this variation allows the trainee to front load the front leg while simultaneously using the opposite leg as a balance point as they hinge back.

 Skater Hinge RDL

A fantastic progression from the above exercise.

This one really begins to set the table for increasing range of motion as well as grooving the hinge itself in addition to hip separation.

I like to tell people to think about driving or pushing the KB through their chest and to “protect their rib cage with their arms” to help create more full-body tension.

Wall Assisted 1-Legged RDL

Once they mastered the “hinge” component, now it’s time to take away a point of contact. However if balance is still an issue an easy fix is to use the wall to assist.

Start with bodyweight and then add external load once they get comfortable with that (and can extend the leg fully).

https://www.youtube.com/watch?v=EazaXmRPA3A

Assisted 1-Legged RDL w/ Reach

Another option would be this gem I stole from the crew over a War Horse Barbell in Philadelphia, PA.

Don’t Worry: Even though the Pats lost the Superbowl to the Eagles this past weekend, we’re still friends. I guess.

1-Legged RDL ISO Hold

Many will scoff at this drill as easy.

Many will suck at it.

It’s okay to LOL at them.

1-Legged RDL ISO Hold w/ KB Swap

And if you really want to LOL at your clients, give them this drill.

They’ll feel stuff firing they never knew existed.

Deadstart 1-Legged RDL

One trick I keep in my back pocket to help people really get a feel for this exercise is to start in the bottom position.

I’m sure there’s some hoity toity term I could be using here to explain things, but all I’ve got for you is that there’s something about starting in the “end” position that helps people contextualize the pattern.

Try it.

I think you’ll agree.

https://www.youtube.com/watch?v=VkfUrsGCXGE

I’m Done

There’s more I could add but 1) no one made it this far, did they? and 2) I’m hungry.

Hope these help.