CategoriesCorrective Exercise Exercises You Should Be Doing

Exercises You Should Be Doing: Wall Press Rotation

Copyright: romastudio / 123RF Stock Photo

Exercises You Should Be Doing: Wall Press Rotation

When it comes to dealing with hip shenanigans1 I think we’ve done a pretty solid job as an industry at prioritizing OPEN chain exercises.

For those not in the know, open-chain exercises are where…

“…the segment furthest away from the body – known as the distal aspect, usually the hand or foot – is free and not fixed to an object.”

This would make a lot sense given the hip joint – which is a ball and socket joint – is an area designed to be mobile. I don’t need to belabor the point here as there’s an abyss of exercises & drills to choose from.

HERE‘s an example.

But you can also peruse Instagram and it won’t take long before you find someone contorting themselves like a pretzel in the name of likes and five seconds of fame.

Which leads to a not-so-obvious digression.

Lately, after having listened to and corresponded with a few of my colleagues, I’m beginning to realize that open-chain exercises are just HALF the answer.

Closed-chain drills need some love too.

Wall Press Rotation


Who Did I Steal It From? – A rockstar (metaphorically speaking): Katie St. Claire. You should give her a follow. She’s legit.

What Does It Do?

1️⃣ This drill works on pelvic range of motion, but as the preface implies…in a closed chain fashion. The advantage here is that it emphasizes acetabulum motion over a fixed femur.

It feels amazing and serves as a nice drill to implement before some squats or deadlifts.

2️⃣ Too, and as Katie has pointed out, this drill also hammers home foot mechanics. As I flex into hip internal rotation I drive more foot pronation. Conversely, as I extend into hip external rotation I drive more foot supination.

A splendid drill that marries together hip-foot mechanics.

Key Coaching Cues – I’m holding onto an EZ-curl bar, but anything similar – PVC pipe, light barbell, Nimbus 2000 – will do. Be sure to press the rear foot into the wall. You’ll then flex/rotate into hip IR on the standing leg while also accentuating a full exhale.

Exhale into the stretch.

Reverse your action, rotating back/extending as you inhale.

Easy as that.

And, bonus points if you include a bicep curl.

Kidding.

But not really.

Okay, kidding.2

CategoriesExercises You Should Be Doing

Exercises You Should Be Doing: The Canister Press

Copyright: ramain / 123RF Stock Photo

The Canister Press

Who Did I Steal It From: I never thought this day would come. I think I may have done it everyone. I can’t believe it. I may have invented an exercise.

At first was going to call it TonyGentilcoreSupremeChancellorDragonSlayer Press, but that seemed a tad grandiose (and a mouthful).

I decided on Canister Press instead for reasons you can read about below… 😉


What Does It Do: The shoulder blades are meant to move:

  • Upward/downward rotation
  • Protraction/retraction
  • Anterior/posterior tilt

The ability to perform all of those actions is indicative of a “healthy” shoulder, and the platform for all that movement to take place comes courtesy of the ribcage.

The ribcage is shaped in a convex manner.

The scapulae (shoulder blade) is concave, or rounded, in nature. The ability for the two to play nicely together is an often overlooked mechanism of what I like to call “my shoulder fucking hurts syndrome.”

Rather than lulling a client down the corrective exercise purgatory rabbit hole, one option I like to hone in on out of the gate is creating context by encouraging what’s commonly referred to as the “canister position.”

Think of the canister position as stacked joints.

Your rib cage should be “stacked” on top of your pelvis. You can get a general visual from the picture below; my bottom hand represents my pelvic floor and my top hand represents my diaphragm and ribcage

This position is often a “safer” position for most, but is also a stable position, oftentimes allowing for more range of motion to occur, as well as a position that allows people to express the most strength and power in the weight room.

By pressing the band out in front of the body and holding it in place I am creating a FLEXION MOMENT with my abs (more posterior pelvic tilt), which in turn “cements” the canister position.

From there I create more congruency with the ribcage and shoulder blades so that the latter can move more efficiently up and around the former.

In short: It allows for a “cleaner” and often less painful overhead press.

Key Coaching Cues: I think the video above is self-explanatory. However, I am using a light resistance band and just wrapped it around my back. Alternatively you could wrap the band around a pole, squat rack, or any inanimate object and perform it that way too.

It’s somewhat hard to notice in the video but as I press the band out in front of my body I am also exhaling ALL my air out. This helps to get the ribs down further and to lock in that canister position even more.

From there I brace and perform my reps on the opposite arm (breathing as I hold the brace).

Give it a try, let me know what you think, and tag me on social media if you do!

CategoriesExercises You Should Be Doing

Exercises You Should Be Doing: Goblet Split Squat with Coil

It’s been a minute since I’ve shared an Exercise You Should Be Doing.

Anyone who’s familiar with this series or has kept tabs on the types of exercises/movements I gravitate towards will dig this one.

Which is to say: It’s not flashy, it’s not sexy, and it doesn’t take a PhD to set up or perform.

Copyright: gekaskr / 123RF Stock Photo

Goblet Split Squat w/ Coil


Who Did I Steal it From? – My coach, Greg Robins, plugged this into my program this month. When I saw it, at first I was like “tha fuck!?!”

What’s up with this foo-fooey exercise?

But then I performed a few sets and was like “whaaaaaaaaaaaaaaaat.”

I like it a lot

(cue Dumb & Dumber voiceover).

What Does It Do? – Well, like any single leg variation it challenges balance, core/hip stability, and helps to “temper” any strength imbalances between one leg or the other. Too, it gives the spine a bit of a reprieve from aggressive axial loading.

What separates this variation, however, is the addition of the COIL (or rotation of the upper torso). This subtle tweak offers a bit of a varying training stimulus in that it takes us out of the traditional up/down, forward/back nature of exercise we’re accustomed to and adds rotation into the mix; or transverse plane motion.

The twisting action also leads to a bit more internal rotation of the front hip which feels divine (unless you’re someone with a history of FAI; in that you’ll probably want to avoid this one).

As a quick aside I had my wife perform this exercise the other day after she tweaked her lower back/SI joint and she loved it. As noted in THIS article written by Dr. Erika Mundinger on this site a few years back, introducing rotation can be a game changer for those with chronic SI joint issues.

Key Coaching Cues – This exercise is pretty self-explanatory.

  • Assume a split squat position.1
  • Whichever foot is in front rotate the opposite shoulder TOWARDS that direction making sure to keep the torso upright and shoulders back.
  • Perform the drill “squatting” up and down while maintaining the same torso position throughout. Perform  allotted reps (6-10) and then switch sides.
  • My god, you’re so hot.
CategoriesExercises You Should Be Doing

Exercises You Should Be Doing: Hollow Position Hold Pull-Up

A quick heads up: In celebration of its two-year anniversary of being released my good friend Meghan Callaway is putting her renowned Ultimate Pull-Up Program on sale all this week.

  • You can purchase it at 40% off the original price.
  • You also have the option of purchasing both her Ultimate Pull-Up Program & Ultimate Landmine Program as a packaged deal at a pretty sweet discount as well.
  • Also, and don’t quote me on this, Meghan is giving away a free hug/high-five (whichever is less weird to you) to anyone who purchases.

If you’re someone who has struggled conquering the pull-up or you’re a trainer/coach who wants a better understanding of how to program for any of your clients interested in performing their first pull-up (or doing more of them), you’d be hard pressed to find a more thorough resource.

I’ve used the program myself many times.1

Copyright: anzebizjan / 123RF Stock Photo

Exercises You Should Be Doing: Hollow Position “Pull-Up”

In light of Meghan’s re-release I wanted to share one of my favorite drills I love using with anyone interested in conquering their first pull-up.

I think there’s a common misconception that the only way to train the pull-up is by doing pull-ups. I mean, yes, that will be a thing – specificity matters – but if someone is unable to perform one, well, what do we do?

I’m a big fan of implementing FLOOR-BASED drills to help build context and confidence.

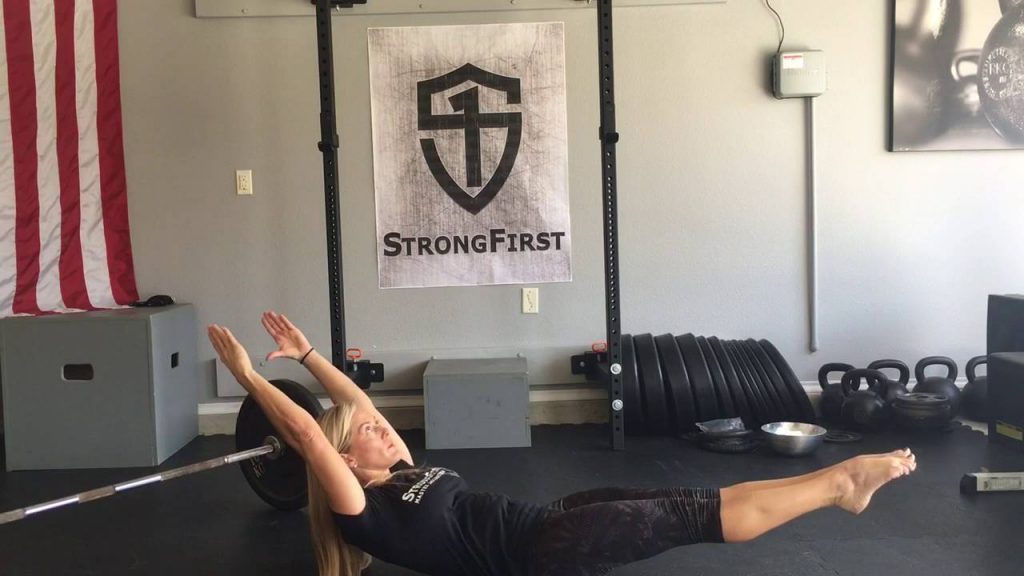
My starting point for pretty much everyone is to learn the correct way to perform a Hollow Position Hold.

Photo Courtesy of StrongFirst.com (Karen Smith)

  • Lie on your back.
  • Feet off the ground.
  • Arms, shoulders off the ground
  • Press/squeeze everything: feet, legs, abs, eyeballs, everything.

What’s so great about this drill – outside of allowing people a better appreciate of full-body tension and how much it really sucks – is that the position itself emulates how I’d want someone to hang from a bar when they attempt an actual pull-up; as the body is a more “connected” unit.

Again, context.

Now, there are numerous ways to progress the Hollow Body Hold.

  • Perform for “x” time (and then add more time each week, say 5-10 seconds).
  • Perform with an emphasis on a FULL exhale (and aim for “x” repetitions).
  • Juggle chainsaws (but only if they’re also lite on fire)
  • Perform the hold but add a little flair to it by having people press or rotate things:


Like I said there’s an infinite array of progressions and shenanigans to consider.

To up the “specificity” ante a little more, however, I really like adding a “pull-up” into the mix.


Who Did I Steal It From? – Another good friend of mine, Artemis Scantalides.

What Does It Do? – If anything I feel it provides a bit of an “ah-HA” moment for the trainee. Once they grab the stick or PVC pipe and begin to perform the “pull-up” in the hollow position a light goes off as if to say” oooooooh snap, now I get why we’ve been doing this stuff!!”

Also, context…;o)

Key Coaching Cues – I wouldn’t add this variation until someone is able to hold a strict hollow position for 30 seconds. Once they’re there hand him/her a stick and wammo-bammo…it’s pretty self explanatory.

One thing of note, though, is the breath.

It behooves everyone to start cueing/coaching an exaggerated exhale/snake breath with each repetition. As the trainee emulates the pulling motion (s)he should perform an aggressive exhale; this helps to maintain tension and core recruitment.

Also, because I said so.

2-3 sets of 6-10 repetitions should be money for most beginner and intermediate lifters.

CategoriesExercises You Should Be Doing

Exercises You Should Be Doing: Angled Landmine Reverse Lunge

I’m horrible when it comes to naming exercises.

I mean, in this instance, should I have gone with the literal name: Single Stance to Reverse Lunge w/ Contralateral Hip Extension & Flexion?

Or, I don’t know, something like Cool Landmine Reverse Lunge Thingamajiggy?

Decisions, decisions.

As you can see, I chose something in the middle.

Shrugs.

Copyright: realstock / 123RF Stock Photo

Angled Landmine Reverse Lunge

Who Did I Steal It From? – Virginia based strength coach Vernon Griffith. If you’re not following him on Instagram you should be. There aren’t many coaches putting out better content than he at the moment.

What Does It Do? – Well, lets take a look at it in action first, shall we?


See what I mean about coming up with a suitable name now?

Anyway, what I like most about this variation is that I can lean into the plate/bar which provides just a smidge of balance, but still allows me to focus on one leg at a time.

As it happens, when I saw Vernon first demonstrate this exercise he ended up lowering the moving leg to his knee (a gentle tap to the floor) whereas I chose to lower so that my foot contacted the ground.

Both are viable options. However, I’d encourage people to start with my option and progress to Vernon’s.

What I also like about this drill is that because I am leaning INTO the plate/bar I get more (closed chain) hip abduction on the standing side.

End Result?: GLUTE O’CLOCK.

Key Coaching Cues: I caution anyone from using an aggressive weight here. I was only using a 25 lb plate in this video and a part of my soul died it was challenging. I prefer a Zercher (in the crooks of your elbows) hold for this drill, but you could also utilize a supinated or underhand grip too.

From there it’s a fairly intuitive exercise. As noted above the lean helps to provide a bit of balance and because the barbell is situated somewhat in a fixed path, you’ll have all the “guidance” you’ll need to make it pretty smooth.

GO SLOW.

The real benefit here is learning control and to recognize how to move through your hips and not to compensate via the lower back.

Aim for 8-10 repetitions/leg.

You’ll feel things firing you’ve never felt before.

Glutes, deep hip stabilizers, core, your eyeballs, everything.

CategoriesExercises You Should Be Doing

Exercises You Should Be Doing: Wall Press Single Leg RDL

Before we get to today’s “Exercise You Should Be Doing,” a quick parenting tip:

If or when your two year old wakes up from a nap and says his tummy hurts, and even if he seems in good spirits, don’t assume he’s just hungry (like I did) and then proceed to take him out for ice cream because it’s Easter.

Cause inevitably, what’s going to happen is what happened to me two hours later…..

…projectile vomit E.V.E.R.Y.W.H.E.R.E.1

Onward!

Copyright: tankist276 / 123RF Stock Photo

Wall Press Single Leg RDL

Who Did I Steal It From? – I honestly can’t remember, but my inclination is to say Chad Rodgers of Show Me Strength.

Or, I don’t know, maybe it was Jesus.

What Does It Do? – Well, before I say anything on that front I should probably show you what the heck it looks like, huh?


Pretty fancy.

I’ve long championed the notion that the single (or 1-Legged) RDL is fairly advanced exercise as it requires a hefty dose of “things” to pay nice together:

– Lumbo pelvic stability
– Core control
– Stable spine
– Balance
– Hip extension
– Lat activation
– Stark’s shaking hands with Lannister’s

Many trainees are unable to perform a traditional single-leg  RDL without my corneas resisting the urge to jump out of their sockets, which is why I’m such a stern fan of more “intermediary” variations such as the one that’s highlighted today.

It provides the support/balance many people need, albeit allows an opportunity to load the standing leg making it more or less a “fake 1-legged” version.

Key Coaching Cues: It takes a bit of trial and error and finesse to get the feel down, but one cue that helps a lot is to push the back foot INTO the wall while also pushing BACK with the standing foot.

This way you elicit a bit of a “wedge,” and thus more full-body tension.

From there, simply push the hips back towards the wall. I like to remind people they’re not lowering the weight with their arms, but rather pushing their hips back.

Continue as such until you feel the bulk of the pressure in the hamstring.

NOTE: The other advantage of this exercise is you can go heavier compared to traditional single leg RDL variations.

So, meatheads will love how this torches the hamstrings.

CategoriesExercises You Should Be Doing

Exercises You Should Be Doing: Supported Hip Airplane

This exercise is magic.

I mean, it pales in comparison to a Wingardium Leviosa spell – or even bacon wrapped dates (magic in my mouth) – but if you’re looking for a drill to add to your squat/deadlift warm-up, or to help with a pair of cranky hips, continue reading.

Copyright: jakkapan / 123RF Stock Photo


Giving credit where it’s due, I first learned of this exercise – well, technically, an iteration of it – via Dr. Stuart McGill while attending one of his workshops years ago.

He included it as a form of progression with regards to low back rehabilitation and performance. In his version, you don’t use anything as support and you then hold your arms out to your sides (like an airplane) and perform the drill.

I’m half convinced the only people who can do it well on the first try are 1) Dr. McGill and 2) Cirque du Soleil performers.

Nevertheless it’s a fantastic drill that stresses a “rigid” (or stable) spine while also performing a CLOSED-CHAIN exercise where the acetabulum – hip socket – moves along a fixed femur.

As much as I’m a fan, however, it’s also a fairly advanced drill and often cumbersome to master for many individuals.

Try this instead.

Supported Hip Airplane


Who Did I Steal It From?: My wife was actually given this exercise by Dr. Sarah Duvall a few weeks ago to help her with some annoying hip “stuff” she’s been dealing with for the past few years.

Within days of implementing this drill my wife saw a massive reduction in her symptoms and was also quoted as saying…

“Hip internal rotation is fucking magic.”

More on this in a bit, because it’s not technically working hip IR.

What Does It Do?: As noted above it’s primarily a closed-chain exercise (weeeeeeee) which allows for the more proximal joint (in this case the hip) to move across a fixed femur (the distal joint, the foot, is cemented to the ground).

When I posted this exercise up on my IG account I had several people keep me in check (and rightfully so) when I had mentioned this exercise helps encourage more hip internal rotation.

It kinda, sorta does.

As Movements 4 Life noted:

“It’s actually a discussion of motion vs position. At the top of the airplane the hip is externally rotatED. Then as you return back to neutral, you are technically going through internal rotation but you are still in a position of external rotation. I would actually encourage you to go beyond neutral to get into an internally rotated position.”

So, yeah, do that…;o)

Suffice to say:

1. I like this drill because it hammers home the point of rigid/stable spine while moving through the hip.

2. DON’T EVER SHOW ME UP LIKE THAT AGAIN MOVEMENTS 4 LIFE. I’LL CUT YOU.1

Key Coaching Cues: I cue up a “soft” knee on whatever leg someone stands on. The idea is to extend the inside leg so that the backside is long. If someone is unable to own that position, I’d encourage them to bend the leg at the knee to reduce the lever length.

Rotate up via the hip making sure to minimize motion from the spine. When in the maximally externally rotated position one can control, reverse the action by thinking about driving the top portion of the hip towards the opposite knee.

And, as noted above, don’t be scared to go past neutral and get into more hip internal rotation (that’s what the support is there for).

To progress, let go of the support.

I’ve been including this drill as part my my lower body warm-up for squats and deadlifts and my hips/glutes are thankful.

CategoriesExercises You Should Be Doing

Exercises You Should Be Doing: Reverse Nordic Curl

Anyone who’s visited the Nordic region of the world – generally considered to be Denmark, Sweden, Norway, Finland, and Iceland – knows they’re known for a few things:

  • Fjords
  • Vikings

And that’s pretty much it.

Copyright: NejroN / 123RF Stock Photo


Okay, that’s a bit of dearth representation of all the history, art, food, and culture the region has contributed to our benefit. I mean, there’s also Nordic walking, the Nordic Track, as well as the star of today’s blog post the Nordic Leg Curl.1

The Nordic Leg Curl (also known as the Natural Glute Ham Raise) is an awesome exercise that can be used as a posterior chain builder and strengthener, in addition to, when implemented accordingly, being a fantastic “rehab” exercise with regards to working with someone suffering from chronic hamstring strains.

To the latter point, because the eccentric – or lowering – component of muscular action can be prioritized, it’s just a nice way to overload the hamstrings in a way that’s unique to the mechanism of injury for chronic strains (I.e, the bulk of them generally occur when the hamstrings are eccentrically resisting knee extension).

You can read about them more in THIS article, or watch this video (courtesy of T-Nation and Bret Contreras):


Anyway, recently I came across the antithesis of the Nordic Hamstring Curl, and I wanted to share it today because I’ve been playing with it of late in my own training (and with a few clients).

The Reverse Nordic Curl

Who Did I Steal it From? – A few people, actually. Sivan Figan and Nick Tumminello have posted videos of it within the past few weeks, and Meghan Callway was a bit of inspiration as well. She posted a nifty Landmine variation HERE not too long ago.


I know, I know…I’m going to rot in YouTube hell for posting a vertical video. May the comment gods show me mercy.

What Does It Do? – I find it’s an excellent way to train the quadriceps eccentrically and to encourage more length in that area. It’s kinda-sorta a more “joint-friendly” variation of a Sissy Squat.

On an aside, from a rehab standpoint, given the bevy of research showcasing the efficacy of SLOW eccentrics on tendon healing & repair, I can see a lot of value for this exercise when working around knee woes.

Key Coaching Cues: Much like Meghan suggests with her Landmine variation, you want to make sure you ensure a “stacked” position throughout the duration of the exercise. Meaning your head, torso, hips, and knees should be “stacked” on top of one another the entire time.

In this case the band across the chest (cameo appearance of the NT Loop, HERE) adds a bit of accommodating resistance – you want to actively resist the aggressive pull of the band on the way down, as well as overcome the pull of the band on the way back up. I find, too, the band provides a bit more kinesthetic feedback to the lifter to better engage his or her’s core.

Slowly lean back making sure to maintain the canister (stacked) position, then use your quads to “pull” yourself back up. I am indifferent with regards to toes plantar or dorsiflexed. I’m sure there’s a nerdy explanation out there as to why one or the other is good or bad, I just can’t think of one.

Besides, Vikings are awesome.

Oh, lastly: I lean more on the idea that this exercise lends itself to a high(er) rep count, in the ballpark of 8-15 repetitions per set. Too, I’ve been tossing them in as an accessory movement towards the end of a squat or deadlift session. Honestly, I think you’ll be surprised by how much of a quad pump you’ll get from these.

Give em a try and let me know what you think.

CategoriesExercises You Should Be Doing

Exercises You Should Be Doing: Anti-Flexion Squats

“It’s official,” I thought to myself.

“I’m a moron. Why have I never thought of that?”

On an almost daily basis I read or watch something one of my colleagues posts on the internet and I am not-so-subtlety reminded of how inadequate I am.

I mean, granted, I have a deadlift most guys covet, and pecs that can cut diamonds, but even still…it’s not enough.

My brain just doesn’t work in the say fashion as some of my fitness brethren.1

Today’s installment of Exercises You Should Be Doing is a gleaming example of this fact.

Copyright: gekaskr / 123RF Stock Photo

Exercises You Should Be Doing: Anti-Flexion Squat


Who Did I Steal It From? – Friend, colleague, and coach, Robert Linkul, owner of Be STRONGER Fitness in Sacramento, CA.

** No fluff here, Robert is an outstanding coach and someone you should be following (especially if you work with older clients).

What Does It Do? – When I first saw this exercise being performed on Robert’s Instagram feed I instantly thought of my IN-SEASON high-school basketball players. They were coming in to train at CORE the following day and I knew they were going to be a bit beat up from a hectic week of games and practices.

I wanted them to come in and get a good training session in, but I also wanted stay cognizant of the fact they would have likely given me the look of death if they walked into the studio and saw “squats” on the docket.

With this iteration I was able to still have them squat, albeit with minimal axial loading on their spine. Too, as I found out myself after performing a few sets, it torches the anterior core.

I receive a high training effect with minimal joint stress with this exercise, and like I said, for in-season athletes this is money.

In reality, though, this is a great exercise for anyone: athlete, non-athlete, in-season, off-season, centaur, whatever.

Other things to note:

– The added “pull” of the band during the eccentric phase of the exercise provides a unique training stress in that the trainee must now learn to CONTROL the lowering portion and not just let the band take over.

– Moreover, I see some value in using this variation with beginners. Getting a beginner to appreciate TENSION and body position during a squat (abs on, ribs down, hips tucked under) is paramount. Far too often they’re “loosey-goosey” and have a hard time comprehending the concept. Here, the band gives them all the feedback they need to FEEL what it is I’m after.

– Lets quit it with the formalities shall we? You know and I know that there’s one thing, and one thing only, we’re both thinking of when it comes to this exercise.

We’ve finally figured out a way to combine squats and bicep curls, baby!

via GIPHY

Key Coaching Cues: I’m using  an EZ Curl bar in the video, but if you wanted to up the bad-ass factor you could use a straight bar or, I don’t know, an ax.

I’d err on the side of conservative here.

A 1/4″ band will be more than enough resistance for most people, but I can see a case being made for 1/2″ band for stronger individuals.2

Programming wise this exercise fits well with high(er) rep schemes (8-15) so don’t be bashful.

SIDE NOTE: Grip will be the limiting factor for the bulk of trainees with this exercise, so please take that into consideration. The last thing you want is someone letting go of the barbell from the top position due to fatigue and then they break their foot.

Jerk.

CategoriesExercises You Should Be Doing

Exercises You Should Be Doing: Band Resisted Kettlebell Deadlift

One of my biggest pet peeves about the fitness industry are those people who tend to be absolutists about stuff.

They feel that just because something worked for them that it must mean it’ll apply to everyone, and you’re an idiot or inept if you feel otherwise:

  • You have to back squat if you want to get strong.
  • You have to follow a Paleo diet if you want to get ripped.
  • You have to wear pants when you’re training clients.

It’s all a bunch of hooey if you ask me. Nothing is set in stone, and nothing is going to apply across the board towards a diverse population with varying injury histories, goals, and ability levels.

This train of thought applies towards the deadlift as well.

Copyright: bezikus / 123RF Stock Photo


There aren’t many exercises as maligned or misrepresented as the deadlift.

On an almost weekly basis I’m having a conversation with someone who offhandedly says “so and so mentioned to me how deadlifts are dangerous,” or “such and such said deadlifts are the worst thing ever for your back,” or “I heard deadlifts give you gonorrhea, is that true?

Listen, deadlifts are no more “dangerous” than any other exercise that’s performed incorrectly (or with too much load/volume that surpasses any one individual’s threshold to recover from).

When performed well, and with the appropriate progressions in place, the deadlift is one of the best bang-for-your-training-buck exercises out there.

It’s also pretty freakin versatile.

Another popular fallacy of the deadlift is that it has to be performed with a straight bar, and that it has to be heavy.

Nothing could be further from the truth.

Picking anything up off the ground – whether it’s a barbell, dumbbell, a bag of groceries, a baby, or Mjolnir – with the knees slightly bent, hips flexed, and with an upright torso, can be considered a deadlift.

Not so dangerous now, huh?

To prove my point check out this gem of a variation.

Band Resisted KB Deadlift


Who Did I Steal It From? – Strength & Conditioning legend, Vince McConnell.

What Does It Do? – I had my client, Jessica (who’s in the video above), perform this last night because we’ve been working on troubleshooting through some hip shenanigans.

To put it bluntly, Jessica is strong AF.

Her best deadlift is 350 lbs with a straight bar, and I’m pretty sure she’s undefeated in Fight Club. Thing is, though, she’s always had trouble feeling her glutes during a deadlift.

As with most people, she’s gotten really good at compensating, and every now and again she’ll get a bit of a back niggle.

Not necessarily an injury; but, you know, just an annoying “something.”

This exercise serves a few purposes:

  • Using a KB – so her center of mass is OVER the load – makes this exercise infinitely more “back friendly.”
  • Adding the band takes advantage of accommodating resistance where the load gets more challenging at a position where she’s strongest (terminal hip extension).
  • Too, adding the band, really helps with engaging the glutes to a higher degree at the top of the movement. I don’t know how better else to explain it other than “IT JUST DOES ALRIGHT. WHY DO YOU ALWAYS HAVE TO QUESTION ME?”

Key Coaching Cues – All I did was wrap a Jump Stretch band across two pegs at the bottom of my power rack and then loop the same band underneath the handle of a kettlebell.

Then Jessica lifted it.

And then it was Glute O’clock.

Normally I’m not a fan of high(er) rep deadlifts, but this variation lends itself to me breaking that rule.

Try 3-4 sets of 8-12 repetitions.