This is a Tony Gentilcore & Matthew Ibrahim collaborative post.
Or, as I like to call it: A Gentilhim (or Ibracore?) production.
The Safety Squat Yoke Bar (also referred to as “SSB”) is a popular speciality bar that’s most often affiliated with collegiate strength & conditioning facilities, powerlifting gyms, or gyms that are a bit more “serious.”1
However, the Safety Squat bar has grown in popularity in recent years and it’s popping up in more commercial and boutique style gyms as well.
This is great because Matt and I both feel the Yoke Bar is a valuable piece of equipment, one that should be in every gym, with a variety of training applications.
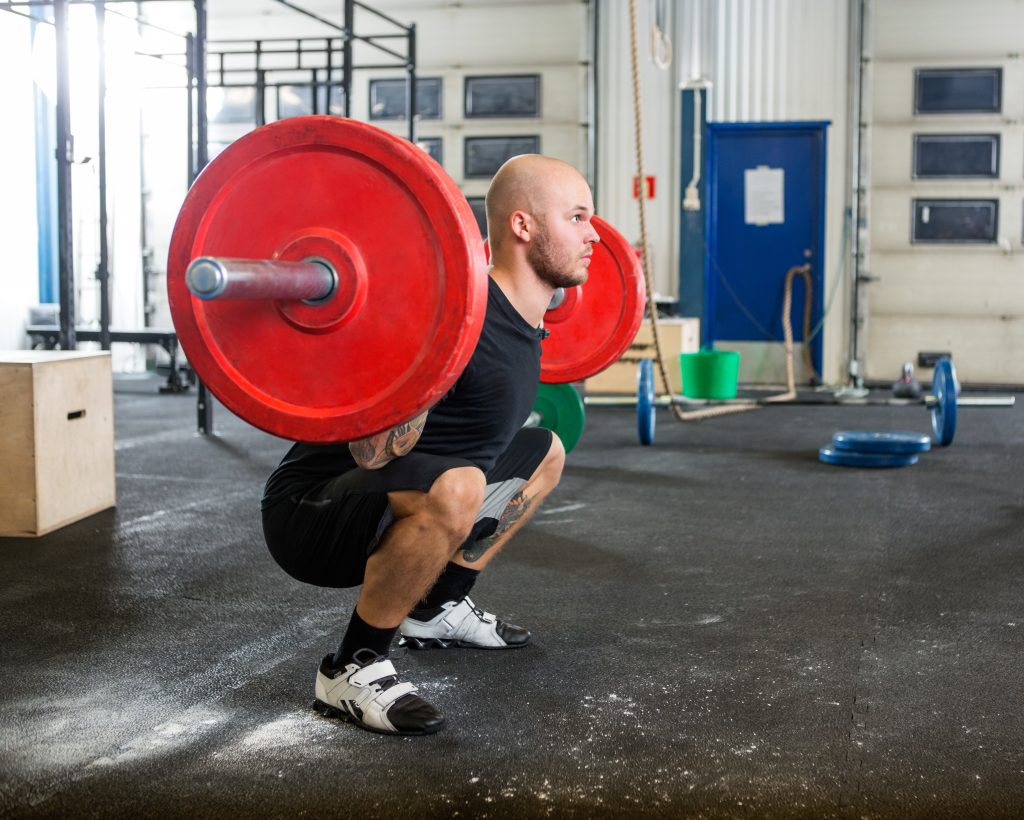
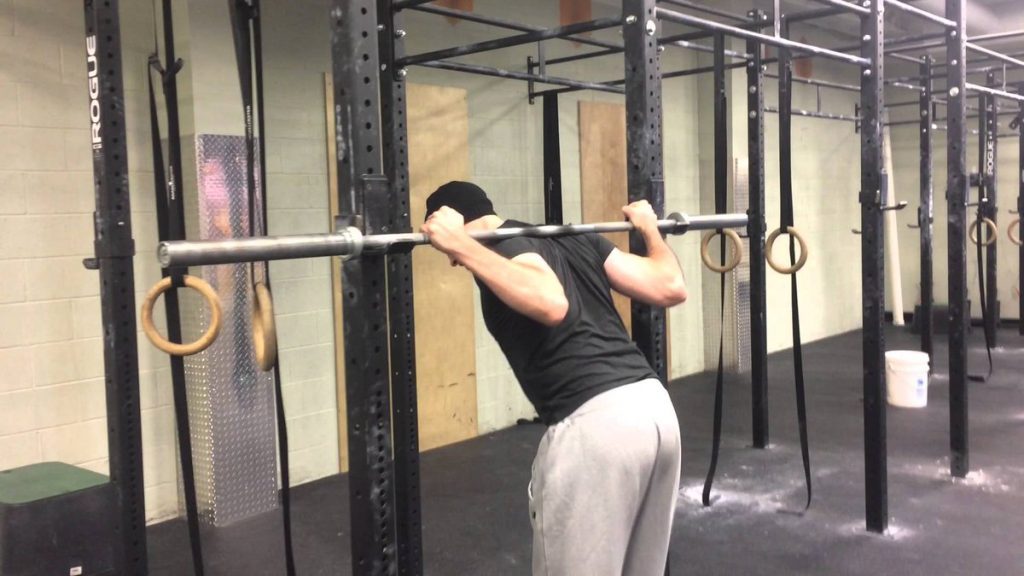
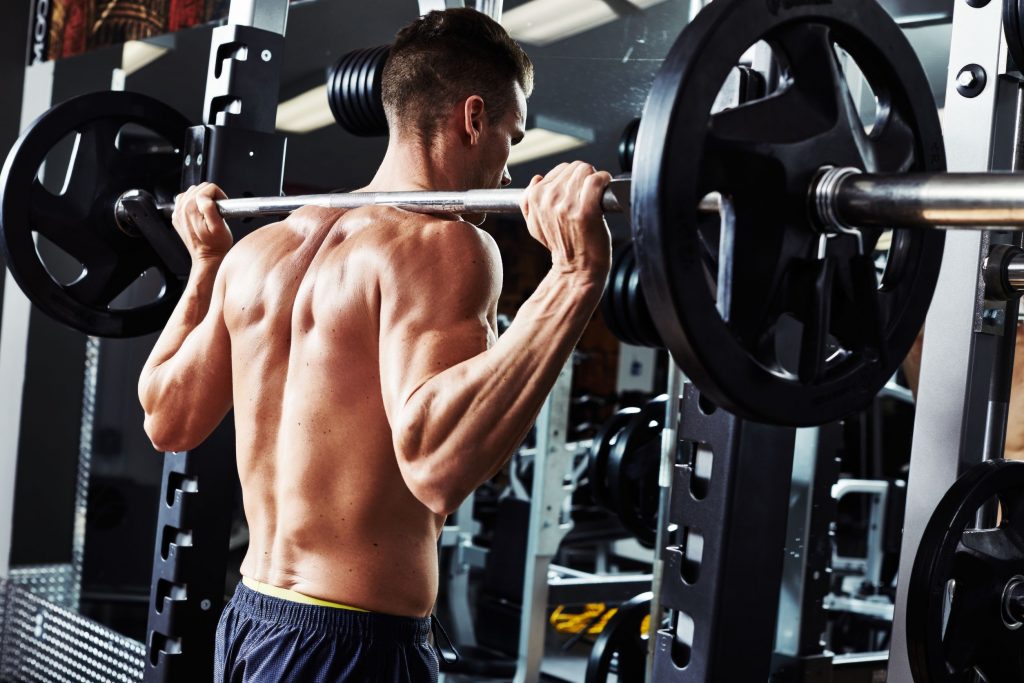
Before I proceed it would make sense to show you a picture of the bar so you know what we’re talking about.
Advantages
1. The SSB is a more “shoulder friendly” way of squatting. Because you grab the bar by the handles which, when the bar is on your back, are located below your shoulders and a smidge in front of the body, it doesn’t require as aggressive of a set-up as a traditional back squat.
Traditional Back Squat (Straight Bar) = Shoulders maximally abducted and external rotated. Many lifters don’t have access to this range of motion and as a result their shoulders are like…
SSB/Yoke Squat = Not the above.
2. The SSB is more of a “hybrid” squat. As Matt notes:
“Since the SSB has a longer bar camber from side to side (as opposed to a traditional barbell) plus a unique loading position for weight plates, it offers the lifter a fine balance between what they would expect from a barbell back squat and from a barbell front squat.“
3. The SSB “fixes” your squat. Mirroring what Matt mentioned above, because of how the bar is designed, you have to fight like hell to stay upright (which, not coincidentally, makes it a great option to strengthen the upper back AND help work on thoracic extension; two things most people need more of).
As you get stronger with the SSB/Yoke Bar it’ll make things infinitely easier to stay upright if or when you revert back to a straight bar.
4. The SSB = 110 Power Boost in World of Warcraft (but only with a +1 Shield and Infinity Cloak).
Nerd.
5. The SSB helps with depth. Because the bar is situated higher up on the back it promotes more of a “squat down” pattern rather that “squat back.”
This, in turn, will often help a lot of people squat deeper (if that’s something they’re interested in).
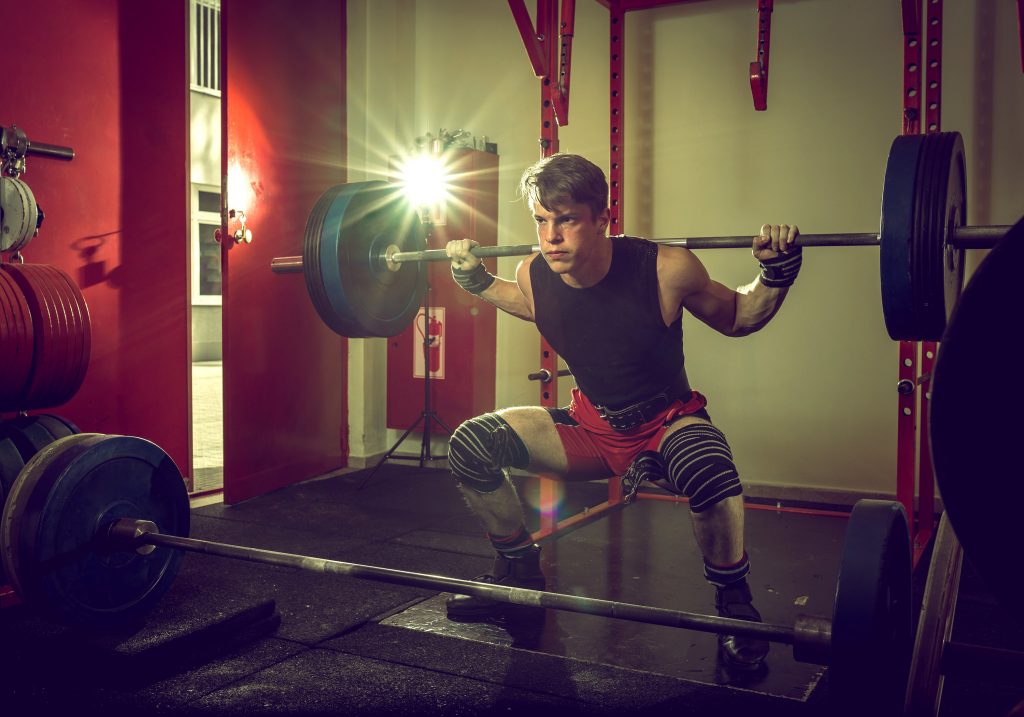
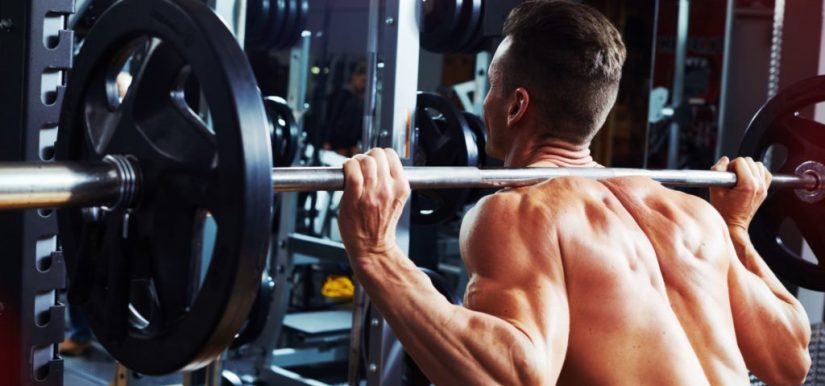
Here’s an SSB Squat in action.
The SSB Squat exercise is quite common and frequently used.
We wanted to delve a bit deeper to provide several other lower body training exercises you could perform with the SSB that you may not be using already in your overall strength and conditioning program.
1. SSB Hatfield RFE Split Squat (Matt)
Description: This exercise targets lower body strength and power, primarily in the quadriceps, hamstrings and glutes.
The trunk stability challenge here is the real deal as well, since you’re holding on to each side of the squat rack with your hands while the SSB rests on your shoulders. Be sure to press the entire surface of the working foot down through the ground as you power up from the bottom position to the top during each rep.
I’m a monster fan of this exercise due to the strength and power development components.
2. SSB Reverse Lunge (Tony)
Description: This was a staple exercise we utilized when I was coaching at Cressey Sports Performance due to it’s shoulder friendliness in addition to the fact we could be more aggressive with loading compared to dumbbells (grip becomes less of a limiting factor).
As with any single leg exercise there’s also a hefty balance and coordination component as well. I prefer a bit of a forward lean when executing this exercise as it places less stress on the lower back and also allows for more emphasis to be placed on the hips.
3. SSB 1-Leg RDL (Matt)
Description: This exercise targets lower body strength, primarily in the posterior chain muscle group (hamstrings and glutes). As the SSB rests on your shoulders, be sure to hold the handle grips tight with each hand to ensure trunk stability.
It’s important to also mention the relevance of keeping a neutral-ish spine as you descend down into the bottom position due to the orientation of the load on your shoulders. I like this exercise due to the single leg strength and stability demand it poses to the athlete.
4. SSB Front Squat (Tony)
Description: This is a variation I first witnessed my man Jim Smith – of Diesel Strength – recommend a few years. ago. I won’t go into the weeds on the benefits of a front squat
– you can read more HERE – but what I will say is that this variation is a wonderful way to counterpoint any client/athlete who insists that barbell front squats are too uncomfortable for him or her to perform,
I get it.
They suck.
They’re uncomfortable.
I don’t care, do this instead.
5. SSB Good Morning (Matt)
Description: Talking about posterior chain development without mentioning the Good Morning exercise is like eating eggs without the bacon; you just don’t do it.
The Barbell Good Morning has been a staple training tool for years when attempting to develop the glutes and hamstrings of the posterior chain muscle group. The SSB offers a slightly anterior loaded position when compared to the traditional barbell loaded version, which forces you to hinge your hips back even more than usual. I enjoy using this exercise as a way to really “feel” the hamstrings under load.
6. SSB Pin Squat (Tony)
Description: I loooooooooove2 this variation as an accessory movement to the deadlift.
The key is to try to approximate the pin height to one’s hips height so that it “matches” their deadlift setup. In other words: the starting position of the Pin Squat should mirror their deadlift setup.
Factor in the increased demand to maintain an upright torso (t-spine extension) and your entire posterior chain is going to be challenged with this exercise.
One of the top priorities to focus on when warming up prior to performing your squat in training is to spend time in the ACTUAL squat position itself.
Most people miss the boat here.
Why?
Well, it’s important to actually groove the pattern with repetition in the warm-up that you plan to load in your training.
Crazy talk, I know.
A handful of other components to address in your warm-up when preparing to squat will be to work on trunk stability, hip mobility, groin flexibility, ankle mobility and upper back (thoracic) extension.
The cool thing about this is that you can work on ALL of those things in the ACTUAL squat position itself in your warm-up, too!
All 8 exercises below provide your body with the opportunity.
1) All Fours Rockback – x10
2) Catcher Rockback w/ Toe Turn – x8 each side
3) Alternating Spiderman – x5 each side
4) Windowpane Squat – x8
5) Squat-to-Stand – x5
6) Alternating Cossack Squat – x8 each side
7) KB Horns-Grip Prying Squat – x30 seconds
8) KB Horns-Grip Squat w/ Press – x8
About the Author
Matthew Ibrahim is the Co-Owner & Lead Performance Coach of TD Athletes Edge in Salem, MA.
He has been an invited guest speaker nationally in over 10 U.S. states, which was highlighted by his presentations at Google Headquarters and Stanford University, in addition to guest speaking internationally in Milan, Italy.
His work has been featured in Men’s Fitness, STACK Media and The PTDC. Currently, he is completing his masters degree at Rocky Mountain University with a direct track into their PhD program. He is a big fan of interacting on Instagram and regularly posts about training, performance and recovery.
I’ve often championed the notion that there’s “no such thing as textbook technique.”
How we’re taught to execute certain exercises in a textbook often won’t translate to the real world because, well, we don’t live in textbooks.
This is a theme that’s hit on several times in The Complete Trainers’ Toolbox. Sam Spinelli, one of the contributors, was kind enough to share a bit of an amuse bouche from his presentation “All Things Squats, Knees, and Hips” with everyone today.
To check out the full presentation, as well as contributions from eight other renowned industry leaders, go HERE for more information.
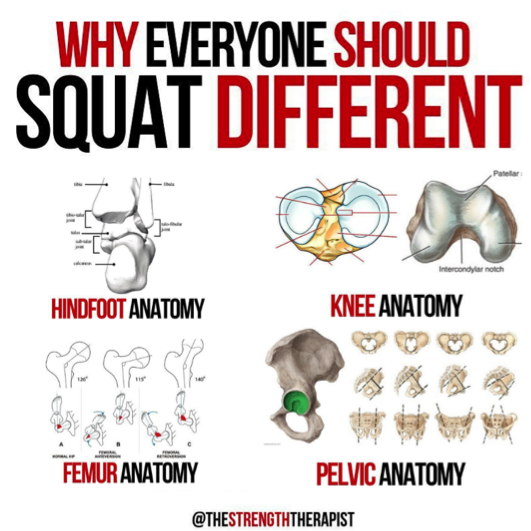
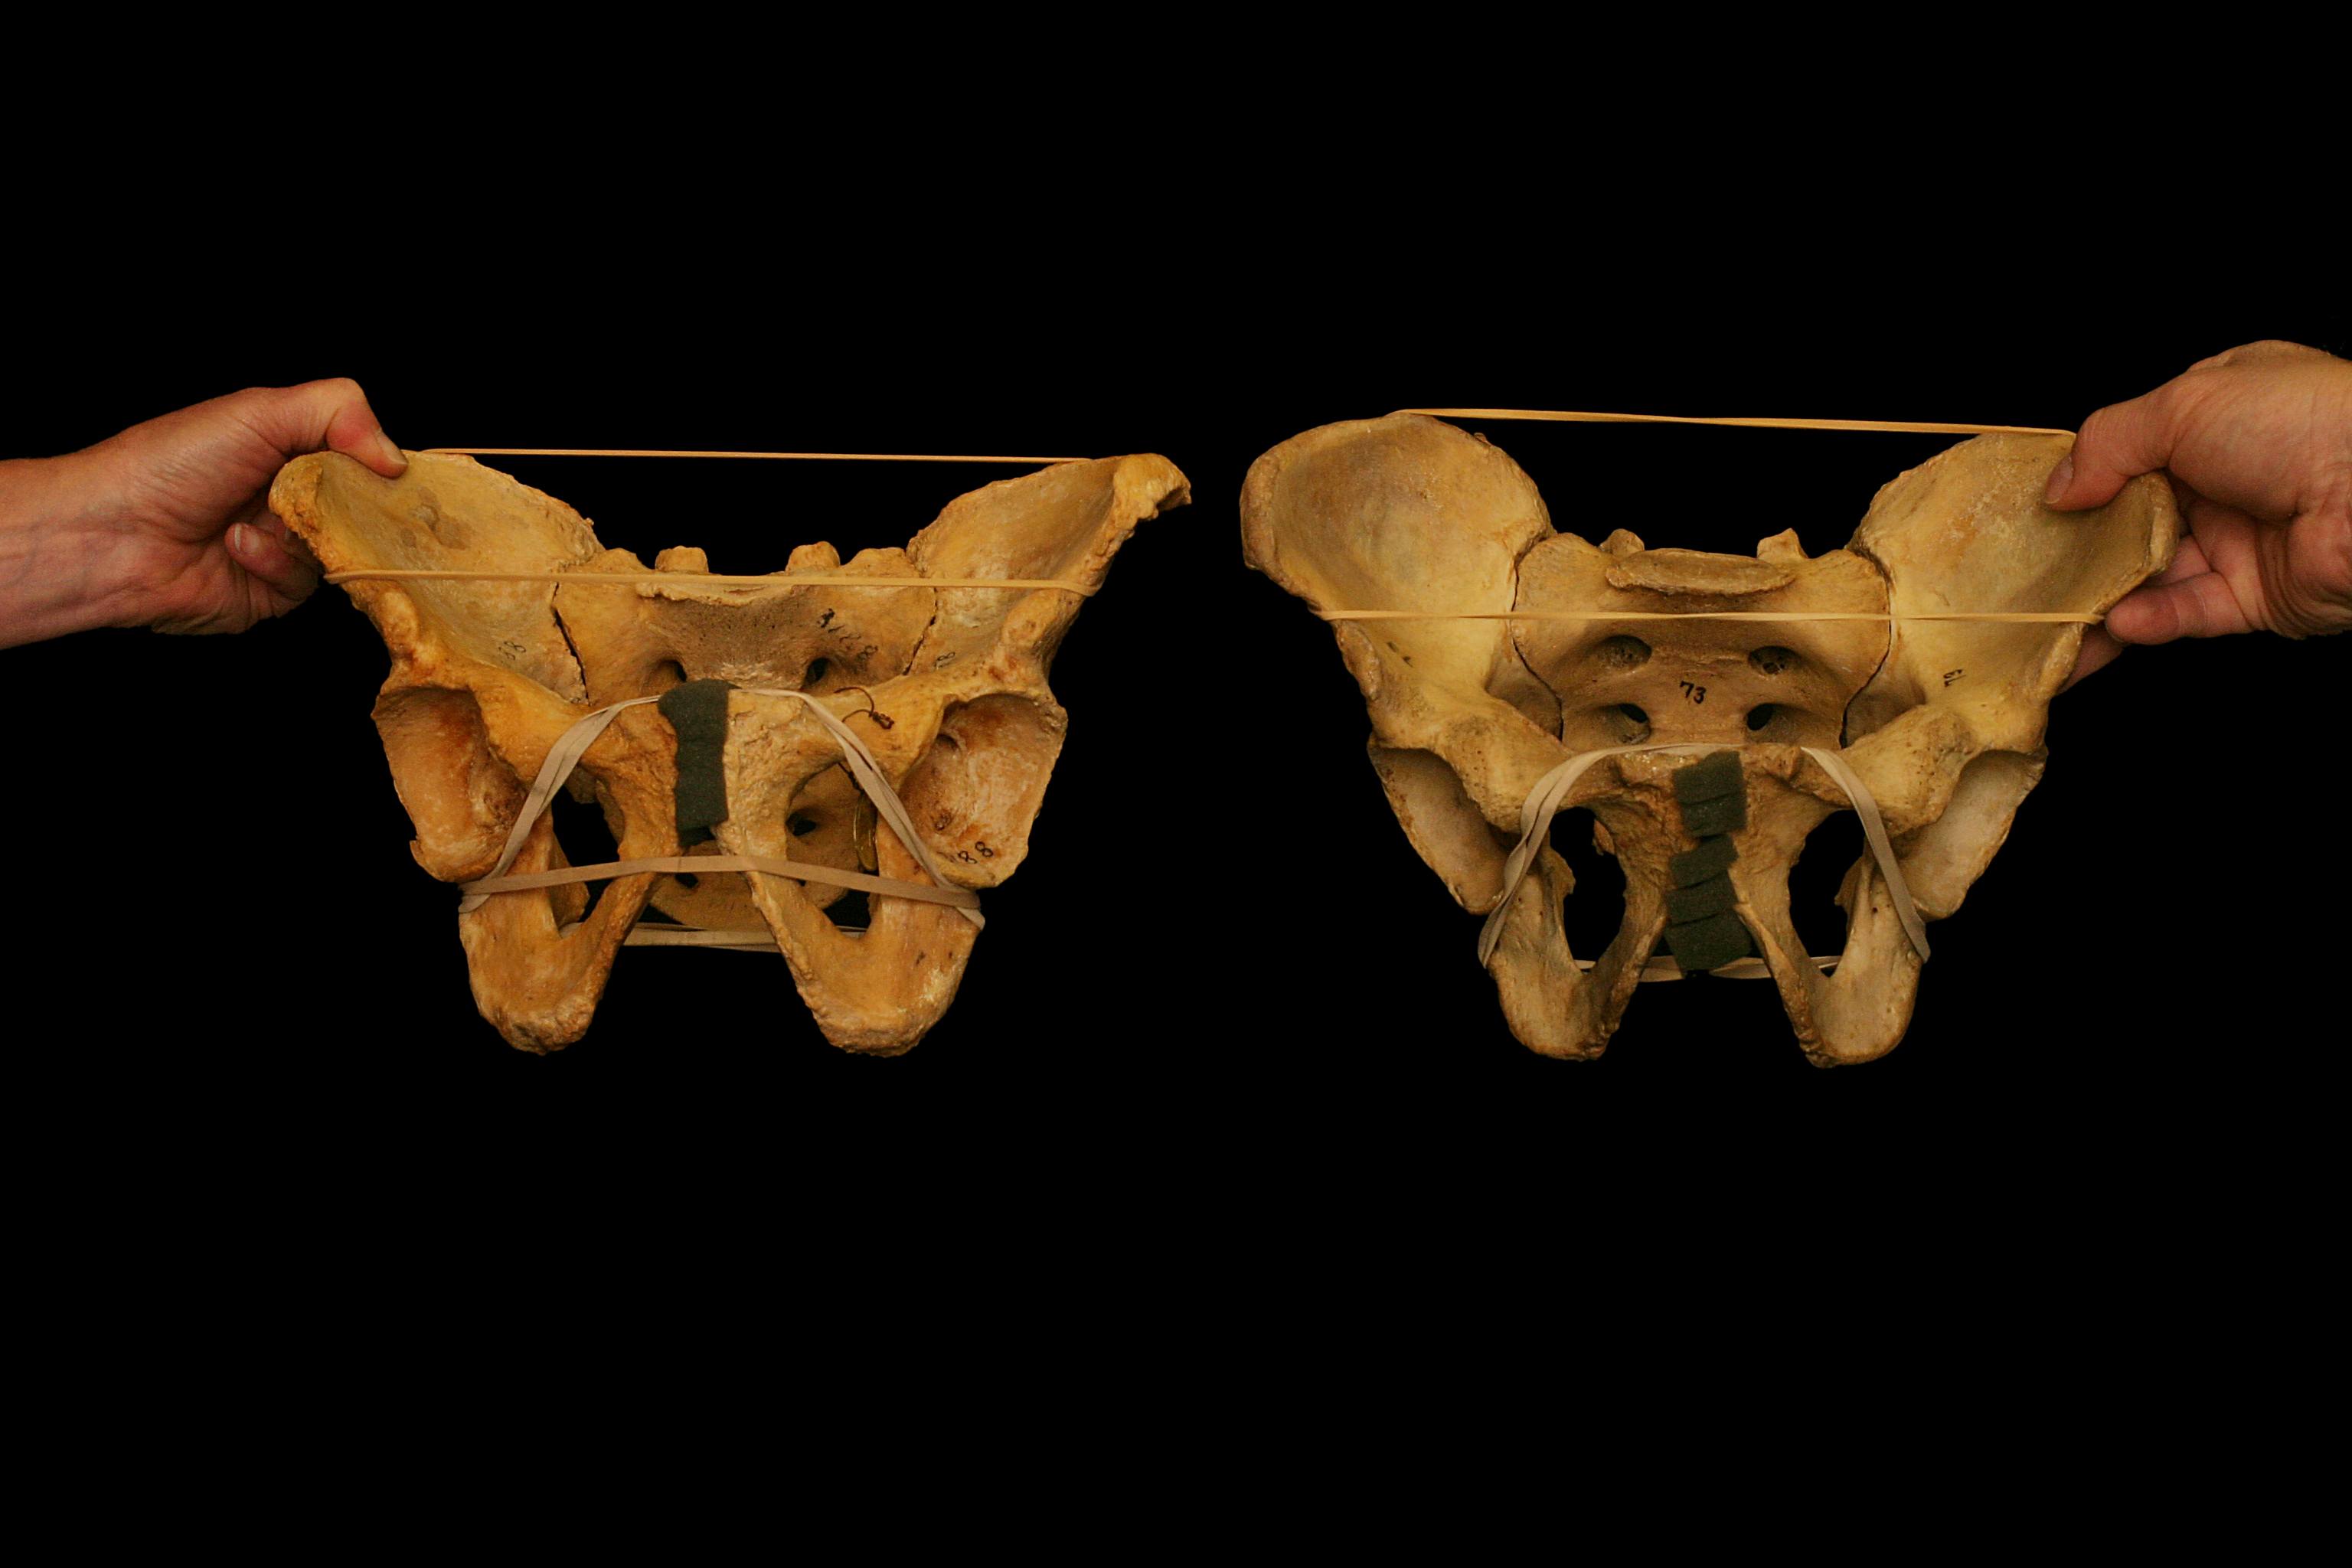
Humans are these incredibly awesome, adaptable, and diverse creatures.
Within our awesomeness, over time we have adapted to have a diverse set of unique features in our anatomy that provides for a wide range of movement from person to person. This is something that we did not readily acknowledge for a long time and tried to fit people into square holes.
The squat is a perfect example of this topic.
For such a long time it has been advocated to squat with your toes forward and perfectly hip width apart. The unfortunate thing is that this limits a significant majority of people from being able to squat comfortably – or to an appreciable depth.
While some people may be able to do so with practice and working on range of motion, for a vast majority it is just not realistic due to their bony anatomy.
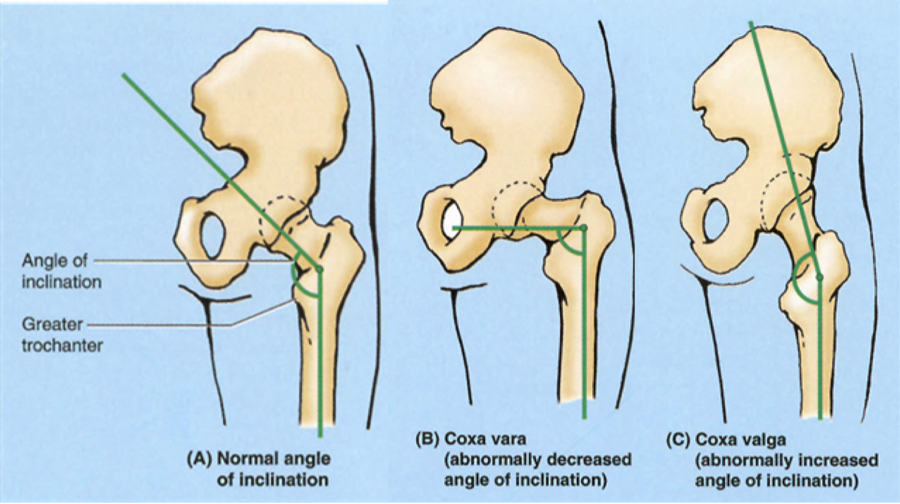
As we examine the ankle, knee, and hip, we can see that there is significant variation within the bones forming them and the resulting joints.
For example, at the hip we have an acetabulum that can vary in depth of which will impact how much motion a set sized femoral head can have. This will impact the capacity of motion for hip range between individuals, leading to diverse squat stances already. When we begin to layer on the other ways our anatomy differs, it compounds and leads to a breadth of variations in how people may squat.
How Should I Squat Then?
There isn’t a set stance that will accommodate everyone – some people will do well with a hip width stance and slight toe out, others may do better with a narrower stance and feet directly forward. Finding what works best for you can be a challenge at first and require some experimentation.
To help expedite the process, try out these four methods:
1) Find Your Squat Stance – Standing
2) Find Your Squat Stance – Supported
3) Find Your Squat Stance – Seated
4) Find Your Squat Stance – Kneeling
The goal with each is to start with feet together and progress foot/knee width. You will find that one width generally feels better than the others, that’s the one to stick with for now. Then you can start playing around with foot/knee angle and continue experimenting.
This will get you a great head start on your squat stance and making it unique to you.
Two additional details – you may find your stance more comfortable with your feet not symmetrical and you may find that your stance changes with time. These things are normal for many people.
Did I Just Blow Your Mind?
This is just the tip of the iceberg in terms of stuff I cover in my presentation “All Things Squats, Knees, and Hips” in the Complete Trainers’ Toolbox, an online resource that became available this week that also features presentations from eight other industry professionals – including Tony Gentilcore, Dean Somerset, Dr. Lisa Lewis, Alex Kraszewski, Kellie Davis, Meghan Callaway, Dr. Sarah Duvall, and Luke Worthington..
It includes 17 total hours of content covering a wide range of topics every health/fitness professional is bound to relate with. It’s on sale this week at a significant discount, but only until Sunday, February 17th at midnight.
What follows is what works for ME and MY clients. This shouldn’t be taken as a personal attack against YOU, your favorite coach, or any methodology that’s seemingly at odds with my point of view.
By all accounts you’re still a decent human being, even if you happen to disagree with what I’m about to say.3
Here goes.
I prefer people to squat down rather than back.
I want the squat to look like a squat.
I Can Hear the Cacophony of Moans Now
But, “moment arms!“
And, “hip extension torque!“
“Biomechanics, Tony. WHAT ABOUT THE FUCKING BIOMECHANICS!?!U?!!!AHHHHH!??!JUMPSOFFCLIFF“
Relax: In no way, shape, or fashion am I discounting any those things, nor turning a blind eye to science or evidence-based approaches and modalities.
I’m on your side my fellow anthropometrical nerds.
What I AM discounting, however – but not necessarily turning a blind eye towards (maybe tossing some shade?) – is the fact that, while all those things mentioned above – moment arm lengths, hip extension torque, biomechanics – can be used to make a solid case for squatting the most amount of weight possible, as coaches we often forget two things:
1) Many people could give two shits about squatting the most amount of weight possible.
2) Most people aren’t powerlifters.
Don’t get me wrong: I am all for people training with intent, striving to get strong(er), and pushing some appreciable iron. The tagline for this site is “Because Heavy Things Won’t Lift Themselves” for crying out loud.
That said, I’m also very much interested in the long-game. I want to keep my clients/athletes healthy and set them up for the most long-term training success possible.
One such way I accomplish this is how I prefer to coach the squat. Again, what follows is what works for me and what I feel fits the needs/goals of the bulk of MY clients and athletes.
If you disagree you’re wrong hopefully we can hug it out if we ever meet in person.
Squat Down, Not Back
The video above demonstrates me initiating the squat by pushing my hips back, but specifically getting a lot of motion via the lumbar spine.4
This won’t bode well for most lifters.
Is it wrong?
Well, no.
Plenty of lifters do this and move a lot of weight. However, what often works for powerlifters, wearing squat suits, won’t be the best fit for “natural” non-powerlifters, not wearing squat suits.
Plus I’m pretty sure a a piece of my soul dies every time I see it.
Instead, I prefer this approach:
Take in your air at the top, create a flexion moment (clamp down abs to prevent excessive lumbar movement), and squat DOWN by breaking with knees and hips simultaneously.
For most lifters, most of the time, this will be the better long-time fit in terms of being able to 1) not only squat a decent amount of weight, but also 2) make it less likely your lower back will hate you.5
I’m currently in the throes of jet-lag sucktitude.
I’ll be back on my writing content horse next week, but I’ve got a treat for you today. TG.com regular contributor, Dr. Nicholas Licameli, is subbing in for me today and he went to TOWN in today’s guest post.
This is one of the most thorough articles I’ve read in a while on the topic with a metric shit ton6 of information with many additional links to help you nerd out a bit more if you so choose.
The squat is a topic that has gotten a great deal of attention among many fitness and medical professionals since mankind first started lifting heavy things against gravity. Since then, much of the conversation has changed (with the advent of civilizations, roads, running water, Instagram.
However much has stayed the same.
I understand this isn’t the first article written about the squat.
Some of the greatest minds in fitness and strength and conditioning have written on the topic, and I encourage you to dive into the multitude of references that I’ve provided.
My goals for this article are to help make your squat look and feel better, improve performance and effectiveness, un-complicate the complicated, and give you the confidence to perform this foundational movement without fear.
Unfortunately, there are those that say to avoid squatting.
As a physical therapist, I have to apologize because much of that flawed thinking stems from misinformed and unqualified professionals in the medical field that are pleasantly ignorant to current practices.
The squat and hip hinge are foundational to basically all movements in and out of the gym.
Whether you’re hitting a PR on the platform or sitting down on the toilet, you are squatting and you better be using proper technique. I’ve treated injuries as a result of poor squatting in both of those previously mentioned instances. Why avoid the squat in the gym if we’re going to do it constantly throughout our day anyway?
I say train it rather than avoid it.
Why not be prepared and do it right?
The squat and hip hinge require total control of the deep abdominals as well as the hips, pelvis, and entire spinal column. We can all agree that teaching proper abdominal bracing, pelvic positioning, and proper lifting mechanics are of utmost importance for the treatment of musculoskeletal injuries including knee, hip, and low back pain. For some reason however, we don’t all agree that squatting is necessary.
Newsflash…when done correctly, THEY’RE THE SAME THING!
As both a doctor of physical therapy and professional natural bodybuilder, it should come as no surprise that in my opinion, people of all ages and from all walks of life should be squatting. This includes the young athlete just starting his/her training career, those recovering from injury, those trying to prevent injury, and even (and especially) the elderly.
No matter if you are an athlete or a great grandparent, we are all essentially “squatting” multiple times throughout our day, so why not train it, strengthen it, and perfect it?
You can release this muscle or stretch that muscle but if patients and clients don’t know how to squat and hip hinge, we are spinning our wheels and wasting valuable time.
How to Squat
While this isn’t a step by step “how to squat” article, here is a quick and dirty rundown of some things to keep in mind.
There is a plethora of information out there about thoracic spines, knees, ankles, spinal positioning, foot placement, etc., and sometimes it can complicate things, make people fearful, and mystify the movement.
Basically, a proper squat and hip hinge starts (obviously) at the hips with the spine in a neutral position (more on this later). After a breath in, tension should be kept throughout the body and throughout the movement. The entire spine, including the neck, mid back, and lower back, should be kept in a relatively stable and neutral position. The feet should remain actively planted on the floor with the weight evenly distributed.
More on all of this to come.
In the beginning of my lifting career, I struggled with finding the “groove” of the squat. This is partially due to improper mental cueing during the movement. Some of my mental cues during the squat were:
“Arch the back hard to avoid spinal flexion.”
“Keep the head and chest up so they remain in line with the horizon.”
“Sit back and push through the heels.”
“Always squat below parallel.”
While there could be worse things, especially considering that, like most beginners, my sources of information were muscle magazines and of course the biggest guy(s) at the gym, I think these cues can be quite misleading and detrimental to squat technique.
Here’s why.
“Arch the Back Hard to Avoid Spinal Flexion.”
Avoid a hard arch in the lower back.
Don’t let the lower back round of course, but rather maintain the natural arch of the lumbar spine.
Hard lumbar extension will crunch down on the delicate structures of the spine, put the glutes in a less than optimal position to stabilize the pelvis, and place the hip in slight flexion before the movement even starts.
Starting in hip flexion will cause the femur to run out of room in the acetabulum for hip flexion when you want it most…at the bottom range of the squat. This could result in femoral acetabular impingement (FAI) and labrum pathology.
Get out of that hard arch and find your neutral.
“Keep the Head and Chest Up So They Remain in Line With the Horizon.”
Keeping the head and chest up isn’t necessarily a bad thing, however if we achieve that position by hyperextending our backs and flaring our ribs forward, it becomes problematic and essentially unstable.
Cueing a slight posterior pelvic tilt prior to un-racking the weight and maintaining that position throughout should do the trick. This will place the spine and ribcage in more of a neutral position.
We maintain the position by taking a breath, contracting the upper back, lats, mid section (as if putting on a tight belt or walking into cold water up to your navel), pelvic floor (as if holding in gas or urine), and even the feet (more on this to come).
Check out my explanation of what it means to “contract your core” right here. Tony does an awesome job of explaining this here, as does John Rusin here. Quinn Henoch and Ryan Brown also hit the point home here. Eric Cressey nails the upper body and lat set up here.
“Sit Back and Push Through the Heels.”
It’s true that we don’t want to push through our toes and allow our heels to rise off the floor, however it is also true that we don’t want to shift our weight so far backward that the toes lose contact with the floor and most of the force goes through our heels.
Yes, we want to descend slightly backward, but the focus should really be on descending down between our hips.
When we say we put an adversary on “his/her heels,” we are saying that we put them in a vulnerable position and on the defense, which will likely lead to a step backward. Why would we want to put ourselves on our own heels while squatting?
A better cue is to have an “active foot,” evenly maintaining 3 points of contact with the floor: base of big toe, base of little toe, and heel. Tony explains this really well here. This foot position will help stabilize the hips and knees, as well.
Mastering the “active foot” takes practice, but once you feel it, there’s no going back.
For everything you (and your children and their children’s children) will ever need to know about squatting, check out this bad boy by Greg Nuckols.
Find Your Squat
Hey fellow millennials!
Remember what our mothers taught us…we are all special, we are all unique, everyone is a winner, Mufasa died of natural causes, and most importantly, we are all different!
When it comes to the squat, this last point is key.
We are all structured differently, which is why there is no particular squat that is perfect for everyone. Things like foot position, stance width, and squat depth will all be impacted by things like the size of our torsos, length of our femurs, and the structure of our hips and pelvis. We need to find the squat variation that best “speaks” to us.
The classic example of this is hip flexion range of motion and lumbar compensatory spinal flexion.
Much has been written about this topic, and to avoid making this more like a Harry Potter book rather than a guest post, I’m going to refer you to some excellent articles down below.
Keep in mind that a range of motion measurement taken while lying on a treatment table DOES NOT always necessarily correlate to what we observe during an actual movement pattern like a squat and vice versa.
That being said, a 2008 study (stolen by me from afantastic articleby Bret Contreras) showed a 60 degree difference in hip flexion range of motion between the least flexible (80 degrees) and most flexible (140 degrees) subjects out of a total of 200 hips.
That’s quite a large difference, considering exercises like a deep squat require about 120 degrees of hip flexion. Differences in femoral anteversion/retroversion (how much the head of the femur faces forward or backward), acetabular anteversion/retroversion (how much the the hip socket faces forward or backward), and inclination angle of the femoral neck (angle of the neck and shaft) are seen from individual to individual as well as from hip to hip within the same person.
These genetic structural differences all change an individual’s ability to squat.
Thanks Mom and Dad…
Pushing past end range hip flexion in the descent of a squat for the sake of going deep will cause compensations up and down the chain, particularly flexion of the lumbar spine, AKA the dreaded “butt wink” (cue the tire screech and screams).
While some amount of lumbar flexion and “butt wink” is acceptable (we’ll get to that in a minute), too much, too often, in an uncontrolled manner, can be problematic.
So you can see why being married to a certain squat variation can be inappropriate.
If you are an individual that is unable to squat deeply but force yourself to perform deep barbell squats because your lifting partner says so, you’re setting yourself up for injury and a faulty and uncomfortable squat.
When it comes to varying your squat type, be sure to know your goal.
Why are you squatting?
To improve overall strength?
Hypertrophy?
To get a stronger squat?
To impress a member of the opposite sex (spoiler alert, they don’t care)?
To be able to pick up your child without pain?
There are many variations of the squat.
The conventional barbell back squat is just one option and unless you are training for a powerlifting meet, where you will be required to perform the conventional barbell back squat, there is no reason to lock yourself into only one type of squat.
Why not try a goblet squat? Or a sumo squat? Or a front squat? Why not use dumbbells or kettlebells instead of a barbell? If structured correctly, any variation of the squat will improve strength and hypertrophy as well as train the hip hinge and proper bending/lifting mechanics.
What’s the take home? We are all structurally different and it is important to find the squat pattern that works best of us.
Here are some great resources that will help you find the squat pattern that works best for you and your anatomy:
Note From TG: Nicholas is kind to include me amongst such elite company (Note to Self: you owe Nick 1000 Predator handshakes), but mine is easily the least pithy of the bunch.
Neutral Spine…Does It Exist?
Yes and no.
Research has shown that lumbar flexion, particularly at the bottom of a squat (the previously mentioned butt wink), is quite natural in a squatting pattern, particularly at the point in the movement where the hips start to run out of space for further flexion.
I agree with Quinn Henoch that neutral spine is more of a range rather than a set position, so don’t lose sleep over a little spinal flexion.
How much excursion is too much?
You knew the answer before you asked it.
It depends!
That being said, you definitely want to avoid movement at the spine and pelvis as much as possible. A moving base causes leaked energy and therefore less stability and built up tension. This means less force produced, less strength, and less Instagram pictures with a bumper-plate loaded bar on your back.
Don’t Stop Squatting Because You Have Pain Or Feel Restricted
If you experience pain during a squat, SEE A QUALIFIED HEALTHCARE PRACTITIONER.
You want someone that will question the type of squat that hurts, ask when in the range of motion the pain occurs, analyze your squat pattern, ask about weekly volume and load, inquire about recovery and sleep, and do everything in his/her power to keep you squatting.
There are always ways to modify the squat in order to keep training this key movement pattern while training with an injury.
Sharp pain at the bottom of a squat?
Try using a more neutral spine with slight flexion using a goblet squat to free up some space in that acetabulum.
No good?
Try adding a band around the knees during a few warm up sets.
Still no good?
Add a box to squat to at a level just above where the pain is felt.
The point is, you deserve better than a rushed, “Stop squatting for 4 weeks, take these anti-inflammatories, and see me in a month.
Oh, and if that doesn’t work, try foam rolling, cupping, turmeric, an oxygen deprivation mask, and VooDoo floss bands in a bath of apple cider vinegar and creatine.”
Fixing the symptoms with things like medication and surgery without considering the cause is an all too common theme.
These things have their place, of course, however they must be used appropriately. For example, surgery to repair a labrum that was damaged after repetitive impingement due to faulty lumbo-pelvic mechanics would be like fixing ceiling tiles in your living room instead of fixing the leaky roof.
After the surgery, if the individual returns to squatting with the same mechanics that got him/her under the knife in the first place, what good has been accomplished? Doesn’t make sense to repair, install, and paint shiny new ceiling tiles without fixing the roof first. Check out a video I made on this a while back right here.
So What Can We Do To Improve How The Squat Looks And Feels?
This is a tough question, because, as you probably guessed, everyone is different and it depends.
I recommend seeking out a qualified healthcare practitioner that will assess, reassess, and give you the tools to improve your individual squat.
Gone are the days of performing long, drawn out warm ups in the name of injury prevention, mobility, and movement optimization. A warm up should increase your heart rate and mentally and physically prepare you for the specific movements of the day.
The warm up should be active, specific and purposeful, not a cookie cutter series of activities like flailing around on the dirty gym floor or jamming a lacrosse ball into your sciatic nerve in hopes to break up adhesions in your piriformis.
Things like static stretching and foam rolling are passive activities.
In contrast, light cardio, dynamic stretching, loaded eccentrics, and actually getting under the bar and grooving the squat movement with sub-max loads are all active.
Passive activities like foam rolling do have their place, but they should be used appropriately. The benefits of foam rolling are short-lived, so if you’re going to foam roll, I’ve found it best to do it in between warm up sets. Of course, the specific muscles you target will be individual to you, your body, and your squat. For more on this, check out my article and videoas well as this fantastic episode of Mobility Mythsby Quinn Henoch.
Don’t feel obligated to use cardio as the only way to increase heart rate.
A dynamic series/circuit of exercises, combined with specific mobility work using active techniques such as loaded eccentricsand reciprocal inhibition (here and here), followed by some squatting with bodyweight or just the bar, will increase your heart rate just fine, not to mention both physically and mentally prime your system.
You get more bang for your buck.
For more on a proper warm up, including explanations of how to put it all together, check out my current lower body warm up right here as well as a great hip mobility exercisenot in included in my warm up video.
Also, Quinn Henoch (<— can you tell I have a little man-crush on him?) nails it in this episode of Mobility Myths about stretching.
And That’s That
I hope this helps in your journey to finding and perfecting your individual squat.
Remember, there is nothing to fear about the squat and there is no need to overcomplicate this foundational movement. Don’t forget to take advantage of all the resources provided in this article, as they are from some of the greatest minds this field has ever seen. Happy squatting!
Oh, and one more thing…knees drifting over toes is OK.
About the Author
Nicholas M. Licameli
Doctor of Physical Therapy / Pro Natural Bodybuilder
Every single thing he does, Nick believes in giving himself to others in an attempt to make the world a happier, healthier, and more loving place.
He wants to give people the power to change their lives. Bodybuilding and physical therapy serve as ways to carry out that cause. Nick graduated summa cum laude from Ramapo College of New Jersey with his bachelor’s degree in biology, furthered his education by completing his doctoral degree in physical therapy from Rutgers School of Biomedical and Health Sciences (previously the University of Medicine and Dentistry of New Jersey) at the age of 24, and has earned professional status in natural bodybuilding.
His knowledge of sport and exercise biomechanics, movement quality, and the practical application of research combined with personal experience in bodybuilding and nutrition allows him to help people in truly unique ways. Love. Passion. Respect. Humility. Never an expert. Always a student. Love your journey.
It’s not lost on me there’s an easy Lord of the Rings reference to be had here, and I’m going to try my best to be professional and abstain and….
Fuck it.
One ring………..to bind them.
Okay, with that out of the way, what do I mean when I say “stacked rings?” and how how can that possibly help your squat?
I had to audit myself a few years ago when it came to coaching the squat. After being introduced to the concepts of PRI (Postural Restoration Institute) and listening to other strong dudes like Chad Wesley Smith speak on the topic, I wondered if cueing people to “arch, hard!,” and to” sit back” were the right things to be saying to the bulk of my athletes/clients when they were getting under the bar?
Very few were competitive powerlifters and even fewer were geared lifers. I.e., none wore squat suits when training (which require an aggressive arch and sitting back to reap the benefits).
To be clear: There are still many very strong dudes (and coaches) who advocate squatting with a hard arch, and that’s their prerogative. The thing to appreciate, however, is that what works and is ideal for a geared lifter won’t necessarily (read: rarely) ever translate well to a non-geared lifter.
If I were to balance the “I want to be brutally strong AND not shit my spine on this next set” teeter-totter, I’d opt for not arching (aggressively).
Like this.
The ribs & diaphragm are pointing in one direction (up) and the hips & pelvic floor are pointing in another (down).
Put simply, this is all sorts of fuckeduppery not a stable position.
We’re placing a ton of shear load on the spine.
What’s more, this will invariably force the lifter to initiate the movement by sitting back (rather than down, you know, like a squat). As a result, often, the chest will fall forward, and the cue we default towads is “arch, arch, arch, chest up, chest up, chest up, you crap you’re going to fall on your face, too late.”
This only feeds instability.
A better approach, I believe (again, for non-geared lifters) is to tone down the arch and adopt what’s been referred to as the “canister” position or to “stack the rings.”
Giving credit where it’s due, the first person I ever heard use this phrase was Dr. Evan Osar. A simple analogy he used was to think of your pelvis as one ring and your rib cage as a bunch of other rings.
We want all those rings to be stacked.
This will nudge us into a more stable, joint-friendly environment
Now, a minor glitch in this way of thinking is that some people think this infers going into posterior pelvic tilt, where we flatten out the lumbar spine.
This is not what’s happening. As you can see in the picture above, my hips are still behind the bar (still very important) but there’s less of an aggressive arch. Telling people to posteriorly tilt their pelvis towards spine neutral is different than telling them to flatten out their spine.
From there it’s a matter of owning the canister position and to squat down rather than back.
Maybe this quick 3-minute video will help:
Want More Tips Like This?
Yeah, I thought so.
My friends Dr. Sarah Duvall, Kellie Hart, and Meghan Callaway released a stellar product this week – Glutes, Core, and Pelvic Floor Online System – and it hammers home points like the one above. It’s often necessary to break down movement(s) into their respective parts to make certain we’re getting motion from the right areas and that we’re using/engaging the areas we want to use/engage to perform exercises well.
GCPF is a 12-week online course that will teach you how to assess movement and how to implement the correct drills and exercises to help you (or your clients) get stronger and to move better.
TODAY (6/29) is the last day to get it at it’s FULL sale price. You can still get it at a discount until Monday (7/2), however today is your last chance to get it at $200 OFF.
It’s a great resource and one I feel will help a lot of people.
I’m not someone who feels everyone needs to squat with a barbell on his or her’s back. I kinda lose a lot of respect for those coaches who have a knack for putting their ego and bravado a head of individual variances in anatomy, ability/skill level, injury history, not to mention goals.
Call me old-fashioned but I’d rather STFU and listen to my client/athlete’s preferences and what feels best to them (and what will breed immediate success) than to force my ideologies and way of doing things into their mix….and then expect they’re going to apply to every…single…individual I work with.
That being said I’m still very much a fan of squatting. And yes, a fair portion of my clientele do back squat.
However, a fair portion do not.
And that’s cool.
The world will continue to spin.
There are numerous ways I can have people squat that will take into account the premise of minimal load/maximal training effect. For long-term, consistent progress the idea is to load people juuuuust enough that they nudge the body to adapt, but also take into account it’s ability to recover.
NOTE: Just so the internet doesn’t have a conniption or shit a copy Supertraining, I want to reiterate that I do like traditional barbell squatting (back and front squat) as well as any speciality bar variation that suits your fancy – SSB squat, GCB squat Duffalo bar squat – and feel all should be considered the first “tier” if the goal is to add mass or get stronger.
That said, we don’t always have to crush people. And, to be honest, the more “joint-sparring” modalities I can incorporate or pepper in the better.
Offset Shouldering Squat
Who Did I Steal It From? – Aw, snap. I can’t recall. One of my female clients showed this variation to me off of someone’s Instagram account that she follows.
It wasn’t God. It wasn’t John Cena.
Man, I can’t remember.
Sorry whoever I “stole” this from.
What Does It Do? – This variation is a close cousin to the traditional Landmine Goblet Squat – where the barbell is held at chest height right against the sternum. What’s makes that such a nice iteration is that the bar path is somewhat (not completely) fixed which makes the movement easier to control and groove.
In addition, the Landmine Goblet Squat helps reinforce the “chest up” cue and more or less organically teaches people to sit “into” a proper squat position.
By moving the barbell to one shoulder or the other – in an offset position – we now add a significant rotary stability component to the movement.
In other words: your core stability will be like “whaaaaaaaat?”
Key Coaching Cues: You don’t have to use one, but I like to place a squat or hip thrust pad on the end of the barbell so that it can rest on the shoulder without any major discomfort. The idea is to let the barbell rest in place – don’t actively hold it there.
And then, you know, squat.
Like I said, the advantage of using the Landmine is that the bar path is pretty much set. There isn’t much thinking involved and the squat will come instinctively to most.
I’ve been having my clients perform 5-6 repetitions PER SIDE trying to emphasize being explosive with each one. I’ll also add these would probably be best served as a nice accessory squat movement to the traditional back or front squat.
I remember the first time I saw Eminem perform. I was at my apartment in between classes watching a little TRL on MTV. It was spring break, 1999. I was in my living room. Many of my friends were somewhere else, not in my living room, galavanting around on some beach in Cancun soaking up some rays and debauchery.
Customary during Spring Break week MTV was also in Cancun, and hoping to catch a glimpse of my friends – and Britney – I tuned in.
“Hi, my name is, what? My name is, who? My name is, chka-chka Slim Shady.“
Mouth agape with a spoon full of Fruity Pebbles I was like, “what in the what is this?”
Eminem something er other now? Trying to impregnate Spice Girls?
“Pfffft, whatever,” I thought. “He won’t last.”
Ten #1 albums, 45+ million records sold, and one not so sucky movie – 8 Mile – to his credit, I guess you could say I was an idiot.
Eminem didn’t do so shabby for himself.
And while I could sit here and reminisce over you7other past pop-culture snafus I made….
Chicks will always dig stone washed jeans.
Robert Downey Jr will never make it as Iron Man.
ABC’s What About Brian? (2006) will become the next Grey’s Anatomy or Lost. It’ll be a sure fire hit.8
…lets not bask too much in my ineptitude.
I mean, Adele?
She’s okay. I guess.
Speaking candidly, my “misses” can extend to the coaching side of the spectrum as well. I can think of a few things I used to think or say back in the day that, upon reflection, were pretty idiotic.
What are some examples you ask?
Good question.
1. Telling People to Arch…HARD.
Like many people interested in lifting heavy things I used to read – and still do – anything and everything by the likes of Dave Tate, Jim Wendler, and Louie Simmons.
All three are strong mofos and have, arguably, put out some of the best training advice on getting strong within the past few decades.
I mean, are you going to argue with this guy?
Or this guy?
Or him?
Uhhhh, no.
They’ve all contributed to the greater good of the industry and many of us owe our PRs to any number of articles or resources they’ve produced throughout the years.
That being said, I had to audit myself a few years ago when it came to coaching the squat. After being introduced to the concepts of PRI (Postural Restoration Institute) and listening to other strong dudes like Chad Wesley Smith speak on the topic, I wondered if cueing people to “arch, hard!,” and to” sit back” were the right things to be saying to the bulk of my athletes/clients when they were getting under the bar?
Very few were competitive powerlifters and even fewer were geared lifers. I.e., none wore squat suits when training (which require an aggressive arch and sitting back to reap the benefits).
To be clear: There are still many very strong dudes (and coaches) who advocate squatting with a hard arch, and that’s their prerogative. The thing to appreciate, however, is that what works and is ideal for a geared lifter won’t necessarily (read: rarely) ever translate well to a non-geared lifter.
If I were to balance the “I want to be brutally strong AND not shit my spine on this next set” teeter-totter, I’d opt for not arching (aggressively).
The ribs & diaphragm are pointing in one direction (up) and the hips & pelvic floor are pointing in another (down).
Put simply, this is all sorts of fuckeduppery not a stable position.
We’re placing a ton of shear load on the spine.
What’s more, this will invariably force the lifter to initiate the movement by sitting back (rather than down. You know, a squat). As a result, often, the chest will fall forward, and the cue we default to is “arch, arch, arch, chest up, chest up, chest up.”
This only feeds instability.
A better, I believe, approach (again, for non-geared lifters) is to tone down the arch and adopt what’s been referred to as the “canister” position.
Giving credit where it’s due, the first person I ever heard use this phrase was Dr. Evan Osar. A simple analogy he used was to think of your pelvis as one ring and your rib cage as a bunch of other rings.
We want all those rings to be stacked.
This will nudge us into a more stable, joint-friendly environment
Now, a minor glitch in this way of thinking is that some people think this infers going into posterior pelvic tilt, where we flatten out the lumbar spine.
This is not what’s happening. As you can see in the picture above, my hips are still behind the bar (still very important) but there’s less of an aggressive arch. Telling people to posteriorly tilt their pelvis towards spine neutral is different than telling them to flatten out their spine.
From there it’s a matter of owning the canister position and to squat down rather than back.
2. Knees Forward Instead of Knees Out
The “push your knees out” cue is something I’ve slide-stepped away from within the past year.
To defend my position I’ll need to piggy back off my comment above – the squat, for most trainees, is more about “sitting down” than it is “sitting back.”
I want the squat to look like a squat.
This means there will be forward translation of the tibia over the toes (but not so far that the heels come off the ground) and that there is equal parts knees coming forward and hips going back.
The net result = down.
My good friend, smart-as-balls physical therapist, and owner of Resilient Performance Physical Therapy (in NYC), Dr. Doug Kechijian, stated it best in a Tweet recently:
Cueing knees forward first then sit down in a loaded squat minimizes the need for the knees out “correction”. Vertical tibia days are #’d.
That’s right: it’s okay, nay, better?, for the knees to travel forward.
Cueing someone to break with their knees almost always negates the need to remind them to push their knees out.
They’ll do it automatically:
I’m all for using less coaching to clean up someone’s technique. The last thing most of your clients need is you barking a plethora of cues at them: “chest up, knees out, eyes forward, chin tucked, what’s the square root of 47?”
Play around with knees breaking first and then sitting down. My suspicions are that things will feel cleaner, more powerful, and the squat will feel like a squat.
Huh, weird.
ADDENDUM: NONE of this is to say I’m right. These are nothing more than cues and approaches that have worked for me in recents months/years with my clients and athletes. You may think I’m batshit crazy, and that’s cool.
I mean, to reiterate, I’ve been wrong on many things prior.
Amazon.com? Such a stupid idea.
I hope you’ll consider these suggestions however, and play around with them yourself. I think you’ll be surprised.
At the expense of sounding like an uber meathead, squats pretty much solve anything. You want to be stronger? Squat. You want more muscle? Squat. You want to lose fat? Squat. You want to beat Captain America in an arm-wrestling match? Squat.
About the only thing squats can’t do is help you grow hair, make you an omelet, and cure cancer9.
There’s a reason squats are a staple in most weight training routines, and today’s guest post by strength coach, George Kalantzis, breaks down the proper progressions most people should consider when starting for the first time.
Enjoy.
The Squatzzzz
“If you want bigger arms- squat. Squatting makes everything grow.”
Sergio Olivia, 3 time Mr. Olympia, on offering advice on how to get bigger.
Squatting has been around for centuries. It is one of the primary movements that Dan John says can impact your life, and also one of the best movements for mass strength and muscle development. Yet unfortunately squats are still one of the most neglected and butchered exercises in the gym.
But Why?
Squats are tough and working hard separates the strong from the weak. Squatting heavy stresses the entire body and it takes a lot of will power and strength to put something heavy on your back, drop down, and stand back up. Therefore most people neglect them altogether.
Then you have some people who claim squats are bad for your knees and stick to leg extensions and leg presses. While it is true that squats can place a lot of stress on the knees, it is typically the form and amount of volume that is the cause of knee pain.
In fact, from a exercise science point of view leg extensions can actually place more stress on the knees than squats because they are an open chained exercises. Open chained exercises like leg extensions cause the quadriceps to contract and pull on the knee ligaments and surrounding muscles without counteraction of the hamstrings. Squats actually recruit both the hamstrings and quadriceps.
Research (Escamilla, 98) supports that squats generate twice as much hamstring activity as leg presses and leg extensions. That same research suggests hamstring recruitment is advantageous to enhancing knee stability and functional capacity of the hips. Squatting does not sound that bad now does it?
Ok, I’m Ready Where Do I Start?
It is always important to start with an assessment to figure out where the you will stand in reference to squatting. Tony wrote an in depth post on that HERE.
Mobility Drills
After establishing a baseline, it is time to begin start preparing the body to squat. Starting with some light soft tissue work and warm-up drills will help prepare the body for full ranges of motion needed to squat and prime the nervous system.
Most people have a hard time reaching full depth in a squat and I have found that it is usually a lack of mobility in the areas of the hips and ankles often leads to compensations in the squat..
Core Engaged Deadbug
A deep squat requires proper pelvic position. If you arch your back to hard during a squat , your femur will have a hard time moving around in the hip socket. This is often the cause of the butt-wink.
A core engaged deadbug will help you learn how to keep the ribs down and control the pelvis which are needed for a good squat pattern.
Wall Hip Flexor Mobilization
This drill really teaches you how to keep your glutes tight, extend the hip and flex the knee at the same time to get a deep stretch in the quads. You should focus on getting the range of motion through your hips and not lower back.
Kneeling Glute Mobs
I love this mobilization drill because it really looses up the posterior chain and allows you to safely work on hip internal rotation without cranking on the knee.
Ankle Mobilizations Drill
An often-overlooked area of squatting tends to be the ankles. In order to squat to full depth the ankle needs around 4 inches of dorsiflexion. If the ankle is lacking the appropriate mobility, you may see yourself coming up n your toes, or not hitting appropriate depth.
Squat To Stand With Reach
By the time you have complete the other drills your body should be primed to squat. The squat to stand synchs the entire body and recruits all the muscles needed to perform a good squat. If you have a hard time getting into this position, you may no the ready to squat to full depth.
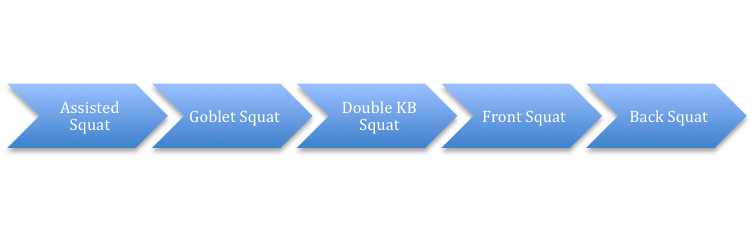
Assisted Squat
Assuming no pain or restrictions are present a great place to start is an assisted version of the squat. There are many ways you can do an assisted squat, but I like using a suspension trainer for assistance.
Holding a suspension trainer allows the trainee to work on static stability and groove a great pattern. Make sure the trainee maintains a neutral back position and uses as much assistance as needed in order to get to the bottom position.
Bodyweight Squat Versions
Once someone has mastered the assisted squat, it is time to move onto a bodyweight squat. Here you can really learn how to squat to full depth and drive up under control.
Sometimes people will have trouble with their heels coming up of the ground. If that is the case, you can create a little heel lift with plates or shoes to help the body recognize how to sit back onto the heels and reduce coming up off the floor.
Another common error for someone just learning to squat is a knee collapse. A great trick for that is to put a mini band around the knees. The bands feeds into the bad movement pattern by pulling their knees farther in and the body reacts by correcting the movement.
Goblet Squat
For most people, a goblet will be the basis of a squatting program. Legendary coach Dan John says that goblet squat is all a lot of people will need and there is a good reason behind that.
Grab a Kettlebell or dumbbell and hold it close to your chest. With your elbows pointing down, lower your body into a squat. Allow your elbows to be inside your knees and put pressure on the outside of your heels to help keep your knees out. Return to the starting position.
Many people are under the assumption that the Goblet Squat is just this plain ol’ vanilla squat variation that offer no variety. Au contraire! There are any number of ways to make it more challenging.
Goblet Squat Against Wall
Cannot seem to keep your back straight and knees from caving in? Try the goblet squat against the wall. Face a wall with your feet around 6-12 inches away from it and work to actively pull down into the squat.
Start further away and work closer to the wall, as you get more comfortable with the position.
Goblet Squat With Pause
Mastered the regular goblet squat? No problem, try a pause in the bottom of the squat. Pause reps will keep you honest, and really challenge your strength because you cannot rely on the momentum to pop back up from the bottom.
Goblet Squat With Heartbeat
This is one of my favorites to use with people, and it is one version that is not used that much. I first saw it from Mike Robertson when I was learning progressions for group training. It is great for people who have shoulder issues and really challenges the core.
Offset KB Squat
Holding a kettlebell on one side of the body will expose any asymmetries from side to side and really teach the body to own the position. Try to really focus on driving through the entire foot rather then shifting to the side of the kettlebell.
Double KB Front Squat
It only makes sense that once you have mastered the above it is time to load up. The double KB front squat is a great squat version because it really teaches you to sit down rather than back and down.
Essentially what you get is all abs and quads without demanding mobility requirements. It can be very humbling if you have never tried this before.
Front Squat
If you have become comfortable with the KB front squat and are ready for more of a challenge it is time to move on the barbell front squat.
Just like the KB, barbell front squats are all abs and quads. They are great because you have to really sit down into the squat rather than sit back or you’ll loose the bar. Due to the position of the bar your body must learn to stabilize the core instead of using back muscles to stand up. If you constantly get stuck hitting depth on a back squat this is a great exercise for you.
Back Squat
At this point, we have covered a lot of information on squatting. The back squat requires tremendous strength throughout the quads, hamstrings, glutes, hips, abs, and back. There is a reason why most people mess the exercise up or neglect it all together. If you have truly mastered the above exercises then it might be time to try a back squat out.
If you want to learn how to set-up, Tony wrote an awesome post HERE.
Conclusion
Squatting is a lot tougher then it seems. Consider hiring a coach for help on some of the barbell work, and if you are just starting out, goblet squat variations will surely get the job done. Try not to be a hero and start with something that is in between.
Quick things to consider before squatting:
If it hurts, you should hire a coach for an assessment and or see a qualified physical therapist.
Not everyone is made to squat to full depth or made to squat.
Squatting with a bar is not for everyone
When you first start out, you will not need that much weight, typically 45-55 % of your true max. Working on technique and conformability with the different squatting positions should be your first goal before trying more advanced versions.
References
1) Escamilla RF, Fleisig GS, Zheng N, Barrentine SW, Wilk KE, Andrews JR. Biomechanics of the knee during closed kinetic chain and open kinetic chain exercises. Med Sci Sports Exerc. 1998 Apr;30(4):556-69.
About the Author
George began his time at Cressey Sports Performance as an intern in the fall of 2013, and returned in 2014 as CSP’s Group Fitness Coordinator, overseeing all Strength Camp coaching and programming responsibilities.
George is a veteran of the United States Marine Corps and was awarded an honorary discharge after eight years of service. He possesses an MBA from Southern New Hampshire University and is currently attending massage school to become a licensed massage therapist.
Outside of CSP, George maintains a fitness-related blog that can be found at www.sgtkfitness.com.
I often joke I’m the worst handyman in history. Something breaks in our apartment? I’m the first one calling the landlord. A picture needs hanging? My wife is the go to aficionado in that realm.
A task calls for a Phillips screwdriver? Well, I’ll hand you a Phillips screwdriver. I’m not that much of a moron.
Suffice it to say: I am not great at fixing things. As a matter of fact – and at the expense of losing a few points off my man card – the risk of me setting a fire increases exponentially with the arduousness of the task being asked of me.
Replace a knob on a cupboard = relatively safe. The cat may end up with her fur singed, but the building is still standing.
Change oil in the car = Obama may as well hand me the nuclear codes.
Outside of the weight-room I’m a HAZMAT accident waiting to happen. Put me within four walls, however, surrounded by squat racks, deadlift platforms, barbells, kettlebells, selectorized machines, and maybe a movie quality Chewbacca mask for good measure, allow me the opportunity to watch people exercise and gauge movement quality, and I miraculously turn into Gandalf.
Well, I like to think I have a good eye and can catch wonky movement and fix it.
That’s Assuming Something Needs Fixing
I had a very interesting interaction last weekend at CORE. I was contacted by a dude here in Boston who reached out asking if he could stop by the studio to have me look over his squat and to discuss a few ideas that had been reverberating in his head about bar path, acceleration, and power development.
Specifically he noted he was a high-level powerlifter (600+ lb squat at 181) and that he had been tinkering with his technique of late and wanted another set of eyes on him to see if there was something he was missing.
My first thought was “holy fucking shitballs, that’s a sick squat,” and more importantly I felt compelled to tell him “um, just so you know…I’m not a competitive powerlifter and maybe you’d be better off contacting my boys at The Strength House for more detailed badassery?”
“Nah, I respect the way you’re able to analyze movement and feel you take a balanced approach.”
High praise.
What transpired was pretty cool. It was every bit an educational/learning experience for me as it was for him (I think. He left happy).
To Repeat: this guy squats over 600+ at a competing bodyweight of 181 lbs. An advanced lifter indeed. His approach is unconventional to say the least.
Take this little tidbit of our conversation as an example (not taken verbatim, but it’s close):
“So we see guys all the time squatting 225 lbs in the squat rack, often with poor technique, but then are able to walk over to the leg press and perform 800+ lbs for reps. What gives? How is that possible? I thought to myself “there has to be something there.” I train alone in my home gym which allows me all the time in the world to play mad scientist and to tinker with my technique.
Then it dawned on me: why not leg press my squat?”
Of course, in my mind I’m thinking “well the leg press provides a ton more external stability to the body so there’s your answer.” What’s more there’s typically less ROM involved too.
I was intrigued to see this in action nonetheless, anticipating some sort of leg press to squat Transformer to appear.
I ended up witnessing a meticulous set-up, as well as a masterful demonstration of someone who knows what his body is doing at all times. Unconventional without question. But it worked. A few highlights:
His “low bar” position was lower than low bar position. I’m talking mid-arm.
A flexed spine. In deep hip flexion, he’d go into lumbar flexion.12
He used a staggered stance (left side was a bit behind the right).
For all intents and purposes, many coaches would look at squat like that and start hyperventilating into a paper bag and immediately go into “I gotta fix this” mode.
Guess what I didn’t fix?
My point: everyone is different. No one has to squat the same way. And he’s an a-hole for being a freak…..;o)
Besides, he squats 600+ freaking lbs. He’s obviously trained himself enough to be able to get into (and out of) precarious situations; and he’s never been hurt or in pain.
It was the last point, though, the staggered stance, that he had never noticed or considered.
I don’t fall into the camp that says everyone must squat with a symmetrical stance. This defeats the purpose of individuality and respecting each person’s anatomy. When you factor in varying hip anatomy (varying degrees of APT/PPT, how this affects the ability to both flex and extend the hip, anteverted/retroverted acetabulums, anteverted/retroverted femurs, and varying femoral neck lengths), not to mention that you have two of them, not to mention other anthropometrical factors too, like torso length, femur length…it doesn’t take a genius to understand there’s no one right way to squat.
If a certain squat stance, width, depth, (whatever) feels better and more stable, why not run with it?
NOTE: I’d be doing a disservice by not linking to THIS article by Dean Somerset on the topic. He does a much better job at explaining things.
Back to the staggered stance.
600 lb squatter guy was trying to figure out why it seemed he couldn’t keep the barbell over mid-foot on his descent. I noted the staggered stance and he was like, “huh, I never thought of that.”
He then noted how he had always filmed his squats from the RIGHT side. I filmed from the left and his bar path looked to be on point. So maybe he was being a bit overcritical? Maybe the staggered stance evened things out? I’m sure there’s a biomechanical rabbit hole to be explored here (calling Greg Nuckols?).
When To “Fix” Someone’s Squat
I get it: Many of you reading aren’t elite level squatters, and much of the dialogue above has little merit in your training. The bigger picture, though, I think, is to avoid confirmation bias and sticking solely within camps that always agree with you. Everyone is a different, and there’s always more than one way to do something.
Last weekend, for me, was proof of that.
But I’d be remiss not to point out my standard or “comfort zone” is vastly different between an elite lifter and beginner/intermediate lifter.
Elite level lifters get much more leeway to mess up. More to the point: they’ve messed up enough to know what to do to not to mess up. Yeah, that makes sense. When I am coaching a beginner/novice, though, they’re rope for messing up is much, much shorter.
I still feel it’s important to avoid over-coaching and to allow an opportunity for newbies to figure things out.
As a coach, it’s okay to allow clients a window to perform a bad rep. Don’t be quick to correct. Let them figure it out & learn themselves
But when it comes to squats I tend to have a few “No-No’s” initially.
1) You Round Your Back, a Part of My Soul Dies
Loaded spinal (end-range) flexion doesn’t do anyone any favors. Pick up a McGill book and join the party. I’d prefer to avoid it as much as possible in the beginning. If I see someone flexing their spine during a squat, it’s my job to figure out why?
From there I’m going to try my best to implement the modality or variation that’s going to best set them up for success.
Much of the time it’s getting someone to appreciate how to adopt a better bracing strategy and stabilize.
Brace your abs. <— Get “big air” and act as if someone’s going to punch you in the stomach.
Learning Active vs. Passive Foot, or spreading the floor with your feet (better yet, a cue I stole from Tony Bonvechio is “find the outside of your heels.”
Full-body TENSION (trying to touch your elbows and pulling down on the bar helps here too) is the name of the game. The sooner a trainee learns this, the sooner he or she will clean up a lot of snafus in their squat technique.
Another easy fix is to implement an anterior load.
This is part of the reason why Goblet Squats or Plate Loaded Squats are so user-friendly and help to maintain a better torso position. The load is in FRONT which then forces the trainee to shift their weight and recruit/engage more of their anterior core, which then helps them remain more upright.
2) Knees Caving In (Past Neutral), Heels Coming Off Ground
The knees caving in aren’t always a deal breaker. Many trainees when they first put a barbell on their back and begin to squat for the first time resemble Bambi taking his first steps.
I don’t mind a little knee movement. Much of the time it’s just a matter of getting some reps in and whammo-bammo, the issue resolves itself.
It’s when it hits the point where they go past neutral and/or the heels come off the ground that it can become problematic.
Some things that have worked for me with knees caving:
Hey, don’t do that.
Think of your knee caps tracking with your pinky toe.
Place a band around the knees to provide some kinesthetic awareness. The band wants to push the knees in, they have to push the band out.
I want a squat to look like a squat. It requires ample ankle dorsiflexion, hip flexion, hip internal/external rotation, t-spine extension, among other things.
Grooving the hip hinge and using props such as a box (box squats) to get someone to learn to “sit back” and use more of their posterior chain is a nice option. This will help keep the heels cemented to the floor.
NOTE: once they master that, the idea is to then perform an equal parts “knees forward, hips back” motion, learning to sit down into the squat (not so much back, back, back). Again, the squat should look like a squat
And That’s Really It
I’m not TRYING to find something wrong with everyone’s squat.
If the 2-3 things above are met from the get go we’re in a pretty darn good spot.
Things like bar position, foot stance/width, hand position, and everything else in between, while significant considerations for some people and staples for entertaining internet arguments, are all going to depend on several other factors (goals, anatomy, experience, ability level, injury history), and in the grand scheme of things are minute comparatively speaking.


 Matthew Ibrahim is the Co-Owner & Lead Performance Coach of TD Athletes Edge in Salem, MA.
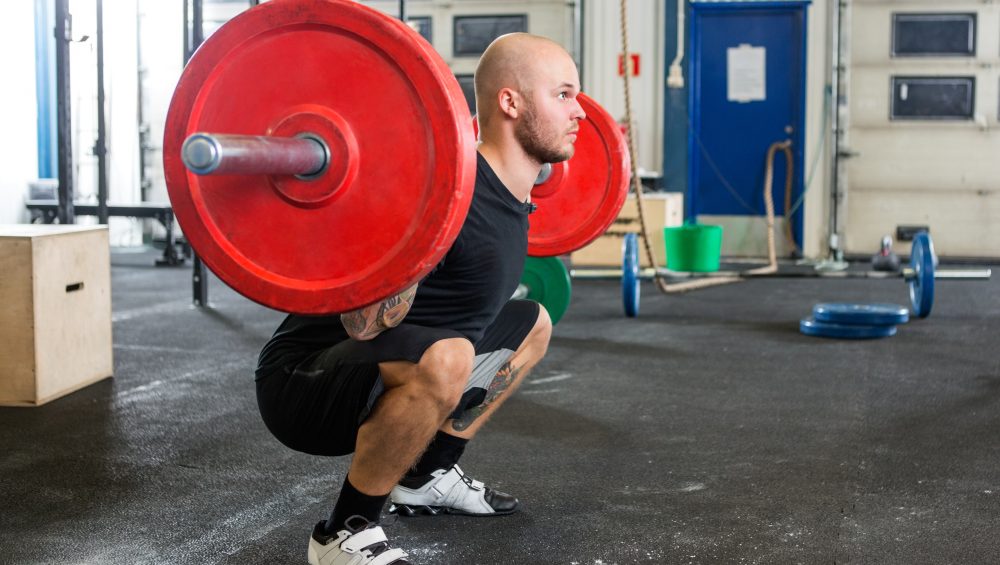

 Nicholas M. Licameli

 George began his time at Cressey Sports Performance as an intern in the fall of 2013, and returned in 2014 as CSP’s Group Fitness Coordinator, overseeing all Strength Camp coaching and programming responsibilities.