CategoriesProgram Design Rehab/Prehab speed training

Using Fillers In Your Programs: Deadlifts

I had a gentleman come in for an assessment recently who, upon arriving, provided me with a laundry list of injuries and maladies that have hampered his ability to workout for quite some time.

The list he handed over would have prompted fist bumps from Tolstoy or Tolkien from its grandiosity in description and length.

Some were legitimate – an old athletic injury to his shoulder, along with some nagging low back pain.

Some were, shall we say, a bit of overkill – “my left Sternocleidomastoid gets a bit tweaky whenever I rotate my head more than 17.22 degrees. It’s even more profound when the Dew Point dips below a certain level. Or if I wear red on Thursday.”

Copyright: spotpoint74 / 123RF Stock Photo

The Power of Fillers

Okay, that last part did NOT happen. Rather, it was meant as an allegory of sorts, an attempt to showcase how some people can often fall into a trap of believing they’re broken and that the only way to “fix” themselves is to put under a microscope every tweak, niggle, and bump that rears its ugly head.

To be clear: It’s NOT my bag to discount people’s past or current injury history. I respect and take into account everything (injury history, goals, ability level, favorite Transformer1) and use that information to ascertain what will be the best, safest and  most efficient path to dieselfication possible.

That said, I often have to play “bad cop” and help people come to an understanding.

That they’re not broken, that they can train, and that they don’t have to spend 30 minutes foam rolling and activating their Superficial Dorsal Fascial Line.

The drawn-out, overly complicated warm-up is my worst nightmare as a coach.

Actually, back up.

Kipping pull-ups are my worst nightmare. With a close second being anytime someone asks me about keto. Oh, and mushrooms.2

Sometimes when I start working with a new client – especially one coming in with an extensive injury history – they’re often riddled with fear and trepidation with regards to training. They’ve been stymied by an endless array of setbacks (and overly cautious physical therapists3) and are reluctant to push past the “corrective exercise” rabbit hole.

Their warm-up often takes longer than it takes to complete the Boston Marathon, to the point where every inch of their body is meticulously foam rolled and every muscle is painstakingly activated.

Yes, it’s important to activate “stuff.”

In fact, I’m often flummoxed some people still don’t understand the importance of taking themselves through a proper warm-up.  Getting the body and nervous system primed for physical activity is kind of a big deal, and I won’t belabor the point here.

You should be doing it.

Don’t get me wrong: the warm-up is a splendid opportunity to individualize someone’s program and to have him or her dedicate some additional TLC to areas of the body that need it.

To that end, however, I do feel – at times – people baby themselves to the extent the warm-up becomes the workout.

This is where I find a lot of value in fillers and implementing them into my programs.

I love it, I love it, I LOVE it.

via GIPHY

The idea is to address common “problem areas” by tossing in some low-grade activation/mobility drills during one’s rest intervals…as part of their training program.

The key point here is LOW-GRADE.

Filler exercises can be anything from glute activation and scapular upward rotation drills to, I don’t know, a particular stretch (hip flexors?) or naming all the members of Wu-Tang Clan. The premise is that they’re low-grade, low-demand, easy, and address something that won’t sacrifice performance on subsequent sets of iron work.

Performing 400m sprints or Tabata anything does not constitute as a filler, and defeats the point. We’re trying to turn stuff on and/or address common mobility/stability issues, not challenge Jason Bourne to a street fight.

via GIPHY

All that said I wanted to share some insights on how I implement fillers into the programs I write, and in particular which ones I like to pair with certain exercises.

First up, deadlifts of course…;o)

Filler For Deadlifts

There are a lot of moving parts to the deadlift and to perform it in a safe manner requires “access” to a number of things:

  • Ample T-Spine extension
  • Ample hip flexion
  • Depending on the variation (I.e., sumo style) requisite adductor length
  • Scapular posterior tilt (hard to do if someone’s in excessive upper back kyphosis).
  • Lumbo-pelvic control/stability
  • The cheat code for unlimited lives in Contra (very important)4

If none of these things are in play or even minimally addressed many lifters are going to have a hard time staying healthy in the long run.

Alright, enough of my jibber-jabber. Lets get to the drills.

1) Split Stance Adductor Mobilization


Now, admittedly, if there was a Wikipedia page for “ordinary and unremarkable exercises,” this one would be right at the top. However, this has always been a staple filler exercise for me and one that I don’t forsee taking out of the rotation anytime soon.

What I like most about this exercise is that it targets the adductors in both hip flexion and extension. The key, though, is attention to detail with regards to anterior core engagement.

A common mistake I see people make is “falling” into their lower back when they walk their hands forward; it’s important to avoid this. Too, another common mistake is allowing the lower back to round as they sit back. The main objective should be to maintain as “neutral” of a spine as possible throughout the entirety of the set.

One other teeny-tiny thing to consider is scapular position. This drill can also be a nice opportunity to work on a bit of Serratus activation by actively “pushing” into the floor so that there’s a bit of protraction and the scapulae “set” or adhere to the ribcage.

Aim for 5-8 repetitions/leg during rest periods.

2) Monster Walks


All I can say about this exercise is that when it’s done properly it’s Glute O’clock.

In the video above I’m using Nick Tumminello’s NT Loop which I have found work really well for this drill.

FYI: I receive zero kickback from Nick – maybe a tickle fight? Fingers crossed – in recommending his band.

The idea here is to lock the ribs down and to keep the hips level so they’re not teeter-tottering back and forth during the set. Walk it back using the hips/glutes until the band is fully stretched and then control the return (again, making every effort not to let the hips teeter-totter).

I prefer to use anywhere from 5-8 repetitions here.

3) Bench T-Spine Mobilization


This is a money filler for those people stuck in flexion hell all day, in addition to those who have chronically tight/short lats.

Some key things to note:

  • Holding onto a stick (or anything similar) helps prevent the glenohumeral joint from going into internal rotation.
  • As you sit back towards your ankles, try to maintain a neutral back position throughout (keep those abs on, actively “pull” yourself back).
  • Perform a pseudo bicep curl at the bottom to help nudge you into a bit more thoracic extension.
  • Be careful not to induce excessive thoracic extension here. It’s easy to think the more ROM here the better, but that’s not necessarily the case.

4) Brettzel Mobilization w/ Exhale


Stolen straight from Gray Cook and Brett Jones this is easily one of my favorite fillers OVERALL, and not just for deadlifts. We’re locking down the lumbar spine by holding the bottom knee down (you can also place a foam roller here if you’re unable to get this low) in addition to adding a nice hip flexor stretch on the opposite side.

The goal, then, is to take in an inhale through nose and EXHALE (out the mouth) as you rotate and drive your top shoulder towards the floor.

Indeed, this is a fantastic drill to work on more thoracic extension, but again, be judicious with ROM here. More is not better. All I’ll say here is stay cognizant of your belly button (innie or outtie?) and where it’s pointing. As you extend back it should not point towards the ceiling. Instead, it should stay relatively motionless and pointing towards the wall your chest is facing.

As you exhale with each subsequent rep, you should notice you’re getting closer and closer to the floor.

3-5 repetitions per side should suffice.

And That’s That

There are a plethora of options here, but all I wanted to do was highlight a handful of my favorites. Choose ONE drill to perform during your rest periods. Also, depending on the total number of sets you have on the menu you could also alternate between 2-3 drills.

There’s no golden rule.

Hope this helped and gave you a few ideas to work with.

CategoriesAssessment coaching Program Design speed training

Bottoms-Up Squat Patterning Is the Jam

I was livid.

Not long ago I had a female client come in for an initial assessment and she divulged to me the previous coach she had worked with, in not so many words, inferred she was “dysfunctional” and that she’d likely never be able to perform a decent squat.1

What kind of BS is that? Within ten minutes of the first session you tell someone how much of a walking ball of fail they are? Awesome business model, dude.

I took it as my mission to use that initial session with her and demonstrate to her success; to prove to her she could squat. Maybe not with a barbell on her back, ass to grass, but I wanted to show her that 1) not many people are able to do that in the first place and 2) there are many different iterations of the squat and it was my job to showcase what her best options were given her ability level, injury history, and goal(s).

Screw that coach.2

Copyright: fxquadro / 123RF Stock Photo


The interaction above took place several months ago.

And, not to be too braggadocious, I was able to successfully get her to “squat” within that first session after taking her through a thorough screen and using more of a bottoms-up approach to pattern her squat.3

It all came down to getting her nervous system comfortable in the bottom position and to own it.

Cliff Notes Version:

  • Perform a hip scour to ascertain general anatomy limitations
  • Assess both passive AND active squat pattern(s).
  • See if active “matches” passive ROM (Range of Motion).
    • If so, do they demonstrate enough motor control to, well, control that ROM?
    • If not, is it a mobility or stability issue? I find it’s rarely the former. However mobility tends to be everyone’s “go to” scapegoat.
  • Implement appropriate patterning drills that match the trainee’s ability level and don’t bore them to tears with too many corrective drills that don’t accomplish much of anything.

Non-Cliff Notes Version:

Read THIS —-> Building the Squat From the Bottom

Bottoms-Up Is the Jam

Using the BOTTOMS-UP approach to introduce specific movements – in this case, the squat – is a foolproof way help build your client’s confidence in the movement and to start to nudge a training effect.

NOTE: a baby dolphin dies every time you default to 30 minutes of “ankle mobilization” drills.

This past weekend I was fortunate enough to attend the Clinical Athlete Workshop in Springfield, MA with Dr. Quinn Henoch, Dr. Zak Gabor, and Matthew Ibrahim.

Quinn brought to light two more drills I’m immediately going to add to my arsenal and I wanted to share them with you here.

Check these bad boys out.

Quadruped Rockback Squat Patterning


Tall Kneeling Squat Patterning


Pretty cool, right?

Play around with them yourself. Use them with your clients. Demonstrate to your clients that they can do stuff, and that oftentimes it’s just a matter of breaking down movements into more digestible parts to show them success.

Go to work my Padwans.

Categoriescoaching Conditioning speed training Strength Training

What Sport Specific Really Means

Soooo, I’m a dad now. Lisa was a CHAMP all throughout, and I’m confident we’ll be heading home today from the hospital. As a heads up, you can expect just as many pics of my kid as my cat…;o)

I’m still a little busy, so please enjoy today’s guest post from strength coach Erica Suter.

Copyright: tnn103eda / 123RF Stock Photo


What Sport Specific Training Really Means

Every time I write an article, I may sound like I want to chop everyone’s balls off.

Truthfully, I get fired up with certain themes in the strength and conditioning world, making my prose honest, raw, and at times, harsh. My article on fitness celebrities, for example, was one of those topics I approached with fervor and sass.

Today’s topic is no different. So let’s dive in:

Sport Specific Training

For the past 5 years, I’ve been lucky to work in both the strength and conditioning, and skills-based realms of performance enhancement. I’m a Certified Strength and Conditioning Specialist who helps athletes get strong, but I’m also a licensed USSF soccer coach who teaches technical soccer skills. I keep my CSCS side separate from my technical side. I’m either in the weight room blasting Skrillex, or out on the soccer field working on my tan:


Knowing both worlds certainly makes me aware of the distinction between strength and skill work.

But alas, confusion still arises. Especially amongst parents, I get questions like:

“So do you do sport specific training for soccer players?”
“Can you get Little Johnny to have a stronger throw-in with medicine ball work?”
“Can you do female soccer specific ACL injury prevention?”

Full disclosure: Getting kidnapped by orcs from the Lord of the Rings sounds way cooler than explaining sport specific training to parents.

Note From TG: Hahahahahahahahaha. That was good. I’m stealing it.

I do, however, want to play the part of the understanding strength-skills coach and share some knowledge on this topic. Here goes nothing.

What Is Sport Specific?

Sport specific has been sensationalized in the strength and conditioning industry as a method of training that mimics a specific skill of one’s sport in the weight room. Often, strength coaches are pressured to train sport specific, especially because they have access to a plethora of fancy gadgets and gizmos.

However. Advanced equipment can be more problematic than effective.

We do not have to kick a heavy medicine ball to build a stronger soccer shot. Nor do we need to tie a golf club to resistance bands to generate a more powerful swing. We do not need a baseball attached to a sling shot to improve pitching speed. And we do not need to strap a spontaneously combusting jetpack to a track athlete to get them to sprint faster. Sorry if that was extreme.

Put simply, the more flashy tools we add, the quicker faulty motor patterns arise and skills-based mechanics go down the drain. Not to mention, an athlete will not be able to perform a skill based movement through it’s full range of motion. This can lead to decreased skills performance, weakened neuromuscular firing, less power output, and increased chance of injury. I get it: cool equipment makes parents “oooh” and “ahhh” and makes strength coaches look like magical fairies that shit sparkles.

Alas, I digress.

Some things to consider:

– Practicing a sport with a weighted vest doesn’t allow for pristine sprinting mechanics.

– Performing soccer 1 v. 1 moves with a resisted harness does not allow players to explode with the ball at maximal speed to beat a defender.

– And running sprints with a Bane Mask while holding a football and wearing your helmet and pads is well… stupid.

Two Different Jobs

The strength coach’s role is to get athletes stronger and less prone to injury through proper strength, power, and energy systems training.


In the other corner, the skills and team coaches help with improving the soccer kick, the bat swing, the golf swing, the hockey shot, and the tennis serve. It is not the strength coach’s job to bring the court, field, or ice rink into the weight room and duplicate these actions with loaded contraptions. That is why we have distinguished differences between Certified Strength and Conditioning Specialists and licensed sports coaches.

Expertise exists in the dictionary for a reason.

ex·per·tise
ˌekspərˈtēz,ˌekspərˈtēs/
noun
  1. expert skill or knowledge in a particular field.
    “technical expertise”
    synonyms: skill, skillfulness, expertness, prowess, proficiency, competence; More

Strength Training Carry-over to Sport

Strength coaches don’t mimic skills in the weight room. Rather, they mimic movement patterns that will enhance a skill.

As an example:

Skill: Shooting a soccer ball

Movement patterns: hip extension, hip flexion, core stability, hip stability, ankle stability, plantarflexion, transfer of force through the trunk.

Planes of motions: frontal (plant foot and hip stability), saggital (kicking leg), transverse (transfer of force through core and hips for shot accuracy).

Weight Room “Sport specific” exercises: Dead lifts, hip thrusts, single leg hip bridges, plank progressions, psoas activation, lateral step ups, medicine ball rotational slam, single leg bridge variations, to name a few.

Single Leg Bridge Progression:


Lateral Step Up:


Psoas/Core Activation:


What we do in the weight room is already “sport specific” to some degree, as strength coaches provide athletes the fuel that is needed to powerfully and deliberately execute skill-based movements.

But if we reallyyyyyyyy want to be sport specific, then the athlete must PLAY MORE OF THEIR SPORT.

Going to drop the mic right there. Thanks.

About the Author

Erica Suter is a certified strength and conditioning coach, soccer trainer, and fitness blogger who has worked with athletes and non-athletes for over 5 years. She is currently a strength coach at JDyer Strength and Conditioning, and also runs her own technical soccer training business in Baltimore, MD. Her interests include writing, snowboarding, and reciting Lord of the Rings quotes to her athletes and clients.
Categoriesspeed training Strength Training

Getting My Athleticism Back

The saying “if you don’t use it, you lose it” can be applied to many facets of life. Vacation time for some people applies here. Within some companies here in the U.S, if you don’t use your vacation time, you lose it.

Which is BS.

And, of course, I could easily toss in an obligatory dick joke here.

But I won’t.

Because I’m mature.


Athleticism is another one of those “things” we tend to lose when we don’t use it. In fact, I’d garner a guess that athleticism is one of the first attributes that diminishes once many of us enter into adulthood.1

But for the sake of brevity, and legally speaking, lets just say adulthood is when someone hits the age of 18.

At this age, unless you’re a high-level athlete and offered/recruited to play a sport at the next level (college), you typically either:

1. Go to college, stop playing sports, and discover beer.

2. Not go to college, stop playing sports, and get a boring desk job. Or, live in your parent’s basement and play World of Warcraft.

OR

3. If you’re me: go to college, play sports, watch way too much 90210, not hang out with chicks, stay active (even after college), still not hang out with chicks (at this point watch way too much Alias), eventually get a job in the fitness industry, get jacked, playing “sports” gets diluted to slow-pitch softball leagues, start working with high-level athletes, still stay jacked though, finally find a chick that will hang out with me, and eventually realize that, while certainly not un-athletic, I’m not close to where I once was.

That sound like you too?

Now, I’m not insinuating athleticism in this case means you’re ready to enter the NFL Combine or that you could win American Ninja Warrior.

Understandably, athleticism can mean different things to different people. But again, for the sake of brevity, lets just say athleticism can equate to the ability to do several things such as sprint, jump, hop, skip, punch a zombie in the throat, change direction, shuffle, accelerate, decelerate, and just move without looking like a drunk pirate.

IMPORTANT NOTE: Many people confuse athleticism with conditioning

And that’s not what I am referring to.

Yes, athletic drills can be a form of conditioning…however, that’s not their main objective. There’s a lot of technical proficiency and skill involved with developing specific athletic skills and athleticism in general.

Too, athleticism favors those who started at an early age. We’re motor learning sponges when we’re young. Not so much as adults when motor patterns and CNS pathways have been engrained for far too long.

Elite athletes and people who stay active their entire lives can do stuff without even thinking about it.

They can change direction on a dime or catch a frisbee with pulling a hamstring.

They can react.

They have to work at it, of course, and they’ve accumulated hours upon hours of “purposeful practice,” (in the form of actual practice and casual recreational activity) but they make athleticism look easy and seamless.

You don’t become more athletic by incessantly accumulating more and more fatigue. Mind you: the most successful athletes in the world are able to perform at a high-level – repeatedly – in the presence of fatigue. They do need to develop conditioning and endurance amongst many other abilities.

However, I feel many people operate under the assumption that conditioning (or getting tired) is equivalent to athleticism. 

And it’s not.

Hitting up your local CrossFit joint is cool. I think that’s amazing. There are many amazing athletes involved with it.

But don’t assume that just because you’re completing some crazy WOD 3x per week, gasping for air by the end, and are thiiiiis close to shitting a spleen, that you’re somehow improving your athleticism.

Getting My Athleticism Back

Make no mistake: I can still move well. I haven’t turned into the Tin Man or anything (although, lets be honest: dude could dance).

I still participate in athletic endeavors and sometimes look athletic when I demonstrate exercises and drills. However, as a former athlete (and as someone who trains athletes) I’d be lying if I said I was happy with my current situation.

Slight abject disdain would seem more fitting

Which is why I was so happy to see Jen Sinkler type these words the other day:

“I missed feeling athletic in almost any situation. I missed it lot.

So, I told my friends Angie Brambley Moyer and Tim Moyer, both world-class strength-and-sport coaches, that I wanted to get it back. That I wanted to get it allllll back.

I ALSO told them that I wanted to invite others who were in the same boat — former athletes, not-yet athletes, or current athletes who wanted to level up their game — to join me in my quest.

I was positive there were others who, like me, wanted to become lean, mean, athletic machines. Again, or for the very first time.

I was right.”

I’m Not Alone!!

I think many fitness professionals feel the same way I do. We’re in an industry where we often put other’s health, well-being, and goals before our own.

Likewise, there are many people reading who, despite being former athletes themselves, don’t have as much pep in their step as they used to.  Or, maybe there are some reading who have never played a sport in their life, but would like to be able to perform a pro-agility without breaking their hip?

I’m taking some initiative and putting myself through the Lighting & Thunder program. I’m even setting my ego aside and starting with the beginner program.

Here’s what I did today:

5 Yd Starts

https://www.youtube.com/watch?v=TklqD8uN_Ds


  • Objective here is to drop down into a proper starting “athletic” position (weight forward, CoG low).
  • Think long backside (toss back arm back as aggressively as possible)
  • Push away as fast as you can (aggressive first step).

5 Yd Jog to 10 Yd Sprint (With Stop Within 10 Yds)

https://www.youtube.com/watch?v=HM-BPJKTslg


  • Objective here is more or less the same as above (except without the athletic start position).
  • When you transition into sprint, you should get low and have an aggressive lean with positive shin angle.
  • You still want an aggressive backside.
  • Also, you want to “stutter step” to a stop within 10 yds, which works on deceleration and better emulates athletic activities.

5 Yd Jog to 10 Yd Sprint (To Coast)

  • I didn’t take a video of this.
  • Just imagine the same video as above, except me without a shirt on or something. Or pants.
  • Also, no need for aggressive deceleration…just a “coast” to finish.

Up 2, Down 1 Drill

https://www.youtube.com/watch?v=YSFDp1QSA2w


My sock game is ON-POINT!!!

  • This drill helps to hammer home the start/stop/start/stop nature of athletic activities and sport.
  • Performing this drill with hands touching the floor helps to cue weight forward and low (you’d obviously not do this in a REAL sport).
  • Important to note that if you stop with right foot forward, you’d want to tap floor with left hand (and vice versa).
  • Rest is 1:3 ratio. Rest for 3x as long as it takes to to complete the drill. This ensures ample recovery for top performance with each set.

It’s nothing fancy, but it doesn’t need to be.

I’ll be doing this program 1-2x per week all summer. If day 1 is any indication, I’m going to be Carl Lewis by September.

You Should Join Me

Lightning & Thunder is on sale now for HALf-OFF until Friday, June 3.

On top of being a top-rate speed/agility program, what’s great about it is that it can easily compliment any strength program.

It comes with a strength program in fact.

However, for those who purchase Lighting & Thunder via the links provided by the end of June 3rd, I’m going to offer you a FREE month of my Group Training Membership on Exercise.com.

NOTE: I’m only going to email the discount codes out to the exact same email address you use to purchase L&T.

You get two killer programs for one!

So, to review:

1. It was bullshit when Kelly chose Brandon over Dylan on 90210. I mean, it’s freakin Dylan McKay. How do you say no to someone like that?

2. The Lighting & Thunder program is pretty baller.

3. I’m doing the entire thing myself, even starting with the beginner program cause I’m cool like that.

4. You should totally do it with me.

5. As incentive…go HERE, and then I’ll send you a code for a FREE month in my Group Training Membership.

6. We’ll be BFFs.

Categoriescoaching Conditioning speed training

When Going Backwards Is a Good Thing: The Up Two, Back One Drill

Today’s guest post comes courtesy of one of my most favorite people in the world, Jen Sinkler. She, along with strength & conditioning coaches Angie Brambley-Moyer and Tim Moyer are releasing their new strength, speed, & agility training product Lightning & Thunder.

I’ve just started playing with the program myself (my wife and I went to BU on Sunday to move around a a bit, photo evidence HERE), and I gotta say…I really, really like it.

It’s elegant in its simplicity, and will compliment pretty much anyone’s training whether they’re an athlete or not.

Check out Jen’s gleaning example below…

When Going Backwards Is a Good Thing

When it comes to training for speed and agility — a worthy endeavor whether you’re an athlete or not, in terms of power and movement efficiency — you may think about zig-zagging from side to side explosively and working on your go-forward locomotion, but just as important is the ability to quickly transition from forward to backward and vice versa.

“Forward-to-backward movement is what athletes do poorly at first. It’s the most likely skill to be untrained and un-coached,” says Angie Brambley-Moyer, MS, MSCC, assistant director of strength and conditioning for Princeton University.

This is a critical error.

In many sports, the ability to switch from offense to defense and back again is paramount, adds Angie’s husband, Tim Moyer, MS, CPT, head volleyball coach of Philadelphia University and longtime strength and conditioning coach.

“Agility is the ability to perform a series of explosive power movements in opposing directions in rapid succession, and unless you’re training these key movement patterns by focusing on movement quality over speed at first, breaking down skills into smaller parts, and getting feedback (from a coach, a video, or motor recognition) from rep to rep, your mechanics will remain slow and sloppy,” Moyer says.

Form equals function. The better your form the better you will function.” That means patterning proper mechanics from the get-go.

“From an injury prevention standpoint, you are only going to be as fast as you can stop and change direction,” says Brambley-Moyer. “In many sports, you have to change direction every three to five steps, and the ‘Up Two Back One’ drill closely mimics that. It’s important to master these short direction changes before increasing the distance (which increases intensity).”

This is one of Brambley-Moyer’s favorite drills for working on forward-to-backward-to-forward agility. Incorporate it at the very beginning of any conditioning work you do, performing three total sets and using a 1:3 work-to-rest ratio. Start slowly and focus on really nailing the mechanics of footwork and body position, picking up speed only as your form improves.

Moyer refers to one of the special forces’ mottos, saying, “Remember: Slow is smooth, and smooth is fast.”

Up Two, Back One: Forward Sprint to Backpedal Instructions:

The Up Two, Back One drill is performed like it sounds: You will first run forward to the second cone, come to a stop, backpedal one cone and then repeat by running up two more cones before backpedaling again. You will sprint and backpedal a total of three times before transitioning to your last sprint and coasting to a stop.

For the set up, place five cones three yards apart in line with one another. Completing the drill as outlined above counts as one set. To ensure you’re performing each set with the proper intensity and technique, take three times the rest as it takes you to run the drill, in a 1:3 work-to-rest ratio.

Coaching Points:

To start, use a staggered stance (with one foot slightly in front of the other) as your starting position for the drill. Direct your head and shoulders toward your target by leaning forward, and then take off into a sprint.

Decelerating at each cone starts by lowering your center of gravity toward your base of support (your feet). You will also increase the length of your ground contact time by taking a number of smaller, choppier steps until you come to a complete stop next to each cone.

This drill’s focus is accelerating quickly, decelerating quickly, and then transitioning into the backpedal before moving forward into another sprint. To ensure you’re staying low and using proper acceleration and deceleration mechanics, touch the ground at each cone when performing this drill.

Ideally, you will touch the ground with the opposite hand as the foot that’s in front. Meaning, if your left foot is the front foot at the transition point (sprint to backpedal or backpedal to sprint), your right hand should touch the ground.

After your last backpedal, focus on proper arm- and leg-drive mechanics through the final cone and coast to a stop.

Lightning & Thunder will help you become a force of nature.

I’ve said it before and I’ll say it again…you don’t have to be an athlete in order to train like one.

Athleticism is one of those things where the saying “if you don’t use it, you lose it” becomes inevitable. As adults we often become more enamored with adult-like things. Things like balancing checkbooks, going to bed early, and binge watching Netflix.

Too, in the context of training, as adults we sometimes (not always) tend to “pump the brakes,” and training goes from this:

To this:

And the most athletic thing many people do on a day-to-day basis is chase down the 66 Bus after work.

That being said: athleticism is important yet it is something that intimidates a lot of people; especially for those who participate in more fantasy sports than actual sports.

However, you don’t need any fancy equipment or complicated periodization schemes in order to train athleticism.

Lightning & Thunder is a brand new strength, speed, and agility program written by Tim Moyer, MS, CPT, and Angie Brambley-Moyer, MS, MSCC, with Jen Sinkler, personal trainer, fitness writer, and former U.S. national team rugby player.


Moyer, Brambley-Moyer, and Sinkler have teamed up to get you stronger, faster, and more agile. You don’t have to have any experience playing sports, and you don’t have to play any in the future, either, if you don’t have the inclination. You only need to be interested in training like an athlete, in moving like one and looking like one.

Make no mistake, though: this program is perfect for athletes too.

In it, you’ll get:

  • A comprehensive training manual that lays the groundwork for this philosophy of training for both the strength and the speed and agility (SAQ) programs.
  • Both beginner and intermediate 12-week SAQ programs.
  • Both beginner and intermediate 12-week strength programs, with an explanation and calendar on how to combine the strength work with the speed work.
  • A complete exercise glossary with written coaching cues and images for every single strength and SAQ movement. This detailed description of 180 moves is a resource in and of itself!
  • A streamable video library of more than 25 speed and agility demonstration videos. In the videos, Tim and Angie coach the athlete through the fundamentals of their SAQ patterns and drills, allowing them to know what they need work on whether they are watching from home or watching it as they hit the gym.

Here’s the best part. To celebrate its release, Lightning & Thunder is on sale for HALF OFF now through midnight Friday, June 3rd. For more information click HERE.

About Jen Sinkler

Jen Sinkler is a longtime fitness writer and personal trainer who talks about all things strength related at her website, UnapologeticallyStrong.com. The former editorial director of fitness for Experience Life magazine, she writes regularly for a variety of national health magazines. She’s a certified RKC 2 kettlebell instructor, and a powerlifting coach through USA Powerlifting. She also holds coaching certs through Ground Force Method, Progressive Calisthenics, Onnit Academy, and DVRT (Ultimate Sandbag).

A lifelong competitive athlete, Jen played rugby for 13 years, many of those on the U.S. women’s national 7s and 15s teams. She co-owns The Movement Minneapolis with her husband, David Dellanave.

Categoriescoaching Conditioning speed training

Using External Cueing To Improve Linear Acceleration

“I’m not fast, but I like to pretend I am on the internet.”

  • Me

Okay, I’m kinda fast.1

Well, I mean, as far as 39 year olds who are roughly 15 years removed from playing any competitive sports are concerned, I’m lightening quick.

Besides, baldness increases aerodynamics right?

Truth be told: as a strength and conditioning coach it’s not required I win the 100m in the Olympics in order to speak to the topic at hand. Granted I should be able to demonstrate a sprint or sprint mechanics without resembling a one-legged pirate or worse…blowing out a hamstring.

But I don’t need to be a world-class sprinter myself in order to coach or teach others to be able do it. Which is why I’ve been making my way through Lee Taft’s Certified Speed and Agility Coach curriculum to better augment my coaching abilities.

At the end of the day it’s about having the ability to break down movement into more manageable parts and more importantly, having the ability to get your athletes into better positions (in order to express speed or strength or whatever).

CSP Coach, George Kalantzis, demonstrating how to use sled work to improve torso angle for linear acceleration.

And when it comes to getting people into better positions – especially as it relates to linear acceleration – as Lee notes, we don’t need to get too fancy with our toolbox.

Which Begs the Question: What Is Linear Acceleration?

Good question.

I’ll tell you what it’s not….sprinting/top speed.

Sprint/Top Speed = more perpendicular posture.

Acceleration = more forward pitch or torso inclination.

When we’re coaching (linear) acceleration it’s important to respect that the idea here is to produce a lot of force quickly. However, that force is still going to be longer in terms of foot contact time compared to top speed.

Linear acceleration requires getting things started and getting the center of mass moving. It’s different than top speed.

  • We must produce a lot of force down and away
  • We also need an extremely long arm action, which then coordinates with the same side leg and high knee drive. All of this accomplishes a ROM of the leg which then allows the athlete to produce as much force as needed to finish the push off to get into the next stride.

It sounds like a lot – and complicated – but I assure you it’s not. This isn’t to imply, of course, that some attention to detail isn’t warranted. If it were easy everyone would be a challenging Usain Bolt to a game of Duck-Duck-Goose.

But there are some easy and ingenious strategies in the form of EXTERNAL CUEING that’ll help accomplish all of the above.

Linear Acceleration Troubleshooting

To reiterate: linear acceleration is not the same as top speed. First and foremost, with acceleration we’re working on starting speed which implies different joint angles and positions.

1) I already mentioned above that top speed requires more of a perpendicular posture and acceleration implies more forward pitch of the torso.

As such, a major mistake many athletes make out of the gate is, well, a poor starting position. Like this:

Here I’m starting way too upright and my hips (and shoulders) are too far back. Not a conducive position to produce horizontal force.

Ideally we’d want to start in a more staggered stance with the hips in front of push off (this will make it easier to gain momentum and get mass moving), which implies a more angled torso. Too, we want the shoulders to be in front of the hips

2) More Aggressive Arm Action

In acceleration the back side needs to be long, front side short. The back side is what matters in acceleration. The front side becomes more important during top speed.

Lee Taft hammers this point home time and time again throughout his CSAC course.

To that end, a common mistake made is that people aren’t aggressive enough with their arm action.

https://www.youtube.com/watch?v=HpzkwBgZoVc


You’ll notice my back arm “stays short” and as a result both my arms and legs are choppy.

A beautiful external cue to use here is to tell the athlete to be more aggressive with “THROWING THE HANDS BACK.”

https://www.youtube.com/watch?v=6v193yEgzjs


Looks sexier, right?

And, subsequently, the more aggressive arm action “nudges” a more aggressive forward action of the knee….with minimal additional cueing.

But what if all of that still doesn’t get the desired effect?

The Magical World of External Cueing

A brilliant corrective strategy2 I “stole” from Lee Taft is to give the athlete a target to shoot for. This is external cueing at its finest.

External cueing takes into consideration what the body is doing in space and implies direction, intent, and action.

The corrective in this case would be to place a med ball – or anything: cone, hurdle, Ewok action figure – a few feet away from the athlete’s starting position. The athlete must then explode, “CHASE HIS SHOULDERS,” and get past the object within one step.

https://www.youtube.com/watch?v=51B3WnDCq6w


As you can see, this immediately incorporates a better arm action. Better arm action mirrors a greater leg action, which then produces more horizontal displacement.

Giving the athlete a target or something to shoot/aim for (EXTERNAL CUEING) will “correct” acceleration mechanics without too much fluff.

The addition of the target cues the athlete to push harder into the ground and then physics takes over.

Action = Reaction

Learn This Stuff (and More)

You can learn all about these drills and cues (and much, much more) by signing up for Lee Taft’s Certified Speed and Agility Coach.

The curriculum is only available until this Friday, January 29th and then it goes bye-bye.

Now, I’m not saying it’s going to be tossed into a Disney Vault never to see the light of day again…..but for all intents and purposes, you WILL NOT be able to purchase this course after the 29th.

I’ve been making my way through the course and to say I am highly impressed would be an understatement.

It’s currently be offered at a generous discount and there are payment plans available.

CategoriesProgram Design speed training

Strength Expert Secrets Video Series

Earlier this year1 I was given an opportunity to sit down with Norwegian strength coach, Eirik Sandvik, and discuss some of my personal philosophies on program design, corrective exercise, and how to coach up some common lower body exercises as part of a larger project to be released down the road.

That project now has a name: Strength Expert Secrets.

Here’s the trailer. It’s less than a minute long, but will require 7 seconds before you start salivating.

https://www.youtube.com/watch?v=a-xpruYNqBo


To be honest it’s quite surreal to see my name affiliated alongside so many other outstanding coaches, many of whom I’ve looked up to throughout my career.

I mean come on!

Dan John, Tim Henriques, Josh Bryant, Matt Kroczaleski, Bud Jefferies…can someone please pinch me? It’s a dream right?

And yes, I’m fully aware of irony in that I’m the smallest guy in the line-up. Wait, scratch that. Jordan Syatt is technically smaller…but he’s also like the world’s strongest Hobbit with a 4x bodyweight deadlift.

NOTE: I contacted Jordan a head of time to see if he’d be cool with the Hobbit joke. He LOL’d.

Nevertheless, I know how to get people stronger, moving well, and performing at a higher level and that’s exactly what I cover in my section. Here’s the cover to my DVD.

And my section is only 1/8 of the total package.

Josh Bryant – talks about making serious gains in the bench press.

Dan John – talks about hip movement.

Jordan Syatt – talks about what else, the deadlift.

Matt Kroc – talks about upper body training.

Tim Henriques – breaks down the squat.

Bud Jefferies – discusses unconventional training methods.

Dean Somerset – talks about core training.

And then there’s me. La de freakin da.

Pre-Launch Video Series

This resource isn’t available yet (and it won’t be until January 2016), but in the meantime you can get a sneak peek of ALL the videos (8-10 minutes) FOR FREE.

Everyone likes free stuff.

All you have to do is click the link provided and enter your email address, and you’ll get all eight videos sent to you periodically. The first one is Tim Henriques discussing the squat, and it’s baller.

Go HERE. Increase your level of awesome.

CategoriesExercise Technique Program Design speed training

3 Exercises To Help You Squat Deeper. Without a Single Mobility Drill

Today’s guest post comes courtesy of fellow Cressey Sports Performance coach, Tony Bonvechio (AKA: the other Tony). He’s got some excellent pointers on squat technique and how you can go about improving squat depth without mention of a single mobility exercise.

Enjoy!

I didn’t like hip-hop music until I met Tony Gentilcore. I’m more of a heavy metal guy, but when TG handles DJ duties during staff lift, I can’t help but get amped up to the sounds of the 90’s Hip Hop or Dirty South Pandora stations.

Note From TG: Tribe Called Quest Radio. You’re welcome.

So when Ludacris poses the esoteric question, “How low can you go?” during a heavy squat workout, it gets me thinking how I can get my clients to safely improve their squat depth.

TG is right when he says not everyone should (or needs to) squat as low as possible. But outside of our baseball players at CSP, I deal primarily with powerlifters who need to squat below parallel in competition. If they can’t get low enough, their squats won’t count, so we prioritize hitting depth in training.

When we combine deep squats with heavy loads and we know not everyone can hit depth (defined as the hip joint passing below the top of the knee joint) easily, how do we get there in the best position possible.

Well, you could stretch, foam roll and mobilize every joint head to toe. Or you could just learn how to squat.

The second option is my favorite. In my experience, nine times out of 10, a person’s inability to squat to depth is NOT a mobility issue but rather a squat strategy issue. Simply picking the right squat accessory exercises to hammer home an optimal squat pattern will almost always improve depth and strength. Here are my three favorite squat exercises to help you drop it low and crush heavy weights.

Squatting: Upright vs. Hip Hinge

First, here’s a harsh reality: an upright squat will always be the most mechanically efficient squat. If you’re pointing your nipples at the floor to use “hip drive,” you’ll never maximize the contribution of your legs and abs. There’s a reason every 1,000-pound squatter (raw or geared) stays almost perfectly vertical through their torso instead of leaning forward.

https://www.youtube.com/watch?v=bSs6_THxn5A


Are YOU gonna tell Malanichev to lean forward with 1,036 pounds on his back? Didn’t think so.

Here’s what happens far too often when people try to squat: they puff their chest up (thoracic extension), which pulls the ribcage up. They take a big breath, which is entirely ineffective because you can’t get good intra-abdominal pressure with a poor rib cage position. Then, they push their butt back as they squat down (lumbar extension, anterior pelvic tilt and hip flexion simultaneously).

Like a seesaw, as one side drops (the chest), the other side must go up to maintain balance (the hips). Not surprisingly, you can’t hip depth if your hips are shooting up and back to keep you from falling forward.

This scenario also effectively minimizes the space the head of the femur has to glide in the hip socket while limiting the contribution from your anterior core to keep your torso upright. What happens? Your hips get stuck so you fall forward to try to get lower. All bad news if you want to squat low and heavy safely.

That said, the optimal squat pattern is going to have an upright torso, knees out and slightly forward of the toes and the hips between the knees. This is much preferred to leaning forward with a vertical shin and over-arched lower back if greater depth is desired.

Here’s how to dial in that optimal pattern:

1. Front Squats

Front squats can cure your depth woes by teaching you to sit straight down between your knees instead of sitting behind your knees. You simply can’t sit back and dump your pelvis forward or you’ll dump the bar, so you internalize proper positioning. Carry this same strategy over to your back squat and you’ll be in business.


That’s why we use so many front squat variations at CSP. It immediately dials in a solid ribcage position and forces you to stabilize with your anterior core instead of your lumbar extensors.

I’ve lost count of the number of athletes who get stuck above parallel with a back squat or body weight squat but can magically sit their butt to their heels with a front squat. Kind of throws the mobility excuse out the window, huh?

By learning to keep the ribs down, chest up and knees out, you create proper alignment for nailing a deep squat. If you struggle with depth, try front squatting for a few weeks before returning to the back squat and I’m confident your depth will improve.

2. High-Bar Pause Squats

Also called Olympic squats because of their popularity with weightlifters, high-bar squats bridge the gap between front squats and a powerlifting-style back squat.

https://www.youtube.com/watch?v=Q6fQ6UPES24


A low-bar position (i.e. holding the bar across the rear deltoids instead of the traps) has ruined many a squatter’s depth. You might be able to handle more weight because it keeps the bar closer to your hips, but it doesn’t matter one bit if you can’t hip depth because it pitches you forward too much.

Switching to a slightly higher bar position has helped many of my lifters get lower. Similar to the front squat, it lets you stay more upright so you can lock the ribcage down and stabilize with your abs instead of your lower back.

Adding a brief pause at the bottom position builds confidence in the hole, which eliminates much of the fear associated with squatting low. This also forces the lifter to initiate the reversal by staying tall and driving the knees out.

Try high-bar pause squats as your second exercise on a squat day. Pause anywhere from 1 to 5 seconds and do sets of 3-8 reps. You can pause at the lowest position, right below parallel, or even on the way back up to target specific sticking points.

Note From TG: These suck donkey balls. You’ll hate life, but they work. Get it done.

3. Squat to Pins

Not to be confused with an Anderson squat where the bar starts on the pins, squatting to the pins hammers home the same technique points as a front squat but is even more sinister and unforgiving.


By lowering the bar to the pins and pausing, you’ll have virtually no room for error in torso position. If you sit back and lean forward, you’ll immediately get stuck as you try to squat back up. Only by staying tall, driving the knees out and keeping the bar over the mid-foot will you be able to stand up.

Few exercises build control and confidence like squatting to the pins. These not only cured my falling-forward problem, but also eliminated my knee cave issues by forcing me to spread the floor and keep tension in my hips.

Cues to Cure Your Squat Woes

Remember these useful cues as you practice these squat variations:

  • “Belt buckle toward your chin” – This prevents unlocking the pelvis as you sit down.
  • “Take all the air out of the room” – This stabilizes your spine by filling your belly and lower back with air.
  • “Bend the bar around your traps” – This locks in the lats to help you tay upright.
  • “Spread the floor apart” – This tenses up your hips and glutes to keep your knees out.

Notice there’s not a single instance of “chest up” or “sit back” on that list. Ditch these antiquated strategies for the ones above and you’ll be hitting depth more consistently while getting stronger.

Optimizing the “Big 3.”

Want to learn these strategies in person? Come see me and Greg Robins at our Optimizing the Big 3 seminar at Warhorse Barbell in Philadelphia on September 19.

There are only a few spots left, so sign up today.

CategoriesProgram Design speed training Strength Training

How Lifters Can Unleash Athletic Power

Today’s guest post comes courtesy of strength coach and writer Eric Bach. Eric’s a coach I respect a lot and someone who’s consistently pumping out quality content.

His new resource, The Four Week Power Primer, is on sale starting TODAY.

How Lifters Can Unleash Athletic Power

What You’ll Learn

– Raw Strength isn’t enough.


- You need to generate fast strength via power.

– Lift heavy and lift fast to maximize muscle unit recruitment

– Incorporate bodyweight and explosive, submaximal work. 
       

– You’ll bridge the gap between strength and speed to become a beast!

Here’s the deal:

Most lifters mistakenly think their goal should be getting as strong as humanly possible. Not so. They should focus instead on improving power. This article explains why.

Sure, maximum strength is important. It builds a foundation to train other physical qualities. But there is an added dimension that separates the okay form the elite:

Power: or the ability to generate force rapidly.

Athletes in sports other than powerlifting run into time constraints when applying as much force as possible. This results in strength plateaus and poor carryover into sport-specific tasks.

Neglecting power leaves huge performance gaps. It results in athletes who are unable to translate their strength into success on the field.

This Power Primer will show you how to:

* Unlock a nervous system that fires faster


* Create greater levels of useful strength


* Create greater levels of strength


* Improve your ability to generate force


* Rapidly improve your athleticism

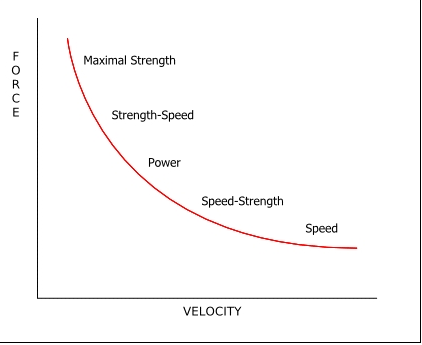
Understanding the Force-Velocity Curve (and Pie)

When looking at the force velocity curve I think of pie (Mmm…pie!)

Maximal strength provides the essential crust. It’s the foundation for a great pie. But you also need finger lickin’ filling, toppings and spices. Think of the fillings, toppings and spices as the ingredients that make the pie unique.

Without the foundational crust a delectable pie isn’t possible. It’s purely mush, much like training for speed and power without a base of strength.

Without careful attention to the other ingredients, there is nothing special about the pie. This is akin to having a base of strength, yet never refining the basic product for maximum performance.

Which brings us to the force velocity curve.

It provides a continuum of training for performances and actions that require different speeds against a variety of loads. These could include:

  • propelling your body though space
  • 
throwing an opponent to the ground
  • engaging in a free for all light-saber battle over that piece of pie

There’s an inverse relationship between load and velocity. The heavier the weight, the slower it moves and the lighter the resistance the faster the speed.

These qualities make up opposite sides of the spectrum, with speed-strength, strength-speed, and power making up the middle of the curve.

Building Explosive Power

Training with a combination of loads improves all-around explosive power, assuming there is a foundational crust of maximal strength.

Unfortunately, most lifters and coaches love hammering huge weights (nuttin’ wrong with that) to the detriment of higher speed movement (something wrong with that.).

This adds adding cheap, canned fillings, toppings, and spices to the pie to an awesome pie crust. Worse still is adding nothing at all. You just end up with the crust.

Stop chasing absolute strength. Most athletes and lifters would derive immediate benefits from lighter, more explosive training that bridges the gap between strength and speed.

Train the factors along the force velocity curve you’ve been neglecting. 
You will become a more powerful athlete.

That said, you must have a base of maximal strength to develop power.

To maximize power, focus on maximum bar speed with various loads. You will develop strength and speed along the force velocity curve. You will improve your power and your rate of force development. Use heavy weights with fast bursts, such as 3×3 at 90% 1-RM two times per with maximal muscular (2).

Improve Intramuscular and Intermuscular Coordination

Intramuscular coordination is the secret sauce that separates smooth, explosive athletes from rigid, uncoordinated ones. Intramuscular coordination is the coordinated firing of motor units within a single movement.

There are three main components when looking at when looking at improved intramuscular coordination:

  • Rate Coding: The capacity to increase firing rate (motor unit discharge rate) in order to express more strength.
  • Recruitment: Recruiting more motor units simultaneously when performing a muscular action.
  • Synchronization: The ability of muscle units to contract nearly simultaneously, with very minimal delay.

Through using multiple loads across the force velocity curve we’re able to improve intramuscular coordination. In time, this teaches the nervous system to recruit fewer motor units for the same relative intensity.

More motor units are available for activation for higher intensity exercise. That could translate into more weight on the bar or a faster sprinting speed.

How to Generate Maximum Force When Lifting

Few things, except coming home with the pie you’ve been eyeballing all night, are as fun as lifting maximal weights.

That said, too much pie (and maximal weights) isn’t good either.

Except for the rare genetic elite, your nervous system, joints, and tissues will scream at you before too long. Luckily, there are two ways to maximize force when lifting:

  1. Lift heavier weights
  2. Lift lighter weights (or your body) faster

Lift compound movements like squats and deadlifts as fast as possible, while still controlling each rep during the eccentric. By moving weights as fast and as hard as possible, you’ll recruit a greater number of muscle fibers for more muscle growth. You’ll also maximize nervous system recruitment for greater performance.

Submaximal Weight Training

Speed-Strength exercises, like sub-maximal lifting, result in high power outputs.

They produce super-high power outputs compared to longer duration, lower velocity max strength exercises.

Compare a tractor-trailer and a Ferrari. It’s great to have a ton of horsepower, but for high-performance it’s best to generate horsepower rapidly.

Power= Work/Time

In this case, explosive exercises are best using loads between 20%-85% for multiple low-rep sets is best (1). If I were a betting man, I’d wager you’re already using a sub-maximal squat day plus multiple warm-up sets between 50-80% 1-rm.

If you’re warming up like a good lad, you’re already getting some volume within the strength-speed realm.

Here’s the Kicker:

The missing piece is lighter, more explosive work.

Speed-strength movements will address this with high-velocity movements movement against a small external load. Exercises like the jump squat, back toss, and overhead slam train an explosive transition from eccentric-to concentric against a light load.

For the athlete or lifter, this requires practicing a specific movement (intermuscular coordination) patterns for optimal transfer.

For example:

Athlete Movement: Triple Extension in sprinting

Training Movements: Resisted sprinting, clean, squat jump

 Or…

 Athlete movement: Powerlifting Squat

Training movement: Barbell jump squat

To maximize the benefits of intramuscular coordination, exercises of mechanical demands should be practiced with various loads to improve the efficiency of the nervous system.

In time, this teaches the nervous system to recruit fewer motor units for the same relative intensity.

How to Immediately Improve Your Power

Provided you already have your foundation of strength, you can rapidly improve your power with a few tweaks to your training.

First, you need to continue training with heavy, multi-joint exercises and explosive intent on reach rep. This maximizes motor unit recruitment, improving RFD.

Second, when warming up accelerate every rep to the best of your ability. This trains in the strength-speed and speed-strength portion of the force velocity curve, specifically with loads between 20-80%.

Third, incorporate light speed, and speed-strength training methods with low-movement load (0-20%) and high-speeds. This comes in the form of jumps, sprints, throws, and other upper/lower body plyometrics.

Fourth, match the explosive movement patterns used to the movements you’re looking to improve using post-activation potentiation (PAP).

PAP, although an advanced method, uses the biomechanically similar exercises to groove explosive movement patterns after a heavy strength exercise.

For Geeks Only: How Does it Work? (Pie-Loving Regular People Can Feel Free To Skip this Section)

According to Hamada et. el (2000), there is an increased phosphorylation of myosin regulatory light chains during a maximum voluntary contraction (MVC). This allows the actin and myosin binding (for muscle contraction) to react to the increased calcium release. This reaction triggers a cascade of events leading to enhanced force muscle production at the structural level of muscle (Horwath & Kravitz ).

Thus, increased muscle activation yields a greater duration of calcium ions in the muscle cell environment, yielding a greater phosphorylation of the myosin light chain protein (Rixon et al. 2007).

The second theory is based on the H-reflex, an excitation of a spinal reflex elicited by afferent muscle nerves. It is theorized that the PAP intervention enhances the H-reflex, thus increasing the efficiency and rate of the nerve impulses to the muscle (Hodgson, Docherty, Robbins, 2005). Your nervous system get’s jacked up full-go.

When a jump is performed, your body is prepared to fire on all cylinders. So when only your body weight is used, the over-stimulated nervous system and muscles will be primed to the max for a higher jump.

Here are some Common Pairings:

Main Exercise: Explosive Movement:

Bench Press                               Clap Push Up, bench plyo push up

Shoulder Press                          Overhead medicine ball slam/ throw

Squat                                           Jump squat, vertical jump, box jump

Deadlift                                       Broad jump, kettlebell swing

What to do:
 Pick an explosive exercise that matches the movement pattern of your main lift and perform 3-5 reps immediately after your pure strength movement. Rest 2-3 minutes between sets to achieve a PAP effect

Wrap Up

Most lifters plateau in the gym and stay mediocre because they continue doing what they’ve always done in the past. They lift only heavy and focus only on the weight or muscle. They neglect rep quality and explosiveness. 


This mistaken approach is not performance training.

A solid strength foundation remains essential. 

Build on that foundation to focus on:

* quality explosive reps to improve neuromuscular performance

* rep speed


* movement quality over quantity

Now, It’s Time to Put the Plan to Action:

If you’re looking for a short-term plan of attack to improve your strength and athletic performance, then check my resource the Four Week Power Primer. It’s a four-week plan to increase your power for bigger numbers in the gym, and better performance on the playing field.

If you’re a coach, you should absolutely own this to understand the science of power, as it’s loaded with the science behind improving performance.

If you’re a meathead just looking to add some strength to the bar, then great: This could be the missing component holding you back from smashing a new PR.

Seriously, don’t wait, because the chance won’t be available for long.

Grab the Power Primer during the limited time sale, and leave Eric any questions you have below.

—> Power Primer <—

Resources and Stuff

Horwath, R., & Kravitz , L. (n.d.). postactivation potentiation: A brief review. Informally published manuscript, Exercise Science , Retrieved from http://www.unm.edu/~lkravitz/Article folder/postactivationUNM.html

Rixon KP, Lamont HS, Bemben M. Influence of type of muscle contraction, gender, and lifting experience on postactivation potentiation performance. J Strength Cond Res. 2007; 21: 500–505.

Robbins, D.W. Postactivation potentiation and its practical applicability: a brief review. J Strength Cond Res. 2005, 19(2): 453-458.

CategoriesFemale Training speed training

4 Strength Goals For a Beautiful Body

I make no secret my disdain towards the mainstream media (magazines, newscasts, infomercials, pop culture, fads) and how it relays fitness information to women.

Wait, what? You mean women can lift weights heavier than 3 lbs????

Most of it – mind you, not all of it – is predicated on the notion that women are these delicate flowers who shouldn’t (or worse, can’t!) lift appreciable weights, and that their fitness needs are better aligned with cardiocentric modalities and/or buzz words like “toned,” “sleek,” and “sexy.”

You know, cause deadlifts will make you grow an Adam’s Apple overnight.

The tone (<- forgive the pun) has changed in the past five years or so with the growing popularity of CrossFit. Women, now more than ever, of all shapes and sizes, backgrounds, and ability-level are hitting the weights and recognizing (and reaping) the advantages of setting performance based goals.

There’s still a lot of work to be done, though.

It’s a never ending upward battle to change the mindset of a society that places more “value” in something as arbitrary as what the scale reads in lieu of someone’s push-up prowess.

In my latest article on BodyBuilding.com I discuss why strength is the key to pretty much everything, including aesthetics.

Continue Reading……..

ALSO

Since we’re on the topic of performance, one of my all-time favorite resources for conditioning and general badassery – Lift Weights Faster 2 – is currently in the midst of a stellar summer SALE.

Not only do you get to learn from one of the best coaches I know, Jen Sinkler, and get bombarded with literally hundreds of different circuits and finishers ranging from 10-30 minutes, but you’ll also have the opportunity to follow workouts written by guest coaches such as myself, John Romaniello, Jill Coleman, Ben Bruno, Bret Contreras, Molly Galbraith, and a host of others.

Frankly, LWF2 is my default resource whenever I need a quick circuit to use myself or with any number of my own clients.

And you can get it for $40 off the regular price the rest of this week.

Check it out HERE.