Admittedly today’s Exercise You Should Be Doing won’t win a “sexiness” award like, say, pretty much any deadlift variation would, or maybe a pistol squat1, or pillow-fighting. Truth be told it’s a relatively unexciting, mundane looking exercise, but whoa Nelly! does it humble even the meatiest of meatheads.
Don’t knock it: pillow fighting is an excellent way to address core stability, primitive patterns, appropriate scapular upward rotation, basic combat skills, (and every teenage boy’s fantasy).
Okay, in all seriousness…lets get to today’s exercise
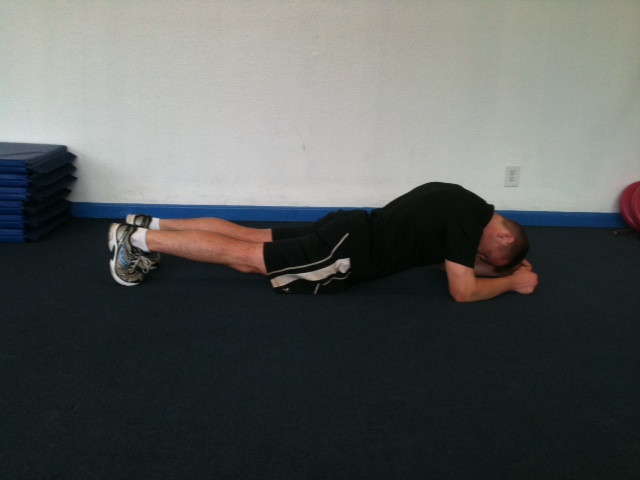
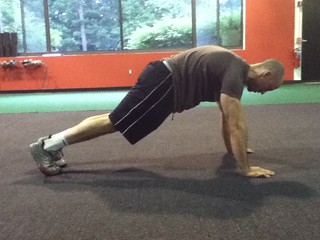
Prone (Val Slide) Hip Flexion-Extension
Who Did I Steal It From: this exercise has its roots in many arenas, but the person I need to give the most credit to is strength coach Dan Hechler. I saw him use this exercise with a client of his a few weeks ago and really liked it.
UPDATE: Dan actually refers to this exercise as a glorified Mt. Climber. I need to figure out a catchy name for this one other than the one I gave it. I’m so lame.
Sliding Mt. Climber?
Mt. Climber McSuckington?
I don’t know, I’m lame.
What Does It Do: It’s challenging to pin-point what, exactly, I like most about this exercise. Of course most long-time readers know I’m a huge fan of push-ups. Yeah, yeah there’s that whole broken record diatribe on improving lumbo-pelvic-hip control and how I feel that’s one of the main advantages.
It still is.
However, what I also love about push-ups is their ability to allow people to reach. Meaning, pushing into the ground (reaching) to promote 1) better scapular movement and 2) more of a canister position so that the diaphragm and pelvic floor are more in line with one another. Promoting a position of alignment/stability is almost always going to allow people to express better movement and strength.
As you can see, we’re not performing a standard push-up with this exercise. Instead, there are a few other components at work.
1. We’re adding hip flexion-extension. The idea here is to work both hip flexion and extension simultaneously so that we can learn to dissociate hip movement from lumbar movement.
2. We’re adding in a full EXHALE. As a bring one leg into hip flexion I’m pushing/reaching into the floor as best I can while also performing a full exhale (which will help to maintain the canister position mentioned above).
Key Coaching Cues: Some cues I gave away above. Assume a strict push-up position with both feet on a pair of Val Slides or standard furniture gliders or even a slideboard. There should be no excessive forward head posture or lumbar extension (hips sagging). Inhale and as you bring one knee towards your chest, push into the ground with your hands and slowly exhale. The idea is to maintain a strict torso position and to limit any lumbar movement. Return back to starting position, again, controlled, and repeat.
I like to perform 3-4 reps per side.
This would be a fantastic progression for those clients with chronic low-back issues once they have conquered the plank. But I also like to use it with my “healthy” clients too as a way to make them hate life for a few seconds.
You don’t need to be be doing core stability exercises or core strengthening exercises. You NEED to be doing BOTH!
What is Core Stability?
Core stability is the ability of the musculature of the trunk aka the “core” to be able to maintain a certain position. It involves musculature contractions typically 20-25% of MVIC (Maximal Voluntary Isometric Contraction). Another way to think of it is that these exercises require precision and control of movement rather than brute strength.
An example of a “core stability” exercise would be the Bird Dog.
The Bird Dog movement requires the participant to maintain a neutral spine position while moving an arm and leg. This does not require a maximal contraction of the abdominal musculature. It requires a low-level, precise contraction of certain musculature to maintain a neutral spine. There are NOT large amount of forces being exuded to cause the person to have to exhibit brute strength to have to perform.
Other examples of “Core Stability” exercises are:
½ Kneeling Chops
½ Kneeling Lifts
Dead Bug
Segmental Rolling
Prone Superman’s
The exercises mentioned above are all movements that can be made more difficult by adding weight or resistance. The purpose of these “easy” movements are to improve the timing and sequencing of the core musculature. Performance of these exercises are to be performed with precision and control.
What is Core Strength?
Core Strength is the ability of the core musculature to maintain or control a certain position against increased forces of gravity, resistance, or weight. Exercises or movements that would be considered core strength are:
Swiss Ball Rollouts
RKC Plank
Stir the Pot
Sledgehammer Hits
Anti-Rotation (Pallof) Press
All the movement mentioned above are using some form of external force. Whether it be gravity, weight, etc., the core musculature has to exhibit a much greater force to resist moving through the spine.
Why Do WE Need BOTH?
Well, you can have great core stability and be weaker than a baby kitten in a wet paper bag or you can have the strongest core in the world and can have poor core stability.
How is that so?
For example, maybe you can hold a plank with proper form for an inordinate amount of time, ie. 5 minutes. I would say that you have great core strength. But we can’t say that you have great core stability.
Here are a few quick tests to determine how someone’s core stability is functioning:
Segmental Rolling
Key Points:
Attempt to roll from your back to your stomach using one arm and no legs.
You may lift your head and reach with one arm.
Bird Dog
Key Points:
Can you maintain a neutral spine while alternating arms/legs?
Does the pelvis remain level while performing?
If so, then you passed. If not, then barring any type of decreased hip extension, thoracic spine extension, or upper extremity flexion mobility, your core stability may be impaired.
½ Kneeling
Key Points:
Bring front foot so that it is in line with down leg.
You should be able to maintain your balance without shaking or using your arms for balance.
Typically, one side is more difficult than the other. There may be a core stability issue if you cannot maintain an upright posture in tandem ½ Kneeling.
If you can perform the ½ Kneeling Test and both sides feel relatively equal, then you passed. If not, then barring any type of decreased hip extension, ankle, or thoracic spine mobility limitations, this could be indicative of a core stability issue.
I don’t think I need to go into as much detail for core strength, but the importance of maintaining a certain position when deadlifting, squatting, lunging, etc. is hugely important to decrease risk of injury and to improve performance.
We needcore stability because throughout the spine there are tiny stabilizing muscles that go from spine segment to spinal segment.
If you present with an imbalance during the Bird Dog, try performing with a towel roll on your low back and widen your base of support so that the movement is challenging but you can perform it with good form.
If the ½ Kneeling Test has imbalances present, try performing ½ Kneeling Chops with a band around the lower legs to improve core musculature recruitment.
The responsibility of these muscles is to stabilize from one spinal segment to another or stabilize a few spinal segments that they may cross over. If these tiny muscles don’t do their job and stabilize like during a bird dog, ½ Kneeling position, or during segmental rolling, compensation will occur.
Instead of those aforementioned muscles working, the work will be placed upon the larger muscles such as the paraspinals, etc.
Who Cares?
Well, if the small, stabilizer muscles aren’t stabilizing effectively and the larger muscles are working harder than they need to, then this can cause movement compensations over time and in turn place you at risk for injury or decrease performance.
If you present with an imbalance during segmental rolling and either can’t do a certain direction or one direction is harder than the other, perform it with some assistance.
If all else fails, see a licensed medical provider with a background in the Selective Functional Movement Assessment here (http://www.functionalmovement.com/site/aboutsfma)
With that said, we need BOTH. Performing core stability exercises as mentioned above during a dynamic warm-up or super-setted in a workout AND doing core strengthening super-setted during a workout.
Run yourself or your client through some of these tests and see what you can do to help improve their movement quality through core stability and core strengthening.
About the Author
Andrew Millett is a Metro-West (Boston) based physical therapist.
Particularly during our long, cold, New England winters.2
The shovel I’m referring to in today’s post, however, has nothing to do with that kind of shovel. Unlike traditional shoveling which sucks – and ranks somewhere between getting a colonoscopy and listening to Donald Trump speak as things I’m not rushing to do – the “shovel” variation I’m highlighting today is (hopefully) more palatable and something you’ll find use for in the weight-room.
HINT: you totally will.
Barbell Shovel Hold
Who Did I Steal It From: Kinda, sorta myself. I wrote about a similar exercise a few years ago – the shovel lift – but came across a quick write-up by Boston-based coach, Matthew Ibrahim, describing this variation…which I felt was brilliant.3
What Does It Do: First and foremost this is a great exercise to help train rotary stability. The asymmetrical – or offset – nature of this exercise makes it a perfect fit for those struggling with chronic back pain. One must “fight” to maintain a neutral and upright torso position. Not only will this target the more superficial or global musculature – glutes (you need to actively fire these bad boys), erectors, abdominals, traps, rhomboids, obliques – but also the deep, stabilizing musculature as well. Think: the “deeper” muscles like TvA, multifidi, etc.
Note: if you perform this exercise while simultaneously performing positional breathing (inhale with FULL exhale, dialing in on rib position) you’ll hammer those deep, stabilizing muscles).
Because the drill is performed in a more or less isometric fashion, it lends itself as a very user-friendly option that pretty much anyone can do.
As a corollary, even with quote-on-quote “healthy” individuals/athletes, it serves as a welcome way to train core stability and possibly as a way to increase full-body time under tension. To that end, it could serve as a nice way for some trainees to add muscle mass to their frame.
Can you dig it?
See what I did there?
Key Coaching Cues: I feel the thrilling (<— kidding) video above makes things self-explanatory. You load a barbell with anywhere from 10-45 lbs. (start conservative, it’s harder than it looks), un-rack, and hold.
Brace your abs, squeeze your glutes, flex your quads, and think about squeezing oranges in your armpits to add even more body tension. Hold for a 5-10s count, rack the barbell, rest for 5-10s, and repeat for a total of 3-5 “reps.” Then repeat the same process with the load on the other side.
Shoot for a total of 3-5 “rounds.”
I’ve been using this as a quick “finisher” with some of my clients/athletes and they love it.
There are many root causes of low back pain and discomfort, and there are many people who’s day to day lives are affected by it.
In my neck of the woods – Strength & Conditioning – the culprit(s) can often be displayed on the weight room floor. Lifters who routinely default into movement patterns that place them in (end-range) LOADED spinal flexion or extension are often playing with fire when it comes to their low back health and performance.
NOTE: this isn’t to say that repeated flexion/extension is always the root cause.
1) There’s a stark contrast between flexion/extension and LOADED flexion/extension. Many people have been programmed to think that all flexion/extension of the spine is bad. It’s not. The spine is meant to move, albeit under the assumption that one can do so without significant compensation patterns (relative stiffness), limitations in mobility, and with appropriate use of both passive (ligaments, labrums, and tendons, oh my) and active (muscles) restraints.
It’s when people start placing the spine under load in ranges of motion they can’t control – often in the name of social media glory – that bad things end up happening.
2) However, there are plenty of examples of lifters (mostly elite level, which is an important point) who have been utilizing techniques many fitness pros would deem incendiary with regards to the increased likelihood of spines all over the world resembling a game of Jenga.
A great example is a piece Greg Nuckols wrote HERE, explaining the benefits – biomechanically speaking – of a rounded back deadlift.
But back pain – specifically low back pain – can strike at any moment. I’ve heard stories of people hurting their back during training of course. But I have also, and I think many of you reading will nod your head in agreement, have heard stories of people messing up their back while bending over to pick up a pencil or to tie their shoes.
Or while fighting a pack of ninjas (hey, it can happen).
In pretty much all cases it comes down to one of two scenarios going down:
1. Ninjas attack.A one-time blunt trauma. Think: spine buckling under load, car accident, falling off a ladder.
2. A repetitive aberrant motor pattern. Think: tissue creep into sustained spinal flexion for hours on end at work.
Dr. Stuart McGill and his extensive research on spinal biomechanics has been the “go to” resource for many people – including myself – to help guide the assessment process and to attempt to figure out the root cause of most people’s low back pain.
A term he uses often is “Spinal Hygiene.”
It behooves us as health and fitness professionals to use the assessment as a window or opportunity to “audit” our client’s and athlete’s movement and to see what exacerbates their low back pain.
“Our approach in identifying the cause of pain during an assessment is to intentionally provoke it. Provocative pain testing is essential and irreplaceable when it comes to determining which postures, motions, and loads trigger and amplify pain and which ones offer pain-free movement alternatives.”
People who have more pain and discomfort in flexion (slouching, sitting, bending over to tie shoes) are often deemed as flexion intolerant. Moreover, people who have more pain and discomfort in extension (standing for long periods of time, bending backwards, excessive “arching” in training), are often deemed as extension intolerant.
Ironically, in both scenarios, people will find relief in the same postures that are “feeding” the dysfunction and their symptoms.
What’s the Fix?
Funnily enough, pretty much everything works. There are any number of methodologies and protocols in the physical therapy world that have worked and have helped get people out of low back pain.
It’s almost as if the appropriate response to “how do you fix low back pain?” is “the shit if I know? Everything has been shown to work at some point or another.”
Active Release Therapy, Graston, positional breathing, stretching, mobility work, rest, sticking needles in whereeverthefuck….it’s all been shown to work.
I’ve had numerous conversations with manual therapists on the topic and the ones who tend to “get it” and elicit the best results are the ones who take a more diverse or eclectic approach.
They’ll use a variety of modalities to best fit the needs of the individual.
That said, I’m a fan of directing people towards therapists who take a more “active” approach as opposed to a “passive” approach.
Both can work and both have a time and place. However one approach is less apt to make me want to toss my face into an ax.
Passive Approach = Ultra sound, electric stimulation, etc. This approach treats the symptoms, focuses on instant relief, and not necessarily addresses the root cause(s).
Active Approach = Is more hands on and more “stuff” is happening. Practitioners who fall on this side of the fence tend to focus more on the root cause – poor movement quality, positioning, muscle weakness, mobility restrictions – and work in concert with the patient/athlete to educate them on how to prevent future setbacks.
Above all, an active approach is about finding and engraining a neutral spinal position, and finding pain-free movement.
I think by now you know my preference.
Tony, Shut-Up, What’s the “Forgotten” Cause of Low Back Pain?
Well, to say it’s “forgotten” is a bit sensationalistic. My bad.
We tend to solely focus on either flexion or extension intolerance…and granted those are the two biggies.
However, have you ever had someone come in and pass those “screens” with flying colors only to complain of back pain or discomfort when he or she rolls over in bed, rotates, or maybe experiences an ouchie when they sneeze?
What’s up with that? And bless you.
Spinal Instability – That’s What’s Up.
Instability can rear it’s ugly head with flexion/extension based issues too, but it becomes more prevalent when rotation is added to the mix.
The body doesn’t operate in one plane of motion, and it’s when people meander out of the sagittal plane and venture into frontal and/or transverse plane movements, when they begin to get into trouble.4
The muscles that provide intersegmental stability to the spine may be under-active and may need some extra TLC.
I’ve worked with people who could crush a set of barbell squats (they handle compression and shear loading well), but would complain of l0w-back pain whenever they did anything that required rotation.
The fix is still going to be helping them find and maintain spinal neutral – I don’t feel this is ever not going to be a thing. Kind of like too much money in politics or LOLcats.
In addition, gaining motion from the right areas – hips, t-spine, for example – will also bode well.
However, I’d like to offer some insight on what exercises might be part of the repertoire in terms of “pain free movement” when spine instability is a factor.5
The Stuff Most People Will Skip (It’s Okay, I Won’t Judge You)
One word: planks.
Dr. McGill has stressed time and time again that improving spinal endurance (and hence, stability) is paramount when dealing with back pain. They key, though, is performing them in ideal positions.
I chuckle whenever someone brags about holding a 5-minute plank. When in fact all they’re really doing is hanging onto their spine….literally.
1. It’s a bonafide way to help people gain a better understanding and appreciation for creating full-body tension.
2. I like cueing people to start in a little more (unloaded) flexion, so that by the end they’re residing in a neutral position anyways.
3. When performed as described in the video below, 10s will make you hate life.
To up the ante you can also incorporate 3-Point Planks (where you take away a base of support, either an arm or a leg, and hold for time) or Prone Plank Arm Marches:
You can also incorporate Wall (Plank) Transitions where the objective is to cue people to keep the torso locked in place. Motion shouldn’t come from the lumbar spine then mid-back. Everything should move simultaneously, as follows:
Deadbugs
I’m a huge fan of deadbugs. When performed RIGHT, they’re an amazing exercise that will undoubtedly help build core and spine strength/stability.
A key component to the effectiveness of a deadbug is the FULL-EXHALE (check out link above). However, one variation I’ve been using lately is the Wall Press Deadbug (for higher reps).
https://www.youtube.com/watch?v=gmtsGHk34C0
Here the objective is to engage anterior core (pressing into the wall), to breath normally, and then to perform a high(er) rep set (10-15/leg) making sure motion comes from the hips and NOT the lower back.
If you want to build stability (and endurance) this is a doozy.
Stuff People Are More Likely To Do (Because It Involves Lifting Things)
1. Offset Loaded Lifts
This is an untapped, often overlooked component to back health and performance. Offset or asymmetrical loaded exercises are a fantastic way to train spinal stability and challenge the core musculature.
By holding a dumbbell on one side, for example, you have work that much harder to maintain an upright posture and resist rotary force:
Likewise, with offset presses, the core must fire to prevent you from falling off the bench. Unless you fall off because you’re drunk. If that’s the case, go home.
And we don’t have to limit ourselves to dumbbells, either. We can use barbells too.
2. Shovel Deadlift
3. Farmer Carries
Farmer carries – especially 1-arm variations – can be seen in the same light. The offset nature is a wonderful way to challenge the body to resist rotation (rotary force) and to help build more spinal stability.
4. 1-Legged Anti-Rotation Scoop Toss
Another option is to perform anti-rotation drills such as the 1-Legged Anti-Rotation Scoop Toss. As you can see from my un-edited video below….it’s tougher than it sounds.
5. Anti-Rotation Press
A bit higher on the advanced exercise ladder, the Anti-Rotation Press is another great drill to help hone in on increased core strength and spinal stability. To make it easier, use a longer stride stance; to make it harder go narrower.
This Is Not an End-All-Be-All List
But a good conversation stimulator for many people dealing with low-back pain nonetheless. Have you got own ideas or approaches to share? Please chime in below or on Facebook!
With apologies to any 90s hip-hop and R&B fans, today’s exercise has nothing to do with Aaliyah’s hit “Rock the Boat.”
OMG – such a classic song.
I listen to this song – as well as other songs from all her albums (Age Ain’t Nothing But a Number, One in a Million, Aaliyah) – and can’t help but wonder “what might have been?” if she hadn’t died so tragically back in 2001 in an airplane crash.8
Alrighty then, lets move away from the somber tone shall we?
I’ve got a quick-n-dirty exercise for you to try this week.
Rock the Boat
Who Did I Steal it From: Surprisingly, not Ben Bruno (the landmine Jedi that he is).
Last week, before heading to NY, I stopped by Mike Reinold’s place, Champion Physical Therapy & Performance (in Waltham, MA), to film a few podcasts and to get a quick lift. Strength coach Rob Sutton showed me this bad boy, and I really liked it.
Outside of that, it’s an excellent drill that trains the abdominals (core) in a more “functional” manner. I.e., anti-extension, not to mention there’s a high degree of resisting rotation (loop stress) as you, you know, “rock the boat” moving the barbell from side-to-side.
Key Coaching Cues: This is a self-limiting exercise in that the ROM used by each individual is going to be determined by his or her’s ability level. The idea, however, is to “lock” things down and place a premium on lumbo-pelvic-hip control (no excessive lumbar flexion or extension).
Foot width will vary (closer together = harder).
Shoot for 5-8 repetitions per side. But you could also make this a timed event, say, 15-20s, working up to 30-40s.
After three movies, a Twin Peaks marathon (because, why not?) and far too many Tim Tams to count10,Lisa and I made it back to Boston from Sydney after a marathon 27 hour travel extravaganza.
We landed at Logan at 7 PM, were in our apartment by 8, and in bed by 9.
Not too shabby, right?
Except now I’m on “Sydney time” and was wide awake at 2:30 AM this morning. I tried to fall back asleep, but decided it was a pointless endeavor and opted to get up and tackle my inbox and catch up on some programs I needed to write.
I have to apologize to the clients who’s programs I wrote at 4AM. I was cranky, which may explain the inordinate amount of squatting you’re doing this month. Sorry (but not sorry).
Anyhoo: as much as I’d like to sit here and wax poetic about my Aussie trip, I know this isn’t the section where people want to read about that.11
SIDE-NOTE:HERE’s a nice write-up about my workshop in Ballina, though.
I’m still easing my way back to my regular schedule. Or as Lisa would put it, “hatching.” To that end, I’m going to keep things simple today and share a nice birddog variation. Because, you know, people go bat-shit crazy for birddogs.
(Emphasis on the slight exaggeration)
Birddog With Band RNT
Who Did I Steal It From: Brett Jones
What Does It Do: Birddogs aren’t anything new (or exciting). Watching paint dry, or grass grow, or an episode of Downton Abbey is Mardi Gras compared to birddogs.
That being said, any fitness professional would be remiss not to recognize they’re an integral drill/exercise that provide a lot of bang for our “core-training-motor-lumbo-pelvic-hip-control-OMG-BIRDDOGS-ARE-THE-SHIT buck.”
Not only that, birddogs are an excellent way to train rotary stability in addition to helping people learn to dissociate their hips from their lumbar spine. I.e., learning to gain movement from the hips and NOT the lower back.
Besides, if Dr. Stuart McGill says to do birddogs, we all better sure as shit do them!
In terms of this particular iteration, the band helps to kick in a little RNT (Reactive Neuromuscular Training) action which, by and large, helps the trainee to better perform the movement.
Speaking candidly: most people BUTCHER birddogs. To the point where their performance and execution is more counterproductive than helpful, often feeding into many of the mechanisms that cause one’s back pain in the first place.
I like using the band because it instantly gives the trainee feedback which forces him or her to clean up their technique.
Key Coaching Cues: using a PVC stick is fine (where you lie it lengthwise and tell the person to keep three points of contact: back of head, between shoulder blades, as well as their sacrum), and I’ve seen some trainers and coaches opt for placing a foam roller on the lower back telling their athlete or client to “balance” it during their set.
I don’t like this latter approach. I find that far too many people end up “balancing” the foam roller by defaulting into lumbar hyperextension, which defeats the purpose of the drill in the first place (which is to try to ensure spinal “neutral” throughout the set).
Adding the band does a few things:
1. It provides a very slight resistance, almost “feeding” the dysfunction, so the trainee is better suited to counteract it.
NOTE: don’t be a hero and be too aggressive with the band selection. As you can see in the video above all I’m using is a 1/2 inch “easy” band. Save the max effort work for squats and deadlifts chief.
2. The band also forces people to SLOW the EFF DOWN and think about what they’re doing. This isn’t an exercise you want to rush in the first place; so anything that allows me to slow people down is gravy in my book.
3. I also find the band allows for a little diversity. I can regress the exercise as needed and have people ONLY perform with the legs moving or the arms; and the resistance of the band makes it easier to use the cue “get and keep your spine long.
4. Lastly, the band encourages more anterior core activation which helps to keep things in line, literally. Many will fall into anterior pelvic tilt on this exercise – a big no no – and the band will encourage more posterior pelvic tilt and help to maintain neutral.
Use these as part of an extended warm-up or as a “filler” exercise for sets of 5-8 repetitions per side. Quality reps are paramount!
What’s up everyone!? I enjoyed a nice, relaxing, extended Labor Day weekend, hence the reason why I didn’t post anything yesterday.
Did you miss me? I didn’t think so….;o)
But in case you’re wondering, I was able to catch up on some reading over the past few days and in addition, did what every other guy who’s in a relationship was inevitably dragged into doing yesterday………
……following his girlfriend around as she attacked every Labor Day sale within a ten mile radius.
The Container Store, Macy’s, Limited, Sephora, and I don’t remember what else. I blacked out after a point.
As you can see Lisa was in seventh heaven.
I, on the other hand, was a beacon of palpable enthusiasm.
Enthusiasm to want to throw an ax into my face.
Looking at the picture now, and noticing the gentleman to my right, I can’t help but think of that bench as a some sort of shopping island purgatory for boyfriends/spouses. Hahahaha.
It wasn’t all that bad, though. I planned a head and brought some reading material to help keep me occupied – the Kama SutraStarting Strength 3rd Edition.
I’ve read the previous two editions of the book and have to say that this third edition is the bomb diggidy and blows the other two out of the water.
The original(s) were already towards the top of my list of books I routinely recommend to fitness professionals, but this third edition is absurdly good and has now taken the #1 spot.
In any case, shopping nightmares and book recommendations aside I wanted to share a quick video with all of you on one of my new favorite exercises.
Band Horizontal Abduction with Press
Who Did I Steal It From: I first read about (and saw) this exercise over on Mike Reinold’s site when former Cressey Sports Performance intern and now Sayco Performance owner and renowned swimming strength coach, Tad Sayce, wrote about it.
When I first saw it all I could think to myself was 1) this is brilliant and 2) why the hell didn’t I think of that!?!?!
What Does it Do: First and foremost it should be noted that it’s important to get comfortable with and master each component alone before combining the two.
With the obvious out of the way, what I like about this exercise is that it helps reinforce many of the things we try to ingrain with our overhead athletes – as well as those with chronic shoulder issues – which is, proper scapular movement, scapular stability (in both retraction and posterior tilt), and as Tad notes, “the ability to maintain position in the presence of increasing tension.”
And it’s with that last point why I feel this is such a rad exercise. The “press” component adds an anti-rotation component that’s unique to any other exercise of its kind.
Key Coaching Cues: It (should) go without saying, but I have to say it nonetheless. This IS NOT a max effort exercise you big meathead! So lets save the super bands for things that actually warrant their use.
I’m more concerned with the QUALITY of this movement, and it’s important to keep this as the running theme while performing it.
Brace the abs and be sure you’re not cranking through your lower back as you perform the abduction component. If you do, the resistance of the band is too much. The movement should be initiated by retracting the shoulder blade and then abducting the arm until it’s in the “T” position. Another thing to note is to make sure you don’t go too far to the point where the humeral head translates anteriorly.
Once the arm is in the “T” position, gently press with the opposite arm until it’s fully extended out in front of the body. Pause for a 3-5s count and repeat.
I like to use sets of 5 here. 5 reps of 3-5s holds.
I know what some of you may be thinking: “Really, Tony, a post on deadbugs? What’s next….telling us how much you love Twilight or that you’re adopting another cat? You haven’t gone soft on us now have you?”
<—– LOL, get it?? I actually put a picture of a “dead bug” here, when I’m actually just referring to the exercise. High five!
Full confession time. Okay, I admit it: back in 2008 I read the first Twilight book. But only because I wanted to see what all the hoopla was about and see for myself why so many people were going bat shit crazy over it.
Well that, and it was a dark period in my life. I was single at the time and was going through some existential phase where I was trying to figure out what everything means. Vampires wasn’t the answer.
I read it, didn’t care for it, and moved on with my life.
As far as the cat thing. I plead the 5th…..;o)
With regards to deadbugs, however, in many ways I feel they get a bad rap and that they’re one of the more UNDERrated core exercises out there. Perhaps a more apropos way to explain things would be that deadbugs are almost universally seen as a “sissy” exercise and a waste of time by many trainees, meatheads, and athletes alike.
I couldn’t disagree more.
I was recently asked by MensHealth.com to provide a “hot list” of some of my favorite go to core exercise that I either use with my athletes and clients, or that I pepper into my own training as well.
1. I didn’t want the incessant eye rolling pointed in my direction.
2. Despite their perceived “easiness,” deadbugs are actually an exercise that are absolutely butchered by, well, everybody.
3. As such, I took the greedy way out, held back, and decided to keep deadbugs to myself and dedicate an entire post on them in an effort to persuade everyone reading that they’re the bees knees (and that they should take the time to pay a little more attention to detail).
Getting the obvious out of the way: deadbugs are an exercise that, for all intents and purposes, help with motor control and can be seen as a “baseline” exercise to ascertain whether or not someone has any glowing imbalances that need to be addressed.
Let me explain.
While it’s fairly common in the athletic realm, more and more we’re seeing people in the meathead/weekend warrior or what I like to call the “I like to lift heavy things category” present with an overextended posture or anterior pelvic tilt.
While this isn’t necessary anything to write home about – there IS a “range” of acceptable anterior pelvic tilt – it does become problematic when it’s excessive and otherwise leads to other imbalances up and down the kinetic chain.
For starters, those in excessive anterior pelvic tilt will almost always have extension based back pain – where the facet joints, posterior discs, etc are placed in an ungodly amount of stress which can manifest into more profound issues like spondylosis (end plate fracture) down the road.
Mike Robertson has a cool term for this called Flawed Active Stability – whereupon you’re cueing the body to engage the paraspinals and spinal erectors, effectively crushing the spine, in an effort to gain stability.
What’s more, in general, because of the misalignment associated with APT, it’s not uncommon for people to experience chronic pulled hamstrings, anterior knee pain, hip pain, and a myriad of other issues.
All of this to say: it just plain sucks donkey balls and can really mess with one’s training in the long run if not addressed or at least kept under wraps.
But again, I’m just stating the obvious.
Do Your Deadbugs, Yo!
Deadbugs are a fantastic way to teach the body to “encourage” more posterior pelvic tilt while simultaneously enhancing motor control and to engage the lumbo-pelvic-hip stabilizers to do their job.
As note above, most people flat out do a piss poor job when it comes to performing deadbugs correctly. Here’s a great example.
Upon first glance those don’t look too shabby, right? Offhand those look pretty good. But with a closer look we can definitely comb through some common technique flaws that many should be able to appreciate.
1. Before anyone makes fun of me for tucking my t-shirt into my sweatpants, just know that I did it for a reason. Which was to show how most people perform their deadbugs: with an excessive arch in their lower back and with their rib cage flared out.
Well that and we had people visiting the facility from Australia yesterday and I didn’t want to make things awkward by walking around with my shirt off.
Admittedly, it’s still hard to see in the video above, but if you were in the video with me (oh, hey, hello!) you would easily be able to fit your hand in between the floor and my lumbar spine. This shouldn’t happen and essentially defeats the purpose of the entire exercise.
And this is why I tend to lean more towards deadbugs from the get go – rather than birddogs – because the floor provides more stability and kinesthetic feedback to the body.
2. Another mistake is that people tend to rush this exercise. Many will just haphazardly flail their arms and legs around hightailing it through the set. While we could make a case that extending the arms and legs may be too much of a progression and we need to REGRESS the exercise – read THISfor more ideas – much of the time it just comes down to slowing people down.
All that said, lets take a look at what PROPER deadbug should look like.
I know it doesn’t look much different than the first video, but I assure you there’s a lot to consider.
1. My shirt’s still tucked in.
2. My lower back is flush against the floor – and I’m encouraging more posterior pelvic tilt.
3. Moreover I’m also taking a massive breath and inhaling THROUGH MY NOSE to focus more on a 360 degree expansion into my torso. In other words: I’m not just breathing into my stomach, but also trying to expand sideways and INTO the floor as well as my ribcage (but without allowing it to flare out too much).
4. From there I lower contralateral limbs – controlled, in an effort to resist extension – while FORCEFULLY exhaling my air through my mouth. I do this until ALL my air is out.
By doing this a few things happen (and I apologize in advance for all the enumerations in this post):
1. I slow myself down.
2. The diaphragm is better engaged.
3. Many don’t think of this part, but with all my air exhaled out, I now have nothing to help stabilize my spine except the muscles themselves.
It’s not uncommon for people to literally start shaking as they proceed with their set. This is okay – so long as you maintain proper spinal position – as it just demonstrates that the muscles in the surrounding area are now doing their job more efficiently.
I’ll typically shoot for 2-3 sets of 5-8 repetitions PER SIDE.
And there you have it. It’s nothing flashy or Earth shattering, but I guarantee that if you go a head and try to perform your deadbugs in this fashion you’ll notice how much MORE challenging they can be, and they’re anything but a sissy exercise.
Lets be clear from the start: there’s really no such thing as a “perfect” assessment. I’ve seen coaches and trainers spend as little as ten minutes assessing their clients, as well as those who take roughly the same time it would take to read the Harry Potter series, and both have been equally as successful with getting results.
Although, in the case of the latter, I’d argue that some fitness professionals spend an inordinate amount of time assessing things that don’t really matter and/or are outside their scope of practice in the first place. Big toe dorsiflexion? Really?
The person standing in front of you is 25 lbs overweight and moves about as well as a one-legged pirate. It’s not rocket science. Get them moving. End of story.
Nevertheless when it comes to assessment I’ve always lived by the mantra of “different strokes for different folks.” As an example, at Cressey Performance, we work with a metric boat load of baseball players which is a unique population with regards to the demands placed on their body. Much of what we look at with them – comparing total glenohumeral ROM between dominant and non-dominant sides, for instance – may not be relevant to someone that walks into the facility who’s just looking to get a little stronger, fix their nagging lower back pain, or not be embarrassed to take their clothes off with the lights on.
That said, how we go about assessing our athletes and clients at Cressey Performance suits ourneeds, ourfacility layout, and our business model.
Put another way: how we go about doing things isn’t to say that we’re right and everyone else is wrong; nor is it to imply that our way is the end-all-be-all of assessment; nor is it suggest that everyone should kneel before us General Zod style:
It all mounts down to what we’ve found works for us. It’s as simple as that.
However, I will say that I do (and always will) feel the push-up is an unsurpassed assessment tool that should be a staple in most assessment protocols.
Not many “tools” can give as much information and feedback to the fitness practitioner than the push-up, and it behooves anyone to dismiss it.
Did you hear me? I said it behooves you! I’m bringing back old-English people, so you know I mean business. You’re just lucky I didn’t grab a white glove, slap you across the face, and challenge you to an old-fashioned bare knuckled boxing match.
Taking actual technique out of the equation (it amazes me how many guys come in to see us with cranky shoulders, only to have some of the worst push-up technique this side of Charlize Theron in the movie Prometheus), the push-up assessment parlays very well to a variety of populations.
With our baseball guys – and even our general population clientele – it gives a good scope to see how well their scapular stabilizers (particularly the lower traps and serratus anterior) are working – if one or both are weak, the scapulae will be more anteriorly tilted and abducted (not “hugged” against the rib cage) which can result in compromised stability.
Too, and an often overlooked component, is anterior humeral glide. You can see this in someone’s standing posture very easily, but it also becomes very pronounced when you watch someone perform push-ups, or just hold the push-up position isometrically.
This can be detrimental in that if it’s not corrected or just left to it’s own vices can lead to increased anterior instability of the shoulder, which as we all know, not only kills baby seals, but also makes your shoulder hate you.
Using a more glaring and obvious anecdote, push-ups are also a fantastic assessment tool because they make it abundantly clear where someone’s weak points are. And almost always, many are going have weak lumbo-pelvic-hip control – to the point where they’ll be hanging on their lumbar spine as well as rocking a nasty forward head posture.
On the flip-side many may also demonstrate a dominant rectus abdominus pattern, which typically means their external obliques are non-existent and they probably spend way too much time in front of a computer stalking people on Facebook.
Again, in both scenarios it’s just valuable feedback for you which will dictate that person’s programming moving forward.
Another dimension of the push-up assessment that I never really thought of before – and something I stole from Mike Robertson – is the concept of ‘core delay.’
In short, instead of starting someone in the standard push-up position – away from the floor with arms fully extended – you start from the floor.
In this way you can see whether or not someone has adequate stability or if there’s a delay in firing, and the hips come up first.
The key is to make sure that whoever it is you’re testing is completely relaxed on the floor, and then you just observe and make a judgement call from there.
The first rep would be considered a “passable” rep and shows that the person (me) has good core stability. They (me) were able to keep the spine in a “neutral” position and everything seemed to fire simultaneously.
And, not to mention their (um, me) triceps were gunny as shit……;o)
With the second rep, though, there was a little wackiness, and you’ll notice how my hips shoot up first and my lumbar spine goes into immediate hyperextension. This shows a ‘core delay,’ which is just a fancy way of saying “dude needs to work on getting his glutes to fire to posteriorily tilt the pelvis more, along with the external/internal obliques and RA.”
In the end I just feel utilizing the bottoms-up push-up is another great way to evaluate clients and to better ascertain where their weaknesses lie and how their programming may manifest moving forward.
There’s no debating the fact that planks (and all their infinite variations) have a place at the “big boy” table in terms of exercises which 1. offer a horde of benefits, and 2. are wildly popular in the fitness community.
Personally I have a love/hate relationship with them.
I love them because, well, it’s hard not to appreciate/respect the long-standing work of guys like Dr. Stuart McGill, Dr. Craig, Liebenson, and a slew of others who are way smarter than me who have routinely shown that building and improving upon spinal endurance is a key factor in addressing low-back pain.
Having the ability to buttress shear loads and maintain a “neutral” spine both from an anterior/posterior perspective (prone planks) as well as laterally (side planks) goes a long ways in demonstrating one’s ability to control the lumbo-pelvic-hip area.
While I don’t have the exact numbers in front of me, Dr. McGill has noted that one should be able to hold a perfect prone plank position for roughly 90-120s, and a side plank for roughly 60s (on both sides).
If one is unable to do so, compensates in any way, or there is a major asymmetry between left and right sides on the side plank, it’s cause for a red flag and more than likely will result in a dolphin gets punched in the face.
In short, planks (or to be more precise: the ability to perform them correctly) can be a valuable assessment tool.
Which brings me to why I also hate them.
Walk into any gym, anywhere, at any time, and you’ll undoubtedly see people planking away. And, more often than not they look god awful.
There’s this….
And this….
And this, which is actually kinda cool….
Worse is that some people will brag – like it’s a badge of honor – that they can “plank” for five minutes. Well la-de-freakin-do. Unless you’re training for some World Planking Championship, who cares????
And that’s not even the worse offense. I’ll give a free pass to the general fitness population because they don’t know any better. But what really grinds my gears is when I see personal trainers having their clients perform planks for minutes on end, and it looks like the first two pictures from above.
What purpose does that serve? And more to the point: how is it you’re letting your client get away with such atrocious technique???????
AHHHHHHHHHHHH.
Okay, deep breaths Tony. Everything will be okay.
Just so we’re on the same page: I am NOT saying that planks are a waste of time. Like I said there’s definitely a ton of efficacy for their inclusion in a well-designed training program. But I’m also in the camp that believes there’s a rate of diminishing returns after a certain point.
If you’re working with a banged up client with a history of low back pain that’s one thing; but if you’re working with a “healthy” client with no contraindications or symptoms then I’d rather make planks more challenging rather than go for longer periods of time.
Which brings us to today’s exercise you should be doing.
Prone Plank Push-Pull
Who Did I Steal It From: fellow strength coach and Cortland State alum, Justin Kompf.
What Does It Do: it definitely brings a new flavor into the mix on two fronts.
1. By taking one arm off the floor, you’re taking away a base of support which inherently makes the exercise more challenging.
2. It also adds a dynamic component where the trainee has to RESIST me with the push component, and then pull AGAINST my resistance with the pulling part.
All this while still maintaining a “neutral” spine and not allowing the torso to compensate in any way.
Key Coaching Cues: All the same rules apply, and this means making sure your technique is spot on. Meaning, there should be absolutely no compensating in the lumbar region (dipping or hiking), no forward head posture, and the glutes should be firing along with a significant abdominal brace throughout the duration of the set.
Additionally, I like to yell out the cues during the set: Push!, Pull!, Push!, Pull!, your sister’s hot!, Push!, Pull!, Push!, Pull!, so on and so forth.
Shoot for 6-8 reps on one side, switch, and repeat the same process on the other.
And that’s about it. Give it a try today and let me know what you think!