CategoriesExercises You Should Be Doing Program Design Strength Training

One of My Favorite Core Exercises: The Lying Overhead Pullover

It’s a shit-show of a week on my end this week.

For starters I’m involved with a pretty cool product – The Trainers Toolbox – that’s set to be released next week that’s going to set the fitness industry on fire. I won’t give away too much here, but suffice it to say it’s going to help a lot of fitness professionals.1

Second, we’ve had a cranky toddler on our hands all week this week (wake-up call of 4:30 this morning as a matter of fact), so, basically, FML.

Hence I haven’t had much time to write for my own site this week. Thankfully I have some awesome contributors – like Dr. Nicholas Licameli – who are more than willing to send me articles out of the blue and make me want to buy them a steak dinner.

Enjoy.

Copyright: valeriylebedev / 123RF Stock Photo


There are some things that you just don’t hear everyday”

-“Who keeps eating all of the kale!?!?”

-“Of course I understand why my cable bill is $37.97 more this month than it has been in the past 15 months.”

-“I hope I get placed in Ravenclaw or Hufflepuff…please, Ravenclaw or Hufflepuff…”

-“Let’s talk about Fight Club.”

-“A strong core? No thanks, not interested.”

There seems to be a slight stigma surrounding training the abs and core while lying down because, as some say, there are “better” and more “functional” ways to train.

While this may have some truth to it, I don’t mind training the abs and core on the ground. Whether or not something is “functional” really depends on the individual and his/her goals (is a standard plank really “functional?”).

In order to have functional carryover to the task at hand, the training must be specific to the activity (more on this below).

This means that “functional” will be different for everyone.

If you’re a weight lifter or powerlifter, “functional” core strengthening may include tempo reps, pause reps with postural bracing, breathing drills under sub-maximal loads, etc.

If you’re a baseball player (check out Mike Reinold and Eric Cressey, if you haven’t done so already), “functional” core strengthening may include plyometric twists, anti-rotation movements, quick accelerations and directional changes, etc. The point here is that “functional” is different for everyone and if the goal is simply to progressively load and train the abdominals, don’t fear the floor.

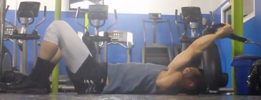
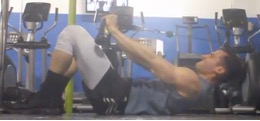
Today I’d like to share with you an exercise that I call the lying overhead pullover (LOP) (see the video link at the end of this article). I think I invented this exercise, however Chuck Norris and Total Gym do have a variation of it in their manual and let’s be honest, I do not want to get on the bad side of a man who once challenged Lance Armstrong to a “Who has more testicles” contest and won by five.

Other than the Total Gym variation, I have not seen it anywhere else.

How To Do It

Before we dive into how to perform the LOP, let’s have a quick review on what it means to “brace the core:”

“From the top down, we have the diaphragm, from the bottom up we have the pelvic floor, and around the sides we have the deep abdominals that surround the midsection like a corset. To engage the diaphragm, take a breath in through the nose and brace. To engage the pelvic floor, pull up as if holding in gas or urine. To engage the deep abdominals, tighten up the midsection as if putting on a tight belt after Thanksgiving dinner or walking into a cold pool as the water drifts up to your navel.”

It is imperative that you understand how to perform a pelvic tilt and properly brace the core…the entire exercise depends on it.

For more on this, check out my videos right here and here (these are from the archives, so bear with me…but the content is still relevant!).

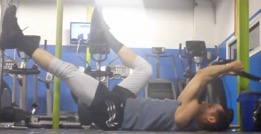
To perform the LOP, lie on your back in front of a low cable station or a low anchored resistance band. Bend the knees and perform a posterior pelvic tilt by pressing the small of your back down into the floor. Reach overhead and grab the rope or band. Maintaining the pelvic tilt, bracing the core, and keeping the arms straight, pull the rope down toward your knees.

Squeeze the abs for a count, and slowly return to the start position.

Progressions and Regressions

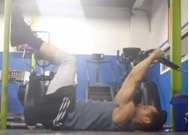
As with any exercise worth writing about, it must have the ability to be modified to better meet individual needs such as level of experience, pain, personal preference, etc. It may seem intuitive that decreasing or increasing the resistance would make this exercise easier or harder to perform, however how changing the range of motion affects the difficulty of the exercise may be less intuitive.

The LOP is an anti-extension exercise, which means it challenges primarily the anterior abdominals to resist spinal extension.

During this exercise, the spine and pelvis collectively become a fulcrum and our arms and legs become levers. The lever arm and extension moment increase simply by stretching out a leg or stretching the arms overhead. As the lever arm increases, it becomes more challenging to prevent the spine from arching off the ground into extension.

By maintaining that pelvic tilt, we are resisting extension.

Looking for a nasty little extended set to take past failure?

Start with the most difficult position and regress in a stepwise fashion to easier versions as muscle failure is reached, again and again.

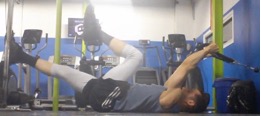
Another simple way to alter the range of motion would be to add a small crunch to the mix.

This would allow us to not only resist extension, but also overcome it with slight flexion. Be sure to crunch up almost into a 45-degree diagonal as opposed to down toward the feet or straight up toward the ceiling. This will ensure proper tension and alignment with the line of pull and resistance curve of the exercise.

Why I Like the LOP

There is one very important function of the abs that is often overlooked, and that is resisting movement. Sure, everyone knows that the abs flex, side bend, and rotate/twist the spine, but besides causing movement, the abs collectively function to resist movement and stabilize the spinal column.

The LOP challenges that function nicely.

Another reason why I like it is that the LOP trains lumbo-pelvic stability during upper and lower extremity movement.

Why is that important?

In order to perform pretty much any sport, exercise, or functional task, the spine has to provide a stable base for the extremities to move about, otherwise it would be like vertical jumping on sand or firing a bazooka off of a kayak (why you’d have a bazooka on a kayak is beyond me…).

I am not saying that performing the LOP will directly increase power output and safety during running, cutting, kicking, punching, squatting, overhead pressing, etc.

Nope. Sorry, but the principle of specificity still reigns supreme.

If you want to improve your 40 time, better get sprinting! If you want to improve power output when kicking a soccer ball, better get out on that field and kick! If you want to improve your squat, better read this article and of course…squat!

What I am saying is that the LOP is a great way to feel, get accustomed to, and train spinal stability with extremity movement, which is foundational to all of those previously mentioned tasks.

And That’s That (LOP in Action)

So be sure to give the lying overhead pullover a shot. Depending on how it is done, the LOP can be used as a top down ab movement, a bottom up ab movement, or a core stability movement. Feel free to experiment and find what works best for you and your goals.

Enjoy!


About the Author

Nicholas M. Licameli, PT, DPT

Doctor of Physical Therapy / Pro Natural Bodybuilder

Nick believes in giving himself to others in an attempt to make the world a happier, healthier, and more loving place. He wants to give people the power to change their lives in hopes to leave this place better because he was here. Bodybuilding and physical therapy just act as mediums for carrying out that cause. Love. Passion. Respect. Humility.   Never an expert. Always a student. Love your journey.

Youtube: HERE

Instagram: HERE

Facebook: HERE


CategoriesCorrective Exercise Program Design

4 Exercises to Strengthen Your Core and How to Program Them For Lower Back Pain

Raise your hand if you watched The Royal Wedding this weekend.

*raises hand*

But I only tuned in because Julian was up so early Saturday morning and there was nothing else to watch.

Yeah, yeah….that’s it.

Anyway, I’ve got an excellent guest post for you today from Florida based trainer William Richards covering a topic pretty much everyone can get on board with…..

…..low back pain and how to choose or modify the best bang-for-your-buck exercises to help nip it in the bud.

Copyright: lightwise / 123RF Stock Photo

4 Exercises to Strengthen Your Core and How to Program Them For Back Pain

When it comes to core training and sensitive lower backs I have been through the gauntlet.

I have experimented on myself and have worked with so many frustrated clients who want to train their core but always seem to re-injure their backs or stay on what I call their own pain cycle.

They go to the gym with minor inflammation thinking a good workout is what they need. They knock out what they think is a “safe” workout and spend the last 20-30 minutes hitting some hanging leg raises, decline sit-ups and maybe even some weighted jumping ball slams (because they heard a stronger core will beat their back pain). The intention behind this workout was good and hopeful but they go home and slowly start to experience this gradual increase in pain and tightness in their lower back.

Fast forward 24 hours and mornings feel like you have a tree branch wedged between two vertebrae.

Forget bending over to tie your shoes let alone put pants on. You feel 80 years old until the Extra Strength Tylenol and Ibuprofen concoction kicks in and you get a small glimpse of what it feels like to be pain-free and healthy. For most this is the only sense of relief they will ever experience.

We all know lower back pain can be complex. There could be a lot of different factors at play here but one of the key topics I want to shed light on is the core training approach.

How Should I Approach Core Training With Lower Back Pain?

In my experience with coaching corrective core training for sensitive backs, there are three key points I find myself covering over and over again.

(1) Safe modified approaches to “modern” exercises that have the sensitive back in mind.

When you here modification you immediately think “an easier version of what your showing me.” Which is true in most cases, but when dealing with a sensitive back your not looking for “easy” you’re looking for a certain pain threshold that the individual/you can control.

This threshold is extremely important to coaching sensitive backs because that very threshold can put someone on the couch for a week popping pain meds or training and moving towards freedom and a faster recovery.

So when picking and executing your core exercises think more about how the variation is affecting the way your lower back feels in the moment AND 24 hours after doing it.

Nothing you should be doing will consists of training through pain. Often times any irritation or discomfort from an exercise will kick in the next day once all the feel good chemicals have worn off.

(2) The correct coaching through these modifications to safely progress to the level of difficulty that is safe for you.

Once you have dialed in on your own safe threshold it’s time to start modifying the exercise to fit your needs. There are tons of ways to do this so I will highlight a few of my top cues here.

If you’re experiencing pain:

-1- Check the position of your pelvis.

Is it neutral?

Especially with exercises like the ones you will see below it’s paramount that you take unwanted stress OFF the lumbar spine. Some of this stress is commonly caused by an overextended or flexed lumbar spine. If you’re experiencing pain, simply being overextended or over flexed will only get worse when you add compression or a form of challenge to the position.

Note From TG: Here’s a great way to teach/cue people how to (safely) move their spine into flexion and extension IN CONTROL. Sometimes back pain is the result of being “stuck” in an over extended or flexed position. Allowing people “access” to range of motion can be a game changer.


-2- Bring the loads or limbs closer to your body.

Wait, what?

Try this out: If you have back pain, take a 10 lb plate and hold it straight out in front with your arms stretched out. How does that feel on your lower back?

Now bring the weight closer to your chest. Did that bring relief?

The majority of instability issues will produce pain with the outstretched arm. The closer the load or limbs are to your body the less your body (in this case your lumbar spine) has to work to keep you upright.

You can apply this cue to exercises such as the plank (side and front) or a Pallof press. The more fully weight bearing you are with the plank the more stress it will put on the irritated lower back. The same goes for the Pallof Press.


The further outstretched your arms are the more demand it will place on the lower back.

The more sensitive the lower back the more pronounced this will be.

(3) A Mindset Change

When training your core for back pain relief you have to adopt this way of thinking.

It’s not about the exercise you’re doing but the position of your painful points when doing the exercise. I did a quick 1-minute explanation of what I mean below:

Where Should I Start With Core Training?

Now that we have covered how you should be approaching core training, let’s get into applying what we learned. Below I want to show you four of my favorite exercises to use and modify for various levels of clients.

Let’s dive in.

1. Banded Quarter Crunch


One of the biggest reasons I love this exercise so much is because of the full upper body muscle recruitment it requires. Sometimes as new lifters or even those who are more seasoned we forget that bracing the trunk and engaging our body with a certain movement requires a lot of interaction between joints and muscle fibers.

To save on energy we subconsciously do the bare minimum to get the exercise done.

This is where weak links in our chain are created.

When doing these banded crunches I want you to think about bringing your arms down and out and engaging your lats before you begin moving anything. When in position be sure your spine is neutral, shoulder blades are tucked down and back and your chin is pulled in towards your neck.

When you go for lift-off, the goal is to move everything together and using the trunk as your primary mover while everything else upstream stays rigid and stiff. One way I like to cue this exercise so that the person isn’t trying to do too much of a sit up is to think about pushing your for-head up towards the ceiling. This will actually make the exercise seem a bit harder and trigger an even more intense muscle fiber recruitment.

You can get creative with this when it comes to the sets and reps scheme. You can do just reps or holds for a number of breath cycles. One rep would be a lift-off followed by a full cycle of breathing (inhale and exhale). For holds, after lift off, you can cycle 3-4 breaths before returning to the starting position.

2. Banded ISO-Deadbug


The dead bug can be a major let down for someone with a sensitive back. Most articles you find on the internet for lower back pain and core training you will find the dead bug. Unfortunately, those who take the dead bug at face value and don’t know how to tailor it to fit them are the ones who quit on the exercise before any benefit is seen.

In this video, I show you four variations that you can work from easy to more difficult with this exercise. We are going to use a similar band like the exercise above to help with upper body engagement.

3. Banded Sit Backs With ISO Hold


One thing I am a huge fan of other than hole-in-the-wall (probably should get shut down) Mexican restaurants are exercises that are designed or coached not only to make the individual stronger but to teach and groove healthy movement patterns.

One of these movements I see butchered is the hip hinge.

We do tons of exercises that include the hip hinge but with every rep and set we are putting ourselves in more danger than anything else. It’s hard to find an extra 30 minutes a day to practice proper bracing, coordination or healthy movement patterns separately. Which is why I will always work them into my workout like you see in this video.

Key points to remember with this exercise.

The most import thing is what I said HERE

I care more about the integrity of your body position then I do how many sets reps or weight you can do. You have to earn those gradual increments.

You want to stay within your pain threshold. No pushing through the pain to get a better burn. Leave that to the people who enjoy soaking in salt baths every night and are popping muscle relaxers and Percocet just to sleep at night.

4. Banded Birddog

This is another one of those exercises that can lead to frustration and more pain if not taken in small increments depending on how sensitive your back is to this type of movement.

I didn’t respect this exercise when I first introduced it into my personal rehab program. Instead, I just did what it LOOKED like I should be doing and went from there.

I want to help break this habit of the copycat approach. The more you know WHY you’re doing the variation of the exercise the better you will understand what you’re doing.

When doing this exercise, I want you to focus on the different modifications that are available with this move. We talked earlier about your specific pain threshold. These modifications should help keep in the safe zone.

Key things to remember:

Don’t rush the exercise. Start by breaking it down into segments and make sure there are no gaps or missing factors that are causing your pain.

You can attach the band to both the wrist or ankle to add difficulty to that individual limb either in the full Bird Dog or broken segments.

I Know What You’re Probably Thinking

Well, what exercise should I start with or which one is best for _________.

Don’t fall into this trap.

Remember, It’s not about what exercise you’re doing that will unlock your potential for long-term relief. It’s how you approach the exercise that you’re using. Focus on the position of your body BEFORE you even start the exercise then use the exercise to challenge that healthy position.

If you apply this to every core exercise, or any exercise for that matter, your ability to train towards lasting relief will significantly improve.

About the Author

After rupturing my L5-S1 disk over 7 years ago I was told that surgery and pain meds were my only option for a “pain-free” life.

I made a choice as a fitness professional to relentlessly pursue the truth to whether or not exercise could truly be the secret to getting relief.

After 10+ years coaching in the fitness industry I now focus the majority of my time teaching people how to pursue their own drug and surgery free path to back pain relief.

Aside from coaching you can find me on the Gulf Coast of Florida, surf fishing with my two kids and wife or eating my weight in Mexican food. For more info on me and what we have going on you can check out my website HERE.

CategoriesUncategorized

Exercises You Should Be Doing: TRX Busdriver

While the world is currently at a standstill over the Royal Wedding pukefest coverage, I for one have stayed true to my word, and haven’t watched one single second of it.  And, despite their efforts to the contrary – I wouldn’t let any of the women in this morning’s womens group talk about it, because frankly, I didn’t want my sperm count dropping.

Nevertheless, I’m going to keep this one short today unfortunately, because I’m in scramble mode trying to find another apartment.  I’ve spent the past few days on Craigslist searching for apartments for my girlfriend and I, and I’ve been meeting with realtors all week trying to find a place that doesn’t smell like wet dog.  It’s getting somewhat comical, though, because this will be the seventh year in a row that I’ve moved.  Thankfully, I travel light, and all I have to pack are my books, a couch, my tv, and a vintage Star Wars poster.

Anyhoo, lets get to the meat and potatoes.

What Is It:  TRX Busdriver (or, for something less lame, you can call it the TRX Kid-n-Play:  as a tribute to the early 90’s dance masters, Kid-n-Play, ohhhhh, ohhhhh, ohhhhhh).  If you don’t get the reference, then shame on you.

Who Did I Steal It From:  strength coach and guy who can kick my ass with both hands tied behind his back, Dewey Nielsen

What Does It Do:  While this is a fantastic exercise to work core stability, what’s often left un-noticed is the fact that this is also a superb way to train ANTI-EXTENSION as well.  So, in a sense, you kill two birds with one stone here.

Key Coaching Cues:  Making sure not to hyperextend the lumbar spine, simply move the TRX (or blast straps for that matter) from shoulder to shoulder maintaining as little movement as possible in the hips and pelvic area.  Another point to consider, is to make sure that you squeeze your glutes the entire time, and to recognize that the narrower your stance is, the harder the exercise will be.

You can do this for time, but I prefer something along the lines of 2-3 sets of 6-8 repetitions PER SIDE.

Give it a try, and let me know what you think!