CategoriesProgram Design

Simple Training Programs = OMGSTOPOVERCOMPLICATINGTHINGS

I’ve been writing training programs since 2002, and in that time I’d say I’ve written roughly 10,717 of them.1 Not coincidentally that’s also the total number of times I’ve wanted to toss my face into an ax whenever someone waxes poetic on their 1) killer CrossFit workout and/or 2) keto diet.

We get it, you’re better than us.

Suffice it to say…

…I’ve written a lot of programs, I’ve helped many people from all walks of life get results, yet I still need to often remind myself to stop overcomplicating things.

Copyright: designer491 / 123RF Stock Photo

Seriously, It’s Not Long Division

I think it comes with the territory that we often want to “wow” our clients and athletes with complicated looking programs that require an Enigma machine to decipher.

I mean, which looks more impressive:

A1. Goblet Squat – 3×8
A2. Seated Cable Row – 3×10

OR

A1. 1-Legged Snatch Grip Deadlifts – from deficit (w/ Intraset Tempo: Reps 1-3 = 3s pause at mid-shin, Reps 4-6 = 3s lowering, Reps 7-9 = blindfolded)
A2. Up, Up, Down, Down, Left, Right, Left, Right, B, A and Start

If you’re a fitness professional it’s inevitable you’ll end up mirroring Dug (the dog) from the movie Up. Whenever he sees a squirrel he can’t help himself and becomes distracted.

via GIPHY

Similarly, we’re seduced by bright, shiny, and new objects.

Or, in this case…exercises.

I’m no different.

I, too, am an amalgamation of shortcomings that can’t help himself when it comes to cool, zany looking thingamajigs I come across on Instagram.

Recently I was updating a program for a long-standing client of mine. This is someone whom I’ve been writing programs for coming up on four years. Our relationship is at the point where whenever it’s time to write a new program for him I am sometimes flummoxed as to what to do…and I try to get cute.

I feel I have to toss in something new or idiosyncratic.

I feel this is pretty normal behavior and comes with the territory when working with a client/athlete for so long. They’re paying good money to work with us and there’s sometimes I feeling of guilt when we don’t go out of our way to spice things up on the programming front.

We don’t want to come across as too repetitive.

In lieu of this I opted to go with my gut instincts and ended up writing a seemingly “vanilla” program (at least in my eyes) for my client this month.

No tomfoolery or shenanigans.

Wouldn’t you know it…

…at the end of one of our more recent sessions he raved at how awesome the workout was. This was followed by an email the following day raining over me with accolades.

“That session yesterday was really something.”

“Your arms looked jacked BTW.”

Okay, that last one was made up.

Nevertheless, I was pleasantly surprised if not somewhat vindicated. “Huh,” I thought to myself. “I guess I need to get out of my own way more often and just stop overcomplicating things.”

This is not an indictment on utilizing more advanced or “sexy looking” exercises.

Novelty is fine (every now and again).

However, this recent experience was a stark reminder that most people, most of the time prefer (and even thrive) on simplicity.

Categoriespersonal training Program Design

3 Mistakes Intermediate Lifters Make When Continuing a Fitness Program. And How to Fix Them

Last week personal trainer, Shane McLean, wrote a guest post for this site titled “4 Mistakes Beginners Make When Starting a Fitness Program (and How to Fix Them).”

In case you missed it you can check it out HERE.

When I read it I was like, “goddammit, this is good.” How dare you Shane, HOW DARE YOU, SIR, FOR WRITING SOMETHING SO SIMPLE AND ACTIONABLE AND THEN MAKING ME LOOK BAD ON MY OWN SITE.

YOU’RE RUINING MY LIFE!”

(throws chair through window).

After my tantrum (and explaining to my landlord why a chair was tossed from the 13th floor) I got to thinking: “What about the intermediate lifter? They make mistakes too. A lot of them, in fact. How about an article directed towards them?”

I suck at intros.

Let’s go.

Copyright: langstrup / 123RF Stock Photo

4 Mistakes Intermediate Lifters Make When Continuing a Fitness Program (and How to Fix Them)

I guess the first order of business is to define what the heck an “intermediate lifter” is.

The definition of intermediate is as follows:

In-ter-me-di-ate (adj): Having or suitable for a level of knowledge or skill between basic and advanced.

So, an intermediate lifter:

  • Has 2+ years of consistent (serious) training experience.
  • Can perform the basic barbell lifts (deadlift, squat, bench press, among others) with competency and acceptable technique.

NOTE: You’re still a beginner if this is my reaction after watching you perform a set of deadlifts:

via GIPHY

  • Has achieved a decent level of strength.2
  • And, most important of all, refers to a kettlebell as a kettleBELL and not kettleBALL

I’d garner a guess that most people reading this site identify as an intermediate lifter. You know, past the point where merely looking at a dumbbell makes you stronger, but not quite to the stage where you’re deadlifting 3x bodyweight or competing at the Arnold Classic.

In short, we could likely make the case that most people will stay in the intermediate category their entire training career. More to the point, I’d make the argument that unless you’re competing at a high-level – whether it’s in powerlifting, bodybuilding, Olympic lifting, Strongman, CrossFit, Hunger Games, etc – and either placing and/or getting paid to do so, you’re an intermediate lifter.

I mean, I still consider myself an intermediate lifter and I started lifting weights when New Kids on the Block were telling us to ‘hang tough.’

I’m such a Danny.

Nevertheless, it should be noted that most intermediate lifters are legit lifters and have a fair amount of experience. It’s just, much like beginners, they have their own set of mistakes they fall prey to as well.

1. Emulating the Programs of Elite Lifters

I get it.

We’re often inspired (or better yet enamored) by what we see our idols doing (or have done) in books or on Instagram and YouTube. It’s hard not to study the likes of Ed Coan, James Fitzgerald, Eddie Hall, Jen Thompson, or Arnold, to name a few, and not want to start a Smolov squat cycle, like this afternoon.

Clearly, if only we followed their programs and what they’re currently doing, the harder and more advanced the better, we’d reap the same result. We’d be the envy of everyone at the gym…

…jacked, diesel, and maybe, just maybe, Tina at the juice bar will actually make eye contact with you.

*fingers crossed*

Unfortunately, things don’t quite work this way. Mirroring what your idols do in the gym is the wrong approach. And, quite frankly, is probably going to get you hurt.

What You Should Do

A better, more cogent, reframe would be to think to yourself:

“I need to follow the program(s) that so and so did when they were a beginner/intermediate lifter. What did (s)he do 5, 10, 15 years ago that allowed them to build their base wide enough to attain a higher peak in order to do what they do now? “

I guarantee it was a program that was very basic and vanilla.

Here’s a simple example of a protocol I use with many of my own clients/athletes. I revolves around the concept of “Inverted Sets,” where you flip-flop sets/reps of a given exercise during the week.

Let’s use squats in this example.

Day 1

A1. Front Squat – 2×5 @ 75%
A2. Filler Exercise

(the rest of the day’s program goes here)

Day 2

A1. Front Squat – 5×2 @ 75%
A2. Filler

One way to periodize week to week is as follows:

Week 2: Day 1: 2×5 @ 77.5%, Day 2: 5×2 @ 77.5%

Week 3: Day 1: 2×5 @ 80%, Day 2: 5×2 @ 80%

Week 4: Day 1: 3×5 @ 75%, Day 2: 5×3 @ 75%

The idea is to increase exposure to QUALITY reps which is a concept I feel gets lost in the weeds with many intermediate lifters. More often than not the mentality is that the only way to progress is to make every workout as hard and challenging as possible.

Stealing a line from Dan John, “easy training is good training.

2. But Training Still Needs to Be Hard

Serving as nice counterpoint, I love this quote from John Meadows I saw on his Facebook Page recently:

“Stop saying the only way to get bigger is to get stronger!

This is ABSURD.

Getting stronger is awesome and can work…do it!

BUT do you realize that when you get to an advanced stage, and have trained for years, you wont just keep piling up the reps and amount lifted. If you can congrats on benching 2000 lbs or repping 1000 15 times (and having adamantium for connective tissue), cause that’s what will happen.

You will have to find other ways to tax the muscle, for example judicious use of high intensity techniques that some people like to say do no good. So get strong, gain muscle, but realize at some point you are gonna stall and you must now actually think and include other ideas in your plan.

Please stop saying stimulating a muscle is all it needs. No it is not. The daily 3×10 with many reps left in the tank on barbell curls will not give you massive biceps. It’s called a warm-up. You will need to activate, LOAD, and EXHAUST fibers to get the desired affect once you get past the novice stages of training.”

I recognize he was directing his ire towards “advanced lifters,” but I do feel it’s a message that should resonate with intermediates as well.

As much as I’m a fan of not making a habit of training to failure or missing reps incessantly, I do find a lot of trainees fail to make continued progress in the gym if for no other reason than they don’t push themselves.

Ever.

What You Should Do

Strain.

Struggle.

You don’t have to shit your spleen or anything, but get uncomfortable from time to time.

Try this:

  • On your next bench press session work up to a challenging set of FIVE (meaning, take as many sets as you need to in order to work up to a weight heavy enough where you can’t complete a sixth rep).
  • Whatever that weight ends up being, drop the load by 10-15% and on your next set or two (or three) perform as many reps as possible (AMRAP).
  • That sucks.

Or this:


That really sucks.

3. Being Too Strict With Technique

I encourage proper technique with all exercises.

I’m on your side.

Really, I am.

But being too strict with technique – to the point where someone becomes that asshole nun from Game of Thrones and shames everyone within a block radius whenever they see the slightest deviation from perfect form on any exercise – isn’t doing anyone any favors.

via GIPHY

Yo, relax.

Listen, I want my clients (and you) to stay as safe as possible when lifting heavy things. When working with beginners (and holding them accountable with regards to their technique) I am that nun.

Much less assholey, of course, but I’d be lying if I said I wasn’t adamant they use strict form at all times.

That being said, there comes a point where it behooves everyone to loosen the reigns a bit.

Take the DB row for example.

Now, it’s one thing for someone to look as if they’re having an epileptic seizure – or as if they’re using an industrial strength Shake Weight – when performing the exercise.

It’s another thing altogether for me to permit “some” body english in order to allow progressive overload or time under tension to occur.

The strength curve of the DB Row – as broken down in THIS article by Nick Tumminello – almost guarantees that, at some point, a little shimmying is inevitable.

And it’s okay. The world will continue to spin.

Moreover, it’s important to lean into the fact that as you get strong(er) the more likely it is your body will explore precarious positions when performing compound movements like squats, deadlifts, overhead presses, etc.

I’m fine with that.

It serves as a vaccine in a way.

The more small doses of these precarious positions the body is “introduced” to the more likely it’ll be able to defend against them when shit really hits the fan.

All of this to say…

…be relentless and practice good technique. Be a champion of it.

But understand that there will be a small window (say, 5% of the time) where it’s okay to deviate.3

Categoriespersonal training

5 Reasons You Aren’t Getting the Results You Want in the Gym

Today’s guest post comes courtesy of Syracuse, NY based personal trainer/strength coach, Ricky Kompf4

If you lift weights as your main mode of exercise you’re bound to experience ruts that can be frustrating, and there are many factors to consider. 

Ricky weighs in (<— see what I just did there?) on several things to consider on why you may not be seeing the fruits of your labor.

Enjoy!

Copyright: pressmaster / 123RF Stock Photo

5 Reasons You Aren’t Getting the Results You Want

This is a constant battle everyone interested in getting fitter or healthier deals with: You start working out a lot, you get a lot of initial gains in your strength, speed, power, endurance and overall performance, and you think “Wow this is awesome!”

You continue to work out the same way and over time you stop getting results. Or, at the very least, progress takes a major nose dive.

You’ve hit a plateau.

This is one of the hardest things to overcome. Many people give up, stop being as motivated, and try to work harder, but crash and burn, leaving a bad taste in their mouth because they aren’t getting the gains they were before.

Sound like you?

via GIPHY

Let’s be clear with one thing, reaching peak performance is a marathon not a sprint.

To get past sticking points in your program it will require you to look at your daily actions much more deeply. It will force you to painfully analyze the things you’re really not good at.  As long as you can approach this with an open mind of getting better you’ll be able to push through your plateaus.

What follows are the top 5 things I’ve found to be the leading reasons why most people fail at attaining the results they want. Read them over, ponder, let them marinate, and then let’s get to work.

1. You’re Training Too Hard

Believe it or not, there is a such thing as training too hard.

Not that it will always result in “overtraining” but it can and absolutely will result in diminishing rate of returns in the gym.

At a micro level your body can only recover from so much stress on a daily basis and if you consistently go above that threshold every day you’re not going to recover and become stronger. The stronger you become the more likely this can happen.

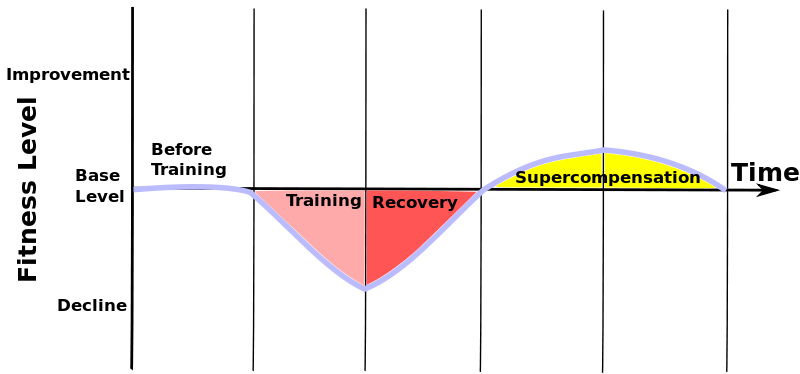
It’s called the Law of Supercompensation and it helps you to achieve the results that you want.

When you first workout your body becomes weaker, and after you eat, sleep and give you body time to recover you become stronger as an adaption to prevent damage to the body.

Your body literally adapts so you don’t die.

As you continue to ramp up the stimulus of training your body needs more time to recover, or it needs to optimize its ability to recover.

If you fail to allow either to happen the body will stop recovering to baseline and you’ll be in a constant state of fatigue.

Fatigue will mask your true fitness level.

Going into the weeds on this topic with a simple blog post is impossible, but the idea here is to champion RECOVERY. Your results in the gym are directly proportional to how well you allow yourself to recover.

Yeah, yeah, yeah, I can sit here and wax poetic on the importance of sleep, proper hydration, and ensuring ample calories to support your training but…

…zzzzzzzzzzzzzz.

Boring.

NOTE: All there are THE most important factors to consider when discussing recovery. I just know most people tend to black out or lose interest when anyone starts to discuss topics.

One of the best ways to ensure ample recovery and to prevent plateaus in the gym is to “lean into” the ebbs and flows of training volume. Some days/weeks should be hard, some days/weeks should be easy, some days/weeks should be right in the middle (what I like to call Goldilocks days), and then, yes, some days should absolutely make you hate your fucking life.

Here’s an excellent video via Chad Wesley Smith of Juggernaut Training outlining the concept:


2. You’re Not Training Hard Enough

This seems to be an obvious one but it’s very common for someone to get stuck into a routine doing the same thing every time they go to the gym, operate at the same level of intensity, and do the same weights every…single…day.

Your body is very good at adapting to what you do on a regular basis and if you continue to do the same thing day in and day out your body will become so efficient at it that, not only will you stop seeing results, but you actually may begin to regress.

Your body needs novel stimuli that it’s not used to, and you need to change the intensity of your workouts on a regular basis.

If you program calls for you to perform an exercise for eight repetitions and when you’re done you could have completed eight more, you’re not training hard enough…

…and you’re likely seeing sub-optimal results.

I always like to tell people you should leave 1-2 reps in the tank after each set. This tends to be a nice compromise because

  • You’ll ensure good technique with each rep.
  • You’ll still be lifting an appreciable amount of weight in order to elicit an adaptive response from the body
  • And lastly, to piggy back from above, you’ll ensure ample recovery between workouts

Figuring out how much weight you should be using can be a bit of a quagmire.

THIS post from Tony should help those of you who need a little direction.

3. You Have Too Many Daily Stressors

Your body recognizes all stressors as the same thing, and when you have too many stressors – good or bad – it will influence your recovery and results.

These stressors can include: working out, a lack of sleep, fighting ninjas, financial stress, friends and significant other, sick kid, your boss is an asshole, and everything and anything in between.

If it feels like the stress is piling up chances are you won’t be recovering very well either.

Maybe taking a day or two off from working out is what’s needed. However, I recognize that for a lot of people heading to the gym on a daily basis IS stress relief. To that end, maybe something like a Bloop, Bloop, Bloop workout is in the cards?

Meditation is lovely idea.

Or, I don’t know, maybe try some yoga.

Try Neghar Fonooni’s Wildfire Yoga (I.e., yoga for meatheads) which provides a plethora of quick 10-20 minutes “yoga flows” that’ll help declutter your mind but also loosen up that pesky piriformis that’s been nagging you for years.

The idea is that you don’t always need go full-boar, DEFCON 1, OMG-this-workout-was-so-awesome-I-can’t-feel-the-right-side-of-my-face.

If daily stress is high, temper your workouts accordingly.

4. You Need to Change the Focus of Your Program

Many people fall victim to this.

Humans are creature of habit and if something worked in the past, it stands to reason it’ll work today, tomorrow, next week, next year, next decade, you get the idea.

Whether it’s strength training, being a cardio bunny, or going on a bodybuilder body part split…

…everything works until it doesn’t work.

The answer to your past problems – when overdone – will be the source of your new issues. 

This is why having a basic understanding of periodization and focusing on different qualities of strength and fitness at different times is so important.

This means taking time to have phases where your main focus is strength, or Hypertrophy, or endurance, or power/speed, or just having better movement.

Change the focus of your program so you can be well rounded and avoid plateaus.

Progress feeds more progress.

5. Do More of What You Suck At

Stop always doing what you’re good at or what you’re familiar with.

If you write your own programs you’ll inevitably lean towards those exercises you’re comfortable with and good at. If you’ve always had a straight bar deadlift and a barbell back squat in your program, I have news for you…

…you don’t need either of them to be strong and get awesome results.

via GIPHY

The body doesn’t know what a deadlift or a squat is.

All that happens is a stimulus and an adaptation to the stimulus.

If the stimulus is the same all the time, the adaptation will be less and less significant. Change your variations, go from a straight bar deadlift to a trap bar deadlift, use specialty bars, use accommodating resistance with bands and chains, use eccentrics and isometrics in your training.


There’re so many things you can change or tweak in your program; the options are endless!

Here’s a list of things you can change to create a different stimulus and continue to allow your body to make adaptation:

  1. Use eccentric and isometrics to limit mechanical stress and master movement of your lifts
  2. Use chains and bands to overload the top of your lifts, mimic the strength curve, and teach acceleration in your lifts
  3. Use specialty bars to change the lift slightly and work on weaknesses
  4. Change your rest periods
  5. Use unilateral exercises as your main lift (ie, Bulgarian split squats, reverse lunges, single arm presses, etc)

About the Author

Ricky Kompf is the head coach/owner of Kompf Training Systems where we work primarily with team sport athletes like baseball, football, lacrosse and basketball.

He’s also a Head Trainer for a corporation for Bankers Heath Care.

You can give him a follow on Instagram HERE.

You can check him out on Twitter HERE.

CategoriesConditioning Program Design

Conditioning That Won’t Make You Hate Life *That Much*

Lets get right to the point.

Conditioning – how much to do?, how “hard” should it be?, what modalities are best? – can be a conundrum for many.

As with any question the appropriate answer is “it depends.”5

That said, the questions above are no different but are predicated on a number of things: one’s goal(s), injury history, current ability/fitness level, and whether or not they’re Bo Jackson.

Okay, that’s the epitome of “it depends.”

Even still, there’s no way a simple blog post can appropriately articulate the expansiveness of this topic and all the components at play.

However, I will say this:

  1. Conditioning as a means to AID RECOVERY is crucial.
  2. Conditioning is not more effective the harder you make it. I.e., it shouldn’t make you shit your spleen. If it does, you may want to head to the nearest hospital.

Conditioning That Won’t Make You Hate Life (That Much)

At the expense of making things a bit too over-simplistic, in my opinion, conditioning is more about helping to increase one’s work capacity (or ability to do more work in a given time).

Watering it down further and directing my train of thought to most of you reading: low(ish) intensity conditioning can help in the weight room and improve recovery and performance.

But if you prefer a more smarty-pants explanation, I like Alex Viada‘s say on the matter:

“If the goal is to improve work capacity (ability to do more work in a given time) it’s crucial to employ modalities that aid and promote general recovery which also create positive adaptations in durability, energy stores, cardiac output and cardiac perfusion, and other general components of overall endurance that essentially provide the foundation for an athlete to train and compete for longer while recovering better.”

The key, though, is not to be an asshat and turn something that’s supposed to, you know, help you recover…and turn it into loaded Prowler sprints paired with 400m handstand walks over broken glass for AMRAP.

Again, I can’t say this enough…

AIDING RECOVERY IS THE GOAL.

Here are a handful of my favorite go to protocols.

1. You Haven’t Been An Athlete For 20+ Years So Lets Stop Pretending You Are One Movement Circuit

Sprinting, more often than not, will not be my first choice for most trainees.

It’s too aggressive and most people just aren’t prepared for it. Repeatedly stabbing themselves in the neck with a cactus would likely be more beneficial.

I keed, I keed.

At some point I may venture into opening things up and introducing some sprint work into the mix.  But in the meantime, for most people, a more down to Earth approach to movement training/conditioning would be to implement more basic calisthenics like skipping, side shuffling, and the like into the mix.

  • 20 yd Forward Skip
  • Walk/jog 20 yd
  • 20 yd Reverse Skip
  • Walk/jog 20 yd
  • 20 yd Lateral Skipping/direction
  • Walk/jog 20 yd
  • 20 yd Side Shuffle/direction
  • Walk/jog 20 yd
  • 20 yd Carioca/direction
  • Walk/jog 20 yd
  • Rest 1-2 Minutes
  • Repeat for 3-5 Total Rounds

2. Tempo “Sprints”

My expectation isn’t that everyone has to look like Tom Cruise sprinting from an alien in order to perform sprints:


However, there should be a “base” level of competence involved which is where coaching comes into fruition. That said, sprinting doesn’t always have to be an-all-out-holy-fucking-shit-that-skyscraper-is-going-to-collapse-on-my- head-if-I-don’t-high-tail-it-out-of-here endeavor.

Strength coach Mike Boyle has always championed “tempo runs/sprints” as a conditioning method for his athletes AND regular Joe’s and I agree wholeheartedly.

I think they’re fantastic.

Basically all you do is perform sprints at 60-75% effort with walking recovery.

A basic template would look like this:

  • Tempo Sprint 50 yd
  • 50 yd walk back
  • Repeat for “x” number of rounds

A good rule to follow is no more than a 10% increase in volume (distance or time) each week.

3. Add a Prowler

There are a thousand and one different ways to implement conditioning with Prowler Sled.

One that I like is this:

  • 20 yd (loaded) Prowler Sprint (or whatever is best suited for the person: loaded, un-loaded, sprint, walk, pants on, pants off, you’re the coach, figure it out)
  • 40 yd Jog
  • 80 yd Walk (recover)
  • Repeat 8-10 Rounds

4. Something I Stole From Chad Wesley Smith

Strength coach Chad Wesley Smith defines tempo as the following:

“Tempo activity is done at 60-75% of max intensity and while the duration will vary based upon the nature of the activity you’re performing and your requisite fitness levels, 15-45 seconds of work is a good guideline. These work intervals are interspersed with low intensity calisthenics like push-ups, ring rows, abs, or can just be rest periods.”

One of Chad’s favorite protocols (and one I stole from him) is as follows using a stationary bike:

  • 1st Rep: 30 seconds of riding (~110 rpm) followed by 10 push-ups, rest until heart rate returns to bottom aerobic development zone OR you can speak normally.
  • 2nd Rep: 3o seconds of riding (~110 rpm) followed by abs, rest until heart rate returns to bottom aerobic development zone OR you can speak normally.
  • 3rd Rep: 30 seconds of riding (~110 rpm) followed by 10 push-ups, rest until heart rate returns to bottom aerobic development zone OR you can speak normally.
  • 4th Rep: 3o seconds of riding (~110 rpm) followed by abs, rest until heart rate returns to bottom aerobic development zone OR you can speak normally.
  • 5th Rep: 30 seconds of riding (~110 rpm) followed by 10 push-ups, rest until heart rate returns to bottom aerobic development zone OR you can speak normally.
  • 6th Rep: 3o seconds of riding (~110 rpm) followed by abs, rest until heart rate returns to bottom aerobic development zone OR you can speak normally.

Rest 3-5 Minutes and begin Set 2.

Two sets of SIX is a good starting point and over a number of weeks build up to TWO sets of TEN and maintain there.

5. Juarez Push-Up Inverted Circuit

This is a doozy I stole from another strength coach, Josh Bryant, of Jailhouse Strong (which should give away where the name of this circuit came from).

  • Perform 10 Push-Ups
  • Get up, walk/jog 20 yds
  • Perform 1 Push-Up
  • Get up, walk/jog back 20 yds
  • Perform 9 Push-Ups
  • Get up, walk/jog 20 yds
  • Perform 2 Push-Ups
  • Get up, walk/jog back 20 yds
  • So on and so forth

Perform any of these conditioning workouts on “off” days between your regularly scheduled workouts and I am willing to bet you’re going to see some drastic improvements in your ability to recover and work harder in the gym.

Categoriesmuscle growth Program Design

6 Week MASS Building Routine: Your Quest for a Bigger, Stronger Physique Begins Here

I’m traveling back to Boston from London today. I’ve been away for two weeks presenting at three different workshops. I’ve had a lovely stay, but am looking forward to heading home and my wife handing Julian over to me as soon as I walk through the door.

Thanks to Boston based personal trainer, George Kalantzis, for contributing today’s guest post.

Copyright: shevtsovy / 123RF Stock Photo

6 Week MASS Building Routine: Start Here

Labor day has come and gone, the days are shorter, and the nights are colder.

That means it’s bulking season.

But you don’t come to Tony’s website for some cookie-cutter bullshit program. Over the next six weeks, you will craft a new physique using intense workouts, discipline, and commitment to add mass.

via GIPHY

Setting the Expectations For A Clean Bulk

Nothing gets me more fired up than people who are not willing to put in the work to get desired results.

When I competed in natural bodybuilding last year, I heard questions like “how do you gain muscle and shred down,” how can I look bigger without gaining fat?” What supplements did you take?

The list goes on.

I hate to burst your bubble, but the universe does not bend at the whims of your desire. Contrary to popular belief, you cannot have your cake and eat it too.

So how do you bulk without gaining excessive weight?

To achieve a clean bulk, you must learn how to gain 2-5 pounds per month with half of that weight being muscle, and half of that weight being fat. This will keep your composition in an ideal state for optimal performance.

So just eat more food, right?

Not quite, too much junk food during a bulk is one of the biggest mistakes you can make. Nutrition does matter, and most people will either eat a surplus of shitty food or not eat enough. That is one of the toughest things about adding solid mass.


You can expect to gain some body fat during a bulk, but not an excessive amount.

We are aiming to build a stronger engine so that you can increase size, which means you’ll need to gain healthy amounts of body fat.

Don’t get discouraged if you see others gain size quickly or achieve different results, gaining mass is about putting in the work, and for some, adding quality size can take time.

Your Blueprint For Success

Life is motion.

The world continues to rotate on the axis, and every day is an opportunity to grow. Your body is the secret to many things. Yet more often, many of us cheat our way through training, going through motions and we never achieve the results we look for.

Today is the day we put an end to all of that.

Very specifically, this template is designed to form the basis of your training to put on size using bodybuilding methods. Because this is a hypertrophy program, it will help with putting on size, but if you are a powerlifter or strong man, this might not be the best program for you.

An additional benefit of this program is that it will help raise your work capacity and thus prepare you even better for the strength phase training you’ll do after.

What’s more, this program will help spare muscle loss when you decide to cut back down.

This will be your blueprint for a six-week mass building phase.

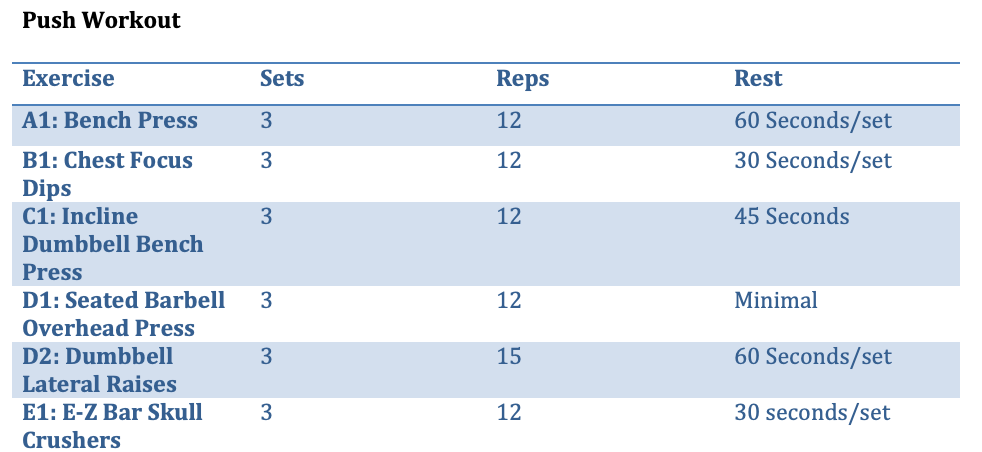
You’ll notice it is broken down into two three-week phases, each phase using a combination of compound exercises and machines to maximize your results. It is these movements where we will construct a blueprint for adding some serious size.

Phase I

Our first phase consists of flooding the muscles by using compound exercises performed in the optimal range to transform your energy into muscle mass.

During the first three weeks, you’ll be training five days a week in a split that is three days of training, with two days off.

You’ll repeat 3/2 for three weeks in the following format: legs, push, pull.

The great thing about a 3/2 cycle is you can alternate it according to your life.

As long as you train three out of every five days, you’ll provide enough stimulus for growth.

At first, you’ll notice that the program does not look lie much, but to prevent overtraining and generate the highest anabolic response, you’ll stick to three working sets, not including your warmup sets.

Phase II

Now that your muscles are primed for growth, this phase makes insane changes to your physique.

You’ll go from training five days to six days, and you’ll do different exercises and reps ranges. As with the first phase, adjust the days according to your lifestyle, but keep the days in order and make sure to train all six days.

Conclusion

It is human nature to fear the unknown, but it would be inhuman to not yearn for something greater. If you want to experience changes in your physique, you must pushup yourself past your comfort zone. This six-week bulk will give you the tools you need to pack on some serious size.

About the Author

George Kalantzis began his career as decorated Marine with over ten years of faithful service and deployments to Iraq and Afghanistan. He’s worked with everyone from professional athletes, celebrities, busy executives, and alongside some of the top strength coaches in the world.

Today he spends most of his time coaching at Equinox in Boston, and outside of work with his gorgeous little daughter. Please feel free to say hi over on Instagram, Facebook, Twitter, and YouTube, as he loves meeting and connecting with new people.

Categoriescoaching Program Design

4 Coaching and Program Design Digressions

Today is the last day you can purchase Mike Robertson’s latest resource, Complete Coach Certification, at a hefty discount.

Mike’s one of the best coaches I know, and if you’re at all affiliated with the fitness industry it would behoove you to consider investing in this awesome product. There’s so much more to being a coach than the x’s and o’s of program design, breaking down deadlift technique or, I don’t know, being able to draw the Kreb’s Cycle blindfolded.6

Those are all important of course, but what I appreciate about Mike’s approach the most is that he also covers more of the soft skills of coaching – being professional, saying people’s names, meeting clients where they’re at in terms of exercise selection, learning how to simplify your cues, wearing pants…you know, the usual.

In the spirit of that I thought I’d take some time to pontificate on a few components of coaching and program design that aren’t often discussed, are a bit off the beaten track, and are under-appreciated by the masses; digressions if you will.

HINT: Not on the list: kipping pull-ups.

Copyright: spotpoint74 / 123RF Stock Photo

Coaching & Program Design Digressions

1. Fillers Instead of Warming Up?

You know it, I know it, your mom’s second cousin’s Little League baseball coach’s sister knows it, everyone knows it…

…people always skip their warm-up prior to training.

Hell, [industry secret revealed] I skip my warm-up more than 50% of the time.7

Now, to back track a bit, I am not anti-warming up and I do advocate my clients and athletes do follow one.

I do write them in.

However, what I am not a fan of is the laundry list approach to warming-up.

You know what I mean: the warm-up that consists of a never-ending list – 10, 15, sometimes 20 exercises deep – of positional breathing, t-spine mobility, glute activation, and stretching drills.

I take a gander at something like that and am like…

via GIPHY

I can only imagine what some of my clients in the past were like…

via GIPHY

This is not an attempt to discount or demerit the importance of doing any of those drills mentioned above. I just know humans, and I know the vast majority of them would rather jump in front of a mack truck than do their warm-up.

Which is where the idea of “fillers” comes in.

These are nothing more than low-grade, low-intensity mobility or activation drills that are performed DURING the workout, typically during rest periods.

In short: It’s a sneaky way to put the shit that people need to work on in the program in a way that they’ll actually do it.

I’ve written about fillers in the past and how to best incorporate them depending on the main lift of the day:

2. Underwhelm Them Early

This is a phrase I stole from Mike, but it mirrors much of what I do with all of my new clients. In the beginning all I am really concerned with is letting my clients marinate in the basics.

I want them to hinge, squat, push, pull, carry, and perform some single leg work.

Now what variation of all those things will depend on a multitude of factors: health & injury history, goals, ability level, not to mention their anatomy (anthropometry and leverages).

When all is said and done, though, from a programming standpoint, my clients should be underwhelmed. I want their programs to be mind-numbingly boring.

People need reps out of the gate, a lot of reps…of the same thing(s). That is the only way they’re going to learn and begin to “own” their movement.

What they don’t need is a bunch of novelty and a coach who’s only goal is to entertain them.

I can appreciate (and understand) that training should be fun and stimulating and fill everyone’s love tank to the ‘enth degree.

However, in my eyes, that needs to be earned via lots and lots and lots of repetition of the same shit.

No one ever got strong or mastered any exercise by constantly changing things up.

Wow your clients with customer service; underwhelm them with exercise selection.

3. Easy Training is Good Training

Keeping in tune with the whole “underwhelming them early” vibe, I’m a firm believer in the anecdote – astutely stolen from Dan John – that “easy training is good training.”

Put into other words: I’m less of a “holy shit I can’t feel the left side of my face, that workout was awesome” kinda guy and more of a “huh, I could totally do more, but [insert anything from going to see a movie and hanging out with your spouse to reading a book and drowning in kitty cuddles]” kinda guy.

See, I’d rather my clients/athletes leave a session feeling as if they could do more, maybe even wanting to do more, but don’t.

This is not to say “easy” training doesn’t involve some amount of effort or uncomfortableness; far from it. It is to say that pounding your clients into the ground every…single…session isn’t necessarily making them better or more resilient or whatever other cute adjective you want to toss in here.

There’s a common saying I’ve seen many other coaches use and it bears repeating:

“Your progress in the weight-room is directly correlated with how well you’re able to RECOVER from said workouts.”

This entails training with sub-maximal loads (65-80% of 1RM) more often in addition to other things such as encouraging more GGP/Zone 2 work (think: heart rate hovers in the 120 BPM range), sleep, calories to support one’s goals, and hydration to name a few.

4. Is It Necessary to De-Load Often?

It’s common practice for many gyms and trainers to use every fourth week as a rudimentary “deload week” (or a structured tempering of training volume, load, or both) for their clients and athletes.

It makes sense…especially when you consider billing cycles.

For example, to a large degree I still use this approach because every month my clients “re-up” their packages and I get to ding their credit cards in exchange for a freshly curated program.

But even then I have to take into consideration a few things.

  • Training Frequency: someone who only trains 2x per week won’t necessarily do enough work to warrant a de-load as compared to someone who trains 4x per week.
    .
  • Training Experience/Goals: someone who is working out for basic health or is a complete newbie will have a stark difference in approach to de-loading compared to someone training for a powerlifting meet or has more experience and is just stronger as a general observation. The former may go weeks without the need for any type of deload while the latter may be best suited for one every 3-4 weeks.
    .
  • Life: Work, vacations, the beach, your slow-pitch softball schedule, your kid’s explosive diarrhea…all have a tendency of tossing us organic de-loads as it is. Oftentimes there’s no need to go out of my way to plan de-loads for some clients because “life” takes care of that anyway.

All of this doesn’t even get into the weeds on all the different types or ways to implement a de-load. I already touched on the idea of lowering one’s overall training volume or even intensity (personally I’m a fan of lowering volume but keeping intensity on the high(er) side of the spectrum, if not the same), but there are a bevy of other options too:

  • Omitting compound movements in lieu of more isolation type movements (I.e., less axial loading).
  • Going into full-on body-part-split-per day bodybuilder mode for a week or longer (<— this is fun).
  • Reducing training frequency (instead of 5x per week, go with two).
  • Get out of the gym entirely and partake in more outdoor activities.

For the Record: I’m very much a fan of people taking a full-week off from training – particularly if they’re consistent – 1x per year just to give themselves a break.

That said, I will sometimes push the boundaries with some of my clients and won’t implement an actual de-load until 1) I see a drastic decrease in their progress or performance on the gym floor 2) they’re eyes start bleeding or, you know, 3) they simply ask.

Often, especially if a client shows up to a session and they look like death, I’ll implement a de-load session, affectionately referred to as a Bloop, Bloop, Bloop workout.

HERE the idea is to listen to them, understand that, yes, life gets in the way sometimes, but to also not let them off the hook so easily.

They’re still going to workout and move – it just won’t involve working up to a heavy triple on their front squat.

Want More Pearls of Wisdom?

I’m a mere simulacrum compared to what Mike Robertson covers in his Complete Coach Certification.

I am not exaggerating when I say Mike covers everything as it relates to setting you up for as much success as possible as it relates to being a better, more well-rounded coach.

The only he doesn’t cover is making your meals for you.

TODAY (9/6) is the last day to take advantage of the discounted rate.

Get it here —> http://bit.ly/2lWGhpJ

Categoriesmuscle growth Program Design

How to Optimize Your Training For Maximal Hypertrophy

Today’s guest post comes courtesy of strength and conditioning coach Kevin Finn.

It’s a doozy with tons of information related to how to add slabs of muscle to your frame in the most time efficient and scientifically backed way possible.

So, pretty much everyone will be interested in reading it.

Enjoy!

\Copyright: shevtsovy / 123RF Stock Photo

Step One: Optimize Your Training Split and Rep Ranges for Volume Accrual

First off, if you’re still doing a “bro split” and hitting your muscles once per week, you need to “get woke” as the kids say these days. It’s time to get out of the 90s and get that frequency up. Besides optimizing muscle protein synthesis rates over the course of the week, higher training frequencies allow you to accumulate more quality volume—both throughout the week and on a per session basis.

Consider this:

We know that 10 sets per muscle, per week is likely the minimum threshold for maximizing muscle gains, but there is also evidence that suggests there may be a per session cap on volume, beyond which, progress is actually impaired. One study, for example, showed that 10 sets of 10 (a popular protocol utilized in German Volume Training) offered no additional benefits when compared to 5 sets of 10. In fact, the group that only performed 5 sets had greater strength gains and slightly higher increases in lean body mass!

via GIPHY

This is one of the reasons higher training frequencies are so beneficial. By upping your training frequency, you can still hit 10+ weekly sets per muscle while sidestepping that potential “per session cap” on volume.

With this in mind, utilize a split that allows you to hit each muscle a minimum of twice per week, and consider even higher frequencies for the upper body or for smaller muscle groups that recover well (calves, shoulders, arms).

Now that you’ve got your training frequency sorted out, you need to consider your rep ranges.

As you attempt to push volume, an issue that will invariably crop up is time. As much as I’d love to stay in the gym for 2+ hours, as a working dad, it’s simply not going to happen.

Some days I’m lucky to get an hour.

So, if time is going to be an issue, you should strongly consider ditching most of your lower rep strength work. In fact, if you’re trying to build muscle as your number one goal, you don’t have any business doing much work below the 5 rep range.

What? Blasphemy you say?

Well, there’s a couple facts to keep in mind when it comes to rep ranges:

1) Utilizing higher rep ranges is a much more time efficient way to accumulate volume: Higher reps allow you to perform more total volume as they require shorter rest periods, less warm-up, and they don’t beat your joints up like heavy loading does.

2) Even when sets are equated, moderate rep ranges (8-12) have been shown to produce more hypertrophy than high load sets in the 2-4 rep range.

If the goal is to build muscle and you’re seeking to push volume, stick to moderate and higher rep ranges. Keep the bulk of your training based around 6-15 reps, and don’t be afraid to play around with reps as high as 15-30 on some of your accessories.

As long as you come sufficiently close to failure, you’ll build just as much muscle and you’ll be able to accumulate a lot more volume in less time.

One more time-saving tip:

If you’re still having issues fitting in the amount of volume you need to progress, I suggest following a split that will allow for the pairing of antagonist muscle groups so you can perform antagonist paired sets (APS). By performing APS, you get the time saving benefits of supersetting without tanking your performance.

Here’s how they work:

Take two exercises that work opposing muscle groups—like a shoulder press and a pulldown.

Perform one set of shoulder presses, rest about a minute or so, and then do a set of pulldowns. Rest for another minute and then repeat until you’ve completed all your sets for both exercises.

If you typically rest 2-3 minutes between sets, this will save you quite a bit of time, since you will be utilizing a portion of your rest periods to perform another exercise.

And, unlike with supersets, your performance won’t suffer due to excessive fatigue; in fact, there’s even some research that suggests performance may be enhanced.

APS work best with movements that don’t inflict a lot of systemic fatigue, so don’t try these with squats or deadlifts.

Key Takeaways:

  • Use higher training frequencies (2-4 times per week) to facilitate higher training volumes and increase the average quality of your per session volume.
  • Do the majority of your work in the 6-30 rep range as this is the most efficient way to accumulate volume and is less likely to leave you beat up and burnt out.
  • If time becomes an issue limiting your total volume, consider using protocols such as APS to get in extra volume without tanking performance.

Step Two: Be Flexible with Exercise Selection

Listen, if it takes you 40 minutes of warm-up, mobility work, and movement prep in order to get to your first working set of squats, we need to talk…

And if deadlifts tire you out so much you need 5-10 minutes between sets to recover, perhaps you need to consider a different approach…

Because the truth is, unless you’re a powerlifter, there’s no need to stay married to the big three, especially if hypertrophy is your main goal.

I love squats and deadlifts as much as the next guy, but these movements tend to be uniquely time-intensive and fatiguing. If you’re not careful, they can “crowd out” other movements that may give you more bang for your buck in terms of volume. Furthermore, some of us are simply not well-suited to these specific exercises and would do better with other movements.

Maybe hitting some heavy leg presses first and following that with some front squats and Romanian deadlifts would allow you to accumulate a lot more volume in a lot less time while still maintaining those same basic movement patterns?

Key Takeaways:

  • Unless you’re a powerlifter, there’s no reason to stay married to the big 3.
  • Do a “cost benefit analysis” on movements that cause a lot of fatigue or eat up a lot of your training time.

Step Three: Work Smarter, not Harder

There’s a fair amount of evidence showing you do not need to train to complete failure to grow your muscles. In fact, by avoiding failure altogether on most sets, you not only reduce the risk of injury, you also open up the possibility of performing more total volume. And more volume is generally associated with more hypertrophy.

Not a bad trade-off, right?

When attempting to maximize volume and recovery, the key is to come close enough to failure to maximize muscle fiber recruitment and adaptations without actually hitting failure—all while maintaining good form.

In general, the higher the intensity (in terms of percentage 1RM), the farther you can be from failure while still maximizing muscle fiber recruitment. Conversely, the lower the intensity, the closer you must come to failure.

Here’s a general rule of thumb I like to follow regarding average RPE ratings:

  • <10 reps = RPE 6-8
  • 10-15 reps = RPE 7-9
  • 15-30+ reps = RPE 8-10

There will always be exceptions to the above of course, but this will get you in the right ballpark.

Key Takeaways:

  • You don’t have to train to complete failure to achieve full muscle fiber recruitment.
  • For lower rep sets you can leave quite a few reps left “in the tank” and still maximally recruit muscle fibers.
  • For higher rep sets, you should come a little closer to failure.
  • In managing your “per set fatigue” by avoiding failure, you will be able to perform more total volume in that session and throughout the week.

Step Four: Mitigate Muscle Damage

I came up as a young lifter thinking the goal of training was to tear down your muscles so they are rebuilt bigger and stronger than before (no pain, no gainz). This lead me to pursue protocols that focused disproportionately on muscle damage. I’d take pride in my levels of soreness and relish the pain–never mind the fact that my recovery and performance were compromised for the rest of the week and I was hobbling around like an old man…

Now I know better.

via GIPHY


As more research comes out, it seems of the three proposed mechanisms for muscle growth (mechanical tension, metabolic stress, and muscle damage), muscle damage is likely the least important factor.

In fact, recent studies show excessive muscle damage can have a detrimental effect on your gains because your body must spend time and resources repairing the damage before it can begin to build new muscle

So the key is to allow for some muscle damage as a natural consequence of training hard and progressing, but not so much that your total weekly volume is compromised by impaired recovery and/or performance.

How do we do that?

One way is by taking advantage of the repeated bout effect.

The repeated bout effect is the phenomenon by which a single session, or bout, of a given exercise protects against muscle damage from future bouts. Put more simply, the more you perform an exercise, the more resistant to damage (and adaptation) the muscle becomes.

This is often viewed as a bad thing; after all, if the muscle becomes resistant to adaptation, doesn’t that make it harder to progress?

That may be true, but there’s another way to look at it…

Becoming more resistant to damage means your muscle are able to perform more volume with less damage per session. This is key because it can allow us to incrementally increase training volume to levels high enough to maximize hypertrophy while protecting against excessive muscle damage that will impair recovery and progress. One way I like to take advantage of this is by incorporating “intro weeks” into my training cycles.

When you first start a new training cycle, you’ve most likely changed quite a few variables—reps, progression schemes, exercises, etc.—and these changes will temporarily result in higher levels of muscle damage due to the novel stimuli.

By starting off with an intro week with slightly lower volume and intensity, you’ll still get a strong training effect and the easy dose of volume will inoculate you against the higher volumes and intensities coming down the line.

How low one should keep the training volume and intensity during an intro week will vary based on the individual, but I like to put the intro week somewhere in between a deload and an average “meat and potatoes” week of training. Think of it like a bridge between the two.

Another thing to consider in regard to mitigating muscle damage is exercise selection.

If deficit, stiff-legged deadlifts consistently leave you so sore you’re crippled for a week, you’re not doing yourself any favors by maxing out on them on the regular. Sure it feels like you’ve accomplished something (gotta sacrifice to win, brother), but it’s a short-sighted approach.

Don’t get me wrong, being sore is not a bad thing per se. And I think it’s good to include a few movements that load a muscle in a stretched position—especially if hypertrophy is the goal, but you need to do a cost-benefit analysis with these types of movements.

You may not need to give them up entirely, but tweaking the volume, rep range, and proximity to failure can help attenuate some of the excessive damage while still allowing for the positive aspects of the movement.

Key Takeaways:

  • Excessive muscle damage should not be the goal of training and may even negatively impact gains.
  • Take advantage of the repeated bout effect’s ability to protect against muscle damage by using intro weeks and gradually increasing volume and intensity as the mesocycle progresses.
  • Consider modifying the loading and progression schemes for particularly damaging exercises if excessive soreness is impairing recovery.

Step Five: Include Overreaching Weeks and Deloads

Just as you are most sensitive to volume at the beginning of a mesocycle, you are most resistant to volume toward the end. Thus, the natural counterpart to an intro-week at the beginning of your mesocycle, is an overreaching week to close it out.

An overreaching week is a week where you intentionally push volume a little higher than normal in an effort to maximize potential progress. When done in an intelligent manner, this can be an extremely productive and fun week of training. During this week you can go for slightly more damaging protocols, push a bit closer to failure, and/or up the volume to a level higher than you could normally sustain.

Immediately following an overreaching week, you should perform a deload week. The two go hand-in-hand.

A deload is more than just a preventative measure to protect against injury, it’s the second half of a “one-two punch” that allows you to expose your muscles to higher levels of volume by providing a window for recovery.

During a deload, you should reduce volume and both intensity of load and intensity of effort to allow for active recovery to occur. Without the recovery period, you would not be able to peak volume as high and your muscles would not have been exposed to those superlative levels of stress.

The higher the peaks, the lower the valleys.

Overreaching strategies:

While I consider deloads a mandatory part of a good training program, overreaching weeks are more of an optional piece. For some lifters (particularly those who tend to run themselves into the ground), any small benefits that may arise from the overreach could easily be outweighed by the increased risk of injury or burnout.

Thus, it’s important to remember an overreach is not an excuse to get sloppy with form or drastically change things up.

If hypertrophy is the main goal, you are primarily just looking to get some extra volume in and perhaps vary the training stimulus a bit. One method of doing this is to add a drop set or two to your last movement for a muscle group in a given session.

Research has shown that drop sets can be just as effective as straight sets. And because they are so time efficient, it’s easy to tack them onto your workouts without a huge time investment.

Thus, drop sets can add a nice little punch of volume without making your workout significantly longer, and we’re not so concerned with the fatigue because the deload in the following week will ensure recovery is adequate.

Key Takeaways:

  • Pushing a bit harder towards the end of a mesocycle can be a valuable strategy to potentially eke out some additional progress.
  • You must pair an overreach with a deload to allow the higher levels of fatigue to dissipate and any potential supercompensation to occur.
  • Regardless of whether you utilize overreaching strategies, regular deloads should be incorporated in your training.
  • Drop sets can be a very time efficient way to add some quality volume during an overreach.

Parting Thoughts and a Word to the Wise

You’ll note I didn’t include a sample training program with this article. This was intentional. I’ve instead chosen to outline some “broad strokes” concepts so that you can use these principles to improve on your programming now and for years to come.

By following the steps outlined above, you may find you now have the potential to double your training volume.

But just because you can, doesn’t mean you should.

Let’s say you’ve been doing around 10-12 sets per muscle group, per week on average. You’re training hard, eating well, and feel well-recovered between sessions, but you’ve hit a plateau. It’s very likely that you’ll benefit from bumping up your training volume. It’s the most logical next step. By using the strategies outlined above, you may find you are now able to fit in 20 quality sets per week.

Don’t jump straight to 20.

Just as you should progress incrementally when adding weight to the bar, you should view volume in the same way. So rather than doubling your volume right off the bat, simply add about 10% or so and see how you fare.

Did you progress? Was recovery okay?

If so, run it again. If it ain’t broke, don’t fix it.

Milk as much progress as you can out of your current level of volume, but keep an eye towards progressively and incrementally adding volume—both to test your limits and to keep those adaptations rolling. Your ideal volume is a moving target, but if you are paying attention to your training, tracking variables, and keeping your eyes on the prize, it’s a target you should be able to hit fairly consistently.

It doesn’t have to be a bullseye.

About the Author

Kevin Finn is a strength and conditioning specialist, online trainer, and the owner and creator of FitnessWalkthrough.com.

As a coach with a master’s degree in education, he specializes in breaking down complex information and arming people with the knowledge and tools necessary to transform their physiques and take their performance to the next level.

He has created some of the most comprehensive guides available online for skinny guys and girls who struggle to build muscle. Visit http://fitnesswalkthrough.com/get-jacked.html to get a free copy and learn more.

CategoriesProgram Design

Boom or Bust: Why You’re Always Hurt

I work with hurt people for a living.

It’s not uncommon for people to seek out a coach or trainer because an exercise doesn’t feel right or because something – a shoulder, a knee, lower back, their soul perhaps – routinely hurts and they can’t seem to get out of their own way.

That’s where I come in to save the day.

Most of the time.

To fix someone’s squat technique and to maybe (probably) give him or her a reality check.

Copyright: france68 / 123RF Stock Photo

Boom or Bust

This is a term I stole from a friend of mine, Dan Pope of Champion Physical Therapy & Performance, and to a larger degree has its roots from a presentation I watched him do centered around the conversation of understanding shoulder pain.9

“Boom or Bust” refers to the person who handles their business as follows:

Train/Overload –> Do a lot –> To the point where it becomes painful –> Get pissed off, becomes upset, is inconsolable, and inevitably increase their volume of ice cream and Julia Roberts’ movies –> Feels better –> Repeat –> What an asshole.

I’m sure many of you reading – whether the above sequence of events describes you or some of your clients – can commiserate.

It can all be summarized using the following graph:

Again, props to Dan Pope. I essentially drew his graph, but added a little Tony LOLs.

What this depicts is a scenario and approach that keeps the alarm system sensitive as well as pain levels up. They train hard on Monday and hit their bench pretty aggressively, of course.

A day or two passes, the shoulder feels okay, and they decide to test the waters again and perform a bunch of high-rep push jerks. Another day or two passes, the shoulder starts to feel, normal again, and since they have zero fucks to give, decide it would be a swell idea to perform kipping pull-ups paired with handstand push-ups for AMRAP on broken glass.

All they do is perpetually plow through their pain threshold and the cycle continues over and over and over again like an episode of Russian Doll.

This, of course, is absurd, and makes zero sense.

Conversely, what also makes zero sense is the opposite approach…

…UNDER-loading, over corrective exercising people to death, or worse, doing nothing at all.

I’m not dissing the corrective component. Depending on how sensitive someone’s pain threshold is, we may very well have to resort to a myriad of side lying external rotations, arm-bars, and band work.

The key to improving pain, though, particularly with the long game in mind, is to elicit a smidge (key word: SMIDGE) of it during training. You want to tease it, buy it a drink, make out with it a little bit.

If you want to elicit change, you need to move. When we move, we induce something called mechanotransduction, which is just nerd speak for “tissue begins to heal.”

Pain, when DOSED ACCORDINGLY, can be beneficial during exercise. When we push into a little pain there’s generally better short-term results than if not. Think of it like this:

There’s a line in the graph above labeled “pain threshold.” On a scale of 1-10 (1 = no biggie, I got this and a 10 = holy shit, a panther just latched onto my carotid), exercise should hover in the 2-3 realm.

In this case, the person can tolerate things like push-up, landmine, and row variations.


  • When (s)he perform those exercises, the pain level never exceeds a “3.”
  • When (s)he’s done exercising, along with the hours after, the pain level never exceeds a “3.”
  • The following day, the pain never exceeds a “3,” and in an ideal situation is back down to baseline, which is a “1.”

That’s the sweet spot and what we’re after from a managing pain standpoint. We’re doing juuuust enough to elicit a training effect, playing footsie with the pain threshold, but avoiding any boom or bust scenario where we place commonsense ahead of our ego.

And then, over time, the graph looks like this:

I’m an idiot. That arrow pointing up should be labeled “Improvement in Pain.”

The pain threshold slowly creeps higher and higher, and before long, push-jerks, bench pressing, and fighting Jason Bourne ain’t no thang.

Training (with weights), when matched with someone’s current ability level, and when dosed effectively, can be corrective.

CategoriesCorrective Exercise Program Design

Using Fillers In Your Programs: Bench Press

I already wrote similar posts covering how I implement fillers with deadlifts and squats, so it only makes sense to finally follow suit with something discussing the bench press.

Copyright: spotpoint74 / 123RF Stock Photo

Fillers For the Bench Press

As a quick refresher for those first tuning in: “Fillers” are low grade exercises that address a specific mobility or stability issue – lack of glute activation, tight hip flexors, poor scapular upward rotation, as examples – which are performed during rest periods of a main exercise.

Fillers could also be a simple stretch.

In short the idea is do something productive during your rest periods – other than stalk your ex on Instagram – that’s not going to affect or deter performance on subsequent sets of deadlifts, squats, bench presses, and the like.

Another way to look at it is this: I know it, you know it, your parent’s mailman’s second cousin’s godfather knows it, we all know it…

…you’re (probably) going to skip your warm-up.

Fillers are the compromise.

Instead of giving people a laundry list of warm-up drills they’re not going to do, I’ll sprinkle fillers in as PART OF THE PROGRAM.

(cue evil strength coach laugh here).

via GIPHY

So in no particular order here’s a quick-n-dirty rundown of some of my go to fillers on bench day.

1. Rows

Okay, I’m cheating a little bit here.

I’m only speaking for myself, but I find rows are something most people can’t include enough of in a program. Many of us are so overdeveloped and/or tight in our anterior chain – namely pecs – that it’s not uncommon practice for me to pair a rowing variation with EVERY set (including warm-ups) of bench press to help offset the imbalance

I don’t care if it’s a DB row, Seated Cable Row, Chest Supported Row, Seal Row, TRX Row, Face Pulls, or Band Pull-Apart…I want some kind of row tethered to every set of the bench press.


And then I’ll include 1-2 more rowing variations later in the session too. The whole notion of a balanced approach to program design – where you attempt to include a 1:1 (press:row) ratio – while noble and good place to start, tends to be a bit underwhelming.

I’ll often say it’s more beneficial to UN-BALANCE someone’s program (to the tune of 2-3 rowing variations for every press) to to better “balance” them.”

So, as more of an umbrella theme to consider, just staying cognizant of rowing volume (and adding more of it into someone’s program) is going to be leaps and bounds more effective for long-term shoulder health and training domination than the litany of correctives that can be substituted in.

2. Band Posture Corrector

This is a drill I stole from my good friend and strength coach Jim “Smitty” Smith of Diesel Strength.


Sitting at a desk all day, every day, can be brutal.

The muscles on the back side (namely, rhomboids) get long and weak, while the muscles on the front (namely, pecs) get short and overactive.

A good bench press requires a fair amount of scapular retraction and depression to help protect the shoulder joint and to provide a more stable “surface” to press from.

This drill targets those muscles involved.

Simply grab a band, loop it around your shoulders, and “reverse” the posture.

I like to perform 10-20 reps with a 1-2 second hold on each rep.

3. Foam Roller Snow Angel

Likewise, the bench press also requires a decent amount of thoracic extension (which makes it easier to retract and depress your shoulder blades).

The Foam Roller Snow Angel allows for a few things to fall in place:

  • A nice pec stretch.
  • Nudges more thoracic extension (by lying on the foam roller).


I like 10-12 reps here.

4. Child’s Pose – off Med Ball


Pigging back off the above drill, this one also helps to improve thoracic extension in addition to strengthening the scapular stabilizers when you add a static hold at the top of each rep.

Adding the medicine ball into the mix along with flexed hips helps to keep the lumbar spine out of the equation.

I like 5, 5 seconds holds here.

5. Bicep Curls


The fuck outta here.10

CategoriesProgram Design Rehab/Prehab speed training

Using Fillers In Your Programs: Deadlifts

I had a gentleman come in for an assessment recently who, upon arriving, provided me with a laundry list of injuries and maladies that have hampered his ability to workout for quite some time.

The list he handed over would have prompted fist bumps from Tolstoy or Tolkien from its grandiosity in description and length.

Some were legitimate – an old athletic injury to his shoulder, along with some nagging low back pain.

Some were, shall we say, a bit of overkill – “my left Sternocleidomastoid gets a bit tweaky whenever I rotate my head more than 17.22 degrees. It’s even more profound when the Dew Point dips below a certain level. Or if I wear red on Thursday.”

Copyright: spotpoint74 / 123RF Stock Photo

The Power of Fillers

Okay, that last part did NOT happen. Rather, it was meant as an allegory of sorts, an attempt to showcase how some people can often fall into a trap of believing they’re broken and that the only way to “fix” themselves is to put under a microscope every tweak, niggle, and bump that rears its ugly head.

To be clear: It’s NOT my bag to discount people’s past or current injury history. I respect and take into account everything (injury history, goals, ability level, favorite Transformer11) and use that information to ascertain what will be the best, safest and  most efficient path to dieselfication possible.

That said, I often have to play “bad cop” and help people come to an understanding.

That they’re not broken, that they can train, and that they don’t have to spend 30 minutes foam rolling and activating their Superficial Dorsal Fascial Line.

The drawn-out, overly complicated warm-up is my worst nightmare as a coach.

Actually, back up.

Kipping pull-ups are my worst nightmare. With a close second being anytime someone asks me about keto. Oh, and mushrooms.12

Sometimes when I start working with a new client – especially one coming in with an extensive injury history – they’re often riddled with fear and trepidation with regards to training. They’ve been stymied by an endless array of setbacks (and overly cautious physical therapists13) and are reluctant to push past the “corrective exercise” rabbit hole.

Their warm-up often takes longer than it takes to complete the Boston Marathon, to the point where every inch of their body is meticulously foam rolled and every muscle is painstakingly activated.

Yes, it’s important to activate “stuff.”

In fact, I’m often flummoxed some people still don’t understand the importance of taking themselves through a proper warm-up.  Getting the body and nervous system primed for physical activity is kind of a big deal, and I won’t belabor the point here.

You should be doing it.

Don’t get me wrong: the warm-up is a splendid opportunity to individualize someone’s program and to have him or her dedicate some additional TLC to areas of the body that need it.

To that end, however, I do feel – at times – people baby themselves to the extent the warm-up becomes the workout.

This is where I find a lot of value in fillers and implementing them into my programs.

I love it, I love it, I LOVE it.

via GIPHY

The idea is to address common “problem areas” by tossing in some low-grade activation/mobility drills during one’s rest intervals…as part of their training program.

The key point here is LOW-GRADE.

Filler exercises can be anything from glute activation and scapular upward rotation drills to, I don’t know, a particular stretch (hip flexors?) or naming all the members of Wu-Tang Clan. The premise is that they’re low-grade, low-demand, easy, and address something that won’t sacrifice performance on subsequent sets of iron work.

Performing 400m sprints or Tabata anything does not constitute as a filler, and defeats the point. We’re trying to turn stuff on and/or address common mobility/stability issues, not challenge Jason Bourne to a street fight.

via GIPHY

All that said I wanted to share some insights on how I implement fillers into the programs I write, and in particular which ones I like to pair with certain exercises.

First up, deadlifts of course…;o)

Filler For Deadlifts

There are a lot of moving parts to the deadlift and to perform it in a safe manner requires “access” to a number of things:

  • Ample T-Spine extension
  • Ample hip flexion
  • Depending on the variation (I.e., sumo style) requisite adductor length
  • Scapular posterior tilt (hard to do if someone’s in excessive upper back kyphosis).
  • Lumbo-pelvic control/stability
  • The cheat code for unlimited lives in Contra (very important)14

If none of these things are in play or even minimally addressed many lifters are going to have a hard time staying healthy in the long run.

Alright, enough of my jibber-jabber. Lets get to the drills.

1) Split Stance Adductor Mobilization


Now, admittedly, if there was a Wikipedia page for “ordinary and unremarkable exercises,” this one would be right at the top. However, this has always been a staple filler exercise for me and one that I don’t forsee taking out of the rotation anytime soon.

What I like most about this exercise is that it targets the adductors in both hip flexion and extension. The key, though, is attention to detail with regards to anterior core engagement.

A common mistake I see people make is “falling” into their lower back when they walk their hands forward; it’s important to avoid this. Too, another common mistake is allowing the lower back to round as they sit back. The main objective should be to maintain as “neutral” of a spine as possible throughout the entirety of the set.

One other teeny-tiny thing to consider is scapular position. This drill can also be a nice opportunity to work on a bit of Serratus activation by actively “pushing” into the floor so that there’s a bit of protraction and the scapulae “set” or adhere to the ribcage.

Aim for 5-8 repetitions/leg during rest periods.

2) Monster Walks


All I can say about this exercise is that when it’s done properly it’s Glute O’clock.

In the video above I’m using Nick Tumminello’s NT Loop which I have found work really well for this drill.

FYI: I receive zero kickback from Nick – maybe a tickle fight? Fingers crossed – in recommending his band.

The idea here is to lock the ribs down and to keep the hips level so they’re not teeter-tottering back and forth during the set. Walk it back using the hips/glutes until the band is fully stretched and then control the return (again, making every effort not to let the hips teeter-totter).

I prefer to use anywhere from 5-8 repetitions here.

3) Bench T-Spine Mobilization


This is a money filler for those people stuck in flexion hell all day, in addition to those who have chronically tight/short lats.

Some key things to note:

  • Holding onto a stick (or anything similar) helps prevent the glenohumeral joint from going into internal rotation.
  • As you sit back towards your ankles, try to maintain a neutral back position throughout (keep those abs on, actively “pull” yourself back).
  • Perform a pseudo bicep curl at the bottom to help nudge you into a bit more thoracic extension.
  • Be careful not to induce excessive thoracic extension here. It’s easy to think the more ROM here the better, but that’s not necessarily the case.

4) Brettzel Mobilization w/ Exhale


Stolen straight from Gray Cook and Brett Jones this is easily one of my favorite fillers OVERALL, and not just for deadlifts. We’re locking down the lumbar spine by holding the bottom knee down (you can also place a foam roller here if you’re unable to get this low) in addition to adding a nice hip flexor stretch on the opposite side.

The goal, then, is to take in an inhale through nose and EXHALE (out the mouth) as you rotate and drive your top shoulder towards the floor.

Indeed, this is a fantastic drill to work on more thoracic extension, but again, be judicious with ROM here. More is not better. All I’ll say here is stay cognizant of your belly button (innie or outtie?) and where it’s pointing. As you extend back it should not point towards the ceiling. Instead, it should stay relatively motionless and pointing towards the wall your chest is facing.

As you exhale with each subsequent rep, you should notice you’re getting closer and closer to the floor.

3-5 repetitions per side should suffice.

And That’s That

There are a plethora of options here, but all I wanted to do was highlight a handful of my favorites. Choose ONE drill to perform during your rest periods. Also, depending on the total number of sets you have on the menu you could also alternate between 2-3 drills.

There’s no golden rule.

Hope this helped and gave you a few ideas to work with.