When Dean Somerset & I created the Complete Shoulder & Hip Blueprint and the (Even More) Complete Shoulder and Hip Blueprint (both currently on sale for the next 72 hours at 40% off their regular price…wink wink, nudge nudge) our goal was to provide a resource for people to better connect the dots between assessment and performance
Too, it was to champion the idea that strength is corrective. It’s rarely necessary to send someone off to corrective exercise purgatory when their shoulder or hip is acting up. While it’s inevitable a swath of time & effort may have to be dedicated to proper breathing mechanics or improving scapular upward rotation, what I have found that often “sticks” the most and provides a greater “buy in” to rehabbing an injury…
…is to make rehab look and feel more like training.
Much of the time the “fix” is a matter tempering one’s training volume (most people are simply doing too much of something) or adjusting a specific exercise – stance, ROM, tempo – in an effort to better mirror one’s injury history and (current) ability level. <— FYI: Dean & I cover this extensively in CSHB 1.0 and 2.0.
If a part of the body hurts when someone performs an exercise it doesn’t automatically mean we have to cancel the exercise altogether.
Cancelling Nazis (and Birthday clowns) = good.
Cancelling Squats = whoa, whoa, whoa…pump the brakes a bit.
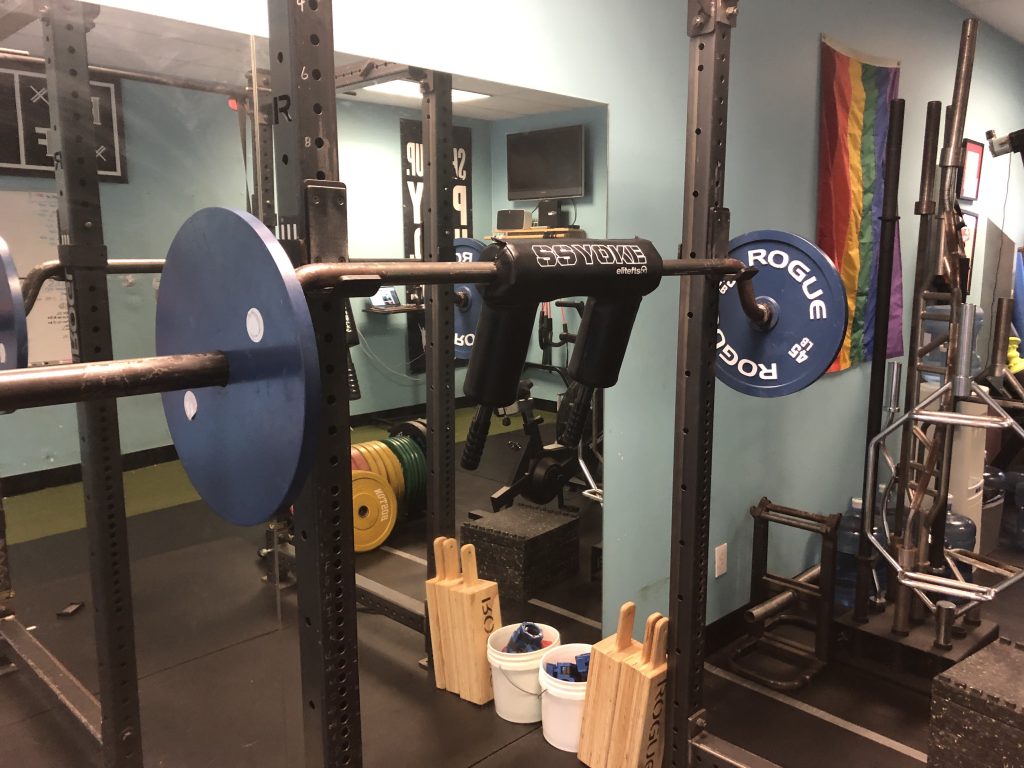
The Bar Every Gym Should Have
This post is not meant to wax poetic on the back squat.
If you want to do it, cool.
If you don’t, that’s cool too.
No one outside of a competitive powerlifter (and maybe He-Man) HAS to perform a traditional barbell back squat. I think they’re a great option if your goal is to be brutally strong & athletic and you want to build an impressive physique.
They’re a tool in the toolbox.
I will say, however, the back squat (when performed with a straight bar) does tend to eat up a lot of lifters’ shoulders. In fact, I’d go so far as to say that straight bar back squats are more of a shoulder destroyer than the bench press any day.
Yeah, that’s right…I said it.
I know the barbell back squat provides a degree of prestige and “street cred,” and I’d be lying if I said there wasn’t a time in my career as a personal trainer & strength coach where I’d ride and die with the statement that everyone, regardless of goal, sport played, or highest Scrabble score should have back squats in their program.
Alas, with age (and experience) comes wisdom.1
That said, I’ve always prided myself in taking a middle-of-the-road approach to most things in the health/fitness industry. I know some coaches who are adamantly PRO back squat and others who are just as adamantly against.
Which brings me to the point of today’s post.
The Safety Squat Bar (also referred to as SSB or Yoke bar), while still technically a back squat, has grown into one of my preferred ways to program (back) squatting into most people’s programs. I also take the stance that it’s a bar that EVERY gym should add to their equipment arsenal.
Why Your Gym Needs an SSB Bar
1. Shoulder Friendly
Back squatting with a straight bar requires a fair bit of shoulder mobility. Many lifters lack the requisite shoulder abduction & external rotation to be able to comfortably rest the barbell on their upper traps (high-bar position) or rear delts (low-bar position).
As alluded to above, part of the appeal for me is that SSB bar coincides very well with my mantra “strength is corrective.’
There’s an element of literal synergy here; the SSB bar still allows someone to lift heavy things. However, the obvious advantage of the bar is its design, and the fact that the handles are located in FRONT of the lifter.
There’s zero shoulder mobility required. To that end, if I am working with someone who’s shoulders don’t handle the straight bar well, I can have them use the SSB bar and continue to TRAIN without irritating the joint.
2. More Upright Torso
There will ALWAYS be a degree of forward lean when squatting. This is not to suggest a more forward leaning position when squatting is inherently wrong or deleterious.
However, back squatting lends itself to more of a forward lean compared to a front squat. As a result, and as a general rule, the more of a forward lean there is, the more “shear” loading will take place on the spine.

Photo Credit: www.PowerliftingTechnique.com
The high(er) bar position with the SSB bar allows for the torso to be more upright (similar to a front squat) and as such a bit more back friendly as well.
Personally speaking, I know when my deadlift volume is high I’ll revert to SSB squats for the bulk of my squatting during that particular phase of training because my lower back will take less of a beating and thank me in the long run.
3. Increased ROM & Upper Back Strength
Pigging back on the above point, because the high(er) bar placement of the SSB bar allows for a more upright torso it’ll also equate to a more robust range of motion for most trainees as well.
In addition, the high(er) bar placement will force the upper back to work overtime because that area needs to work harder to prevent the bar from “rolling” the shoulders over.
So, in effect…we can make the case that the safety squat bar recruits the upper body more (compared to traditional squats).
4. Reneges Upper Body Injuries
The SSB bar does a splendid job at opening up one’s TRAINABLE MENU in lieu of an upper body injury. Lets say you just had surgery on your shoulder and you’re in an arm sling for several weeks. Or, I don’t know, you got in a tickle fight with an Uruk-hai and ended up busting up your wrist.
Both situations make back squatting problematic if not altogether impossible.
Not with an SSB bar, though.
LOL.
You can still train your lower body.
Nice try.
5. Hatfields!
Last but not least, the SSB bar allows you to CRUSH “supported” single-leg training like Hatfield Split Squats.
I’m certain I’m neglecting to think of other cogent benefits, but that’s what I have at the moment. Feel free to forward this post to your local gym’s owner/manager so that you can start incorporating this SSB bar soon!