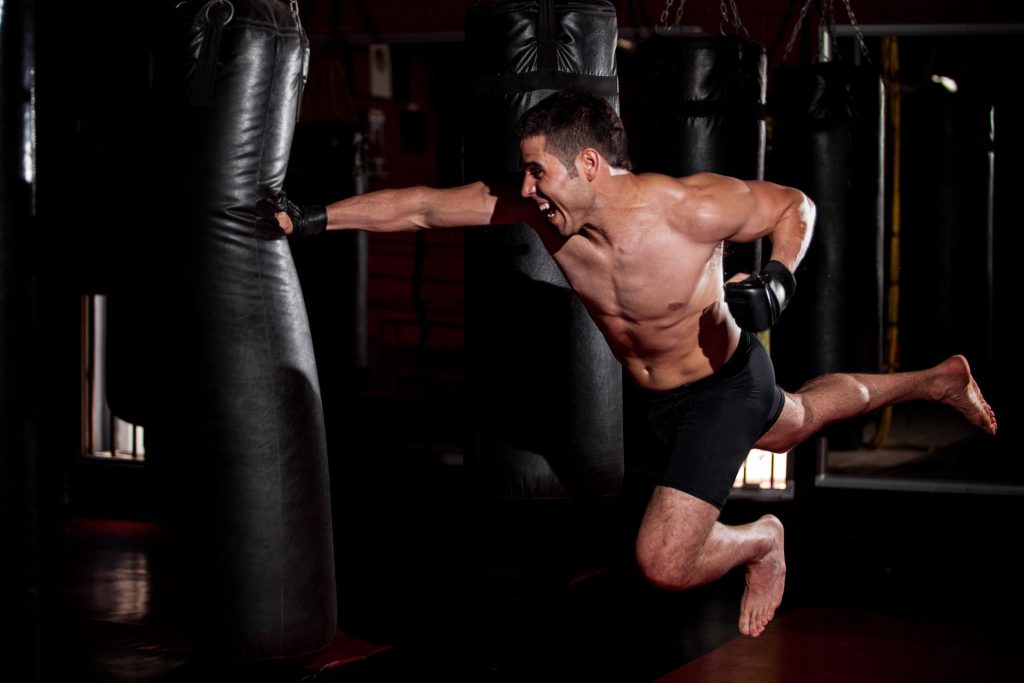
NOTE: Actual exercise not pictured. More power to you if you want to pull it off though. I mean, it does work the serratus…;O)
But First – A Rookie Parenting Mistake
It was a consortium of errors this past weekend. Lisa and I were supposed to head to Toronto for our Strong Body-Strong Mind workshop.
We were pumped to go, but what made the trip an even bigger of a deal was the fact it was going to be our first attempt at bringing our almost 5-month old, Julian, with us. On a plane. Did I mention on a plane?
On a plane.
With no where to go if he acted up.
You could say we were both a little nervous. But we took solace in that the plane ride from Boston to Toronto is a pretty short one and we had a kick-ass weekend a head of us hanging out with 25+ fitness professionals.
That is until we got to the airport, through security waiting at our gate, and were then informed Julian needed a passport.
In the end we had to postpone our workshop, and head back home with our tail between our legs.
Sorry Toronto. We’ll see you later this year, I promise. The man can’t keep us down.
We have a tentative date planned in September, but will confirm shortly.
Lets get to the exercise….
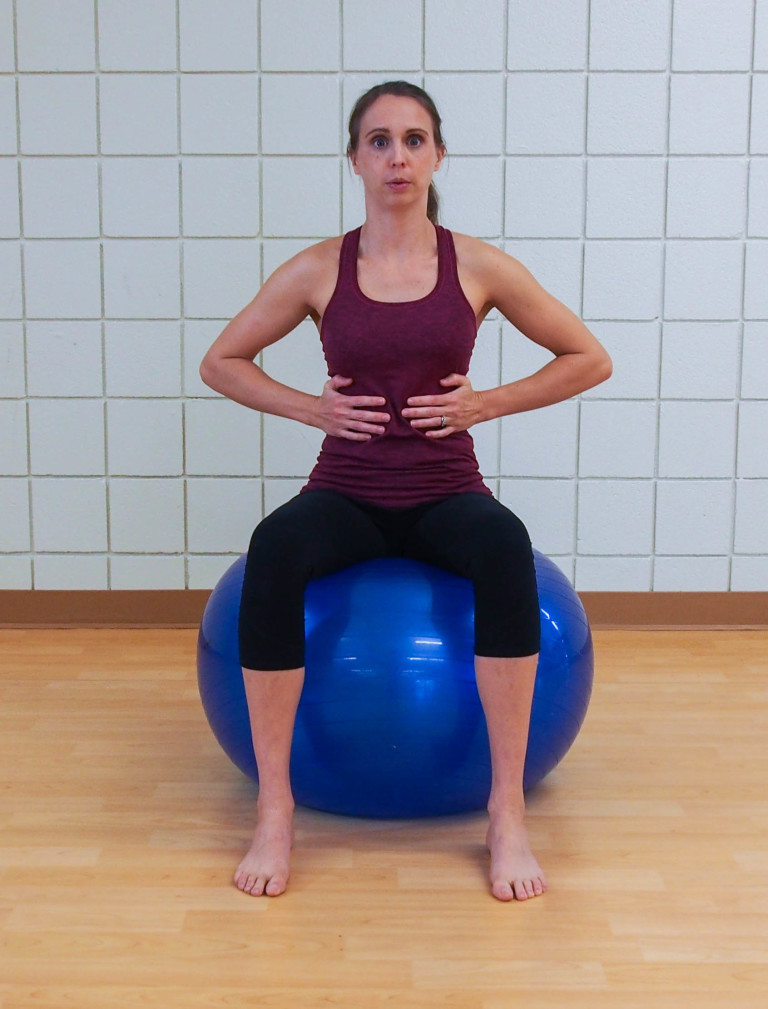
Serratus Punch
Who Did I Steal It From: This is an exercise I’ve done for several years with clients off the floor. The addition of the stability ball, though, is something I snaked from Dr. Joel Seedman.
What Does It Do: The serratus anterior is the muscle located alongside the ribcage and plays a crucial role in shoulder health and performance. Specifically, it’s main role is to aid in upward rotation of the scapulae via protraction.2
It’s a relatively innocuous muscle, but I’d venture a guess the bulk of shoulder “issues” you come across as a personal trainer or strength coach can be remedied with a little more TLC given to it.
It’s a BIG deal.
It’s a big deal especially when we start discussing one’s ability to raise his or her’s arms overhead. In order to do so, safely, three actions need to happen with the shoulder blades:
Upward rotation
Posterior tilt
Protraction
I feel protraction is a lost movement. More and more we’re finding people “stuck” in an extension pattern which has a domino effect up and down the kinetic chain. With regards to upper extremity movement and mechanics we find people with a more depressed (low, not sad) shoulder girdle, excessive rib flair, and shoulder blades that tend to be more adducted/retracted and downwardly rotated.
In no small part the culprit can often be pointed to execution of common strength training movements. True, in order to lift BIG weight with the “big 3” it behooves anyone to “pack” the shoulder blades together and down when setting up to bench press, deadlift, or squat.
Getting and maintaining full-body tension requires “stuff” to be locked down tight.
That being said, it’s still important to be able to access movement. While we may coach people to clamp their shoulder blades down when bench pressing, as an example, to provide more stability to the joint, that doesn’t mean this should be the case 100% of the time.
Protraction or reaching is a vital component for shoulder health and performance.
And the serratus anterior is an often neglected muscle that can have profound effects on how one’s shoulder feels.
Also, not for nothing, this is also a solid core stability exercise.
Key Coaching Cues: Since the successful execution of this exercise is predicated on one’s ability to perform a plank position that doesn’t make me want to throw up a little, lets discuss that first:
TENSION! – everything should be firing. Your abs, your glutes, your quadricep muscle, your eyeballs, everything.
You should not be “hanging out” on your lower back.
Once you’ve got that down, from there the idea is to “punch” or push away from the stability ball making sure to stay fully engaged throughout.
NOTE: I’d start with performing these off a more solid surface – like the floor – if you’re new to this.
I like to add a full exhale as I push away which will help with keeping the ribs down (and serve as a kick-ass ab workout).
Under control, lower yourself back down by retracting the shoulder blades making sure not to poke your head forward. You should still be engaged here.
I know, I know: I’ve been slacking on the writing front the past few weeks. I do hope you’ve been enjoying the influx of informative guest posts of late. It’s important to me that this site remains a repository of good information and ass-kickery (and cute kitty pictures), even in my absence.
The past two weeks have been a whirlwind of international travel and crime fighting.3 I promise I’ll be back on task starting Monday.
Lets get to this week’s list of stuff to check out.
I’m really excited to announce the Strong Body-Strong Mind Workshop, coming to Boston (finally!) later this summer.
The idea is simple: there’s a corner in the industry that’s underserved….mental skills.
There are a lot of people out there who write about “mindset” and describe themselves as mindset coaches (whatever the heck that means) who, by and large, have zero academic background in that department.
Lisa, SPOILER ALERT: she’s my wife, went to school for this shit.
I went to school to help turn people into badasses.
Lisa can speak to building competency and discussing how to build the skills to develop rapport with clients. I can speak to getting people bigger, stronger, and faster.
Our Vancouver shindig in April sold out, but Dean and I have recently announced a stop in Orlando, FL later this year, October 21-22nd at Spark Fitness.
I’ve never been to Orlando. There’s no way in hell I’m visiting Disney World.
3. Elite Fitness & Performance Summit – Chicago, IL
And speaking of being pumped, I am really – and I mean really – pumped for this event.
First off: Take a look at the roster of speakers (HERE).
Second: Holy shit, I am one of them.
Third: Cue trying not to destroy the back of my pants.
This is one of the premier events of the year for fitness professionals and entrepreneurs alike. And it’s taking place in an awesome city. What’s not to be excited about?4
The early bird special only lasts through June (and it’s an amazing price).
However, if you go HERE you’ll get an additional $100 OFF the early-price. BOM CHICKA BOM BOM.
In light of a blog post a wrote last week with a similar vibe – Easy Training is Good Training – I felt this literary masterpiece by Nia was a nice compliment.
Social Media Shenanigans
**Admittedly, I was lame last week and wasn’t on social media much. I mean, I was in London for fuck’s sake.
Twitter
Attempted a fake British accent in a room full of Brits today. Note to self: don’t do that again.
I arrived back to Boston late last night from London and I’d like to say I woke up today well-rested and ready to wow everyone with some witty fitness prose.
I’d like to say that.
Not gonna happen today. I’ve got a ton of emails and programs to catch up on, but that doesn’t mean I don’t have any content prepared for you today. Andrew Millett, good friend and Boston based physical therapist/strength coach was kind enough to send along this baller post today.
I got the idea for this post after recently attending the Advanced Warm-Up and Recovery Workshop put on by Matt Ibrahim and Dr. John Rusin. I didn’t know what new things I may learn at the workshop, but after taking pages of notes and getting new ideas for my clients and patients, it was definitely worth it.
You walk into any gym or fitness facility and you will see people warming-up on the bike, treadmill, elliptical, or maybe even rolling around on the foam roller. It is great to see people putting in the time and effort to consciously warm-up their musculoskeletal, nervous, and circulatory systems prior to engaging in their exercise routine.
The key word in that last statement is:
Consciously
Too many times, people warm-up without any direct goals or agenda in mind. They hop on one of the aforementioned cardio machines and watch TV or read a magazine and aimlessly pedal or step until they think they are ready to exercise. If they are on the foam roller, they probably roll around on it like they are rolling out pizza dough or look like a boy scout trying to start a fire with 2 sticks.
When you are working with a client or are performing a warm-up in your own gym routine, there needs to be a specific goal in mind while warming-up prior to your exercise session.
First off, we need to assess our clients to see what areas they may be lagging in. Here are a few quick and easy tests to see if there are any areas that need to be targeted for some type of self-myofascial release.
Ankle
In the sagittal plane, the ankle needs to be mobile. It needs to be able to plantar-flex and dorsiflex for the demands of life as well as demands in the gym.
In order to perform a squat without compensations, the ankle must be able to dorsiflex and allow the tibia to translate anteriorly as the person descends down in the bottom position. To determine if someone has adequate ankle dorsiflexion, try the Knee to Wall Test.
Knee to Wall Test
You instruct the client to place their foot on the tape strip. On the tape strip, there are 4 lines, each 1-4 inches away from the wall.
Start with the client’s foot on the “4” line. Four inches is required for adequate dorsiflexion in order to perform the squat.
Tell the client to try and touch their knee to the wall without letting their heel come up. Also, make sure they are going into valgus or varus movements at the knee to potentially compensate for lack of dorsiflexion.
If someone cannot reach from the “4” line, then have them move up and determine where they can reach from. Then test the opposite side.
If they cannot reach, ask them where they “feel it.” If they feel they can’t go any farther due to tightness in the back of their ankle, then we know that some of the soft tissue structures on the posterior aspect of their lower leg could be to blame.
For that, some type of self-myofascial release (SMR) to the soleus, posterior tibialis, flexor hallucis longus/flexor digitorum groups could help to improve range of motion at the ankle.
If they feel a pinch on the anterior aspect of the ankle, that could potentially be a joint mobility dysfunction.
Try a Banded Ankle Mobilization.
Start by placing a thick superband around a post or squat rack; something that can’t move. Then place the band at the ankle joint, just inferior to the medial and lateral malleoli. Place a good amount of tension on the band. While maintaining this tension, recreate the same movement as if you were performing the knee to wall test. Go as far as you can comfortably go. Hold for 2-3 seconds when you can’t go any farther. Return to the starting point and repeat for 6-10 reps.
Then retest the Knee to Wall Test.
If it improves, then we know the Banded Ankle Mobilization worked. Whether it improved or not, it might be wise to refer out to a licensed healthcare practitioner to further assess the ankle to determine what may be limiting that motion.
If there has been an improvement in ankle mobility, we want to be able to control that “new found” mobility.
Try the Heel Raises with Single Leg Eccentric. I first saw this from Dr. Ryan DeBell of The Movement Fix.
Key Points:
– Perform the movement slow and controlled.
-When your foot is are parallel to the ground, slightly flex the knee and go slow and controlled towards the ground.
-Imagine like you are slowly pulling your heel to the ground.
Hip
At the hip, we need to determine a few different areas of mobility. Starting in the sagittal plane, we need to determine if the client has adequate hip extension. If the client doesn’t have adequate hip extension mobility, they will have a more difficult type using their gluteal musculature to perform some of the movements we ask them to.
In addition to not being able to effectively activate and use certain muscles, lack of hip extension mobility can place increased stress on the lumbar spine and the knees, as well as some other more distal joints. By ensuring the client has adequate hip extension mobility, then we know some of the other joints of the body will be able to function properly.
To determine if someone has adequate hip extension mobility, we have two different options. First off, you can perform the ½ Kneeling Hip Extension Test.
VID ½ KNEELING HIP EXT TEST
Have the client place one knee down on a padded surface and the other knee up. Instruct them to contract their gluteus maximus on the down leg side, brace their abs, and slowly bring the hips forward.
We ideally would like to see 30 degrees of hip extension on the trail leg. You can use the Inclinometer App on the Iphone to measure the angle.
You can also perform a Thomas Test. This is a test that is typically taught in physical therapy schools to determine hip extension mobility.
*Disclaimer*: First off, you need to ask your client if they are okay with you placing your hands on them to assess their hip mobility.
Thomas Test
Self Thomas Test (and Sick Beats)
You are going to have the client lie supine on the side of a table or bench. Have them hold their knee at 90 degrees of hip flexion, or at hip height. Place your thumb on their Anterior Superior Iliac Spine (ASIS).
Using your other hand, slowly lower the leg the client is not holding with their hands.
If you can lower their leg to the level of the table and their ASIS does not translate anteriorly, then we know they have adequate hip extension mobility.
If you lower the client’s leg and their ASIS DOES translate anteriorly prior to the leg reaching the level of the table, then we know there is some muscle group limiting hip extension.
To determine, which muscle group, then we need to change the position of the lower leg.
If we extend the knee and perform the same test, this will place tension on the Psoas and Iliacus muscle groups. If you lower the leg with the knee extended and the ASIS translates anteriorly, then we can determine Psoas and Iliacus are to blame for decreased hip extension mobility.
If we lower the leg and the ASIS doesn’t translate anteriorly, then the only other muscular group to blame would be Tensor Fascia Latae (TFL).
To test for this, we slightly abduct the hip and perform the same test. If the ASIS translates anteriorly, then we know TFL is to blame.
If we run through all of these tests and each test with the knee extended doesn’t cause anterior translation of the ASIS, but when the knee is flexed it does, then we can determine that Rectus Femoris is to blame.
To improve hip extension mobility, try SMR to whichever area you determine to be problematic.
SMR w/ Lax Ball to Iliacus/Psoas & TFL
SMR to Rectus Femoris
SMR to Vastus Lateralis & TFL
Then re-test to see if any of these SMR variations improved the client’s hip extension mobility.
Once someone’s hip mobility has improved or is normal, we want to make sure they can stabilize in that mobility.
The Cook Hip Lift is a great movement for accessing and stabilizing hip extension mobility.
Key Points:
-Place a ball in your hip crease.
-Use non-stance leg to keep ball in hip crease.
-Lift hips up off ground. Do not let ball fall out
-Perform for 8 repetitions per side.
Thoracic Spine
The thoracic spine is another area of the body that needs adequate mobility. If it doesn’t present with adequate mobility, areas of the lumbar and cervical spines and the shoulder can be affected. It is one of the most influential areas of the body because of the impact it can have on so many different areas.
To determine if your client has adequate thoracic spine mobility, it is best assessed in quadruped using the Quadruped Thoracic Rotation Test.
Normal thoracic rotation in the general population should be 50 degrees. To measure this, use the Inclinometer app and place it ½ way between both shoulders on the thoracic spine.
When you are passively bringing them through the movement, make sure there is no lumbar movement such as sidebending occurring as this will skew your measurements. Also, gently rotate the client. Don’t try to force rotation on someone that may not have it.
If the client does not have 50 degrees of thoracic rotation, there are various thoracic spine mobility drills that can be performed such as:
A-Frame T-Spine Mobilization
Side Lying Thoracic Rotation
Side Lying Rib Roll
If the client has 50 degrees or more of passive rotation, but less than 50 degrees of active rotation, a thoracic spine motor control drill can be performed.
Drills such as:
Quadruped Assisted Thoracic Rotation
Key Points:
-Perform slow and controlled.
-Make sure not to side-bend through your spine. Make sure to rotate through mid-back.
Seated Assisted Thoracic Extension
Key Points:
-Squeeze ball between your knees.
-Slightly turn away from where band is attached.
-Slow and controlled, allow band to rotate body.
Shoulder
The last pertinent area of the body to address in a warm-up is the shoulder. Limited shoulder mobility in shoulder flexion, abduction, or internal/external rotation can affect function at the shoulder, cervical spine, thoracic spine, and even the lumbar spine.
To assess the shoulder, movements such as:
Supine Shoulder Flexion Test
Supine Shoulder ER Test
If there are limitations in mobility, performing self-myofascia release as shown below can help:
Once mobility has been improved, now we want to make sure we can use that mobility. Performing movements such as:
Back to Wall Shoulder Flexion
Key Points:
-Maintain low back flat to the wall.
-Raise arms up and when the reach shoulder height, gently reach 1 inch in front of your finger tips.
-Continue this gentle reaching as you continue to raise your arms overhead.
Forearm Wall Slides
Key Points:
-Slide arms up the wall.
-When your elbows get to shoulder height, gently press into the wall/push your trunk away from the wall.
-Maintain the pressure on the pinkie side of your hand as you slide up the wall.
Quadruped Assisted Reach Roll and Lift
Key Points:
-Perform slow and controlled.
-Slowly reach out. Rotate palm up to the sky. Slowly raise arm up.<
Yoga Push-Ups Sans Pushups
Key Points:
-Think of pushing the ground away from you with your hands.
-Should be felt in your upper back and out and around your rib cage.
If you have no mobility limitations in any of the aforementioned areas, feel free to use the motor control or stability drills to help primer your nervous system to prep you for your lift.
There you have it! Create a plan for your warm-up, do said plan, and then go and get after your training!
About the Author
Andrew Millett is a Metro-West (Boston) based physical therapist
I’m still across the pond in London with Dean Somerset presenting our Complete Shoulder & Hip Blueprint workshop.5 I have zero plans to do work today, but a good friend (and colleague) of mine, George Kalantzis, was kind enough to pinch hit write for me.
He’s written several articles for this site and he’s a master at writing effective fat-loss programs.
In fact, the cards are stacked against you and mainstream media keeps flooding you everyday promising you with six pack abs shortcuts and seven day cleanses to only leave you frustrated and tired of results.
But Not Today
Over the past 15 years of my life, I have had the chance to train with some of America’s finest men as a Marine, and coach alongside some of the best in the fitness realm. I’ve learned some pretty cool training methods and have helped people lose anywhere from 5-40 pounds in a matter of a few months.
Because you are here to pick heavy things up and see results, you want a training method that will optimize time and accelerate fat loss.
And to be lean and athletic, you need to utilize combination exercises in your training to build more muscle and boost the metabolism so that your body continues to burn off calories well after exercise.
Combination Exercises and How The Accelerate Fat Loss
The common mindset or misconception seems to be that you can shred fat faster by doing two things- lower exercise at a longer steady duration or crush yourself into oblivion with high-intensity training.
While both play a vital role in fat loss and a well-rounded program, no one has time to train multiple hours throughout the week, ( if you do, I applaud you) and if you want to accelerate fat loss and keep burning calories well after your workout, you have to work hard and smart.
That means you have to find a training method that will burn a ton of calories, promote muscle mass, and elevate the metabolism.
One of the best ways to accelerate fat loss is to utilize combination movements in your training program. Combination movements play a huge role in fat loss because they allow for the greatest muscle fiber recruitment and an increase in the resting metabolic rate.
By stimulating a greater amount of muscle fibers during a workout your body will see huge increases in metabolic demand, which in turn will increase EPOC (Exercise Post Oxygen Consumption). EPOC is the amount of oxygen consumed during recovery in excess than what would have been consumed at rest.
Essentially your body becomes a fat burning machine well after the workout.
Ok, so now that we’ve covered the why combination exercises work, let’s cover how to shred some serious fat!
How To Use Combination Exercises For Fat Loss
Just training hard and fast isn’t usually the answer to a good fat loss program. Or is running for hours on end on the treadmill and Stairmaster going to do the trick.
You need to stimulate the most muscle in the shortest amount of time while finding a sweet spot between failure and easy in order to boost your caloric deficit, a key component to getting shredded.
Combination exercises are great for fat loss because they use compound movement patterns with short rest periods and higher intensity. A must have for shredding that stubborn fat.
But before we get into the circuits, I want to walk about the method behind the madness of combination circuits.
I’m a huge fan of taking what has been known to work and finding out ways to make it better. Density training has been known as one of the best things you can to shred fat fast. The greater the density, the more fat you will burn. You can increase density by cutting rest times and set up circuits like the ones below.
Day # 1
1a) Upper/Lower Compound x12-15 Reps
1b) Push-up Progression 8-10 Reps
1C) Split Stance Progression/Core x6 reps
2) Quad Dominant x 5
2b) Vertical Pull x 5
2c) Core
Day # 2
1a) Upper/Lower Compound x12-15 Reps
1B) Inverted Row x 5
1C) Single Leg RDL Combo x 6/leg
2a) Hip Dominant x 15
2B) Horizontal Press x 5
2C) Core
These circuits are a bit more advanced, so use them as a starting point and make modifications where you can
Pre-Exhaust Method Combination – Then Heavy Equals Accelerated Fat Loss
Not all circuits are created equal. To stimulate the most muscle during a workout and keep burning fat well after the workout, you need to shock the system.
Traditional fat loss programs include lighter weight and higher reps to produce results. And while there is nothing wrong with those programs, I like my clients to maintain muscle while shredding fat.
This is where I like to combine pre-exhaust training with heavier training to accelerate fat loss. Pre-exhaustion is a way to fatigue the muscles before hitting them with compound multi-joint exercises. This method is old school but is a great way to wake up the muscles prior to the larger lifts and stimulate muscle growth. Which means you get to build some more muscle and keep shredding pounds.
Fair warning, just because the reps are higher and the load is lighter, does not mean it will be easy. You will soon begin to feel what pre-exhaustion meals into your second and third set.
Pre- Exhaustion Set For Fat Loss Looks Like This
A1) DB RDL/Bentover Row Combo x 12
A2) Tempo Pushup x 3-0-3 x 8
A3) Walking Lunge Into Renegade Row 6/side
Then You Would Rest No More Than 90 seconds and Get Right Into Heaver Weights
B1) Double Kettlebell Front Squat x 5
B2) Pull-up x 5
B3) Side Plank With Knee Drive 5/side
A second day would look like this
A1) Kettlebell Squat To Press x 12
A2) TRX Inverted Row x 10-12
A3) Single Leg RDL To Reverse Lunge Combo x 6/leg
B1) Kettlebell Swing x 5
B2) BB Bench Press x 5
B3) Push-up To Mountain Climber 5/side
Accelerated Fat Loss Summary
For most people, when it comes to shredding fat, being consistent with eating healthy and working hard produces results. Sometimes, you will need to think outside of the fat loss box and mix it up with different styles of training.
Harder, shorter training sessions work better than high reps and lower weights because they force you to recruit more muscles than a typical training session. Attack fat loss training with a specific goal and stick to it for at least 4-6 weeks. Use the training methods above at least two days a week and you will begin to see a transformation in your body composition.
Author’s Bio
George is a Marine Corps Veteran of 9 years and was awarded an honorable discharge after deployments to Iraq and Afghanistan. He is currently a Master Instructor and Personal Trainer at Equinox in Boston and a licensed massage therapist.
Outside of Equinox, George maintains a fitness related blog that can be found at www.sgtkfitness.com.
He and his wife Shawna reside in Manchester, NH with their daughter Melina and fur baby Lola the dog.
I’m abroad in London this weekend not hanging out with the Queen.
I’d be lying if I said I was a bit reticent about coming given the current climate. But every time I am here I’m reminded about how much I love this place – the people, the culture, the zippy public transportation.6
As this post goes live I’m either geeking out at the WWII Museum, walking along the South Bank, or reenacting scenes from the movie Notting Hill. You know, because that’s what cool people do.
“Oopsie Daisies”
Nonetheless I’m in London, and lets get to this week’s stuff.
I’m really excited to announce this workshop in Boston later this summer.
The idea is simple: there’s a corner in the industry that’s underserved….mental skills. There are a lot of people out there who write about “mindset” and describe themselves as mindset coaches (whatever the heck that means) who, by and large, have zero academic background in that department.
Lisa went to school for this shit.
I went to school to help turn people into badasses.
Lisa can speak to building competency and discussing how to build the skills to develop rapport with clients. I can speak to getting people bigger, stronger, and faster.
Our Vancouver shindig in April sold out, but Dean and I have recently announced a stop in Orlando, FL later this year, October 21-22nd at Spark Fitness.
I’ve never been to Orlando. There’s no way in hell I’m visiting Disney World.
Mike Robertson and Joe Kenn’s flagship resource, Elite Athletic Development 1.0, 2,0, and 3.0, is on SALE this right not, through this weekend only, for $100 off each.
EAD 1.0 – dives into both Mike and Joe’s training/coaching philosophy
EAD 2.0 – goes rabbit hole deep into program design.
EAD 3.0 – goes into superb detail on specific topics like breathing, core training, youth athletics, and a host of other things.
Also, as a bonus, you can choose between either the DVD set or digital format.
Nothing, and I mean nothing compares to this series with regards to the art of coaching, program design, and making your athletes into badass mofos. If you’re a coach and are remotely interested in getting better, take advantage of this sale.
I had the opportunity to chime in on this doozy of an article alongside the likes of Lee Boyce, John Rusin, Paul Carter, TC Luoma, Bret Contreras, Mark Dugdale, Dan John, Christian Thibaudeau, and a few other guys who make me look like a skinny Steve Rogers.
A simple article with a simple premise: if you’re new to training and having a hard time differentiating between sound advice and eye-wash, this will point you towards the former.
It’s elegant as it is simple: Easy training is good training.
Much like we’re seduced into thinking that driving a certain car, wearing a specific perfume/cologne, or adopting certain fashion trends will lead us to greener pastures (whatever that means to you), it’s also common practice for many of us to be seduced by the “more is better” mentality when it comes to working out.
The harder, elaborate, or “sexier” our workout(s) and training program(s) are, the more results we’re going to get. And the more jacked, diesel, and, well, sexier we’re going to be.
A colleague of mine sent me this tongue-in-cheek message on Facebook Messenger last week regarding one of his clients:
“I did CrossFit and got great results. I was always hurt, though.“
Relax. This isn’t going to be a rambling anti-CrossFit diatribe. There have been roughly 317 of those posted this week alone on the internet (+/- 49). I was part of that train 6-7 years ago when CrossFit was really going mainstream. In recent years, however, I feel I’ve taken a pretty agnostic stance on it as a whole.
Some boxes do “it” very well, assessing people, scaling movements based off ability level and unique injury history, and otherwise giving a shit. Others take the Sweet Brown approach:
All told, I give CrossFit a ton of credit. Nothing, and I mean nothing has done more to make barbells and lifting appreciable weight cool.
Ten years ago if someone saw me deadlifting it would have been blank stare central:
Nowadays, people see someone, anyone, deadlifitng, and they’re like “dude, you CrossFit? OMG….I do too!!!.”7
So, in all, we’ve come a long ways and I can dig it.
However, I’d be remiss not to toss a slight begrudging stone their way in that they’ve also helped “nurture” this mentality that every workout MUST to be an all out war, galvanizing the troops into an incessant “go hard or go home” mindset.
And, to some degree, this is okay.
Far be it from me to nudge people into not push themselves in the weight room. If anything, many people could use a little nudging in that direction; whether we’re referring to CrossFit or not.
That said, it’s foolhardy to believe this train of thought should be universal. All we have to do is revisit the quote from above:
“I did CrossFit and got great results. I was always hurt, though.“
To be fair, lets OMIT the “c” word and replace it with strength training, powerlifting, olympic lifting, or Jazzercising in a park.
If you’re always hurt at the expense of always making your workouts as hard as possible, are you really getting results?
Lets use a real live example: one of my own clients who I’ve only been working with for about two months.
She came to me with several issues that had been nagging her for a while: low back pain and a nasty case of Plantar fasciitis to keep it brief. We did her initial assessment and I pointed out a few “red flags” that may or may not have been the culprits: very limited ankle dorsiflexion, an inability to dissociate lumbar movement from hip movement, and a few technique snafus I felt could be cleaned up.
I wrote her program and at the end of Week #1 she reports back, “everything is going great, but my workouts seem easy.”
I explained to her that was the point. I wanted them to feel easy, in no small part to help her gain some confidence and modicum of success. That she could train pain-free and make progress.
I wanted her to be consistent with a well-structured plan that (hopefully) addressed some root causes I felt would resolve her repeated setbacks with training.
Easy Training Is Good Training
My client was on board – and still is – and has been crushing her training since. But I’d be lying if I said it still hasn’t been a bit of a mind-fuck (my words, not hers. Although, I think she’d agree with my terminology here) on her end. She’s been programmed to think that training has to be hard, that it has to be “I think I just shit my spleen, yay!” brutal in order to get results.
Even as recent as two weeks ago she was still commenting how easy some of her workouts have been.
Me:“Are you getting all of them in?”
Her:“Yes.”
Me:“Do you feel good?”
Her: “Yes.”
Me:“Are you doing more work and adding more weight?”
Her:“Yes.”
Me:“Are you in as much pain?”
Her: “No.”
Me:“Excuse me while I go toss my face into an ax.”
I’m being facetious, of course. She gets my point of view and understands her flawed way of thinking. We’re making baby-steps…..;o)
I love an analogy I stole from T-Nation contributor and overall badass, Paul Carter (albeit I’m going to put my own spin on it).
10% of your workouts you’re going to feel like Mick Jagger on cocaine. The weights will just fly up.
10% of your workouts you’re going to feel like Mick Jagger the day after. You feel like a bag of dicks. I don’t know what a bag of dicks feels like, but I can assure you it (probably) ain’t good.
80% of your workouts are the ones where you go in and just do the work. You show up, get your reps in, and leave. Easy peasy. <—-THESE are the workouts we should strive for and crush.
I’d argue for most people, most of the time, they should leave the gym wanting more. This is what 80% workouts are all about.
Don’t get me wrong: there’s a time and place for workouts and/or programs that exist solely to be ass-kickers and make you hate life:
The thing to consider, though, and what many fail to recognize, is that programs like the ones mentioned above are designed to be done once a year (if that) and only for a fraction of time.
A small window of hell if you will.
They’re not designed to be done week in and week out for an extended length of time.
I mean heck, if you don’t believe me, take a deep dive into many of the most popular (strength) training programs in recent memory (5/3/1, Juggernaut, Cube Method, any of Travis Mash’s programs). If you dissect any of them you’ll find the bulk of the work being done in those programs is in the 75-85% of 1RM territory.
Nothing hardcore or “ball-busty” about it.
It’s smart training, designed to ensure people feel fresh, recovered, and ready to attack every training session without, hopefully, all the bumps and bruises along the way.
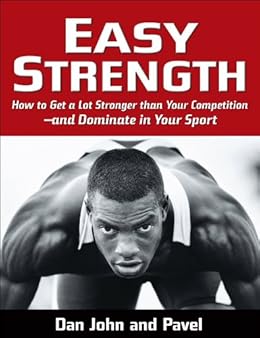
And, to take it step further, freakin Dan John and Pavel wrote a book titled Easy Strength. It’s excellent by the way.
Wrapping Up
The umbrella message here isn’t that working hard should be avoided. On the contrary, there are some people who could use a nice warm cup of “suck it up buttercup.”
Lifting weights isn’t supposed to tickle.
Nevertheless, there’s a fine line between working hard and taking it so far that it becomes more of a hinderance than anything else.
After all, in the end, you’re at the mercy of how well you allow yourself to recover.
Hard training is fine and has a place. But it’s the “easy” training that will get to where you wan to go in the long run.
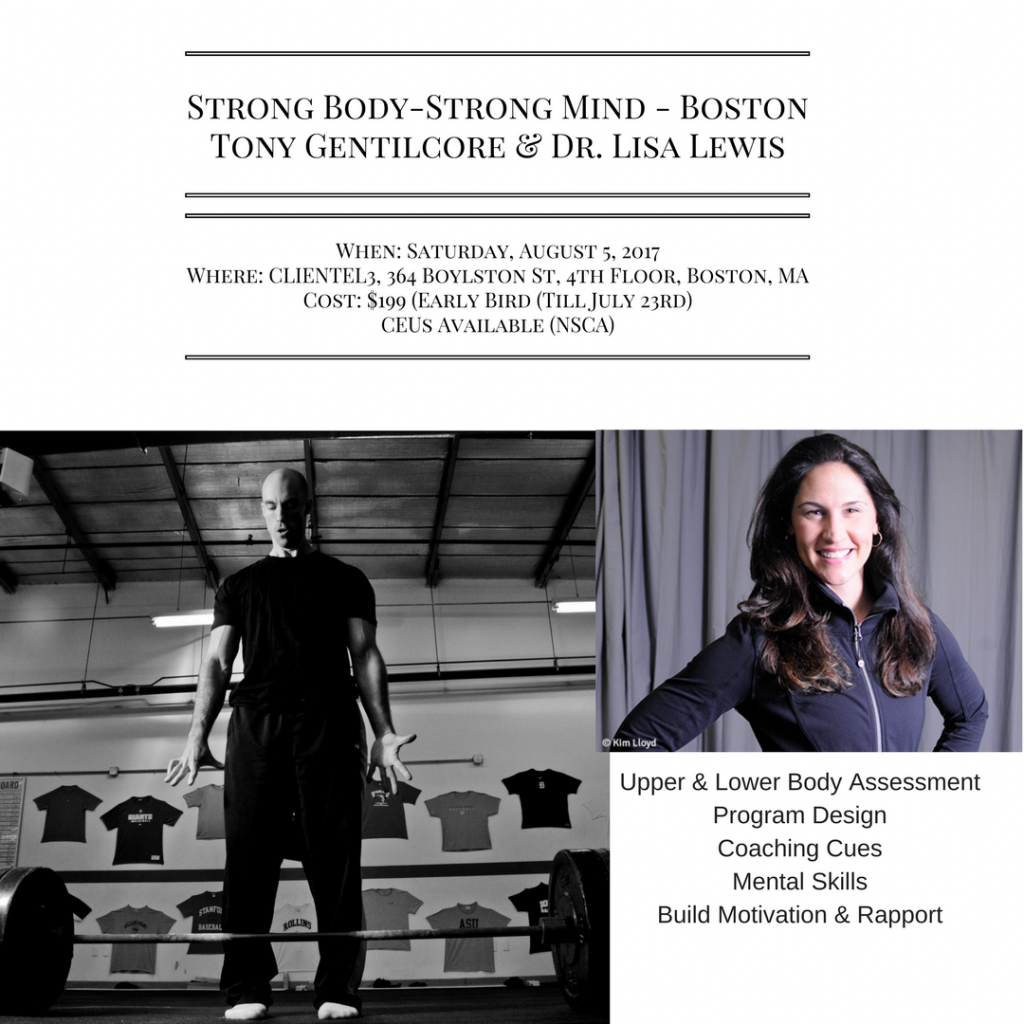
My wife, Dr. Lisa Lewis, and I have had the honor of presenting this workshop in both Austin, TX and London, UK last year (and will also be heading to Toronto, ON next week), so it only made sense we’d eventually try to host it in our backyard.
The idea is simple: there’s a corner in the industry that’s underserved….mental skills.
There are a lot of people out there who write about “mindset” and describe themselves as mindset coaches (whatever the heck that means) who, by and large, have zero academic background in that department.
I can appreciate that many have their hearts in the right place, have helped plenty of people, and likely have read many books on the topic.8
With regards to mindset and mental skills, however, Lisa went to school for this shit.
She can speak to building competency and discussing how to best develop the skills to breed rapport with clients. I can speak to getting people bigger, stronger, faster, and increasing their general levels of badassery.
So, come make a weekend of it. Boston is a beautiful city. You can hang out with Lisa and I on Saturday (admittedly I’m biased, but we’re totally cool) and then explore the city on Sunday: take a Duck Tour, hit up Fenway (RedSox are home that weekend), visit Quincy Market, hang out with Tom Brady, whatever your heart desires.
All the pertinent details are in the graphic above.9
Also, spots are limited to 26 people. Like, for real, 26 people. I’m not just saying that to build a false sense of urgency.10
This past weekend Lisa and I had friends over and we ordered a few pizzas. I love pizza. And no surprise I went a little overboard. Also no surprise: I woke up the next day feeling lethargic, bloated, and as if my mouth spent the night in a desert.
Don’t get me wrong: I didn’t feel guilty or anything. I deadlifted earlier that day, and everyone knows that pizza and deadlifts are synonymous with one another.11But man oh man, you can bet I felt the affects all through the weekend.
Today’s guest post from Toronto based nutritionist, Marc Capistrano, helps explain a topic everyone reading has experienced at one time or another: food induced inflammation.
How Food Induced Inflammation Affects Performance and Recovery
We all know that stubbing your toe against the coffee table while twerking in the living room creates an inflammatory response (and it sucks!). It’s the body’s repair mechanism that kicks in when it detects damaged tissue.
The thing that people tend to forget is that this inflammatory response can kick in as a result of dietary triggers as well.
Instead of reacting to damaged tissue, the body is responding to less than optimal foods.
Don’t get me wrong, I’m not here to talk about “good” and “bad” foods (I’m really not about that life), but there are definitely foods that offer more benefit than others. With that being said, inflammation and low-level inflammation can impact performance, recovery and long-term health.
How Does Food Cause Inflammation?
Ever heard of the antigen/antibody complex? If you haven’t, here’s a brief and basic re-cap.
You eat something foreign in excess (let’s say trans-fats or arts and crafts glue for example), the body detects it as an antigen and the immune system releases an antibody to tag it and directs white blood cells to dispose of these foreign substances.
When this happens, an immune complex is formed and inflammatory by-products are released as a result of this. Normally our immune system is efficient enough to quickly handle this immune complex and move on but when we’re constantly eating these trigger foods, inflammatory by-products can deposit themselves into our tissues.
Whenever I explain this immune system reaction to someone, the person I’m talking to will either nod their head and agree or they’ll want to throw hot coffee on me for confusing them. If it’s the latter, I’ll always come back to the “car accident” analogy.
Imagine a car accident on a main road. Tow trucks, cop cars and a fire truck come to the scene and start doing their job. The fire fighters are cleaning spilled oil, the tow truck is moving cars and all of this is backing up traffic. It’s a hectic scene, but all of this havoc is a small price to pay in order for the mess to be cleared.
If you’re a visual learner, this is similar to an immune system reaction. The car accident is inflammation and the firefighters and police are the immune system coming in to clean it all up.
It’s perfectly normal and the organized mess is needed in order to get traffic moving again. The problem is, what if another accident happened 100m ahead and then another one, and then…. we’ll you get the idea. Small fender benders turn into a major backup and make a small delay become a huge one. It’s a stressful environment for everyone involved and that “stress” can manifest itself as achy joints, low energy and lengthened recovery times.
I know it may seem like an extreme picture but it also best describes food in relation to its potential crappy effects on the body. It’s not a major issue but quite possibly, the last 5% that you’ve been chasing could be found in food quality i.e. what it is you’re eating.
3 Tips for Reducing Food-Induced Inflammation
So what can we do to support recovery time and limit the overall crappy-feeling caused by food-induced inflammation?
1. Pay What Your Body is Due
Enjoying pizza and skittles is not a bad thing but you need to earn it first.
What I mean by this is you need to pay your body with quality macronutrients and micronutrients.
Once this is paid and calories are equated, feel free to spend the rest of your macronutrients on anything of your choice (my personal favourites include gelato and hamburgers). Remember that micronutrients and minerals serve as cofactors that support the secretion and response of hormones in our body (ever heard of testosterone?)
Side Note: If you like to geek out on food quality, fancy ingredients and antioxidants, check out a video I did on my kick ass morning smoothie.
Pro Tip: Apply the 80/20 rule or 70/30 rule or the 60/40… You know what just keep things balanced. Enjoy your pizza and wings; just be sure to accompany it with some vegetables and protein at some point in the day. It’s hard to overeat on pizza if you’ve had some roasted vegetables and steak prior.
2. Value Insulin Sensitivity
Insulin resistance and inflammation are synonymous with each other. Insulin resistance can eventually cause sugar molecules to attach itself to muscle tissue otherwise known as “glycation” which can cause inflammatory by-products. A balanced amount of fat, low glycemic, fruit and vegetables will go a long way in preventing insulin resistance and help to maintain optimal tissue quality.
Pro Tip: If its insulin sensitivity you’re chasing, keep your denser carbohydrates in and around training. Vegetables and fat can accompany your protein for the rest of the day. This tip should be taken with a grain of salt as individualized diets depend on training volume and personal preference.
3. Balance Your Fats
An imbalance of Omega 3 to Omega 6 fatty acids can lead to an inflammatory response because of the hormone like factors known as prostaglandins.
Note: Omega 6 in excess is inflammatory. Because of the way food is processed these days, we’re getting more omega 6s in our diet than we need.
Wild caught salmon, walnuts and egg yolks are examples of great Omega 3 sources and can correct omega 3 and 6 imbalances.
Pro Tip: Oil is like your older brother, the less you piss him off, the more helpful he’ll be to you. Excess deep fried and processed foods can tip the balance between good and bad fats.
Wrapping Up
I know what some of you are saying. “This guy is trying to push detox salads and organic produce on us or else our recovery is doomed”.
Not true at all my friend.
I’m definitely not telling you that French fries and ice cream are bad for overall performance and recovery. Instead, I’m say that eating a diet that primarily consists of pizza and french fries will start to have an impact on your performance and recovery.
The take-home message is that balance and moderation is one of the most important aspects of food in relation to inflammation, performance and recovery. I’m not trying to promote any “special foods” but rather a balance between nutrient dense foods and not-so-nutrient-dense food. Building this habit will benefit you in the long run.
Take care of the housekeeping tasks (getting enough quality protein, fibre, fat and carbohydrates) and it could be the missing link in your quest for the city of Gainz.
About the Author
Marc Capistrano is a Toronto based Certified Nutritionist, fitness enthusiast and content creator. He currently works out of downtown Toronto and maintains the Live It Holistic Nutrition blog. His work has been featured on CBC Life and he is also a brand ambassador for Garden of Life.
Man oh man, can you believe it’s June? We had an unseasonable cold month (even for Boston standards) this past month, so I was glad to see May go, but seriously….June? Already?
I had a busy week this past week so I didn’t have ample opportunity to get much writing done, sorry! I do have some good ideas percolating around in my head for next week, so I promise to try to make up for it.
Nonetheless, here’s this week’s list of stuff to read….
Lisa and I will be in Toronto in two weeks presenting our Strong Body-Strong Mind workshop. We’re really excited since it will be our first family get-away since Julian was born.
We’re bringing him with us by the way….on a plane…..at four months old.
There are still some seats available, and you can go HERE for more details.
However, we’re really excited to announce we’ll also be doing a workshop in Boston later this summer.
This graphic took me an hour to make. Not kidding.
The idea is simple: there’s a corner in the industry that’s underserved….mental skills. There are a lot of people out there who write about “mindset” and describe themselves as mindset coaches (whatever the heck that means) who, by and large, have zero academic background in that department.
Lisa went to school for this shit.
I went to school to help turn people into badasses.
Lisa can speak to building competency and discussing how to build the skills to develop rapport with clients. I can speak to getting people bigger, stronger, and faster.
Our Vancouver shindig in April sold out, but Dean and I have recently announced a stop in Orlando, FL later this year, October 21-22nd at Spark Fitness.
I’ve never been to Orlando. There’s no way in hell I’m visiting Disney World.
Nice article from Sam Spinelli on Dean Somerset’s site on a concept I wish more fit pros would consider: finding the right “place” on the continuum where your clients possess ownership of movement via stability/motor control which then leads to hitting goals, whether they’re for function, performance, or aesthetics.
Dr. Duvall wrote an excellent article for this site a few weeks ago titled 5 Things to Consider With Postpartum Training. It was excellent because I have excellent taste in the people I choose to provide additional content on this site….;o)
Given she lives in Boston as well we decided to meet up yesterday in a local coffee shop. We got to talking about pelvic floor issues, specifically prolapse (because, what else do you talk about in a coffee shop?), and one sentence she said made me want to jump up and give her a high-five:
“Women need to lift heavy so that more serious shit doesn’t happen (I.e., prolapse). A three-year old isn’t light.”
Now, “heavy” in this sense is subjective. But all things considered, assuming proper exercise technique and progressions have been met, there’s no reason to think women can’t be more aggressive when trying to train postpartum.
I love her message and it’s quite a stark contrast from the litany of other “pelvic floor specialist” out there regurgitating drivel who have very little experience actually coaching people; let alone having the educational background to back their claims up.13
Social Media Shenanigans
Twitter
NEWSFLASH: long-term weight/fat-loss is more about habitual, sustainable lifestyle changes than it is about repeating same “diet” repeatedly
As odes are concerned, you can relax: this post is not a poem.
However if I were to give my poem writing skills a test-drive it may look a little something like this:
Meadow’s Row, Meadow’s Row.
Thou shall build superior backs.
Lats, lats.
More lats.
I like bacon.
Seems how I won’t be giving Langston Hughes a run for his money anytime soon, lets get into the meat and potatoes of the Meadow’s Row and why I like it so much.
First off, John Meadows, the guy who popularized the movement, was a brick shit house. Sadly, John passed away in 2021.
It was a long-time staple exercise in his routines, and, if you want a back the size of Nebraska, like John had, you’d be remiss not to start peppering it into your exercise routines as well.
I’ve been a big fan of the Meadows’ Row for awhile, ever since I first saw John mention it in THIS article over on T-Nation a few years ago. It wasn’t until earlier this week, however, when I posted the picture below on Instagram that I felt compelled to write about it.
A post shared by Tony Gentilcore (@tonygentilcore) on
Basically, someone saw the picture and asked if I’d discuss coaching cues and provide a few videos?
Given I’ve been in a little “coming up with new content funk” I was more than happy to oblige. So, here you go.
The Meadow’s Row
What Does It Do? – I’d like to preface everything by saying I do feel it’s important for most trainees – especially beginners and intermediates – to pump the brakes a little and learn to perform a strict 1-Arm DB Row first.
The 1-Arm DB Row should not be performed in a straight up and down motion. This often leads to faulty mechanics and people “rolling” their shoulder(s) too far forward due to excessive humeral extension.
The resultant abducted and anteriorly tilted scapular position makes it cumbersome to target the upper back muscles, which is kinda the point of the exercise in the first place. So, there’s that.
Rather, the more kosher way to perform them is to have the DB move in an “arc” fashion; forward and back. This does two things:
When conjoined with the cue “bring your elbow to your hip or back pocket” it prevents the elbow from going past the midline of the body, avoiding that “rolling” of the shoulder mentioned above.
It matches the fiber orientation of the lats, which is what we’re really trying to target.
Side Note: I also agree with Lee that you can only be so strict with the DB Row for so long before it loses its moxy.
Meaning: I think it is important to be strict – at first – so that you can target the scapular retractors (namely, rhomboids). However, it won’t take long before the limiting factor of how much weight you can use is, you know…being strict.
As Nick Tumminello notes in THIS excellent article, two things to consider are the Resistance Curve and Strength Curve of any exercise.
The Resistance Curve: This refers to how the load changes throughout the range of motion based on changes in lever-arm (or moment-arm) length.
The Strength Curve: This refers to how your strength changes throughout the range of motion of a given exercise, which is due to a principle of physiology known as the length-tension relationship or the length-tension curve.
Photo Credit: T-Nation.com
Muscles have the lowest potential to produce force when they’re either fully elongated or fully contracted – somewhere in the middle is when they produce the highest amount of tension.
Moreover, when performing a horizontal row (like a 1-Arm DB R0w) the lever arm gets LONGER at the end range of the concentric motion (when your humerus is perpendicular to the ground).
As Nick notes:
“This is why you often see lifters pull the weight halfway with good form, then jolt it the rest of the way when doing exercises like barbell bent-over rows and one-arm dumbbell rows. It’s also why you see so many people turning their torso towards their rowing arm as they pull the dumbbell in on dumbbell rows, along with seeing people staying too upright on bent-over barbell rows and one-arm dumbbell rows, or leaning back to far when performing seated rows or machine rows.”
Anyways, I’m a firm advocate for coaching strict technique in the beginning. But we also need to recognize said strictness can be a limiting factor if muscle growth is a goal.
And, it is…..always……….;o)
By all means, be strict!
Just know you (likely) won’t be turning any heads or building an impressive upper back with your “strict” 45 lb rows.
So What is it About the Meadow’s Row That I Like So Much?
It builds ginormous backs.
Specifically, it hammers the lats (which is your largest back muscle).
It makes you feel like a badass diesel motherfucker.
It’s fun to do, and nice change of pace from plain ol’ vanilla DB Rows.
A great option to go heavy if your gym is lame and doesn’t have heavy DBs.
Key Coaching Cues:
1. Use straps.
Don’t listen to internet trolls who will tell you you’re “cheating” if you use straps. They brag about 225 lb deadlifts and their parents still pay their phone bills.
Use straps. You don’t want your grip to be the limiting factor on these.
2. John himself advocates you open up your hip closest to the bar. As in: the hip closest to the bar should be higher than the outside hip. I believe he prefers this method as it puts the lats on stretch a bit more.
Either way, play around with hip position and see what feels best for you.
3. I like to support my torso with my “free” hand by resting it on my opposite knee. I feel this takes the burden off my lower back.
4. I still use the same cue: “elbow to back hip or back pocket.”
5. Try to feel a slight “stretch” in the bottom position, when arm is straight.
6. Holy shit, lats for days.
Another option would be to perform the Meadow’s Row with a Meadows Attachment.
The thinner handle helps with grip issues, and won’t result in demerit points if you’re adamant on not using straps.
In addition, you can also play around with different handle positions to see which one you prefer or feel most. There’s no right or wrong here.
NOTE: You can purchase the attachment HERE on Elitefts.com.
And That’s That
If you haven’t already, give the Meadow’s Row a try today. It’s one of my favorites and I’m sure you’ll learn to appreciate them as well.