CategoriesAssessment Corrective Exercise mobility Program Design

4 Ways to Fire Up Your Belly

Today’s guest post comes courtesy of Gavin McHale, a Certified Exercise Physiologist from Winnipeg, Canada (in his words, straight north of Fargo). Gavin attended a workshop I did with Dean Somerset in Minneapolis a few weeks ago and he wanted to write up some of the things he picked up from it.

Read on to find a breakdown of how you can clean up your shoulders and hips, lift more weight and allow yourself to relax, just by changing the way you breathe.

Copyright: sunlight19 / 123RF Stock Photo


4 Ways to Fire Up Your Belly

Let me paint you a picture.

A client or physical therapist refers someone to me and they walk in ready to get their ass handed to them. After our initial conversation, I tell them we’re going to start the session with some breathing drills.

They often glaze over and assume it means something else, until I tell them to lie down and take a deep breath.

“Wait, you just want me to breathe?”

“That is correct.”

Almost every time, I can provide a new client a take-home benefit with a couple of breathing cues, all inside the first 2 minutes on the gym floor.

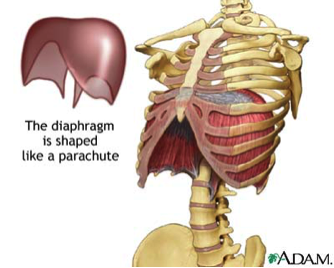
Image courtesy of Crossfit Southbay, via A.D.A.M

Why, you ask? Well there are lots of reasons why breathing is a good practice to get into, and I’m not talking about the breathing we do mindlessly, day-in day-out. I’m talking about mindful “diaphragmatic” or “belly” breathing.

We live in what I’d call a very sympathetic world. Our sympathetic nervous system, also known as fight-or-flight, is cranked up all the time. We have to drive to work in traffic, get a project done, feed the kids, manage the mortgage… you get the point.

All this stress kind of shuts down our parasympathetic nervous system, also known as rest-and-digest. You know, the one that fixes all our shit? Ya, that one.

The diaphragm is actually intended to be our body’s primary breathing muscle, but as a consequence of modern life, it’s been shunned like Tony and I are by all those cat haters (I see you). Instead, the much less efficient breathing muscles of the upper chest and neck then must take over, creating all sorts of issues.

Although it doesn’t look very sexy, diaphragamatic breathing allows us to create a better balance between fight-or-flight and rest-and-digest, and could be the key to fixing a lot of movement issues as well.

When we breathe, this dome-shaped muscle contracts, allowing the lungs to take in air. What we should see is the stomach rising as the dome compresses the abdominal cavity. This is why I tell my clients to try and “get fat” if they’re having trouble figuring it out. I often see the exact opposite, and while it may present a more pleasing side profile, it only allows the lungs to partially expand and results in weaker core stabilization.


So why do we do it?

Not only is it a good idea to get back to the muscles we should be using for an activity like breathing, but an under-active or dysfunctional diaphragm is going to lead to movement issues as well. Neck and shoulder issues are the bulk of what I see, but back and hip irritation have also been linked to breathing concerns.

Proximal stability leads to distal mobility.

If we can create more stability in the core and centre of the body, the limbs and other areas where we need to be more mobile are free to do their job as well.

Test/Re-Test

Below, I’m going to give you several tests to try based on areas that you may have trouble with or issues you want to clean up. The protocol here is to test the movement, correct with a breathing drill, the re-test to see if it got better.

If it did, great! If not, we may have to do some more digging. The breathing correctives are outlined at the end of the article.

1. Shoulder Issues

I found it very interesting how many people had shoulder pain and dysfunction when I first started training. I cleaned up their technique, had them pull way more than they pushed and focused on opening up their thoracic spine. Things got better, but never really got better, ya know?

Then I went further down the rabbit hole and recognized there was more to it. I realized that almost all shoulder problems are somehow tied to breathing mechanics, and a couple of simple drills can make a world of difference, especially when done consistently. Here are two (related) tests to see where problems may lie and outline the path to correcting them.

Shoulder Test/Re-Test #1: Active and Passive Shoulder Flexion

*Ideally, the shirt is off for all tests of shoulder function. Although it can be awkward, this allows someone to see exactly what the scapulae are doing during these movements.

You may have to stand against a wall to do this properly, but stand tall and proud and slowly brings your hands up over your head in front of you. Your ribcage should stay down (the back should stay against the wall) and the head should stay in a packed position (no poke-necks).

How high did your arms get? Was there any pain?

Here is Tony showing an example of a bad active shoulder flexion (left) and a good active shoulder flexion (right). If you’re not careful, you may think the “bad” test is better than the good one. A closer looks reveals that Tony is flaring his ribcage, overextending his lower back and poking his head forward. The test on the right is a true test of his active shoulder flexion. Not bad T, but why is your shirt still on?

The passive test is the same as the active test, only lying down on your back. The knees should be bent and feet flat on the floor or table. The ribcage should stay down and lower back flush to ensure a true test.

We will review correctives later in the article.

Shoulder Test/Re-Test #2: Scapulo-Humeral Rhythm (probably need a friend for this one)

Stand in the same position as your active shoulder flexion test, but this time we’re going to bring the arms overhead by your sides, trying to touch the backs of your hands together above your head.

As the arms move overhead, the scapula should rotate ½ as much as the humerus does. So, to get overhead (180 degrees total), the humerus should rotate upward 120 degrees and the scapula should rotate the remaining 60 degrees.

Image courtesy of BEST Performance Group

If there is any pain with this movement, you should see a registered healthcare professional (or refer to one, if you’re a trainer).

However, if you’re a trainer and you notice the scapula isn’t moving as it should (i.e. the medial border isn’t at 60 degrees) see if you just help it along by manually moving it to the desired position.

Better? Great, let’s get to breathing and fix that shit. Still painful? Refer.

2. Back Issues

Everyone who’s ever had or worked with people with back issues raise their hand! Ya, a lot of us have, myself included and it’s no fun. Whether it’s chronic back pain or a little tweak here and there, worrying about blowing your back out is a real concern for many people.

They’re scared to lift things around the house, scared to bend over the wrong way and especially scared to lift a shit-ton of weight off the floor in the gym (covered later). We can’t be having that… let’s fix it.

I said that lower back and shoulder issues can be related because their main structures are intimately connected via the thoracolumbar fascia. You can see the lats (major players in the shoulder) and the glutes (major players in the lower back) in the image below. If you have issues getting your arms overhead, you may very well have lower back problems as well, and vice versa.

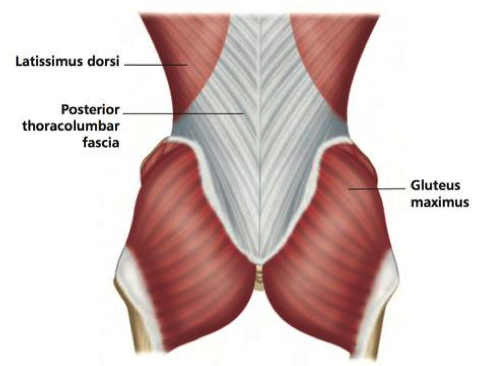
Image courtesy of Neil Asher Healthcare

Back Test/Re-Test #1: Active Straight Leg Raise

This one is nice and simple. Lie on your back, legs straight. Lift one leg as high as you can before you stop or you feel pain. The knee should stay straight. Note how high you got. A good score is 90 degrees with no movement in the opposite leg.

Image courtesy of www.FunctionalMovement.com

Back Test-Re-Test #2: Passive Hip Rotation (bring that friend back, you’ll need em)

Lie flat on your back with legs straight and lift one leg. Bend the leg at the knee, coming up to 90 degrees hip flexion. Move the hip into external rotation (foot to opposite hip) and internal rotation (foot outside hip) while supporting the knee. Note the angle achieved with each movement. A good score is 90 degrees from midline for external rotation and 45 degrees for internal.

Photo courtesy of geekymedics.com.

LIFTING HEAVY A.F.

(if you have to ask what it means, you’re not ready for it)

There’s no question that if you’ve ever done a heavy squat or deadlift and not wrecked your back, you know that you need to be able to create massive amounts of tension through your core. If you can’t, you get hurt, pretty simple.

The diaphragm plays a massive role in stabilizing the core. It forms the lid on the “core box”, working with the obliques, QL, pelvic floor and transverse abdominus. Being able to take in air and maintain a high-pressure area in the abdominal cavity is crucial for lifting heavy (another reason I start with breathing drills).

RELAXATION

Remember that sympathetic world I spoke about earlier where most of us live that wreaks havoc on our breathing patterns? Needless to say, it can also create difficulty with relaxation and sleep.

I’m pretty sure most of us (and our clients) can agree we’d like to sleep better.

So, when you watch the videos below, don’t just put them in the “workout” box, but remember they can also have a positive impact on your ability to relax and even fall asleep.

Not only will these breathing drills assist in improving movement patterns, they’ll set up the context for creating tension before and during a heavy lift.

THE BREATHING CORRECTIVES

Prone Crocodile Breathing

If you’re new to the diaphragmatic breathing game, this is your place to start. Maybe you scored poorly on one of the above tests or you have an itch to throw more weight on the bar but aren’t yet comfortable doing so.

Either way, give this drill a shot before moving on.


Prone Lengthening

This one is particularly useful if you have trouble with your shoulder and/or struggled with the shoulder flexion and scapulo-humeral tests. Many people’s shoulder dysfunction comes from a number of factors, one of those being tight/ropey serratus anterior. This drill will help to release that muscle, allowing it to do it’s part in moving the scapula to get that arm overhead.

The serratus anterior (SA) works in concert with the upper traps (UT) and lower traps (LT) to allow the scapula to upwardly rotate.

Note From TG: props to Dr. Evan Osar for introducing me to this exercise a few years ago.


Crook Lying Belly Breathing

This is another great beginner drill as the lower back is supported and the table or floor can provide external feedback. This is also the best position for belly breathing, allowing the belly to fully expand. Along with the others, this one is great for those with back or hip issues.


Quadruped Breathing

This is another great drill for those with issues rotating that scap when going overhead. The serratus anterior is a massive player and if we can get it rotating properly (or at least better than it was), we may be able to provide relief and learn what it is we need to focus on moving forward.

So there you have it, a good, hard look at what we should be looking for and how to make it better, just by changing the way we breathe.

One final note for trainers, make sure you try these yourself as you may find that different cues work better. If you do, please tell me. I want to know all your secrets!

OBLIGATORY PROMOTIONAL PLUG FROM TG (sorry not sorry)

Pretty much everything discussed above is covered in more detail in mine and Dean Somerset’s Complete Shoulder & Hip Blueprint which is being released this week (Nov. 1st).

hipandshoulderfb-banner

In fact the site goes LIVE tonight. You can check back HERE at midnight to get in on the action. It’s totally going to be like a Harry Potter book release! Except, you know, without wizards and Sorting Hats and shit.

Author’s Bio

gavinGavin McHale is a Certified Exercise Physiologist from Winnipeg, Manitoba, Canada (straight North of Fargo).

He loves getting people to lift things they never imagined they would both in-person and online.

He also likes to lift said heavy things and, much like Tony, loves cats.

Check him out at www.gavinmchale.com.

CategoriesCorrective Exercise mobility Strength Training

Strength Starts Here: Breath, Control, Express Badassery

I always enjoy when I have the opportunity to introduce my readers to someone new; coach’s who are “in the trenches,” doing great things, and are well articulate in conveying their message.

Ladies and gentlemen I give you Chris Abbott. He’s a coach and gym owner based in Chicago. As it happened, he sent me a t-shirt out of the blue as a “thank you” for what I do on this blog. It was a class move and nice gesture to say the least.

Not long after Chris expressed some interest in writing a guest post, and well, it took me all of three seconds to say yes.  I hope you enjoy it as much as I did.

Strength Starts Here

Life is better when you’re strong, and that’s a fact.

Over the years as a trainer I’ve worked with average Joes, stay at home moms, significant weight loss clients, professional athletes, and a wide variety of broken and damaged people ranging from hip replacements and torn labrums to herniated/broken discs and torn knee ligaments – to name a few. Every one of these clients had one thing in common; they all reached their goals by becoming stronger.

Perhaps I’m stating the obvious, but based off of the people I see and work with daily I feel people may know they need to get stronger, may know they need to get in better shape, but they really have no idea how to actually get stronger, hence strength starts here.

Commonalities in Strength

There are certain aspects of strength that are required for success – this goes for sport, individual hobbies, and most importantly quality human movement.

My approach to those aspects can be viewed in the following way; you have attachment sites – your arms at your armpits and your legs at your hips. All movement will come from these attachment sites.

In addition you have your thoracic spine (T-spine).

Your neck, shoulders, and t-spine are all tied together; therefore healthy movement of the neck, head, and shoulders (really the entire upper body) requires healthy t-spine functioning. One could go on to describe how the upper body and more importantly a lack of alternating, reciprocating movement affects your lower body (hips and knees), but that goes beyond this post.

Furthermore, my approach can be summarized by this relationship:

  • Positional breathing leads to increased control
  • Increased control leads to increased strength development
  • Being stronger allows you to do whatever you’d like in life

Let’s break this down a bit further and see how you can own all to generate massive strength gains – and really enjoy life more!

Position and PRI

Are your shoulders really tight or are your scapula maybe just in a poor position which is limiting your range of motion?

This is usually the first time someone looks at me with a sideways head tilt expression of “huh?”

When searching for strength your key to performance will reside within your ability to take a breath properly.

All my sessions start with a common goal; restore proper breathing mechanics and allow your diaphragm to work as a primary breathing muscle rather than a postural stabilizing muscle. This does a few things:

  • Triggers parasympathetic activity in the body which results in the body “letting go” or relaxing more
  • “Letting go” will lead to increased range of motion at the attachment sites and T-spine
  • You’ll feel “lighter” – which never hurts anyone
  • You’ll be more focused – which is awesome just about any time
  • And most importantly, you’ll be in a better position to get stronger

The approach and exercises I use to correct someone’s breathing mechanics (and ultimately help restore control) stem from an organization called the Postural Restoration Institute, PRI for short. The Institute’s director, Ron Hrsuka, has devoted his life to PRI. It’s a powerful concept and one that immediately grabbed my attention after I first took one of their home study course a few years ago.

In a nutshell, PRI’s take on the relationship of posture, movement, and performance begins with asymmetries and the fact that everyone, whether you’re “righty” or “lefty”, has the same features internally – one heart, one liver, etc.

These asymmetries predispose us to shift our center of gravity and throw off our position; which in turn affects our posture, limits our movement abilities, and decreases performance. As a result, areas such as your shoulders, t-spine, and hips (sound familiar?) are placed under distress – compensation patterns develop and your ability to get strong has been diminished.

Positional breathing can be viewed as achieving the following:

  • Re-training your diaphragm from being used as a stabilizing muscle to a primary breathing muscle – this allows your body to “let go”
  • “Untwist” your body, positioning it in more of neutral state thus giving you more joint centration and ultimately greater potential for building strength

Positional breathing will open doors that lead to increased control. Remember, increased control leads to greater strength development so taking 5-7 minutes on positional breathing can and will make a difference during your set of heavy deadlifts. Here are a couple of my favorite positional breathing exercises:

90/90 Hip Lift


All Four Belly Breathing


Control is King

Flexibility seems to be the rabbit everyone wants to chase when something goes wrong.

However, as we just discovered, a lot of your flexibility concerns might in fact stem from your inability to breathe properly and your poor position. It’s not uncommon to see a significant increase in range of motion in your attachment sites after performing some positional breathing exercises.

Now that you’re in a better position, you can more easily gain control!

I view flexibility as your ability to passively pass through a specific range of motion – no ownership here, just swinging by to say hi to grandma.

Mobility on the other hand is your ability to control a specific range of motion – you’re laying the foundation and moving in!

Mobility = Control. Control = Strength.

Therefore Strength = Mobility.

In order to be strong you need to have control – you need to have the mobility needed to perform your sport, hobby, or live as a healthy functioning human being. Perhaps another head tilt “huh?”

Your sport/activity will determine how much control is needed at said attachment site(s) in order for you to perform at a high level.

A gymnast for example needs far more control than a basketball player.

You can name plenty of other comparisons that support this notion. However here’s my argument; wouldn’t you rather be able to control a much larger range than you need so as to not only become freakishly strong, but also increase your longevity by decreasing your risk of injury?

I’m not suggesting a football player be able to move like Neo in the matrix – it’s not needed, in fact for some athletes having too much range of motion is detrimental to performance.

But in the game of life – that’s a much different story and can in fact tell you from personal experience and client experience, yes you do want the increased control!

I’m falling more and more in love with Dr. Andreo Spina’s FRC system and its ability to give you loads of control. More importantly it’s blending very nicely with the positional breathing exercises I have my clients perform.

Dr. Andreo Spina is a world-renowned musculoskeletal expert. His system stands for Functional Range Conditioning. Its focus is on three main goals; mobility development, joint strength, and body control (fits pretty nicely with what we’re talking about).

The end result is people doing some crazy sh** that would likely land most people in the hospital.

A photo posted by Hunter Cook (@hunterfitness) on

I’ve been fortunate enough to learn from colleagues who are FRC certified. I myself cannot wait to join them!

Through various series of controlled articular rotations (think searching through your end range in various joint motions) one can find where he/she is limited. Once limitation is found, applying progressive and regressive isometric loading (PAILs and RAILs as he calls them) can be used to increase your usable range of motion – more control = more room for strength.

From there you can play with lift offs and other fun movements but the overall takeaway is clear; you will gain loads of control which can lead to loads of strength!

One of my favorite non-FRC exercises for control is the Arm Bar as it allows the athlete to simultaneously gain shoulder and t-spine control

Life is better when you’re STRONG

This is the fun part. In my mind the end of my little equation is whatever you want.

If you’re an athlete maybe it’s run faster, jump higher, or get stronger.

Or, maybe it’s longevity – for athletes this can mean millions and millions more in income. For people who are injured or de-conditioned it could mean a fresh start or at least a new perspective on life.

The key I’ve realized is this; no matter what sport you play or what hobby you enjoy, everyone needs to be strong and there IS a relatively easy way to get there. It all starts with a breath followed by owning your body – gaining control.

Once you have control you are in fact in control – do what you want!

Until then, keep practicing.

I myself am a simple man. I’ve become attached to swings and getups everyday for my workout. My workout is short, effective, and to the point. My newest warm-up routine has 1 rule – I can’t use anything other than my bodyweight. This has not only placed me in a great position to start my swings, but also led to some fun movement sessions prior to my “workout”.

To summarize; strength starts with a breath, is enhanced with control, and transforms into greater strength – which leads to all around awesomeness in life.

Be STRONG!

About the Author

Chris Abbott has been a personal trainer for the past 7 years. He and his wife recently moved to Chicago where Chris Abbott Piche started Evolution Strength and Performance – a company dedicated to getting people strong through postural restoration, body weight training, and kettlebell training. He develops programs used for weight loss, total body strength, and overall health and wellness. Additionally, he works with clients who have suffered from back, knee, hip, and shoulder pain.

Along with neighborhood clients, he has worked with a variety of professional athletes including NFL, NHL, MLB, MMA, Pro Lacrosse, and European Basketball.

“I want people to realize there is more to life than the gym, and that life is better when you’re strong. It unlocks opportunities to enjoy life more, become a faster, more powerful athlete, or return to hobbies you’ve been unable to do for years.”

You can learn more from Chris by joining his newsletter or visiting his website. Additionally he’s on instagram and facebook.


CategoriesExercise Technique Exercises You Should Be Doing Rehab/Prehab

Deadbugs: The What, Why, and How

I know what some of you may be thinking:  “Really, Tony, a post on deadbugs?  What’s next….telling us how much you love Twilight or that you’re adopting another cat?  You haven’t gone soft on us now have you?”

<—– LOL, get it??  I actually put a picture of a “dead bug” here, when I’m actually just referring to the exercise.  High five!

Full confession time.  Okay, I admit it: back in 2008 I read the first Twilight book.  But only because I wanted to see what all the hoopla was about and see for myself why so many people were going bat shit crazy over it.

Well that, and it was a dark period in my life. I was single at the time and was going through some existential phase where I was trying to figure out what everything means.  Vampires wasn’t the answer.

I read it, didn’t care for it, and moved on with my life.

As far as the cat thing.  I plead the 5th…..;o)

With regards to deadbugs, however, in many ways I feel they get a bad rap and that they’re one of the more UNDERrated core exercises out there.  Perhaps a more apropos way to explain things would be that deadbugs are almost universally seen as a “sissy” exercise and a waste of time by many trainees, meatheads, and athletes alike.

I couldn’t disagree more.

I was recently asked by MensHealth.com to provide a “hot list” of some of my favorite go to core exercise that I either use with my athletes and clients, or that I pepper into my own training as well.

While I offered the prerequisite favs like Pallof press variations, stir-the-pot, and carry variations, I purposely OMITTED deadbugs for a few reasons:

1.  I didn’t want the incessant eye rolling pointed in my direction.

2.  Despite their perceived “easiness,” deadbugs are actually an exercise that are absolutely butchered by, well, everybody.

3.  As such, I took the greedy way out, held back, and decided to keep deadbugs to myself and dedicate an entire post on them in an effort to persuade everyone reading that they’re the bees knees (and that they should take the time to pay a little more attention to detail).

Getting the obvious out of the way:  deadbugs are an exercise that, for all intents and purposes, help with motor control and can be seen as a “baseline” exercise to ascertain whether or not someone has any glowing imbalances that need to be addressed.

Let me explain.

While it’s fairly common in the athletic realm, more and more we’re seeing people in the meathead/weekend warrior or what I like to call the “I like to lift heavy things category” present with an overextended posture or anterior pelvic tilt.

While this isn’t necessary anything to write home about – there IS a “range” of acceptable anterior pelvic tilt – it does become problematic when it’s excessive and otherwise leads to other imbalances up and down the kinetic chain.

For starters, those in excessive anterior pelvic tilt will almost always have extension based back pain – where the facet joints, posterior discs, etc are placed in an ungodly amount of stress which can manifest into more profound issues like spondylosis (end plate fracture) down the road.

Mike Robertson has a cool term for this called Flawed Active Stability – whereupon you’re cueing the body to engage the paraspinals and spinal erectors, effectively crushing the spine, in an effort to gain stability.

What’s more, in general, because of the misalignment associated with APT, it’s not uncommon for people to experience chronic pulled hamstrings, anterior knee pain, hip pain, and a myriad of other issues.

All of this to say: it just plain sucks donkey balls and can really mess with one’s training in the long run if not addressed or at least kept under wraps.

But again, I’m just stating the obvious.

Do Your Deadbugs, Yo!

Deadbugs are a fantastic way to teach the body to “encourage” more posterior pelvic tilt while simultaneously enhancing motor control and to engage the lumbo-pelvic-hip stabilizers to do their job.

As note above, most people flat out do a piss poor job when it comes to performing deadbugs correctly.  Here’s a great example.

Upon first glance those don’t look too shabby, right?  Offhand those look pretty good.  But with a closer look we can definitely comb through some common technique flaws that many should be able to appreciate.

1.  Before anyone makes fun of me for tucking my t-shirt into my sweatpants, just know that I did it for a reason. Which was to show how most people perform their deadbugs:  with an excessive arch in their lower back and with their rib cage flared out.

Well that and we had people visiting the facility from Australia yesterday and I didn’t want to make things awkward by walking around with my shirt off.

Admittedly, it’s still hard to see in the video above, but if you were in the video with me (oh, hey, hello!) you would easily be able to fit your hand in between the floor and my lumbar spine.  This shouldn’t happen and essentially defeats the purpose of the entire exercise.

And this is why I tend to lean more towards deadbugs from the get go – rather than birddogs – because the floor provides more stability and kinesthetic feedback to the body.

2. Another mistake is that people tend to rush this exercise.  Many will just haphazardly flail their arms and legs around hightailing it through the set.  While we could make a case that extending the arms and legs may be too much of a progression and we need to REGRESS the exercise – read THIS for more ideas – much of the time it just comes down to slowing people down.

All that said, lets take a look at what PROPER deadbug should look like.

I know it doesn’t look much different than the first video, but I assure you there’s a lot to consider.

1.  My shirt’s still tucked in.

2.  My lower back is flush against the floor – and I’m encouraging more posterior pelvic tilt.

3.  Moreover I’m also taking a massive breath and inhaling THROUGH MY NOSE to focus more on a 360 degree expansion into my torso.  In other words:  I’m not just breathing into my stomach, but also trying to expand sideways and INTO the floor as well as my ribcage (but without allowing it to flare out too much).

4.  From there I lower contralateral limbs – controlled, in an effort to resist extension – while FORCEFULLY exhaling my air through my mouth.  I do this until ALL my air is out.

By doing this a few things happen (and I apologize in advance for all the enumerations in this post):

1. I slow myself down.

2. The diaphragm is better engaged.

3.  Many don’t think of this part, but with all my air exhaled out, I now have nothing to help stabilize my spine except the muscles themselves.

It’s not uncommon for people to literally start shaking as they proceed with their set. This is okay – so long as you maintain proper spinal position – as it just demonstrates that the muscles in the surrounding area are now doing their job more efficiently.

I’ll typically shoot for 2-3 sets of 5-8 repetitions PER SIDE.

And there you have it.  It’s nothing flashy or Earth shattering, but I guarantee that if you go a head and try to perform your deadbugs in this fashion you’ll notice how much MORE challenging they can be, and they’re anything but a sissy exercise.

Give it a try and let me know what you think.


CategoriesCorrective Exercise Rehab/Prehab

Why Are We Breathing Inefficiently (and What Are the Ramifications)?

Last week I wrote a quick synopsis of a staff in-service we participated in that consisted of  Michael Mullin stopping by for a few hours and proceeding to melt our faces off with the number of knowledge bombs he dropped regarding some of the “inner workings” behind the PRI (Postural Restoration Institute) philosophy.

For those who missed it, you can check it out HERE (< — click me, don’t be shy).

In a nutshell (if that’s even possible to do):  we breath like poop.

I’m more of an analogy guy, so using one that most people reading can appreciate:  if our breathing patterns are like the worst karaoke singer we’ve ever heard, we’d sound like a whale passing a kidney stone.

Yeah, not pretty.

As a corollary to the above post I linked to, current Cressey Performance intern/coach (and resident break-dancing/ Gangham style guru), Miguel Aragoncillo, wrote a quick follow-up that I felt many of you would enjoy.

Why Are We Breathing Inefficiently?

Everyone is breathing incorrectly. We are all stuck, we are all patterned. The real question is… Do you want to get out of the pattern?

Take the blue pill, the story ends, you wake up in your bed, and believe what you want to (and still breath like an asthmatic Darth Vader).

Take the red pull, you stay in Wonderland, and I show you just how deep the rabbit hole goes.

The stance that the Postural Restoration Institute takes (pun intended) is that yes, we have two arms, two legs, two eyes, two ears, etc. To elaborate on the PRI aspects of Tony’s blogpost, we have one heart on the left/central part of our body, liver on the right, along with different diaphragmatic discrepancies such as more crural attachments on the lumbar spine, right versus left lung control, and lung structure.

With this anatomy refresher, you have to wonder: how does this affect our ability to use our diaphragm effectively?

To break down how the body compensates, here are a few factors that are involved in the PRI philosophy:

1. Posture

What is your posture like? If you are constantly standing or moving around (or coaching), you are subjecting ourselves to being in a more extended position.  Comparing by contrast, if you’re a desk jockey – a phone pressed to your ear, a keyboard to crouch over and work on, and more often than not, a not so comfortable chair that you plop yourself into everyday – you’re most likely a walking (or more appropriately, a sitting) ball of flexion.

Whether you are extended or flexed for the majority of your day, it is safe to say that the posture you assume for most of your day will definitely affect you in the long term.

2. Patterns

After attending a 2-day PRI seminar at Endeavor Fitness, my brain was mush on the ride home. So to spare your face from getting melted like Tony from our most recent in-service, understand that there are different patterns that we can be classified into, along with the breakdown of what exercise we should use to not only inhibit these patterns, but also “encourage” us into a better working posture.

Further, if you’re an athlete that has extreme unilateral demands (ie: baseball), it’s pretty much guaranteed that you’re an ideal candidate for PRI’s corrective exercises.

Personally, as a breakdancer, I’m full of dysfunction and asymmetry – rotating in one direction along with favored limbs for other dance movements falls neatly within the PRI philosophy.

During the PRI Seminar, I had many “A-ha!” moments as to why I move the way I do, along with why I favor one side versus the other during years of dancing.

Now take a look at any sport – baseball exhibits handedness (right-handed vs. left-handed pitcher), soccer shows favor for a dominant leg, and swimmers favor one side over the other to rotate towards their flip turns.

The constant demands of a chosen sport, coupled with your structural posture (thanks to the above reasons) will more often than not “feed into your dysfunction,” which in turn can often exacerbate common injuries seen in specific sports.

These dysfunctions alter how we breathe and how we respond to certain exercises or stretches.

3. Positioning

When we got into the practical portion of our in-service at CP, we were asked to get into some rather crazy positions, even blowing up a balloon. However, by getting into an ideal position, we are more readily able to get ourselves out of this pattern. So do not fear – most of us are able to get out of this pattern, much like Neo did in The Matrix. 

WARNING – I’m going to geek out a bit…

 “The activation/setting of the abdominals pulls the lower ribs down and in (caudad and posterior) and helps to inhibit/relax the paraspinals muscles (trunk extensors) which may help to decrease the patient/athlete’s lumbar lordosis and pain in the paraspinal region through reciprocal inhibition.”-1

(Side note: After performing these exercises, a few mentioned that they felt immediate results – loss of tension in their back, or even getting rid of back pain upon movement after being “repositioned”. Some pretty magical stuff.

On another aside: I asked Michael Mullin to walk me through some of the advanced tests, as I had only experienced the lower half of the assessments. After breathing into a few positions, I had seen immediate results with my shoulder issues. Craziness – I know.)

Putting It All Together

So putting the pieces of this puzzle together shows that a large majority of us may fall into a few of these categories from the get-go. What can we do now? Luckily for us, PRI gave us a few corrective exercises that they use often enough for the unlucky few that are still caught up in “The Pattern.”

Sounds like a Stephen King novel, I know, but bear with me.

One question that’s often been asked: where can we fit more exercises into an already jam packed session of foam rolling, mobilizations, and strength exercises?

The few things I’ve been experimenting with on my own along with coaching at CP are using these correctives after foam rolling, and before a dynamic warm-up, and also between sets of heavy compound lifts.

Note from TG:  For those who feel it a bit strange to use a balloon, you can also use a standard straw for this exercise.  Just be sure that when you inhale, you do so through the nose (which means you’ll have to block/pinch the tip of the straw in with your tongue against the roof of your mouth).

And for those who feel it’s a bit weird or “funky” to do this exercise in your gym, it’s no stranger than the moron who’s performing one-legged squats on an inverted BOSU ball while curling pink dumbbells.

Further, we have even gone on to emphasize with our athletes the importance of fixing our posture when we are standing during games, during our travels, and even at rest – sleeping and sitting. If your commute to work is long, making a conscious effort at shifting your posture can go a long way towards reducing overall symptoms.

What can we expect after appreciating these factors?

Whether you call it diaphragmatic breathing or the zone of apposition, we need to be mindful of how we position ourselves not only during exercise, but during our “resting” posture, and most importantly during our respiration.

With these things under our belt (or diaphragm!), I recommend watching the diaphragmatic video one more time to “see” how the above factors can affect our ultimate goal of performance and getting out of The Pattern.

Author’s Bio

Miguel Aragoncillo, CSCS, graduated from Temple University with a B.S. in Kinesiology. His focus as a trainer is getting people to move better and lift heavy things. Miguel is currently interning at Cressey Performance, and openly enjoys Techno Tuesdays, breakdancing, and powerlifting. Check out his writing at www.miguelaragoncillo.wordpress.com and follow him on Twitter @MAragoncillo1.

References:

-1 http://www.ncbi.nlm.nih.gov/pmc/articles/PMC2971640/ – The value of blowing up a balloon