Today’s guest post comes our way from Montreal based strength coach, Rich Thaw. I had the pleasure of meeting Rich several times a few years ago while he was here in Boston interning for Mike Boyle Strength and Conditioning.
We all know the importance of single leg work, and it’s probably a safe assumption to say that it’s something we all love to hate.
While I won’t sit here and say I hate single leg work as much as I hate Jar Jar Binks, I have no qualms putting it in the same breath as poodles or people who don’t turn right on red.
I’m not impervious to the hate. But I still do it.
That said, single leg work is a staple at Cressey Performance and if there’s one exercise which makes our athletes belly ache the most it’s the RFESS, or more popularly known as the Bulgarian Split Squat.
In this post Rich breaks down some technique flaws as well as offers some different variations to try.
Enjoy! – TG
Bulgarian Split Squats have been around for generations (apparently) but only recently have been thrust into the limelight. In recent years Bulgarian Split Squats have been making headlines everywhere from magazines to online publications and even on YouTube (note the sarcasm…everything makes it to Youtube)
Bulgarian Split Squats were outrageously foreign to me until the summer of ’09 when I started my internship at Mike Boyle Strength and Conditioning (MBSC). Although I had seen them before and used them a few times, I had not really exploited them to their full potential.
Long story short, after chasing a 315lb front squat for several months leading up to the internship, I decided to abandon the all-mighty lift in exchange for RFESS.
Fast forward 3 months and back to Montreal where I returned post-internship, I decided to re-attempt front squatting 315lbs.
The most recent experience yielded a mediocre 280lbs for 3 reps.
This time was different, I un-racked the bar and it felt really freakin’ heavy. I sat back and lowered myself to the 12’ box I had as a depth gauge, and then stood up without much difficulty…hmmm.
I decided to go for another, and then a 3rd. Racking the bar I thought to myself; “I have one more in me”. So I took a breath and gave’er for another.
I just front squatted 315lbs for 3 + 1 reps up from 280lbs for 3 reps only 3 months ago. That’s a 35lb increase and a rep to boot in a little under 3 months. WTF!?
What The Heck Is A RFESS And Where Can I Get Some?
Simply put, a RFESS (Rear Foot Elevated Split Squat) is a Bulgarian Split Squat, only with a less cool and more straightforward name.
Besides, I doubt the Bulgarians made up this exercise.
Note: I’m still awaiting conformation from The Bulgarian Government).
Lets start things with demonstration of the difference between a “good” RFESS and a bad one.
RFESS are a tricky beast, but when done correctly, in my opinion, they’re one of the best exercises which gives you the most bang for your training buck.
RFESS Are (Not) Made For You
They have huge benefits if used and loaded correctly, but correctly is a pretty vague term.
However, they’re not the best exercise for everyone – particularly if you’re rocking a solid anterior pelvic tilt (APT).
(Hyper) lordotic individuals usually develop these patterns as a result of breathing mechanics as well as a number of tight and weak muscles most likely set forth by sport, and repetitive, aberrant habits.
Lordotic people usually have a diaphragm that is ‘stuck’, tight lats, Quadratus Laborum (QL), Psoas, and Rectus Femorus, which are also tight/overactive – most notably understood under Janda’s Lower Cross Syndrome.
If You Present with Low Back Pain
The rear foot elevated position sets your pelvis up in a mildly compromised position. If, for example, the surrounding hip musculature is tight, the innominate bone (the hip bone on one side) of the leg that is on the bench will anteriorly rotate while the sacrum and innominate bone of the driving leg stays neutral.
This is not a great loading pattern.
What’s more, if you’re really tight the sacrum could be rotated as well…also not a pattern you want to load.
During a seminar I took with Dr. Stuart McGill back in April of 2013, he mentioned the increase in popularity of sacroiliac (SI) pain resulting from single leg training. All the more reason to make sure your core is working flawlessly.
The idea is that you don’t rely on joints for stability but rely on the surrounding musculature for stability. As it relates to some people, their back pain can very likely be related to some sort of compensation pattern and/or tight muscle(s).
If Your Buns Aren’t Made Of Steel
At CoreXcellence it is of the utmost importance that by the time we progress to RFESS in the program, our athletes and everyday clients have effective and efficient glutei function.
To get buns of steel you need your butt to fire first in hip extension, then the Adductor Magnus, hamstring, and lastly the lower back at the extreme end range. To effectively determine if that is the case on your end, here’s a quick test:
If You Can’t Lock It Down
The ‘proper’ way to do a deadlift used to be to bend down, arch the back and pick up the bar. But no longer.

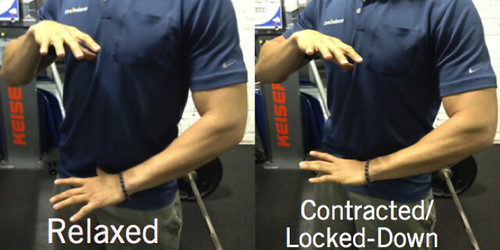
You need to be able to maintain a rigid torso throughout any movement and keep the ribs locked down.
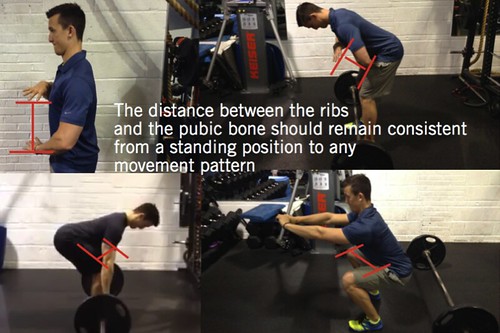
Think of maintaining the distance between the ribs and the pubic bone the same as when you are standing braced to when you are bent over in a hip hinge (deadlift pattern).


It’s impossible to contract a stretched muscle, and by arching your back (shown in the 1st photo) your entire mid-section is stretched.
That leaves one of two places for a trainee to gain stability:
1) The powerful lats, and 2) The vertebrae, sacrum and sacro-iliac joints. Again, not a pattern you want to load.
The inability to keep the distance between the ribs and pubic bone consistent during a split squat, reverse lunge and a slideboard lunge, in that order, throws up a major red flag.
Sorry, no RFESS for you chief.
RFESS Progression Checklist
#1 – Split Squat
#2 – Reverse Lunge
#3 – Slideboard Lunge
#4 – RFESS
The Set-Up
Grab yourself a good old-fashioned bench. Prop the shoelaces of your left foot on the bench then lower that knee to the ground. You’ll be in a half-kneeling position.
The Right heel should be slightly behind your knee.
Note: This is a great position to assess if you can maintain neutrality in your hips or if you are rotated. If you can get and maintain a neutral pelvis, you’re cleared for takeoff.
At the bottom of the exercise your right femur should be just slightly below parallel with the ground.
If you have access to a Single Leg Squat Stand you’re golden.
It’s set up for RFESS specifically so no tinkering required. It’s much more comfortable on the ankle than a bench. Benches pinch your ankle at times.
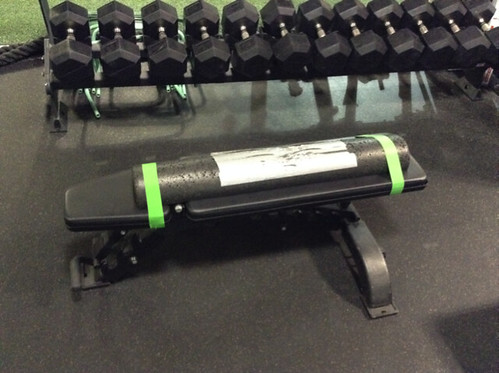
If you don’t have access to a Single Leg Squat Stand you can always jimmy a bench to replicate it by attaching a half-roller onto the top with some mini-bands.

Load ‘er up
There are a few ways of loading RFESS. The go-to loading pattern I use with clients and athletes is always the dumbbell goblet. Once they master the goblet RFESS, then they can progress to any number of variations.
Here are a few I use quite frequently:
1. Dumbbell or Kettlebell Goblet
2. Bilateral Dumbbell
3. 1-Arm Kettlebell
The bell usually touches the floor at the exact moment when you reach optimal depth, usually.
4. Front Racked Barbell
5. Back Squat Barbell
My beef with back loading
While it may work wonders for some, I firmly believe that by loading the bar on your back only further reinforces an arched back, stretched abdominals, and recruits the lats & QL’s to act as stabilizers rather than the core.
Sure the first rep or so will look decent, but decent isn’t good enough for the first few reps. Every rep should be flawless. Your last rep should always be your last good rep. It’s also a lot harder to coach this pattern compared to the front racked position because of the pattern it reinforces.
Wrap Up
While there are more than a few contraindications and compensations to look out for in a RFESS, the same principle applies for every exercise.
A stable torso, ample mobility, stability and flexibility are all required to reap the rewards of this exercise with none of the risk. It all comes down to progression. RFESS are an advanced exercise and should be treated as such.
Give yourself a few weeks to perfect a flawless Split Squat, Reverse Lunge and then Slideboard Lunge and then RFESS will be made for you!
About the Author
When he is not working as a Strength & Conditioning coach at CoreXcellence, Rich does extensive work with online training and nutrition consultations through his website titled ‘InnerAthlete’.
 Using his extensive knowledge and experience in athletic development, Rich has developed a training system which progressively challenges his clients. To ensure proper postural alignment and injury prevention methods learned from the Functional Movement Screening System, Postural Restoration Institute and Myofascial Techniques have become an integral part of his programming.
When Rich isn’t working you can find him playing hockey, watching the latest Marvel Comics movie, drinking Reeces Peanut Butter Cup inspired smoothies and dreaming about front squats, kettlebells and chin-ups.
He has been found eating cacao nibs and spirulina by the pound and firmly believes that “Everyone should have access to professional grade training, nutrition, & rehab strategies. Everyone can go from an average Joe (or Jill) to looking, feeling and moving like a Pro.”
The website can be found at www.InnerAthleteHQ.com. Find him on facebook or twitter by using the hashtag: #Joe2Pro


