For some people seeing the words “Turkish Get-Up” in the title of an article elicits a gag reflex or makes them want to jump into a live volcano.
Even I’ll be the first to admit it’s not the most exciting exercise to talk about.
However, that doesn’t mean it’s altogether invalid or that it doesn’t deserve our undivided attention. It’s an exercise that has carryover to many facets of fitness whether you’re a beginner or elite athlete.
Call me crazy, but I wholeheartedly believe it has a time and place in everyone’s programming.
In today’s guest post by Calgary based personal trainer, Linden Ellefson, he breaks down the movement into more manageable, bite-sized tidbits that’ll (hopefully) convince you to give it a try.
Enjoy.
Breaking Down the Turkish Get-Up
In fitness, there aren’t any magic exercises… any more than there magic fat loss pills or magic devices that will get you jacked injury-free.
You have to put in the work and train intelligently.
That said, every once in awhile the fitness fairy godmother graces us with an exercise that performs beyond expectations.
Case in point: The Turkish Get Up.
The Turkish Get Up:
* Improves hip and shoulder mobility
* Improves core strength
* Can be a great conditioning tool
* Makes your look great
But wait, there’s more (as they say on infomercials.)
This Turkish Get-Up can fix a lot of problems before they even come up.
An example is bulletproofing your shoulder to reduce the risk of injury. Even NFL teams are trading the bench press for the Turkish Get Up.
Shoulder, chest, and arm development will skyrocket due to the amount of time you spend keeping the kettlebell above your head.
It will iron out any left to right imbalances, meaning that your bench press and squat will likely improve because both are being trained equally.
Because your hip moves in multiple planes of movement, you train your hip more than up/down and forward/back like a squat or deadlift. This helps prevent injury.
Another benefit of this exercise is that since there are so many pieces to the exercise, you can work on improving each step to get better at the whole.
If you aren’t drooling with anticipation to master this exercise and be the envy of your entire gym, we can’t be friends.
You’re going to need:
Overhead Mobility: Can you put your arms overhead so that your biceps rub your ears without your lower back compensating?
Hip Hinge: Can you move your hips independently of your lower back? If so, then feel free to give this a shot!
Obligatory “If You’re Hurt, Then Read This” Warning: If you are currently going through an injury, then you need to see a physical therapist or doctor to get out of pain first. Do that, THEN you can learn your turkish get-ups.
Lets Get to the Breaking Down Part
While this exercise may look complicated when we look at the whole, there are actually five different parts you’re going to learn about. Here’s what they are.
- Drive to the elbow
- Press to the hand
- Bridge the hips
- Sweep the foot underneath
- Half kneeling position
- Stand Up
If you watch this video, you’ll know how technical this movement is.
This is best learned by having someone coach you through it. If you have access to a competent coach, be sure to learn this from them.
Note From TG: You can find competent coaches by perusing both the StrongFirst & RKC (Dragondoor.com) websites.
If you like learning by reading, read along!
A Couple Keys to Keep in Mind.
- There is a concept known as active and passive shoulder. When you have an active shoulder when someone pulls on your hand, your whole body would come with it. When you have a passive shoulder, it means that your shoulder moves independently of your body. We’re looking to keep your shoulder active the entire time.
- You’ll naturally press into the hand that’s holding the kettlebell, but I also want you to press into the ground with your bottom hand like you’re a wide receiver trying to stiff arm the safety as you run to the endzone for a touchdown. This will allow you to keep the shoulder in a safe position, not increasing your risk of shoulder pain.
Ready to learn? Let’s start then.
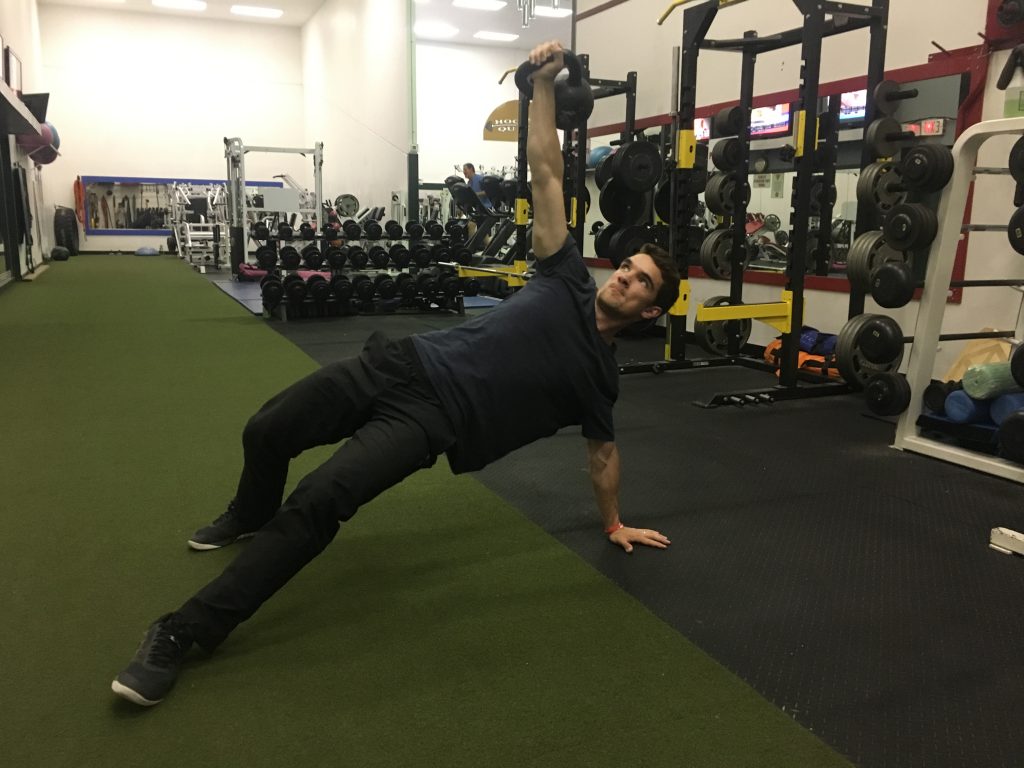
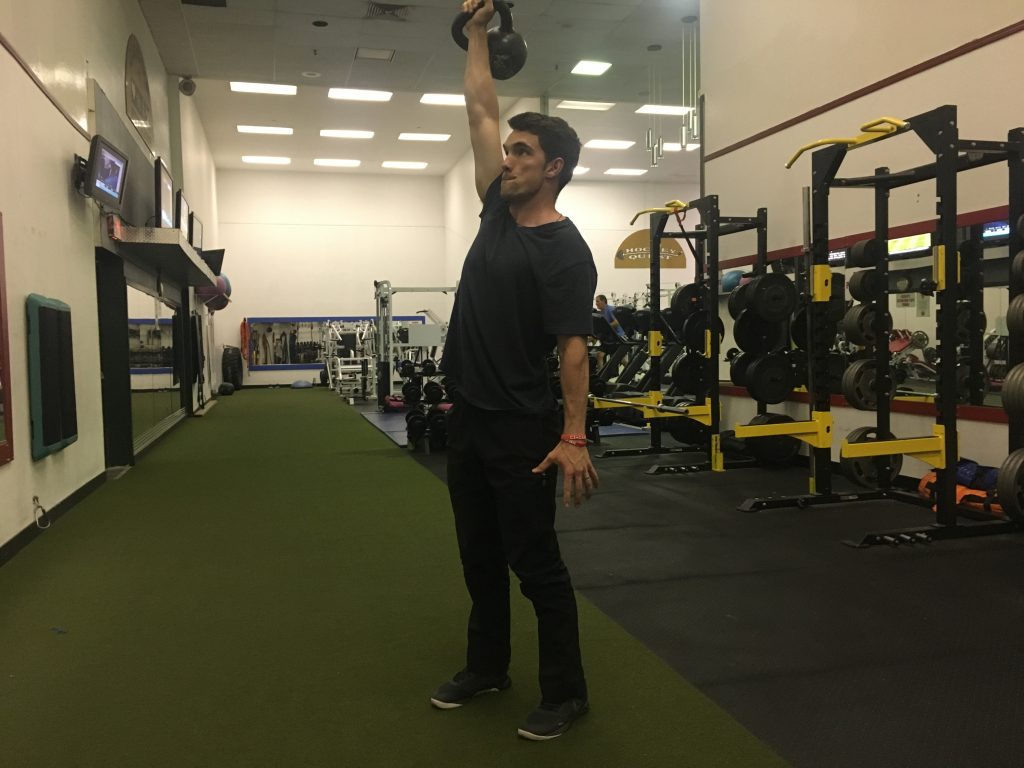
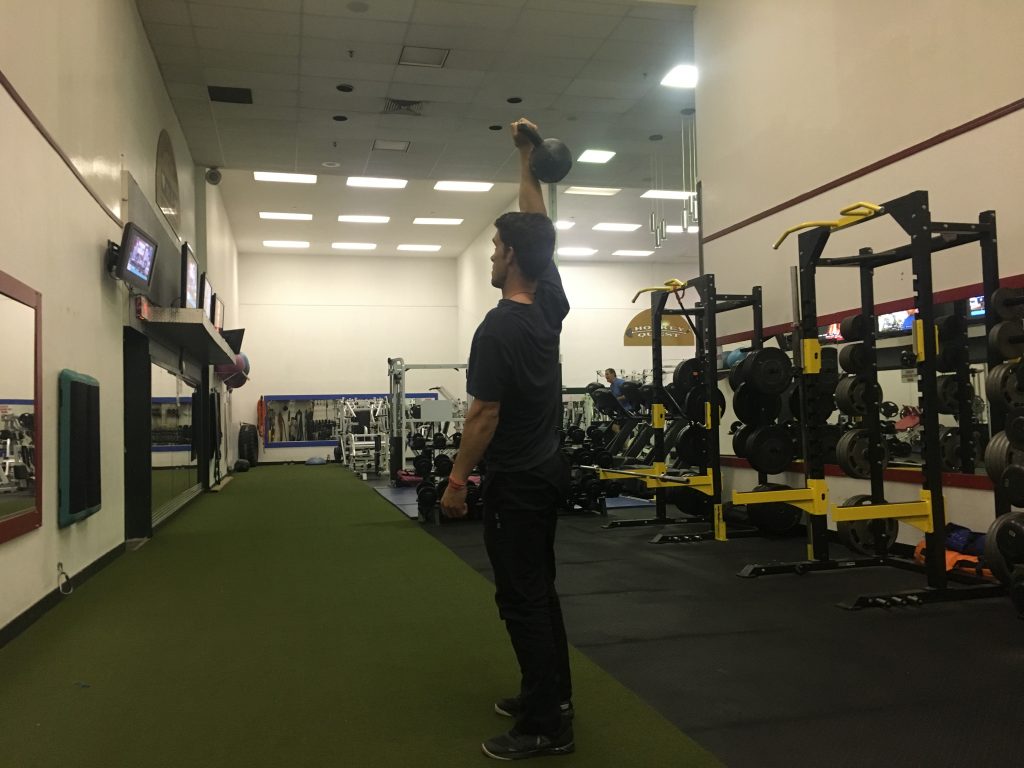
Drive to the Elbow
Assume you’re using your right hand. Start with the kettlebell directly above your elbow at a 90 degree angle. Your right knee is at a 90 degree angle with your foot on the ground. You will look like the following:

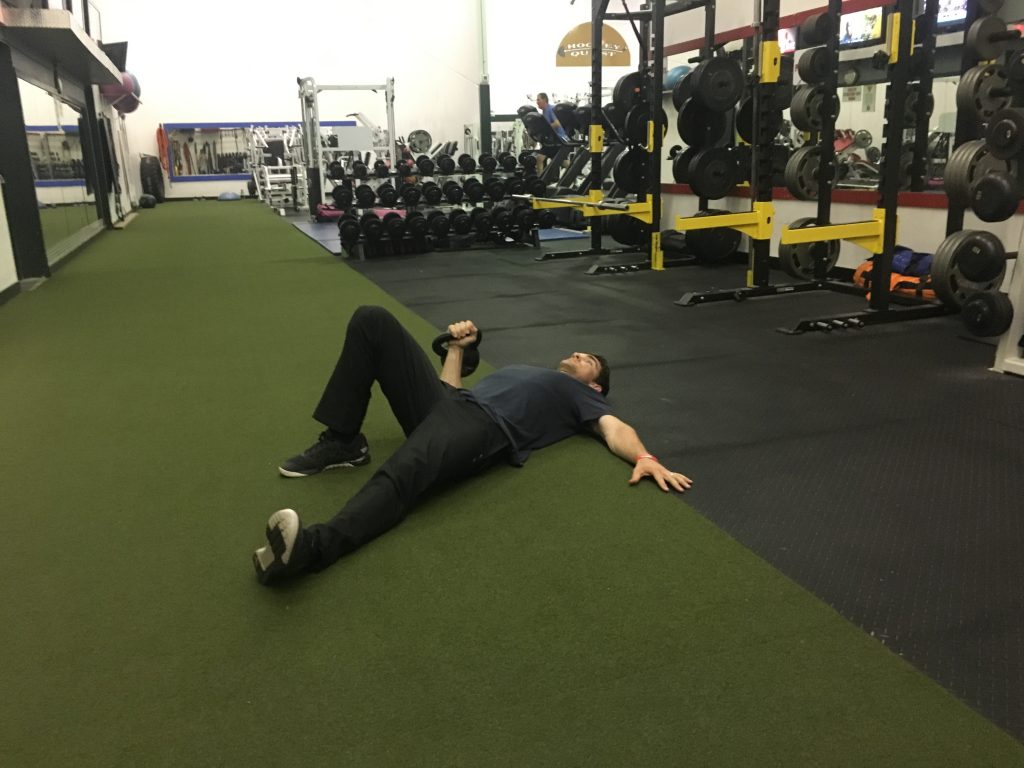
From here, drive the kettlebell across your body as if you’re going to punch someone. Push with your right leg as well.
As you drive the kettlebell in the air across your body make sure you push through your elbow into the ground. When you do this, your shoulder is less likely to get injured.
Part 1 done! At this position, you should feel your back turned on, your shoulders nice and warm, and core turned on too. Finish position below:
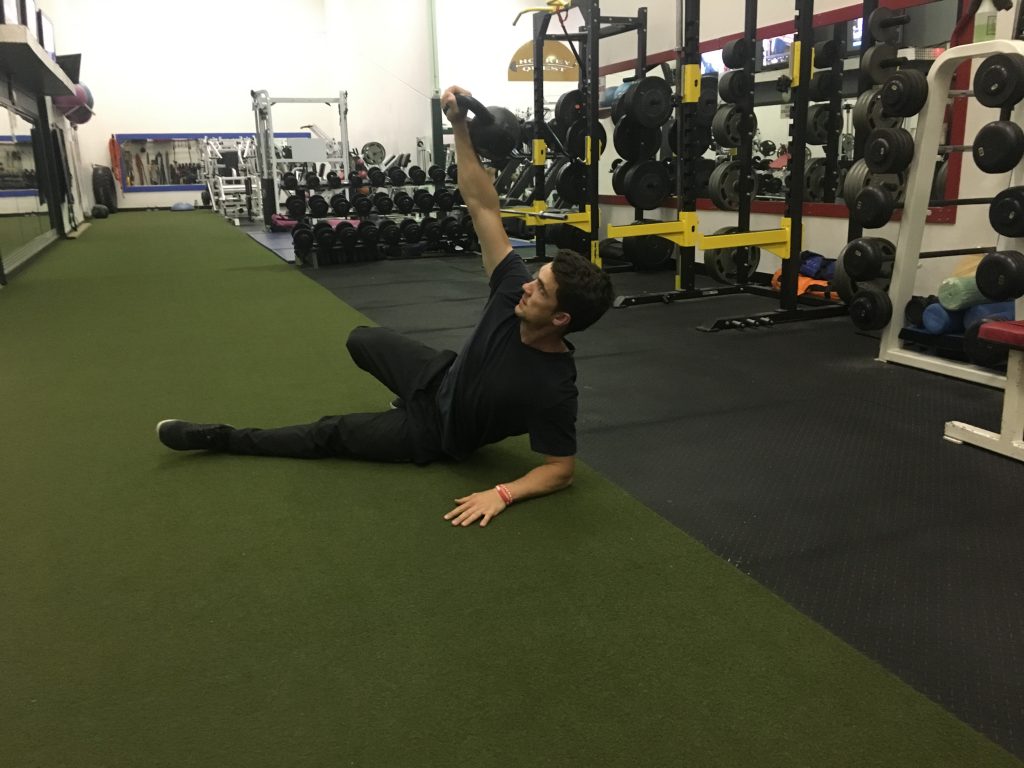
Press to Hand
With your right hand in the air, extend your left elbow and squeeze your tricep as you press up onto your hand, just like a tricep extension. When you finish you will look like the following:
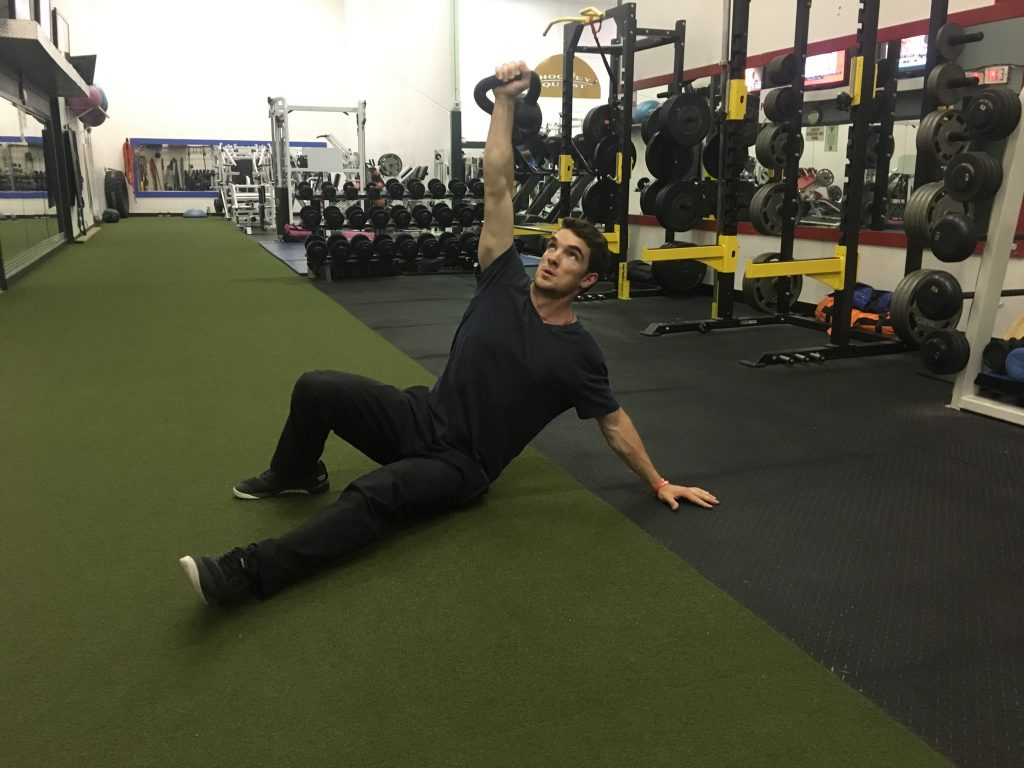
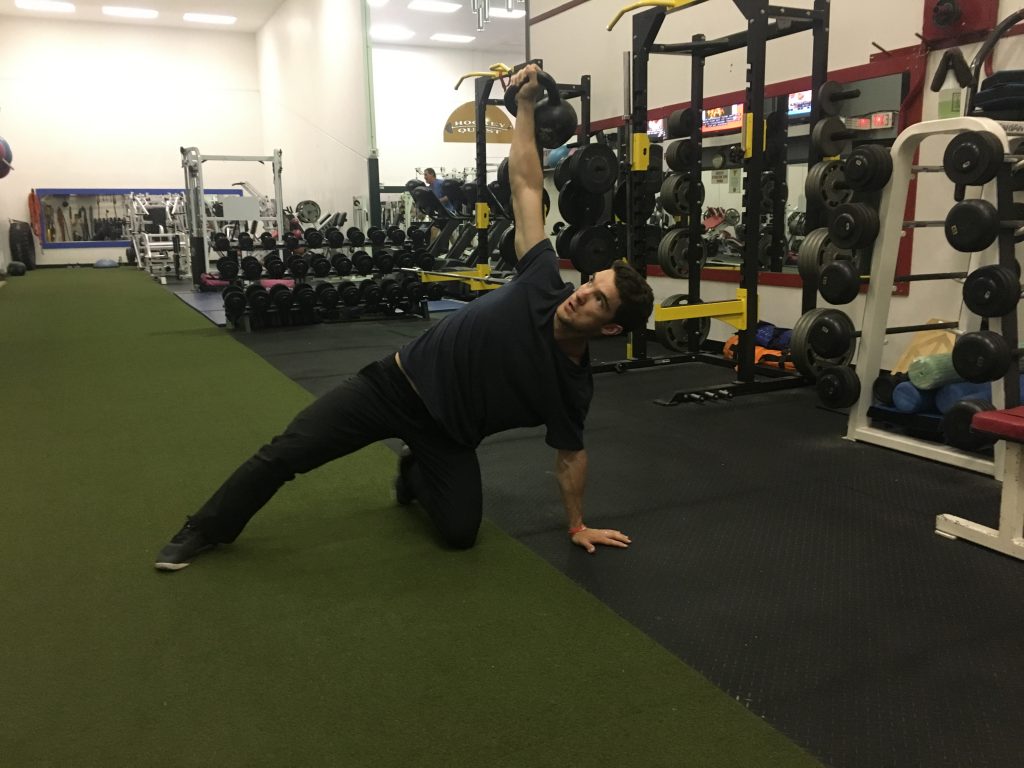
Hip Bridge
This step can cause the most problems with trainees. Make sure your both the bell hand and the hand on the ground are stable. When here, drive your hips up in the air by aggressively squeezing your glutes.
Like a deadlift.
Or other fun activities 😉
The higher you can get your hips, the easier the next step will be.
This is the finish position:
Note From TG: As an alternative, and I hope Linden doesn’t mind me poking my opinion into the mix, I’m not married to trainees always performing the high bridge option. Both Gray Cook and Dr. Mark Cheng (the latter likely should get more credit) note that this is a “speed bump” or fork in the road to the get-up.
Meaning we have some options.
There’s the high-bridge option which is delectable option for those with optimal hip mobility and hip flexor length.
And then there’s the non high-bridge option where one more or less sweeps the leg – Johnny Lawrence style – and transitions to the half kneeling position from sitting.
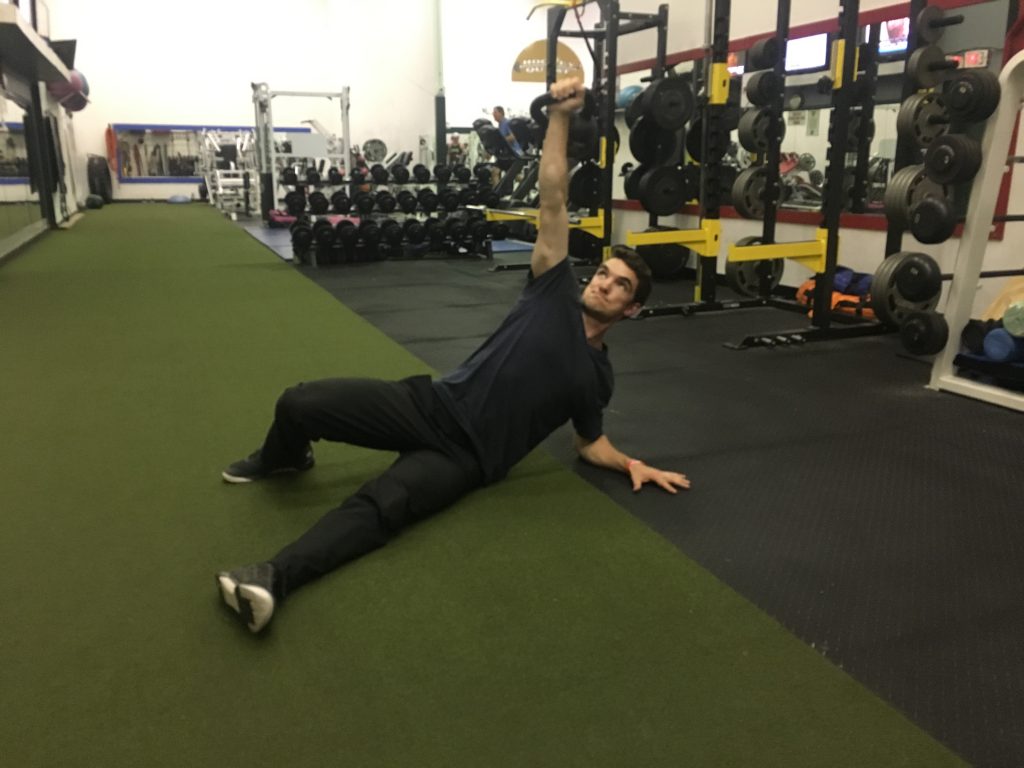
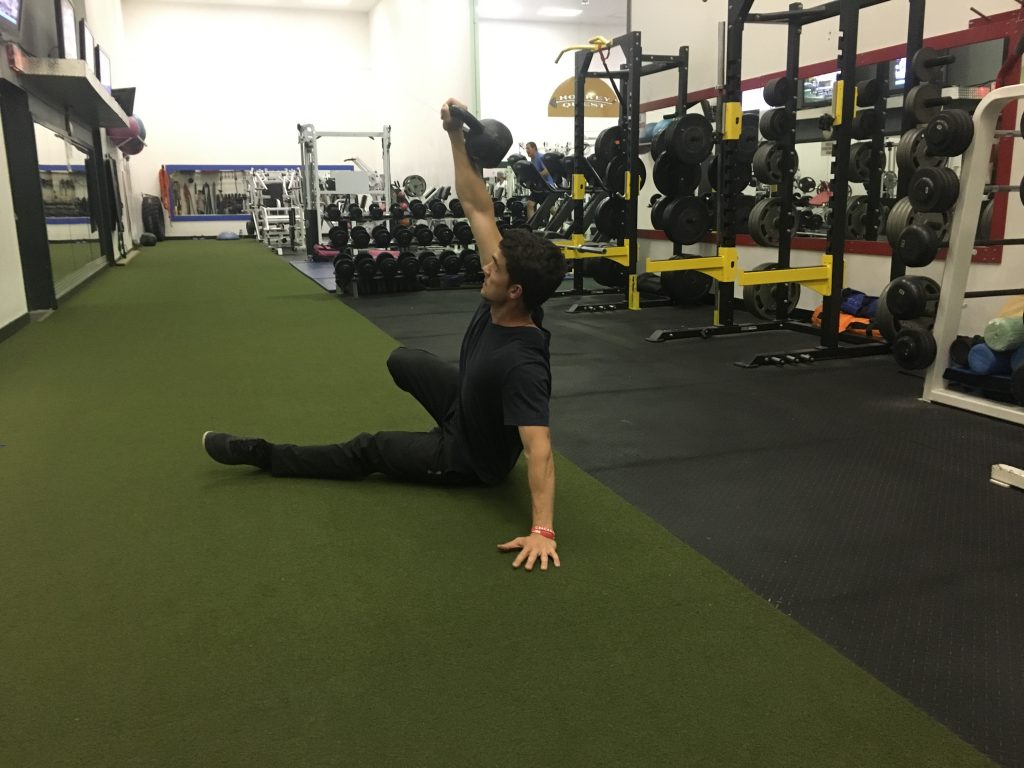
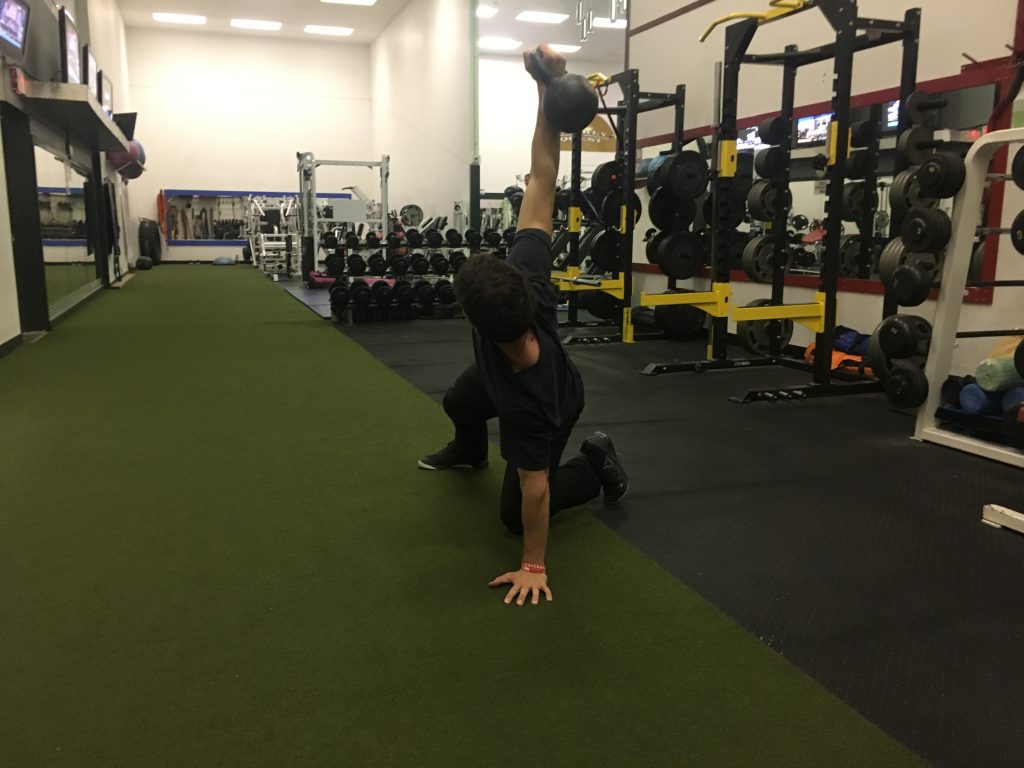
Sweep the Leg
From here, you’re going to take your LEFT leg, and sweep it underneath your right leg and place your left knee directly underneath your hip. Your right arm will still be in the air, and your left hand directly below your right. You will look like the following picture:
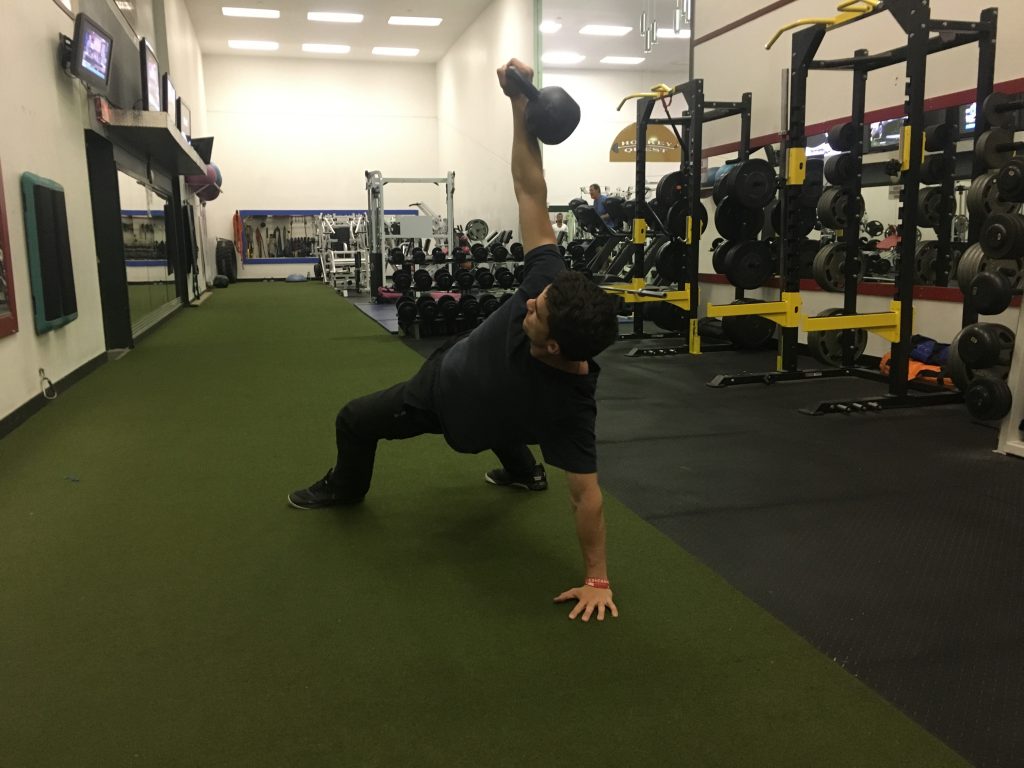
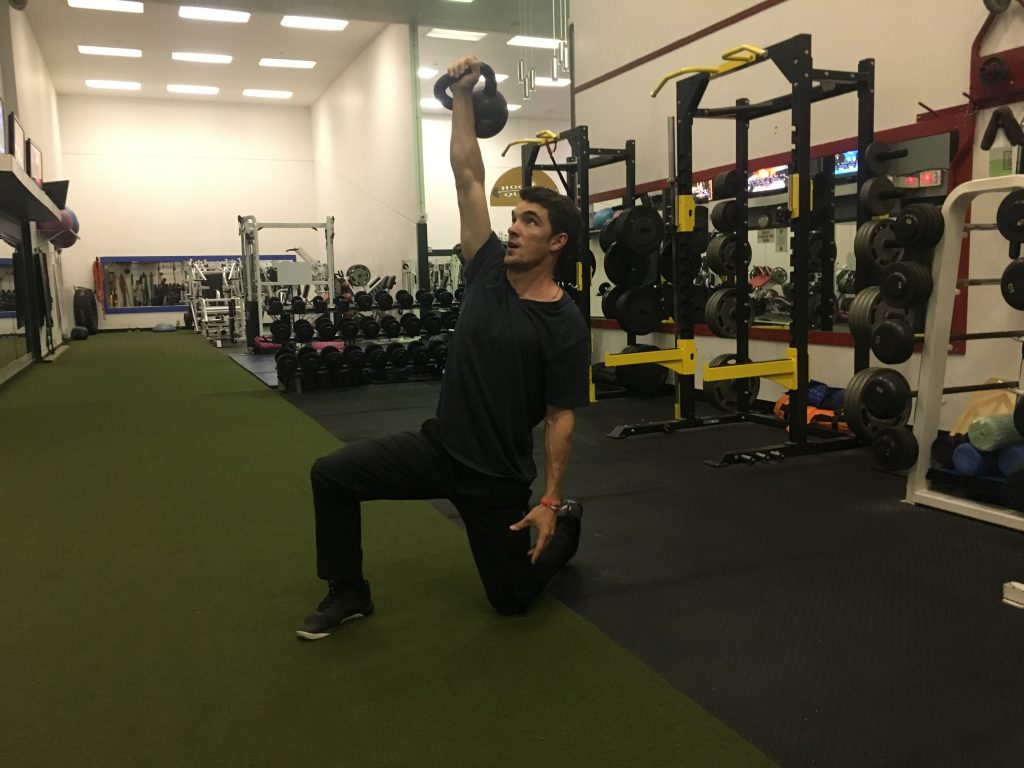
Half Kneeling Position
This isn’t a movement, but the position you end in. You DON’T use your back to get to a kneeling position with the bell above your head. Instead, you’re going to brace your core, squeeze your butt and push your hips underneath your upper body as you press the weight up.
Your butt is fully engaged here as you keep the weight up. Keep your core tight as the tendency here will be to use your lower back to keep the shoulder stable.
The picture of the position is below.
Note From TG: Hey, it’s me again. This is yet another speed bump to the Get-Up. The most popular option to transition to the half-kneeling position is the “windshield wiper” the back leg and position into half-kneeling.
This is fine.
However, it can oftentimes feel wonky to a lot of trainees.
Another option I like is this:
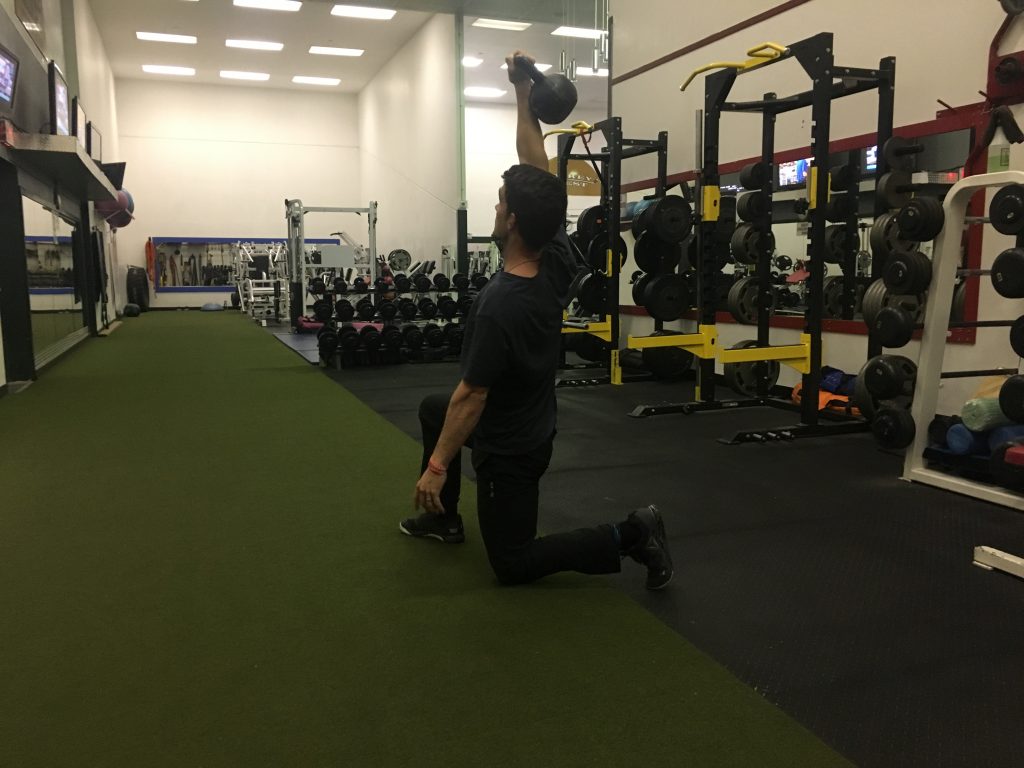
Stand Up
This is essentially where we stand up from a lunge. With the weight over our head, we’ll stand up using the entirety of our legs. Stand up from there.
Finished position below:
With that, we’re going to reverse this whole process to lie back down.
If you understood all that and put it into practice, then you might have successfully completed your first turkish get-up.
OR you might have picked up a couple cues to clean up your relatively hideous one.
Where Should You Put It In Your Workout?
Without understanding how to put it into your workouts, it does you no good. There are three places where I would suggest using them.
- As a Warm-Up. Since this uses every muscle, depending on your workout for the day, you can emphasize different steps to get specific muscle groups prepped.
Doing upper body? Spend 3 Seconds in each position until you Sweep the Leg. Got a killer deadlift workout coming? Spend 3 Seconds in each step from the hip bridge on. - Use it as part of your strength programming. This can work as your second or third exercise in an upper body day or your full body workouts. Due to the length of this exercise, if you’re looking to get stronger, I would suggest sets of 3-5 reps with a heavy bell. Start with 35lb as a man, and 15-25lb as a woman.
- Use it for conditioning. With a lighter bell than you would use for your strength work, set a timer for 10-15 minutes and see how many good quality Get-ups you can do in the time frame. Alternate your hands every rep or after every second rep. Challenge yourself to be better next time.
If you want a good challenge, one of my new favourite conditioning combos is to use turkish get-ups and overhead walking lunges together. Check out the video below to see how to perform it.
If you follow this step by step guide, along with download the accompanying video, you’re going to master this exercise in no time. Use this exercise, abuse it, and thank the fitness fairy godmother for this one when you get a chance.
About the Author
Bkin, CPT
Linden is a Calgary, Alberta personal trainer and online coach. He loves good coffee, his Boston Terrier Taco, and a great workout. Most of all, he loves making his clients the strong, pain free, athletic beasts they were meant to be.
To find out more from Linden connect with him at www.lindenellefson.com Facebook (he’s the only Linden Ellefson), or on Instagram.


