CategoriesCorrective Exercise Program Design

Never Question Your Exercise Selection Again

I’ve been a fan of “offset” loading for a number of years now. Without getting too deep in the weeds on what offset loading is and what the benefits are…

…it’s when you either stagger your foot or hand position on certain exercises OR you load an exercise a certain way (how you hold a DB or KB) to target or overload a specific limb or joint.

It has implications for both rehab (helping people to move better) AND for getting them jacked (self-explanatory). My good friend and Boston-based colleague, Dr. Michelle Boland, elaborates more on offset loading and how you can use it to your clients’ advantage below.

Enjoy.

Copyright: lightfieldstudios

Never Question Your Exercise Selection Again

I speak from personal experience, as a personal trainer, when I say it can be challenging to navigate through all of your client’s aches, pains, and movement hiccups.

It has caused me some serious headaches in the past. 

In a social media guru filled world, there is so much information about magic tricks to FIX your clients movement struggles. These magic tricks are typically called corrective exercises. 

We then think we are Harry Potter and build our client’s sessions and training programs around corrective exercises, making the perfect potion to have our clients move perfectly. 

Harry Potter cosplay concept. Moment of magic wand action

BUT, what ends up happening is that our FITNESS TRAINING sessions start feeling like a bad physical therapy experience. 

  • Our clients are not TRULY becoming better movers. 
  • Our clients are not TRULY gaining muscle or looking better in a bathing suit.  

They are in no man’s land, not getting results, and being held back from their physical potential.

Not to worry though!

(Check out THIS blog post to learn more about the mental barriers that may be holding your clients back.)

I am here to help!! Because I made these same mistakes and learned from them!

I am going to provide you with four simple rules to make sure your clients are still achieving their fitness goals while ALSO becoming better movers.  

These rules will provide you the ability to build a training program and select exercises without having to choose between a simple corrective exercise that is targeted to help someone move better and a complex lift that is targeted to get them jacked. 

Most coaches’ have go-to exercises for getting jacked and strong which is great but these same exercises can also create some movement restrictions due to the high levels of tension they require, such as a barbell back squat or bench press.

Sports young woman doing exercises with barbell on bench in the gym. Bar Bench Press

However, simple considerations to where the weight is placed, the type of grip, and feet position (stance) can be changed during these typical go-to exercises to prevent some of the possible movement restrictions. 

Below, I am going to provide you with simple, practical programming strategies that will allow you to both load AND improve movement quality for all ages and training levels.

The four simple rules allow you to make small tweaks to exercises in order to help people move better, WHILE still getting 80-90% of a training effect from the loading. In other words, we can still get our clients strong and powerful without turning them into walking refrigerators. 

(If you prefer to watch instead of read, Check out my video presentation of these Rules HERE.)

Rule 1. Choose Offset Positions

Offset positions include separating hands and feet from front to back. These positions will allow your clients to feel stable, so they can still try hard, without robbing them of their rotational abilities along the way.

Offset positions benefits include:

  • Improving rotational abilities from separating hands and feet front to back which helps to turn people’s hips and chests
  • Initiates alternating positions of the hips with one hip more extended and the opposite hip more flexed
  • Provides greater variation in your exercise selection especially for unilateral loading
  • Provides more options to add different weight shifting which helps to create unilateral loading challenges 

Offset positions include:

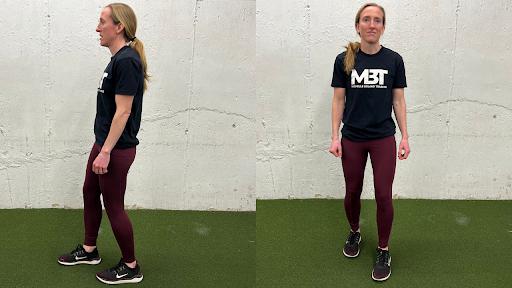
1. The Staggered Stance position is standing with both feet flat on the ground and split front to back. Feet are typically hip-width apart from side to side and a half foot distance apart front to back, but the distance can be altered in relation to base of support needs. So, if your client has a difficult time balancing in this position, move their feet wider side to side. The position initiates alternating positions of the pelvis with one hip more extended and the opposite hip more flexed and can also create rotation towards the back side leg.

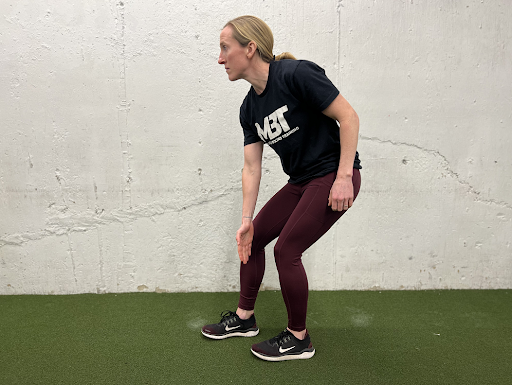
The Staggered Stance position can also be challenged with a variation called the ‘Loaded Step’. The Loaded Step variation is a weight distribution backwards onto the back leg. The center of mass should be about 80% on the back leg and 20% on the front leg. 

Loaded Step benefits:

  • This position variation encourages rotation through the hips and chest
  • You can coach it to be a knee or hip dominant exercise (see examples below)
  • You will feel LOTS of inner thigh (adductor), glute, and hamstring on the back leg
  • It supports hip mobility and eases tight posterior hips by allowing someone to feel a stretch in the back leg posterior hip, but try to avoid squeezing glutes…I know how tempting this can be 😉 
  • It encourages more single leg loading or shared loading

2. The Split Stance position is standing with a front to back separation of the legs and includes a reduction of foot contact on the back side foot. The leg separation is wider front to back than the Staggered Stance position and there is removal of full foot contact on the back side foot, such that the back heel is off the ground and the weight is rolled onto the ball of the foot. The position mimics (not equivalent to) a top of a split squat exercise.

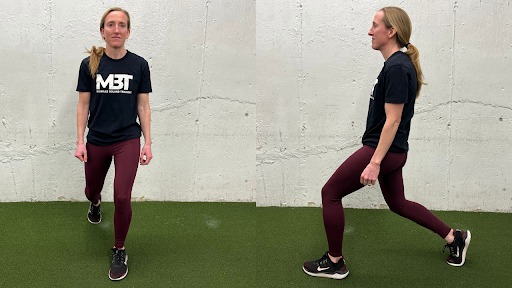
The Staggered Stance position can be challenged with a variation called the ‘Kickstand  Step’. The Kickstand Step Split Stance variation position is a body weight distribution forwards on the front leg with supportive, light weight on the back toe. Body weight distribution should be about 80% on the front leg and 20% on the back leg. 

Kickstand Step Consideration and Benefits:

  • This position variation encourages more single leg loading 
  • This position variation encourages rotation through the hips and chest
  • You will feel LOTS of inner thigh (adductor), glute, and hamstring on the front leg

You can challenge the position with where you hold the weight:

Holding Weight With Two Hands Will Limit Rotation


Holding Weight In Opposite Hand As Front Leg Will Encourage More Rotation


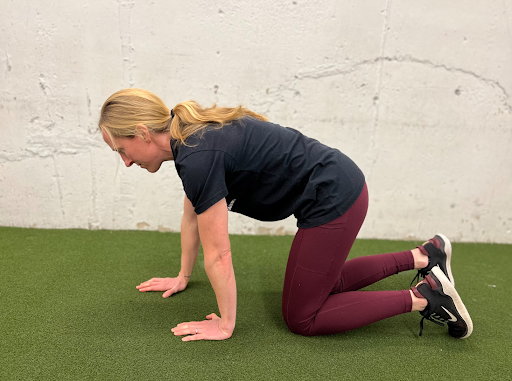
3. The Staggered Hand position is a front to back separation of the hands on the ground. Staggering the hands can help with creating alternating movement in the ribcage. The side of the ribs of the back hand will be lower and the upper body will be more likely to be rotated in that direction. You can also help target more side abdominal wall muscles by staggering the hands. 

Check out some exercises you can start incorporating today with offset positions:  

Contralateral Loaded Step Hip Hinge


Loaded Step Ski Erg


1-Arm Kickstand KB Swing


Staggered KB Hang Clean


Offset Pushup


Salamander Pushups For Staggered Hands


Rule 2. Choose Offset Loading

Offset loading involves having your clients hold weight in less than obvious places that will challenge them in different ways. For example, instead of putting a barbell on your back, hold the barbell between your elbows (see Zercher hold below).

Holding a weight in the front will help target more abdominal wall muscles with less low back issues (see Goblet hold below). Instead of holding a kettlebell with two hands, you can also hold it with one hand to create some unilateral loading challenges.  

Check out some exercises you can start incorporating today with offset loading:  

KB Goblet Split Squat


Contralateral 1-Arm KB Split Squat w/ Opposite Arm Reach


DB Zercher Split Squat


Alternating 1-Arm KB Deadlift


Rule 3. Alternate Grips

Alternating your grip on the weights can improve your client’s ability to rotate, making them super athletes while ALSO being able to pick up heavy things and put them down. Turning one hand into supination and the other hand into pronation causes the upper body to turn towards one side. 

Check out some exercises you can start incorporating today with alternating grips: 

Jefferson Split Squat


Alternating Grip Pull-Up


Rule 4. Reduce Tension When It Is Not Necessary

Have you ever had a client who picks up five pound dumbbells to do a bicep curl and acts like they are 60 pound dumbbells?

I sure have. 

Encourage clients to create tension and substantial effort WHEN THEY HAVE TO.

Other times, encourage them to back off a bit. Exercises that are not too demanding can encourage improvements to joint range of motion and movement quality IF they are performed with low tension, no squeezing, no death grips, or no breath holding. 

Your clients do not need to be squeezing all of their muscles, all of the time, to get a good workout. Low tension exercises can stretch tight areas and improve mobility. For example, the Loaded Step RDL can improve hip mobility and stretch the back side of the hip when it is performed with low weight and low levels of tension. 

Loaded Step RDL


A great start would be to select warm-up or cool-down exercises that can be performed with low tension!

QUICK Programming Tips To Incorporate These RULES:

  1. Combine: Every exercise within your training session include the above four rules
  2. Pair: Pair a heavy, bilateral lift with an exercise that incorporates the rules 
  3. Consider positions in your exercise selection process, to learn more click HERE

Summary

Incorporating offset positions, offset loading, and alternating grips into your exercise selection will help your clients gain some rotational abilities, gain hip and rib cage mobility, and add some excitement into their training while STILL allowing them to get strong.

To learn more, check out my EXERCISE SELECTION PROCESS which layers positions, fitness qualities, then individualized variations. Position selection is the foundation of my exercise selection and all the information included in this article about offset positions comes from my quick and concise Position Principles course. 

The Position Principles course will help you to avoid leaving behind the greatest factor in getting your clients and athletes to move better. The course provides clarity on positional biomechanics, clarity on terminology within the fitness industry for exercises, a downloadable programming template, and easy steps to organize your program design. After this course, you will never question your exercise selection again.

If you have any comments or questions please feel free to email me at mboland@michelleboland-training.com

If you enjoyed the exercise videos in this article, check out the MBT Exercise Database for 1,200 more videos to use, embed within your programming, and level up your exercise selection game. 

Author: Dr. Michelle Boland


Categoriespersonal training Program Design

The Ultimate 5-Step Guide to Progressing a Client Workout

Last week I received an email from Jon Goodman. At first I thought he was going to extend an invite to me to come up to Toronto for a weekend of watching Jean Claude van Damme movies.

But that wasn’t the case.

Fingers crossed for next time.

Nope, instead Jon was curious if I’d be interested in him writing an article for my site highlighting his new & nifty (and FREE) program writing software for coaches.

Uh, hell yes!

Jon is notorious (in a good way) at giving away stuff that he could easily charge good money for. Not only that, there aren’t many people who have had as much positive influence on the industry as Jon…he continuously brings the tide up for everyone.

Check it out.

Copyright: dolgachov

The Ultimate 5-Step Guide to Progressing a Client Workout

Note From TG: Before I defer to Jon, let’s begin with this: It’s NOT by spotting someone like what’s pictured above. OMG this is one of my biggest gym pet peeves. Well that, and people who refuse to share equipment.[footnote]Oh, and kipping pull-ups.[/footnote] I don’t know who the person is that gives the okay or thumbs up on all these registered images showcasing a trainer spotting their client this way, but they need to be fired. There’s got to be room in the National Defense Budget to fix this travesty, no?

Workout programs often last a month.

Then, a coach ‘changes it up’ for no reason other than it’s been four weeks.

This is wrong.

My programs don’t start and stop: They evolve.

Every four weeks I’ll review, assess, and adjust the program.

The goal’s to balance fun and progressive overload.

This article shares how I think about progressing workouts.

This is a picture of me in workout attire. I felt like one belonged here but have basically zero pictures of me training. So, here’s one of the few I have. It’s old. K, moving on.

Four-Week Program Assessments Are Based on 5 Questions:

  1. Exercise flow: Did anything not work?
  2. Stalling: Is anything important not progressing?
  3. Limitations: Is anything outside of our control affecting programming?
  4. Boredom: Is the client bored or do they hate anything?
  5. Moving forward: How should I progress the program for next month?

Next, I’ll show ya how I use these questions to evolve my own program.

My goal’s hypertrophy.

The program I’m doing three different workouts repeated twice a week for four weeks (24 total workouts).

The split:

  • Legs / shoulders
  • Chest / back
  • Arms / core

Let’s dig in:

To start, I’ll pull up my list of completed workouts using my free software for personal trainers, QuickCoach.Fit.

1. Exercise flow: Did anything not work?

BB Romanian Deadlifts (RDL’s) are performed on day 1. This thrashes my hamstrings.

Then, on day 2, I perform BB bent-over rows.

While I didn’t get hurt, the idea of loading heavy BB bent-over rows with sore hamstrings isn’t ideal.

The goal’s back training, not core stability.

With that in mind, I’ll switch the BB bent-over rows for a bench-supported DB row moving forward.

My previous plan (with bent over bb rows)    

Notice that the sets, reps, and all other variables (I use RPE) stay the same. When evolving a program, things like exercise selection / grip often change but stuff like sets, reps, order, tempo, etc. don’t.

Beyond that, the flow was good.

Moving on . . .

2. Stalling: Is anything important not progressing?

For each program, there’s 2-3 exercises I monitor progress on.

They’re usually representative large multi-joint movements.

I’m currently basing progression on two exercises:

  1. Incline BB Bench Press
  2. BB Romanian Deadlift

To check up on progress, I’ll pop open the Past Performance tab in QuickCoach:

I’ll then search for the exercise I want (BB Bench Press), and click on it to view performance.

Based on this it looks like progress is stalled.

But I also know that I was coming back from a layoff to begin this program so pushed the weights up quickly to start.

With that in mind, I’m not going to change anything for this phase.

The other key exercise in my routine was the BB Romanian Deadlift.

I’m also happy with the progress and will keep it in the program.

Four weeks isn’t a long time with fitness.

Changing it up too quickly is a mistake.

3. Limitations: Is anything outside of our control affecting programming?

With a 5-month year old baby, my time’s stretched.

To save time, I’m training at the community center around the corner.

A downside is that the DB’s max out at 55lbs––not heavy enough for conventional pressing. (#humblebrag)

Instead of a DB press, I’ll do higher-rep alternating DB presses to increase time under tension.

It’s not ideal but it’s necessary.

The right plan for a client should fit their life at that time, even if it’s not the Capital B-Best exercise.

Sub it in, and let’s move on…

4. Boredom: Is the client bored or do they hate anything?

As a trainer, your client is your boss.

Changing a workout because you’re bored isn’t OK.

Changing it because they’re bored is.

That, and sometimes client’s just hate certain things.

There’s usually a change you can make that’s just as good for the client’s goals that they hate less.

Here’s a few things I didn’t like in my previous training phase:

  • Cable ab crunches feel weird. So I replaced them with ab wheel rollouts.
  • Russian twists drag on for me. So I replaced them with side planks.
  • I switched cables for DB’s for chest flyes as noted in a comment I had sent to myself early on in the previous program.

5. Moving forward: How should I progress the program for next month?

I’m following a four week undulating periodization plan.

Week one is a deload. Then volume increases followed by intensity ramp up.

  • Week 1 I’ll do 3 sets at an RPE of 8 (Using the Borg CR10 scale).
  • Week 2 I’ll bump up to 4 sets.
  • Week 3 I’ll increase RPE to 9.
  • Week 4 I’ll increase RPE to 9.5.

Then I’ll deload again. And repeat the process.

I’ve found this to be a great way to progress without crushing myself.

If my life revolved around training and I didn’t have a family or business to run, I might be more aggressive.

For now, the deload week each month helps keep my body in check.

24 Workouts Cued Up and Ready To Go

Here’s how it looks on my side as a coach.

From this page, I can reorder and edit anything and it’ll change in real time on the client view.

Then when it’s time to train, I pop open the client link on my phone, click the next plan, and I’m ready to go.

Here’s what the client (in this case: me) sees:

Go Deeper: Watch me share my screen as I build this program in real time using QuickCoach (19 mins)

I recorded myself building this entire phase of programming in real time, exercise by exercise, using QuickCoach.

If you’re interested in watching it and hearing me talk through my thinking it as I go


Elevate Your Brand With Professional Coaching Software Today

All screenshots from this email showcase QuickCoach in action, which you can use 100% free with your clients.

QC is professional coaching software, built by coaches, for coaches.

It works for fitness, nutrition, habits, physiotherapy, chiropractic, and running––both in-person and online.

Join 14,000+ others and register your free account at www.QuickCoach.Fit to start playing around.

Also, as crazy as it is, I think that this is the first time that I’ve ever shared my own workout and thought process behind it.

Wild.

Does this officially make me an Internet Fitness Bro?

Do I need to start posting pics of me half-nekkid?

I have so many questions . . .

Anyway, thanks for letting me share my thought process with you. Hope it helps.

About the Author

Jonathan Goodman has 17yrs in the fitness industry and is the author of Ignite the Fire (1,000+ 5⭐ ). His current project is free software for fitness and nutrition coaches: QuickCoach.Fit. Follow him (along with 100k other trainers) on his Personal Instagram where he is very active.


CategoriesAssessment Corrective Exercise Program Design

Accessing T-Spine Extension For Healthy Shoulders

There are many things that can make your shoulder(s) hate life.

  • Poor programming balance
  • Less than stellar exercise technique
  • Muscular imbalances
  • Bony adaptations (acromion type
  • Poor scapular kinematics
  • Orcs

And, for some, we could even make the case for faulty breathing mechanics and/or contralateral hip/ankle mobility restrictions.

I try not to get that into the weeds when it comes to people’s shoulders, though. It comes across as too voodoo(ish). That’s a word right?

If someone’s shoulders are cranky I like to keep things simple and start where I most often see issues…….

……their left ventricle.

HAHA, just kidding.

It’s the thoracic spine.

Copyright: remains / 123RF Stock Photo

Accessing T-Spine Extension For Shoulder Health

Having the ability to extend the thoracic spine is a game changer for many people, especially for those who tend to be sequestered for hours on end in front of a computer on a day-to-day basis.

For lack of a better term, a lot of cool shit happens with extension:

  • The shoulder blades can retract and upwardly rotate.
  • It’s much easier to get the arms overhead.
  • It’s easier to keep the chest up during squats and deadlifts.
  • It makes for a “better” bench press. I.e., shoulder blades can retract and depress providing a more stable base of support.
  • It makes you 17.2% more attractive.[footnote]Look it up on PubMed.[/footnote]

The thoracic spine (thorax for the nerds in the room) is the “anchor” of the shoulder blades. Ideally we like to see congruency between the ribcage/thorax/t-spine/whatchamacalit and the shoulder blades.

When someone is a bit more kyphotic (rounded) in that area it makes it almost impossible for this to happen because the shoulder blades will often be more abducted and anteriorly tilted.

This can setoff a domino effect of other shenanigans such as a narrowing of the acromion space (for example), which in turn leads to rotator cuff issues, which then leads to not being able to bench press without pain, which, as we all know, means the Apocalypse is upon us.

Let’s avoid the Apocalypse.

To that end I’d like to take this time to share some of my “go to” T-Spine Extension drills I use with my own clients and athletes on a weekly basis.

1. T-Spine Extension Off a Foam Roller (Performed In a Way That Doesn’t Make Me Want to Swallow Live Bees)

Likely the most recognizable drill many gravitate towards – and for good reason (it’s a good one) – is T-Spine Extension off a foam roller.

However, many tend to go waaaaaaay too far with their total range of motion on this to where it becomes more of a lumbar spine movement.

Here’s how to do it correctly:


2. Prone T-Spine Extension

I reserve “fancy” for choosing a nice restaurant for a date night with my wife.[footnote]You know, something like Applebees.[/footnote]

I don’t feel the need to get fancy with my T-spine extension drills.

The Prone T-Spine Extension drill is a fantastic way to build mid-back endurance.


3. Child’s Pose Back Extension Off Med Ball

What’s great about this variation is that when we adopt the “child’s pose” (knees tucked underneath) we OMIT the lumbar spine.

So now the only area we can get movement is the t-spine.


4. Pigeon Stance w/ Reach Through & Extension

Taking the previous concept and upping the ante a little bit is this exercise I “stole” from Dean Somerset.

If we want to talk about a drill that provides a TON of benefit for our training buck this is it.


Here we get a stellar hip mobility/glute stretch, while at the same time taking the lumbar spine out of the equation (because that’s NOT where we want movement from).

Too, with the reach through (and then extension) we’re getting a double whammy effect of mid-back mobility goodness.

NOTE: I like to add in an inhale (through the nose) on the reach through and then a FULL exhale (out the mouth) as the individual extends back up.

NOTE #2: My tricep looks fucking amazing in this video.

5. Wall T-Spine Extension w/ Lift Off


This drill is a doozy as well.

Pushing the hips back and “settling” into your accessible t-spine extension ROM is money enough for most people. But when you add in the end-range “lift off” (lifting the hands off the wall) at the end, it adds that little “eff you” component not many people will like.

Be careful not to crank through your lower back on this one!

6. Goblet Squat w/ Overhead Reach


You can thank Dr. Quinn Henoch for this one.

This one is more challenging than it looks, so way on the side of conservative when choosing the loads you use.

I’m using a 10 kg kettlebell in this video and am pretty sure I blacked out after shooting this video.

Want More Shoulder Magic?

Join me IN-PERSON for two upcoming Fall workshops I am putting on. I cover shoulder/hip assessment, programming strategies, the concept of the TRAINABLE MENU, favorite Decepticons, and much, much more.

1. Strategic Strength Workshop (w/ Luke Worthington) – October 8-9th @ West Hollywood, CA

2. Coaching Competency Workshop – October 20th @ Rochester, NY