CategoriesAssessment Corrective Exercise

The Power of Test, Re-Test: How to Supercharge and Add Value to Your Assessment

During the Complete Hip & Shoulder Workshop in Seattle last weekend I spoke on the importance of the test/re-test concept with regards to assessment.

It’s nothing fancy or elaborate.

You test something – whether it be range of motion or maybe a strength discrepancy – implement a “corrective” modality if something’s deemed out of whack, and then re-rest that shit to see if it worked.

If it did….you’re Gandalf.1

If not…#awwwwwkward.

The test/re-test approach helps set the tone for any future “corrective” strategies or programming considerations you’ll do as a coach or trainer.

In addition, and something I’d argue is equally as important, it also provides an added layer of value to the assessment.

If you’re able to demonstrate to someone a significant change or improvement in ROM or reduction in pain/discomfort by implementing a drill or two, and it’s something they’ve been struggling with despite countless interactions with other fitness professionals, what’s the likelihood they’ll bust out their checkbook or Bitcoin wallets (<—depending on their level of geekery)?

I suspect highly likely.

It demonstrates a perceived level of “mastery” and knowledge-base towards the assesser (you) and, in a roundabout, reverse psychology kind-of-way, delves into the “pain center” of the assessee (athlete/client).

In this example it can refer to literal pain such as a banged up shoulder, knee, or lower back. But it can also speak to pain in the figurative sense too. Someone who’s frustrated and “had it up to here!” that they can’t lose weight, or maybe an athlete who was cut from their high-school team would have a degree of “pain” that would incentivize them to take action.

Show someone success or a clear path of action, however little, and they’re putty in your hands.

Of course this assumes you’re not some shady shyster who tries to up-sell the benefits of some super-secret concurrent, 47-week, Easter-Bloc training program you copied from Muscle & Fitness or, I don’t know, organic raspberry ketones laced with mermaid placenta.

People who promote and use smoke-and-mirror tactics are the worst.

But lets get back to the topic at hand.

Test/Re-Test

One of the main screens I use with my athletes and clients is their ability to lift or elevate their arms above their heads.

Shoulder flexion is important for everyone, not just overhead athletes and CrossFitters.

If someone lacks shoulder flexion, and they’re an athlete, it’s going to affect their performance. A baseball pitcher may be “stuck” in gross shoulder depression, which in turn will have ramifications on scapular positioning and kinematics, which in turn will result in faulty mechanics and compensatory issues up and down the kinetic chain.

Conversely, regular ol’ Hank from accounting, who likes to hit the gym hard after work, if he lacks shoulder flexion, he too could have numerous issues arise ranging from shoulder and elbow pain to lower back shenanigans.

Shoulder flexion – and the ability to do it – is a big deal in my opinion. And it’s a screen that should be a high-priority in any fitness professionals assessment protocol.

So lets say I’m working with someone who lacks shoulder flexion. I test it both actively (standing, picture above) and passively (on a training table).

I surmise that it’s limited and that it may be feeding into why a particular person’s shoulder has been bothering him or her.

I can use the test/re-test approach to see if I can nudge an improvement.

Now, as I’ve learned from many people much smarter than myself – Mike Reinold, Sue Falsone, Dr. Evan Osar, Dr. Stuart McGill, Papa Smurf, etc – you shouldn’t rely on any ONE screen/corrective.

Everyone is different, and what works for one person might not even scratch the surface for another.

With regards to addressing (lack of) shoulder flexion2, there are a handful of “go to” strategies I like to use.

And then it’s just a matter of seeing which one sticks.

1) Encouraging a Better Position

In order to elevate the humerus (arm) above your head, the scapulae (shoulder blade) needs to do three things:

  • Upwardly rotate
  • Posteriorly tilt
  • Protract

The ability to do so is vastly correlated with the thorax. Those who are super kyphotic (ultra rounded upper back) will have a hard time elevating their arms overhead. Often, the simple “fix” here is to foam roll the upper back and work on more t-spine extension and you’ll almost always see an improvement.

Bench T-Spine Extension


Side Lying Windmill


But what about the opposite? Those who are stuck in more “gross” extension and downward rotation?

I.e., the bulk of athletes and meatheads.

Here the shoulder blades can be seemingly “glued” down.

In that case some positional breathing drills to “un-glue” the shoulder blades (and to encourage more 3D or 360 degree expansion of the ribcage/thorax) would be highly advantageous.

All 4s Belly-Breathing


It’s amazing what a few minutes of this drill can do with improving shoulder flexion ROM, without having to yank or pull or “smash” anything.

2) Allow the Shoulder Blades to Move

Some people simply don’t know how to allow their shoulder blades to move. A prime example is this past weekend.

An attendee who’s a personal trainer – but also competes in figure – mentioned how her shoulders (especially her left) had been bothering her for eons, and she couldn’t figure out why.

We had her perform this drill.

1-Arm Quadruped Protraction


In reality, both protraction and retraction are occurring, but many people have a hard time with the former.

The idea here is to learn to gain movement from the shoulder blade itself and not via the t-spine.

Here’s another angle (because, triceps):

https://www.youtube.com/watch?v=eyNFNxqFlSc


After a few “passes” with this drill, she saw an immediate improvement in her ROM. What’s more, the following day when she showed up for Day #2, the first thing out of her mouth was “my shoulder feels amazing today.”

That’s a win.

3) Pin and Go

Another route to take is to have the person foam roll their lats. Not many people do this, and there’s a reason why: It’s un-pleasant.

I’ll have the person spend a good 30 seconds or so on each side and then have them stand up and perform a simple SMR drill using a lacrosse ball against a wall.

They’ll “pin” the teres minor down (basically, find the tender spot behind their shoulder and hold it there) and then work into upward rotation.

https://www.youtube.com/watch?v=9OiGt_O1FvY


Another five or so passes here, and I’ll re-test.

Many times I’ll see a marked improvement in their shoulder flexion.

Caveat

NONE of this is to insinuate that anything mentioned above will work for everyone. The idea is to understand that it’s important to “test” a number of modalities and then re-test to see if you find an improvement.

If you do, you’re likely barking up the right tree which will make your corrective approach and subsequent strength training more successful.

If you don’t, well, my bad…..;o)

CategoriesAssessment coaching Exercise Technique Strength Training

Building the Squat From the Bottom

We all know that squats are a staple movement that span the gauntlet when it comes to helping people get stronger, leaner, and faster.

Blah, blah, blabbidy, blah.

That’s all well and good. But lets be honest.

Squats also help build bodacious bottoms.

There’s a reason why no one has ever written a song titled “Flat Bottomed Girls” or “I Like Average-Sized Butts.”

We like our derrieres fat and big, baby!

Alas, this article isn’t about the human form, appreciating the backside, and how squats help build bottoms.

No, this article is about something else entirely.

How to Build the Squat FROM THE BOTTOM

Dean Somerset and I spent this past weekend up in Kitchener, Ontario (<– that’s in Canada) just outside Toronto co-teaching our Complete Hip and Shoulder Workshop.

Note: you can check out to see if we’re coming to your neck of the woods HERE.

One of the main bullet points Dean and I hit on was squat patterning and how coaches and personal trainers can go about cleaning up their athlete’s or client’s squat technique.

Or, better yet: demonstrate to them some semblance of success.

Just so we’re clear: I think the squat is a basic movement pattern that everyone should be able to perform. I’m not insinuating that everyone should be able to walk into a gym on day #1 and drop it like it’s hot into a clean, deep squat and/or be able to load it to a significant degree.

Not everyone can (or should) squat deep. I’ve written on the topic several times, and for those interested you can go HERE and HERE.

That said, it is a movement pattern that’s important and one that can help offset many postural weaknesses, imbalances, not to mention more colloquial goals like athletic performance and aesthetics.

Assessment

Squat assessment is a crucial component to figuring out what’s the right “fit” or approach for each individual.

I can’t stress this enough: Not everyone is meant to squat to ass-to-grass on day one. Not everyone has the anatomy or hip structure to do it!

But it’s also important to figure WHY someone can’t squat to depth? Is it a mobility issue (which many are quick to gravitate towards) or a stability issue?

Digging deeper on the mobility-stability conundrum, Dean hit on a few important points this past weekend in trying to differentiate what mechanism(s) prevent someone from A) squatting deeper than that think they can squat and B) squatting with a better, more efficient pattern.

It’s a concept I’ve used myself with my own athletes and clients, but Dean did a really great job at peeling back the onion and helping the attendees better understand where they should focus their efforts.

Is it a Structural Issue?

Say someone makes the Tin Man look hyper-mobile when they squat. No matter what they do or how they position themselves, they just can’t seem to squat to an appreciable depth.

Most trainers and coaches would chalk it up to something lame like “tight hip flexors” or lack of hip mobility (which certainly could be the case), and revert to any litany of drills to improve either of the two.

This could very well be the correct anecdote, but I do feel it’s an often simplified and overused approach. I can’t tell you how many coaches have taken this route only to end up barking up the wrong tree.

It’s imperative to dig a little deeper.

Structural issue(s) = bony growth (FAI?), bone spur, and/or geometry of the hip joint itself.

As a trainer or coach you’re not diagnosing anything, and unless you’re Superman3 and have X-ray vision you’re more or less speculating anyways.

Assuming you have the knowledge base and are comfortable doing so, you can ascertain of what each person’s (general) anatomy is telling you by using a hip scour.


Supine (Passive): Have an individual lay on his or her’s back and bring knee into hip flexion. Is it uncomfortable or do they feel any pinching at or near the hip joint? If so, abduct the hip. Does the pinching go away? Do they gain more hip flexion?

This can speak to what their ideal squat-stance width should be.

You can also check hip internal/external rotation. Do they have more or less ROM in either direction? This could speak to more retroversion/anteversion of the acetabulum itself.

In general: those with an anteverted acetabulum (more than enough IR) are going to have crazy amounts of hip flexion. These are people are the ones who can squat ass-to-grass without blinking an eye. Of course, whether or not they can control that ROM is another story.

Conversely, those with a retroverted acetabulum (more ER) may struggle with hip flexion (bone hits bone earlier) and will likely never live up the all the internet trolls’ expectations regarding squat depth.

They’ll likely dominate hip extension ROM, however.4


Supine (Active): You can also have someone test their hip flexion ROM actively (meaning, they’re the ones doing the work). The key here, however, is making sure they use their hip flexors to actively “pull” their knees towards their chest.

Can they do it? Any restrictions?

https://www.youtube.com/watch?v=k3TI-GJNl9w


Prone/Quadruped: Another “screen” to add is in the quadruped position where, again, the person is more stable.

Here you’re checking to see at what point do they lose control of lumbar positioning?

Some people, due to their anatomy, and despite 698 coaching cues being tossed their way, will lose positioning before they hit 90 degrees of hip flexion. You can be the most well-intentioned coach in the world, but unless you’re Professor Dumbledore you’re never going to be able to fit a square peg into a round hole.

So, you work with what’s presented to you. This person will need to squat at or above parallel.

I’m fairly certain the Earth will still continue to spin.

However, what you’ll often find is that they’re able to get into what would be equivalent to a “deep squat” position. Further, if you have them dip down and extend their arms above their head it’s akin to the same position as an overhead squat.

If they’re able to assume this position, it’s a safe bet (although not entirely exclusive) they it’s not a structural issue that’s preventing them from assuming a deep(er) and “clean” squat pattern.


All of it’s information – which may or may not stick – but it’s information nonetheless. And it’ll all help guide you as a coach to figure out what’s most suitable approach for your athletes and clients.

When assessing someone’s active squat pattern they may present as a walking ball of fail and demonstrate a whole host of compensation patterns. This is where some fitness professionals are quick to jump on the “it’s a mobility issue” bandwagon.

Taking the time to perform a more thorough screen (like the ones suggested above), though, is an excellent way to glean whether or not that is indeed accurate.

Squat From the Bottom

Lets assume you figured out it’s NOT a structural issue. You assess/screen someone in the supine/prone/quadruped positions and find they’re able to exhibit a passable squat pattern.

Yet, when they stand up and attempt to squat they resemble a stack of crashing Jenga pieces.

One of the best strategies I’ve found to help address this is to teach/re-groove the squat pattern FROM THE BOTTOM. Basically, start in the end position.

It helps to build context and confidence. In addition, it engrains the CNS to inform the brain “dude/dudette, relax, we got this!”

Assisted Squat Patterning

If I’m working with someone in person, I’ll hold my hands out in front of me (palms up), ask them to place their hands on top of mine (palms down), assume a squat stance, and “groove” their squat pattern (sit back with the hips, push the knees out), and “pull” themselves down into the bottom position of the squat.

I’ll then have them let go, hold that position for a good 3-5 second count, and then stand back up. We start them where we want them to finish. As a result this BOTTOMS-UP approach helps groove technique, but more importantly helps improve people’s confidence at sitting in the hole.

Some other variations you can use:

Squat Walk Down


Suspension Trainer Assist


Have someone grab the side of a squat or power rack (or use a suspension trainer – TRX, Jungle Gym) and use as much assistance as they need in order to get into the bottom position.

Note: Make sure they maintain a good back position.

Once they get into a position they feel they can control and “own,” have him or her let go and hold that position for a 3-5s count.

Then, stand up.

Have them repeat for several repetitions.

You’ll often find that after a few reps things start to click.

Boom

When it comes to squatting, not everyone should be held to the same standard.

  • Perform the screens mentioned above. Do your job.
  • Figure out what the best “fit” is for each person – depth, stance width, foot placement, etc.
  • Use pattern assistance if necessary. Start from the bottom. Build success into people’s training.

Either approach you use – whether it’s partner assisted or with external assistance (rack, TRX) – the main advantage is that it forces anterior core engagement, which in turn helps improve stability, which in turn improves motor control, which in turn makes people into rock stars.

Except without the fame, money, and glory. And amphetamines.

CategoriesAssessment coaching Corrective Exercise Exercise Technique

Everyone NEEDS to Deadlift

Note from TG: If there was ever a blog title conceived specifically for this website, this is the one. Jason Bourne, an F-16 fighter jet, and a lumberjack punching a grizzly bear in the face while eating a bag of beef jerky could have steel cage match and it wouldn’t be as manly as this title.

My good friend (and Boston(ish)-based physical therapist) Andrew Millett wrote this fantastic guest post today. 

Fair warning: parts are a bit “heavy” with technical terms and verbiage, but there are still plenty of insights and suggestions (and videos!) that are applicable to everyone reading, because……

Everyone NEEDS to Deadlift

There are a few absolutes in this world.  Some of those absolutes are:

Gravity
The Earth is round
Humans need oxygen to survive.
The Human Body needs food and water to survive.

And I’m sure I am forgetting some others.5

Another absolute I could add to that list is that…Everyone NEEDS to Deadlift!

Now, that I’ve got your attention, finish reading this article before you decide to send your hate e-mail or hate mail if you are still living in the dark ages.

Let me clarify my point: Everyone needs to do some form of hip hinging in order to maintain good back and lower extremity health.

The movement of hip hinging is a vital component of everyday life.

Whether you want to lift up your kids without blowing out your back or you are trying to deadlift your car for reps, being able to hip hinge properly is an integral component to reducing injury risk as well as attaining a high level of performance.

What is “Hip Hinging?”

Hip Hinging is the ability of a person to maintain a neutral aligned spine while predominately loading the hips and having the primary movement come from the hips in an anterior to posterior direction.

For the visual learners, this is what it looks like:


As you can see from the video, we ideally want a neutral spine position and the majority of the movement comes from the hips moving in an anterior to posterior direction.  The knees remain in a soft knee position.  This means that the knees are not in a terminally extended (straight) position nor are they overly flexed (bent).

What movements use hip hinging?

The hip hinging move is used for a multitude of movements.  It can be used in the:

  • Deadlift
  • Good Mornings
  • Variations of the Glute Ham Raise
  • Certain Athletic Endeavors

For activities throughout your day, it could include:

  • Properly picking up your kids.
  • Lifting a heavy box from the floor to a different location.
  • Picking a pencil up off the floor.

The list is endless.  Being able to properly move through this movement pattern, whether it be for performance or daily life, is a NECESSITY!

How do I know if I can hip hinge?

Well, check out this video below for a quick and easy test to tell if you are hip hinging properly:

Place a broom, golf club, dowel, etc. on your back as shown in the video.  Place one hand on the top portion at your head and the other hand at your sacrum (tail bone).  Make sure to keep the three contact points between your head, thoracic spine (mid back), and sacrum.

Next, while maintaining “soft knees”, attempt to push your butt back like you are trying to tap the wall with it.

As you are doing this, you are going to need to counteract falling backwards by leaning your upper body/trunk anteriorly (forward).  Time and time again, I will see people attempt to do this movement with just pushing their hips backwards and then in turn, fall backwards or lose their balance.

Your hips should always be more superior than your knees.  If your hips are in line with your knees in the transverse plane, then you are squatting, not hip hinging.I can equate it going to an upscale club or lounge.

You walk up to the club and there is a line.  It is up to the “bouncer” aka the strength coach/physical therapist in this example, to let you past the velvet rope and into Club Hip Hinging.

Once your in the club, there is a VIP section.

In this example, that VIP section is the Deadlifting VIP.  If you aren’t on “the list,” then you aren’t making it into the “VIP” section.

For the physical therapists, strength and conditioning coaches, performance coaches, etc. who want to know if someone can perform hip hinging and/or deadlift variations, then screen your clients and patients.

Screening/Assessment

***Disclaimer*** If you are NOT a physical therapist, you need ask your client if you may put your hands on them to screen them.  Also, if someone has pain with any of these screens/assessments, structure your programming appropriately and refer out to a PT, sports chiropractor, etc.

Tell them you want to screen them so you can adjust their programming so it is customized for them.

99.9% of people won’t have a problem with this, but you need to look out for yourself and make sure your clients are fine with this.

First piece of information I would like to know is, what does their hip flexion motion look like.

Place your client on the ground and passively/gently move their hip through their available range of motion (ROM).

Then, we want to check and see if they have the passive straight leg raise (PSLR) mobility.  Gently raise their leg until you feel some resistance.

Per the Selective Functional Movement Assessment (SFMA), we would like to see 80 degrees of the PSLR.  If the client doesn’t have 80 degrees, all is not lost.  We have to modify their training regimen.  We will get to that later in this post.

Next, if the client has 80 degrees of PSLR, we want to see if they can stabilize in that ROM.  Ask them to actively raise their leg, keeping the knee straight up in the air without letting the opposite leg come up off the ground/table.  We like to see 70 degrees of active straight leg raise (ASLR).

If they have 70 degrees of ASLR, then we can progress further in our assessment/screening.  If they do NOT have 70 degrees, have the client place their hands on the ground.  Then press into the ground with their hands and try again.

If their ASLR improves, then they have either a:

  • Core Stability Issue
  • Anterior Pelvic Tilt

What the pressing down into the ground/table does is activates the anterior core musculature and in turn, places the trunk in a more neutral position.

Since the hamstrings attach on the pelvis, if the pelvis is in an anterior pelvic tilt, this can cause the SLR to appear limited because it is starting in a stretched position.

If pressing down into the ground/table does NOT improve anything, then try these ASLR correctives:

Active-Straight Leg Correctives (via FunctionalMovement.com)

1) Active-Straight Leg Lowering to Bolster

2) Assisted Single Leg Lowering to Bolster

If there is an improvement in the ASLR, now, have the client stand up and tell them to bend over and touch their toes.

If the client can bend over and touch their toes with ease and without trying to blow a gasket or bouncing up and down, then this is another assessment check point that can tell us that they may potentially be able to deadlift/hip hinge.

The toe touch test comes from the SFMA.

What does the toe touch tells us?

We want to see if the client has the ability to posteriorly shift their hips when performing the toe touch.  This tells us that the client can get into their posterior chain to load their hips.  When watching someone perform the toe touch, find their greater trochanter (hip bone on the side of their hip region) and watch to see if that area moves backwards during the toe touch

In the first video below, you can see the person can shift their hips backwards.


In this next video, if the person doesn’t perform an adequate posterior weight shift, then they wont be able to touch their toes.


If your patient or client doesn’t have the ability to touch their toes, then try these correctives as recommended by FunctionalMovement.com.

This series of correctives is called the Toe Touch Progression.

First, place a 1/2 foam roller or a 10 lb plate underneath your client or patient’s toes as shown in the picture below.

Then, while maintaining the feet on the plates and the knees straight, instruct the person to bend over and gently try to touch their toes.

Perform 10 repetitions then switch to the heels elevated as shown below and perform 10 more repetitions.

You can also place a foam roller or a small ball between the person’s knees and instruct then to squeeze it during the toe touch.  When you instruct the person to squeeze the ball, it up-regulates inner core musculature and places the core/trunk in a better position to perform the toe touch.

Next, have the client perform the toe touch again.  If they can know touch their toes or it has improved as compared to before, then we know that this simple corrective has taught their brain/body to learn how to perform a posterior weight shift needed to perform hip hinging and/or deadlifting.

Now, their toe touch may have improved, but in a few hours or when they wake up tomorrow morning, it may be back to the way it was before the toe touch progression corrective.

With the body and the brain when we see a quick improvement such as this one with the toe touch, we are tapping into the Central Nervous System (CNS) and the brain.

It is “teaching” the brain/CNS a new way to move.

As Erson Religioso has mentioned on his website, Modern Manual Therapy, the brain/CNS is easily tricked, but it is difficult to convince.  What that means is that with the toe touch, we have opened a window to the CNS that has allowed for a chance or an improvement to the system, we want to do whatever we can to “keep that window open” through various correctives and behavior modification in our daily lives.

If the client’s toe touch hasn’t improved, then there may be something else from a mobility, stability, or motor control standpoint that a licensed healthcare practitioner may need to dig a little deeper to discover why the toe touch hasn’t improved.  Refer them to someone in your network, but we will go into more detail now on other ways to train this client even though their toe touch isn’t sufficient enough to deadlift from the floor.

Well, there are many options that you can provide your client to receive a great training effect.  The next few examples all work to help load the posterior chain musculature as well as helping to improve core/trunk stability.

Most of these exercises should be felt in the gluteal and hamstring musculature.

Cable Pull-Throughs


Key Points:
  • Sit back into hips.
  • Maintain a neutral spine; no rounding or extending of the lumbar spine/TL junction.
  • Make sure to extend through the hips at the end of the movement, NOT through lumbar hyper-extension.

Hip Thruster/Single Leg Hip Thruster


Key Points:
  • Start with upper back resting against a bench and hips/knees flexed.
  • Maintain a “neutral spine” or “ribs down” position.
  • Extend your hips upwards and squeeze butt at the top.
  • Finish with your knees, hips, shoulders, and ears in a straight line.

Barbell Supine Bridge


Key Points:
  • Place an airex pad or exercise mat over hips/under bar to provide some padding.
  • Maintain a neutral spine, “ribs down” position and drive hips to the sky.
  • Make sure not to try and lift too high by extending through the lumbar spine.

Elevated Kettlebell Deadlift


Key Points:
  • Stand directly over the kettlebell (KB).
  • Push your hips back like you are trying to touch your butt to the wall behind you.
  • Maintain a neutral spine position.
  • Grasp the KB, drive your heels through the floor, and lift up through your hips/legs.
  • Squeeze butt at the top.  Make sure to extend your hips and not your low back.  Imaginary line should be between your ears, shoulders. hips, knees, and ankles.

Once the client or patient demonstrates proper form with an elevated KB deadlift, eventually lower the elevation height to make the exercise more difficult and eventually perform off the floor as long as proper form is maintained.

Trap Bar Deadlift

https://www.youtube.com/watch?v=p-sA3PG1kGY


Key Points:
  • Step into the trap bar/hex bar.
  • Push hips back like you are trying to touch your butt to the wall behind you.
  • Grasp handles and maintain a ribs down, neutral spine.
  • Imagine their are oranges in your armpits.  Try to squeeze them.
  • Drive through the heels and extend your hips.  Shoulders, hips and knees should be in a line at the top of the movement.
  • If the client/patient can’t demonstrate proper form with the Trap Bar DL from the floor, then you can place blocks or some other implement underneath the weights to elevate it so they can demonstrate proper form.

Rack Pulls


Key Points:
  • Step up to bar.  Push hips backwards and grasp bar.
  • Same points as mentioned above.
  • Can use pronated grip (palms facing you) OR mixed grip (one palm facing you, one facing away from you).

Once someone can demonstrate proper form with these movements, then you can start by progressing towards the floor.

If someone’s goal is to deadlift from the floor and they can do it with proper form and pain-free, then we’re on our way to hitting that goal.

If someone’s goal is to be able to pick-up their kids or move and feel better, then the exercise variations mentioned above are great ways to help with that.

CategoriesAssessment Corrective Exercise Exercise Technique

Common Mistakes With Shoulder Assessment

Assessment in the health and fitness setting can be tricky, and rife with numerous (common) mistakes some fitness professionals make.

This is especially true when we start talking shoulders.

Mistake #1: the shoulder isn’t just the shoulder. 

As in: it’s not just one “thing.” We’re actually referring to a shoulder “complex” that’s, well, complex.

The “shoulder” is comprised of four separate articulations (glenohumeral joint, sternoclavicular joint, acromioclavicular joint, as well as the scapulothoracic joint), all playing nicey-nice together in order to perform a wide array of movement(s).

All deserve their time under the assessment microscope.

Mistake #2: However, while all areas are important, I do find that assessing and addressing scapular function/positioning is often the key to unlocking answers. Unfortunately, it’s often the area that’s least looked at with regards to shoulder pain/dysfunction.

Mistake #3: shoulder assessment can – and should be – attacked from a few different perspectives.

Far too often, I find, fitness professionals take a static view of what’s going on and that’s it. They’ll have an individual stand there in the middle of a room, utter a few “mmm’s and ahhh’s,” write a few fancy schmancy words like “internally rotated,” “kyphotic,” or “I have my work cut out for me,” and that’s that.

Assessment complete.

Lets go squat!

When in fact, shoulder assessment should be broken down into a few disparate – but not altogether separate – components: Static Assessment, Integrative Assessment, and Dynamic Assessment.

Not to mention one’s ability to fill in a smedium t-shirt. Very important.

All three provide pertinent information that will help better ascertain the appropriate plan of attack when it comes to movement dysfunction, pain, and/or improved performance within the shoulder complex.

I Got 99 (Shoulder) Problems and….

…..My scapulae are the reason for all of them.

Sorry, I’m no Jay-Z. And I know I just butchered one of his classic hits.

But it was the only way I could think of to best articulate my point.

The scapulae (shoulder blades) are kind of a big deal when we begin to discuss shoulder health. It’s an arbitrary number I’m throwing out there with no research to back it up – so please, don’t quote me6  – but 90-95% of the “shoulder” issues I’ve helped address in the past when I was a coach at Cressey Sports Performance as well as the present (now that I am on my own), can be correlated back to scapular positioning and function.

Static Assessment

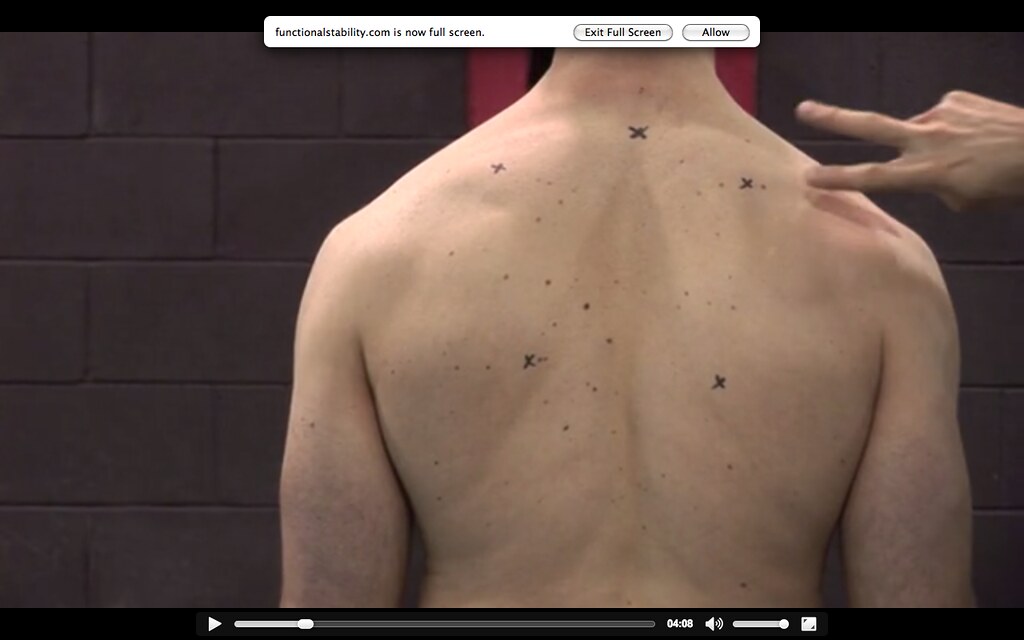
  • The scapulae should be in slight upward rotation. As you can see in the picture above, this individual is in slight downward rotation statically (both inferior medial borders (the two bottom x’s) of the scapulae are inside the superior medial borders.
  • Both scapulae should rest between T2-T7. The top middle “x” is T2 and you can see this person is below that point and in slight shoulder depression.
  • The medial borders themselves should rest between 1-3 inches from the spine.

If we only used static assessment it would be easy to assume this person is f****d. Many fitness pros would see this, hyperventilate into a brown paper bag, and immediately go into corrective mode.

But as Mike Reinold has poignantly noted time and time again:

“Statically, everyone’s shoulder blades start in a different position (elevated vs. depressed, internally rotated vs. externally rotated, abducted vs. adducted, anteriorly titled vs. posteriorly tilted, Autobots vs. Decepticons), and it’s moot to take static posture at face value.”

Besides, the above picture is of me, and when this was filmed/taken I presented with zero shoulder pain. This isn’t to imply I don’t have anything to work on, but it does showcase that static posture alone isn’t going to tell you all you need to know.

Integrative Assessment

Once we start adding movement – looking at scapulohumeral rhythm (the interplay between humerus and shoulder blade) or one’s ability to elevate arms above their head – sometimes, people self-correct really well.

What presents as “bad, “faulty,” or “shitty (<— depending on your rating system) statically, may very well be passable or very good once you add movement.

When looking at shoulder elevation/flexion, for example, does the scapula posteriorly tilt, upwardly rotate sufficiently (generally looking at 55-60 degrees of upward rotation), and does the inferior angle wrap around the thorax to the midline of the body?

This is something that can’t be determined if you’re only looking at static posture.

Dynamic Assessment

This is basically the part of the assessment where I ask the person to do stuff. Rather than boring someone to tears poking and prodding for an hour and making him or her feel like a patient, I prefer to get them moving and have them demonstrate certain exercises.

The push-up tells me a lot. Not only does it give me insight on their ability to move their scapulae (many times they’re “stuck” in adduction), but it also provides details on their lumbo-pelvic-hip control.

Because, something like this makes my corneas want to jump into a pool of acid:


Note: I understand the point of the video above was to purposely showcase a bad push-up. Mission accomplished.

More importantly, if someone comes to me with pain present, having them demonstrate how they perform certain exercises provides unparalleled understanding of what needs to be fixed.

A common theme I see amongst many trainees is allowing their shoulders to roll forward during execution of given exercises.

A Brief Review: when we elevate our arms above our heads the shoulder blades posteriorly tilt (hug the rib cage) and upwardly rotate. Reversing the action calls for scapular anterior tilt and downward rotation.

Many people “feed” into excessive downward rotation/anterior tilt by allowing the shoulders roll forward during common exercises like rows, push-ups, curls, and tricep press downs.

Stop It

https://www.youtube.com/watch?v=A9ytqrIf-dc


I Said, Stop It!

https://www.youtube.com/watch?v=47xXBhD7SuI


The “fix” here is easy:

Me to Client: “Okay, show me how you’d perform a standing cable row and tricep press down.”

Client: “Um, okay.”

[Then proceeds to emulate technique from the videos above.]

“Yeah, that hurts.”

Me to Client: “Stop doing them that way.”

[Puts client in a better position…shoulders rolled back with posterior tilt.]

Client to Me: “Wow, that feels so much better. You’re so smart and attractive.”

That’s Not All

What’s described above is in no way an exhaustive approach to shoulder assessment, but I hope it at least opened your eyes to the notion that it’s more multi-faceted than many give it credit for.

And on that note, I’d be remiss not to point people in the direction of guys like Eric Cressey, Mike Reinold, and Dr. Evan Osar.

Functional Stability Training – Upper Body is an excellent resource for more insight on shoulder assessment and corrective exercise.

Likewise, Dr. Osar’s Integrative Corrective Exercise Approach is an excellent resource.

And, pimping myself up a little bit, I cover the above and many other shoulder related topics in mine and Dean Somerset’s Complete Hip & Shoulder Workshop coming to the Toronto area in a few weeks (1 week left to take advantage of the Early Bird Special), Seattle, and two stops in Europe in May.

Go HERE for dates and to register.

CategoriesAssessment coaching

Become a Certified Speed and Agility Coach: Like, a Real One, And Not Just Someone Who Sets Up a Speed Ladder

Yesterday renowned speed and agility coach, Lee Taft, released his new course Certified Speed and Agility Coach (CSAC).

As the name implies, it’s a certification.

Eric Cressey wrote a well-written article yesterday on his blog elucidating the meaning of that word…certification.

Are certifications worth investing in? Which ones are the best? Which ones are the best around?


In strength and conditioning circles there are any number to choose from. And, much like Eric, the ones I gravitate towards and find have the most value are the ones that 1) fulfill a void or knowledge gap on my end and/or 2) stems from a source I respect.

Truthfully, unlike some fitness professionals, outside of those certifications that “govern” the industry from a professional market perspective (NSCA, ACE, NASM, ISSA, etc), I don’t latch onto any one certification so I can add letters next to my name and treat my LinkedIn account like a Pimp My Ride episode.

Lee’s Certified Speed and Agility Coach certification is the real deal.

1) You’re learning from a guy with over 25 years of coaching experience. That in of itself makes the cost (nay, investment) a no brainer.

2) You’re not just given a laundry list of drills and coaching cues, and BAM…you’re certified. You learn the WHYs behind the drills:

  • Why Lee uses specific progressions and the order in which he uses them.
  • Why he chooses certain correctives to place people into appropriate positions.
  • Why and how he periodizes things.

3) I’m personally making my way through the curriculum right now and can’t speak highly enough to the content and production quality. Going back to point #1, Lee’s an amazingly detailed and easy to follow-along coach.

4) It was filmed at Cressey Sports Performance using CSP coach, Miguel Aragoncillo, as the model.7I mean, do you honestly think CSP would allow itself to be affiliated with a less than stellar product?

Pfffft, no way!

Registration is live now at an introductory $100 off discount. If you’re like and find this sort of a material a “weak link” in your coaching arsenal or if you’re just looking for some amazing content to better yourself, look no further.

You can check it out HERE.

CategoriesAssessment coaching Exercise Technique rant

Why I Dislike the American Kettlebell Swing

To any overly patriotic or political zealots out there who may have misread, note the title does not say “Why I dislike America.”

To everyone else, notice too that the title doesn’t say “I hate the American kettlebell swing.”

Hate is such a strong word anyways; more appropriately reserved for things like Hitler, ebola, global warming, Gwyneth Paltrow playing the role of a health & fitness authority, poodles, and skinny jeans.

Oh, and side walk solicitors.8

No, I dislike it. Or maybe, “mildly need to resist the urge to jump through a glass door whenever I see it done.”

But not hate.

I’ll explain why below.

What’s a Kettlebell?

It first may be prudent to get some particulars out of the way. Like, for instance, explaining what a kettlebell is in the first place?

Well, that’s what’s Wikipedia is for:

The kettlebell or girya is a cast-iron or cast steel weight used to perform ballistic exercises that combine cardiovascular, strength and flexibility training. They are also the primary equipment used in the weight lifting sport of girevoy sport. Russian kettlebells are traditionally measured in weight by pood, which (rounded to metric units) is defined as 16 kilograms (35 lb).

In other words: it’s one of those “cannonball with a handle” looking thingamajigs that you see all those people at your gym pushing, pulling, hoisting, and tossing every which way in an effort to 1) perform a legitimate exercise such as a swing, get-up, snatch, clean & press, Farmer carry, amongst many, many others 2) perform an exercise that makes absolutely no sense for its intended design and/or use.

Like this:

Although, giving credit where it’s due, this is kind of badass. Albeit from a cost-benefit standpoint I see little upside.

And 3) to look cool. <— Research backs this up.

Kettlebells are a very useful piece of equipment, a piece of equipment I use often with my own athletes and clients, but I do find some people take an elitist attitude towards them to the point where things like barbells and dumbbells are considered obsolete or inferior (which I feel is an absurd stance to take).

It’s a minority take, but a take nonetheless.

The Kettlebell Swing

Splitting the conversation further is the swing; one of, if not the most popular exercise performed with a kettlebell.

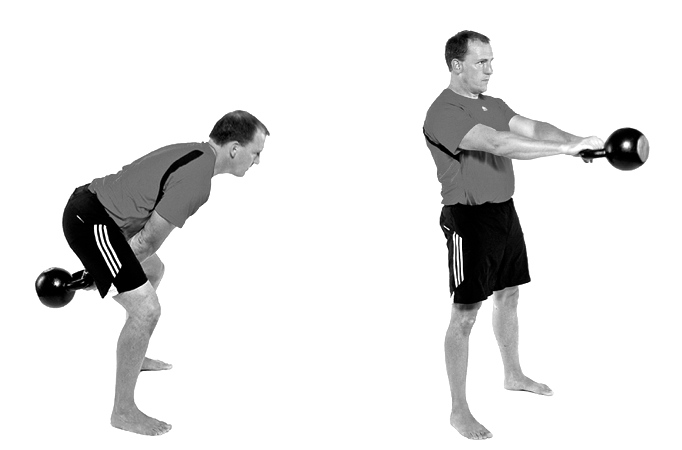
FMS and Strong First instructor, Brett Jones, showcasing the Russian Style (and I’d argue, correct) swing.

I’ve written several articles in the past expounding my take/approach to the swing and I’m not going to belabor my point(s) here. If interested you can peruse THIS, THIS, and THIS article. We can high-five later.

I’d also encourage you to seek out information from the likes of Dan John, Dr. Mark Cheng, Jen Sinkler, Neghar Fonooni, Gray Cook, and Iron Body Studios (Artemis Scantalides and Eric Gahan):


All the coaches/peeps mentioned above advocate the “Russian” style swing as opposed to the “American” style. To which I say, “Samsies.”

What’s the Difference?

Russian Style = less ROM, more vodka.

American Style = more ROM, because, why not? And, America!


There are adamant supporters in both camps, and both make solid cases for why their style is the style everyone should be using.

And, as far as internet pissing contests are concerned, it’s an “argument” that ranks right up there with the low bar squatters vs. high bar squatters, steady state cardio vs. HIIT cardio, meat eaters vs. vegetarians, and you better bet your ass this calls for a Rocky vs. Drago reference.

I have to say, though, the “American” advocates have a far less stellar rationale (it’s just my opinion of course) for their style.

Let’s discuss shall we?

My Case Against the American Style Swing

I posted the following question on Twitter yesterday:

Little Help: can anyone provide benefits/advantages for the “American” KB swing?

I received this well-thought out response (which made me chuckle):

“Looks more hardcore in METCON.”

However the bulk of responses fell in the line with:

“To practice the movement for CrossFit competition. Sport specific practice, in essence.”

“It is measurable in the context of the bell has to be fully extended overhead to be a rep is the only thing I can think of.”

It’s hard for me to counterpoint that train of thought. I get it, I respect it, and I can appreciate any “specificity” that’s involved. You don’t get better at swimming by riding a bike just like you don’t get better at American style swings by not doing American style swings (for competition).

CrossFit competitions are one thing (and even then, why?). Where I feel things get dicey are for those CrossFitters who don’t compete and when personal trainers/coaches start using the American style with their regular clientele who, again, don’t compete and more importantly, have poor movement quality…all because they watched the wrong YouTube video, or Jillian Michaels DVD.

Mind you, there are plenty (not a lot) of people who can perform an American style swing and not make my corneas bleed.

It’s a learned skill just like any other exercise – with a right way and wrong way to do it (I think) – and I’m sure it’s not too hard to find passable images on Google.

However, lets not kid ourselves…most people who do it end up looking like this:

Or this:

Maybe it’s the cynical coach in me speaking, but all I see is forward head posture, excessive lumbar extension (both primarily compensation patterns for limited shoulder flexion mobility; or the ability to get your arms over your head, and lack of lumbo-pelvic-hip control; or limited anterior core strength/stiffness), and a local physical therapist salivating.

And who knows: maybe the pics taken above were rep # 117 of a WOD, where technique is bound to take a hit. Either way, my back hurts looking at it.

I am not at all against people training overhead.

I just feel the vast majority of people need to earn the right to do it.

(Check THIS out for more details on that front).

Many people just don’t have ample enough shoulder flexion and/or lumbo-pelvic control to get their arms overhead without blatant compensations and (potentially) serious ramifications down the road – much less be competent enough to add load and repetitions (unfortunately, usually both).

Someone was kind enough to link to THIS article on Twitter written by CrossFit serving as a rebuttal to everyone else’s rebuttal that, for 90% of people 90% of the time, the American swing, and I’m paraphrasing here, fucking stupid.9.

See! An example of a better, “passable” American swing where the hips get through into more terminal extension. Understandably the criteria for a CF competition isn’t to get the hips through, it’s just whether or not the arms get overhead.

From the article itself:

“On first being introduced to the kettlebell swing our immediate response was, “Why not go overhead?” Generally, we endeavor, somewhat reflexively, to lengthen the line of travel of any movement. Why? There are two reasons.

The first is somewhat intuitive. We don’t do half rep pull-ups, we don’t do half rep squats, and we don’t do half rep push-ups. If there is a natural range of motion to any movement we like to complete it. To do otherwise seems unnatural. We would argue that partial reps are neurologically incomplete.”

I’ve already pointed out my disdain for assuming everyone can train overhead. It’s just not true, and I applaud any CF box or affiliate who take the time to properly screen their clients beforehand to better ascertain who can and cannot perform movements overhead…safely.

Shout-outs to Coolidge Corner CrossFit and CrossFit Resilience (two boxes I know screen their clients).

I almost shit a kettlebell when I read that second paragraph.

First off, every gym does half rep everything. Walk into any gym, anywhere, and you’re bound to see people “cheating” their lifts. Some lifts warrant partial reps – block pulls, Anderson squats, board presses, etc. There’s a ton of efficacy for partial ROM lifts, typically to address a technique flaw or weakness in one of the “big 3.”

But I’m sorry, CrossFit isn’t anything special, needs to be held to the same litmus test, and recognize that people cheat their lifts just as much there as in any other gym (commercial, collegiate, private, or otherwise).

All of that comes down to coaching anyways.

Secondly, You don’t do partial rep pull-ups?

Um, what the hell are kipping pull-ups then? They’re certainly not full- ROM. Puh-lease.


Here’s another doozy from the same article:

“From physics we know that the higher we lift something, and the more it weighs, the more “work” we are performing. Work is in fact equal to the weight lifted multiplied by the height we lift the object. Work performed divided by the time to completion is equal to the average “power” expressed in the effort.

When we swing the kettlebell to overhead, the American swing, we nearly double the range of motion compared to the Russian swing and thereby double the work done each stroke.”

Who says you have to increase ROM (and do more work) to make an exercise better? It’s the American way I suppose. We work more, take less vacation, and are otherwise stressed to the gills because we’re a-holes like that.

More is better, right?

With the swing – as with more conventional exercises like the bench press, squat, and deadlift – it’s not (always) about how much more work you can do (by increasing ROM) to make it better or harder or more effective. With the latter examples it’s about doing LESS work to improve efficiency and to take better advantage of one’s unique anatomy and leverages.

This is why many coaches advocate a low-bar position when squatting or why we tinker with deadlifting style to get the hips closer (laterally speaking) to the bar. Some do better with conventional deadlifts while others do better with Sumo. It depends.

Lastly, with regards to the American swing being more “powerful” compared to the Russian style I’ll defer to THIS excellent post by Mike Young on why that’s not the case.

I’ve also seen it argued that the American swing produces more force due to the increase in ROM. Sorry, but force output is more about forward motion, not up (the bell actually slows down the higher you go).

Not to mention – from a personal standpoint – I feel there’s more room for error with the American style swing. Taking compensation patterns and physical limitations out of the discussion, the increased ROM often lends itself to the bell traveling well below the knees for most people, which can lead to much more “stress” to the lumbar spine – something I’d like to avoid altogether.

Although the KB snatch is very similar, so I guess the real culprit is one’s ability to “clear” the hips and get overhead.

Additionally, I’ve heard stories of people losing the bell overhead, where it ends up flipping over and the bell falls.

In the End

This is not an attack on CrossFit or any coach who uses this particular style – relax. Far be it from me to tell any coach what he or she should be doing with their clients. If they want to coach their swings American style, have at it. They have their reasons.

It’s also not about pandering to which style is right or wrong. However I do feel the Russian style is more optimal and a better fit for most people. Why fix what isn’t broken?

All of this is my opinion – one it’s hopefully coming across in a respectful, “huh, that makes sense” kind of way – and as with anything in this industry the right answer as to whether or not the American style swing is a good fit for you is…it depends.

It depends if you compete in CrossFit. If so, I get it. I guess.

It also depends on whether or not you have the requisite shoulder flexion and anterior core stability to go overhead. Most people don’t.

It also depends on the cost-benefit. I argue there’s little upside to performing it. It does make your METCON finisher look more hardcore. Yay?

CategoriesAssessment

Assessment Protocols: There’s No One Right Way

We had a new crop of interns start up this week at the facility, and last night I had the opportunity to spend a little time with them to go over some “big rock” coaching cues and assessment protocols on the squat.

I only had 30 minutes with them and there’s obviously a lot to discuss with regards to the squat. I mean, people pay good money to spend entire weekends geeking out over squat mechanics, lever arms, and arguing over whether it’s better to squat with a low-bar position or high-bar.

So I did my best with the time given. I huddled them up in the corner of the facility, in front of a squat rack, and told them to KNEEL BEFORE ZOD!


Okay, that didn’t happen. But it may very well in the future…;o)

However, the whole 30-minute squat tutorial did happen, and one of the very first things that came out of my mouth was:

“There’s no such thing as one right way to squat.”

Some people do better with a high(er) bar placement on their back, some people will squat with a wider stance compared to others, and yes, contrary to what some blowhard coaches on the internet subscribe to…some people, due to their anatomy/hip structure, will not be able to squat past 90 degrees of hip flexion (or ass-to-grass in brospeak).

To hold everyone to such a standard is unrealistic at best, entirely ignorant at worst. That’s like me saying, “everyone should deadlift Sumo style” or “everyone should bench press with their heels down” or I don’t know, “everyone should be right handed.”

It’s dumb.

The conversation got me thinking about the topic of assessment and how, oftentimes, some coaches and trainers will marry themselves to one protocol or “one way” to assess their athletes and clients.

Now, don’t get me wrong: I wholeheartedly understand (and appreciate) that some demographics require specific assessment strategies to best ascertain what they’re unique needs are as it relates to the demands of their sport or profession.

I work with a lot of overhead athletes (baseball players) so it makes sense that, within the realm of their assessment and what’s important for them to be successful in their sport, I place a lot more scrutiny on their ability to upwardly rotate their shoulder blades, how much shoulder flexion they have, and whether or not they have ample segmental rotation.

However, how you go about assessing and what you look for in a gymnast will differ (in some regards) with how you assess a football player. And how you assess your everyday office worker/computer guy will most likely, in some ways, differ with how you assess a bomb sniffing dolphin trainer. It’s science.

In addition, there’s more of an onion to peel back and factors to consider once we start talking injury history (flexion based back pain vs. extension based back pain), training history, and goals.

In all, we could make the argument that no one assessment is the same given the plethora of sports, activities, hobbies, injuries, aberrant movement patterns, and training goals which exist amongst different populations.

Head, Shoulders, Knees Over Toes

I for one use and implement several assessment methodologies. You can plug in just about anything – FMS, PRI, SFMA, NASM – and I’ve likely used snidbits of each with the over thousands of assessments I’ve done throughout my career.

I think all are important, and all have their advantages and disadvantages. And, honestly, one of the advantages of working in the private sector is that I’m able to implement more of a smorgasbord approach to assessment if I so choose.

My assessments are more of a two-part show anyways:

1. The Poking and Prodding Part (which, not coincidentally, and unfortunately, is where many fitness professionals stop).

This is more or less the non-exercise static & dynamic assessment – testing things like shoulder flexion, scapulohumeral rhythm, hip IR/ER, glenohumeral ROM, toe touch, push-up, bodyweight squat, and, if need be, given a unique injury, performing more provocative tests to see what exacerbates their pain/symptoms.

The poking and prodding part (don’t be creepy about it) is an important part. It provides a lot of valuable information. I can implement screens that test passive ROM which essentially gives me feedback on their total ROM; but then it’s equally as important to include screens which test one’s active ROM which gives feedback on their available/usable ROM.

Lack of ROM isn’t always a mobility issue.


And while it’s not the case for everyone, many fitness professionals stop their assessment there – at the poking and prodding part.

Giving credit where it’s due: it’s amazing if they actually do this part. Many don’t even bother. It’s unfortunate, though, that this is the point where some stop. It makes me sad.

It’s only half the equation. It’s important to include the second part, too.

2. The “Lets Go Move Around and Lift Stuff” Part.

At CSP we’ll do the poking and prodding part and then go out on the gym floor and see what shakes free. I’ll often stay a fly in the wall and just see what people do without giving them much coaching. I want to see what their default movement patterns are when I say “deadlift that weight,” or “go pick that up.” It’s often uncanny how, what was perceived as wonky movement on the table, clears right up once someone is under load.

Too, the “pick stuff up” part serves as a way to give someone a little flavor for what to expect moving forward and get them excited to train.

How excited would you be walking into a new facility where, on day #1, all you did was stand there while a complete stranger “hmmm and ahhhh’d” for 60 minutes over your Thomas Test, told you how your left big toe doesn’t dorsiflex enough, your Zone of Apposition is all off, and that you’re going to perform a bunch of breathing drills?

Spending all that time telling someone how much of a walking ball of fail they are isn’t going to impress.

So yeah, get them moving!

Assuming they’re in the clear why not take a look at their deadlift (ability to hip hinge)? Or maybe take a look at their squat pattern with a barbell? You don’t need to go heavy, of course. But it stands to reason loading people up will offer a bevy of additional information.

Or maybe take a page out of Dan John’s latest book, Can You Go?, and implement some subtle performance based assessments/markers:

1. Plank – can they perform it (correctly) for two minutes? If not, well, they’ve got some work to do.

2. To the Floor and Back Up (I like this one a lot).

It’s just as it sounds. Tell someone to get down on the floor and back up. What do they do?

From Dan’s book:

Claudio Gil Araujo, who performed a study at the Clinimex Exercise Medicine Clinic in Rio de Janeiro, said being ablt to stand up from a seated position on the ground was “remarkably predictive” of physical strength, flexibility and coordination at a range of ages.

Araujo said, “If a middle-aged or older man or woman can sit and rise from the floor using one hand – or even better without the help of a hand – they are not only in the higher quartile of musculo-skeletal fitness, but their survival prognosis is probably better than that of those unable to do so.”


3. Farmer Carry

Have someone perform a loaded farmer carry for max time. Mark it down. When you re-assess a few weeks (or months) down the road and they’re able to carry a further distance, you know what you’re doing is working.

Dan’s Standards (from his Mass Made Simple book)

Bodyweight on left, load on the right:

– Under 135 pounds: 135 pounds.

– 136-185 pounds: 185 pounds.

– 186-205 pounds: 205 pounds

– Over 206 pounds: 225 pounds

For your “non-athlete” general fitness population clients the above suggestions are fantastic markers to get (and improve upon), and they probably won’t even realize you’re “assessing” them in the first place. Plus it adds more variety and fun to the overall process.

So in the end, there’s no ONE right way to assess. In addition there’s more to an assessment than having someone lie on a table and telling them how much their posture sucks.

Get people moving, people.

Want More?

Dean Somerset and I have already kick-started our Complete Shoulder & Hip Workshop tour in Edmonton two weekends ago. The feedback we received was amazing, and we’re excited to be hitting up various spots on North America soon:
ST. LOUIS: September 26-27th.
CHICAGO: October 17th-18th.
LOS ANGELES: November 14th-15th
I’ll also be doing a super special SOLO (1-Day) workshop in NYC at Legacy Strength located in Floral Park, NY. The workshop is titled Shoulder Assessment 101: Deconstructing Everything From Computer Guy to the Elite Athlete.
Date: Sunday, October 25th
Location: Legacy Strength, Floral Park, NY.
For more information contact Joey Olivo at: [email protected]
CategoriesAssessment Corrective Exercise Program Design

32 Random Thoughts On Training

A few days ago my good buddy, Mike Robertson, posted an article up on his blog titled 31 Random Training Thoughts. It was fantastic and you should take the time to read it. I liked the idea so figured I’d take some time today to toss my hat into the ring and showcase some of my own random thoughts as well. 32 of them. Because, you know bacon.

Starting with this amazing picture…

1. Agility ladders and foot speed drills work wonders on making people better at doing agility ladders and foot speed drills. They DO NOT (at least rarely) translate to better performance on the court/field/diamond/pitch. It’s crucial to actually coach athletes (young and old) to learn to develop force. These drills, along with anything involving cones (the more elaborate the geometric shape the better), which make parents oooh and ahhh, should not be prioritized. Especially for younger athletes.

2. And since we’re on the topic of developing force…it’s just as crucial to coach our athletes how to ABSORB force or decelerate their bodyweight. What good does it do anyone to have all this horsepower and not have the ability to put on the brakes?

3. Also, force development is vector specific. This is why we utilize ‘Heidens’ in many of our programs for baseball players, particularly pitchers:

https://www.youtube.com/watch?v=aOI1exR6pSk


4. The whole notion of “muscle confusion” is lame. Most people don’t need as much variety as they think. If you’re not squatting or deadlifting 2x your bodyweight (for reps) I doubt the limiting factor is your lack of use of chains or bands.

5. More than ever I am convinced that the reason many people miss a lift is due to a poor initial set-up.

6. To that point, the lats play a HUGE role in stability and upper back stiffness (which in turn equates to less energy leaks during a set). It’s difficult to be efficient at any of the “Big 3” without:

– Big lats.

– Learning how to better engage them.


7. Still having a hard time getting a “feel” for what it’s like to fire the lats during a deadlift? This drill may help:


8. One-arm dumbbell rows aren’t a great exercise to strengthen your scapular retractors. They are, however, the bomb when it comes to developing the lats. Just sayin….

9. Cuing someone to arch hard on a squat and to sit back is inefficient, especially for natural/un-geared lifters. Think: “belt buckle to chin” (posteriorly tilt pelvis), pull elbows together and forward (pull down on bar), push knees out, sit down (not back).

10. For the record: the above cue to posteriorly tilt the pelvis brings people from a state of excessive extension TO neutral. That’s a major difference compared to taking someone from neutral to more flexion.

11. Warm-ups should start ground based to standing to adding movement (linear or lateral).

12. By that same token they should start proximally (positional breathing, diaphragm) to distally.

13. Is this not the most baller groomsmen photograph ever taken?

14. People hate doing pause squats, but dammit if they don’t make everyone’s squat numbers go up.

15. A common mistake that people make when bench pressing: not letting the bar settle. Meaning, after receiving a handoff don’t immediately descend the bar towards the chest. Rather, let the bar settle by placing your shoulder blades in your back pocket (posteriorly tilt, lats engage) and gather your bearings before you lower.

16. I’ve repeated this quote several times but I love it so much I’m going to repeat it again.

“When you start throwing a baseball with only your arm, then we’ll worry about doing only arm care exercises.”

Eric Schoenberg, PT, owner of Momentum Physical Therapy in Milford, MA

17. Despite popular belief, you can perform a Turkish get-up with a dumbbell.

18. Speaking of get-ups I like to include them as an extended warm-up. Do this:

– 10 KB Goblet Squats

– 10 KB Swings

– 1-2 KB Get-ups/side

Three rounds. Now go em Tiger!

19. Also, if I were you I’d err on the side of QUALITY for your get-ups rather than how hard you can make them. Progression on these isn’t necessarily about how heavy you can go, but how “effortlessly” you can perform them. Dr. Mark Cheng can perform 48 kg Get-ups; he chooses to stick with 24 kg for the bulk of his training.

20. When assessing shoulders don’t only look at anterior/posterior imbalances (traditional upper cross syndrome), it’s equally as important to look at superior/inferior imbalances (scapular upward/downward rotation).

21. Scapular stability is more or less a misnomer. There aren’t any significant bony structures to warrant a ton of stability. Instead, as Sue Falsone notes, a more appropriate term would be controlled scapular mobility.

Here’s a good drill for that: Band Wall Walks


22. Alignment matters. Always.

23. If you stretch in mis-alignment (think: hip flexor stretch when someone stays in excessive APT) you create more instability. If you strengthen in mis-alignment you create more muscular imbalances.

24. Women: if you want to get better at chin-ups/pull-ups you need to train them more than once per week. Follow the lead of Artemis Scantalides of IronBody Studios: train them 4-6x per week.

Monday: Flexed Arm Hangs/Hanging Leg Raises
Tuesday: Chin-ups or Eccentric Chin-Ups (Rule of 10): 3×3, 5×2, 2×5, etc
Wednesday: Band Assisted Chin-Ups
Thursday: Flexed Arm Hangs/Hanging Leg Raises
Friday: Chin-ups or Eccentric Chin-Ups (Rule of 10): 3×3, 5×2, 2×5, etc
Saturday: Band Assisted Chin-Ups

25. Guys, you suck at chin-ups too. I’d listen to Artemis as well if I were you.

26. Don’t be afraid to include some more athletic movements into your training. Jumping, skipping, sprinting will improve your general day-to-day activities. Even if the most athletic thing you do is gardening….;o)

27. To that end, you don’t need to go 100% with your sprints. I like 60-70% effort “tempo repeats” (40-60 yds) for most general fitness clients. Also, if you cranky knees, sprint uphill. You’ll thank me.

28. Instead of embarking on a “fat loss” plan, focus your efforts towards a performance based goal. I find diverting efforts towards something more quantifiable leads to better long-term success. The amount of work and effort it takes to achieve said goal, assuming it’s realistic and attainable10, more often than not results in the aesthetic markers many people covet.

29. Push-ups are a very UNDERrated exercise. Some cues I always use:

– Squeeze glutes, brace abs (both help to posteriorly tilt pelvis which prevents excessive lower back arch).

– Spread fingers as wide apart as possible and think about “cork screwing” the floor apart. This will create more external rotation torque in the shoulders and provide more stability.

– Chest should hit floor first.

30. Not everyone is meant to squat ass-to-grass. We need to respect anatomy. Hip structure is different person to person, and you’re an a-hole if you hold everyone to the same standard. Some people are built to squat deep (and generally will have limited hip extension), while others are meant to deadlift a bulldozer (and might not be able to squat past 90 degrees). Some people can dominate both and we all hate them.

31. Passive Tests = provides information on one’s available/total ROM. Active Tests = provides information on one’s ROM they can use. If someone tests great passively yet as limited active ROM it’s most likely a stability issue. Don’t always assume it’s lack of mobility.

32. Stop doing kipping pull-ups. Seriously, stop.

CategoriesAssessment Corrective Exercise Program Design

Is Corrective Exercise Overrated?

We got a doctor in the house!

Today’s guest post comes courtesy of Dr. Evan Osar, a Chicago based chiropractic physician and coach, and someone I’ve been a huge fan of since reading his first two books Form and Function and Corrective Exercise Approach to Common Hip and Shoulder Dysfunction.

His latest resource (a course, really), The Integrative Corrective Exercise Approach, is available starting today and is something I believe will add a ton of value to any fitness professional looking to take his or her’s assessment and programming skills to a higher, dare I say, Jedi’esque level.11

Is Corrective Exercise Overrated?

These days it’s hard to read an article or view a video about exercise without the mention of corrective exercise. Like many things in our industry, corrective exercise has its fair share of proponents as well as detractors. And there are plenty of facts and fictions about how to define corrective exercise and actually what it is.

FYI: Despite what Google says, this isn’t corrective exercise

In this article I am going to explain our concept of corrective exercise and dispel one of the biggest myths surrounding it.

I will also share with you how to integrate corrective exercise to improve the success you are already having with your general population clients. Because when you understand what corrective exercise is – as well as what it isn’t – you can create dramatic changes in your client results by implementing some very simple principles and key concepts into your programs.

Lets Do This

The first thing we need to discuss prior to covering the most common myth is to define the term corrective exercise. While it may seem like an issue of semantics, similar to other industry terms like ‘functional training’ and ‘core training’, corrective exercise takes on a variety of different meanings depending upon whom you speak with.

It’s important to recognize that our clients have developed their own unique and individual strategy for posture and movement. This strategy has been influenced and driven by many factors including but not limited to:

  • Things they have learned throughout their life such as adopting posture and exercise cues from their parents, therapists, and/or fitness professionals.
  • Compensations they have developed as a result of previous injuries, traumas, and surgeries.
  • Their lifestyle – sitting at a desk, the types of exercises they do and/or have done, how active they are or aren’t.
  • How they have been taught to exercise (for example many individuals have been taught to over-brace or grip as their primary stabilization strategy).
  • Their emotions or how they generally feel about themselves or their situation in life

These factors directly contribute to your client’s habits, which then dictate their current postural and movement strategy.

These habits are how your clients will perform most things in their life.

They will generally use this habitual postural and movement strategy when they sit, stand, walk, do their job, and exercise. It is these habits – actually their non-optimal habits – that lead so many individuals to develop chronic tightness, muscle imbalances that inhibit optimal performance in many of their activities, and which eventually lead to pain syndromes.

Because they become so engrained into their nervous system, most individuals are not even aware of these habits. This is why it is becomes so challenging to alter chronic posture and movement habits – they have been imprinted into their nervous system.

This is where we believe corrective exercise can play a vital role as part of an overall training system.

In our paradigm, we view corrective exercise as a strategy that consists of a thorough assessment so that you can:

  1. Identify the key factors contributing to an individual’s current postural and movement strategy.
  2. Utilize specific release and/or activation techniques to address the individual’s primary issues that are driving their chronic problems or loss of performance.
  3. Incorporate the principles of the Integrative Movement System™ – alignment, breathing, and control – into the fundamental movement patterns of squatting, lunging, bending, rotating, pushing, pulling, and gait so the individual can accomplish their health and fitness goals.

In other words, we view corrective exercise as a strategy – rather than a series of exercises – to help individuals develop and maintain a more optimal postural and movement strategy so that they can accomplish their health and fitness goal whether they be to exercise at a more intense level, develop a strategy for dealing with their chronic muscle tightness, or simply to live life with greater ease and less discomfort.

With an understanding of what corrective exercise is, it is also important to understand what corrective exercise is not.

Corrective Exercise Is Not:

  • A ‘fix’ for your client’s postural dysfunction, muscle imbalances, and/or pain.

  • A method for making individuals do their exercises in a ‘perfect’ way.

  • A group of remedial exercises that a client performs to undo the effects of performing inappropriate exercise (allowing clients to perform exercises in which they can’t maintain their alignment, breathing, and control).

  • A diagnosis or substitute for a thorough evaluation by a qualified health care professional.

  • A substitute for a well-designed integrative strength training program.

Note From TG: I really like that last point.

https://www.youtube.com/watch?v=oTY8bE6C1bs


Now that I have defined what it is and what it is not, here is the most common myth I hear surrounding the concept of corrective exercise:

Corrective Exercise ‘Fixes’ Postural Dysfunction and Muscle Imbalances

This is by far the biggest myth surrounding corrective exercise and the statement that its detractors most often bring up. This myth commonly stems from within the health and fitness industry because we like to make BOLD claims and then promise equally BOLD results.

We often claim things like:

1. ‘Everyone has a tight, short psoas’ from sitting too much so do this stretch and strengthening exercise (insert the novel stretch and strengthening exercise here) and you’ll fix everyone’s back pain.

2. ‘Everyone has forward shoulders from working on the computer so have your clients stretch out their pecs and strengthen their rhomboids and lower trapezius with some Y’s, T’s, and W’s and you’ll solve all your client’s shoulder problems’.

3. ‘Here’s the ‘best’ movement screen so you’ll know exactly what’s causing your client’s problems’ and here’s the corrective exercises to ‘fix’ those problems.

Making BOLD statements and promising BOLD results gets people to open the most recent blog or video post.

Making BOLD statements and promising BOLD results gets people excited that they have discovered ‘the answer’ to their clients issues.

However making BOLD statements and promising BOLD results also makes people lazy about performing their own assessments and determining the best exercises for the individual that they are working with.

Because the Truth Is:

  • Yes, some people have a tight psoas and weak glutes… and many do not. And for those individuals in the latter group, stretching their psoas and strengthening their glutes actually perpetuates the very problem causing their low back pain.
  • And yes, many individuals have forward shoulders and inhibited rhomboids and lower trapezius…and many do not. Doing Y’s, T’s, and W’s for example however do not even address the most common cause of the forward shoulder so again, these exercises will perpetuate and/or create an entirely new issue in your clients.


  • Finally, there is no magic screen or assessment that will tell you all you need to know about your client. You need to perform a series of assessments, combine them with your client’s intake and functional goals, and then determine where you would start with them. Then you must find the exercises that work best for your clients that help them address their biggest issues and how to incorporate these components into a well-designed program.

Conclusion

Corrective exercise is not a series of exercises designed to diagnose or identify the ‘fix’ for your client’s issues.

It is a strategy for implementing a thorough assessment, implementing the appropriate releases and/or activation sequences so that your client can achieve optimal alignment, breathing, and control, and then integrate these principles into the fundamental movement patterns and/or your client’s functional goals.

Used judiciously, corrective exercise is a part of an overall training strategy designed to look at your client as an individual and provide them with a viable option for successfully addressing their issues while working towards their functional goals.

Corrective exercise should enhance and not deter from developing greater strength, mobility, endurance, or other objective outcome. When you understand and integrate a successful corrective exercise strategy, you will help so many clients who have been struggling with chronic issues, safely and effectively accomplish their individual health and fitness goals.

About the Author

Audiences around the world have seen Dr. Evan Osar’s dynamic and original presentations.  His passion for improving human movement and helping fitness professionals think bigger about their role can be witnessed in his writing and experienced in every course he teaches.

His 20-year background in the fitness industry and experience as a chiropractic physician provide a unique perspective on corrective exercise and fundamental training principles for the health and fitness professional that works with the pre and post-rehabilitation, pre and post-natal, baby boomer and senior populations.

Dr. Osar has become known for taking challenging information and putting it into useable information the health and fitness professional can apply immediately with their clientele. He is the creator of over a dozen resources including the highly acclaimed Corrective Exercise Approach to Common Hip and Shoulder Dysfunction and the Integrative Corrective Exercise Approach.

CategoriesAssessment Program Design

When To Progress an Exercise: Muscle Confusion is Wack

“How do you know when to progress an exercise whether it be increasing load or implementing a different exercise altogether?”

This is a question I receive a lot from other trainers and coaches, as well as many of the athletes and clients I work with on a daily basis.

And to be honest there’s no one clear-cut answer. As is the case with any question asked the appropriate response is…it depends.

What do you want for dinner tonight? It depends.

Who are you going to vote for in 2016? It depends.

Where should we go on vacation? It depends.

What do you want to watch tonight on tv? It depends. But if it’s Downton Abbey I’d rather swallow live bees.

The above examples aside, when it comes to anything related to fitness, and especially with regards to exercise and weight selection, the default answer is always…it depends.

There’s a cacophony of factors that need to be considered, including but not limited to one’s training history, experience, injury history, training schedule, equipment availability, work ethic, not to mention any number of specific goals and needs that need to be taken into consideration.

All factor in and play an important role in designing a training program.

Speaking from a generic vantage point I do feel there’s an easy answer to the question.

1. How To Progress Load

Lets use an example I think everyone reading can relate to. Have you ever been working with a certain weight on any exercise and crushed it, only to increase the load 5, 10, maybe 15 lbs. and it seems as if gravity increased tenfold? The weight doesn’t budge. Or if it does it’s infinitely more challenging?

What gives?

Simple.

You haven’t “earned” the right to increase load yet. You haven’t performed enough repetitions at “x” to increase to “y”.

I get it: Progressive overload is KING.  It behooves all of us to make a concerted effort to try to increase load (increase sets or reps or both, or decrease rest intervals) – to do more work – each and every week. I think this is a fantastic approach and something many trainees often overlook in lieu of the more sexy or unconventional answer.

It’s not the lack of chains, or bands, or some lost Eastern Bloc Undulated Block Periodization set/rep scheme written in Elvish that’s the reason you’re not getting stronger or making progress.

For whatever reason many people resort to long division or Common Core for the answer when all they needed to do was add 2+2.

Or, in this case…add more weight to the bar.

But even that simple approach will only go so far. And this is what occurs when we add 5-10 lbs. to the bar and it’s as if a giant magnet is underneath the floor.

Stick with the lower weight. Stay there. Own it.

You’re not any less of a human being or the spawn of Satan if you perform an exercise with the same weight for multiple weeks in a row. Life will go on.

For further reading on progressive overload check out my article on BodyBuilding.com on the topic HERE.

2. When to Progress An Exercise?

The answer to this is a little trickier and a bit more murky. Without getting too far into the weeds I find that most trainees (and even worse trainers/coaches) suffer from exercise ADD.

The market is saturated. Walk into any commercial gym and you’re likely to see anywhere from 10-20 head shots of personal trainers near the front desk all highlighting their certifications, education, and how long they’ve been eating Paleo.

Who to choose?

Far be it from me to tell you. While I attempt to answer that question HERE, it’s hard to say with any certainty what you’re getting when you hire a personal trainer. There are plenty who look amazing on paper who end up making people do shit like this:


And this is what I mean when I refer to exercise ADD. Because the market is so saturated many trainers resort to gimmicks and smoke & mirrors (and use buzz words like “functional training” and “core” and “balance”) to separate themselves from the masses.

Weeeeeeeeeeeeeeeeeee.

The more “gimmicky” and against the grain a trainer appears, sadly, the more attention they get. Goblet squats just aren’t as sexy as whateverthef*ck is being demonstrated above is.

Personal training has become more about entertainment and one-upmanship than getting people results and helping them become more autonomous.

READ: the goal of any trainer should be to educate and make it so their client DOESN’T need their services.

I mean, look at a program like High Performance Handbook (which is representative of many of the programs we write at Cressey Sports Performance). There’s not a ton of variety involved. Yet, people get results.

Of course there are outliers and trainers/coaches who don’t fit into this mold. But those are few and far between. In this day in age “success” is defined by Facebook likes and Twitter followers than it is by experience and being able to actually coach someone through a deadlift.

To that end, to answer the question:

1. Read THIS article by CSP coach, Tony Bonvechio, which gives some insight on how to choose the best accessory exercises.

2. I’d argue most people don’t need as much variety as they think they do. The whole notion of muscle confusion and that you have to switch up exercises every few weeks irritates me. For most people this makes no sense because rarely do they allow themselves enough time to learn and “own” the exercise to be able to perform it efficiently.

Alas, they make very little progress.

I’ve used this analogy before, but with program design (especially when the goal is to get stronger) I think of things as a diamond.

At the bottom are your beginners, and at the top are your advanced and high-level competitive clients/athletes. Neither need a ton of variety in their training.

Beginners need to learn and master the basics – squat, hinge, lunge, push, pull, carry, skip, swing, side-shuffle, etc.

Advanced trainees/athletes need to be concerned with their competitive lifts and/or because they’re so strong, don’t require a ton of variety (or stimulus) to maintain that strength.

In the middle, however, are the intermediates. Not coincidentally this is where most of us (even myself) reside.

It’s here where we can be a little more Willy Wonka(ish) and immerse ourselves in the crazy, zany world of variety.

So in many ways how you “progress” an exercise will be dictated by where someone resides in the diamond.

NOTE: I’ll be covering this very topic in more detail at the Elite Training Workshop here in Boston on Saturday, August 1st.