CategoriesExercises You Should Be Doing

Exercises You Should Be Doing: Dumbbell Squeeze Press

A little over a week ago I posted an article titled My Pecs Could Win a Fight Vs. a Tank Are Compound Movements Actually Making You Stronger?

In it I made the case that:

1) Compound movements (deadlift, squat, bench press, rows, chin-ups, etc) should encompass the base for most weight training programs regardless of goal(s).

2) We’re very good at compensating. I.e., not doing shit correctly.

3) Bionic Six was the most underrated Saturday morning cartoon of the 80s.1

4) As such, sometimes, it requires that ISOLATION exercises need to be given more priority because the “targeted” muscles may not be getting the stimulation required to grow (and hence, get stronger).

Nevertheless I went into some detail that, ever since I started including more isolation movements for my pectoral muscles like DB chest flyes, I’ve seen a nice jump in not only my bench press performance, but the “feel” of the movement too.

Meaning, the quality of my reps have improved and I feel more confident with a given weight which I may have been struggling with only weeks prior.


Suffice to say, the assiduous journey to becoming more “pecy” – and including more isolation type work into my training programs (thanks to my coach, Greg Robins) – has paid off. Today I wanted to highlight another exercise I’ve been using more often of late (and, admittedly, it’s always been a favorite of mine).

Dumbbell Squeeze Press


Who Did I Steal It From: I can’t remember. I’ll say Chuck Norris just because.

What Does It Do: I’ve long championed the notion that the bench press isn’t a fantastic exercise for pectoral development. Yes, the pecs play a role in completing the movement – and by all means, they do get stimulated – however, the bench press is more of a FULL-body movement that many people give it credit for.

A lot of other “stuff” comes into play – technique, technique, upper back, not to mention leg drive. The pecs, when all is said and done, aren’t going to get hit optimally during a standard bench press.

If you factor in basic anatomy of the pectoral (major) muscle, you’ll notice it has attachment points on the clavicle (clavicular head) as well as the sternum (sternal head).

Again, during a bench press the pectoral muscle will be engaged, but I’d make the case not nearly to the degree as compared to dumbbell variations (where more humeral ADDuction comes into play).

Whenever I work with someone who has more aesthetic minded goals, of course I’m still having him or her bench press (I still want to use exercises which allow me to better overload the “system” or body as whole), but I’ll go out of my way to include more DUMBBELL work into their programming.

1) We generally see more ROM during dumbbell variations.

2) They’re more “shoulder friendly” in that we’re not locked into humeral internal rotation as what happens when using a barbell (pronated grip). DB variations allow more wiggle room for external rotation.

3) More humeral adduction is present (which hammers the sternal head).

4) We can also, if need be, address any imbalances that may be present between one side or the other.

I really like the squeeze press, though, because it hits 2/3 points above, but also increases time under tension of the pectoral muscles while also hitting the delts (anterior, middle) pretty hard too.

Key Coaching Cues: It’s pretty self-explanatory. Grab two dumbbells, assume a normal position on a flat or incline bench, then squeeze those bad boys together, and press.

Keep them pressed together throughout the duration of your set. Your pecs will be on fire.

Also, some people have a tendency to “fall” into anterior humeral glide on these so it’s important to cue “chest up” or “chest meets the DBs” during the set.

NOTE: performing these with hex-shaped DBs would be ideal as they’re easier (safer?) to squeeze together. However, you could use round shaped DBs too, or PowerBlocks (as I did in the video)…it just may feel a little more wonky.

I like these as an accessory movement – after a main bench movement – for high(er) repetitions (10-15 range).

CategoriesExercises You Should Be Doing

Best Articles of 2015: Exercises You Should Be Doing

This will be the last rendition of “Best of” anything for 2015.

Unless I change my mind of course, and do a “Best Cutest Pictures of My Cat 2015” 0r “Best Shirtless Pics of Me While Washing Dishes 2015.”2

There’s still a few days left in the year, anything can happen.

Note: Not a picture of my cat, but super cute nonetheless.

My Exercises You Should Be Doing series is always a popular one, and today I highlight some of the best “new to you” exercises/drills that I discussed this past year.

Enjoy!

Hinge Row

This was one of the later editions to the series in 2015, but probably the most popular.

If there’s ONE lesson to learn it’s this: the shoulder blades NEED TO MOVE people.

Band Resisted 1-Legged Hip Thrust

Hip thrusts are an excellent exercise, but a humbling one. Here’s a more advanced variation I love using with some of my athletes and clients.

Hover Deadlift

Lack of getting (and maintaining) tension is crucial component many trainees fail to appreciate when it comes to cleaning up their technique.

This drill is a great way to help people not suck….;o)

Bulgarian Split Squat to RDL

Looking to spice up your single leg training? I didn’t think so.

But if you are, this exercise may be right up your alley.

Wall Windshield Wiper & Wall Walk

1. Both these drills are great at addressing scapular upward rotation, in addition to strengthening retraction and posterior tilt.

2. Also, these two drills, when performed correctly, will make even the manliest of men cry. I show-off these two drills whenever I speak and it never fails to get a good laugh from me at how humbled many people become.

Categoriescoaching Exercise Technique Exercises You Should Be Doing

Exercises You Should Be Doing: Hinge Row

Mike Boyle was once quoted as saying:

“Most trainees can never really do enough (horizontal) rowing.”

I tend to agree.

It’s no secret most guys (and girls) are mirror-centric, often training the muscles most easily viewed when staring into a mirror – pectorals, shoulders, biceps, abdominals, and the tranzipidous3

It’s also no secret most guys (not so much girls) often skip leg day

Whenever I audit a program it’s amazing to me the ratio of pushing exercises compared to pulling. I saw one program recently that, when broken down into it’s parts, looked like this:

Push (benching variations): 45 total sets

Pull: 7 total sets. And none of them were horizontal in nature. All were the obligatory handful of sets of lat pulldowns – more glenohumeral internal rotation – tossed in for good measure.

And this person was wondering why their shoulder was bothering them. Weird.

Horizontal rowing variations (think: inverted rows, seated rows, chest supported rows, 1-arm row variations) do a superb job at targeting the upper back – specifically scapular retraction – which often helps to offset or counteract the muscular imbalances and injuries seen with too much pressing.

Moreover, horizontal rowing offers many aesthetic advantages and I’m pretty sure it’s a well known scientific fact it also cures gonorrhea4. And a bad hair day.

For all the accolades and hoopla, horizontal rowing does have a dark side and is not immune from scrutiny or interrogation from the technique police.

As I covered in THIS article a few months ago, I do feel there’s a common flaw in how many people perform their row variations.

More people are rowing: Yay!

More people are rowing incorrectly:

So today I wanted to share a variation I’ve been using with many of my own athletes/clients which helps to address the technique flaw discussed in the link above (<— seriously, you should read it).

The Hinge Row


Who Did I Steal It From: This exercise is nothing new (and it is one I’ve used sporadically in the past), but it wasn’t until I watched a video from Jordan Syatt where I had a better appreciation for it’s value.

What Does It Do: The fatal flaw many people make with their rows is that they keep their scapulae (shoulder blades) “glued” together the entire time. They’ll perform their first repetition by squeezing their shoulder blade(s) together (retraction/adduction) – which is correct – but then keep them there throughout the duration of the set.

You need to let those bad boys move.

By not letting them move – think: shoulder blade should move around the rib cage – the bulk of the motion comes form the glenohumeral joint alone (often leading to anterior humeral translation, and hence instability) in addition to leading to rhomboid dominance and the risk of scapular downward rotation syndrome.

A sort of “reverse posturing” if you will.

As a result the shoulder blades can’t effectively upwardly rotate, which exposes the shoulder to a whole host of other issues and makes performing activities overhead difficult.

And makes this kitten sad.

The hinge row allows for more scapular movement – particularly upward rotation.

Key Coaching Cues: You’ll set up as you would for a normal suspension trainer (TRX, Jungle Gym, rings) row with the body in a straight line. Maintaining a straight/rigid torso you’ll pull the shoulder blades together keeping chest up. On the way down, however, instead of maintaining the rigid torso you’ll allow a “hinge” at the hips when your arms are fully extended and lower them to the ground. Basically, you should feel a subtle stretch at in the bottom position.

This allows the scapulae to upwardly rotate, which is money.

Of Note: This can also be performed if you don’t have access to a suspension system, like so:


If you notice, I have a pad on the bar to serve as a target for my chest and to prevent myself from going too far into glenohumeral extension.

I like this variation, but I prefer the former because it doesn’t lock me into a pronated (overhand) grip which then locks me into internal rotation.

The suspension system allows for a little more wiggle room with regards to external rotation of the shoulder.

Of Note (again): you can easily make this exercise more challenging by 1) elevating the feet onto a platform (box, bench) or by 2) adding an external load with either a weight vest or by placing chains across the hips.

Don’t be too quick to jump to the progressions. This exercise is every bit about the QUALITY of movement as it is about anything else. And if I catch wind of anyone adding a “kip” to this, I’ll punch you in the face.

CategoriesExercises You Should Be Doing

Exercises You Should Be Doing: Band Resisted 1-Legged Hip Thrust

Guess where I’m going this morning?

No, it’s not the gym (that’s later). No, it’s not the grocery store (again, later). And no, it’s not Tom Brady’s house (only in my dreams).

I have to head to the RMV this morning to get my driver’s license renewed.

(Cue sarcastic “yay” here)

I can think of a bazillion things I’d rather do than spend a few hours at the RMV:

  1. Take a piano lesson.
  2. Eat sawdust.
  3. Jump into a shark’s mouth.
  4. Listen to a John Tesh cd.
  5. Talk about my feelings.

Alas, it has to be done. I haven’t had an updated picture on my license since 2006 when I first moved to Boston (and when I still had some hair). So, in the unlikely event that you don’t hear back from me due to my life being sucked dry of every ounce of enjoyment and reason to live, remember I love you all.

I need to hit up the RMV early this morning, so today’s post is going to be quick and to the point. Here’s a cool, new hip thrust variation I’ve been using myself and with my own clients.

Band Resisted 1-Legged Hip Thrust


Who Did I Steal It From: You’d assume Bret Contreras, and you’d be wrong. I actually “stole” this idea from my boy, Dean Somerset.

What Does It Do: Outside of making badonkadonks bootylicious, I like this variation because it allows for some semblance of loading hip extension

Admittedly, the band doesn’t add a ton of resistance. But it’s juuuuust enough to make it worthwhile, especially for high(er) rep sets. This is a great way to kick your hip thrusts up a notch – especially for those who don’t have access to a hip thruster or who find setting up band resistance with a bunch of DBs on the floor too cumbersome.

Key Coaching Cues: For starters, slow the frick down. The biggest mistake I see most people make with hip thrusts in general is that they go too fast. The movement ends up being all in the lower back and not in the hip/glute.

I like to cue the shoulders to be externally rotated as I feel it helps to “open” people up. I also cue “head should follow the hinge.” As in: don’t just let your head/neck crank back the entire time. As you hinge and your torso moves, your head should follow.

Take a resistance band (I’m only using a 1″ jump-stretch band in the video), double loop it, and wrap it around the bottom of your foot and your thigh.

Foot stays flat on the floor and be sure to push THROUGH THE HEEL. Keep a controlled tempo and “feel” the glute fire at the top. Pause for a 1-2s count and repeat.

As noted I like to perform these for high(er) reps – 12-15/20. The resistance of the band isn’t going to feel like much to start, but once you get up there in reps you’ll learn to appreciate it.

CategoriesExercises You Should Be Doing

Exercises You Should Be Doing: HBT Overhead Press

What the WHAT!?! I know what some of you may be thinking:

“Did Tony just recommend an overhead exercise?”

For all intents and purposes, I’m 100% against overhead pressing right? What the hell has happened? Has the world flipped on itself?

This is analogous to Donald Trump showcasing an ounce of humility, or Kanye West not being an asstard, or, I don’t know, the Jedi and Sith hugging it out.

There’s part truth to the statement above. I’ve said it before, and it bears repeating here:

“People need to earn the right to overhead press.”

Most (not all) people have the movement quality of a rusty crowbar. I’m not even sure that’s makes a ton of sense, but I’m rolling with it nonetheless.

Okay wait, people move like shit. That’s better.

Due to a litany of reasons – poor t-spine mobility, poor lumbo-pelvic-hip control (weak core), overly kyphotic posture (computer guy) or excessive extension (most athletes and meatheads), both of which affect our ability to upwardly rotate our scapulae, global warming – many of us have lost the capacity to move our arms over our heads (pressing or otherwise) without serious compensation patterns and increased risk of injury.

I’ve written on the topic in the past – HERE – and I’d be remiss not to mention that, because I’ve worked with overhead athletes almost extensively for the past eight years, I play the conservative card a bit more that other coaches with regards to total frequency I allow my athletes/clients overhead press.

It comes down to risk-reward.

I’m not against overhead pressing. I understand and respect it’s a fantastic way to build total body strength – particularly upper body strength. And, if we’re going to hop onto the “functional training” caravan I’d much rather see people get brutally strong with overhead pressing compared to bench pressing.5

That said it’s rare when someone walks in on day #1 and passes THIS screen which helps me ascertain whether or not overhead pressing is a good fit.

Even if it’s not, I can still include a variety overhead pressing variations that are more “shoulder friendly.”

Like:

1-Arm Landmine Press

Bottoms-Up KB Side Plank

And Even the Turkish Get-Up (<– links to article on MensHealth.com)

But lets say all systems are a go for overhead pressing. There isn’t a lengthy history of shoulder issues and the person standing in front of me demonstrates ample movement quality with limited restriction(s).

Lets overhead press our faces off.

HBT Overhead Press


Who Did I Steal It From: Dr. Joel Seedman from THIS article printed on T-Nation not too long ago.

What Does It Do: HBT = Hanging Band Training.

It’s exactly what is sounds like. You take some bands, hang some stuff off them, and do stuff. Because, science.

While at first glance it comes across as a bit gimmicky, HBT training does have a fair amount of efficacy. As Dr. Seedman explains in the article linked to above, the oscillatory characteristics of this brand of training provides a unique training stimulus that challenges stabilization, increases core demand, helps “excite” the CNS, and also has a bit of carryover to muscle gain due to the increase in time under tension.

Key Coaching Cues: Don’t be a hero. You won’t need a lot of weight with this exercise to make it challenging. In the video above I looped two 1″ resistance bands and hung a 12 kg kettlebell from each side. That was plenty.

The idea here is to keep the bar quiet.

You want to go slow. If you go too fast, the KBs start flying all over the place and you’ll inevitably collapse to the floor like a game of Jenga.

Take a deep breath in before you un-rack the bar and then exhale all your air until you feel your ribcage depress. Owning that position take another deep breath in and focus on getting 360 degrees of expansion.

Un-rack bar.

Maintain abdominal brace, squeeze glutes, and press – under control – keeping the bar quiet. Don’t be surprised if you end up using a tempo akin to 2-3s up and 2-3s down.

I actually like the idea of being forced to use less weight on the bar as it forces the trainee to focus on technique. But the increased time under tension will more than make up for it.

You don’t have to limit yourself to one band per side, but I also feel it’s a bit over-kill to use more. You also don’t have to use KBs. Plates work fine too.6

I consider this more of an accessory movement, so high(er) reps is the way to go. Think: 8-10.

Give it a try today and let me know what you think.

CategoriesExercises You Should Be Doing

Exercises You Should Be Doing: 1-Arm Low Cable Row

Point to someone with a monster bench press, deadlift, or squat and I’ll point to someone who has monster lats.

They’re a massive muscle with an expansive cross-sectional area spanning the entire (upper) backside. Don’t take my word for it, just peruse any anatomy book and notice all the attachment points: vertebral attachments (T6 to the sacrum), ribs, pelvis, scapula (<– not everyone), and humerus.

Aesthetically there’s no question having a big set of lats will win you a few bodybuilding shows and more than a few glances from onlookers.

However there’s very little talk on how having big lats – or, more to the point, having the ability to activate the lats to increase tension and stabilize the spine – can help improve performance in many of the big lifts.

One drill we’ve been using at Cressey Sports Performance recently to help in this regard is the 1-Arm Low Cable Row.

1-Arm Low Cable Row


Who Did I Steal It From: giving credit where it’s due, CSP coaches Greg Robins and Tony Bonvechio were the ones who started tinkering with the standard Standing Cable Row we use often at the facility and lowered the positioning of the (cable) arm to better increase activation of the lat.

What Does It Do: I just told you! It activates the lats to a higher degree. GOSH. It’s like you don’t even listen to me anymore.

You know what, stop. Don’t “babe, I’m sorry. I didn’t mean it” me. You know what you did. You know I don’t like it. And…wait, what’s that? You found a kick-ass, fan made, fake Boba Fett movie trailer?

What were we talking about again? Right, the low cable row.

Key Coaching Cues: Set up as you would a normal standing cable row, albeit in this case you’ll set the “arm” at a lower angle in relation to the body.

From there all the same rules apply: athletic stance, feet shoulder width apart, chest up, don’t allow shoulder to “roll” forward, etc. Think about rowing/pulling your elbow to your hip (elbow still shouldn’t go past the midline) and pause for a 1-3s count. You should definitely feel a difference with the lat turning on to a higher degree.

If you don’t, you’re weird….;o)

NOTE: I also like to cue people to start with a pronated (overhand) grip and as they “row,” rotate the handle to a neutral position.

Return back to starting position, but be sure to allow the scapulae to protract forward around the ribcage. You don’t want to “glue” it down the entire time.

While I wouldn’t go out of my way to use this drill with overhead athletes (who are generally stuck in extension and overly lat dominate, which affects their ability to upwardly rotate the scapulae), this is an awesome drill to use to help people learn to “engage” their lats to a higher degree, which in turn translates very well to better performance with the “Big 3.”

It’s a subtle tweak, but something worth giving a try.

CategoriesExercise Technique Exercises You Should Be Doing Strength Training

The Most Underrated Exercise in Strength and Conditioning? It’s Not Deadlifts.

While I can’t say it’s always been the case (I’ve grown less dogmatic and immature as a coach the older I’ve gotten7, I operate under the guise that every exercise has its time and place.

Except for maybe this one.

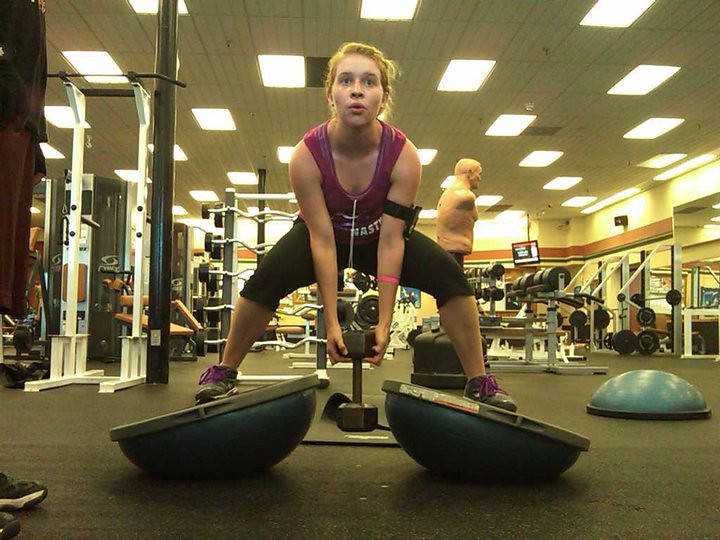
If she were juggling a pair of chainsaws while standing on the BOSU balls I could see myself giving a nod of approval.

I used to scoff at any coach or trainer who had the audacity to have his or her client leg press instead of squat.

Roll my eyes whenever I saw leg extensions or leg curls programmed.

And don’t even get me started on the gym coat rack Smith Machine.

I was a gym snob through and through. Borderline douchey. I still am to a small degree. But I’ve toned it down considerably as the years have passed.

I mean, for what it’s worth: I’ve actually been including more low intensity aerobic training in my own training (and that of my athletes), which is something I would have punched myself in the face for in the not so distant past.

I’d like to think of it as a form of evolvement on my end. More to the point, I’m not so singular in my train of thought on any given topic8 In short: I’m more open and less of a dick.

In fact, my thoughts on the topic mirror that of Bret Contreras (in THIS post):

“If there’s one movement that I absolutely loathe, it’s the “movement” that attempts to convince readers to avoid certain exercises altogether.”

Flipping the script, though, rather than waxing poetic on exercises not to do, today I wanted to instead discuss an exercise I feel is vastly underrated and underutilized.

Dare I say…most people reading should make it a point of doing it more often.

(Double) Anterior Loaded KB Front Squats


This is an exercise I’ve been using for years at Cressey Sports Performance and have always understood its benefits. I’ve used it with many beginner and intermediate lifters, and for those who feel they’re above this exercise and think they’re “too elite,” I’d defer to strength coach, Joe Kenn, who uses it exclusively with many of his NFL athletes too.

Side Note: I’d encourage you to listen to his interview on Mike Robertson’s Physical Preparation Podcast HERE.

Why I Heart This Exercise

1. I’m not an anti-back squat guy. We incorporate it – and it’s many iterations – at CSP often. I do feel there’s a cost-benefit to the exercise and that it has to be paired well to the athlete/person given their injury history, training experience, and overall goals.

Having said that, the Anterior Loaded KB Front Squat (from now on referred to as ALKBFS because I’m lazy and don’t want to type it out every time) lends itself to be a much more “back friendly” variation that most anyone can do on day #1.

The fact the load is more anterior (and not directly over the spine) seems an obvious advantage.

2. The ALKBFS elicits an almost unparalleled “core” challenge. Because the load is more anterior, one must fight like crazy not to tip over.

I.e., this is an excellent drill to help teach/coach people to maintain t-spine extension. You’ll still want to encourage a flexion moment, but because this variation encourages more extension it allows people to stay more upright.

It won’t take much to humble even the strongest back squatter. I’ve seen numerous trainees (both male and female) second guess their weight selection.

3. Moreover, for those with upper body imbalances or mobility issues – which may make back squatting difficult – the ALKBFS is great option. If someone doesn’t have the requisite shoulder abduction/external rotation ROM it doesn’t make much sense to slam a square peg into a round hole.

Of course we can utilize a Safety Squat bar, a giant cambered bar, or even have them perform a traditional barbell front squat, which makes the aforementioned imbalance moot. However, I encourage you not to disregard this movement just to be a contrarian.

4. Another reason why I like the ALKBFS so much is that it can transform or melt itself into more of a “hybrid” exercise if one so chooses.

Who’s to say we couldn’t transition from a KB clean to a squat? Or a KB clean to a squat to a press? Or a KB clean to a squat to a press to an overhead farmer carry? Or a KB clean to a squat to a press to an overhead farmer carry to sniper roll off a loading dock, Jason Bourne style?

The possibilities are endless.

You could even perform them offset style:


Give them a try today and let me know what you think.

CategoriesExercises You Should Be Doing

Exercises You Should Be Doing: Hover Deadlift

Anyone who’s read this site for any length of time knows I have an affinity for several things:

1. Matt Damon9

2. LOLCats10

3. Beef Jerky11

4. Star Wars.12

5. Deadlifts13

With regards to strength and conditioning there’s probably no one topic I’ve written about more than the deadlift.

And, as it happens, I’m currently working on a project for the Personal Trainer Development Center I feel will end up being one of the most thorough (and entertaining) resources on the deadlift ever written.

It’s tentatively titled Deadlift – catchy, right? – and based off my initial draft, looks as though it will run the length of a Dostoyevsky novel. Or a Bret Contreras blog post.

So keep your eyes peeled for it within the next few weeks. Fingers crossed.

And on that note I have a new exercise you should try.

Hover Deadlift


Beard!

Who Did I Steal It From: Massachusetts based strength coach, Mike Perry. You should check out his website Skill of Strength. Amazing stuff on there.

This is an excellent drill for newbies learning to deadlift correctly.

What Does It Do: For me the biggest mistake many people make when it comes to performing the deadlift is taking a haphazard approach to their setup. The key is to get (and MAINTAIN) tension throughout the duration of the lift (or set).

Ever watch someone deadlift and immediately see their upper back rounding or the their hips shoot up first? This is usually indicative of lack of tension (or the weight is too heavy, but the sake of brevity lets assume the former).

The Hover Deadlift is a simple (and quite ingenious) way to help teach someone how to get tension in their lats/upper back, and more importantly to MAINTAIN that tension throughout their rep/set.

Key Coaching Cues: I used two kettlebells in the video above, but you could just as easily use one if that’s how you roll.

Stand directly above the bells, push your hips back, knees out, and try to melt the handles in your hand(s). This last cue will help teach you to pack your shoulders.

Instead of standing straight up with the weight, you’ll first “hover” an inch or two above the ground. This will ensure you maintain tension in the lats/upper back to prevent rounding (and so that the bell doesn’t move away from the body).

Lock out at the top, squeezing glutes hard.

Return back to the ground, hovering again 1-2 inches above the floor before coming to a complete stop.

Reset and repeat for 6-8 repetitions.

CategoriesExercises You Should Be Doing

Exercises You Should Be Doing: Bulgarian Split Squat to RDL

I’m always intrigued on why certain exercises are called what they’re called. Take the Turkish get-up for example.

I understand there’s a bit more panache in naming the Turkish get-up the Turkish get-up than say, “hold a cannonball looking thingamajig in your hand and stand up,” but seriously: why is it called the Turkish get-up and not the Cambodian get-up or Floridian get-up or the Elvish get-up?

Okay, elves don’t exist. You got there.

There’s actually an answer to this question (and is something I’ve written on before), courtesy of Dr. Mark Cheng:

It seems back in the day, and I assume present day too, the Turks were kind of badass. I forget what term Mark used, but he described the form of grappling they typically trained their warriors in, and how they used to do so all oiled up.

You know how hard it is to grip or grab something that’s all wet or sweaty, right? Well imagine that, only 100x more challenging and 1000x more filled will sexual innuendo.

Anyways, waaaaaaay back in the day, in order to even be considered “man enough” to train and to learn how to fight the Turks made it a prerequisite you had to perform a get-up with close to a 100 lb kettlebell (give or take a few lb’s). While fighting a grizzly with your free hand!

Okay, I made that last part up….but still. WTF!!!!!

And that’s more or less the back story of the Turkish get-up.

So what’s the deal with Bulgarian split squats?

I’m sure there’s some legit reason with a very rationale and simple explanation, but my suspicion is that the reason why Bulgarian split squats are called what they’re called is because your mom doesn’t love you.

Or, I don’t know, maybe some meanie head Bulgarian was a bully and not only stole the lunch money from the person who actually invented the exercise – most likely from a neighboring country like Macedonia, Greece, or, in the ironies of all ironies, TURKEY – but stole the exercise too!

Whatever the case, while there’s the Rear Foot Elevated Split Squat camp (doesn’t roll off the tongue so easily), most people refer to the exercise as Bulgarian split squats. It is what it is.

Which brings us to today’s Exercise You Should Be Doing.

Bulgarian Split Squat to RDL


Who Did I Steal It From: renowned coach and fitness educator, Nick Tumminello. I “stole” this exercise during his presentation at the SUNY Cortland Strength & Conditioning Symposium this past March.

What Does It Do: This is a “hybrid” exercise which combines two exercises into one and makes you hate life 4x as much.

I like to use this exercise with clients who are in more of a “time crunch” with their training sessions or for those who just want to perform something challenging and smoke their legs.

Key Coaching Cues: As is the case with any single-legged exercise, I operate under the assumption that most trainees go too heavy and sacrifice quality for quantity.

While quality of movement should always be stressed, with single leg work in particular I find many people go too heavy and fail to reap any real benefit from the exercise other than to say “wow, that was really, really, really hard.”

I could wax poetic and bullet point any number of benefits to single leg work: hip stability, pelvic control, core stability/strength, addressing strength deficit between limbs, “sport specificity,” so on and so forth.

But lets just assume I’m preaching to the choir.

Because this is a 2 for 1 type of exercise you’ll need to go lighter than you think. You’ll want to stay cognizant of rib position during the set (limit rib flair, maybe a slight forward lean on the split squat portion), and the torso should stay as rigid as possible (no leaning to one side or the other).

Perform a standard BSS where the anterior surface of the thigh dips below knee level, and when you return back to the top position perform an RDL, where you hip hinge into the standing leg. The RDL portion will feel a little wonky to start, but with some practice you’ll get the hang of it.

I prefer to keep repetitions fairly low, in the range of 4-6 reps PER SIDE (which is really 8-12 reps because you’re performing two exercises).

Give it a try and let me know what you think.

CategoriesExercises You Should Be Doing

Exercises You Should Be Doing: Wall Windshield Wipers & Wall Walks

You could say we know shoulders at Cressey Sports Performance.

Because we work with a ton of overhead athletes (and a lot of meatheads who have the uncanny ability to extend “bench day” to 4x per week), we’ve taken it upon ourselves to learn everything there is to know about the shoulder. Give or take.

Everything from assessment and corrective exercise strategies to program design and effective ways to soften the blow when you tell someone with limited shoulder flexion that performing barbell snatches probably isn’t a good fit for them (“Dude, you can’t lift your arms above your head!”)…it’s all in a days work at CSP.

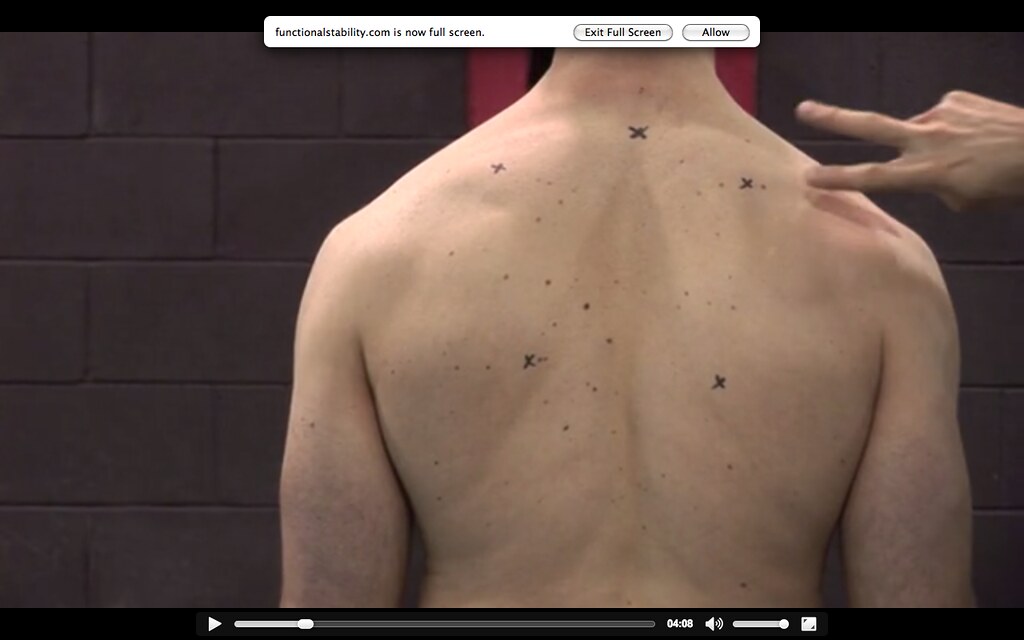
Take the picture above for example.

To the untrained eye that looks like a normal, beefy back.14 Those “x’s” you see aren’t some weird, hipster, tribal tattoo whateverthef***. Nor do they reflect some kind of pentagon fetish.

They’re actually marks used to highlight “landmarks” of the scapulae. The outer x’s mark both the superior and inferior border of the medial border of the scapulae.

A few things to note:

1. Scissor hand didn’t chop off this person’s head.

2. The right shoulder is lower (which plays into some of the “predictive” patterns you’ll find under the Postural Restoration Institute philosophy).

3. On BOTH sides you’ll note the inferior border is INSIDE the superior border, speaking to more of a downwardly rotated scapulae.

4. You’ll also note more of a “depressed” presentation of the entire shoulder girdle/complex (notice the sloped shoulders?). An easy way to ascertain this information is to compare where the AC joint lies in relation to the SC (sternoclavicular) joint.

In a “normal” presentation, the AC joint is (typically) 1-1.5 inches above the SC joint. In this example it’s even (see pic below).

[Note: I put “normal” in quotations because even if someone presents as “normal,” that doesn’t mean they’re in the clear or that they’re not symptomatic with pain. The person above had no pain. But it’s clear, statically, that they present with less than ideal alignment. What a loser!]

Don’t worry: that loser is me.

Abs.

Anyways, the example above was just to prove a point:

1. I can spell scapulae correctly.

2. Shoulder assessment sometimes takes a keener eye for detail.

3. It served as a nice segue to today’s Exercises You Should Be Doing.

When working with overhead athletes (and pretty much everyone for that matter) there’s a group of criteria we’re generally (not always) trying to address:

Lack of scapular upward rotation (and subsequently poor eccentric control of downward rotation), poor external rotation strength, lat dominance, poor shoulder flexion, classic Upper Cross Syndrome (shortened muscles anteriorly, lengthened/weak muscles posteriorly), poor tissue quality, alignment issues, and gluten intolerance…because, why not?

Gluten is blamed for everything else nowadays.

The two exercises below are two that I “stole” from physical therapist Sue Falsone, and are ones that provide a lot of bang-for-our-corrective-training-buck with regards to improving shoulder function, performance, and health.

Wall Windshield Wipers


What Does It Do: Helps strengthen/activate posterior cuff, helps with driving more scapular posterior tilt, strengthens glenohumeral external rotation, and provides a nice stretch to the anterior musculature (pecs, namely) which are often short/stiff.

Key Coaching Cues: It’s important to OWN RIB POSITION <– something I discuss HERE). What you don’t want to happen is to drive through lumbar hyperextension and allow the ribcage to flair out too a large degree. This creates a poor zone of apposition, which then starts a cascade effect where we start talking about the Posterior Mediastinum and how over-extension will “inhibit” our nervous system and affect diaphragmatic function.

It’s a deep, dark, rabbit hole that I don’t want to get into here. Just don’t do it…mmmm kay?

Chin stays tucked. Wrist must stay neutral throughout. Pretend like you’re making the number “11” with your arms.

Also, be sure to protract away from the wall which will help activate the serratus anterior.

You want to drive movement through the elbows. If you drive through the wrists they won’t stay neutral, and you fail at life.

There won’t be a ton of ROM here, so don’t judge this exercise by how much distance you achieve. The bread and butter of this exercise (to me at least) is protracting away from the wall, attaining the posterior tilt of the scapulae, and then CONTROLLING the return back.

Band Wall Walks


What Does It Do: I consider this a progression from the Windshield Wiper, albeit in this context we’re trying to drive more scapular upward rotation and learning to control, eccentrically, downward rotation.

Key Coaching Cues: Much the same as above. Watch for lumber hyperextension and owning rib position. Start with your arms emulating the number “11,” protract away from the wall, provide a bit of external rotation to the band, and then “walk” your arms up gradually.

Don’t go too high!

I like to tell people to stop when their elbows reach eye-level. From there work your way back to the starting position by CONTROLLING the movement; don’t just allow your arms to fall back down into position.

With both exercises I’m more inclined to do these as part of an extended warm-up, as their own corrective approach, or as a “filler” in between sets of squats or deadlifts.

Windshield Wipers: sets of 8-10 reps

Wall Walks: sets of 3-5 “walks” (up and down).

Give them a try today and let me know what you think.