Categoriesmobility Program Design

A Warmup You’ll Actually Do and Makes Sense

I had an amazing time in the DC area this past weekend presenting and catching up with friends and colleagues.

Today is all about playing catch up: emails, writing programs, and of course spending some quality time with family. I’ve got some good blog posts percolating in my head and hope to do a massive writing dump later this week. In the interim, however, I’ve got strength coach George Kalantzis filling in for me today with a stellar article.

Enjoy.

Copyright: magiceyes / 123RF Stock Photo

Un-Fuck Your Warm-Up

Like anything worth having in life, all good things have a starting point.

If you’re like me, you’ve probably been guilty of skipping the warm-up. Don’t bother lying to me – I know you’ve done it. And I get it. You’re crunched for time and the last thing you want to do is roll around and warm-up.

But, what if I could explain the warm-up for you in terms you might appreciate a bit more…

I.e.,……sex.

BOM CHICKA BOM BOM

Do I have your attention now? Great, then keep reading to un-fuck your warm-up.

I got this idea from my mentor and friend John Romaniello a few years back, and it has to be the best explanation of warm-ups I have ever heard and something I find myself using quite often.

Workouts are like sex, and the warm-ups are foreplay.”

Sure, you can skip foreplay and have great sex, but if you skip foreplay all the time, chances are things will get stale and your sex life will suffer.

The same thing can be said about your body. Continuing to ignore the warm-up will cause your body to break down, hinder your results, and you’ll become more prone to injuries.
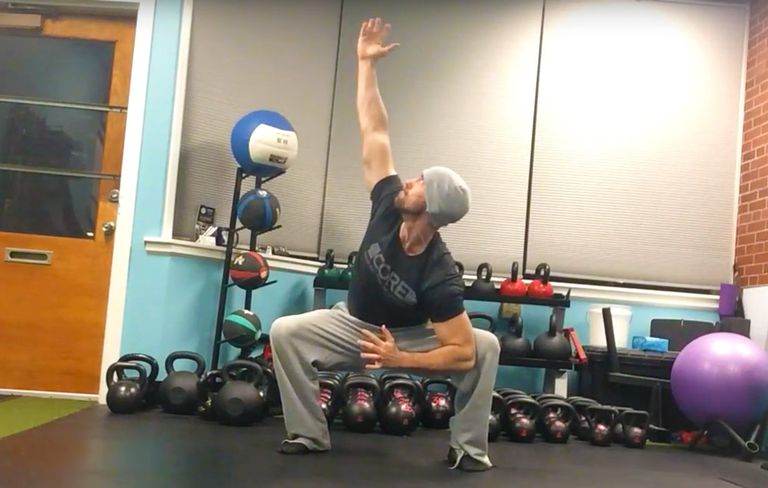
Maybe warming up does not sound that bad after all.

While I’m not here to tell you that you can’t just walk into the gym grab an empty bar and start lifting or to tell you that you “must” foam roll and do a “dynamic” warm-up prior to your lift.

I’m here to say that warm-ups do matter and with the right time and concentration you can get tremendous benefits without wasting useless time.

The Only Warm-up You’ll Ever Need

Recently I attended The High-Performance Pain Seminar by Dr. John Rusin at The Onnit Academy in Austin, TX. It was a 2-Day seminar packed with a ton of great information.
There were so many things presented, but what I liked most about his presentation was his ability to make things a lot simpler for my clients and myself. One of those concepts was the warm-up.

A quick and effective warm-up looks like something like this:

  • Release tight muscles (SMR, Bi-Phasic stretching)
  • Activate weak or inactive muscles (corrective exercises, stability based activation)
  • Get Moving (pattern development, central nervous system stimulation)

For the context of this article and not writing an entire book, I will be covering a few of my favorite SMR techniques and drills that everyone can benefit from.

Release Tight Muscles

As a massage therapist, I’m a huge fan of foam rolling. But too often I see people making love to their rollers or just perhaps haphazardly rolling because they’ve seen coaches do it.


Replace Eric’s (Cressey) voice with a little flute and guitar and things could get interesting.

While there are many ways you can “foam roll,” the goal should be to choose an area that will have the biggest carry over to your movement that day.

In general, most people have trouble with the following areas.

Lower Body – Quadriceps, Adductors, Glutes, and Lateral Hip

Upper Body– T-Spine, Pectoralis Group, Posterior Shoulder Girdle

Mid/Upper Back Release

The mid-back release is one of my favorites mobility drills to use as everyone can benefit from some upper back mobility. Tony wrote an amazing article on it HERE.

Lateral Hip Trigger Point Release

The glutes take a beating daily, and trigger points are a common source of hip and low back pain. Performing daily release on the glutes can make a huge impact on everyday health and performance.


Bi-Phasic Stretching

One of the common myths associated with stretching is that if a muscle feels tight, it should be stretched to improve range of motion and restore flexibility. But, just because your muscle feels stretched doesn’t mean that exercise will yield a positive result.

Take for example the hip flexor and hamstring stretch. A lot of people stretch through pain because they believe it is helping, or do they end up in the wrong position. Not only is this a waste of time, it can actually be one of the prime reasons tightness never goes away.

So what can you do to help with tight muscles?

Instead of haphazardly stretching, learn how to achieve proximal stability through the shoulders, hips, and core. Not only will this save your joints and you’ll feel better, you’ll begin to notice a difference when you hit the gym floor.

Most people will benefit from biphasic stretching in the following areas:

Lower Body– Hip Flexors, Adductors, Posterior-Lateral Hip

Upper Body– Pectoralis Complex, Posterior Shoulder, T-Spine/ Lats

Add These Drills To Your Arsenal

Deep Squat Belly Breathing With Lat Stretch x 5 Breaths

Grab a TRX and sit deep into a squat with your feet together and palms up. This will turn off the lats and facilitate a good stretch throughout the upper body. Let your head relax and take deep breaths.


Split Stance Adductor Mobilization With T-Spine Rotation x 6-8/side

I see a lot of people mess this drill up.

Set up on all fours, kick your leg out to the side, and screw your palms into the ground to create tension throughout the body. Rock back slightly until you feel a slight stretch in your adductor (inside leg). Make sure not to round your lower back.


True Hip Flexor Stretch x 30-45 seconds/side

The key here is to sit tall, squeeze the glutes forward and make sure that your spine stays neutral rather than achieving a range of motion through the lower back.


Supine Hamstring Stretch x 6-8/leg

Take your time with this drill. Don’t worry if you cant get your leg straight, just work in a range of motion and a nice controlled manner.


Activate Weak Muscles

After you’ve addressed the areas of mobility, its time to activate and enhance movement.The goal here should be to find the big-ticket items that will enhance movement for the workout, not become a corrective guru.

Movement needs to be good enough, not perfect. Choose big areas that will yield optimal ranges of motion and force production.

Most people will need work in the core, glutes/hips, shoulders, and lats.

Banded Glute Bridge 8-10 Reps


Shoulder Activation x 10 Reps ( Facepulls, Band Pull Aparts, Lat Pulldowns)


Get Moving With CNS Development

After you’ve released tight muscles and activated everything, it’s now time to select a few exercises that will match the primary movement of the workout and wake everything up.

For example, if the workout is based on a heavier deadlift day and you are a bit more advanced, choose something like this:

Explosive drill – Swings, jumps, throws etc

Mobility Drill


If you were more of a beginner, it would look something like this:

Half Kneeing MB Chest Pass


Mobility Drill


In Summary

 If you want to maximize your performance and keep your body healthy in the long term, warming up is a must-have component of your workouts. Instead of spending useless time rolling around for countless minutes and just performing exercises haphazardly, spend about 5-7 minutes on exercises that will have the biggest carry over for that day and you’ll begin to not only see a huge improvement in your strength, but also your health.


Author’s Bio

George is a Marine Corps Veteran of 9 years and was awarded an honorable discharge after deployments to Iraq and Afghanistan. He is currently a Master Instructor and Personal Trainer at Equinox in Boston and a licensed massage therapist.
Outside of Equinox, George maintains a fitness related blog that can be found at www.sgtkfitness.com.
He and his wife Shawna reside in Manchester, NH with their daughter Melina and fur baby Lola the dog.
Categoriescoaching Corrective Exercise mobility

It’s a Warmup, Not a Social Hour

I arrived back to Boston late last night from London and I’d like to say I woke up today well-rested and ready to wow everyone with some witty fitness prose.

I’d like to say that.

Not gonna happen today. I’ve got a ton of emails and programs to catch up on, but that doesn’t mean I don’t have any content prepared for you today. Andrew Millett, good friend and Boston based physical therapist/strength coach was kind enough to send along this baller post today.

You’ll love it.

Copyright: undrey / 123RF Stock Photo


It’s a Warmup, Not a Social Hour

I got the idea for this post after recently attending the Advanced Warm-Up and Recovery Workshop put on by Matt Ibrahim and Dr. John Rusin.  I didn’t know what new things I may learn at the workshop, but after taking pages of notes and getting new ideas for my clients and patients, it was definitely worth it.

You walk into any gym or fitness facility and you will see people warming-up on the bike, treadmill, elliptical, or maybe even rolling around on the foam roller.  It is great to see people putting in the time and effort to consciously warm-up their musculoskeletal, nervous, and circulatory systems prior to engaging in their exercise routine.

The key word in that last statement is:

Consciously

Too many times, people warm-up without any direct goals or agenda in mind.  They hop on one of the aforementioned cardio machines and watch TV or read a magazine and aimlessly pedal or step until they think they are ready to exercise.  If they are on the foam roller, they probably roll around on it like they are rolling out pizza dough or look like a boy scout trying to start a fire with 2 sticks.

When you are working with a client or are performing a warm-up in your own gym routine, there needs to be a specific goal in mind while warming-up prior to your exercise session.

First off, we need to assess our clients to see what areas they may be lagging in.  Here are a few quick and easy tests to see if there are any areas that need to be targeted for some type of self-myofascial release.

Ankle

In the sagittal plane, the ankle needs to be mobile.  It needs to be able to plantar-flex and dorsiflex for the demands of life as well as demands in the gym.

In order to perform a squat without compensations, the ankle must be able to dorsiflex and allow the tibia to translate anteriorly as the person descends down in the bottom position.  To determine if someone has adequate ankle dorsiflexion, try the Knee to Wall Test.

Knee to Wall Test


You instruct the client to place their foot on the tape strip.  On the tape strip, there are 4 lines, each 1-4 inches away from the wall.

Start with the client’s foot on the “4” line.  Four inches is required for adequate dorsiflexion in order to perform the squat.

Tell the client to try and touch their knee to the wall without letting their heel come up.  Also, make sure they are going into valgus or varus movements at the knee to potentially compensate for lack of dorsiflexion.

If someone cannot reach from the “4” line, then have them move up and determine where they can reach from.  Then test the opposite side.

If they cannot reach, ask them where they “feel it.”  If they feel they can’t go any farther due to tightness in the back of their ankle, then we know that some of the soft tissue structures on the posterior aspect of their lower leg could be to blame.

For that, some type of self-myofascial release (SMR) to the soleus, posterior tibialis, flexor hallucis longus/flexor digitorum groups could help to improve range of motion at the ankle.


If they feel a pinch on the anterior aspect of the ankle, that could potentially be a joint mobility dysfunction.

Try a Banded Ankle Mobilization.

Start by placing a thick superband around a post or squat rack; something that can’t move.  Then place the band at the ankle joint, just inferior to the medial and lateral malleoli.  Place a good amount of tension on the band.  While maintaining this tension, recreate the same movement as if you were performing the knee to wall test.  Go as far as you can comfortably go.  Hold for 2-3 seconds when you can’t go any farther.  Return to the starting point and repeat for 6-10 reps.

Then retest the Knee to Wall Test.

If it improves, then we know the Banded Ankle Mobilization worked.  Whether it improved or not, it might be wise to refer out to a licensed healthcare practitioner to further assess the ankle to determine what may be limiting that motion.

If there has been an improvement in ankle mobility, we want to be able to control that “new found” mobility.

Try the Heel Raises with Single Leg Eccentric.  I first saw this from Dr. Ryan DeBell of The Movement Fix.


Key Points:

– Perform the movement slow and controlled.

-When your foot is are parallel to the ground, slightly flex the knee and go slow and controlled towards the ground.

-Imagine like you are slowly pulling your heel to the ground.

Hip

At the hip, we need to determine a few different areas of mobility.  Starting in the sagittal plane, we need to determine if the client has adequate hip extension.  If the client doesn’t have adequate hip extension mobility, they will have a more difficult type using their gluteal musculature to perform some of the movements we ask them to.

In addition to not being able to effectively activate and use certain muscles, lack of hip extension mobility can place increased stress on the lumbar spine and the knees, as well as some other more distal joints.  By ensuring the client has adequate hip extension mobility, then we know some of the other joints of the body will be able to function properly.

To determine if someone has adequate hip extension mobility, we have two different options.  First off, you can perform the ½ Kneeling Hip Extension Test.

VID ½ KNEELING HIP EXT TEST

Have the client place one knee down on a padded surface and the other knee up.  Instruct them to contract their gluteus maximus on the down leg side, brace their abs, and slowly bring the hips forward.

We ideally would like to see 30 degrees of hip extension on the trail leg.  You can use the Inclinometer App on the Iphone to measure the angle.

You can also perform a Thomas Test.  This is a test that is typically taught in physical therapy schools to determine hip extension mobility.

*Disclaimer*:  First off, you need to ask your client if they are okay with you placing your hands on them to assess their hip mobility.

Thomas Test


Self Thomas Test (and Sick Beats)


You are going to have the client lie supine on the side of a table or bench.  Have them hold their knee at 90 degrees of hip flexion, or at hip height.  Place your thumb on their Anterior Superior Iliac Spine (ASIS).

Using your other hand, slowly lower the leg the client is not holding with their hands.

If you can lower their leg to the level of the table and their ASIS does not translate anteriorly, then we know they have adequate hip extension mobility.

If you lower the client’s leg and their ASIS DOES translate anteriorly prior to the leg reaching the level of the table, then we know there is some muscle group limiting hip extension.

To determine, which muscle group, then we need to change the position of the lower leg.

If we extend the knee and perform the same test, this will place tension on the Psoas and Iliacus muscle groups.  If you lower the leg with the knee extended and the ASIS translates anteriorly, then we can determine Psoas and Iliacus are to blame for decreased hip extension mobility.
If we lower the leg and the ASIS doesn’t translate anteriorly, then the only other muscular group to blame would be Tensor Fascia Latae (TFL).

To test for this, we slightly abduct the hip and perform the same test.  If the ASIS translates anteriorly, then we know TFL is to blame.

If we run through all of these tests and each test with the knee extended doesn’t cause anterior translation of the ASIS, but when the knee is flexed it does, then we can determine that Rectus Femoris is to blame.

To improve hip extension mobility, try SMR to whichever area you determine to be problematic.

SMR w/ Lax Ball to Iliacus/Psoas & TFL


SMR to Rectus Femoris


SMR to Vastus Lateralis & TFL

Then re-test to see if any of these SMR variations improved the client’s hip extension mobility.

Once someone’s hip mobility has improved or is normal, we want to make sure they can stabilize in that mobility.

The Cook Hip Lift is a great movement for accessing and stabilizing hip extension mobility.


Key Points:

-Place a ball in your hip crease.

-Use non-stance leg to keep ball in hip crease.

-Lift hips up off ground.  Do not let ball fall out

-Perform for 8 repetitions per side.

Thoracic Spine

The thoracic spine is another area of the body that needs adequate mobility.  If it doesn’t present with adequate mobility, areas of the lumbar and cervical spines and the shoulder can be affected.  It is one of the most influential areas of the body because of the impact it can have on so many different areas.

To determine if your client has adequate thoracic spine mobility, it is best assessed in quadruped using the Quadruped Thoracic Rotation Test.

Normal thoracic rotation in the general population should be 50 degrees.  To measure this, use the Inclinometer app and place it ½ way between both shoulders on the thoracic spine.

When you are passively bringing them through the movement, make sure there is no lumbar movement such as sidebending occurring as this will skew your measurements.  Also, gently rotate the client.  Don’t try to force rotation on someone that may not have it.

If the client does not have 50 degrees of thoracic rotation, there are various thoracic spine mobility drills that can be performed such as:

A-Frame T-Spine Mobilization


Side Lying Thoracic Rotation


Side Lying Rib Roll

If the client has 50 degrees or more of passive rotation, but less than 50 degrees of active rotation, a thoracic spine motor control drill can be performed.

Drills such as:

Quadruped Assisted Thoracic Rotation


Key Points:

-Perform slow and controlled.

-Make sure not to side-bend through your spine.  Make sure to rotate through mid-back.

Seated Assisted Thoracic Extension


Key Points:

-Squeeze ball between your knees.

-Slightly turn away from where band is attached.

-Slow and controlled, allow band to rotate body.

Shoulder

The last pertinent area of the body to address in a warm-up is the shoulder.  Limited shoulder mobility in shoulder flexion, abduction, or internal/external rotation can affect function at the shoulder, cervical spine, thoracic spine, and even the lumbar spine.

To assess the shoulder, movements such as:

Supine Shoulder Flexion Test

Supine Shoulder ER Test

If there are limitations in mobility, performing self-myofascia release as shown below can help:

Once mobility has been improved, now we want to make sure we can use that mobility.  Performing movements such as:

Back to Wall Shoulder Flexion


Key Points:

-Maintain low back flat to the wall.

-Raise arms up and when the reach shoulder height, gently reach 1 inch in front of your finger tips.

-Continue this gentle reaching as you continue to raise your arms overhead.

Forearm Wall Slides


Key Points:

-Slide arms up the wall.

-When your elbows get to shoulder height, gently press into the wall/push your trunk away from the wall.

-Maintain the pressure on the pinkie side of your hand as you slide up the wall.

Quadruped Assisted Reach Roll and Lift


Key Points:

-Perform slow and controlled.

-Slowly reach out.  Rotate palm up to the sky.  Slowly raise arm up.<

Yoga Push-Ups Sans Pushups


Key Points:

-Think of pushing the ground away from you with your hands.

-Should be felt in your upper back and out and around your rib cage.

If you have no mobility limitations in any of the aforementioned areas, feel free to use the motor control or stability drills to help primer your nervous system to prep you for your lift.

There you have it!  Create a plan for your warm-up, do said plan, and then go and get after your training!

About the Author

Andrew Millett is a Metro-West (Boston) based physical therapist

Facebook: From The Ground Up

Twitter: @andrewmillettpt

Instagram: andrewmillettpt
Categoriescoaching Corrective Exercise mobility

My Go To Mid-Back Mobility Drills

Mid-back (or T-spine) mobility drills are one of those things that, much like bacon, Jason Bourne movies, or LOLCat memes, most people just can’t get enough of.

Copyright: lightwise / 123RF Stock Photo


At this point I don’t think I need to belabor why t-spine mobility is a kind of important. But if I had to give a quick 10-second elevator pitch I’d say something to the effect of:

“It helps improve performance in sport(s) and in the gym, helps with posture, and also helps offset the likelihood of your shoulder, neck, or lower back from flipping you the middle finger.”

You’re not going to find that explanation on Wikipedia or anything, but it gets the point across. Having the requisite mid-back mobility – 0r, more to the point: having the ability to “access” mid-back or T-spine mobility (via rotation and eliciting an extension moment) as well as nudging more dynamic stabilization – keeps people healthy (namely shoulders and lower back) and not feeling like a bag of dicks.

Note to Self: I totally need to start submitting more often to Wikipedia.

There are a million and one different T-spine mobility drills and rarely is there ever a “bad” one. However, the three shown below tend to be the ones I gravitate towards the most when working with athletes and general fitness population clients alike.

1. Mid-Back Release

A common drill many people perform to improve T-spine mobility (more specifically, extension), especially when they’re more kyphotic and exhibit overly rounded shoulders, is to extend their mid-back over a foam roller.

First: Most people perform it poorly (see below).

Second: We’ve fallen into this trap of oneupmanship where the “harder” the surface the better the drill is.

Is it better?

Ten years ago it was a plain ol’ foam roller. Now people are rolling on lead pipes. Before you know it, the next iteration will be rolling on live grenades.

Regardless, Here’s How Not to Do It.


The mid-back area isn’t necessarily designed to have that much range of motion – to the point where someone can extend their shoulders all the way to the ground – and what most people end up doing is exhibiting excessive rib flair and plowing through their lumbar spine (where we don’t want a ton of movement).

The end result is nothing more than “feeding” what’s causing the issue(s) in first place: an un-stable core (lumbo-pelvic area) which forces the mid-back to lock-up for lack of stability where you want it.

Do This Instead (Seriously, I’m Not Kidding)


This mid-back release from the people over at AcuMobility.com is a game-changer.

The idea is to train STABILITY (by paying diligent attention to engaging and maintaining core activation) while also working on the areas we actually want to mobilize.

This drill is a catch-all for pretty much everyone: male, female, young, old, likes to deadlifts, hates it, office worker, Klingon….seriously, everyone.

It works – albeit for different reasons – whether you’re a computer guy with Quasimodo posture or someone who’s more athletic and exhibits more of a “flat” t-spine.

Computer Guy = the added extension is postural gold.

Opposite of Computer Guy = these people tend to be “stuck” in extension due to over-active erectors, rhomboids, etc from lifting heavy things repeatedly. Also, much like “computer guy” most people here will exhibit a weak or unstable core, which, for many, may be the culprit for why their mobility is poor to begin with.

The lack of base of support in the lumbo-pelvic region will have negative ramifications in terms of ideal positioning up and down the kinetic chain, and one’s ability to produce and transfer force.

When we dial down tonicity in the mid-back, we’re able to exhibit better positions (rectus abdominus less lengthened and rib flair less prevalent) and we’re then able to express our actual badassery.

I really love the content and material AcuMobility has been putting out over the past year. You can watch ALL their videos for free on their site HERE.

It’s awesome stuff.

Also, because I’m cool, you can get 10% off any AcuMobility orders by using the code “gentilcore” (no quotations needed) at checkout HERE.

2. Side Lying Windmill


It…..just…..feels…..so…..good.

Lots of cool things happening here: T-spine extension & rotation, in addition to a nice pec stretch (which is often overactive in many people).

A key point, however, is to make sure you’re not just flailing your arm and making it a shoulder circle thingamabobber exercise.

The motion should come for the scapulae (shoulder blade) itself, so don’t force ROM you don’t have. It’s okay if you’re unable to get close to the floor.1

The more you perform this exercise the better you’ll get

Also:

1. Place a foam roller underneath the top knee (at 90 degrees) so you lock the lumbar spine in place and don’t default into lumbar rotation.

2. Squeeze the glute of the leg that’s straight.

An exercise sibling – if you will – of the side-lying windmill is a variation I learned from Dr. John Rusin:

Side Lying Open Book


3. Quadruped Reach Through and Extension


I like this drill for a lot of people, but I really like it for rotational athletes (especially pitchers as it’s important for them to be able to follow-through and “access” flexion on their throwing side).

A key aspect of this drill is to sit back onto the calves/ankles (if your mobility allows and it doesn’t bother your knees) and to lock the lumbar spine in place and take it out of the equation.

From there it’s pretty self-explanatory:

1. Slide hand underneath and reach through as you exhale your air.

2. Reverse the action and extend back.

3. I tend to default to more of a “rib-roll” action as I feel it’s allows for less cheating and compensation.

Give these bad-boys a try and let me know what you think. Or, if not, I guess I’ll GFM….;o)

CategoriesFemale Training mindset mobility

Yoga: For People Who Lift

I lift. You lift. We all lift. Raise your hand if you do yoga?

[Cue crickets chirping]

Chances are not many of you raised your hands. I can count on one hand the total number of times I’ve been to a yoga class. In fact, I wrote about taking one HERE.

It was okay, but it’s never been my cup of tea. Because, you know, yoga.

Copyright: alexandralexey / 123RF Stock Photo


If only there was a style of yoga that was quick, not boring, and designed with meatheads in mind.

Egads, here comes Neghar Fonooni to the rescue.2She sent me a copy of her Wildfire Yoga resource last week and made sure to include this note (as if she knows me or something):

“I know what you’re thinking, yoga. But even meatheads can’t afford to not do this. This isn’t your standard yoga, but more along the lines of “flow series” that can be done in 5-20 minutes. The idea is to take the minimal effective dose and DO this shit.”

She had me at meathead.

Check it out HERE. But also read Neghar’s guest post below. If I can’t convince you she certainly can.

Yoga: For People Who Lift

The first time I stepped into a yoga class I was 18 years old. I’d been lifting weights for a few years as part of my high school sports requirements, and I had recently started working at the local YMCA—which meant I could try all of the classes free of charge.

And try them I did, which is how I ended up in this yoga class in the first place—the youngest, least flexible person in the room by a landslide. I remember watching these women, most of whom were 10-20 years my senior, get into positions I couldn’t even wrap my head around. It wasn’t so much that I wasn’t flexible, as I’d always stretched and mobilized while playing sports, but I sure wasn’t “yoga flexible” by any means.

Copyright: dimol / 123RF Stock Photo

It was during that extremely uncomfortable hour that I decided I couldn’t allow that physical discrepancy to stand. A competitive athlete all my life, I just couldn’t accept the notion that these “older” women could do something I couldn’t—which is absolutely comical when you consider that I sit here today in that age bracket I once considered old.

In response, I spent the next several years straddling both the lifting and yoga worlds, learning how to down dog and deadlift, and more than anything, learning how to be at home in my own body. At some point in my mid-twenties I officially became a meathead, chasing strength goals and worshipping barbells—and in that process, I lost touch with my yoga practice.

I was training 1-2 hours a day, and I just couldn’t find the time for yoga practices. Not to mention, I’d gotten so into lifting that yoga began to feel…superfluous. Unimportant, even. It wasn’t until a few years later, while seeking emotionally and mental balance, did I realize what a disservice I’d done myself by abandoning my yoga practice.

Sure, deadlifts and squats were great—but something was missing.

I’d gotten so serious about training to the extent that I’d actually lost touch with my body. It became a tool to lift things up and pick them down, and as a result, I often felt like a stranger in my own skin.

It didn’t take long for me to figure out that yoga was the missing link. But, having completely immersed myself into the meathead world, I simply didn’t have the time to dedicate to a yoga practice. Not to mention, I’d gained a lot of muscle in my yoga off-season, making it a little trickier to get into some of those poses.

I found myself uncomfortable and intimidated in most of the yoga classes I attended, not having a typical “yoga body” and finding resistance in certain poses due to my delts of doom and my Quadzilla legs. I also found that during 60-90 minute yoga classes I would get bored, distracted, and even anxious.

I wasn’t really a yogi, at least not like the yogis I saw around me. But I knew I wasn’t only a meathead either, because yoga felt like something I needed in my life. I was, in fact, a meathead yogi—the most flexible person at my gym, yet the least flexible in my yoga class.

I had a unique perspective in this role, one that allowed me to see the beautifully inverse relationship between the two practices. But I couldn’t balance them with my schedule—at least not completely. I was a single mom, a full time personal trainer, and a blogger—all while taking night classes to finish my degree. I didn’t have time for 60-90 minute yoga classes, but I could carve out space for the minimal effective dose.

We talk about this a lot as it pertains to strength training; we know that we don’t necessarily have to dedicate hours in the gym in order to get strong, and that by being consistent with a minimal effective dose, we can make major strides.

Copyright: jtrillol / 123RF Stock Photo

We know that a 20 minute workout is better than no workout at all, and we know that by giving ourselves permission to do these shorter workouts, we’re more likely to build momentum when it comes to our training.

In contemplating this lesson I’d spent years teaching my clients, I realized that, just as I could get a lot out of a 20 minute training session, I could really benefit from just 5-10 minutes of yoga as well. Was a 60 minute yoga class going to be effective? Absolutely. But I didn’t have that kind of time, and I knew that I couldn’t afford not to do yoga.

I was spending so much time in the gym, lifting heavy weights, doing serious, strenuous movements, and I had nothing to balance me out. I was all yin and no yang, all hustle and no flow. But once I gave myself permission to do the bare minimum with regards to yoga, everything changed.

I started spending 5 minutes per day on my mat, and that 5 minutes eventually increased to 10, then 15, then twenty. Today I fluctuate between 5 minute morning flows and 20-30 minute flows on Sunday. I still consider myself a yogi but I rarely make it to a yoga studio. And despite that fact, I enjoy the myriad benefits that come with a yoga practice.

If you’re anything like me, you love to deadlift too. You probably like to squat, maybe even bench. Me? Pull-ups are my absolute favorite. And by doing just a few minutes of yoga per day, I’ve improved all of those lifts. My lifting regimen has benefited immeasurably from the addition of a short yoga practice, and in ways I’d never even imagined.

Here’s how…

More Active Recovery

Yoga is an effective and low impact way to move on your non-lifting days without compromising recovery. Rather than take a full day “off,” you can keep your movement momentum going every single day by doing just a few minutes of yoga.

Plus, if you’re feeling sore from a particularly intense training session, a short yoga flow can help redistribute blood flow and in recovery. If you could help your body recover in just 5-10 minutes per day so that you felt better going into your next training session, wouldn’t you say that’s a no-brainer?

Kinesthetic (Body) Awareness

Flowing through poses while barefoot and without a mirror requires a great deal of control. Yoga requires you to listen to your body, tapping into your trunk, your feet, your legs, and your hands to enter and sustain postures without visual aid.

This process increases kinesthetic (or body) awareness and can help when moving through compound lifts at the gym such as squats and pushups. Because yoga carries such an internal focus, it can encourage you to practice more intuition during your lifts.

Balance

And I don’t mean stability, although you’ll certainly get your fair share of that from yoga. I’m referring to the balance of activity that yoga provides to meatheads like us. Lifting sessions are typically aggressive and weighted, while yoga is intrinsic and uses the body as leverage. This can create a balance between Herculean and Buddha-like activities, which in turn, encourages balance within your daily life.

If you’re anything like me, you find that you’re more hustle than flow—yoga helps you add more flow into your life, which actually benefits your hustle.

Mobility and Flexibility

No matter how many times someone tells us that we need to spend more time stretching our muscles or mobilizing our joints, we would just rather lift, wouldn’t we?

I mean, who has time to do all that flexibility work when we have to make sure we snag that open rack for a squat sesh? But, improving your mobility and flexibility will increase your movement efficiency-benefiting your lifts exponentially.

Yoga is a fun way to get bendy that won’t take up valuable gym time. By doing 5-8 minutes of yoga every day, you’re building a foundation of mobility that doesn’t require you to do lengthy warm-ups at the gym, or add time to your already time-consuming lifting sessions.

Breath Control

I cannot tell you how many times I have helped someone out of shoulder pain by teaching them to breathe from their diaphragm or coached a client into a stronger overhead press just by cueing them to BREATHE. Yoga places significant emphasis on the breath, which will keep you aware of your breathing during your training sessions.

Note from TG: while not quite the same thing (it’s close) here’s me explaining what it means to get 3D expansion of rib cage which is all about keeping diaphragm and pelvis aligned for optimal stability.


The Goldilocks Principle

Understanding when to hold back on your lifts and when to push through is a delicate dance.

You can sometimes set down the weight and think, “I could’ve done more.” Inversely, you might be wishing you hadn’t pushed through that last ugly rep. Yoga teaches you how to feel free within your body, accomplishing challenging poses while fostering ease of movement.

You can’t force the poses if you intend to do them correctly, but you are encouraged to work with the body you have in that moment, and access what abilities you can find. It’s a beautiful balance of just right that can aid you in your lifting endeavors.

Bodyweight Strength

When I started bringing yoga back into my life, I realized that my strength training had some critical holes in it. Being able to move heavy iron relative to your bodyweight is awesome, but then discovering that you have little ability to leverage that bodyweight? Well, that was a revelation.Yoga improves bodyweight strength, and puts you in positions that you might not otherwise put yourself in at the gym.

Noncompetitive Environment

Most of us who lift regularly have an inherent competitive nature. We compete with ourselves to set PRs, compete with friends at the gym, or even compete in an organized environment such as powerlifting, CrossFit games, or sporting events.

This is a personality trait I see in most of my gym buddies, and it’s something that can certainly benefit us. However, even when this competition is friendly, it’s still competition and can sometimes blind us.

Yoga is a noncompetitive environment that can bring you back to your center when your hunger for big lifts gets ravenous. You’ll have to learn to accept your progressions and avoid comparing yourself to others.

There is no “PR” in yoga, just a commitment to show up on the mat and move.

Bigger Lifts

You might not typically think of yoga as something that can make you stronger, but it sneaks up on you like that. Yoga poses can translate to lifting strength by waking up muscles you don’t often use, encouraging cooperative multi-joint movements and giving you wicked upper body strength. I can deadlift over twice my bodyweight and perform multiple sets of 10 pull-ups-but there are yoga poses that absolutely humble me.

With all of these amazing benefits, you cannot afford not to do yoga. Give yourself a few minutes on the mat per day, and I guarantee your training—and your quality of life—will improve drastically.

Wildfire Yoga

Can you get all of these benefits in just 5 minutes a day? Of course you can! Chances are you’re not doing any yoga right now. You’ve decided it’s not for you because:

  • It takes too long
  • You’re not good at it
  • Yoga studios are not your jam
  • You don’t want to spend money on classes
  • You’d rather lift

And I get it, trust me. I can totally relate to all of those things. But what if I told you that you could use the minimal effective dose of yoga to get you all of these benefits and more?

Enter Wildfire, the 21-day yoga program designed for people who would rather lift…

CategoriesCorrective Exercise mobility

A Better Lower Body Warm-Up: Hybrid Drills for the Win

I don’t know about you, but whenever I have squats or deadlifts on the itinerary it always takes me just a liiiiiitle longer to warm-up.

Copyright: spotpoint74 / 123RF Stock Photo


There are a lot of moving parts to performing each lift safely and at a high level; much more so than compared to upper body counterparts such as the bench press or chin-up/pull-up.

This is not to say upper body movements don’t require warming up or attention to detail, they do. However, when all else is equal I find upper body movements lend themselves to a little more of a lackadaisical approach compared to lower body movements. Admittedly, it’s 100% anecdotal on my end, but it’s more common to see people walk into a gym, mosey on over to the bench press area without much of a song and dance with a warm-up, and pretty much get right into the nuts and bolts of their workout than it is to see the same person walk in, start deadlifting, and not be leaving five minutes later because their spine just flipped them the middle finger.

Plus, lets be honest: if there’s ONE thing you’re going to omit from your training session for the day when you’re in a rush (or because it’s a Wednesday) it’s your warm-up. You skip it, I skip it, your friends skip it, there’s no point in pretending we’re all warming up 100% of the time. Heck, I’d be surprised if most people did it 50% of the time.

As a fitness professional the warm-up is a bit of a catch-22. On one hand I can’t deny it’s importance. People are too tight, too stiff, too loose, or 2 legit 2 quit.3 The warm-up serves as a fantastic way to hone in on any “correctives” that any one person may need to address whether it’s any of the above or inhibited glutes, immobile hips and t-spine, and/or general movement malaise. Moreover, the warm-up serves as a way to increase body temperature, joint lubrication, and CNS up-regulation.

It’s here, during the warm-up, we can attack movement dysfunction and better set people up for a productive training session.

On the other hand, people can be handicapped by the warm-up. As in…the warm-up becomes this drawn out, overly dramatic “thing” to the point where some people spend 45 minutes on a foam roller hitting every inch of their body and/or performing an inordinate amount of mundane correctives before they even touch a dumbbell or barbell. To which I am always quick to say:

“Get off the f***ing foam roller. That’s why you’re always hurt.”

Nevertheless, I tend to fall on the “better to do it than skip it” side of the fence. Albeit something I have been toying with of late with my own training and that of my clients is using more combo or “hybrid” drills to help expedite the process.

Take a lower body day for example where squats or deadlifts are on the agenda.

Glute Bridge w/ Rotation


Key Notes

  • Addresses both glute activation and t-spine rotation/mobility
  • Careful not to go into excessive lumbar extension at the top. “Feel” your glutes fire and then make sure when you rotate to one side you move everything as one unit.
  • You should feel a nice anterior hip stretch on the contralateral side (if you rotate towards the right, you’ll feel a slight stretch on the front side of the left hip).

1-Legged RDL to Cossack Squat


This is climbing the ladder as one of my “go to” hybrid drills as it accomplishes a lot.

Key Notes

  • Try to get the backside as long as you can – reach both forward with your arms and back with the moving leg.
  • Try to prevent any hip rotation – toe of moving leg should point towards the floor and to the midline.
  • “Soft” knee on standing/supporting leg.
  • Idea of Cossack squat is to sit BACK into the hips. ROM will be limited in some people, so don’t worry if you cannot get to the ground at first; use what ROM you do have available.
  • Heel should be down and it’s okay to point the toes of the straightened leg up towards the ceiling.
  • If you have to use your hands as support for the first rep or two or for the entire set, that’s fine. Eventually, the idea is to be able to perform with using your hands.

Bear Squat


Key Notes

  • Start in a “deep squat” position. Push knees out with elbows to help get more hip abduction and make sure chest is UP or “tall.” T-spine extension is important.
  • Walk out making sure not to “collapse” the shoulder blades. Try to push away from the floor. This will help with a little serratus activation.
  • The walk out also helps with anterior core engagement (never a bad thing), and at the same time you’re also getting a fair bit of ankle (and big toe) dorsiflexion into the mix as well.
  • Try not to allow your lower back to sag or torso to teeter-totter. Pretend as if there’s a bottle of water (or battery acid) on your back and you don’t want it to spill. Ouch.
  • You can also up the ante by adding an overhead reach component before you “bear crawl” out, like so:

Just a Taste

There’s obviously an endless parade of exercises I could showcase here. But hopefully these give you a little taste of a few you can implement prior to a lower body session that’ll help speed up your warm-up yet target many of the problematic areas most people need to hit prior to hitting squats or deadlifts hard.

Give them a try and let me know what you think.

CategoriesAssessment Corrective Exercise mobility Program Design

4 Ways to Fire Up Your Belly

Today’s guest post comes courtesy of Gavin McHale, a Certified Exercise Physiologist from Winnipeg, Canada (in his words, straight north of Fargo). Gavin attended a workshop I did with Dean Somerset in Minneapolis a few weeks ago and he wanted to write up some of the things he picked up from it.

Read on to find a breakdown of how you can clean up your shoulders and hips, lift more weight and allow yourself to relax, just by changing the way you breathe.

Copyright: sunlight19 / 123RF Stock Photo


4 Ways to Fire Up Your Belly

Let me paint you a picture.

A client or physical therapist refers someone to me and they walk in ready to get their ass handed to them. After our initial conversation, I tell them we’re going to start the session with some breathing drills.

They often glaze over and assume it means something else, until I tell them to lie down and take a deep breath.

“Wait, you just want me to breathe?”

“That is correct.”

Almost every time, I can provide a new client a take-home benefit with a couple of breathing cues, all inside the first 2 minutes on the gym floor.

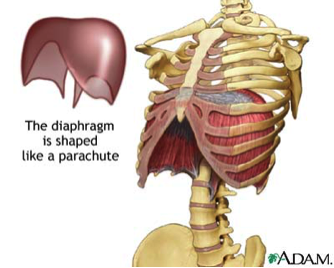
Image courtesy of Crossfit Southbay, via A.D.A.M

Why, you ask? Well there are lots of reasons why breathing is a good practice to get into, and I’m not talking about the breathing we do mindlessly, day-in day-out. I’m talking about mindful “diaphragmatic” or “belly” breathing.

We live in what I’d call a very sympathetic world. Our sympathetic nervous system, also known as fight-or-flight, is cranked up all the time. We have to drive to work in traffic, get a project done, feed the kids, manage the mortgage… you get the point.

All this stress kind of shuts down our parasympathetic nervous system, also known as rest-and-digest. You know, the one that fixes all our shit? Ya, that one.

The diaphragm is actually intended to be our body’s primary breathing muscle, but as a consequence of modern life, it’s been shunned like Tony and I are by all those cat haters (I see you). Instead, the much less efficient breathing muscles of the upper chest and neck then must take over, creating all sorts of issues.

Although it doesn’t look very sexy, diaphragamatic breathing allows us to create a better balance between fight-or-flight and rest-and-digest, and could be the key to fixing a lot of movement issues as well.

When we breathe, this dome-shaped muscle contracts, allowing the lungs to take in air. What we should see is the stomach rising as the dome compresses the abdominal cavity. This is why I tell my clients to try and “get fat” if they’re having trouble figuring it out. I often see the exact opposite, and while it may present a more pleasing side profile, it only allows the lungs to partially expand and results in weaker core stabilization.


So why do we do it?

Not only is it a good idea to get back to the muscles we should be using for an activity like breathing, but an under-active or dysfunctional diaphragm is going to lead to movement issues as well. Neck and shoulder issues are the bulk of what I see, but back and hip irritation have also been linked to breathing concerns.

Proximal stability leads to distal mobility.

If we can create more stability in the core and centre of the body, the limbs and other areas where we need to be more mobile are free to do their job as well.

Test/Re-Test

Below, I’m going to give you several tests to try based on areas that you may have trouble with or issues you want to clean up. The protocol here is to test the movement, correct with a breathing drill, the re-test to see if it got better.

If it did, great! If not, we may have to do some more digging. The breathing correctives are outlined at the end of the article.

1. Shoulder Issues

I found it very interesting how many people had shoulder pain and dysfunction when I first started training. I cleaned up their technique, had them pull way more than they pushed and focused on opening up their thoracic spine. Things got better, but never really got better, ya know?

Then I went further down the rabbit hole and recognized there was more to it. I realized that almost all shoulder problems are somehow tied to breathing mechanics, and a couple of simple drills can make a world of difference, especially when done consistently. Here are two (related) tests to see where problems may lie and outline the path to correcting them.

Shoulder Test/Re-Test #1: Active and Passive Shoulder Flexion

*Ideally, the shirt is off for all tests of shoulder function. Although it can be awkward, this allows someone to see exactly what the scapulae are doing during these movements.

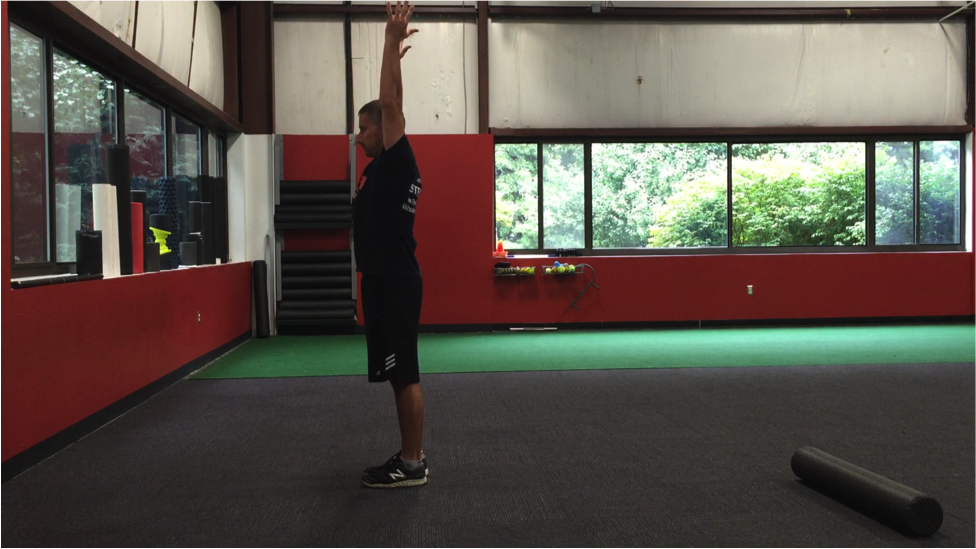
You may have to stand against a wall to do this properly, but stand tall and proud and slowly brings your hands up over your head in front of you. Your ribcage should stay down (the back should stay against the wall) and the head should stay in a packed position (no poke-necks).

How high did your arms get? Was there any pain?

Here is Tony showing an example of a bad active shoulder flexion (left) and a good active shoulder flexion (right). If you’re not careful, you may think the “bad” test is better than the good one. A closer looks reveals that Tony is flaring his ribcage, overextending his lower back and poking his head forward. The test on the right is a true test of his active shoulder flexion. Not bad T, but why is your shirt still on?

The passive test is the same as the active test, only lying down on your back. The knees should be bent and feet flat on the floor or table. The ribcage should stay down and lower back flush to ensure a true test.

We will review correctives later in the article.

Shoulder Test/Re-Test #2: Scapulo-Humeral Rhythm (probably need a friend for this one)

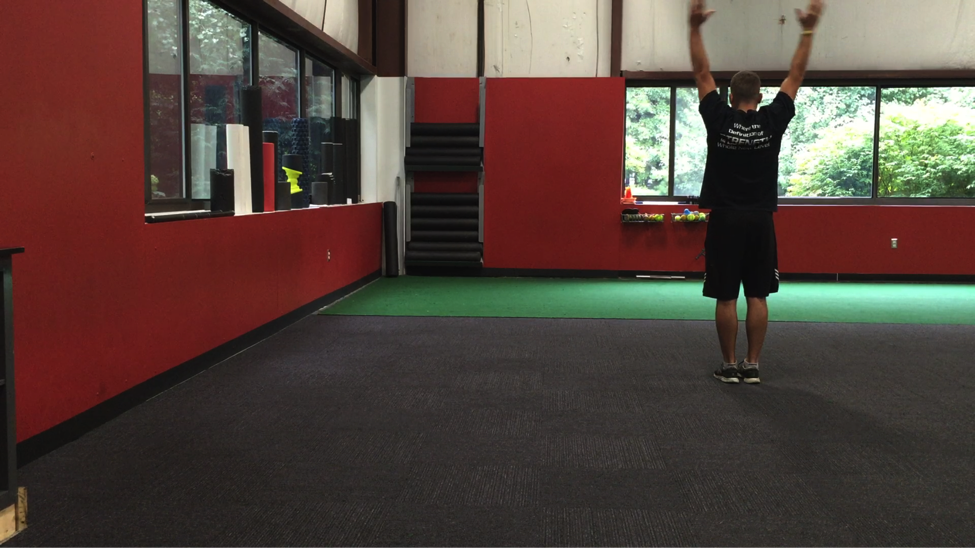
Stand in the same position as your active shoulder flexion test, but this time we’re going to bring the arms overhead by your sides, trying to touch the backs of your hands together above your head.

As the arms move overhead, the scapula should rotate ½ as much as the humerus does. So, to get overhead (180 degrees total), the humerus should rotate upward 120 degrees and the scapula should rotate the remaining 60 degrees.

Image courtesy of BEST Performance Group

If there is any pain with this movement, you should see a registered healthcare professional (or refer to one, if you’re a trainer).

However, if you’re a trainer and you notice the scapula isn’t moving as it should (i.e. the medial border isn’t at 60 degrees) see if you just help it along by manually moving it to the desired position.

Better? Great, let’s get to breathing and fix that shit. Still painful? Refer.

2. Back Issues

Everyone who’s ever had or worked with people with back issues raise their hand! Ya, a lot of us have, myself included and it’s no fun. Whether it’s chronic back pain or a little tweak here and there, worrying about blowing your back out is a real concern for many people.

They’re scared to lift things around the house, scared to bend over the wrong way and especially scared to lift a shit-ton of weight off the floor in the gym (covered later). We can’t be having that… let’s fix it.

I said that lower back and shoulder issues can be related because their main structures are intimately connected via the thoracolumbar fascia. You can see the lats (major players in the shoulder) and the glutes (major players in the lower back) in the image below. If you have issues getting your arms overhead, you may very well have lower back problems as well, and vice versa.

Image courtesy of Neil Asher Healthcare

Back Test/Re-Test #1: Active Straight Leg Raise

This one is nice and simple. Lie on your back, legs straight. Lift one leg as high as you can before you stop or you feel pain. The knee should stay straight. Note how high you got. A good score is 90 degrees with no movement in the opposite leg.

Image courtesy of www.FunctionalMovement.com

Back Test-Re-Test #2: Passive Hip Rotation (bring that friend back, you’ll need em)

Lie flat on your back with legs straight and lift one leg. Bend the leg at the knee, coming up to 90 degrees hip flexion. Move the hip into external rotation (foot to opposite hip) and internal rotation (foot outside hip) while supporting the knee. Note the angle achieved with each movement. A good score is 90 degrees from midline for external rotation and 45 degrees for internal.

Photo courtesy of geekymedics.com.

LIFTING HEAVY A.F.

(if you have to ask what it means, you’re not ready for it)

There’s no question that if you’ve ever done a heavy squat or deadlift and not wrecked your back, you know that you need to be able to create massive amounts of tension through your core. If you can’t, you get hurt, pretty simple.

The diaphragm plays a massive role in stabilizing the core. It forms the lid on the “core box”, working with the obliques, QL, pelvic floor and transverse abdominus. Being able to take in air and maintain a high-pressure area in the abdominal cavity is crucial for lifting heavy (another reason I start with breathing drills).

RELAXATION

Remember that sympathetic world I spoke about earlier where most of us live that wreaks havoc on our breathing patterns? Needless to say, it can also create difficulty with relaxation and sleep.

I’m pretty sure most of us (and our clients) can agree we’d like to sleep better.

So, when you watch the videos below, don’t just put them in the “workout” box, but remember they can also have a positive impact on your ability to relax and even fall asleep.

Not only will these breathing drills assist in improving movement patterns, they’ll set up the context for creating tension before and during a heavy lift.

THE BREATHING CORRECTIVES

Prone Crocodile Breathing

If you’re new to the diaphragmatic breathing game, this is your place to start. Maybe you scored poorly on one of the above tests or you have an itch to throw more weight on the bar but aren’t yet comfortable doing so.

Either way, give this drill a shot before moving on.


Prone Lengthening

This one is particularly useful if you have trouble with your shoulder and/or struggled with the shoulder flexion and scapulo-humeral tests. Many people’s shoulder dysfunction comes from a number of factors, one of those being tight/ropey serratus anterior. This drill will help to release that muscle, allowing it to do it’s part in moving the scapula to get that arm overhead.

The serratus anterior (SA) works in concert with the upper traps (UT) and lower traps (LT) to allow the scapula to upwardly rotate.

Note From TG: props to Dr. Evan Osar for introducing me to this exercise a few years ago.


Crook Lying Belly Breathing

This is another great beginner drill as the lower back is supported and the table or floor can provide external feedback. This is also the best position for belly breathing, allowing the belly to fully expand. Along with the others, this one is great for those with back or hip issues.


Quadruped Breathing

This is another great drill for those with issues rotating that scap when going overhead. The serratus anterior is a massive player and if we can get it rotating properly (or at least better than it was), we may be able to provide relief and learn what it is we need to focus on moving forward.

So there you have it, a good, hard look at what we should be looking for and how to make it better, just by changing the way we breathe.

One final note for trainers, make sure you try these yourself as you may find that different cues work better. If you do, please tell me. I want to know all your secrets!

OBLIGATORY PROMOTIONAL PLUG FROM TG (sorry not sorry)

Pretty much everything discussed above is covered in more detail in mine and Dean Somerset’s Complete Shoulder & Hip Blueprint which is being released this week (Nov. 1st).

hipandshoulderfb-banner

In fact the site goes LIVE tonight. You can check back HERE at midnight to get in on the action. It’s totally going to be like a Harry Potter book release! Except, you know, without wizards and Sorting Hats and shit.

Author’s Bio

gavinGavin McHale is a Certified Exercise Physiologist from Winnipeg, Manitoba, Canada (straight North of Fargo).

He loves getting people to lift things they never imagined they would both in-person and online.

He also likes to lift said heavy things and, much like Tony, loves cats.

Check him out at www.gavinmchale.com.

Categoriescoaching Corrective Exercise mobility

To Roll and Stretch or Not To Roll and Stretch

Here’s the deal: Whether or not someone should stretch and/or utilize the foam roller is up to them. There’s research and anecdotal evidence to back up both sides of the argument

I find value in both as a coach. Considering we’re talking about a 5-10 minute “investment,” and the abyss of benefits involved – improved tissue quality, increased tissue extensibility, decreased likelihood of injury, a more primed CNS, 1007% increase in general level of sexiness – I feel implementing both is a no-brainer.

Copyright: wavebreakmediamicro / 123RF Stock Photo

There’s a degree of expectation management involved, however:

1. Foam Rolling – harder doesn’t mean better. People seem to be under the impression that the more you grimace and induce “pain,” the more benefit you’re getting.

Here’s the progression most people take:

“Soft” Foam Roller —> “Hard” Foam Roller —> Rumble Roller (the one with those spikey thingamabobbers) —> PVC Pipe —> Barbell or Straight Up Lead Pipe —> Live Grenade.

Some people take foam rolling to the next level, as if the goal is to earn a Badge of Hardcoreness. BTW: that badge needs to happen. I do not agree with this approach and find it defeats the purpose.

I also understand there are camps out there who feel foam rolling is a complete waste of time. I tend to call in like with THIS response from Kevin Neeld.

2. Stretching – Lets be honest: this is the first thing that gets “tossed” when there’s a time crunch with training. I hate doing it, you hate doing it, the Easter bunny hates doing, everyone hates doing it. However, it’s hard to discount the mountain of research and anecdotal evidence that it works and does help people feel better.

And I know most people reading along agree with my train of thought: “I should do more of it.”

A funny thing: people tend to stretch what “feels good” or what they’re good at. Or, more commonly, they stretch, but they’re not stretching what they think they’re stretching.

I.e., not a good hip flexor stretch

Nonetheless, while I could keep going on and on and on I want to defer to my colleague, Shane McLean, who offers up some of his insights and “go to” rolling and stretching strategies he uses with his clients.

Enjoy.

To Roll and Stretch Or Not To Roll and Stretch (That is the Question)

Foam Rolling

Don’t you love that person who grabs the foam roller, plonks himself in the middle of the gym and proceeds to twist, grunt and grimace like a game of Twister?

Yeah, that person definitely needs a talking too.

Foam rolling is either better than sliced bread or a complete waste of time depending on whose camp you’re in. However, there is plenty of middle earth ground.4

You should think of foam rolling as a poor man’s massage. Having hands on you with the massage therapist inflicting pain is definitely more effective than the roller. However, foam rolling is cheaper and more accessible.

Just don’t go overboard.

Mike Boyle explains his rationale for foam rolling in The New Functional Training for Sports 2nd edition. He thinks foam rolling can help combat muscle creep.

Muscle creep is the extensibility of soft tissues which are those loaded under low pressure for an extended period of time.

A stretched muscle will attempt to go back to its resting length but will give up and in an attempt to bridge the gap will lay down more fibers. If the stretch is applied slowly enough the muscle will change its length and retain that change (Myers 2009, 36).

Doesn’t that sound creepy?

One study by back guru Dr. Stuart McGill concluded that “sitting with the back slouched for as little as 20 min can result in increased laxity in the posterior spinal ligaments” (McGill and Brown 1992).

Now if that doesn’t strike any fear into you to sit up straight this instant I don’t know what will. Prolonged spinal flexion can reduce back muscle protection of the underlying spine due to increased laxity. (1)

The muscles in the back already take a beating and going straight from the office to the squat rack would be as pointless as poking yourself repeatedly in the eye, for fun.

However, showing your muscles a little love with foam rolling to decrease muscular tension before crushing your squats and deadlifts sounds like a much better idea.

Foam rolling before warming up sets the table for a better warm up. A better warm up means a better training session and less chance of you ending up on the DL. Doesn’t that sound like a good idea? Thought you would see things my way.

Here are my five preferred must do rolls to help combat the creep and to feel and move well:

1) Foot Massage With Ball


2) Hamstring Roll


3) Piriformis Roll


4) Lower Back Roll


5) Thoracic Spine Roll

https://www.youtube.com/watch?v=LgNWSQx08Hw


Stretching

Stretching is one of those topics that fitness professionals will never sit on the fence about. It’s either the devil incarnate or it’s the cure all. Both sides will argue till their blue in the face.

When coaches get into a pissing match, it’s never pretty. There is plenty of name calling, hair pulling and chests puffed out. However, like with most polar opposite points of view, the truth lies somewhere in between.

Let Mike Boyle be the voice of reason here.

“A lack of flexibility seems to be a causative factor in many of the gradual onset injury conditions that plague today’s athletes. Overuse problems like patella-femoral syndrome, low back pain, and shoulder pain seem to relate strongly to long term tissue changes that don’t respond to dynamic stretching.” (2)

If static stretching good enough for Mike, it should be good enough for the rest of us. Besides, if you stretch for a few minutes it will feel good and the universe will not blow up.

Combining foam rolling for the back of your body with a few stretches for the front may help improve your range of motion and help the stretch tolerance of the foam rolled muscle.

Here my preferred “go to” stretches:

1) Hip Flexor


2) Half Kneeling Quad


3) Biceps


4) Chest


5) Anterior Deltoid


References

1. Is Activation of the Back Muscles Impaired by Creep or Muscle Fatigue? Daniel Sánchez-Zuriaga – Michael Adams – Patricia Dolan – Spine – 2010

2. The Effect of Static Stretch and Warm-up Exercise on Hamstring Length Over the Course of 24 Hours. Volkert Weijer – Gerard Gorniak – Eric Shamus – J Orthop Sports Phys Ther Journal of Orthopaedic & Sports Physical Therapy – 2003

About the Author

Shane “The Balance Guy” McLean, is an A.C.E Certified Personal Trainer working deep in the heart of Dallas, Texas.

No, Shane doesn’t wear a cowboy hat or boots.  After being told that his posture blows by Eric Cressey, he has made it his mission to rid the world of desk jockeys and have fun while doing so.

After all exercise is fun and never a “work” out.

You can follow Shane on Twitter HERE, and Facebook HERE.

CategoriesAssessment Corrective Exercise mobility

Stop Cranking on Your Shoulders for More Mobility

Seriously, stop it.

For many people the first choice when their shoulder begins to hurt or if they lack mobility is to start cranking and yanking on it. This is rarely the right approach, and as Andrew Millett (my good friend and Boston based physical therapist) points out in today’s post…there a far better and far more effective approaches.

Enjoy.

45885490 - man with pain in shoulder. pain in the human body. black and white photo with red dot

Copyright: staras / 123RF Stock Photo

The shoulders, specifically, the glenohumeral joints, are typically very mobile joints. They need to flex, extend, abduct, adduct, horizontally abduct and adduct and internally and externally rotate in multiple planes and positions in relation to the body. Even though the shoulders are a common area of mobility, many people will present with limitations in at least one aspect of glenohumeral motion.

There are various reasons why someone may have limited shoulder mobility.

Bony Limitations

bone

photo credit: pediatric-orthopedics.com

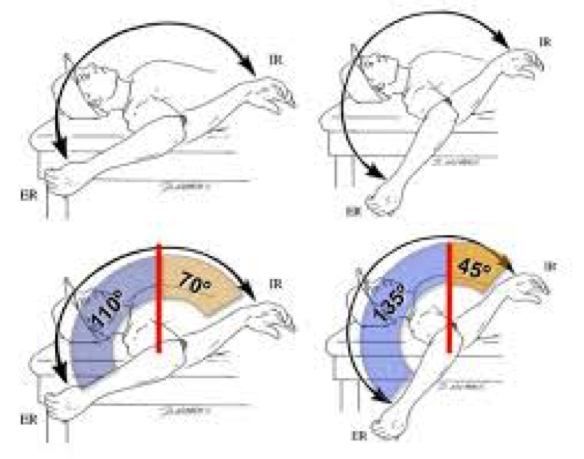
People who engaged in various overhead sports such as baseball, softball, etc. have been shown on multiple studies to have changes to the glenoid and humeral head. In baseball players specifically, they can appear to have a loss of internal rotation range of motion as compared to their non-throwing shoulder and an increase in external rotation range of motion as compared to their non-throwing shoulder.

This change in range of motion is commonly due to humeral retroversion. Humeral retroversion is the alternation of the humerus and humeral head in relation to the glenoid fossa from years of repetitive overhead activity, specifically throwing.

gird

Photo credit: opensiuc.lib.siu.edu

This is typically only seen in overhead athletes. This differentiation in range of motion side to side in external and internal rotation is considered “normal” for this population. As long as External + Internal Rotation aka Total Motion is within 5 degrees of the non-involved shoulder, then that is considered normal.

Note from TG: In other words, loss of IR in a throwing shoulder is an adaptive response and is normal! It doesn’t necessarily have to be fixed.

With that said, we do not want to crank on someone who has “normal” total motion, but may lack internal rotation on one side versus the other. Asking your patient or client if they engaged in overhead sports as a child is a good clue to this. Then measuring their motion will give more information.

We will get into more detail later on how to improve their motion if their is more than a 5 degree difference in total motion.

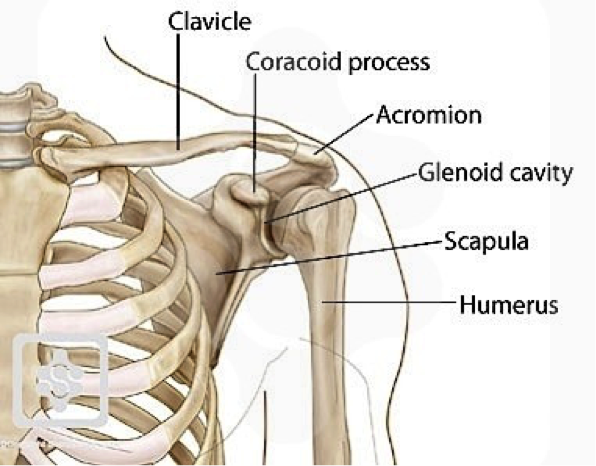
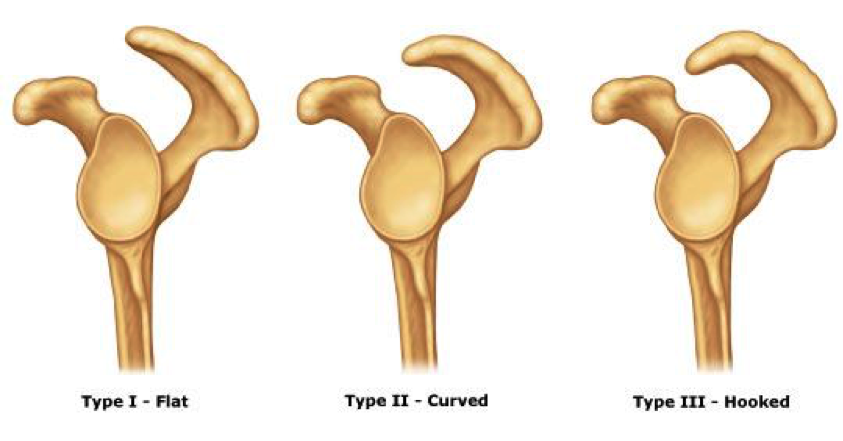
Another bony limitation at the shoulder can be acromion type. The acromion is a bony structure that is present in all people that is part of the scapula.

acromion

Photo credit: ipushweight.com

All acromions are not created equal though. There can be 3 varying types of acromions.

acromion-type

Photo credit: cursoenarm.net

As you can see in the picture above, a type I acromion is relatively normal in appearance. In type II and III, there is more of a curved/hooked appearance to it. This alteration in can cause pain and limited motion when reaching overhead.

The only way to definitively know if someone has a type II or III acromion is through radiographic imaging. Programming may need to be altered to more horizontal pulling/pushing variations instead of overhead work if someone doesn’t have full overhead mobility due to a type III acromion.

For most people with a type II acromion, physical therapy can help to improve range of motion and decrease the effect of the acromion on shoulder motion and pain. For most people with a type III acromion, more often than not, surgical intervention is what will help.

Capsular Limitations

In the majority of the joints in the body, there is something called a “capsule” surrounding the joint. A capsule is synonymous to a ziploc bag encompassing the joint.

In this capsule, there are “folds” in certain aspects depending on where the arm is positioned. Due to an old injury, surgery, etc., this capsule can become “tight or stiff.” Now, without getting into too much detail about why it is tight/stiff or why there are capsular limitations, the only way to determine if there is capsular limitations, is by a licensed healthcare practitioner, ie. PT, chiropractor, etc.

Typically, older populations may have more capsular limitations OR if someone has had a long standing injury or prior surgery to the shoulder, they may present with decreased ranges of motion because of the capsule.

The only other area that can be attributed to decreased ranges of motion due to the joint capsule itself that affects the shoulder, would be the thoracic spine. Lack of thoracic spine extension and/or rotation can limit shoulder flexion, external rotation, etc.

To test for limited thoracic spine mobility, try Quadruped Passive Thoracic Rotation:


Normally, passive rotation should be 50 degrees in the general population. If it is less than that, that can significantly limit shoulder range of motion.

Soft Tissue Restrictions

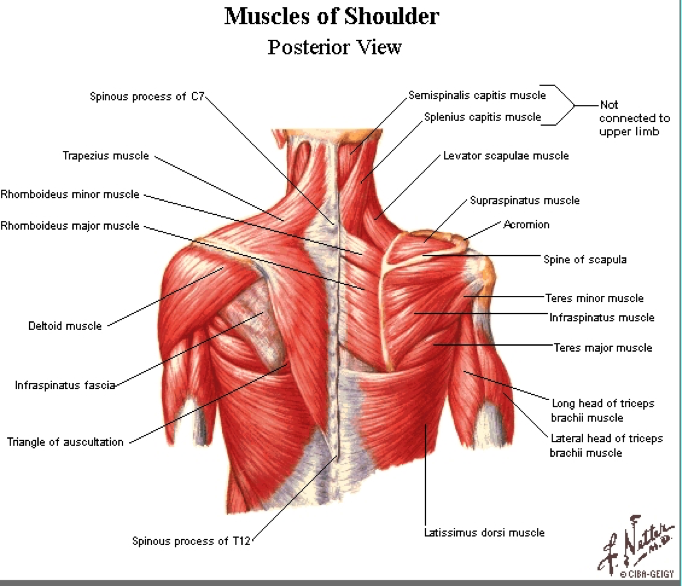
Now, this is the more common of all three of the factors that can limit shoulder mobility. Excluding clients who are hyper-mobile, the majority of clients and patients have some form of increased soft tissue tone in one if not more areas of their body.

At the glenohumeral joint, there are a few “big” than can contribute to limited shoulder mobility.

muscles-of-shoulder

Photo credit: www.smogshoulder.com

Muscles that can limit shoulder flexion are:

  • Pectoralis Major/Minor
  • Teres Major
  • Latissimus Dorsi
  • Subscapularis

Muscles that can limit shoulder abduction are:

  • Pec Major/Minor
  • Teres Major
  • Latissimus Dorsi
  • Subscapularis

Muscles that can limit shoulder external rotation are:

  • Pec Minor
  • Teres Major
  • Latissimus Dorsi
  • Subscapularis

Muscles that can limit shoulder internal rotation are:

  • Infraspinatus
  • Teres Minor

Now, you’re probably thinking that I just “copied and pasted” most of those muscles from one section to the other. The latissimus dorsi is a huge contributor to limited overhead shoulder mobility due to its attachment on the trunk into abduction and flexion. It can also limit external rotation as it is a shoulder internal rotator.

Pectoralis minor can limit overhead motion because of its attachment on the coracoid process of the scapula and the rib. Decreased pectoralis minor tissue extensibility can cause an anterior tilt of the scapula limiting humeral motion on the glenoid.

Subscapularis can limit overhead motion due to its attachment on anterior side of the scapula and on the humerus. Teres major attaches on the scapula as well as on the humerus and can limit overhead mobility as well.

Infraspinatus and Teres Minor limit internal rotation of the shoulder due to its attachment points on the humerus and scapula.

Typically, one if not more than one of the aforementioned muscles can limit overhead mobility. Instead of performing intense stretches and forcing the glenohumeral joint into motions it just does not have, we need to ASSESS and then ADDRESS any limitations that are present.

Assessment

Active Motion

To assess someone’s active ranges of motion, ask them to move.

Have them perform:

Shoulder Flexion

active-shoulde-flexion

Shoulder Abduction

active-shoulder-abduction

Shoulder Medial Rotation

active-shoulder-medial-rotation

Shoulder Lateral Rotation

active-shoulder-external-rotation

“Normal” ranges of motion for general population clients would be:

Shoulder Flexion: 180 degrees OR humerus in line with the client’s ear.

Shoulder Abduction: 180 degrees OR humerus in line with side of body

MRE: 3rd digit finger tip to contralateral inferior angle of scapula

 LRF: 3rd digit finger tip to superomedial border of contralateral scapula.

Now that you have assessed someone’s active motion, we need to assess it passively to fully determine if someone has a true mobility limitation.

Passive Motion

Perform the same motions passively into flexion, abduction, MRE, and LRF. Do not force these motions or push through tightness or pain. If you cannot passively bring the client’s arm to the aforementioned areas mentioned in the Active Motion section, then we know the client has a true mobility limitation.

Addressing the Issue

If someone presents with limitations in passive shoulder flexion, abduction, MRE, or LRF, performing some form of Self-Myofascial Release (SMR) can be beneficial.


Then, re-test passive motion to see if there has been an improvement in mobility. If there has, then you know you have worked on the appropriate areas.

If there has NOT been an improvement in mobility, refer out to a manual therapist (PT, sports chiropractor, massage therapist, etc.)

If the mobility has improved, then we want to use appropriate mobility drills to help groove the patterns that were just improved.

Horizontal Adduction/Posterior Rotator Cuff Stretch


Key Points:

  • Make sure to keep scapulae retracted by using wall or door jam.
  • Once scapulae is fixed, gently bring arm across body.
  • Hold 5-8 seconds pre-training or 30 seconds post-training.
  • By fixating scapulae, it will provide a more focused stretch to the posterior aspect of the shoulder.

Latissimus Dorsi Stretch


Key Points:

  • Use opposite side hand to fix scapulae to rib cage.
  • Once scapulae is fixed, hold onto a stationary object and sit back.
  • Gentle stretch should be felt in the lat.
  • By fixating the scapulae to the rib cage using the opposite hand, it provides a truer stretch to the lat vs tractioning the glenohumeral joint.

 Motor Control

Once there has been an improvement in mobility, we want to make sure that the brain and the body knows how to access that “new” mobility. We need to make sure to re-pattern the proper movement patterns to avoid falling back into an poor compensations.

For shoulder re-patterning, various movements that help to promote proper movement patterns such as:

Forearm Wall Slides


Back to Wall Shoulder Flexion


Quadruped Assisted Reach, Roll, and Lift


Now that we have improved the mobility by addressing increased soft tissue tone, re-patterned those movement patterns, now we want to incorporate them all together.

Movements such as:

Turkish Get-Up


Kettlebell Bottoms Up Baby Get-Up


There you have it! Instead of mindlessly stretching your shoulder, address any potential limitations and get back to training effectively!

About the Author

Andrew Millett is a Metro-West (Boston) based physical therapist

Facebook: From The Ground Up

Twitter: @andrewmillettpt

Instagram: andrewmillettpt
CategoriesAssessment coaching Corrective Exercise mobility

3 Unconventional Ways to Move Better

Counting today’s post, four out of my last five entries have had a number included in the title. That’s never happened before.

Wanna know what else I’ve never done?

  • Gotten a speeding ticket.
  • Tried calamari.
  • Deadlifted 2000 lbs.
  • Cried to the movie Notting Hill.5

Nevertheless, in conjunction with Dean Somerset putting his Ruthless Mobility resource I sale TODAY (through July 4th) I wanted to share a few thoughts on the topic (mobility/movement/general badassery) that maybe some of you reading would find useful or interesting or mildly captivating.

Captivating like this picture of a kangaroo punching someone in the face:

1. Anterior Pelvic Tilt Doesn’t Always Have to be Fixed, Nor Is It Bad. Everything Will Be Okay. Seriously.

New Client: “I’m so excited to work with you. I was told by my previous trainer I had anterior pelvic tilt.”

Me: “Okay, explain.”

New Client: “Well, I went in for my assessment and he told me I had anterior pelvic tilt and that it needed to be addressed and that he’d write me a program to fix it.”

Me: “I see. How long did you do the program for? And, was it fixed?”

New Client: “I worked with him for eight months, and I don’t know if it was fixed. All I know is that we did a metric shit-ton of stretching, corrective exercise, and very little strength training.”

Me: “Well, that’s unfortunate. Excuse me while I go toss my face into a brick wall.”

Okay, the brick wall comment didn’t really happen…but everything else stated above was said verbatim as I sat down with a new client recently.

Without going into the particulars I went on to state that roughly 7 billion other people in the world “suffer” from anterior pelvic tilt, and that it’s truly reached pandemic levels of clusterfuckedness.

In short: I explained that, aside from scenarios where excessive anterior pelvic tilt may be causing pain or movement dysfunction, having it was not a disease or a scenario which always required intervention.

In fact, APT is considered anatomically neutral. I.e., Your lumbar spine has a natural lordotic curve.

To quote Bret Contreras:

“Is APT abnormal?

No, it’s not. According to a published study by Herrington 2011, 85% of males and 75% of females presented with an anterior pelvic tilt, 6% of males and 7% of females with a posterior pelvic tilt, and 9% of males and 18% of females presented as neutral. Anterior pelvic tilt is also the most common postural adaptation in athletes according to Kritz and Cronin 2008, and it seems to naturally occur with athletes that do a lot of sprinting. Therefore, it’s actually normal for healthy individuals to possess APT, and the average angle of anterior pelvic tilt ranges from 6-18° depending on the study and methods used to determine the angle, with around 12° appearing as the norm (ex:Youdas et al. 1996, Youdas et al. 2000, Christie et al. 1995, Day et al. 1984).”

As I recall, there’s no definitive test or “screen” which can correlate “x-degrees” of APT and one’s vulnerability to pain and dysfunction.

Some people have APT and walk around in considerable pain, while others have APT (even excessive APT) and have no issues what-so-ever.

However, those coaches with an acute eye for assessment and movement can often use a plethora of screens and tests to ascertain whether or not APT may be something that’s needs to be addressed.

To reiterate, APT is not always wrong (or bad)…but it can be problematic once we start allowing ill-prepared people to load the pattern and not only that…begin to add repetitions and/or speed.

Often, it’s the LACK of ability (or our proclivity to refrain from) posteriorly tilting the pelvis when bad things start to happen.6

As Tony B mentions above: There’s a big difference between cueing someone to arch like crazy (and thus encouraging excessive APT, resulting in poor positioning and increased instability) and cueing someone to posteriorly tilt the pelvis to nudge them into a more neutral spinal position.


NOTE: As Mike Robertson notes in THIS article, there is no such thing as a bad cue. However, there does exist poor cues when they’re not applicable to the individual or are used haphazardly (because you heard someone else use it).

2. Thoracic Spine Endurance is Often Overlooked

A huge shout-out to Mike Reinold for hammering this point home in a recent Inner Circle I watched on How to Improve Thoracic Extension.

Mike noted that in order to improve t-spine extension it is important to work on mobility (Windmills, Bench T-Spine Mobilizations, Quadruped Extension-Rotations, etc), however we can’t dismiss the importance of ENDURANCE in order to maintain it.


Mike also noted that with regards to posture, “sitting upright is fictitious.” The amount of hours many of us spend in a flexed position far out-weigh the number or hours we’re upright. As such, keeping an upright posture is freakin exhausting.

My words, not his.

Building spinal endurance (not strength) is key here.

Don’t get me wrong: strength is (and always will be) important. A healthy dose of horizontal rowing (DB rows, seated rows, chest supported rows, Seal rows) is never a bad thing.

However, when we’re talking about our “posture muscles” – the muscles that need to be on all day in order to keep us upright – endurance is the name of the game.

3. Lack of ROM Isn’t Always Because You Need to Stretch More

The second someone is told that they lack range of motion (ROM) in any part of their body, they’re immediately shown 37 different stretches and ways to “smash” their tissue.

Many end up cranking this joint and yanking that joint till their blue in the face.

One of the more common examples I like to use here is lack of shoulder flexion (or ability to elevate the arms above one’s head).

Many people are unable to do so without some form of compensation via forward head posture, rib flair, and/or excessive lumbar extension. Picture on the left.

The fix can be any number of things: addressing lat length, fighting a zombie, poor anterior core control, poor tissue quality in the pecs/pec minor, you name it.

And none of those approaches would be wrong. Fighting zombies is awesome.

However, stretching tends to be the “go to” modality for many fitness professionals, and frankly it isn’t always the answer.

Oftentimes, taking the time to teach people to get 3D expansion of the rib cage with their breath (front, side, and into the back) and then learning to fully exhale (to get rib cage down and promote better engagement of anterior core) will help to “open up” the thorax.

I can’t tell you how many times I’ve tested someone’s shoulder flexion and saw an immediate 10-20 degree improvement after having them perform ten good breaths.

I call it my Gandalf moment.

Except, you know, I’m not a wizard.

Did Someone Say Gandalf?

For more insights on the topic and wizard-like shenanigans I’d recommend checking out Dean’s Ruthless Mobility.

You get FIVE hours of content (digital or DVD) from one of the smartest coaches I know on assessment, corrective exercise, and how to get people moving better.

What’s more, CEUs are available AND it’s on SALE at close to 50% off the regular price.

Go HERE and thank me later.

CategoriesCorrective Exercise mobility Strength Training

Strength Starts Here: Breath, Control, Express Badassery

I always enjoy when I have the opportunity to introduce my readers to someone new; coach’s who are “in the trenches,” doing great things, and are well articulate in conveying their message.

Ladies and gentlemen I give you Chris Abbott. He’s a coach and gym owner based in Chicago. As it happened, he sent me a t-shirt out of the blue as a “thank you” for what I do on this blog. It was a class move and nice gesture to say the least.

Not long after Chris expressed some interest in writing a guest post, and well, it took me all of three seconds to say yes.  I hope you enjoy it as much as I did.

Strength Starts Here

Life is better when you’re strong, and that’s a fact.

Over the years as a trainer I’ve worked with average Joes, stay at home moms, significant weight loss clients, professional athletes, and a wide variety of broken and damaged people ranging from hip replacements and torn labrums to herniated/broken discs and torn knee ligaments – to name a few. Every one of these clients had one thing in common; they all reached their goals by becoming stronger.

Perhaps I’m stating the obvious, but based off of the people I see and work with daily I feel people may know they need to get stronger, may know they need to get in better shape, but they really have no idea how to actually get stronger, hence strength starts here.

Commonalities in Strength

There are certain aspects of strength that are required for success – this goes for sport, individual hobbies, and most importantly quality human movement.

My approach to those aspects can be viewed in the following way; you have attachment sites – your arms at your armpits and your legs at your hips. All movement will come from these attachment sites.

In addition you have your thoracic spine (T-spine).

Your neck, shoulders, and t-spine are all tied together; therefore healthy movement of the neck, head, and shoulders (really the entire upper body) requires healthy t-spine functioning. One could go on to describe how the upper body and more importantly a lack of alternating, reciprocating movement affects your lower body (hips and knees), but that goes beyond this post.

Furthermore, my approach can be summarized by this relationship:

  • Positional breathing leads to increased control
  • Increased control leads to increased strength development
  • Being stronger allows you to do whatever you’d like in life

Let’s break this down a bit further and see how you can own all to generate massive strength gains – and really enjoy life more!

Position and PRI

Are your shoulders really tight or are your scapula maybe just in a poor position which is limiting your range of motion?

This is usually the first time someone looks at me with a sideways head tilt expression of “huh?”

When searching for strength your key to performance will reside within your ability to take a breath properly.

All my sessions start with a common goal; restore proper breathing mechanics and allow your diaphragm to work as a primary breathing muscle rather than a postural stabilizing muscle. This does a few things:

  • Triggers parasympathetic activity in the body which results in the body “letting go” or relaxing more
  • “Letting go” will lead to increased range of motion at the attachment sites and T-spine
  • You’ll feel “lighter” – which never hurts anyone
  • You’ll be more focused – which is awesome just about any time
  • And most importantly, you’ll be in a better position to get stronger

The approach and exercises I use to correct someone’s breathing mechanics (and ultimately help restore control) stem from an organization called the Postural Restoration Institute, PRI for short. The Institute’s director, Ron Hrsuka, has devoted his life to PRI. It’s a powerful concept and one that immediately grabbed my attention after I first took one of their home study course a few years ago.

In a nutshell, PRI’s take on the relationship of posture, movement, and performance begins with asymmetries and the fact that everyone, whether you’re “righty” or “lefty”, has the same features internally – one heart, one liver, etc.

These asymmetries predispose us to shift our center of gravity and throw off our position; which in turn affects our posture, limits our movement abilities, and decreases performance. As a result, areas such as your shoulders, t-spine, and hips (sound familiar?) are placed under distress – compensation patterns develop and your ability to get strong has been diminished.

Positional breathing can be viewed as achieving the following:

  • Re-training your diaphragm from being used as a stabilizing muscle to a primary breathing muscle – this allows your body to “let go”
  • “Untwist” your body, positioning it in more of neutral state thus giving you more joint centration and ultimately greater potential for building strength

Positional breathing will open doors that lead to increased control. Remember, increased control leads to greater strength development so taking 5-7 minutes on positional breathing can and will make a difference during your set of heavy deadlifts. Here are a couple of my favorite positional breathing exercises:

90/90 Hip Lift


All Four Belly Breathing


Control is King

Flexibility seems to be the rabbit everyone wants to chase when something goes wrong.

However, as we just discovered, a lot of your flexibility concerns might in fact stem from your inability to breathe properly and your poor position. It’s not uncommon to see a significant increase in range of motion in your attachment sites after performing some positional breathing exercises.

Now that you’re in a better position, you can more easily gain control!

I view flexibility as your ability to passively pass through a specific range of motion – no ownership here, just swinging by to say hi to grandma.

Mobility on the other hand is your ability to control a specific range of motion – you’re laying the foundation and moving in!

Mobility = Control. Control = Strength.

Therefore Strength = Mobility.

In order to be strong you need to have control – you need to have the mobility needed to perform your sport, hobby, or live as a healthy functioning human being. Perhaps another head tilt “huh?”

Your sport/activity will determine how much control is needed at said attachment site(s) in order for you to perform at a high level.

A gymnast for example needs far more control than a basketball player.

You can name plenty of other comparisons that support this notion. However here’s my argument; wouldn’t you rather be able to control a much larger range than you need so as to not only become freakishly strong, but also increase your longevity by decreasing your risk of injury?

I’m not suggesting a football player be able to move like Neo in the matrix – it’s not needed, in fact for some athletes having too much range of motion is detrimental to performance.

But in the game of life – that’s a much different story and can in fact tell you from personal experience and client experience, yes you do want the increased control!

I’m falling more and more in love with Dr. Andreo Spina’s FRC system and its ability to give you loads of control. More importantly it’s blending very nicely with the positional breathing exercises I have my clients perform.

Dr. Andreo Spina is a world-renowned musculoskeletal expert. His system stands for Functional Range Conditioning. Its focus is on three main goals; mobility development, joint strength, and body control (fits pretty nicely with what we’re talking about).

The end result is people doing some crazy sh** that would likely land most people in the hospital.

A photo posted by Hunter Cook (@hunterfitness) on

I’ve been fortunate enough to learn from colleagues who are FRC certified. I myself cannot wait to join them!

Through various series of controlled articular rotations (think searching through your end range in various joint motions) one can find where he/she is limited. Once limitation is found, applying progressive and regressive isometric loading (PAILs and RAILs as he calls them) can be used to increase your usable range of motion – more control = more room for strength.

From there you can play with lift offs and other fun movements but the overall takeaway is clear; you will gain loads of control which can lead to loads of strength!

One of my favorite non-FRC exercises for control is the Arm Bar as it allows the athlete to simultaneously gain shoulder and t-spine control

Life is better when you’re STRONG

This is the fun part. In my mind the end of my little equation is whatever you want.

If you’re an athlete maybe it’s run faster, jump higher, or get stronger.

Or, maybe it’s longevity – for athletes this can mean millions and millions more in income. For people who are injured or de-conditioned it could mean a fresh start or at least a new perspective on life.

The key I’ve realized is this; no matter what sport you play or what hobby you enjoy, everyone needs to be strong and there IS a relatively easy way to get there. It all starts with a breath followed by owning your body – gaining control.

Once you have control you are in fact in control – do what you want!

Until then, keep practicing.

I myself am a simple man. I’ve become attached to swings and getups everyday for my workout. My workout is short, effective, and to the point. My newest warm-up routine has 1 rule – I can’t use anything other than my bodyweight. This has not only placed me in a great position to start my swings, but also led to some fun movement sessions prior to my “workout”.

To summarize; strength starts with a breath, is enhanced with control, and transforms into greater strength – which leads to all around awesomeness in life.

Be STRONG!

About the Author

Chris Abbott has been a personal trainer for the past 7 years. He and his wife recently moved to Chicago where Chris Abbott Piche started Evolution Strength and Performance – a company dedicated to getting people strong through postural restoration, body weight training, and kettlebell training. He develops programs used for weight loss, total body strength, and overall health and wellness. Additionally, he works with clients who have suffered from back, knee, hip, and shoulder pain.

Along with neighborhood clients, he has worked with a variety of professional athletes including NFL, NHL, MLB, MMA, Pro Lacrosse, and European Basketball.

“I want people to realize there is more to life than the gym, and that life is better when you’re strong. It unlocks opportunities to enjoy life more, become a faster, more powerful athlete, or return to hobbies you’ve been unable to do for years.”

You can learn more from Chris by joining his newsletter or visiting his website. Additionally he’s on instagram and facebook.