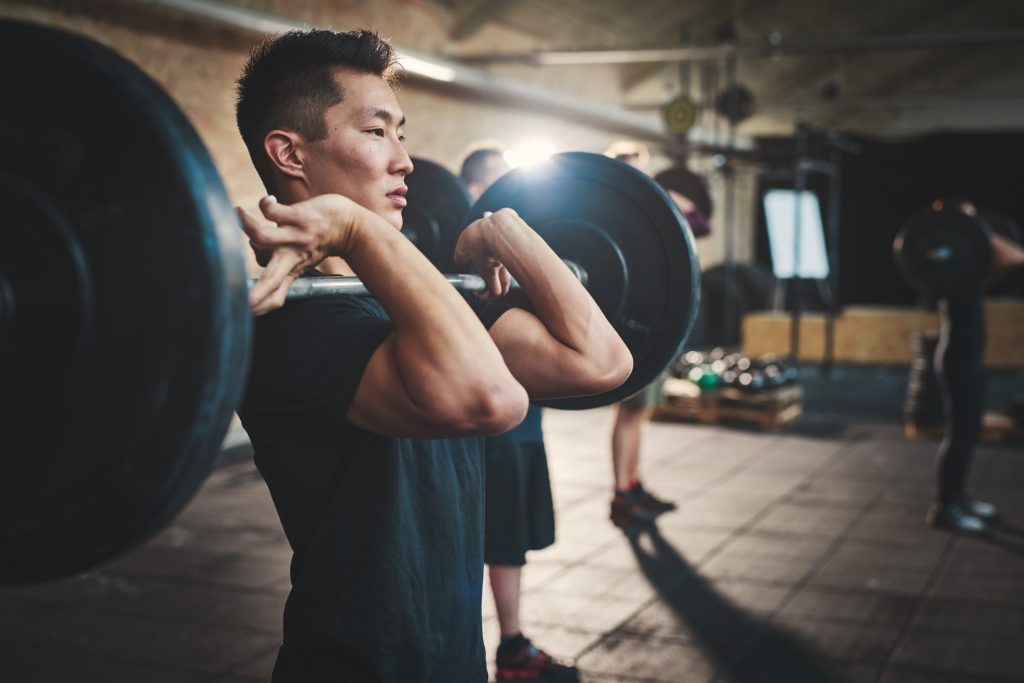
There’s more to building strong, powerful legs than just traditional barbell squats and deadlifts.
Note From TG (cue Southern Belle drawl):I do say kind sir, I have never heard such blasphemous shenanigans uttered in all my life. I feel a bit of faint coming on.
Someone.
Catch me.
CATCH ME!
While those movements certainly have their place, you know by now not to skimp on single leg work.
Single leg exercises are going to help you work out imbalances between sides, improve coordination, balance, stability, and athleticism, while helping to make you more resistant to injury.
Single leg work can be divided into two categories:
Supported – As in a lunge or rear foot elevated split squat
Unsupported – As in a single leg deadlift or skater squat
Both categories are sagittal plane dominant, meaning the body moves from front to back.
But when you do unsupported single leg exercises, the need to resist motion in the frontal and transverse plane increases significantly. You need to call in your adductors, glute medius, minimus, the intrinsic muscles of the foot, and your core musculature, to a larger degree.
The best single leg exercise is the skater squat.
Why?
Because just like with every other exercise in the world, progressive overload is the name of the game. Of all the unsupported single leg exercises, skater squats allow the greatest range of motion and the most loading potential.
Not quite a single leg squat and not quite a single leg deadlift, skater squats are the ultimate hybrid. They build lower body strength and add size to your quads and glutes, without beating up your back, hips, or knees.
The only problem with them is most people don’t want to do skater squats because:
They take a little bit to get the hang of the technique, and
They are really hard and humbling.
Here’s How to Master Them
1. Use a Counterbalance
Use 2.5 or 5 pound weights in your hands as a counterbalance, and squeeze a tennis ball between your hamstring and calf on the non working leg. This will help keep the back leg in a better, tighter, position and keep you from turning it into a reverse lunge.
2. The Rest
Reach with your hands slightly across an imaginary line coming out of your middle toe of the working leg and towards the wall in front of you as you lower your back knee down to a pad without letting your back foot touch the ground.
Then, use your hands like ski poles and drive them down as you push through your front foot to return to the starting position.
Start by stacking a few airex pads for your back knee and lower them as you get stronger to increase the range of motion.
I mentioned before that they have the greatest overload potential. After you start knocking out 8+ skaters to the floor, you need to continue upping the ante to keep building muscle and strength.
Here Are 5 ways to Take Them to the Next Level
1. Torso Weighted
Use a vest or chains to increase the load.
2. Front Loaded
Using a sandbag or weight plate increases the core challenge and emphasis the quads more.
3. Angled
Full disclosure: I picked this up from performance coach Vernon Griffith. The angled loading places more stress on the muscles involved with stabilizing you in the frontal plane: your adductor and glute complexes, QL, and obliques.
4. From a Deficit
Elevate the working leg on a 45 pound plate or two to increase the range of motion.
5. Eccentric Emphasis
Use anywhere from a 3-8 second lowering phase to increase the time under tension.
Whichever variation you’re using, try these for 2-4 sets of 5-8 as either your main lower body exercise or after your heavier bilateral exercises to balance out the spinal loading.
About the Author
Scott Hansen is a Bostonian transplanted in Southern California, a strength/fitness/wrestling coach, educator, sub par surfer, and die hard New England sports fan.
He works with adult athletes, as well as an assistance wrestling coach and strength and conditioning coach for La Costa Canyon high school wrestling in Carlsbad, CA.
I want to make something crystal clear before I proceed:
Exercise – I.e., lifting weights in particular – should have a degree of sucktitude attached to it.
No one became a brick shit house in the gym or built an impressive physique without pushing their body to the limits on a consistent basis. I’m often flummoxed by people who, when I post a video of myself or one of my clients doing something badass, will sometimes chime in with something to the effect of “oh, you better be careful. Such and such exercise causes too much stress on the body.”
I can’t help but think to myself: “Um, that’s kinda the point of exercise isn’t it?…
…to stress the body and force it to adapt?”
It’s a narrow-minded and boneheaded take if you ask me.
That being said, I do feel there’s a distinct difference between working hard and (always) striving to make exercise harder.
The former = good. Great, even.
The latter = meh.
Working Hard vs. (Always) Making Exercise Harder
The easiest way for me to explain my train of thought here is to use a real-world example.
I have a client I started working with a few months ago. She’s a trainer herself, actually, and is no stranger to being a gym-rat, getting after it, and satiating her inner-meathead.
She reached out to me because she had been training on her own for several years and was sorta “stuck” in her progress. Namely she wanted someone to audit her technique with the barbell lifts (squat, deadlift, bench) in addition to having someone take over the mental gymnastics that’s often a side-effect of writing your own programs.
I can totally relate (even coaches need coaches).
As is the case with every client I work with there’s always a window where the two parties are kinda feeling each other out and getting the lay of the land. On my end I’m trying to ascertain how I need to temper my coaching style to better fit the personality, ability level, and needs of the client.
On their end there’s undoubtedly an adjustment to Techno Tuesdays or, I don’t know, maybe even coaching with no pants Thursdays.2
This was no different.
One thing that struck me in our initial sessions together was her proclivity to always want to beat her previous workout. Meaning, if she deadlifted “x” weight the week prior and didn’t surpass that number the following week (or at least attempt to) she’d be disappointed.
Now, in a general sense I LOVE this kind of attitude.
I want people to work hard and to push themselves in the weight-room.
A continual, consistent pattern of progressive overload – gradually doing more and more work over the course of weeks, months, years – is the key to long-term progress & success.
It makes my job infinitely easier when someone “gets” this concept. However, it can also be a double-edged sword.
In the case of my client, I got the impression that she was stuck in the trap of constantly testing her strength rather than building it.
More to the point, she was stuck in the trap of trying to always make exercise harder.
But Tony Didn’t You Just Say You WANT Your Clients to Work Hard?
Yes, I did (and do).
But working hard and always making exercise harder are two different things.
To help ruminate my point further I always recall this idea of “80% Workouts” I picked up from strength coach Paul Carter.
In short:
10% of the time you will feel like Leonidas leading his Spartan soldiers to battle and crush your workouts.
10% of the time you will feel like you spent the night in the Sunken Place and your workouts will crush you.
80% of the time you will just show up, get your reps in, and leave.
THAT’s the key.
Those 80% workouts.
The workouts where nothing spectacular happens.
You just exist and do the work.
80% of the time or 8 out of 10 workouts (<— I’m a master in math).
Another way to think about it: You’re still working hard every session, straining, and training with intent…but it’s just not worthy of Instagram.
To that end:
You can still work hard despite having a poor night’s sleep.
You can still work hard despite being injured.
You can still work hard despite having a bad day at work and resisting the urge to throw a stapler into boss’s face.
The point is: Every session (and exercise) doesn’t have to be a ball-breaker or “battle” or leave you with no sensation in the left side of your face in order for you to make progress.
Life gets in the way often and it’s unhelpful to hold ourselves to the impossible standard of breaking personal records every single training session.
It doesn’t always have to be harder.
This is where using other metrics of effort – like Rate of Perceived Exertion or Reps in Reserve – can be useful. For example, lets say you have a client who had a poor night’s sleep the night prior or maybe lost a fist fight to Rambo.
Whatever, they’re in no shape to train at full throttle.3
Instead of hitting that scheduled heavy double with their squats, maybe a better approach would be to have them perform 2-3 sets of squats aiming for 2-3 Reps in Reserve (a concept popularized by strength coach Dr. Mike Israetel).
This way they’re still squatting and hitting a few challenging sets, but not risking injury or further piling on more CNS fatigue that will only continue to accumulate and further derail their training.
Alternatively, you can try this approach (which is something I picked up recently from strength coach Conor Harris):
Week 1: 3×5 @ 70% of 1 Rep Max + one set of as many reps as possible (AMRAP).
If AMRAP >8 reps, go up 5 lbs next session.
If AMRAP 6-8 reps, repeat next session.
If AMRAP <5 reps, go down 5 lbs next session.
This is a healthy compromise because it satisfies my preference of each repetition being (somewhat) fast and crisp, but the AMRAP set also helps satiate the more competitive clients.
First of all, the mere thought of even calling myself something like that invokes an immediate gag reflex. But more to the point I am not nearly creative enough to fall into that camp.
I mean, a true fitness influencer would have used any of the following titles to lure you in:
“187 Goblet Squat Variations That I Made Up on a Wednesday”
“The Keto Guide to Goblet Squats”
“4 Maybe New to You Goblet Squat Variations (You Can Perform With a Chainsaw)”
See?
I’m too boring to be an influencer.
4 (Maybe New to You) Goblet Squat Variations
All that said, I’m a firm believer that training doesn’t always have to be a circus show. Sure, it behooves us to add a little variety and pizzazz into the mix – I.e., chainsaws? blindfolds? unstable surface? chains? a black bear? – but for most people, most of the time, what yields the best results are sticking with exercises that:
Are user friendly and easily reproducible.
Don’t require a bevy of speciality equipment and/or signing a liability waiver to perform.
Provide carryover other than garnering “likes” on social media.
I don’t know, maybe it’s because I’m a bit old school and am kinda-sorta set in my ways, but for me and my money, the best exercises are the ones that are monotonously boring.
To that end, since we’re all sequestered and training at home and likely doing all we can to NOT toss our faces into a brick wall from too much monotony, below are a handful of Goblet Squat variations – that, for the record, can be performed with either a kettlebell or dumbbell – I tend to default to with my own programming (and that of my clients/athletes).
1. Goblet Squat w/ Lowering
Let’s be honest: It’s a bicep curl. The “lowering” part is a bicep curl.
However, WHY I like adding in the bicep curl may surprise you.
Rather, I like how it forces you to OWN the bottom position of the squat. I find a lot of trainees tend to “relax” in the hole and either end up losing their spine position or just “hang out” on their passive restraints (ligaments and tendons). With the lowering component the idea is that they have to remain ON throughout the motion.
There’s a bit more of a mind-body connection which I find is beneficial for many.
SIDE NOTE: As you can see, my 3-year old in the background is super impressed.
2. Goblet Squat w/ Pulse
I got this one from Dan John years ago and it’s a sneaky little fucker.
The limiting factor, of course. will be shoulder endurance so err on the side of conservative when selecting a load to use.
That said, the main benefit of this variation is targeting the anterior core. Similar to above, the idea is to OWN the hole and pressing the KB out in front of the body forces you to fire your core to a very high degree.
It also forces a bit of weight shift (back), which allows for a bit of “settling” into the squat to occur. Be PURPOSEFUL with pulse part; it shouldn’t be a quick jolt back and forth.
3. Squat w/ Overhead Press
I’m just going to come right out and say it: This one suuuuuuuuuuuucks.
I picked this one up from Dr. Quinn Henoch of Clinical Athlete a few years ago when listening to him present, and was slapped in the face with intrigue when he mentioned he liked this variation to help with grooving thoracic extension with his athletes.
Once I tried it the lightbulb went off.
Try it.
You’ll get it too.
4. Goblet Kickstand Squat
Also known as a “B-Stance” Squat, all we’re accomplishing here is getting more acquainted with asymmetry and using it to our advantage. I’ve written more on my stance with regards to asymmetry in the past and you can check it out HERE.
TLDR: Asymmetry is normal. You’re going to live.
I like this variation because:
Everyone is a bit different – anthropometically speaking – and for many, experimenting with asymmetrical stances is a splendid way to help make the squat feel more comfortable.
I also view this as “fake single leg training” in that we can overload one limb over the other while not taking balance out of the equation (which can be a limiting factor for some).
On a scale of 1 to NASCAR they’re not very exciting. They’re not exciting to perform, much less write about. You think I want to sit here and write about push-ups?
I can think of a litany of things I’d rather write about:
Standing in line at the Post Office.
Rugs.
Buying socks.
Attending another kid’s clarinet recital.
Alas, given the pickle we’re all in at the moment (everyone’s training at home with access to minimal equipment) and the tsunami of push-up tutorials and variations making my eyes bleed on social media I felt it prudent to add my quick two-cents on the topic.
As much as I may bellyache on the push-up I’m actually a huge fan.
There’s a bevy of benefits.
They’re one of the more user-friendly exercises out there, require no equipment other than your body, can be easily progressed or regressed depending on the needs and ability level of the person performing them, are gluten free, and, maybe most important of all, have a superb carry-over to both everyday and athletic pursuits.
I’ve been coaching people for 18+ years and I have yet to come across a client/athlete who’s improved their efficacy in performing a push-up and not seeing a noticeable improvement in their ability to execute sexier lifts like squats, deadlifts, you pick.
A push-up done well improves lumbo-pelvic control (canister position or stacked joints) which then helps with force transference which then helps with…E.V.E.R.Y.T.H.I.N.G.
Poor Torso Position:Lower back arching, anterior pelvic tilt (porn star). Thanks to the folks at Mark Fisher Fitness for the porn star analogy.
But this isn’t even the main mistake I want to point out.
Everyone points this one out and I am wowing no one here.
Here’s the One I Wanted to Point Out
Performing them with pants on.
Why?
What’s the benefit of wearing pants?
Tell me.
TELL ME!!
Okay, the REAL Thing I Wanted to Point Out
Another bonafide benefit of the push-up is it’s proclivity to bolster one’s overall shoulder health.
Sometimes (but really almost always) whenever someone comes to CORE to work with me in person due to a shoulder that hates them, I’ll watch him or her perform a push-up and I’ll inevitably see this:
Other than the obligatory game of connect the dots you could play with the “beauty” marks on my back, what do you see?
SPOILER: Two shoulder blades that are glued together.
THIS is the mistake I see most people make. The (in)ability of the shoulder blades to upwardly rotate and move around the ribcage.
The shoulder blades are meant to move. This cementing effect can spell trouble:
Overactive rhomboids, which feeds into scapular downward rotation syndrome.
Ligaments of anterior shoulder capsule become lax and are more prone to injury.
A part of my soul dies.
Instead, what I prefer to see is something like this:
(Kudos to my wife for the Stanley Kubrick’esq camera work).
The subtle “plus,” or protraction (pushing fully away) at the top of the push-up is MONEY for Serratus Anterior activation which then helps nudge the scapula into upward rotation (as well as abduction).
The result is a proper push-up and most likely a pair of shoulders that will feel infinitely better.
If I had to choose a Mt. Rushmore of people who are badass at push-ups it would go:
Rocky
He-Man
T-1000
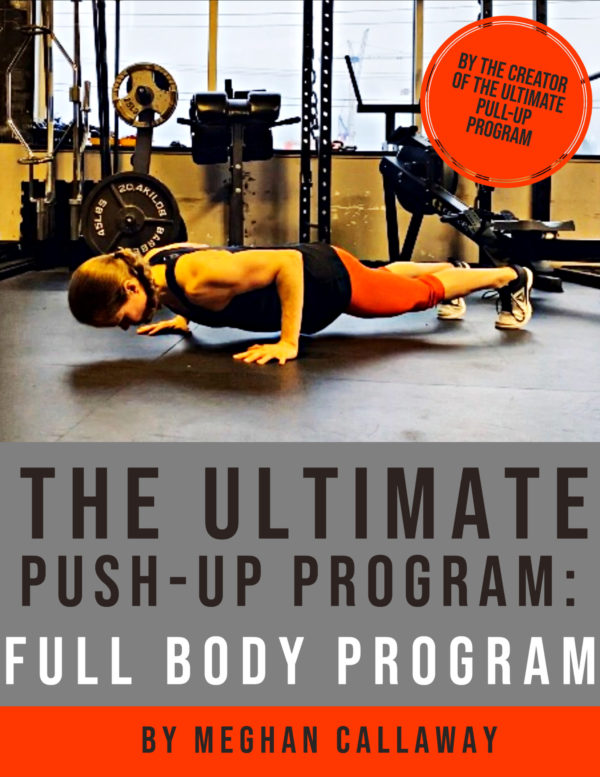
Meghan Callaway
Just like her previous product – The Ultimate Pull-Up Program – Meghan leaves no stone unturned with regards to innovative ways to train the push-up.
Whether you’re a newbie or seasoned pro you will be challenged by this program. And, if you’re a fitness professional you’ll pick up a ton of ideas when it comes to programming.
It’s on sale this week at $50 off the regular price…HERE.
For an amuse bouche of some of the variations Meghan covers in her program check out her guest post below.
5 Advanced Push-Up Variations You Might Not Have Tried
Push-ups are one of my favorite exercises.
Not just bodyweight exercises.
ALL exercises.
Push-ups are versatile and effective, and are certainly not boring. Push-ups require no equipment, so they can be done anywhere, anytime.
In our current world where most people are working out from home, push-ups and minimal equipment exercises are the perfect solution! Once you have mastered the fundamentals the sky is truly the limit, and there are countless advanced, innovative and fun push-up variations you can sink your teeth into.
Here are 5 advanced push-ups you might not have tried.
#1) Russian Push-Ups
This totally badass push-up variation absolutely torches the triceps, and requires a lot of lumbo-pelvic stability.
Coaching Tips:
Get into a plank position from your hands and feet.
Position your hands so they are slightly closer together than during regular push-ups. In the bottom position, your elbows and upper arms should remain tight to your sides.
At the top of the push-up, your shoulders, elbows and wrists should be in a relatively stacked position.
Your weight should be evenly distributed throughout your full hand and fingers, not just at the base of your hands/wrists. Pretend you are trying to spread your full hands and fingers to the floor.
Before each rep, take a deep breath in (360 degrees of air around your spine), brace your core (360 degree brace around your spine), and squeeze your glutes.
Lightly press your tongue against the roof of your mouth (behind your upper front teeth). This subtle trick can make keeping your head and neck from collapsing much easier.
Descend into the push-up and retract your shoulder blades. Think about lightly drawing your shoulder blades together and towards your spine as you are performing the eccentric component, but do not overdo this movement.
Once your upper arms are approximately parallel (or slightly closer) to the floor, press your body backwards and touch your forearms to the floor. Your feet should glide along the floor during this component.
Then pull your body forward and perform the reverse movements so your elbows are directly over your wrists and forearms are in a vertical position. Then press back up to the starting position. As you are performing these movements, do not sink into your shoulders, and do not allow your body to collapse towards the floor.
When you are pressing your body away from the floor and are returning to the top position, protract your shoulder blades. Think about spreading your shoulder blades apart and moving them away from your spine and around your ribcage.
Do not keep them pinned.
For the duration of the exercise, your body should remain in a straight line from the top/back of your head to heels.
In terms of breathing, do what works and feels best for you.
#2) Archer Push-Ups
This advanced push-up is a great progression if you have the goal of being able to do one arm push-ups. While one arm is performing the majority of the work, the other arm is providing some assistance.
Coaching Tips:
Get into a plank position from your hands and feet.
Position your hands so they are significantly wider than shoulder width apart.
On the side that is going to be doing the push-up, your weight should be evenly distributed throughout your full hand and fingers, not just at the base of your hand/wrist. Pretend you are trying to spread your full hand and fingers to the floor.
Before each rep, take a deep breath in (360 degrees of air around your spine), brace your core (360 degree brace around your spine), and squeeze your glutes.
Lightly press your tongue against the roof of your mouth (behind your upper front teeth). This subtle trick can make keeping your head and neck from collapsing much easier.
Descend into the push-up by bending one elbow as you would during regular push-ups, and straightening the other elbow
On the side that is performing the push-up, think about lightly drawing your shoulder blade towards your spine as you are performing the eccentric component, but do not overdo this movement.
In the bottom position, your elbow on the side that is performing the push-up should be positioned over your wrist, and forearm in a vertical position. Do not allow your elbow to flare out.
Your other elbow should be fully extended (but not hyperextended).
On the side that is performing the push-up, once your upper arm is approximately parallel (or slightly closer) to the floor, press up and return to the starting position.
On the side that is performing the push-up, when you are pressing your body away from the floor and are returning to the top position, protract your shoulder blade. Think about moving your shoulder blade away from your spine and around your ribcage. Do not keep it pinned.
Exhale after you have pressed away from the floor and as your body is returning to the top position of the push-up.
For the duration of the exercise, your body should remain in a straight line from the top/back of your head to heels.
#3) Longer Lever Push-Ups With Feet Elevated
This advanced push-up really isolates the triceps, and requires a lot of lumbo-pelvic stability. I upped the ante by elevating my feet on a couch.
Coaching Tips:
Get into a plank position from your hands and feet, and elevate your feet against a wall or couch.
Unlike during regular push-ups (or even triceps push-ups), position your hands so they are very close together, and so the fingertips of your thumbs and second fingers in both hands are touching, and form a triangle.
At the top of the push-up, your hands should be significantly ahead of your shoulders, and your elbows should be fully extended.
Your weight should be evenly distributed throughout your full hands and fingers, not just at the base of your hands/wrists. Pretend you are trying to spread your full hands and fingers to the floor.
Before each rep, take a deep breath in (360 degrees of air around your spine), brace your core (360 degree brace around your spine), and squeeze your glutes.
Lightly press your tongue against the roof of your mouth (behind your upper front teeth). This subtle trick can make keeping your head and neck from collapsing much easier.
Descend into the push-up by bending your elbows, and fully touch both forearms to the floor. In the bottom position, do not allow your elbows to flare out.
Once your forearms are completely on the floor, use your triceps to press up and return to the starting position.
Exhale after you have pressed away from the floor and as your body is returning to the top position of the push-up.
For the duration of the exercise, your body should remain in a straight line from the top/back of your head to heels.
#4) Negative 1.5 Rep Push-Ups + Band Resistance
Coaching Tips:
Place a resistance band under your hands, and so it is resting just below your shoulder blade area. Make sure that the band does not interfere with the movement of your shoulder blades.
Choose a resistance that allows you to use proper form at all times.
Get into a plank position from your hands and feet. Position your hands so they are shoulder width apart or slightly wider.
At the top of the push-up, your shoulders, elbows and wrists should be in a relatively stacked position.
Your weight should be evenly distributed throughout your full hand and fingers, not just at the base of your hands/wrists. Pretend you are trying to spread your full hands and fingers to the floor.
Before each rep, take a deep breath in (360 degrees of air around your spine), brace your core (360 degree brace around your spine), and squeeze your glutes.
Lightly press your tongue against the roof of your mouth (behind your upper front teeth). This subtle trick can make keeping your head and neck from collapsing much easier.
Descend into the push-up and retract your shoulder blades. Think about lightly drawing your shoulder blades together and towards your spine as you are performing the eccentric component, but do not overdo this movement.
Aim to lower yourself down in 3-5 seconds. Once you reach the bottom position of the push-up, press halfway up, then return to the bottom position, and then finally press up to the top/starting position. This is one rep.
In the bottom position, do not allow your elbows to flare out.
When you are pressing your body away from the floor and are returning to the top position, protract your shoulder blades. Think about spreading your shoulder blades apart and moving them away from your spine and around your ribcage. Do not keep them pinned.
For the duration of the exercise, your body should remain in a straight line from the top/back of your head to heels.
#5) Single Arm Push-Up Iso Hold + Band Resisted Towel Slides
This exercise is SO much tougher than it looks, and requires a lot of lumbo-pelvic stability, and shoulder/scapular stability. If you don’t believe me, give this a try ;).
Coaching Tips:
Place a resistance band around your wrists, and place one hand on a towel.
Position your hands so they are shoulder width apart or slightly wider, and get into the bottom position of a push-up. Tuck your chin, and keep your neck in a neutral position.
Your elbows should be positioned over your wrists, and forearms in a vertical position. Do not allow your elbows to flare out.
On the planted side, your weight should be evenly distributed throughout your full hand and fingers, not just at the base of your hand/wrist. Pretend you are trying to spread your full hand and fingers to the floor.
Lightly press your tongue against the roof of your mouth (behind your upper front teeth). This subtle trick can make keeping your head and neck from collapsing much easier.
While holding in a single arm push-up position, perform a slide out with the other side. Go to a range where you are able to maintain proper form.
For the duration of the exercise, your body should remain in a straight line from the top/back of your head to heels.
For the duration of the exercise, keep your core muscles braced (360 degree brace), and squeeze your glutes.
In terms of breathing, do what works and feels best for you.
In fact, you can purchase that OR the combo pack (includes both version 1.0 & 2.0) for a hefty discount in addition to taking advantage of a payment plan option.
Other benefits:
Continuing Education credits.
Instant digital access.
30 day money back guarantee (you will learn something that’ll improve your coaching skills and business).
Comes with a 5×7 autographed copy of Tony’s pecs (limited time offer).
Anyone who’s been lifting weights for a significant amount of time will, at some point or another, have a shoulder (or two) that isn’t too pleased with them.
Sometimes it’s a niggle —> you know, something that doesn’t feel good but also isn’t something that’s going to derail your workout plans.,
Sometimes it’s a lot more than a niggle —> but you’re an idiot and proceed to max effort bench press anyway; you idiot.
Needless to say, niggles happen – to varying degrees. Here are a few short-n-sweet preventative measures you can implement TODAY to keep your shoulders from hating you.
1. You Can Never Do Enough Rows
A simple audit of one’s program often gives a lot of insight.
It’s no surprise that the bulk of people who come to me with cranky shoulders tend to have a programming issue. Meaning, they perform a lot more pressing compared to pulling movements.
In other words: People like to train the muscles they can see in the mirror.
This can lead to an infatuation of sorts with pressing movements.
I find it rarely ever hurts to add more ROWING variations into everyone’s programs. A one-to-one (pull:push) ratio is a nice starting point. However, a 2:1 or even 3:1 (pull:push) ratio is often what’s needed.
We need to take an UNBALANCED approach to “balance” things.
In other words: More rowing variations.
Sometimes it’ll be something heavy – Seal Rows, Bent Over Rows, DB Rows, Seated Rows, Chest Supported Rows.
Sometimes it’ll be something medium – TRX Rows, Face Pulls
NOTE: This isn’t to imply that the exercises listed after “heavy” can only be done heavy and that the ones listed after “medium” can’t be performed with more challenging loads. Rather it’s just to point out that those exercises tend to be better suited for those type of loading parameters.
And sometimes it’ll be an exercise that is better suited for “lighter” loads.
Like this:
Split Stance 1-Arm Band Row
2. Reaching = MONEY for Shoulder Health
I wrote about this in detail a few weeks ago in THIS article, but you probably didn’t read it because I titled it something lame:
“Exercises You Should Be Doing: This Is One That Will Make Your Shoulders Feel Better”
See? Lame.
What I should have done is title it something like:
“101 Bicep Variations That’ll Make More People Swipe Right on Your Tinder Profile.”
And then I would have LOL’d because you would have been expecting an article on how to build swole biceps and what you would have really have clicked on is an article about the Serratus and the benefits of reaching for shoulder health.
Inspired by my good friend and Baltimore based personal trainer, Sivan Fagan, this is a SUPERB movement prep series to get your shoulders primed and ready to handle some subsequent big boy (or girl) weights.
Or if you just want a good ol’ fashioned shoulder pump.
All good.
4. The Arm Bar
Outside of sounding like an 80’s WWF finishing move, this is easily one of the most under-rated exercises for shoulder health out there.
I like to use this one as an extended warm-up for those clients with a history of shoulder issues because it hits a few major big rocks:
Grip (irradiation = more rotator cuff activation).
Trains the rotator cuff in a more “functional” manner (keeping humeral head centered in glenoid fossa).
Scapular stability (I actually like adding a reach/protraction at the top to help train scapular motion AROUND THE RIBCAGE)
Thoracic mobility (namely extension; great for those stuck in front of a computer for hours on end).
Julian is LOCKED IN to Spiderverse over there in the corner.
5. Following a Ketogenic Diet
The fuck outta here with that nonsense.
6. Bottoms-Up Carry Variations
I love bottoms-up carries because they’re a supreme way to train the shoulders in a more “functional” manner with minimal load.
There aren’t many exercises more humbling than this.
I figured we could all use a reprieve from the barrage of “at home” exercises and workouts everyone is posting of late.
#COVID19sucksdonkeyballs
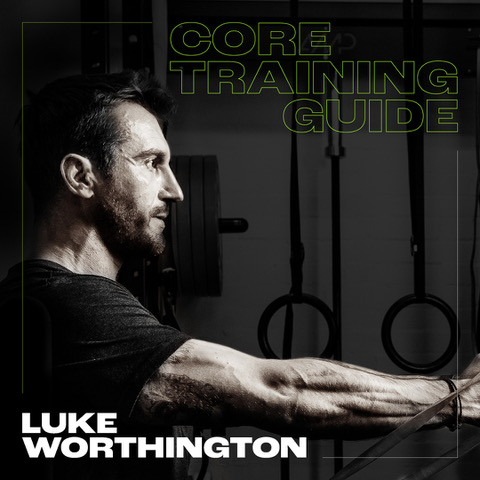
My good friend and London based personal trainer, Luke Worthington, released his Core Training Guidebook recently and in light of that wrote up this guest post that takes a bit of a different “take” on the topic.
Luke’s one of the smartest coaches I know and I think you should check it out (not an affiliate link).
Actually, now that I think about it: the timing of this pans out.
You’re all stuck at home and can’t go to the gym.
Everyone wants a core you can cut diamonds with.
Training the core doesn’t require a lot of equipment.
We have known for some time that core training and core control was about so much more than a six pack. But did you know it also plays a role in your mood, how you sleep, and even how you laugh or cry?
It’s generally accepted that movement is good for us on both a mental and a physical level. However, do we know just how closely the two are linked?
Our nervous system has two parts – parasympathetic (rest & digest) that takes care of all our subconscious actions. And sympathetic (fight or flight) that is our reaction to situations around us.
Generally in life we want to spend as much time as we can in a parasympathetic state – because quite simply, its easier!
However, moving from one to the other has just as much to do with how we move, as how we think.
Our neural anatomy isn’t just enclosed in our skull – the sympathetic ganglion (the part of or neurological system that activates sympathetic activity), are actually situated in the thoracic spine. So extending that part of your skeleton (arching your back) actively stimulates them, and therefore creates a sympathetic state. (one of the reasons why we stretch in the morning to wake ourselves up).
Note from TG: Also another “advantage” to powerlifters accentuating the low back arch during their bench press setup?
Moving ourselves into an extension position (also known as ‘scissor’ position) stimulates us, which makes us more alert, more able to exert force, run faster, jump higher, and generally be more ‘alpha’.5 Excellent for when we’re playing sports or fighting for our lives.
However, it also means that recovery, sleep, decision making and empathy are significantly reduced…
Not so good for maintaining relationships and resting – which we also need to do at times!
How Position Feeds This
One of the primary activities we must do in order to stay alive is breathe.
In order to perform this apparently simple activity we have quite a complex array of musculature supporting it. Our primary respiratory muscles are the diaphragm and the intercostal, which drive air in and out of the lungs with the purpose of exchanging gas and essentially stopping us from dying.
Whereas we may assume that inhaling oxygen is the primary cue for breathing – its actually blowing off carbon dioxide.
“A failure to do this results in our system becoming more acidic leading to a state of anxiety, increased sympathetic activity (fight of flight), impaired nerve conduction, restricted blood flow in cerebral cortex (poor decision making), increased phobic dysfunction panic attacks, and fatigue.”
LaghiF, Tobin F. Disorders of respiratory muscles. American Journal of Respiratory and Critical Care Medicine. Vol 168: 10-48 2003
The majority of the ‘good stuff’ in respiration happens in the lower 1/3 of the lungs.
Where the majority of blood vessels are situated.
However, in order for gas exchange to happen adequately here the ribcage and the pelvis have to be in the correct positions.
In simple terms they have to oppose each other – the pelvis in neutral, and the ribcage oriented over the top of it – almost like a cereal bowl with another one upside down on top of it! In coaching parlance we often call this the ‘cannister’ position.
If this doesn’t happen – then gas exchange cannot happen at this part of the chest cavity. But as a pre cursor to life it has to happen somewhere! If its not happening at the bottom, then it will happen at the top, however, in order for this to occur we have to engage additional musculature to help out (think upper back, trapezius, neck) as we need to elevate the upper chest to create space for airflow.
As well as the more direct consequences of creating unwelcome hypertonicity (over activity) in those areas (trapezius trigger points anyone).
This drive to create space in the upper chest requires thoracic extension, which as we know stimulates the sympathetic nervous system, creating a heightened state of anxiety, which in turn causes an increased desire to breathe…. but… we’re in the wrong position to!
This means we drive further into thoracic extension (scissor position), so we further stimulate the sympathetic nervous system and so we go around in a constant feedback loop…
To propagate the situation even further, the chest /neck breather is far less efficient at blowing off excess CO2 than the diaphragmatic breather (simply due to the fewer blood vessels available for gas exchange in the upper parts of the chest).
Not blowing off enough CO2 makes us more acidic, therefore more anxious, therefore having a greater desire to breathe, therefore driving further into thoracic extension
Poor position = poor breathing mechanics = greater level of anxiety.
However it also places us at a greater risk of further mechanical issues.
“In situations where respiratory drive is increased such as stress, disease or physical exercise, the ability of the respiratory muscles to perform their postural tasks is reduced. The presence of respiratory disease is a stronger predictor for lower back pain than other established risk factors”
International Journal of Osteopathic Medicine 12 (2009)
This constant feedback loop is what is occurring on a physiological level when a person suffers from a panic attack or hyperventilation. What they actually need to do is exhale fully, allow their torso to flex, and reducing the mechanical stress on the sympathetic ganglion, blowing off some CO2, restoring PH, and eventually settling back to homeostasis (balance).
When we’re over stimulated, hyperinflated, and unable to moderate our nervous systems – we push the emergency button.
When we cry, we exhale fully, and flex out of scissor position and into cannister.
Not sure if you’ve noticed but you don’t see people cry in an upright, extended position – they restore canister – get themselves neutral, and exhale. This is why we feel better after we do it, and why we often feel tired afterwards, and also why it makes our abs hurt!
Note from TG: All you have to do is watch me watching the ending of Notting Hill and you’ll see what Luke is referring to.
Training our core to resist movement through all three movement planes, whilst in incrementally more challenging positions will help us lift more and do more cool stuff – but it can also just make us better at life.
Last week personal trainer, Shane McLean, wrote a guest post for this site titled “4 Mistakes Beginners Make When Starting a Fitness Program (and How to Fix Them).”
When I read it I was like, “goddammit, this is good.” How dare you Shane, HOW DARE YOU, SIR, FOR WRITING SOMETHING SO SIMPLE AND ACTIONABLE AND THEN MAKING ME LOOK BAD ON MY OWN SITE.
YOU’RE RUINING MY LIFE!”
(throws chair through window).
After my tantrum (and explaining to my landlord why a chair was tossed from the 13th floor) I got to thinking: “What about the intermediate lifter? They make mistakes too. A lot of them, in fact. How about an article directed towards them?”
And, most important of all, refers to a kettlebell as a kettleBELL and not kettleBALL
I’d garner a guess that most people reading this site identify as an intermediate lifter. You know, past the point where merely looking at a dumbbell makes you stronger, but not quite to the stage where you’re deadlifting 3x bodyweight or competing at the Arnold Classic.
In short, we could likely make the case that most people will stay in the intermediate category their entire training career. More to the point, I’d make the argument that unless you’re competing at a high-level – whether it’s in powerlifting, bodybuilding, Olympic lifting, Strongman, CrossFit, Hunger Games, etc – and either placing and/or getting paid to do so, you’re an intermediate lifter.
I mean, I still consider myself an intermediate lifter and I started lifting weights when New Kids on the Block were telling us to ‘hang tough.’
I’m such a Danny.
Nevertheless, it should be noted that most intermediate lifters are legit lifters and have a fair amount of experience. It’s just, much like beginners, they have their own set of mistakes they fall prey to as well.
1. Emulating the Programs of Elite Lifters
I get it.
We’re often inspired (or better yet enamored) by what we see our idols doing (or have done) in books or on Instagram and YouTube. It’s hard not to study the likes of Ed Coan, James Fitzgerald, Eddie Hall, Jen Thompson, or Arnold, to name a few, and not want to start a Smolov squat cycle, like this afternoon.
Clearly, if only we followed their programs and what they’re currently doing, the harder and more advanced the better, we’d reap the same result. We’d be the envy of everyone at the gym…
…jacked, diesel, and maybe, just maybe, Tina at the juice bar will actually make eye contact with you.
*fingers crossed*
Unfortunately, things don’t quite work this way. Mirroring what your idols do in the gym is the wrong approach. And, quite frankly, is probably going to get you hurt.
What You Should Do
A better, more cogent, reframe would be to think to yourself:
“I need to follow the program(s) that so and so did when they were a beginner/intermediate lifter. What did (s)he do 5, 10, 15 years ago that allowed them to build their base wide enough to attain a higher peak in order to do what they do now? “
I guarantee it was a program that was very basic and vanilla.
Here’s a simple example of a protocol I use with many of my own clients/athletes. I revolves around the concept of “Inverted Sets,” where you flip-flop sets/reps of a given exercise during the week.
The idea is to increase exposure to QUALITY reps which is a concept I feel gets lost in the weeds with many intermediate lifters. More often than not the mentality is that the only way to progress is to make every workout as hard and challenging as possible.
Stealing a line from Dan John, “easy training is good training.”
2. But Training Still Needs to Be Hard
Serving as nice counterpoint, I love this quote from John Meadows I saw on his Facebook Page recently:
“Stop saying the only way to get bigger is to get stronger!
This is ABSURD.
Getting stronger is awesome and can work…do it!
BUT do you realize that when you get to an advanced stage, and have trained for years, you wont just keep piling up the reps and amount lifted. If you can congrats on benching 2000 lbs or repping 1000 15 times (and having adamantium for connective tissue), cause that’s what will happen.
You will have to find other ways to tax the muscle, for example judicious use of high intensity techniques that some people like to say do no good. So get strong, gain muscle, but realize at some point you are gonna stall and you must now actually think and include other ideas in your plan.
Please stop saying stimulating a muscle is all it needs. No it is not. The daily 3×10 with many reps left in the tank on barbell curls will not give you massive biceps. It’s called a warm-up. You will need to activate, LOAD, and EXHAUST fibers to get the desired affect once you get past the novice stages of training.”
I recognize he was directing his ire towards “advanced lifters,” but I do feel it’s a message that should resonate with intermediates as well.
As much as I’m a fan of not making a habit of training to failure or missing reps incessantly, I do find a lot of trainees fail to make continued progress in the gym if for no other reason than they don’t push themselves.
Ever.
What You Should Do
Strain.
Struggle.
You don’t have to shit your spleen or anything, but get uncomfortable from time to time.
Try this:
On your next bench press session work up to a challenging set of FIVE (meaning, take as many sets as you need to in order to work up to a weight heavy enough where you can’t complete a sixth rep).
Whatever that weight ends up being, drop the load by 10-15% and on your next set or two (or three) perform as many reps as possible (AMRAP).
That sucks.
Or this:
That really sucks.
3. Being Too Strict With Technique
I encourage proper technique with all exercises.
I’m on your side.
Really, I am.
But being too strict with technique – to the point where someone becomes that asshole nun from Game of Thrones and shames everyone within a block radius whenever they see the slightest deviation from perfect form on any exercise – isn’t doing anyone any favors.
Listen, I want my clients (and you) to stay as safe as possible when lifting heavy things. When working with beginners (and holding them accountable with regards to their technique) I am that nun.
Much less assholey, of course, but I’d be lying if I said I wasn’t adamant they use strict form at all times.
That being said, there comes a point where it behooves everyone to loosen the reigns a bit.
Take the DB row for example.
Now, it’s one thing for someone to look as if they’re having an epileptic seizure – or as if they’re using an industrial strength Shake Weight – when performing the exercise.
It’s another thing altogether for me to permit “some” body english in order to allow progressive overload or time under tension to occur.
The strength curve of the DB Row – as broken down in THIS article by Nick Tumminello – almost guarantees that, at some point, a little shimmying is inevitable.
And it’s okay. The world will continue to spin.
Moreover, it’s important to lean into the fact that as you get strong(er) the more likely it is your body will explore precarious positions when performing compound movements like squats, deadlifts, overhead presses, etc.
I’m fine with that.
It serves as a vaccine in a way.
The more small doses of these precarious positions the body is “introduced” to the more likely it’ll be able to defend against them when shit really hits the fan.
All of this to say…
…be relentless and practice good technique. Be a champion of it.
But understand that there will be a small window (say, 5% of the time) where it’s okay to deviate.7
I’m stuck in the midst of an avalanche of entrepreneurial shenanigans this week, so apologies for the lack of content on my end.
I do, however, have a first-class guest post from TG.com regular contributor, Shane McLean today discussing some common mistakes many beginners make in pursuing their health/fitness goals. But unlike a lot of articles with the same theme that go on and on and (and on) about what people do wrong, he actually provides some simple strategies to address things.
Enjoy!
NOTE: Be sure to check below for a special (and FREE) 4-week program offer from Shane.
4 Mistakes Beginners Make When Starting a Fitness Program (and How to Fix Them)
Starting something is easy.
This is evidenced by the crowds that pour into every gym after January 1st.And how many of these people are still in the gym after February 1st?
Probably not a lot.
They realize that a year’s worth of debauchery is not undone in four weeks, no matter what Dr. Oz says.
No cleanse, no magic exercise, no magic pill or diet will undo all that unhealthy living.
Like anything worth doing, it takes time and patience.
If this sounds anything like you (or a friend) here are some other mistakes (besides impatience and listening to Dr Oz.) you need to watch out for when starting out your fitness quest.
And if you recognize them and made them before, here’s what to do about it so you don’t do it again. Because learning from your mistakes is a good thing.
And learning about a potential mistake (before you make it) is even better.
1. Changing Too Many Habits at Once
When you’re first starting, your gun-ho to get this show on the road.
You want to hit the gym four, no, five days a week.
You throw away your junk food and buy all the fruits and vegetables.
And you vow to drink more water and less soda. However, the more you try to change, the less those changes stick according to Leo Babauta, the author of ‘The Power of Less.’
He states:
“In order to create a sustainable habit, you need to address one habit at a time.”
His research tells us that you will have an 85% success rate adopting one new habit at a time. Trying to change two habits at once the success rate to 33%.
That’s a huge drop off.
Trying to change more than one habit at a time is more likely to lead to failure than success.
What to do instead
Start small– Most people want to create big change as quickly as possible. For example, if you’re trying to lose weight start with drinking a glass of water before each meal
Get hooked on your habit- That’s the point. It takes a little while to make it a habit to stick. Don’t worry if you miss a day. Just don’t miss twice. The only way to fail is to quit.
2. You Think Rome Was Built in a Day
Following from above, because you’re making all these changes at once you (may) expect instant success. You feel the weight should fly off and the scale and mirror become your best friends.
Hold your horses.
Usually, it takes 4-6 weeks to see any visible changes in your body. During this time your nervous system, ligaments and tendons are getting used to the exercise you’re throwing at them.
They’re all busy making new connections and getting stronger. Once this period is over, you’ll start seeing some changes when you flex in the mirror. The trick here is to stick it out and be patient.
Because it doesn’t happen overnight, but it will happen.
What to do instead
Realize it took you awhile to get here and it’s going to take some time to turn this ship around.
You need to celebrate the small wins along the way. Even if you walked for an extra 10 minutes or did an extra rep of an exercise, give yourself a pat on the back. This helps keep you going.
3. Making Vanity Your Only Reason
Self-improvement for whatever reason is a worthy pursuit.
The trick here is to keep it going and to find your why outside of vanity.
For example, training for a 5 k or bending over to pick up your kids without pain.
Because when vanity is your only reason and if your results dry to a trickle, it’s easier to give up and listen to your thoughts that are saying this exercise thing isn’t for you.
That’s why it’s important to find your WHY.
Because when you have a deeper reason for your health outside of vanity, you’re more likely to keep going.
What to do instead
Spend some time in self-reflection and ask yourself the 5 whys.
Here’s an example.
Why do you want to exercise? To lose weight.
Why do you want to lose weight? Because I don’t like the way I look.
Why don’t you like the way you look? Because I’m 35 pounds overweight.
Why is losing 35 pounds important to you? Because I’m pre diabetic, have low energy and I can’t keep up with my kids anymore.
Why is keeping up with your kids important? Because they’re young and I want to be a better parent to them for as long as possible.
Boom. Now you do the same.
4. NOT Asking for Help
When everything is shiny and motivation is at an all-time high, exercise is easier. You’re going to the gym consistently; you’re eating better and you’re looking sexier.
Everything is going to plan until you hit a roadblock.
It could take the form of:
A fat loss plateau
Your hours increase at work
Your caregiver duties increase because of sickness
You get hurt or injured
Life and all it entails 😊
Bears. What out for those jerks.
Then you either think power through it or you begin to drop off your good habits, little by little. Either way, reaching your goals is more difficult.
But you still got this, right?
What to do instead
I’m all about making it easier, (on myself and clients) not harder. This is why I enlist the help of a friend and coach to write my programs. Because a trainer who has himself as a trainer has a fool for a client.
Please make it easier for yourself by asking for help.
This may take the form of asking the trainer at your gym for tips to work around an injury or exercising when you have limited time. Enlisting help from your spouse or loved ones, so you carve out a little time for yourself for health purposes.
Because when you don’t ask, the answer is always no.
Wrapping Up
Starting something is easy. The follow through and the ability to keep going is more difficult. Especially when things are not going your way.
But, the only way to fail is to quit. And you’re no quitter, right?
Do you need help with your exercise, getting started or overcoming roadblocks to be your best self?
Download my 4-week program here to get you on the road to better health.
About the Author
Shane “Balance Guy” McLean, is an A.C.E Certified Personal Trainer working deep in the heart of Louisiana with the gators.
Granted I’m biased, but I truly feel making a concerted effort to get strong(er) in the gym is the way to go for most people.
Strength is the base for pretty much everything; it’s the “thing” that most all other attributes we strive to improve upon is tethered to
Speed, power, endurance, Laser Tag world dominance, literally, pretty much everything performance based has its “roots” in improved strength. What’s more, there’s also a significant interplay between strength and improved body composition (strong people typically have more muscle), not to mention a high correlation of less risk of getting injured.8
I’m not saying strength is the end-all-be-all-answer-to-everything-and-you’re-totally-going-to-be-the-hero-of-your-recreational-slowpitch-softball-team-and-have-the-stamina-of-37-Spartan-Warriors-in-bed…
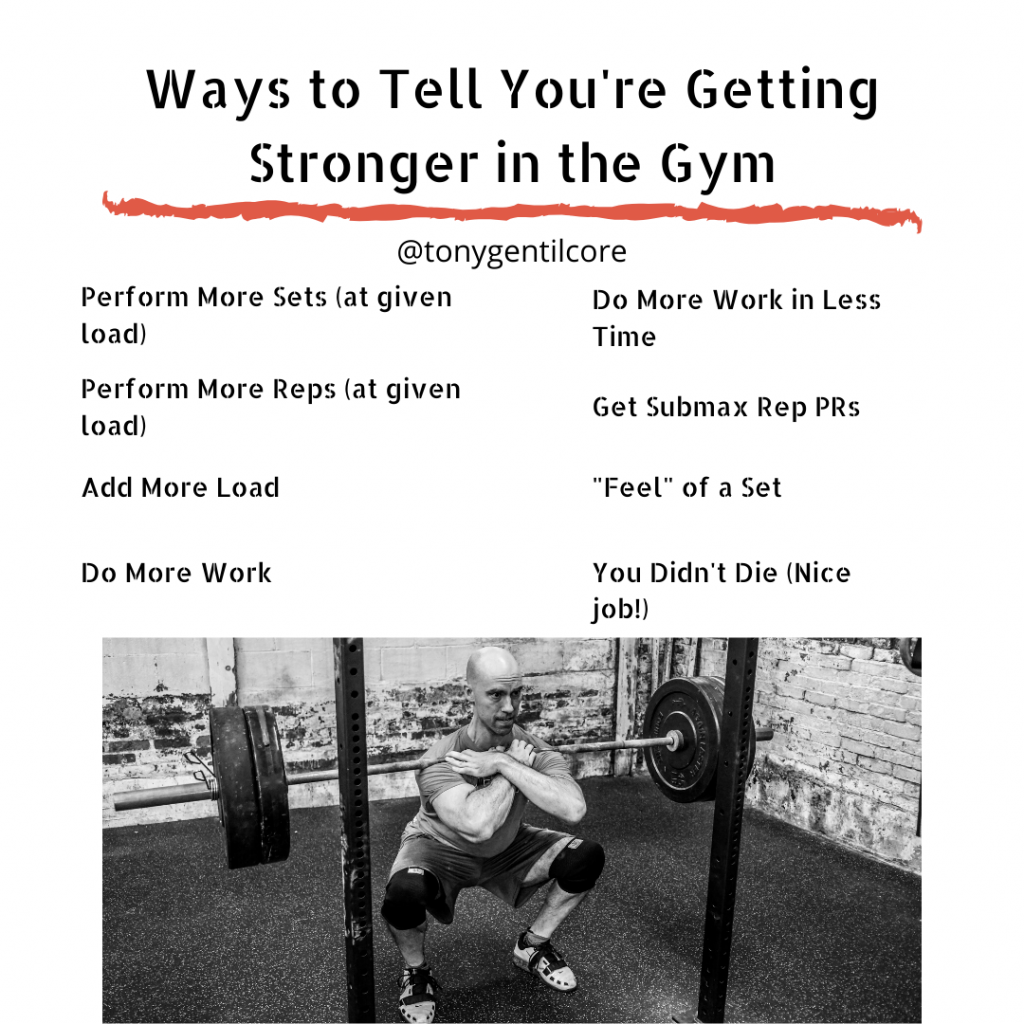
But How Can You Tell If You’re Getting Strong(er)?
There’s a lot of nuance as to HOW to get stronger (HINT: lift heavy things consistently) in addition to HOW to measure it.
However, for the sake of brevity I made this handy Cliff Notes graphic to hammer home the key components at play:
The left-side of the graphic is fairly self-explanatory, but in case some people reading are looking at this as if it were written in Elvish let me elaborate.
If you make a consciouses effort to perform either more reps, sets (or both) at a given load…you’re winning.
Example
Front Squat (225 lb)
Week 1: 3 sets of 5 reps = 15 total reps at a total tonnage (volume) of 3,375 lb lifted.
You know you’re getting stronger if you stay at the same weight and you perform either an additional set or more repetition(s).
This is also called PROGRESSIVE OVERLOAD.
So, Week #2 could go as follows:
3 sets of 6 reps = 18 reps completed at a total tonnage (volume) of 4,050 lb lifted.
4 sets of 5 reps = 20 reps completed at a total tonnage (volume) of 4,500 lb lifted.
Likewise, if you add more weight to the bar and lift that once, twice, eleven times, well, the secret’s out…you’re stronger.
Hell, I may as well just hand you the Sword of Grayskull and give you a killer bowl cut at this point.
To simplify things further: You’re going to get stronger if you DO MORE WORK over the course of several weeks, months, years.
To Note: Beginners will have a much easier time with this than advanced lifters. Most beginners can just gaze at a dumbbell and they’re going to get stronger.9 The first year or two of training can easily be boiled down to what’s described above; linear periodization at its core.
The more time under the bar someone has, however, and the stronger they are, the more “fluctuations” in training parameters have to be taken into consideration.
There’s going to be more peaks and valleys in training stress/load throughout the year in order to improve strength, as well as more meticulous attention to things like bar speed, ability to recover, and what accessory work needs to be done to address weak points in technique.
Lets just say more things need to be taken into consideration to take someone from a 400 lbs. deadlift to 500 compared to someone going from 200 to 300 lbs.
The cool thing, though…once you ARE strong (whatever that means to you), while the work to get there is no walk in the park, it doesn’t require nearly as much effort to maintain it. Maximal strength, for example, has a “residual” duration of 30 (+/- 5) days.
Meaning, so long as you remind the body (to be more specific, the central nervous system) that it can do something, you don’t have to do a lot of that something to maintain it.
To summarize the left side of my handy graphic above:
“What gets measured gets managed.”
That being said, where many people seem to miss the mark is that, where strength is the main goal, it isn’t just about always doing more reps, sets, and/or adding more weight to the barbell.
1. Do More Work in Less Time
This is density training 101.
Not only is this indicative of improved strength, but work capacity as well.
2. Get Submax Rep PRs
Dan John is known for a bevy of remarkable quotes.
“The goal, is to keep the goal the goal,” is a popular one.
One of my favorite of his, though, is this:
“Easy training is good training.”
There’s a time a place for training to suck and to make you come close to shitting your spleen.
Here’s a hint: That time is not every…single…workout.
It’s music to my ears when I client says “your pecs are looking awfully pecy today, Tony.” But it’s a goddamn symphonic masterpiece when a clients says “I could have done more” at the end of a session.
This doesn’t imply that they didn’t work hard or that the training session wasn’t challenging (trust me, it was). Rather, what it implies is that they got their work in and will likely show up for their next session feeling refreshed and ready to go.
It’s hard to make strides in strength when you constantly feel like you got run over by a Mack truck.
In short: Make your 3-rep Max your 5-rep Max. Chances are your 1-rep max will improve too. You don’t always have to pursue ABSOLUTE strength in order to get stronger.
3. “Feel” of a Set
I find a lot of people are too quick to add weight to the bar at the expense of their technique.
Sure, you may complete all desired repetitions of a given exercise, but if my eyes start bleeding watching it or I could watch an entire episode of The Mandalorian before you complete five repetitions…
 Scott Hansen is a Bostonian transplanted in Southern California, a strength/fitness/wrestling coach, educator, sub par surfer, and die hard New England sports fan.