Lets be honest: most of you reading either skip it altogether or discreetly brush it to the side as something you know you should be doing, but, you know, don’t.
I’m not here to judge. I do it too.
I don’t feel I need to sit here like an overbearing parent and type out all the reasons why you should be doing a thorough warm-up prior to training. But I will anyways.
A warm-up:
Improves alignment and posture.
Allows for additional and opportune times to address and tackle “problematic areas” such as the thoracic spine (lack of rotation and/or extension), hips (it takes a crowbar to squat past 90 degrees), glutes (you don’t have any), and ankles (the cement blocks we wear for shoes – not to mention high-heels – place us in a constant state of plantar-flexion, thus compromising our ability to dorsiflex).
Helps to increase core temperature and promotes blood flow…which helps improve flexibility/extensibility of muscles.
All that said – and despite many, many, MANY– smart people telling us how important it is…people still tend to skimp on their warm-up.
NOTE: HERE is an article I wrote a few years ago on “The Perfect Warm-Up?” As well as THIS one I wrote for STACK.
This video was part of the article linked to above. I only post it NOW for Eric Cressey’s EPIC video-bomb. Wait for it…..
Long story short: including a warm-up prior to training is a smart use of training time, will help to offset many of the poor sitting (and standing) positions we tend to be stuck in on a daily basis, and it only takes maybe 10 minutes.
DO IT!
The Over-Warm-Up
So now that we’ve established that you’re not going to warm-up, lets discuss the concept of the over warm-up, a term popularized by strength coach and powerlifter Paul Carter.
You’re TOTALLY going to be down for this…so keep reading!
For any uppity strength and conditioning snobs reading this can also, technically, be referred to as Post-Activation Potentiation.
Rather than attempt to define what Post-Activation Potentiation (PAP) is, I’ll defer to Bret Contreras:
“PAP is a phenomena by which muscular performance characteristics are acutely enhanced as a result of their contractile history. The underlying principle surrounding PAP is that heavy loading prior to explosive activity induces a high degree of CNS stimulation which results in greater motor unit recruitment lasting anywhere from five to thirty minutes.”
Traditionally, PAP is performed by utilizing a close to max-effort lift (think: bench press, squat, deadlift, arm wrestling a Terminator) followed suit with an explosive activity with the same “pattern” (think: medicine ball throw, vertical jump, 10-40 yd sprint, high-tailing it to local florist when you forget it’s your anniversary).
To take advantage of the phenomena most strength coaches agree that PAP is best utilized using the “lift something heavy then perform a similar explosive movement after” approach.
NOTE: I’d encourage you to read Bret Contreras’s full article HERE on PAP if you really want to dive into the nitty-gritty stuff.
However, for strength purposes I’ve found using a similar approach useful. Essentially you’ll take your “main” movement of the day – squat, bench press, deadlift – and extend your warm-up/build-up sets so that you work above your intended, scheduled work load.
So, for example, lets say you’re performing squats today and your program calls for 4×4 @ 75% of your 1RM. For the sake of argument lets say your 1RM is 350 lbs.
1) 75% of 350 = 262 lbs (rounded up to 265).
2) A traditional warm-up may look like this:
1×8 @ 40% (140 lb)
1×6 @ 50% (175 lb)
1×5 @ 60% (210 lb)
1×2 @ 70% (245 lb)
4×4@ 75% (265 lb)
3) The OVER warm-up will look like this:
1×8 @ 40% (140 lb)
1×6 @ 50% (175 lb)
1×5 @ 60% (210 lb)
1×2 @ 70% (245 lb)
1-3×1 @ 80-85% (280-300 lb)
4×4@ 75% (265 lb)
So in this case the objective is to hit a weight above or past the intended work sets to “potentiate” the nervous system, and thus (hopefully) making them feel easier/lighter.
The idea is to ENSURE your “over warm-up weight” is one you KNOW you can crush. Meaning, it’s not close to a 1RM and bar speed should still be, well, speedy.
Something else to consider is that this should only be utilized when you’re using sub-maximal weight with your work sets (60-80% of 1RM). DO NOT attempt this when you know you’re working at percentages higher than that.
I mean, you could…it just (probably) won’t end well.
Also, this isn’t something you’re going to want to perform long-term. Maybe use it for a block (3-6 weeks) and then revert to something else.
Today I have an excellent guest post from strength and conditioning coach, jump training specialist, and Director of Sports Performance at Reach Your Potential Training, Inc (www.igotrypt.com), Adam Feit.
Adam’s new resource, Complete Jumps Training, is available starting today. Unlike most traditional jump training programs that tend to focus solely on sagittal plane exercises or worse, utilize ankle weights2, this one actually, you know, helps get people more athletic.
Hybrid Jumping: More Efficient Than Your Prius
Sure, I get it. It’s good for the environment.
Better gas mileage. Minimizing the carbon footprint. Hell, you even get a tax break in most states.
But you’d think they would work on the aesthetics a bit better, no?
All kidding aside, what if I could introduce a new type of hybrid locomotion that would close the gap between where you are and where you want to be?
Possibly even save you time, space and money (without the fear of being made fun of by your friends)?
Would you consider it?
Good.
Because we’re going to explore the latest innovation in jump training for today’s athlete—the hybrid.
When I transitioned from coaching NCAA and NFL athletes to today’s youth, I knew we did not have the resources or the athletes to advance our jump training exercises like we used to.
We actually had real budget restrictions, athletes who had never trained before and limited space. And it got even worse as our business continued to grow and new groups were added.
We were filling the gym but limiting our capacity to move, move often and move well.
So we adapted.
We overcame and attacked the situation at hand and found a way to work around all those roadblocks, specifically when it came to jump training.
Most jump programs focus on some sort of variation of the vertical jump and long jump.
Why? Because they’re easy to coach, touch on both aspects of vertical and horizontal power and allow results to be compared across multiple sporting and coaching organizations.
But was there more to jumping than simply getting up as high as possible or far as possible, especially when it involved athletics? Could jump training be properly programmed and planned out to maximize performance and reduce the risk of future injury?
No question.
After coaching thousands of athletes through jump training, we noticed a few reoccurring themes.
1) Athletes had a difficult time jumping on one leg and landing on the same or the alternate leg.
2) They were stuck moving in the vertical or linear plane, only moving up or out.
3) Coaches did not know how to progress outside the scope of increasing volume or height/distance.
4) There was less and less transfer to actualsport tasks simply because of focusing on double-legged takeoffs and landings.
Years ago, Coach Michael Boyle addressed this very issue and proposed a simplified way of explaining jumps to his coaches and athletes. To minimize confusion amongst his coaches and athletes, he classified jumps as follows:
Jump: a two-legged takeoff with a two-legged landing (e.g., vertical jump)
Hop: a one-legged takeoff with a same one-legged landing (e.g., vertical hop)
Bound: a one-legged takeoff with an alternate one-legged landing (e.g., lateral bound)
However, the more we looked at our own athletes, the more we realized this needed to be expanded. We decided to add a fourth category to the list.
Enter the hybrid.
The hybrid is the combination of any type of jump, hop, or bound with the possible addition of a medicine ball (MB) for upper body power development (e.g., lateral bound to double-legged landing or a hurdle jump to MB punch.)
The hybrid category was a valuable addition to Coach Boyle’s original three categories for three primary reasons:
1) It bridged the gap between the transition of double-leg and single-leg jumping exercises.
With the use of the hybrid, we were able to better prepare for single-leg hops and bounds through the use of single-legged takeoffs with double-legged landings.
No longer were we rushing to do a vertical hop or long hop.
Now, we could slow down our teaching progressions even further to ensure long-term success and appropriately layer sequences within themselves for optimal programming.
Don’t believe us?
Ask your athletes to do a vertical jump (two legs). Then watch them do a vertical hop (one leg).
What do you see?
Dropped chests? Internally rotated hips and valgus knees? Lack of triple extension?
By adding a single-legged takeoff with a double-legged landing (novice) or double-legged takeoff to a single legged-landing (expert), we were able to better prepare our athletes for the forces, speeds and positions they may face in sport.
(Not to mention better hops and bounds for our highlight videos!)
https://www.youtube.com/watch?v=kn5v85ekXFs
2) It provided what we call “variation within simplicity.”
Rather than change exercises completely, we could simply add or remove one piece of the drill to change the stimulus and keep our athletes and coaches progressing.
Too often, coaches use a two-dimensional approach in regards to progressive overload—heavier weight or more volume.
What about rest periods? Changes in body positioning? Use of different implements?
When our space and time got cut shorter and shorter, we had to think of a way to combine not only types of jumps but also where they were occurring. Instead of devoting a day to solely linear jumping, why not combine it with another day?
Rather than only performing a long jump, why not add a lateral bound to a long jump? Or perhaps a rotational hurdle jump to a vertical jump and long jump?
https://www.youtube.com/watch?v=QUbClRjpLGk
Variation within the jumping exercise itself allowed us to combine multiple takeoffs, landings and planes of motion to better prepare the athlete for future exercises and what they may feel on the court or field.
3) Lastly, it allowed our staff to analyze single-leg jumping and landing mechanics much earlier in the programming.
Instead of wasting a period of 4–6 weeks on primarily double-leg takeoffs and landings, we could work on the limiting issue (usually single-leg strength/stability/power) right away.
From experience, we knew the importance of using jump training not only for power development, but also more importantly, for the reduction of future injury.
We have seen too many orthopedic doctors clear athletes for their return to play without evaluating all dimensions of their performance, namely deceleration and change of direction. Because of this, we have devoted our efforts to educating our staff and athletes on the importance of single-leg training, specifically jumping and landings.
We perform jump training in the warm-up, during movement, and throughout weight-training sessions.
After all, running, cutting, planting, pivoting, and jumping almost always occur with one leg at a time. Why would we not want to make it a priority?
So, if you’re looking to take your coaching and programming to the next level, I’d strongly urge you to check out the Coaches’ Guide to Jump Training.
It was made for coaches, by coaches. Whether you’re working with middle-schoolers or high-profile professionals, we’re certain this system will add another element to your awesome coaching.
Also, if you are looking to improve your own jump training, this is a fantastic resource. It’s currently available for HALF-PRICE.
1) Be sure to check out my updated speaking schedule HERE. Early bird rate still applies for mine and Dean Somerset’s workshop at Vigor Ground Fitness in Seattle at …..hint, hint, nudge, nudge.
2) Still haven’t tried Athletic Greens? What’s the dealo? Check THIS out for 50% of your first month.
One of the most thorough articles in recent memory on what “mobility” really is and how we can effectively train for it (if it’s deemed necessary). Hint: it rarely involves stretching.
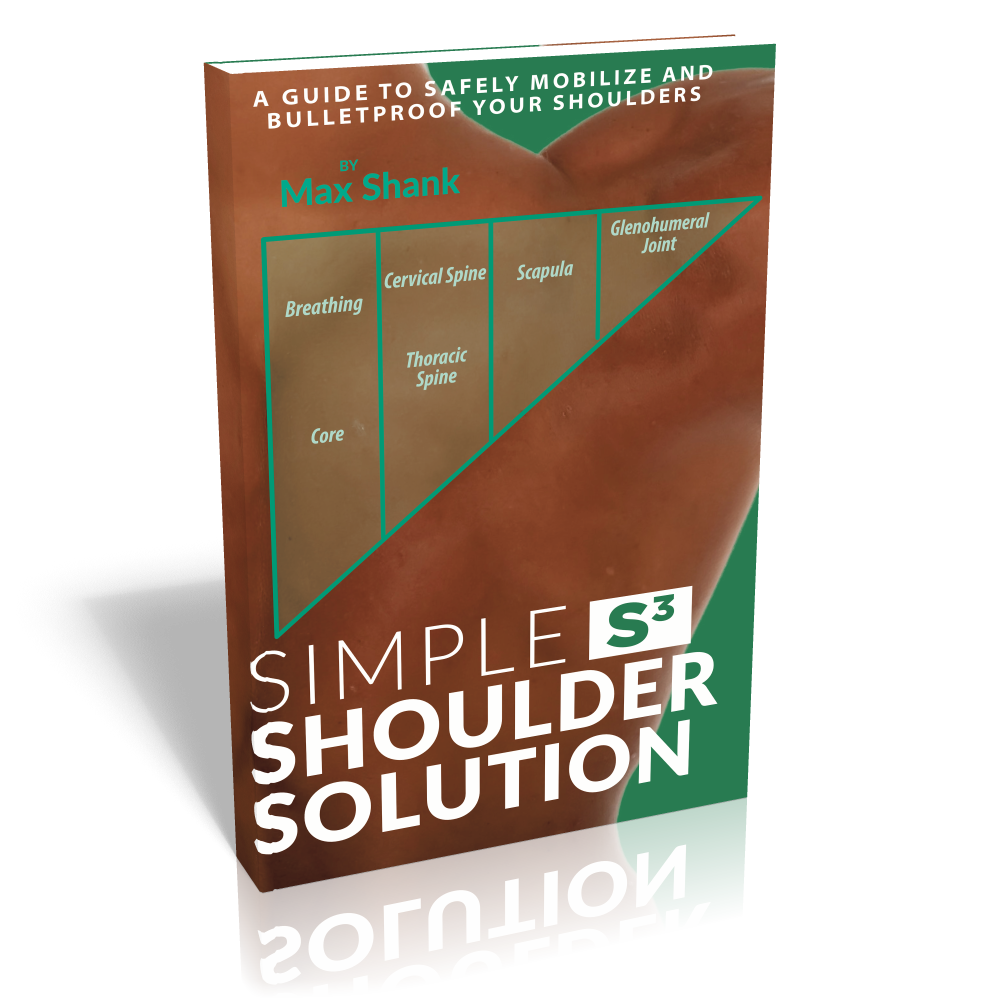
To check out Simple Shoulder Solution by Max Shank. It was just released this week, and is getting awesome feedback.
It takes a more unconventional approach to shoulder health, but that’s what I dig about it. I LIKE when coaches think outside the box and take more of a “lets do some cool shit and train” mentality. I’m 100% stealing some of his material. But, you know, giving credit. Max could kick my ass in 2.3 seconds.
Unlike Dan John, I lack the ability to seemingly rattle off an array of quotable quotes with the frequency of a Donald Trump soundbite.
That said, every now and then luck strikes and I chime in with gem like this:
“Lifting weights isn’t supposed to tickle.”
Muscles are going to get sore, and joints are going ache. And, in keeping things real, the risk of sharting yourself increases exponentially.
Sorry, it comes with the territory.
Being “sore and achy,” however, while nothing new to anyone who lifts weights on a regular basis, shouldn’t be a regular occurrence…or badge of honor.
Likewise, while the saying “pain is just weakness leaving the body” is a popular one amongst fitness enthusiasts (most often, CrossFit participants and marathoners3)…it’s really, really, really stupid.
Pain is not weakness leaving the body. It’s your body telling you to “quit the shit” and that what you’re doing has surpassed its ability to recover.
Of course, there are different levels of pain. I can have someone perform a set of 20-rep squats or Prowler drags – on their hands, blindfolded, uphill, for AMRAP – and there’s going to be a degree of “pain” involved.
But if pain is present – to the point where, you know, stuff fucking hurts – then that’s something entirely different and something that needs to be addressed…sans the machismo.
The shoulders are a problem area for many lifters and often take a beating. Below are some brief, overarching talking points on how to address shoulder pain/discomfort.
Note: it’s a broad topic, and one teeny tiny blog post won’t be the answer to everything. However, chances are, addressing one – if not several – of the talking point below may be exactly what’s needed to get the ball rolling in the right direction.
1) Stop Doing What Hurts
I had a client approach me recently about his shoulder. The conversation went something like this:
Client: “My shoulder hurts when I do this.”
[Proceeds to do this weird behind the head, shoulder dislocation thingamajiggy]
Me: “stop doing that.”
Client and Me: “LOL LOL LOL LOL LOL.”
Me: “seriously, stop doing that.”
It seems like an obvious thing to do, but if something hurts – whether it be the weird Cirque du Soleil contortionist move my client was doing, bench pressing, or whatever – stop doing it.
At least for now.
I know it’s a hard blow for a lot of guys to be told to stop bench pressing for any length of time, and in fairness, much of the time it’s a matter of addressing a handful of common technique flaws:
Better upper back stiffness (learning to pull shoulder blades together and down for improved stability).
Learning to engage the lats (to make a “shelf” and to “row” the bar down towards the chest).
Maybe tweaking wrist and elbow position (so one isn’t so flared out).
Addressing leg drive.
BAM – shoulder doesn’t hurt anymore.
All that said, it’s usually a better play to take out the incendiary movement altogether – maybe for a few days, or even weeks – and take the time to allow tissues to calm down and address any profound weaknesses and dysfunctions present.
2) Earn the Right to Overhead Press
The ability to raise one’s arms overhead – I.e., shoulder flexion – is something that’s not quite as easily accomplished in today’s society.
The left: what most people look like (forward head posture, excessive lumbar extension). The Right: dead sexy. Kinda.
We just don’t spend that much time there. Yet, walk into any commercial gym or CrossFit box and you’ll witness any number of trainees happily pushing, hoisting, and/or kipping overhead.
Often with deleterious ramifications.
Several factors come into fruition when discussing the ability to elevate the arms overhead4:
Shoulder: if one lacks abduction/upward rotation on any given side, you could see any number of compensations like lack of elbow flexion.
Scapulae: we need upward rotation, protraction, and posterior tilt to get overhead. Most people are lacking in one or all three.
T-Spine: does it extend? It should.
Lumbar Spine: does it extend? It sure as shit shouldn’t.
This is where assessment and individualized programming comes into play. Some people require a different “corrective” approach compared to others. However, if that’s not your wheelhouse, refer out!
But as a strength and conditioning professional you could still set people up for success by having them perform more “shoulder friendly” overhead pressing.
1-Arm Landmine Press
Serratus Upward Jab
3) Improve Upward Rotation
Many people are “stuck” in a downwardly rotated position – especially those who participate in an overhead sport (baseball for example) or are a lifetime meathead.
Due to lack of anterior core control, tight/stiff lats, soft tissue restrictions, poor programming balance, or a combination of several factors, many tend to live in a state of “gross” extension.
To that end: anything we can do to target the muscles that help upwardly rotate the scapulae – low/upper traps, serratus – would bode in our favor.
Band Wall Walks
1-Arm Prone Trap Raise
1-Arm Band Overhead Shrug
TRX Hinge Row
Moreover, a little TLC to foam rolling the lats would work wonders, as well as addressing anterior core control/strength with exercises like deadbugs.
Too, proper coaching/cueing by not allowing clients to crank though their TL junction or lumbar spine during movement would be stellar. Thanks, appreciate it.
4) Obligatory Commentary On How Breathing Will Cure Everything
I’m a believer in PRI (Postural Restoration Institute) principles and have used it to great success with clients in the past and present.
Helping to “reset” posture with focused breathing drills can be a game changer – especially for those living with shoulder pain.
First, lets address a common fallacy…beautifully articulated by NYC-based physical therapist, Connor Ryan:
PRI is not about learning how to move, it’s about breaking patterns driven by threat & chronic stress, allowing a window for learning
Anyone familiar with Max’s work knows he’s a guy that likes to think outside the box and help get people more athletic.
Much of what I discussed above mirrors much of what Max covers in this manual (with more detail).
In order to best address the function of the shoulder you need to follow the order of operations and handle the surrounding structures first. These are:
1) Breathing and Core Activation
2) Thoracic and Neck Mobility
3) Scapular Mobility and Stability
4) Glenohumeral Mobility and Stability
The main idea here is that if you do not address 1-3 FIRST, you are likely to create more compensation, hypermobility and potential for injury at the Glenohumeral joint.
I was invited back by the crew at Mark Fisher Fitness to participate in round #2 of their Motivation and Movement Lab. I, along with Mark Fisher, Michael Keeler, Harold Gibbons, Michael Littig, Steven Ledbetter, Pete Dupuis, and Artemis Scantalides spoke over the course of two days to a group of 80+ trainers, coaches, therapists, and gym owners from around the country on a variety of fitness-related topics ranging from business and behavioral change to program design and assessment.
What’s more…there were roughly 17,459 f-bombs dropped, 245 references to unicorns/dildos, and this Pulitzer Prize worthy picture.
It’s hard not to appreciate the sharp contrast and symmetry between the lighting, Jackie Chan’s facial expression, and my biceps.
Much like last year, I left the event feeling energized and thankful for being included in such an amazing event. I’m a better human being after having been immersed in the infectious MFF culture. Their passion and proclivity at helping every person pursue and amplify the best version of him or herself possible is unparalleled.
It’s quite an honor to see and be a part of it.
On that note: I got back into Boston somewhat late last night, and am in the throes of email purgatory. However, I do have something cool for you to check out.
Trainer Critique 2: The Deadlift
Last year, both Bret Contreras and Nick Tumminello were part of a video series hosted by ProShapeFitness.com called Trainer Critique “Live” I felt was pretty neat.
The premise was simple: the two of them watched a video of someone performing a lift (in this case, the squat) and they would each provide real-time, “live” feedback on what they saw.
For the second go-round, I was asked – alongside Jordan Syatt – to critique two different deadlifts. Here’s what transpired. Enjoy!
Jump to each critique section:
– Jordan Syatt critique 1: 0:56
– Jordan Syatt critique 2: 3:59
– Tony Gentilcore critique 1: 7:12
– Tony Gentilcore critique 2: 14:07
I’m heading to NYC this weekend to hang out with my boy Mark Fisher and his clan of unicorn loving ninjas.
For those of you who live in New York it’s a wonderful place. Their tagline “Ridiculous Humans. Serious Fitness” is so on point.
I mean, where else can you find people squatting, deadlifting, and performing immaculate kettlebell swing and Turkish get-ups, all while wearing speedos and capes and participating in spontaneous ABBA sing-a-longs?
Not to mention this happened the last time I visited….erotic bicep curls paired with squats.
I’ll be in town for the second iteration of the Motivation and Movement LAB. I was honored to be invited to speak at the inaugural event last year, and was elated to witness how well-received it turned out to be.
It sold out on it’s first go. Pretty sweet.
It’s a bit of a different flavor compared to most fitness events:
Swearing is highly encouraged.
Sexual innuendos are also highly encouraged.
Each presenter gives a 25 minute TED-like presentation, followed by a 45 minute hands-on portion.
Dance-offs optional.
I had blast attending last year and was very happy I was invited back for the second go around in 2016. This time it’s a 2-Day event, eight presenters in all. I’m actually car-pooling with two them from Boston – Pete Dupuis and Artemis Scantalides.
I’m driving. And I already warned them that I preset ALL my XM channels to Electric Area.5
One of the most thorough articles I have ever read on the very controversial topic of metabolism. Don’t be intimidated, though. Brian does a fantastic job of making things accessible and not too sciency.
Sit down, maybe grab some caffeine, you’ll be here for awhile.
And since we’re on the topic of squats, this was a great piece by Cressey Sports Performance coach, Miguel Aragoncillo, on the efficacy of the overhead squat.
Assessment in the health and fitness setting can be tricky, and rife with numerous (common) mistakes some fitness professionals make.
This is especially true when we start talking shoulders.
Mistake #1: the shoulder isn’t just the shoulder.
As in: it’s not just one “thing.” We’re actually referring to a shoulder “complex” that’s, well, complex.
The “shoulder” is comprised of four separate articulations (glenohumeral joint, sternoclavicular joint, acromioclavicular joint, as well as the scapulothoracic joint), all playing nicey-nice together in order to perform a wide array of movement(s).
All deserve their time under the assessment microscope.
Mistake #2: However, while all areas are important, I do find that assessing and addressing scapular function/positioning is often the key to unlocking answers. Unfortunately, it’s often the area that’s least looked at with regards to shoulder pain/dysfunction.
Mistake #3: shoulder assessment can – and should be – attacked from a few different perspectives.
Far too often, I find, fitness professionals take a static view of what’s going on and that’s it. They’ll have an individual stand there in the middle of a room, utter a few “mmm’s and ahhh’s,” write a few fancy schmancy words like “internally rotated,” “kyphotic,” or “I have my work cut out for me,” and that’s that.
Assessment complete.
Lets go squat!
When in fact, shoulder assessment should be broken down into a few disparate – but not altogether separate – components: Static Assessment, Integrative Assessment, and Dynamic Assessment.
Not to mention one’s ability to fill in a smedium t-shirt. Very important.
All three provide pertinent information that will help better ascertain the appropriate plan of attack when it comes to movement dysfunction, pain, and/or improved performance within the shoulder complex.
I Got 99 (Shoulder) Problems and….
…..My scapulae are the reason for all of them.
Sorry, I’m no Jay-Z. And I know I just butchered one of his classic hits.
But it was the only way I could think of to best articulate my point.
The scapulae (shoulder blades) are kind of a big deal when we begin to discuss shoulder health. It’s an arbitrary number I’m throwing out there with no research to back it up – so please, don’t quote me6 – but 90-95% of the “shoulder” issues I’ve helped address in the past when I was a coach at Cressey Sports Performance as well as the present (now that I am on my own), can be correlated back to scapular positioning and function.
Static Assessment
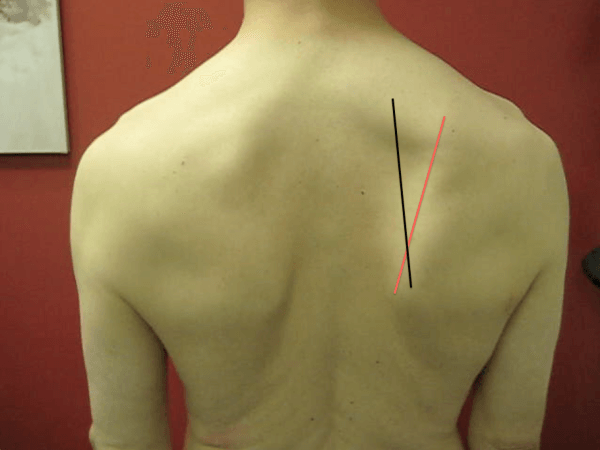
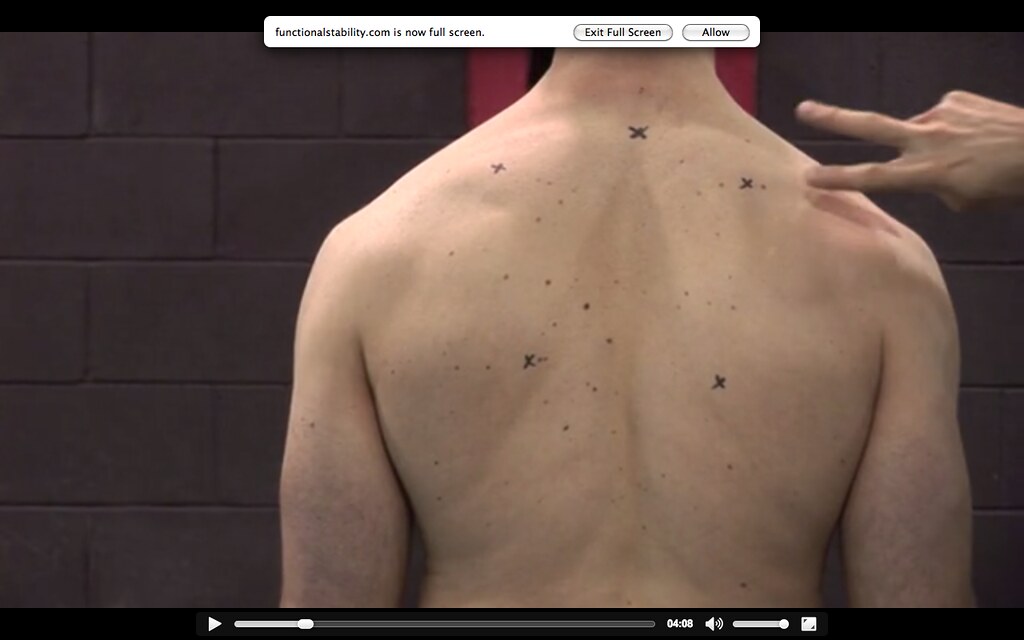
The scapulae should be in slight upward rotation. As you can see in the picture above, this individual is in slight downward rotation statically (both inferior medial borders (the two bottom x’s) of the scapulae are inside the superior medial borders.
Both scapulae should rest between T2-T7. The top middle “x” is T2 and you can see this person is below that point and in slight shoulder depression.
The medial borders themselves should rest between 1-3 inches from the spine.
If we only used static assessment it would be easy to assume this person is f****d. Many fitness pros would see this, hyperventilate into a brown paper bag, and immediately go into corrective mode.
But as Mike Reinold has poignantly noted time and time again:
“Statically, everyone’s shoulder blades start in a different position (elevated vs. depressed, internally rotated vs. externally rotated, abducted vs. adducted, anteriorly titled vs. posteriorly tilted, Autobots vs. Decepticons), and it’s moot to take static posture at face value.”
Besides, the above picture is of me, and when this was filmed/taken I presented with zero shoulder pain. This isn’t to imply I don’t have anything to work on, but it does showcase that static posture alone isn’t going to tell you all you need to know.
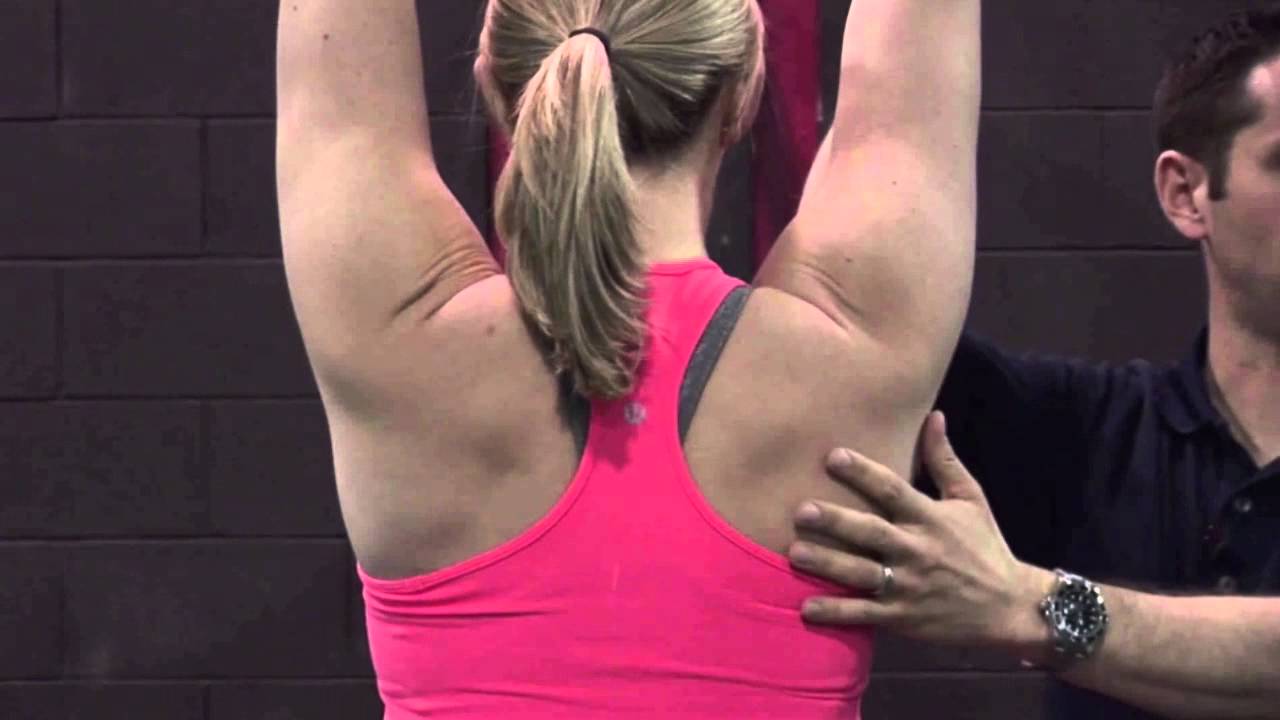
Integrative Assessment
Once we start adding movement – looking at scapulohumeral rhythm (the interplay between humerus and shoulder blade) or one’s ability to elevate arms above their head – sometimes, people self-correct really well.
What presents as “bad, “faulty,” or “shitty (<— depending on your rating system) statically, may very well be passable or very good once you add movement.
When looking at shoulder elevation/flexion, for example, does the scapula posteriorly tilt, upwardly rotate sufficiently (generally looking at 55-60 degrees of upward rotation), and does the inferior angle wrap around the thorax to the midline of the body?
This is something that can’t be determined if you’re only looking at static posture.
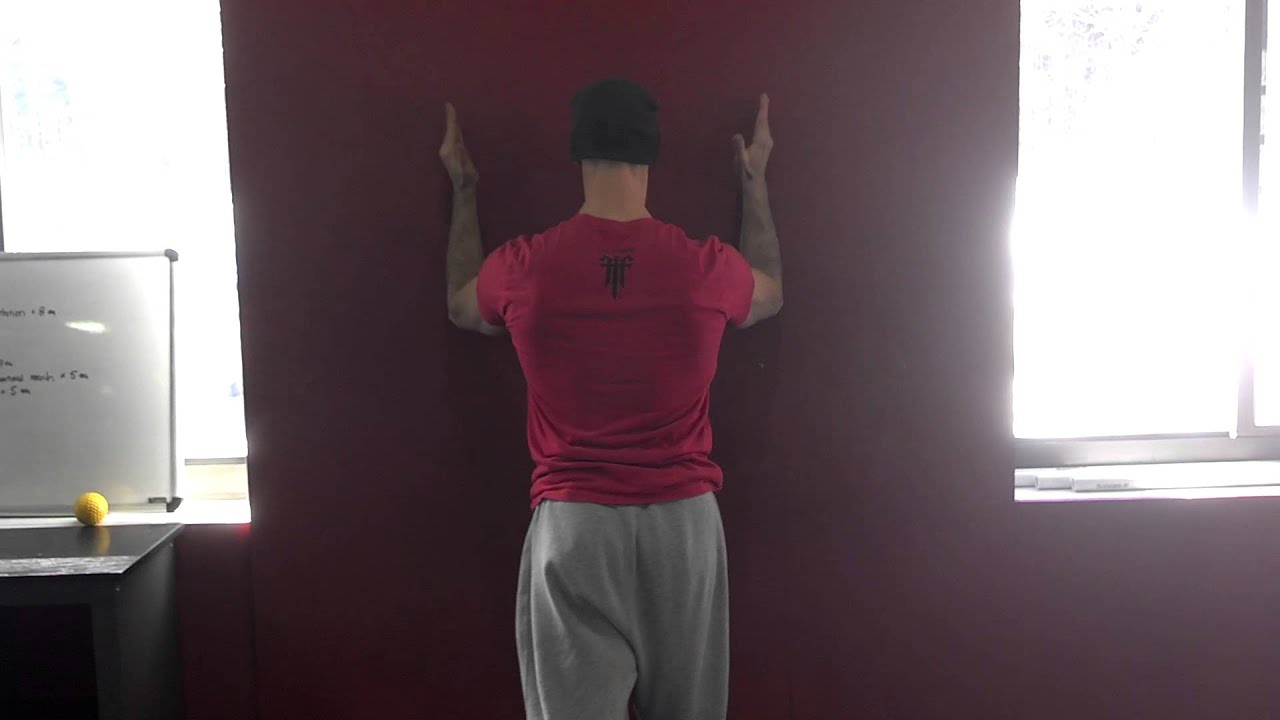
Dynamic Assessment
This is basically the part of the assessment where I ask the person to do stuff. Rather than boring someone to tears poking and prodding for an hour and making him or her feel like a patient, I prefer to get them moving and have them demonstrate certain exercises.
The push-up tells me a lot. Not only does it give me insight on their ability to move their scapulae (many times they’re “stuck” in adduction), but it also provides details on their lumbo-pelvic-hip control.
Because, something like this makes my corneas want to jump into a pool of acid:
Note: I understand the point of the video above was to purposely showcase a bad push-up. Mission accomplished.
More importantly, if someone comes to me with pain present, having them demonstrate how they perform certain exercises provides unparalleled understanding of what needs to be fixed.
A common theme I see amongst many trainees is allowing their shoulders to roll forward during execution of given exercises.
A Brief Review: when we elevate our arms above our heads the shoulder blades posteriorly tilt (hug the rib cage) and upwardly rotate. Reversing the action calls for scapular anterior tilt and downward rotation.
Many people “feed” into excessive downward rotation/anterior tilt by allowing the shoulders roll forward during common exercises like rows, push-ups, curls, and tricep press downs.
Stop It
https://www.youtube.com/watch?v=A9ytqrIf-dc
I Said, Stop It!
https://www.youtube.com/watch?v=47xXBhD7SuI
The “fix” here is easy:
Me to Client: “Okay, show me how you’d perform a standing cable row and tricep press down.”
Client: “Um, okay.”
[Then proceeds to emulate technique from the videos above.]
“Yeah, that hurts.”
Me to Client: “Stop doing them that way.”
[Puts client in a better position…shoulders rolled back with posterior tilt.]
Client to Me: “Wow, that feels so much better. You’re so smart and attractive.”
That’s Not All
What’s described above is in no way an exhaustive approach to shoulder assessment, but I hope it at least opened your eyes to the notion that it’s more multi-faceted than many give it credit for.
And on that note, I’d be remiss not to point people in the direction of guys like Eric Cressey, Mike Reinold, and Dr. Evan Osar.
And, pimping myself up a little bit, I cover the above and many other shoulder related topics in mine and Dean Somerset’s Complete Hip & Shoulder Workshop coming to the Toronto area in a few weeks (1 week left to take advantage of the Early Bird Special), Seattle, and two stops in Europe in May.
If you’ve ever picked up a VHS off the shelf at Blockbuster—you still do that too, right?—you know that movies often aren’t what they appear to be at first glance.
The Deer Hunter isn’t about hunting deer.
The Neverending Story actually, you know, ends. There’s even a sequel.
50 Shades of Grey is not a coloring book.
Strength training is the same way. Plenty of movements look like a whole lot of weirdness—or a whole lot of nothing—when you see them in a 10-second YouTube clip without context. But with a little more context, they turn out to be just the thing you needed all along to build an epic overhead press or nail that first pull-up.
These three movements are all worthy of being performed without a shred of self-consciousness. Still, it’s a good idea to be prepared for the inevitable question: “What is that working?”
SPOILER ALERT: exercises discussed in the article are HBT (Hanging Band Training) Overhead Press, Lying Hollow Position, and the Spoto Press (pictured above).7.
It’s a national holiday here in the States – President’s Day – which means my wife has the day off from work. Whenever that happens we like to go get a workout in together since it’s rare we have the opportunity to do so.
Contrary to what many reading may thing, getting a lift in at a commercial gym is actually something I look forward to, because it allows a little change of pace and environment for me. Plus it gives me access to pieces of equipment I normally don’t have access to.
Pec deck for days baby!!!
Another side benefit is the observations into human behavior it highlights. Commercial gyms are a petri dish of odd and comical behavior.
Today called for squats. I walk into the main weight area and noticed that both squat racks were in use by, weirdly enough, two guys squatting. Awesome. I’ll wait.
The “wait” turned into ten minutes as one guy, in his mid-20s, was taking F.O.R.E.V.E.R in between his sets. When he’d complete a set he’d stand there looking straight into the mirror, gazing into his own eyes for a few minutes catching his breath, and then walk over to his what I have to assume girlfriend to chat it up.
After the 3rd round of this, I casually walk up to him and ask, “hey man, how many more sets do you have?”
“A few sets.”
“Mind if I jump in and start warming up?”
[Cue incredulous look, as if I just asked him if I could fart in his eye.]
“Um, yeah, sure.”
As I start my warm-up I notice, through the corner of my eye, him acting all “huffy” with his girlfriend.
It ended up being fine. I made sure to re-rack the bar to the weight he was using and by the time I was half-way through my warm-up sets he had finished. But man, the experience just reminded me that people are way too serious sometimes.
End rant.
Lets get to the gist of today’s post.
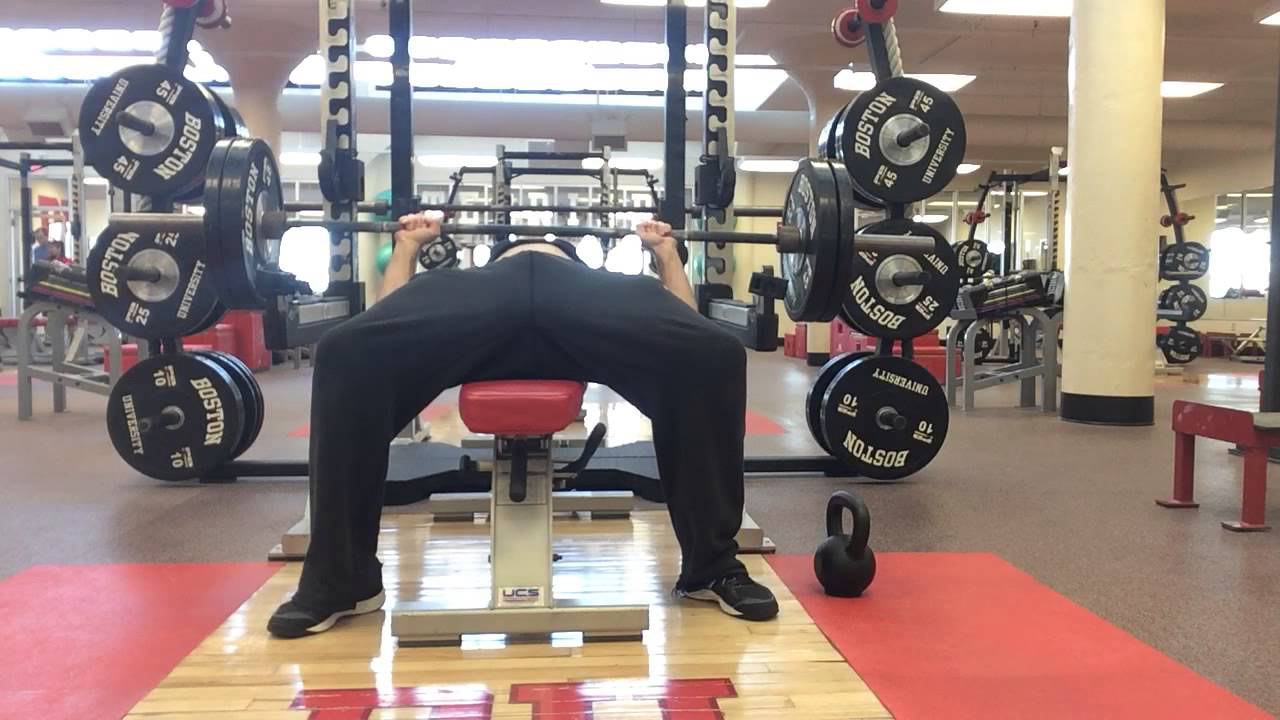
Barbell Seal Row
Who Did I Steal It From: The guy who writes my programs, Greg Robins, put these into one of my days last week and I loved them.
When I posted this video up on my Instagram account, Greg noted he “stole” the exercise from a guy named Mike Shea via Josh Bryant. Who, I can only guess, got it from some obscure Russian weight training coach or The Rock. Doesn’t matter. It’s a baller exercise.
What Does It Do: This is an excellent exercise that hammers the upper back, specifically the (lower) lats. The exercise lends itself to taking away “body english” and forces the lifter to place a premium on technique and really “feeling” the lats fire.
Key Coaching Cues:
Be sure you use a set-up that allows you to fully extend (straighten out) your arms. The should be enough room for the shoulder blades to move around the thorax/rib cage.
Squeeze glutes, brace abs. This will help prevent any hyper-extension of the lumbar spine.
Try to keep the neck packed (make a double chin).
Think about pulling your elbows towards the hips. The barbell will more or less be in line with that cute, little, belly button of yours.
Pull barbell all the way up until barbell touches the bench. I you find that that position places you in too much glenohumeral extension (shoulders roll forward), you can add a fat pad to the barbell to help lessen the ROM.
Progression would be to eventually lift the legs off the bench, via the glutes (hip extension).
Try not to wear too tight of a shirt, cause you’re jacked, and you’re shirt will rip….;o)