CategoriesUncategorized

The Real Rules of Assessment

The topic of assessment can be a daunting subject to tackle given there have been hundreds – if not thousands – of books, ebooks, manuals, DVDs, tapes (ha – remember those!?), brochures (and whatever other form of media you can think of) that have dissected and scrutinized every nook and cranny.

What else is there to say?  Certainly writing a blog post on the subject isn’t going to enlighten anyone –  especially considering there really isn’t anything new to say.  Likewise, it’s unlikely I’m going to say anything profound or revolutionary that will bring me accolades, a ticker tape parade, or in the event I really blow people’s minds, a Nobel Prize for Being Awesome.

Giving full disclosure, when it comes to assessment, there really is no set protocol I follow.  In the fitness world there are undoubtedly a bevy of phenomenal procedures or “systems” to utilize (FMS, NASM, Assess and Correct, to name a few) – but if I’m going to be honest, there is no ONE  that I prefer over the other.

I think Eric Cressey (my good friend, and business partner) said it best:  at Cressey Performance, with regards to assessment, we take a bit more of a “broad” approach and then dig a little deeper if need be.

Well I should clarify that statement to a degree.  With a large part of our population – specifically all of our baseball guys – we definitely start with a more targeted approach.  With them we’ll immediately delve into nitpicky things like total range of motion (IR + ER) between throwing and non-throwing sides, check their scapular upward/downward rotation, shoulder flexion, and the like.

After placing them under the microscope, we’ll then start to incorporate more generalized screens like the Thomas Test, adductor length, lunge and squat pattern, so on and so forth.

With such a specialized group of people, it only makes sense to start in that capacity.

On the flip side – with a more generalized population (those looking to lose some fat, increase their general level of badassery, or to look better neked), we’ll usually start with a more “broad” approach and then dig a little deeper if need be.

In the latter scenario, a perfect example would be someone who walks in with a history of chronic lower back pain.  In that case I’m definitely going to want to take a closer look at things and try to see if any red flags pop up that will give me more pertinent information.

The more info I have, the clearer picture I get, and the more likely I am to better ascertain what their needs are and come up with a plan of attack from a programming standpoint.

It’s in this type of scenario where having a “cherry picking” attitude towards assessment comes in handy.  I’ll take bits a pieces from the FMS, from some of Dr. McGill’s stuff, Gray Cook, Mike Boyle, Mike Robertson, Charlie Weingroff, Papa Smurf.  It’s all fair game.

Like I said:  I’m not married to one train of thought over the other.

Regardless, I do feel there are some overlying rules or “code of conduct” when it comes to assessment that I’d like to share.  And with that I’d like to share what serves as an umbrella of sorts to my general philosophy when it comes to assessment.

Rule #1: Actually, You Know, Do an Assessment

It still boggles my mind that there are still some fitness professionals out there who don’t even perform an assessment with their clients.  While I know it’s a cliched saying:  if you’re not assessing, you’re guessing.

As I alluded above, I don’t care what type of assessment you follow – everyone has their own preferences            train of thought, and I’m not here to state who’s right and who’s wrong, which systems are worthwhile and which ones are bogus.

BUT:  you’re an a-hole if you’re idea of an assessment is to just show a client the Cybex circuit. If you’re not taking your clients through an assessment, you might as well use a dartboard to write their programs.  Good luck with that.

I am by no means saying that what we do at CP should be considered the gold standard, but just to give everyone an inkling of what an assessment entails:

Thomas Test, Seated Hip IR/ER, Supine Hip IR/ER, Adductor Length, Hamstring Length, Prone Quad Test, Prone Hip IR/ER, Shoulder IR/ER (total ROM), GIRD?, Shoulder Flexion, Say the Alphabet Backwards (for time)

This takes all of 5-10 minutes (tops) and provides a gulf of information.  For example, if I’m working with a right-handed pitcher coming in with some elbow pain, the first inclination is to look at the elbow (which we obviously do).

But if that’s all I did, and I didn’t test his lead hip IR (which we find is woefully deficient, which means he’s probably opening up on his delivery too soon, which mean’s he’s placing waaaay more valgus stress on his elbow), we’d be barking up the wrong tree.

From there, we like to get people moving.  Testing them on the table is cool and all, but when we train, we move, and I like to see how people move.

– Squat Patern

– Lunge Pattern

– Teach Em’ How to Dougie

Using a general fitness enthusiast as an example, there are several squat “screens” I’ll take people through which I highlighted in THIS article.

But if all I did was a simple overhead squat screen – which most people fail miserably at – and I didn’t dig any deeper, I may just assume that the reason why he or she can’t get to depth is because their hips are tighter than a crow bar.  This is what they’ve been told from several other trainers, so it must be true!

I’ll take people through 3-4 squat screens to see what shakes free.  With the last one I’ll have them hold a counterbalance out in front of their body, and it’s almost profound how much of an improvement you’ll see.

By holding the weight out in front of you as a counterbalance, you’re forced to engage your anterior core musculature, which in turn gives the entire body the stability it needs to allow for more squat depth.

Without performing this last screen, many would automatically assume that the reason they can’t squat to depth is because of a mobility issue, when in fact, as Alwyn Cosgrove has noted on numerous occasions, it’s a stability issue.

Without this differentiation, we can see how many people would be barking up the wrong tree, and doing themselves a massive disservice on the training side of things.

Think what would happen if we omitted or neglected to perform the last squat screen – we’d assume that we have a mobility deficit somewhere and just focus on that one component, rather than address the real issue at hand, namely lack of stability.

Rule #2: You’re Objective Isn’t To Make Them Feel Like a Walking Ball of Fail.

The objective of an assessment is to give you information, not to point out every dysfunction that the person has and make them feel like a loser.

I remember one of the biggest mistakes I made as an upcoming trainer was to try to prove to people who much smarter I was than them.  When I’d start with a new client, I’d take them through an assessment, use big words like synergistic dominance, reciprocal inhibition, and adductor aponeurosis, and try to wow them with my infinite wisdom, intelligence, and witty banter.

Really all I did was come across as a walking douche.

I’d go out of my way to point out every single dysfunction – OMG, your left pinky toe doesn’t dorsiflex 17 degrees! – and honestly, it would turn many of them off.

Don’t get me wrong:  I think it’s important (wand warranted) to point out any concerns or red flags that may appear, but it also doesn’t hurt to have some sort of social filter and tone it down on the first day.   Try not jump at every chance to tell them how much of a train wreck they are.

Rule #3: It’s Still Important to Achieve a Training Effect

Pigging backing on the point above, many trainers get a little too overzealous with assessment and fail to realize that it’s still important to give people a training effect (even if they are banged up).

Think about it this way:  would YOU want to spend an entire hour on a table getting poked and prodded like a piece of meat?  Indeed, there are cases where that’s warranted – particularly when someone presents with a unique injury history. But you might as well just toss in an episode of Army Wives and bore them to tears if all you’re going to do is test hamstring length for an hour.

GET THEM MOVING!!!!!!!!!

At CP we’ve designed our initial assessment to be half table work/showing them how to foam roll/taking them through a general dynamic warm-up and half lets-get-them-on-the training-floor-and-see-what-shakes-free  hodgepodge.

Actually SEEING whether or not your client can perform a proper hip hinge or whether he or she can perform a push-up without compensating willl provide a heckuva lot more information, in my opinion, than testing breathing patterns for 45 minutes.

Rule #4: Make Them Prove You Wrong

And lastly, this is the crux; the creme de le creme if you will.

The REAL point of an assessment is for them to prove to me that they CAN do “stuff.” Listen, I think as fitness professionals (or just general fitness enthusiast) we all know that exercises like squats, deadlifts, rows, pull-up variations, single leg work, etc are going to make the “bulk” of most training programs.

My goal is to get all of my clients squatting, deadlifting, bench pressing, and kicking ass.

What TYPE of squat or deadlift or whatever is where the assessment comes in.  If someone comes in with FAI, I’m sure as shit not going to squat them (at least not past parallel).  But I can more than likely have them perform trap bar deadlifts and single leg work without much fanfare.

Additionally, if I’m working with someone dealing with a shoulder impingement problem, I’m probably not going to have them bench press, but I can probably have them perform dumbbell floor presses (and a crap ton of horizontal rowing) and progress them from there.

The point is:  they must demonstrate to me – through the assessment process – that he or she can perform the things I want them to do in a safe manner, with flawless technique, and without pain.

More importantly (and this can’t be glazed over):  will said exercises point them in the right direction with regards to helping them attain their goals?

In many ways, this is the REAL rationale behind an assessment.  To prove to you – the fitness professional – that they can perform “x” exercise(s) without causing injury or harm.

And That’s That

The above certainly isn’t an exhaustive overview on my thoughts with assessment, but more along the lines of a quick brain dump that (hopefully) sheds some light on things I’ve learned, experienced, and adapted throughout the years.

I think at the end of the day, no one is really right or wrong when it comes to assessment.  There are certainly many, many ways to approach it.

I’d love to hear everyone else’s thoughts.  Agree? Disagree?

CategoriesProduct Review

Muscle Imbalances Revealed – Assessment & Exercise Edition

Trilogies usually suck. Sure we have the golden standards like Lord of the Rings, Star Wars (the first one, don’t even get me started on that piece of crap Phantom Menace that Lucas tried to pawn off on us), The Godfather, and The Dark Knight. But for every one that raises the bar, we have ten “sequels” that are just absolute garbage: Police Academy V, anyone?????

So what the heck does this have to do with anything?

Well, as far as fitness info products are concerned, you’d be hard pressed to find any series more impressive than the Muscle Imbalances Revealed franchise.  Having been a part of the last installment – Muscle Imbalances Revealed – Upper Body – I can attest that the information routinely provided is top notch and will undoubtedly help any professional take his or her “game” to the next level.

I mean, if you want to become the best, you need to learn from the best.  Right?

Today, as well as sporadically throughout the rest of the week, I’m going to be discussing the latest in the series (the third, in fact), Muscle Imbalances Revealed – Assessment & Exercise, which includes presentations from the likes of Rick Kaselj, Anthony Mychal, John Izzo, and Nick Rosencutter.

Assessment and Exercise for Knee Injury Recovery – Rick Kaselj

Since Rick is the “Oz” behind the Muscle Imbalances Revealed curtain, doing all of the behind the scenes work that never gets recognized (as well as serving as the figurehead of the series) I figured it only made sense to start here.

Before I begin, though, I just have to say that Rick is probably one of the most genuine and jovial human beings I’ve ever met, and his thirst for knowledge (and spreading it to others) is unparalleled.

As such, Rick has a lot of experience working with injured people (and healthy ones, too) and he’s recognized as one of the “go to” professionals with regards to assessment and rehabilitation.  For those who aren’t familiar with Rick’s work, you can check out his website HERE.

Rick’s presentation spoke volumes to me personally because I’ve had a history of knee issues for the better part of the past decade, and he has an uncanny ability to break things down into manageable, “why the hell didn’t I ever think of that!?,” nuggets of information that can easily be implemented on day one

After giving a brief overview of general knee anatomy, here are a few bits of awesome that Rick provided:

1. When it comes to assessment, it’s important to test the knee in both PASSIVE and ACTIVE ranges of motion.

Passive = gravity or someone else is doing the movement.

Active = the individual themselves is doing the movement.

2.  In terms of general ROM guidelines, we’re typically looking at an individual to be able to get to -5 degrees of knee extension, and around 140 degrees of knee flexion.

This is important because we need anywhere from 2-70 degrees of flexion in order to walk, and a loss of around ten degrees of extension can result in a limp, which, not surprisingly, will place a lot of undue stress on the ligaments and muscles.  Not to mention put a damper on your ultimate frisbee plans this weekend.

Rick also noted we need 93 degrees of flexion to get out of chair, 106 degrees to tie shoe, 136 degrees to take bath, and 141 degrees to swift kick someone in the face.

I made that last one up, but the key point is that having full knee ROM is important for every day activities.

3.  Speaking in more specific terms, Rick noted that a lack of knee extension also results in loss of what he referred to as the “screw home mechanism,” which serves its purpose by reducing stress on the quads and placing more on the passive restraints (cartilage, menisci, and bones).

This seems counterintuitive, and when I first heard Rick say this I tilted my head to one side and was like “what the what!?!?!?”

But once he explained his rationale in more detail, I was picking up what he was putting down.

In short, in stealing a line from Mike Roberston:  stacked joints, are happy joints.

4.  As far as the actual assessments are concerned, I like Rick’s approach because he takes more of a simpleton approach, which I dig.  A lot.

There’s no smoke machines, or laser show,or any theatrics for that matter. I think a lot of fitness professionals fall into the trap that the more advanced or seemingly “cool” the assessment looks, the better it must be.  I disagree.

Using one example from Rick’s presentation (and there are several):  he likes to incorporate a bilateral standing calf raise into the mix to see whether or not someone can get onto their toes and attain knee extension.

For the record:  When Rick demonstrated this, I couldn’t help but notice that basketballs he has for calves.  Well played, sir. Well played.  I hate you.

5. Rick then goes into several common exercises to regain ROM, and then progressing depending on how the knee responds.

I’ve poo-pooed on Terminal Knee Extensions (TKEs) is the past – namely because I feel they’re woefully OVERemphasized  in knee rehab – but Rick does a good job of demonstrating several variations progressing from unloaded (d0ne actively) to loaded, to adding resistance.

On top of that, he even demonstrated several Terminal Knee FLEXION exercises using a towel that I thought were pretty neat.

If anything what I took most from Rick’s presentation is that we can’t always be meatheaded with our rehab. It’s REHAB for crying out loud!!!  But there’s also a lot to be said about not treating our clients and athletes like they’re patients, and giving them a training effect.

As much as we want to think that squats cure everything from global warming to cancer, when it comes to knee pain and fixing it, that’s not necessarily the case.

More often than not, we must take it down a notch (or 20) to re-teach the body proper motor learning engrams, to teach it which muscles actually need to fire, and to prevent someone from overreaching their pain threshold.

Muscle Imbalances Revealed: Assessment and Exercise is on sale starting TODAY (Tuesday, August 14th) until this Friday for a redunkulous introductory price of $37.  Considering you can get your learnification on from some of the industry’s best, all in the comfort of your own home, without having to spend an inordinate amount of money travelling, and you’ll simultaneously earn some CECs in doing so, well, that’s a bargain if there ever was one.

—> Muscle Imbalanced Revealed: Assessment and Exercise <—

CategoriesUncategorized

Q & A: Fixing the “Tuck Under” When Squatting – Part I

NOTE (from August, 2014):  I wrote this article back in March 2012. When I was an idiot. I still hope you read what I have to say below, because most of what I say still applies.

However, I’ve changed my thought process significantly since I originally posted this article. For a more up-to-date, um, update…check out the following article I wrote on T-Nation titled How Deep Should I Squat?

I.e., the hamstrings have little to do with the tuck under or “butt wink.”

Q:  Hey Tony,

Just read this old article over at T Nation – Squat Like You Mean It:  Tips for a Deeper Squat.

I’ve been trying to improve my mobility for a deeper squat and eventually got there ( I can sit in a squat position all the way down with heels still on the floor) but my problem lays in lumbar flexion at the bottom.

Obviously I’d need an assessment in front of you to pinpoint the issue but is there anything you can recommend for neutral spine. It’s driving me nuts that I cant keep a neutral spine. I’ve been retracting my shoulder blades, squeezing my lats and activating my core but still no cigar. Any common issues you see in this area?

A: Notably, it is completely bat shit crazy to say that everyone should squat to the same depth. Some people picked the right parents, have awesome levers, and are able to squat ass-to-grass with no issues at all.

PS:  I hate you.

Conversely, there are others out there who try to squat deep and, well, bad things happen.  Not everyone is the same, and it’s important – especially as a coach – to understand this.  While admirable, the end goal for every single trainee shouldn’t necessarily be to go ass to grass from the get go –  just because some meat head on a random forum who doesn’t know any better told you so.

Instead, the goal should be to teach proper squat mechanics and groove proper technique in a safe range of motion that won’t be overly deleterious to the spine.

As my good friend, Kevin Neeld, has mentioned prior:

Someone with limited hip flexion that attempts to squat deeper than their anatomy allows inevitably tucks their hips under at the bottom.  Invariably this leads to lumbar flexion under a significant load.

The question then becomes:  how can we remedy this issue?  Can we ease our way to a respectable depth without the ol’ butt tuck?

Of course we can!

Since it is a fairly common occurrence in the general training population, to start, we should discuss  what causes the tucking in the first place? While there are several things that need to be ruled out which are outside the scope of this particular post (nasty adductors – specifically with regards to sports hernia, and femoral acetabular impingement), one of the major points I want to hit on is that a vast majority of people (not everyone) are sitting in posterior tilt all day, and as a result the hamstrings tend to get stiff(er) relative to the anterior core.

It’s no secret that we spend a lot of time sitting.

In an ideal sitting posture, the pelvis is level or has a slight anterior pelvic tilt. With a posterior pelvic tilt, the PSIS are lower than the ASIS.  A posterior pelvic tilt is accompanied by an increased kyphosis. In addition, the ischials travel forward and new pressure points are created at the sacrum and the spine.

For those who are a bit glassy eyed from reading that, try to visualize how you sit in your car, or on the bus, or even at your desk…..right now…..as you read this.

Chances are, it looks very similar to the picture to the right.

Not surprisingly, and as noted above, the hamstrings become short or stiff relative to the anterior core.  Because the anterior core can’t counteract the pull of the hamstrings (and adductor magnus for that matter), the force couple on the pelvis is compromised and squatting may become problematic.

With that, I’m going to stop with the technical talk now because it’s making my brain hurt. Besides I’m sure many of you would rather swallow a live grenade than listen to me go on and on and on about PSIS and ASIS shenanigans.

Of course, the issue could be more far more reaching than just looking into the hamstrings/weak anterior core – but for simplicity sake, we’re going to focus our attention there.  And, just a heads up, in Part II, I’ll discuss training modifications that can be implemented…..so be sure to check back then.

In the meantime…..

Here’s What I’d Do If I Were You

Incorporate more multi-planar hamstring mobilizations.  I MUCH prefer these drills over just telling someone to haphazardly “go stretch.” Moreover, I find that these drills have much more of an effect since they address the hamstrings from multiple angles and not just “what’s easy.”

Note:  this last one will be a doozy for most.  The key point to consider is to make sure that you rotate through the hip and NOT the lumbar spine.

Other Stuff to Consider:

1.  Notice how I don’t flex my lumbar spine when doing these drills? You should do the same.

2.  Another thing that can’t be appreciated because of the camera angle is that the toes of my standing foot are pointing straight a head as I perform all the drills

I like to incorporate all of these as part of an (extended) dynamic warm-up, or they’re something that could easily be performed throughout the day in your office or home – all you need is a counter top or desk and you’re all set.

Bonus points if you bust them out during a business meeting!

And that’s it for today.  Tomorrow (UPDATE:  actually, it’s going to be on Monday.  Had too many things to catch up on in the meantime) I’m going to discuss how you would differentiate between whether it’s a hamstring issue or weak anterior core (Hint:  it’s usually the latter more than the former), as well as discuss some simple training modifications that can be done to help alleviate the “tuck,” and (hopefully) groove a more conducive squatting pattern.

CategoriesUncategorized

Bulletproof Your Body: Assessments for the Hardcore Lifter

I know, I know – I’m lame for posting while on vacation.  But, if it’s any consolation the picture above gives you a little taste of what I’ve been up to. 

I hear it’s snowing up in Boston today.  Muhahahahahahahahahaahahahahahaha.**

Anyways, I had another article go up on t-nation earlier this week, so for those who haven’t checked it out yet, enjoy!

You lift heavy things. You believe there’s no illness that heavy squats can’t cure. Heck, you’re so hardcore you consider creatine a garnish.

But let your health slip and it’s bye-bye big muscles and new PRs. To prevent the slip, you may need a few physical assessments. 

When it comes to assessments, there are a few schools of thought. On one end of the spectrum you’ve got trainers who spend two days assessing someone, taking meticulous notes on everything from how much someone’s left big toe pronates to rectal temperature.

At the other end, you’ve trainers who don’t know their ass from their acetabulum, and so long as their client can stand on two legs they’re good to go, oftentimes leading to disastrous results.

As always, the best approach lies somewhere in the middle.

CONTINUE READING………

** Hahahahaha- muhahhahahahahahahahaa.  LOL.  ROTFLMAO. 

CategoriesUncategorized

Thomas Test: Hip to Be Square Part II

Yesterday I went into a little detail on the Thomas Test and how it can be a very effective test to assess hip flexor length.  Unfortunately, while it’s a fairly idiot proof test to administer, many fitness professionals out there perform it incorrectly and have no clue on how to interpret what they find.  In case you missed it, CLICK HERE to read part one.

Today, however, I want to switch gears and talk a little about some of the corrective strategies one can implement after having completed the Thomas Test.   Come on, you didn’t think I was just gonna leave you hanging like that did you?

Predictably, as I noted yesterday, pretty much everyone has a little sumthin, sumthin going on in their hip flexors, whether we’re talking poor tissue quality and/or limited length – no big surprises there.  We sit…. a lot.  We sit on our commute to work.  We sit at work.  We sit on our way home from work.  We then sit some more at home.  And, for most, we even sit while we “workout,” if you want to call it that.   It’s no wonder our hip flexors are tighter than a crowbar!

But this is where the waters get a little murky and people start to miss the boat entirely.   Simply put, while many are quick to just throw in a few mundane stretches into the mix – if they’re even stretching at all – it takes a little bit more than that to alleviate the problem.

As such, here’s the basic formula I like to use:  release, stretch that mofo, then activate/mobilize.

Does the order matter?  In my opinion, absolutely!  When dealing with soft tissue restrictions, it’s important to break up any trigger points, adhesions or scar tissue first, because you can stretch till you’re blue in the face but you’re never going to get full extensibility/length of a muscle if it’s nothing but one massive knot in the first place.

Likewise, while it can be argued whether or not prolonged stretching actually stretches the muscle or just increase our tolerance to a stretch, the fact of the matter remails – it’s better than nothing; and, it undoubtedly makes people feel better afterwards.  in addition, lenghtening the muscle allows us to “use” the new range of motion.  It’s a win-win.

Don’t ne a Jonny Raincloud – just do it!

And finally, it makes sense that once any triggers points or knots are taken care of, we need to mobilize and/or activate the muscle to help engrain/cement the new ROM we’ve established.

Rectus Femoris:

In terms of self myfascial release, you need a foam roller.  if you don’t have one, get one.  They’re only $10 and there’s really no exciuse not to have one.  No, really.

Having said that, the video below is a great place to start.  While it demonstrates our entire foam rolling series, you can easily see how we hit the anterior surface of the thigh, which is where the RF is located.

From there, a few of my favorite exercises to mobilize the area are the yoga plex, and the wall hip flexor mobilization.

Perform 8-10 repetitions on each leg and you should be good to go.  Just be cognizant NOT to hyper-extend your lower back while doing these.

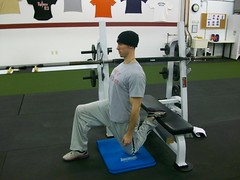
In much the same light as the video above, when discussing the topic of stretching, it’s important to recognize that the RF crosses TWO joints (the hip and knee) and we need to take that into consideration.   To that end, I really like the kneeling heel-to-butt stretch.   Simply kneel on the floor, placing one foot behind you on a bench.  From there, one important cue I like to give people is to squeeze the glute on the same side that’s kneeling.  This “co-contraction” of the glute will posteriorly tilt the pelvis and allow for a more intense stretch of the RF.  Hold for 30-60 seconds and switch to the other leg.

Psoas

The psoas is a bit tricker to get to in terms of SMR work, and as such, calls for modalities that are a bit more aggressive.  Since the foam roller is virtrually useless in this case, I like to defer to the Thera Cane instead.  Lie on your back with one leg flexed to 90 degrees.  From here, I like to cue people to perform a teeny tiny crunch and feel for the lateral aspect of their rectus abdominus; then relax.  Where you feel the muscle relax is where you want to “dig” the knob of the cane into.  Hold it in place, and SLOWLY extend your leg until it’s completely straight.   Try not to cry.

Essentially what you’re doing is a poor man’s version of Active Release Therapy, and to say that it’s a tad bit uncomfortable would be an understatement.  Put another way: it f#@cking sucks, and I won’t think any less of you if you have to grab a Kleenex.

Perform 3-5 total passes on each side.  Told ya, not fun.

In terms of activating the psoas, I like to use two exercise.  The first is one that I got from Mike Boyle called the Seated Psoas Activation.  Because the psoas is the one hip flexor that’s active above 90 degrees of hip flexion, it’s important that you find a low enough box to perform this exercise effectively.

All you’re going to do here is sit on the box with your back flush against a wall (so that you can’t lean back and cheat).  Raise you foot off the ground and hold for 10-15 seconds.  Lower it back to the ground and repeat the same sequence on the opposite side.  Don’t be surprised if you can’t raise you’re foot that high – really, all we’re looking for are a couple of inches.

Another exercise I like is the lying psoas band march.  Here, you’re going to lie supine (on your back) with a light band wrapped around both feet.  Bring both knees up to 90 degrees of hip flexion and then extend ONE leg, keeping the other stationary at 90 degrees.  The psoas is forced to fire by resisting the pull of the band (and staying above 90 degrees).  Peform 8-10 repetitions on one side, then switch.

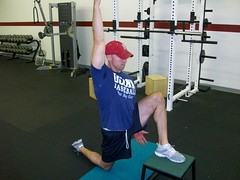
As far as dedicated stretches, I like the feet elevated warrior lunge stretch.  Here, I like to note a few things:

1.  You’re going to place one foot on a slight elevation (8-12 inches).

2.  The leg that’s extended behind you is the side you’re stretching – much like the heel-to-butt stretch, be sure to squeeze the glute of that same side to posteriorly tilt the pelvis, which in turn, will elicit a more intense stretch.

3.  Too, you want to reach up towards the ceiling with your arm and lean slightly in the opposite direction.  So, if you’re right leg is extending behind you, you’ll reach up with your right hand and then lean slightly to the left.  In all, it should look something like this:

Hold for a 30-60 second count and repeat on the opposite side.

TFL:

Okay, here’s the deal.  In the process of writing this blog post, I accidentally deleted the ENTIRE thing and had to start from scratch.

FML!!!!

AFter throwing my face through a wall, I wrote the entire thing again (not quite as awesome as the first go round), and now I’m short on time, and the TFL is getting the shaft. Sorry.

Maybe I’ll throw a little tidbit in tomorrow, but for now, I really need to go lift something heavy to get this pent up aggression out.  Hope this helps, and if anyone has anything to share, please feel free below!

CategoriesUncategorized

Thomas Test: Hip to Be Square Part I

Not surprisingly, when it comes to assessment, there are many school’s of thought.  During our staff in-service the other day, Eric made a great point in saying that most assessments are very general to start and then move into more specific things as you dig a little deeper.  For instance, in his book Movement, Gray Cook notes that the Functional Movement Screen hits on seven key movement patterns:

Deep Squat Movement Pattern
Hurdle Step Movement Pattern
Inline Lunge Movement Pattern
Shoulder Mobility Movement Pattern
Active Straight-Leg Raise Movement Pattern
Trunk Stability Push-Up Movement Pattern, and
Rotatry Stability Movement Pattern

All the above are very general and do a supberb job at assessing movement quality, addressing assymetries, and just covering our bases.

Conversely, Cook also has what he calls the Selective Functional Movement Assessment (SFMA), which, unlike the FMS, has many “breakout” (more specific) assessments depending on what you find.

As an example, Lower Body Extension can be broken down to:  standing hip extension, prone active hip extension, prone passive hip extension, FABER test, and the Thomas Test.

Not always, but because of the population we deal with at Cressey Peformance (baseball players), we start with more specific tests (testing GIRD, lead leg ROM, ect) and then go into more general things.

One test that seems universal, however, is the Thomas Test.  Named after Dr. Hugh Owen Thomas (thank you Wikipedia), this test is a great assessment tool to better ascertain hip flexor length (or lack thereof).

Here’s the deal, though.   As simple as this test is, many fitness professionals have no clue how to perform it correctly, let alone interpret the results.  Here, I’m going to try my best to break it down and hopefully clear up some of the confusion, and maybe drop some knowledge bombs along the way.

Starting Position:  Seated at the end of the table, with the thighs half off the table.

**This is an important point, because the body position shifts as the subject lies down and brings his or her knee toward their chest.  The end position for the start of the testing is with the other knee just at the edge of the table so that the knee is free to flex and the thigh is full length of the table.

From there, simply hold your thigh, pulling your knee towards the chest, only enough to flatten the low back and sacrum on the table.

In an ideal world, I like to hold down the pelvis – on the testing side – to allow a little more posterior tilt.  Many people will go into excessive lumbar extension, which will give the illusion of having ample hip flexor length.  By holding the pelvis down, they can’t cheat.

Conversely, in Muscles: Testing and Function With Posture and Pain, Kendall recommends NOT to bring both knees to the chest because it does allow excessive posterior tilt which can skew the results towards apparent (not actual) hip flexor shortness.

In the end, use your own discretion.  For those of you reading who are coaches or personal trainers, I prefer the “bring one leg towards the chest, pin the pelvis down approach.”  If performing this alone, I prefer the “two knees to the chest, lower one leg approach.”

Anyhoo

So, what now?  As noted above, the Thomas Test is a great test to assess hip flexor length – namely the rectus femoris, psoas, and TFL.

Testing:  With the low back and sacrum flat on the table, a “passing test” will show that the posterior thigh touches the table, and the knee passively flexes – to approximately 80 degrees.

Almost always, you’ll rarely (if ever) come across a perfect Thomas Test.  We’re a very sedentary society, and it’s no surprise that pretty much everyone has poor hip flexor length.

One thing to consider, however (especially if you’re dealing with a well-trained individual), is the size of one’s hamstrings.  Dudes (and girls, too) who have well developed hamstrings will seemingly “fail” this test because the posterior thigh does not touch the table.  So, it’s not so much they have short hip flexors (which still could be the case), but rather, they have hamstrings the size of Kansas that prevents the thigh from coming down flush to the table.

Ruling this out, if the thigh does come off the table, we can rule out the rectus femoris by simply extending the lower leg.  Since the RF crosses both the hip and knee joint, if we extend the leg and the thigh then touches the table – viola – you found your culprit.

On the flipside, if you extend the lower leg, and the thigh still stays off the table, you can assume it’s the psoas that’s short and/or stiff.

In terms of the TFL, we don’t need to get too detailed here.  Some trainers like to get all geeky and bust out their protractors and Bunsen Burners and measure every degree.  I have my limits and just prefer to keep the assessment flowing.  If there’s an issue with the TFL, I’ll note any lateral deviation of the thigh from the midline of the body and move on with my life.

And that, ladies and gentlemen is the Thomas Test – in a nutshell……..more or less.  Tomorrow, in part II, I’ll discuss a handful of correcive strategies you can implement to help fix some of the issues you may have come across.  Till then, stay sexy.