Yesterday I went into a little detail on the Thomas Test and how it can be a very effective test to assess hip flexor length. Unfortunately, while it’s a fairly idiot proof test to administer, many fitness professionals out there perform it incorrectly and have no clue on how to interpret what they find. In case you missed it, CLICK HERE to read part one.
Today, however, I want to switch gears and talk a little about some of the corrective strategies one can implement after having completed the Thomas Test. Come on, you didn’t think I was just gonna leave you hanging like that did you?
Predictably, as I noted yesterday, pretty much everyone has a little sumthin, sumthin going on in their hip flexors, whether we’re talking poor tissue quality and/or limited length – no big surprises there. We sit…. a lot. We sit on our commute to work. We sit at work. We sit on our way home from work. We then sit some more at home. And, for most, we even sit while we “workout,” if you want to call it that. It’s no wonder our hip flexors are tighter than a crowbar!
But this is where the waters get a little murky and people start to miss the boat entirely. Simply put, while many are quick to just throw in a few mundane stretches into the mix – if they’re even stretching at all – it takes a little bit more than that to alleviate the problem.
As such, here’s the basic formula I like to use: release, stretch that mofo, then activate/mobilize.
Does the order matter? In my opinion, absolutely! When dealing with soft tissue restrictions, it’s important to break up any trigger points, adhesions or scar tissue first, because you can stretch till you’re blue in the face but you’re never going to get full extensibility/length of a muscle if it’s nothing but one massive knot in the first place.
Likewise, while it can be argued whether or not prolonged stretching actually stretches the muscle or just increase our tolerance to a stretch, the fact of the matter remails – it’s better than nothing; and, it undoubtedly makes people feel better afterwards. in addition, lenghtening the muscle allows us to “use” the new range of motion. It’s a win-win.
Don’t ne a Jonny Raincloud – just do it!
And finally, it makes sense that once any triggers points or knots are taken care of, we need to mobilize and/or activate the muscle to help engrain/cement the new ROM we’ve established.
Rectus Femoris:
In terms of self myfascial release, you need a foam roller. if you don’t have one, get one. They’re only $10 and there’s really no exciuse not to have one. No, really.
Having said that, the video below is a great place to start. While it demonstrates our entire foam rolling series, you can easily see how we hit the anterior surface of the thigh, which is where the RF is located.
From there, a few of my favorite exercises to mobilize the area are the yoga plex, and the wall hip flexor mobilization.
Perform 8-10 repetitions on each leg and you should be good to go. Just be cognizant NOT to hyper-extend your lower back while doing these.
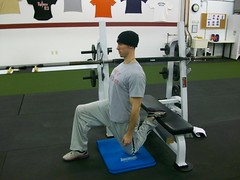
In much the same light as the video above, when discussing the topic of stretching, it’s important to recognize that the RF crosses TWO joints (the hip and knee) and we need to take that into consideration. To that end, I really like the kneeling heel-to-butt stretch. Simply kneel on the floor, placing one foot behind you on a bench. From there, one important cue I like to give people is to squeeze the glute on the same side that’s kneeling. This “co-contraction” of the glute will posteriorly tilt the pelvis and allow for a more intense stretch of the RF. Hold for 30-60 seconds and switch to the other leg.
Psoas
The psoas is a bit tricker to get to in terms of SMR work, and as such, calls for modalities that are a bit more aggressive. Since the foam roller is virtrually useless in this case, I like to defer to the Thera Cane instead. Lie on your back with one leg flexed to 90 degrees. From here, I like to cue people to perform a teeny tiny crunch and feel for the lateral aspect of their rectus abdominus; then relax. Where you feel the muscle relax is where you want to “dig” the knob of the cane into. Hold it in place, and SLOWLY extend your leg until it’s completely straight. Try not to cry.
Essentially what you’re doing is a poor man’s version of Active Release Therapy, and to say that it’s a tad bit uncomfortable would be an understatement. Put another way: it f#@cking sucks, and I won’t think any less of you if you have to grab a Kleenex.
Perform 3-5 total passes on each side. Told ya, not fun.
In terms of activating the psoas, I like to use two exercise. The first is one that I got from Mike Boyle called the Seated Psoas Activation. Because the psoas is the one hip flexor that’s active above 90 degrees of hip flexion, it’s important that you find a low enough box to perform this exercise effectively.
All you’re going to do here is sit on the box with your back flush against a wall (so that you can’t lean back and cheat). Raise you foot off the ground and hold for 10-15 seconds. Lower it back to the ground and repeat the same sequence on the opposite side. Don’t be surprised if you can’t raise you’re foot that high – really, all we’re looking for are a couple of inches.
Another exercise I like is the lying psoas band march. Here, you’re going to lie supine (on your back) with a light band wrapped around both feet. Bring both knees up to 90 degrees of hip flexion and then extend ONE leg, keeping the other stationary at 90 degrees. The psoas is forced to fire by resisting the pull of the band (and staying above 90 degrees). Peform 8-10 repetitions on one side, then switch.
As far as dedicated stretches, I like the feet elevated warrior lunge stretch. Here, I like to note a few things:
1. You’re going to place one foot on a slight elevation (8-12 inches).
2. The leg that’s extended behind you is the side you’re stretching – much like the heel-to-butt stretch, be sure to squeeze the glute of that same side to posteriorly tilt the pelvis, which in turn, will elicit a more intense stretch.
3. Too, you want to reach up towards the ceiling with your arm and lean slightly in the opposite direction. So, if you’re right leg is extending behind you, you’ll reach up with your right hand and then lean slightly to the left. In all, it should look something like this:
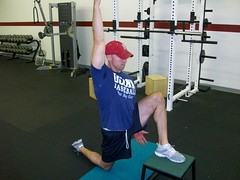
Hold for a 30-60 second count and repeat on the opposite side.
TFL:
Okay, here’s the deal. In the process of writing this blog post, I accidentally deleted the ENTIRE thing and had to start from scratch.
FML!!!!
AFter throwing my face through a wall, I wrote the entire thing again (not quite as awesome as the first go round), and now I’m short on time, and the TFL is getting the shaft. Sorry.
Maybe I’ll throw a little tidbit in tomorrow, but for now, I really need to go lift something heavy to get this pent up aggression out. Hope this helps, and if anyone has anything to share, please feel free below!


