In a word: yes. Yes, he is. But more on that in a second.
This industry is constantly changing – almost on a weekly basis. One week it’s boot camps that are all the rage. The next? Dude, you’re gonna kill it if you incorporate more semi-private or group training into the mix.
Even still, there are plenty of trainers and coaches out there who are doing very well following more of a private, one-on-one approach.
In the end, it doesn’t necessarily matter which avenue you choose to go down – private training, group training, Victoria Secret model boot camps (which would be awesome) – when you don’t take the time get really (really, really, really) good and what you do.
The people who tend to be the most successful are the ones who take pride in what they do and go out of their way to master their craft. They’re the ones who are constantly learning, trying new things, changing their train of thought, and most important of all…..
…….are TEACHING it to others.
A few of my friends, Eric Cressey, Mike Robertson, BJ Gaddour and Dave Schmitz have collaborated on a pretty baller project that I think is going to help a lot of upcoming (and even seasoned) fitness professionals out there.
It’s called the Elite Training Mentorship, and as of yesterday, they’re giving people an inside look at what it’s all about with some amazing FREE content.
Yep, that’s F to the REE. As in, you don’t pay a dime.
To kick things off, and to give you an idea of what kind of amazing content is to come, Eric Cressey has shared a staff in-service video on lower body assessment that, for lack of a better term, is pretty freaking good.
And I’m not just saying all of this because Eric’s my good friend (and business partner). He’s one of the industry’s best at what he does and this staff training could easily be a stand alone product due to the depth and quality of information he provides – but you can get it at no cost here:
The cool part? This is just the tip of the iceberg. Every month these guys will be releasing similar, in the trenches content that is normally only reserved for their own staff. If you’re looking to separate yourself from the masses and become a better coach or trainer, you’d be insane not to take advantage of this incredible offer.
Yesterday I went into a little detail on the Thomas Test and how it can be a very effective test to assess hip flexor length. Unfortunately, while it’s a fairly idiot proof test to administer, many fitness professionals out there perform it incorrectly and have no clue on how to interpret what they find. In case you missed it, CLICK HERE to read part one.
Today, however, I want to switch gears and talk a little about some of the corrective strategies one can implement after having completed the Thomas Test. Come on, you didn’t think I was just gonna leave you hanging like that did you?
Predictably, as I noted yesterday, pretty much everyone has a little sumthin, sumthin going on in their hip flexors, whether we’re talking poor tissue quality and/or limited length – no big surprises there. We sit…. a lot. We sit on our commute to work. We sit at work. We sit on our way home from work. We then sit some more at home. And, for most, we even sit while we “workout,” if you want to call it that. It’s no wonder our hip flexors are tighter than a crowbar!
But this is where the waters get a little murky and people start to miss the boat entirely. Simply put, while many are quick to just throw in a few mundane stretches into the mix – if they’re even stretching at all – it takes a little bit more than that to alleviate the problem.
As such, here’s the basic formula I like to use: release, stretch that mofo, then activate/mobilize.
Does the order matter? In my opinion, absolutely! When dealing with soft tissue restrictions, it’s important to break up any trigger points, adhesions or scar tissue first, because you can stretch till you’re blue in the face but you’re never going to get full extensibility/length of a muscle if it’s nothing but one massive knot in the first place.
Likewise, while it can be argued whether or not prolonged stretching actually stretches the muscle or just increase our tolerance to a stretch, the fact of the matter remails – it’s better than nothing; and, it undoubtedly makes people feel better afterwards. in addition, lenghtening the muscle allows us to “use” the new range of motion. It’s a win-win.
Don’t ne a Jonny Raincloud – just do it!
And finally, it makes sense that once any triggers points or knots are taken care of, we need to mobilize and/or activate the muscle to help engrain/cement the new ROM we’ve established.
Rectus Femoris:
In terms of self myfascial release, you need a foam roller. if you don’t have one, get one. They’re only $10 and there’s really no exciuse not to have one. No, really.
Having said that, the video below is a great place to start. While it demonstrates our entire foam rolling series, you can easily see how we hit the anterior surface of the thigh, which is where the RF is located.
From there, a few of my favorite exercises to mobilize the area are the yoga plex, and the wall hip flexor mobilization.
Perform 8-10 repetitions on each leg and you should be good to go. Just be cognizant NOT to hyper-extend your lower back while doing these.
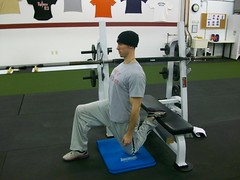
In much the same light as the video above, when discussing the topic of stretching, it’s important to recognize that the RF crosses TWO joints (the hip and knee) and we need to take that into consideration. To that end, I really like the kneeling heel-to-butt stretch. Simply kneel on the floor, placing one foot behind you on a bench. From there, one important cue I like to give people is to squeeze the glute on the same side that’s kneeling. This “co-contraction” of the glute will posteriorly tilt the pelvis and allow for a more intense stretch of the RF. Hold for 30-60 seconds and switch to the other leg.
Psoas
The psoas is a bit tricker to get to in terms of SMR work, and as such, calls for modalities that are a bit more aggressive. Since the foam roller is virtrually useless in this case, I like to defer to the Thera Cane instead. Lie on your back with one leg flexed to 90 degrees. From here, I like to cue people to perform a teeny tiny crunch and feel for the lateral aspect of their rectus abdominus; then relax. Where you feel the muscle relax is where you want to “dig” the knob of the cane into. Hold it in place, and SLOWLY extend your leg until it’s completely straight. Try not to cry.
Essentially what you’re doing is a poor man’s version of Active Release Therapy, and to say that it’s a tad bit uncomfortable would be an understatement. Put another way: it f#@cking sucks, and I won’t think any less of you if you have to grab a Kleenex.
Perform 3-5 total passes on each side. Told ya, not fun.
In terms of activating the psoas, I like to use two exercise. The first is one that I got from Mike Boyle called the Seated Psoas Activation. Because the psoas is the one hip flexor that’s active above 90 degrees of hip flexion, it’s important that you find a low enough box to perform this exercise effectively.
All you’re going to do here is sit on the box with your back flush against a wall (so that you can’t lean back and cheat). Raise you foot off the ground and hold for 10-15 seconds. Lower it back to the ground and repeat the same sequence on the opposite side. Don’t be surprised if you can’t raise you’re foot that high – really, all we’re looking for are a couple of inches.
Another exercise I like is the lying psoas band march. Here, you’re going to lie supine (on your back) with a light band wrapped around both feet. Bring both knees up to 90 degrees of hip flexion and then extend ONE leg, keeping the other stationary at 90 degrees. The psoas is forced to fire by resisting the pull of the band (and staying above 90 degrees). Peform 8-10 repetitions on one side, then switch.
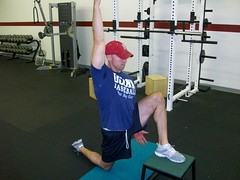
As far as dedicated stretches, I like the feet elevated warrior lunge stretch. Here, I like to note a few things:
1. You’re going to place one foot on a slight elevation (8-12 inches).
2. The leg that’s extended behind you is the side you’re stretching – much like the heel-to-butt stretch, be sure to squeeze the glute of that same side to posteriorly tilt the pelvis, which in turn, will elicit a more intense stretch.
3. Too, you want to reach up towards the ceiling with your arm and lean slightly in the opposite direction. So, if you’re right leg is extending behind you, you’ll reach up with your right hand and then lean slightly to the left. In all, it should look something like this:
Hold for a 30-60 second count and repeat on the opposite side.
TFL:
Okay, here’s the deal. In the process of writing this blog post, I accidentally deleted the ENTIRE thing and had to start from scratch.
FML!!!!
AFter throwing my face through a wall, I wrote the entire thing again (not quite as awesome as the first go round), and now I’m short on time, and the TFL is getting the shaft. Sorry.
Maybe I’ll throw a little tidbit in tomorrow, but for now, I really need to go lift something heavy to get this pent up aggression out. Hope this helps, and if anyone has anything to share, please feel free below!
Not surprisingly, when it comes to assessment, there are many school’s of thought. During our staff in-service the other day, Eric made a great point in saying that most assessments are very general to start and then move into more specific things as you dig a little deeper. For instance, in his book Movement, Gray Cook notes that the Functional Movement Screen hits on seven key movement patterns:
Deep Squat Movement Pattern
Hurdle Step Movement Pattern
Inline Lunge Movement Pattern
Shoulder Mobility Movement Pattern
Active Straight-Leg Raise Movement Pattern
Trunk Stability Push-Up Movement Pattern, and
Rotatry Stability Movement Pattern
All the above are very general and do a supberb job at assessing movement quality, addressing assymetries, and just covering our bases.
Conversely, Cook also has what he calls the Selective Functional Movement Assessment (SFMA), which, unlike the FMS, has many “breakout” (more specific) assessments depending on what you find.
As an example, Lower Body Extension can be broken down to: standing hip extension, prone active hip extension, prone passive hip extension, FABER test, and the Thomas Test.
Not always, but because of the population we deal with at Cressey Peformance (baseball players), we start with more specific tests (testing GIRD, lead leg ROM, ect) and then go into more general things.
One test that seems universal, however, is the Thomas Test. Named after Dr. Hugh Owen Thomas (thank you Wikipedia), this test is a great assessment tool to better ascertain hip flexor length (or lack thereof).
Here’s the deal, though. As simple as this test is, many fitness professionals have no clue how to perform it correctly, let alone interpret the results. Here, I’m going to try my best to break it down and hopefully clear up some of the confusion, and maybe drop some knowledge bombs along the way.
Starting Position: Seated at the end of the table, with the thighs half off the table.
**This is an important point, because the body position shifts as the subject lies down and brings his or her knee toward their chest. The end position for the start of the testing is with the other knee just at the edge of the table so that the knee is free to flex and the thigh is full length of the table.
From there, simply hold your thigh, pulling your knee towards the chest, only enough to flatten the low back and sacrum on the table.
In an ideal world, I like to hold down the pelvis – on the testing side – to allow a little more posterior tilt. Many people will go into excessive lumbar extension, which will give the illusion of having ample hip flexor length. By holding the pelvis down, they can’t cheat.
Conversely, in Muscles: Testing and Function With Posture and Pain, Kendall recommends NOT to bring both knees to the chest because it does allow excessive posterior tilt which can skew the results towards apparent (not actual) hip flexor shortness.
In the end, use your own discretion. For those of you reading who are coaches or personal trainers, I prefer the “bring one leg towards the chest, pin the pelvis down approach.” If performing this alone, I prefer the “two knees to the chest, lower one leg approach.”
Anyhoo
So, what now? As noted above, the Thomas Test is a great test to assess hip flexor length – namely the rectus femoris, psoas, and TFL.
Testing: With the low back and sacrum flat on the table, a “passing test” will show that the posterior thigh touches the table, and the knee passively flexes – to approximately 80 degrees.
Almost always, you’ll rarely (if ever) come across a perfect Thomas Test. We’re a very sedentary society, and it’s no surprise that pretty much everyone has poor hip flexor length.
One thing to consider, however (especially if you’re dealing with a well-trained individual), is the size of one’s hamstrings. Dudes (and girls, too) who have well developed hamstrings will seemingly “fail” this test because the posterior thigh does not touch the table. So, it’s not so much they have short hip flexors (which still could be the case), but rather, they have hamstrings the size of Kansas that prevents the thigh from coming down flush to the table.
Ruling this out, if the thigh does come off the table, we can rule out the rectus femoris by simply extending the lower leg. Since the RF crosses both the hip and knee joint, if we extend the leg and the thigh then touches the table – viola – you found your culprit.
On the flipside, if you extend the lower leg, and the thigh still stays off the table, you can assume it’s the psoas that’s short and/or stiff.
In terms of the TFL, we don’t need to get too detailed here. Some trainers like to get all geeky and bust out their protractors and Bunsen Burners and measure every degree. I have my limits and just prefer to keep the assessment flowing. If there’s an issue with the TFL, I’ll note any lateral deviation of the thigh from the midline of the body and move on with my life.
And that, ladies and gentlemen is the Thomas Test – in a nutshell……..more or less. Tomorrow, in part II, I’ll discuss a handful of correcive strategies you can implement to help fix some of the issues you may have come across. Till then, stay sexy.