The most cogent place to start is to (briefly) explain what a hip hinge is. And to that end I often like to steal a train of thought from renowned strength coach and writer, Dan John:
“The Hip Hinge = Maximal hip flexion with minimal knee flexion.”
Well, that was easy.
Now that we know what it is, why do we care?
In my neck of the woods – strength & conditioning – the hip hinge is the precursor (or base) for a lot of what we do to help make people stronger, faster, and more athletic.
Deadlifting = hip hinge.
Jumping = hip hinge.
But in everyday life, too, the hip hinge pops in to make a cameo appearance:
Bending over to pick up your child.
Picking up anything off the ground, really.
Sitting down.
Assuming an athletic position in your recreational basketball league. You know, the same league a bunch of your friends asked you to join because it was going to be fun, but then you went a head and missed those two foul shots to lose the championship game, and now everyone hates you. That league.
Photo Credit: STACK.com
Whether you realize it or not, and whether or not it involves lifting heavy things (or your recycling bin), you likely hip hinge many, many, many times per day.
And you’re likely more than proficient at it.
Some (not all) fitness professionals like to make things more complicated than they have to be. When it comes to the hip hinge, really what we’re after is the ability to dissociate hip movement from lumbar movement.
We want to be able to move from the hips with little (if any) movement from the spine; especially when we’re under significant load.
Some fit pros will assess the hip hinge and if it seems wonky or awry they’ll automatically transform into “corrective exercise” mode where said individual will be put through a hefty 17-week program complete with dowel rods, bands, breathing drills, and maybe a Shaolin monk (in worst case scenarios) to set them straight and to fix things.
Now, I am not here to bemoan corrective exercise or to belittle those who take the time to coach up their clients with hip hinge drills.
I mean, I’ve written several blog posts on the topic HERE and HERE, so I’d be a major asshole if I did that.
But, what I would like today’s post to do is to provide a bit of context and to remind coaches that sometimes all people need is a slight nudge or reminder that “x” is what you want them to do.
Again, with a hip hinge, all I’m after is dissociation of hip movement from lumbar movement. If I can get an individual to create tension – or a “flexion moment” – in the anterior core so that they can’t move through their lower back, then my job is done.
I view the Single-Leg RDL as a valuable movement to master. I think it behooves2 most people to be able to do it, and do it well.
And while I’d like to sit here and say that mastering the 1-Legged RDL will help you jump seven inches higher, run a sub-10s 100m dash, shed 25 lbs of fat, add 50 lbs to your squat, and help cure male pattern baldness…it won’t.
But it’s still a pretty fuckin important movement pattern to add to your training menu for a variety of reasons.
Helps correct left-right strength and size asymmetries.
Can be used in both a rehabilitation AND strength training setting.
Phenomenal for hip stability and strength.
Challenges the body in a multi-faceted way – namely proprioception and balance.
Trains the feet (you learn how to “root”” your foot into the ground).
Also, and maybe most important of all, improves your Fortnite Dance-off prowess.
All that said, even for people with a fair amount of experience in the weight room, Single-Leg RDLs are about as advanced as they get as far as single leg movements go.
Here, a lot of things have to harmoniously come together (core stability, hip stability, upper back strength, balance, hip hinge, etc) in order to perform the movement effectively, and in a fashion that doesn’t make me want to throw my face into a brick wall.
The LAST thing I’m going to do with the bulk of people I start working with – especially in the beginning stages – is to put weights in their hands and have them RDL to their hearts content.
A lot of things need to happen first.
As with any exercise, there’s a right of passage and a natural progression that needs to take place.
Oh, and it just so happens I wrote an article a few months ago detailing many of the Single-Leg RDL progressions I use with my clients/athletes HERE.
It’s pretty good. I believe it’s up for the Pulitzer.3
To that end I wanted to share with you another viable RDL progression I learned recently that you can add to the mix.
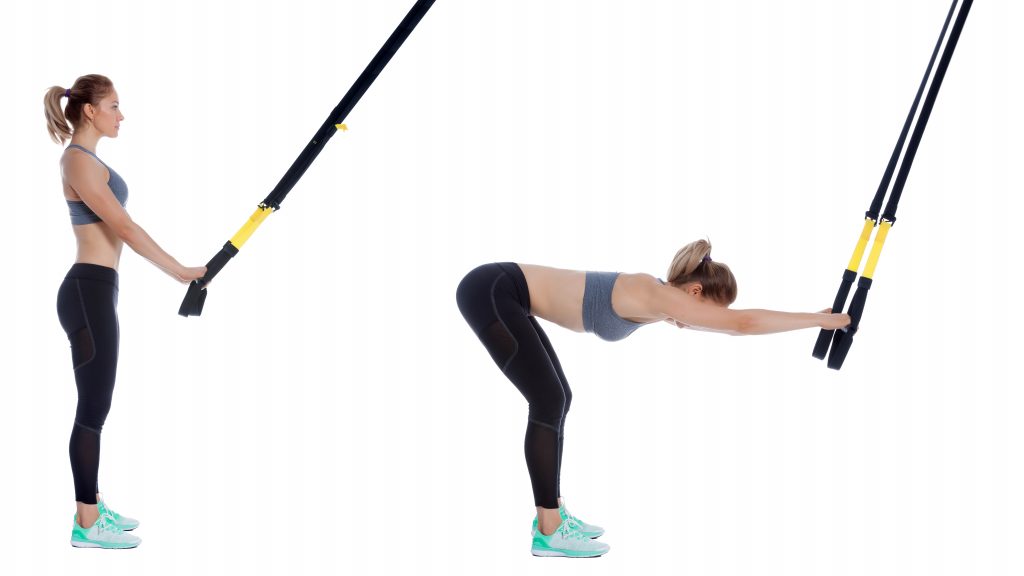
Bench Assisted ValSlide RDL w/ Reach
Who Did I Steal It From? – My friends over a Warhorse Barbell Club in Philadelphia, PA.4
What Does It Do? – Using a bench as a support helps to keep the backside “stable” as one extends their moving leg back. In addition it helps to prevent the pelvis from rotating to one side or the other.
Also, the reach forward is important here because it inspires a posterior weight shift which many trainees have a hard time with out of the gate.
Key Coaching Cues – The beauty of this drill is that it’s proper execution keeps people honest. If the hips rotate, the ValSlide falls off the side of the bench, the “sliding component” helps to groove a long (and stable) backside, and the reach helps prevent excessive rounding of the upper back.
I like to stick with a med ball for a few weeks, and once someone feels competent with that I can then add a pair of dumbbells or kettlebells as a progression.
In today’s guest post by strength coaches and physical therapists, Sam Spinelli and Jason LePage, they break down the hip hinge from beginner level to more advanced iterations.
Your hips have a powerhouse of potential for performance. In the realm of athletics hip extension is one of the most vital components for success. Through the progression of strategies to develop incredible hip extension, the start is to learn how to hip hinge. By hip hinging we can develop a potent supply of hip extension strength and movement capacity that will feed into our other exercises (jumps, cleans, snatches, etc.).
In a hip hinge we are moving our body through hip flexion and extension, while maintaining our spinal position in a neutral range. In most hip hinge exercises we are minimizing (not eliminating) knee movement, allowing for a focus to be placed on the hips; this is often referred to as a “soft bend” in the knees.
By having this soft knee bend, in contrast to a squat motion, we are going to encourage bending over. Due to this, understanding how to move through the hips and not the low back is vital to long term development.
While the hip hinge holds the opportunity to develop some awe-inspiring power, it is not the most simple movement, and for some people can be a real struggle to just pick up. That is where the following “hacks” come in. These are a collection of some of our top picks for learning the hip hinge motion.
Wall Referenced Hip Hinge
Back to Wall Hip Hinge
Wall Facing Hip Hinge
By using the wall we can have an external source of feedback guiding us. When we have our back to the wall, if you aren’t able to do a posterior weight shift and move your hips, you won’t reach the wall.
In contrast, when we face the wall, if you aren’t able to do a posterior weight shift you’ll make contact and not get very far.
Combine the two to get the best of both worlds and own the hinge pattern.
Handcuff Hip Hinge
With the weight held behind our back, it gives a reference of where to push into and guide the weight shift. As well, it places our shoulders in a more retracted and depressed position which cues to keep our chest proud through the movement.
Finally, with your arms secured behind your back you can feel if your lower back begins to round during the movement.
Kneeling Band-Assisted Hinge – Video link + Commentary
Struggle to move through just the hips and not bend the knees excessively or arch your back?
This variation will be a huge help.
The tall kneeling position temporarily eliminates the ankles which brings the focus to the hips! For this drill, simply try to sit your butt onto your heels. If you are struggling to move at the hips, the band will assist that movement to show you what it feels like to perform a hinge.
Some repetition here will help your body sense what the hinge feels like before moving on to a standing strategy.
Foam Roll Assisted Single Leg Hinge – Video link + Commentary
With this hip hinge hack, we transition to a single leg to hone the mechanics for unilateral hinging. In this variation, the foam roller functions as an external cue that allows you to create tension using the entire body as well as increase the stability of the movement allowing you to move slower if needed.
In most people, the foam roller will fit nicely between the foot and hand and is a solid option if you are struggling with a single leg variation of the hinge prior to loading the movement pattern.
Once you’ve begun to hone the hinge pattern, it’s time to start loading it up and building a monstrous posterior chain. Below are some of our top picks for beefing up your training program and solidifying your backside.
Pull Through
Banded Pull-Through
Pull-Through Added Band Resistance
Transitioning from the hip hinge hacks to loading can be challenging for some people. That is where the pull through can be utilized perfectly.
The pull through is an excellent exercise for novices to begin loading the hip hinge as it helps to give great feedback through the cable/band pulling your hips and weight in the direction we want them to move. As well, due to the direction of pull, their is a greatly reduced amount of loading on the back, making it a very safe exercise to begin with.
For those of you who are more advanced, the pull through can still be a great option for loading the hamstrings and glutes without putting as much stress on the low back/erectors. If you find yourself struggling with having enough load, consider adding in a band for additional loading.
Elevated Deadlift
The deadlift is arguably one of the best movements in general – challenging most of the body in one motion, but it is in particular one of the best posterior chain exercises.
It allows for great loading of the hamstrings, glutes, and lumbar extensors while also incorporating much of the upper back musculature to stabilize the spine and shoulders. Most people struggle to effectively pull off the floor and by elevating the bar a few inches we can get into a much better starting position and focus on good mechanics.
Hip Thrust
When we talk hip hinge, we are generally referencing movements that have us in an upright posture. However, there are some fantastic exercises that use the hips that are not done being upright. The hip thrust is an incredible strength movement for the glutes and other posterior chain muscles and really helps those who have a need for horizontal force production – such as most field sport athletes.
Landmine 1-Leg SLDL
Working the posterior chain on a single leg can put a big focus on hip, knee, and ankle stabilization, while also reducing how much loading is on the lower back and placing more on the legs and hips.
However, many people struggle initially learning the mechanics of the 1 leg SLDL. Utilizing the landmine we are able to take advantage of the arcing motion of the bar and also the increased amount of structural stability to have a slightly easier time learning the motion.
KB Swing
The KB swing offers us the ability to ramp up the speed of the movement and incorporate some higher rate of force development. This can be very beneficial for all athletes and incorporated as a primer before heavy work. As well, the KB swing can be a great exercise to use in a conditioning format as it can really get the heart rate going.
About the Authors
Sam Spinelli
Sam Spinelli is cofounder ofThe Strength Therapist, a company devoted to educating people about strength training for rehab and performance.
Coming from the great white north of Canada, Sam spent 5 years working with high level hockey as a strength and conditioning coach. Currently he has taken up a nomad status in the United States to pursue his doctorate of physical therapy and hang out with really smart people (Like Tony G).
Outside of spending his time reading research papers and drinking coffee, he is a competitive strength athlete in sports such as powerlifting, weightlifting, and strongman.
Jason LePage is a Doctor of Physical Therapy student at Quinnipiac University and the founder of PrimePhysioFitness. For the last 4 years, Jason has worked as a personal trainer and group fitness instructor with a passion for promoting fitness and wellness for all ages. Outside of school and work, Jason loves playing a variety of sports including basketball, tennis, and volleyball and spending time with his family. If you want to learn more from or connect with Jason:
The internet is a funny place. Regardless of the topic – Presidential elections, Black Lives Matter vs. All Lives Matter, GMOs, or debating the original Star Wars trilogy vs. the prequels5 – people tend to marry themselves to extremes. They’re either way over on the left or way the eff over on the right.
There’s very little middle-ground, when it’s the “middle ground” where the answer almost always resides.
I think my fitness and strength & conditioning bubble personifies this sentiment and is very applicable…especially when the topic revolves around the deadlift.
Some people feel the deadlift is the exercise to perform and is a compliment to everything: improved strength, muscle mass, athletic performance, posture, movement quality (dissociating hip movement from lumbar movement), and a whole host of other benefits including the answer to global warming and erectile dysfunction.
Others feel the deadlift – any variation of it – is the worst exercise ever, that no one should perform it under any circumstance, and that it will cause the world markets to collapse (not to mention everyone’s spine).6
I think it goes without saying I tend to err on the side that prefers not to make blanket statements and to demonize and proclaim an entire movement pattern as “dangerous” because, well, frankly, you either have very little experience with it (which is cool, you’re just naive and that can be remedied) or, more often than not, you’re probably just a really shitty coach.
Or you might not even be a coach and just someone who likes leaving angry, oblivious comments like this on my blog (a recent doozy I received in response to THIS article I wrote six years ago):
“Idiot. This is a poorly written article that will only appeal to the ignorant or existing proponents of this stupid exercise.
To begin with:
He never illustrates any health benefit from the outcome of a deadlift. And if he will, I challenge him to provide any scientific evidence, let alone anecdotal evidence, that supports his claim.
Moreover, the deadlift may have various effects of potential damage depending on a person’s anatomy and body-type. The only people i see doing DL’s are the short and squatty types with short legs and longer torsos. It’s easier for them to complete that range of motion due to their short legs bypassing the barbell as it ascends upward. This means that they can keep a more straight knee alignment without putting undue stress on the knee joint. If a person is tall and long-legged they run the immediate risk of knocking their shin on the barbell as it ascends upward in motion. Thus, forcing them to angle the thighs outward causing undue stress on the knee joints. The author fails to acknowledge this simple mechanical principle.
These articles that permeate the internet often have this ‘one size fits all’ modality that, if read by an uninformed or novice, will harm an unsuspecting person. These articles, whether, deliberately irresponsible or not, should be vetted and researched thoroughly and vigilantly.”
Um, how do you really feel?
In fairness: I didn’t address in the original article some of what he brought up in his rant. There was no talk about assessment, nor was there any commentary on anthropometry and individual differences in anatomy and how that would affect programming and what variations of the deadlift/hip hinge would be best suited for any one individual (based off goals, current/past injury history, and ability level).
So, yeah, he did bring up some valid points. For some people, deadlifts are a bad choice. And given their leverages and anatomy, certain deadlift variations may be more counterproductive than others. But that’s why we assess, progress accordingly, and cater the lift to the trainee (and not vice versa).
Then again:
1) The main point of the article was to point out that blanket comments suck – “all deadlifts are dangerous and no one should perform them” – and that, in the end, they do little service in helping the industry.
2) It wasn’t a fucking dissertation on everything and anything deadlifts. It was a blog post. Relax.
Ironically, I found it odd he commented “I challenge him (me) to provide scientific evidence that supports his claims” when, in the article, I not only direct people towards Dr. Stuart McGill’s work (the world’s most renowned spine researcher and mustache haver…and avid deadlift fan) but I also referenced seven studies within the text (admittedly through someone else’s quote).
But whatever. I guess I should just GFM.
What’s the deal with using “stress” as an argument against the deadlift?
Deadlifts place “stress” on the spine.
Deadlifts place undue “stress” on the knees.
Well, no shit. That’s the point of lifting weights. To STRESS the body.
We need to “stress” the body in order to elicit an adaptive response – whether it be corrective in nature or more on the performance side of things. We don’t live life in this “stress free” bubble. Lifting weights isn’t supposed to tickle.
Besides, stress is what makes the body more resilient to prevent injuries.
To steal a quote from the always blunt and to-the-point Alex Viada:
“The goal of exercise/training is adaptation. Adaptation is a result of applying a stimulus that is, either acutely or in the aggregate, more than the body can handle in its current state. Applying a stress that is more than the body can handle is almost by definition uncomfortable. It may hurt. It may cause a certain level of discomfort, or even suffering. In other words, it is anything BUT comfortable.
This process is not supposed to be easy or painless. Attempting to keep it so is quite possibly the number one reason many would-be athletes or trainees stagnate- they dislike discomfort, and tend to embrace the flawed notion that “training should be comfortable and enjoyable.”
And this, dear readers (and meanie head commenter), is why any competent fitness professional will use his or her’s assessment to guide their programming and to figure out what VARIATION of the deadlift will be the best fit.
(If they deem it a good fit).
And Guess What?
The word “deadlift” doesn’t always have to equate to a barbell being placed on the ground loaded to 90% of someone’s 1RM.
Deadlift = Hip Hinge
Hip Hinge = Dissociating Hip Movement From Lumbar Movement
That can mean any number of glorious “deadlift” variations (that don’t involve a barbell):
KB to Sternum Hip Hinge
Foam Roller Assisted 1-Legged RDL
Pull-Through
KB Deadlift w/ Hover (and an epic beard)
However, more cogent to the discussion, when we DO incorporate a barbell, it doesn’t always mean we have to 1) perform it from the floor or 2) perform it using a conventional stance or 3) load it heavy each and every time so we shit a spleen.
The only people that have to deadlift from the floor are competitive powerlifters and weightlifters. That’s it.
And no one has to perform only conventional style.
So, of course it behooves any fitness professional to match the proper variation to the needs and ability of the trainee. Conventional, sumo, modified sumo, block pulls, rack pulls, Romanian, trap bar, and Jefferson deadlifts are just the tip of the iceberg.
https://www.youtube.com/watch?v=q6Xjb72gGTE
[NOTE: All of this assumes one is able to maintain a neutral spine and that appropriate progressions (and regressions) are being utilized.]
Furthermore, none of this takes into consideration that foot stance, stance width, and hip structure will vary person to person. To assume everyone has to perform the same variation let alone point their toes the same way or use a symmetrical stance disregards everything mentioned above.
You’re not going to lose demerit points or be sent to Slytherin if you have the audacity to choose trap bar deadlifts over conventional. If someone does lack ankle dorsiflexion, hip flexion, and t-spine extension, yeah, the trap bar is going to be a better choice. Likewise, lifters with longer femurs and T-rex arms will be better suited with sumo style deadlifts.
It’s all okay. The world won’t end.
No one has to deadlift. Yeah, that’s right: I said it.
However, to say it’s “dangerous” and that it should be avoided at all costs is myopic and juvenile, and, frankly, just as bad as someone who feels the opposite.
Lets pump the brakes internet: the answer is always somewhere in the middle. Except for bacon. It’s always delicious.
It’s a Good Thing I Have a Resource to Help You Figure This Stuff Out
Dean Somerset and I made the Complete Shoulder and Hip Blueprint in part, to do just that. Help fitness professionals figure stuff out, understand that everyone is different, and that “it depends” is a very powerful phrase to keep in your back pocket.7I mean, only Siths deal in absolutes. And you’re not a Sith. Or, are you? OMG can we hang out?[/footnote
Want to learn our systems and strategies we use to “connect the dots” from assessment to badassery on the weight room floor? I thought so…;o)
Complete Shoulder and Hip Blueprint is on SALE this week at $60 off the regular. It ends this weekend. Go HERE now. Now I tell you.
Note from TG:If there was ever a blog title conceived specifically for this website, this is the one. Jason Bourne, an F-16 fighter jet, and a lumberjack punching a grizzly bear in the face while eating a bag of beef jerky could have steel cage match and it wouldn’t be as manly as this title.
Fair warning: parts are a bit “heavy” with technical terms and verbiage, but there are still plenty of insights and suggestions (and videos!) that are applicable to everyone reading, because……
Everyone NEEDS to Deadlift
There are a few absolutes in this world. Some of those absolutes are:
Gravity
The Earth is round
Humans need oxygen to survive.
The Human Body needs food and water to survive.
Another absolute I could add to that list is that…Everyone NEEDS to Deadlift!
Now, that I’ve got your attention, finish reading this article before you decide to send your hate e-mail or hate mail if you are still living in the dark ages.
Let me clarify my point: Everyone needs to do some form of hip hinging in order to maintain good back and lower extremity health.
The movement of hip hinging is a vital component of everyday life.
Whether you want to lift up your kids without blowing out your back or you are trying to deadlift your car for reps, being able to hip hinge properly is an integral component to reducing injury risk as well as attaining a high level of performance.
What is “Hip Hinging?”
Hip Hinging is the ability of a person to maintain a neutral aligned spine while predominately loading the hips and having the primary movement come from the hips in an anterior to posterior direction.
For the visual learners, this is what it looks like:
As you can see from the video, we ideally want a neutral spine position and the majority of the movement comes from the hips moving in an anterior to posterior direction. The knees remain in a soft knee position. This means that the knees are not in a terminally extended (straight) position nor are they overly flexed (bent).
What movements use hip hinging?
The hip hinging move is used for a multitude of movements. It can be used in the:
Deadlift
Good Mornings
Variations of the Glute Ham Raise
Certain Athletic Endeavors
For activities throughout your day, it could include:
Properly picking up your kids.
Lifting a heavy box from the floor to a different location.
Picking a pencil up off the floor.
The list is endless. Being able to properly move through this movement pattern, whether it be for performance or daily life, is a NECESSITY!
How do I know if I can hip hinge?
Well, check out this video below for a quick and easy test to tell if you are hip hinging properly:
Place a broom, golf club, dowel, etc. on your back as shown in the video. Place one hand on the top portion at your head and the other hand at your sacrum (tail bone). Make sure to keep the three contact points between your head, thoracic spine (mid back), and sacrum.
Next, while maintaining “soft knees”, attempt to push your butt back like you are trying to tap the wall with it.
As you are doing this, you are going to need to counteract falling backwards by leaning your upper body/trunk anteriorly (forward). Time and time again, I will see people attempt to do this movement with just pushing their hips backwards and then in turn, fall backwards or lose their balance.
Your hips should always be more superior than your knees. If your hips are in line with your knees in the transverse plane, then you are squatting, not hip hinging.I can equate it going to an upscale club or lounge.
You walk up to the club and there is a line. It is up to the “bouncer” aka the strength coach/physical therapist in this example, to let you past the velvet rope and into Club Hip Hinging.
Once your in the club, there is a VIP section.
In this example, that VIP section is the Deadlifting VIP. If you aren’t on “the list,” then you aren’t making it into the “VIP” section.
For the physical therapists, strength and conditioning coaches, performance coaches, etc. who want to know if someone can perform hip hinging and/or deadlift variations, then screen your clients and patients.
Screening/Assessment
***Disclaimer*** If you are NOT a physical therapist, you need ask your client if you may put your hands on them to screen them. Also, if someone has pain with any of these screens/assessments, structure your programming appropriately and refer out to a PT, sports chiropractor, etc.
Tell them you want to screen them so you can adjust their programming so it is customized for them.
99.9% of people won’t have a problem with this, but you need to look out for yourself and make sure your clients are fine with this.
First piece of information I would like to know is, what does their hip flexion motion look like.
Place your client on the ground and passively/gently move their hip through their available range of motion (ROM).
Then, we want to check and see if they have the passive straight leg raise (PSLR) mobility. Gently raise their leg until you feel some resistance.
Per the Selective Functional Movement Assessment (SFMA), we would like to see 80 degrees of the PSLR. If the client doesn’t have 80 degrees, all is not lost. We have to modify their training regimen. We will get to that later in this post.
Next, if the client has 80 degrees of PSLR, we want to see if they can stabilize in that ROM. Ask them to actively raise their leg, keeping the knee straight up in the air without letting the opposite leg come up off the ground/table. We like to see 70 degrees of active straight leg raise (ASLR).
If they have 70 degrees of ASLR, then we can progress further in our assessment/screening. If they do NOT have 70 degrees, have the client place their hands on the ground. Then press into the ground with their hands and try again.
If their ASLR improves, then they have either a:
Core Stability Issue
Anterior Pelvic Tilt
What the pressing down into the ground/table does is activates the anterior core musculature and in turn, places the trunk in a more neutral position.
Since the hamstrings attach on the pelvis, if the pelvis is in an anterior pelvic tilt, this can cause the SLR to appear limited because it is starting in a stretched position.
If pressing down into the ground/table does NOT improve anything, then try these ASLR correctives:
Active-Straight Leg Correctives (via FunctionalMovement.com)
If there is an improvement in the ASLR, now, have the client stand up and tell them to bend over and touch their toes.
If the client can bend over and touch their toes with ease and without trying to blow a gasket or bouncing up and down, then this is another assessment check point that can tell us that they may potentially be able to deadlift/hip hinge.
The toe touch test comes from the SFMA.
What does the toe touch tells us?
We want to see if the client has the ability to posteriorly shift their hips when performing the toe touch. This tells us that the client can get into their posterior chain to load their hips. When watching someone perform the toe touch, find their greater trochanter (hip bone on the side of their hip region) and watch to see if that area moves backwards during the toe touch
In the first video below, you can see the person can shift their hips backwards.
In this next video, if the person doesn’t perform an adequate posterior weight shift, then they wont be able to touch their toes.
If your patient or client doesn’t have the ability to touch their toes, then try these correctives as recommended by FunctionalMovement.com.
This series of correctives is called the Toe Touch Progression.
First, place a 1/2 foam roller or a 10 lb plate underneath your client or patient’s toes as shown in the picture below.
Then, while maintaining the feet on the plates and the knees straight, instruct the person to bend over and gently try to touch their toes.
Perform 10 repetitions then switch to the heels elevated as shown below and perform 10 more repetitions.
You can also place a foam roller or a small ball between the person’s knees and instruct then to squeeze it during the toe touch. When you instruct the person to squeeze the ball, it up-regulates inner core musculature and places the core/trunk in a better position to perform the toe touch.
Next, have the client perform the toe touch again. If they can know touch their toes or it has improved as compared to before, then we know that this simple corrective has taught their brain/body to learn how to perform a posterior weight shift needed to perform hip hinging and/or deadlifting.
Now, their toe touch may have improved, but in a few hours or when they wake up tomorrow morning, it may be back to the way it was before the toe touch progression corrective.
With the body and the brain when we see a quick improvement such as this one with the toe touch, we are tapping into the Central Nervous System (CNS) and the brain.
It is “teaching” the brain/CNS a new way to move.
As Erson Religioso has mentioned on his website, Modern Manual Therapy, the brain/CNS is easily tricked, but it is difficult to convince. What that means is that with the toe touch, we have opened a window to the CNS that has allowed for a chance or an improvement to the system, we want to do whatever we can to “keep that window open” through various correctives and behavior modification in our daily lives.
If the client’s toe touch hasn’t improved, then there may be something else from a mobility, stability, or motor control standpoint that a licensed healthcare practitioner may need to dig a little deeper to discover why the toe touch hasn’t improved. Refer them to someone in your network, but we will go into more detail now on other ways to train this client even though their toe touch isn’t sufficient enough to deadlift from the floor.
Well, there are many options that you can provide your client to receive a great training effect. The next few examples all work to help load the posterior chain musculature as well as helping to improve core/trunk stability.
Most of these exercises should be felt in the gluteal and hamstring musculature.
Cable Pull-Throughs
Key Points:
Sit back into hips.
Maintain a neutral spine; no rounding or extending of the lumbar spine/TL junction.
Make sure to extend through the hips at the end of the movement, NOT through lumbar hyper-extension.
Hip Thruster/Single Leg Hip Thruster
Key Points:
Start with upper back resting against a bench and hips/knees flexed.
Maintain a “neutral spine” or “ribs down” position.
Extend your hips upwards and squeeze butt at the top.
Finish with your knees, hips, shoulders, and ears in a straight line.
Barbell Supine Bridge
Key Points:
Place an airex pad or exercise mat over hips/under bar to provide some padding.
Maintain a neutral spine, “ribs down” position and drive hips to the sky.
Make sure not to try and lift too high by extending through the lumbar spine.
Elevated Kettlebell Deadlift
Key Points:
Stand directly over the kettlebell (KB).
Push your hips back like you are trying to touch your butt to the wall behind you.
Maintain a neutral spine position.
Grasp the KB, drive your heels through the floor, and lift up through your hips/legs.
Squeeze butt at the top. Make sure to extend your hips and not your low back. Imaginary line should be between your ears, shoulders. hips, knees, and ankles.
Once the client or patient demonstrates proper form with an elevated KB deadlift, eventually lower the elevation height to make the exercise more difficult and eventually perform off the floor as long as proper form is maintained.
Trap Bar Deadlift
https://www.youtube.com/watch?v=p-sA3PG1kGY
Key Points:
Step into the trap bar/hex bar.
Push hips back like you are trying to touch your butt to the wall behind you.
Grasp handles and maintain a ribs down, neutral spine.
Imagine their are oranges in your armpits. Try to squeeze them.
Drive through the heels and extend your hips. Shoulders, hips and knees should be in a line at the top of the movement.
If the client/patient can’t demonstrate proper form with the Trap Bar DL from the floor, then you can place blocks or some other implement underneath the weights to elevate it so they can demonstrate proper form.
Rack Pulls
Key Points:
Step up to bar. Push hips backwards and grasp bar.
Same points as mentioned above.
Can use pronated grip (palms facing you) OR mixed grip (one palm facing you, one facing away from you).
Once someone can demonstrate proper form with these movements, then you can start by progressing towards the floor.
If someone’s goal is to deadlift from the floor and they can do it with proper form and pain-free, then we’re on our way to hitting that goal.
If someone’s goal is to be able to pick-up their kids or move and feel better, then the exercise variations mentioned above are great ways to help with that.
1. You don’t punch kittens in the face9. That’s just common sense (and really cruel).
2. Guys: you don’t not pay for the first date. And ladies: the fake purse grab at the end of dinner makes us guys feel good, and we appreciate the sentiment; but at some point, say between dates #3-71, you don’t need to continue the charade.
At some point you should eventually actually pay for something.
3. You don’t hang out at Chuck-E-Cheese when you’re an adult. That’s Creepy McCreepypants territory.
5. And, for the love of all that’s holy, you don’t squat the kettlebell swing.
I’d argue it’s the most common mistake that many people make with their swing technique. For starters, it’s wrong. I don’t care who you are or who you were coached by, even if it was Captain America, squatting the KB swing is not correct. It just isn’t.
How’s that for a scientific explanation?
Second, and more importantly, “squatting” the swing (to the point where the KB drops below the knees) increases the lever arm and places much more stress on the lower back. Often, whenever someone complains that KB swings bothers their back the culprit is one of two things: 1) not engaging their glutes enough and 2) not incorporating a hip hinge.
Today I wanted to share a simple tactile cue I learned from Dr. Mark Cheng (Senior Instructor for StrongFirst) you can use to help groove more of a hip hinge/hip snap pattern when swinging. Basically you need to stay upright A LOT longer than you think (and much longer than most are comfortable with) before you break the hips and hinge back.
ADDENDUM: I’ve noticed a few comments on various social media outlets where people have noted there ARE viable reasons to perform a squat swing and that it does have its place. I guess agree. Sorta.
There’s a time and place for everything I suppose. But even for those who DO perform a squat swing, there’s still a significant hip hinge involved. Yeah, yeah, there’s “research” to back up a squat swing and how it can improve “x” factor; but then again, there was research back in the day that said smoking wasn’t carcinogenic.
The eye sores that I see a lot people performing (where it’s entirely a squat) is wrong. You’d have a hard time convincing me there’s a legitimate rationale to do swings that way.
Nevertheless, I guess I should have re-worded things to say this: My main beef are for those people learning the swing in the first place. The hip hinge is such an integral movement which reduces the learning curve when introducing new movements drastically.
Maybe a better way to articulate my thoughts would be this: learn the hip hinge swing first, get really good at it, and THEN you can play around with the squat swing, if that’s what floats your boat. Weeeeeeeeeeeee.
Sometimes I think to myself how much of a moron I am.
And I don’t say that lightly. I’m 100% serious. I’m a moron. Or, to use a more “Tony’esque” term…..an asshat.
Lets rule out the obvious offenses like that time, as a freshman in my first college start, I threw a 3-2 hanging curveball to the clean-up hitter. I still think that ball has yet to land.
Or that other time I thought it would be hiiiiiilarious to sneak up behind my girlfriend in college – whom I knew hated to be scared – and scare her.
Her immediate reaction was to punch me in the mouth and give me a fat lip. Needless to say I learned that night where she stood on the whole fight or flight spectrum.
But at least I’m not as moronic as the guy on a recent episode of Forensic Files I watched who killed a woman and, upon using her credit card at a convenience store, signed his own name on the receipt.
Or this girl who did this……
https://www.youtube.com/watch?v=y50POlvKRyw
I’ve had my moments, as I’m sure everyone reading can commiserate with, where I demonstrated less than exemplary common sense.
But when I say I’m a moron/asshat/pick chosen adjective here, I’m also referring to my profound inability to think of stuff that many of my esteemed colleagues seem to do with as much ease as breathing.
At least once or twice a week I read something or watch something that makes me have a Homer Simpson moment where I slap myself in the forehead, yell “DOH,” and wonder why it never dawned on me to come up with the same idea or concept.
Ben Bruno gets the most recent tip of the hat.
A Simple Way to Pattern the Hip Hinge
I’ve written on the importance of the hip hinge and some basic drills I like to use to help groove it HERE. The Cliff Notes version goes something like this:
“It’s important because I said so.”
[Drops mic, exits stage left]
Okay, in all seriousness the sooner someone hones their hip hinge the sooner they’ll be putting the leverages and torques they’re placing on the body in a more advantageous or “user friendly” setting. I.e., learning to move through the hips (and greasing hip extension without compensating with lumbar hyperextension) in addition to less stress on the knees and lower back when performing exercises like squats and deadlifts.
Likewise, once the hip hinge is cleaned up it makes the learning curve when introducing new exercises down the road much more expedited.
While out in LA teaching a workshop Ben Bruno stopped by to say hello and was nice enough to take the attendees through a quick 30-minutes session on cool ways to use the landmine. He showed this ingenious way to use it to groove the hip hinge:
The placement and counterbalance of the bar lends itself so that the trainee has no where to go BUT to hip hinge in order to lower the bar. If they don’t they’re going to hit themselves in the boy or girl down there parts.
It’s more or less the most intuitive way I’ve come across to help someone “feel” the hip hinge yet!
Understandably, some people may cry afoul about the hands/arms moving towards the floor, but remember all I’m trying to accomplish is helping someone feel the hip hinge happen in the first place! Once they have that, then I can work on upperback and lat tension when deadlift and squatting.
As an FYI: you don’t necessarily need the landmine apparatus in order to perform this drill. You could just as easily place a barbell up against a wall or kitty corner between two walls and accomplish the same objective.
Give it a try yourself or with your clients struggling to master the hip hinge and let me know how it goes.
The program itself will never go away (ever!!!) and will always be available to start whenever you’d like, but this will be the only time you’ll be able to purchase month #1 at a discount.
All you have to do is type in IncreaseDeadlift30 within the Coupon Code area at checkout and you’re all set. God, you’re good looking!
2. iOS users have had the luxury of using the WeightTraining.com workout logger app on their phones or iPads for several months now. The app is FREE and allows users access to WT.com’s extensive library of over 2500 exercises and 400+ workout plans.
TODAY marks the release of the Android version. Holla!!!!!!!
Which is to say, you can purchase my Deadlift Specialization Program(which is really a program designed to get you strong. Wolverine strong) and follow it on your iOS or Droid phone. Which is cool.
And if some trainer or uppity douche at your gym gives you flak for having your phone out on the weight room floor under the impression you’re doing something lame like checking Instagram or sexting with your significant other or co-worker or lab partner (hey, I’m not judging), you can just say “back off!! I’m getting my deadlift on with TG!!!!”
Master the Kettlebell Swing
The kettlebell swing is a fantastic exercise, an exercise I feel offers a gulf of benefits, and one I feel everyone should do.
The thing is: it looks simple to perform, but it’s not quite that simple to execute.
The biggest mistake I see people make is not being able to distinguish between a squat swing (wrong) and a hip-snap swing (correct). This is a non-negotiable fact.
Squat swings are dumb (and a small piece of my soul dies every time someone performs one). A hip-snap swing, on the other hand, opens up Pandora’s box to a whole world of awesome.
The key, though, is ensuring someone has patterned the hip hinge motion.
There’s that, and then there’s a bunch of other stuff that us trainers and coaches like to get nit-picky about. In my latest article on T-Nation.com I discuss some ways to pattern the hip hinge in addition to two common mistakes many people make with their KB swing technique.
Or, in other words: Learn how to groove the hip hinge and then be able to train like a boss.
Quick question/observation: Have you ever wondered why, among other things – like why women tend to make that funny face when applying make-up – when it comes to American cars, or “Western” cars, the driver’s side is on the left side of the car and not the right (as is the case in the rest of the world)?
It’s something I’ve pondered in the past and up until recently I just kinda shrugged it off as one of those things which had no legitimate rationale other than us Americans are a bunch of pompous a-holes that like to do everything differently than everyone else – analogous to us being the only country not to adopt the metric system of measurement.
As it turns out – there is a reason why the steering wheel is on the left hand side and not the right. And it’s something that makes complete sense.
In the book I’m currently reading, One Summer: America, 1927, author Bill Bryson spends a whole section going into detail about Henry Ford and the Model T car.
Up until the Model T came to fruition every car that was produced in America had the steering wheel on the right hand side so that the driver would have easy access to the side curb, side-walk, or grassy area to easily step out of the car.
Ford then decided that this was a convenience that should be afforded to the “lady of the house,” and thus the Model T was designed to have the steering wheel placed on the left hand side.
“Load is not weight. Load is how your body adapts to carrying the weight. So someone with good alignment can squat 100 lbs and experience an adaptation in their butt and legs, and another person can squat 100lbs and experience an adaptation in their hip flexors and low back muscles (very simplistic example). This is because of how we load our body! You want to load the muscles and joints properly to develop the qualities of strength, power, speed, mobility etc. A lot of pain and what “dysfunctional” movement can be a result of improper loading for your body and structure.”
This summary served as one of a few reasons why I wrote THIS article for T-Nation on why I feel learning to brace and not relying on over-arching or over-extending the lumbar spine (in other words: maintaining ALIGNMENT) is paramount with regards to lifting heavy things. Not only in the context of improved performance in the weight-room, but also as a way to play the house in your favor with relation to long-term health – especially spine health.
Taking this concept a step further, though, and since this is a fitness blog, lets roll with the talking point of alignment and loadand delve into something a bit more practical and relevant to just about everyone reading:
The Hip Hinge
https://www.youtube.com/watch?v=a1Y73sPHKxw
For those unfamiliar and stealing some insight from renowned strength coach Dan John – who’s a mega fan of the hip hinge (and rightfully so), we can introduce the hip hinge as follows:
“It’s the hip snap, the hip slam and all of the various inappropriate terms coaches have used to teach young virgin ninth graders to tackle like NFL linebackers. Just learning the move right can open up hamstring flexibility. Doing it slowly with a massive load can impress your friends for generations. Learning to have symmetry in the movement can jumpstart you to an injury-free career.
And, to do it fast? It’s the one-stop shop to fat loss, power and improved athletic ability. Swings, the top of the food chain in hinge movements, are the most under-appreciated move in life, in sport and in the gym.”
In more rudimentary terms the hip hinge involves any flexion/extension originating at the hips that involves a posterior weight shift.
And if we wanted to be super-duper simplistic, and separate ourselves from the notion that a hip hinge is the same thing as a squat pattern – WHICH IT ISN’T! – we can break things down like this:
Hip Hinge = maximal hip bend, minimal knee bend.
Squat = maximal hip bend, maximal knee bend.
*Smoke bomb, smoke bomb, exit stage right*
Moreover, taking the swing out of the equation altogether, I’d argue that nothing has quite as a profound effect on one’s performance in the gym, overall movement quality, addressing pain (especially low back pain), as well as shortening one’s “learning curve” when introducing new exercises than the hip hinge.
About the only thing a properly patterned hip hinge doesn’t help fix is a bad hair day and Justin Bieber’s general level of douchebaggery.
1o points awarded to me for a Biebs burn!
So the question then becomes: How can we go about grooving a proper hip hinge?
More to the point – when working with athletes or clients who either A) have an extensive injury history, have engrained an aberrant motor pattern, and hence like to “squat” everything or B) are otherwise healthy and still like to “squat” everything……how can we groove the hip hinge pattern we’re looking for and start to teach people how to load their body properly?
Well, I’m glad you asked!
At the lowest level two of the easiest (and effective) ways to begin to pattern the hip hinge are:
1. The Wall Tap Hip Hinge
The objective here is pretty self-explanatory. Brace the abs, ensure spinal alignment (move through the hips and NOT the lumbar spine) and then focus on tapping your derriere to the wall.
One cue I like to use is to tell people to chop or “fold” their hips with their hands (you’ll see me do this on like the third or fourth rep).
I’ll start people as close to wall as I need to in order to ensure they’re doing it correctly, and as they become more proficient I’ll move them further and further away.
2. Dowel Rod Hip Hinge
This too is fairly self-explanatory, so I’ll try not to belabor anything. I love this variation because it gives the trainee some kinesthetic feedback on spinal positioning.
In short: there should be three points of contact with the dowel rod – the sacrum, in between the shoulder blades, as well as directly behind the head. If at any point the dowel rod loses contact with any of those points – whether because the chin isn’t staying tucked or they’re squatting with too much knee bend – that should be considered a fault and corrected immediately.
Upping the ante a bit, here are some more drills that I like to implement.
3. Rip Trainer Hip Hinge
Taking the dowel rod hip hinge to the next level is the TRX Rip Trainer Hip Hinge, which very much plays into a lot of Gray Cook’s work on loading the hip hinge.
It’s a subtle load – you don’t need to be too aggressive here – but it’s amazing how much technique cleans up when you cue someone to “pull” themselves into the hinge pattern (here the trainee literally has to pull into the hinge).
Much like with the wall tap drill, I’ll tell people to visualize “folding” their hips and to sit back.
4. Sternum Hip Hinge
Place a kettlebell (you could use a plate or DB here) flush against the sternum and try to visualize driving it through your chest.
I can’t really explain why it works so well – most likely because of the anterior load – but it just does, so just do it! GOSH!
5. Behind the Head Hip Hinge
Pigging back off the sternum hip hinge is the behind the head hip hinge, which places the load posteriorly behind the head. This offers a bit more of a unique challenge in that you have to make sure that you’re bracing your abs HARD so that you don’t compensate and hinge through the lumbar spine.
6. Band Resisted Hip Hinge
Lastly, the band resisted hip hinge drill is great because it teaches people “terminal hip extension,” to the point where they must finish the movement with their glutes in order to finish the drill. Moreover, because the band is pulling them back they really have to be more cognizant of bracing their abs, maintaining alignment, and controlling the movement.
What Now?
If or when those drills are mastered THEN it’s time to add appreciable load. One of my go to exercises is the pull-through. I find that this is a fantastic exercise to introduce people to loaded hip hinging because, well, I said so!
And because it hammers the posterior chain with minimal spinal loading.
Of course deadlifts and squats will come into the picture, but not until I feel confident that the person I’m working with (especially for those with a vast injury history) can hip hinge properly and disperse the load accordingly.
I can usually coach someone up and get them deadlifting and/or squatting with a good hip hinge pattern within a short amount of time – typically in one session – but not without utilizing some of the drills mentioned above.
I know some reading are going to scoff at the title of this post and immediately go off on some diatribe about how pull-throughs are so 2002 and about why we’re even having this conversation in the first place when we can just mosey on over to the corner of the gym, grab a kettlebell, and swing away to our hearts content.
Everyone knows that kettlebells are far superior in every way – whether we’re referring to hip hinge patterning, posterior chain strength, explosiveness, overall conditioning, or some of its lesser known uses like how awesome it is as a door stopper, fish line sinker, or paper weight.
I agree that kettlebells are fantastic tool in the exercise toolbox, very versatile, and something that I implement into my programs quite often. However, as with anything else, there’s a time and place for them.
In my opinion pull-throughs are one of the more underrated exercises out there, which is unfortunate because it offers a lot of advantages in its own right.
A look at from a few vantage points:
1. It’s very user friendly. Granted, with proper coaching, a KB swing can be easily taught within 5-10 minutes. The key point to consider, though, is “proper coaching.” I don’t know about you, but Iv’e been in my fair share of commercial gyms and I can count on one hand the total number of times I’ve seen someone perform a proper KB swing – and this includes those who are actually under the supervision of a trainer!
Needless to say, there’s a lot more to a KB swing than just casually picking one up and hoisting it around like it’s some kind of toy light saber.
I find that pull-throughs are a much more “convenient” way to introduce the hip hinge pattern to people – especially those with limited training experience under their belt.
What’s more, not everyone has access to kettlebells, and pretty much everyone has access to a cable system. So there.
2. Furthermore, and going along with the whole versatility angle, pull-throughs are a staple amongst powerlifters (it’s a fantastic accessory exercise for the hamstrings and glutes), as well as beginners who are just learning their way around the weightroom.
3. Likewise, there’s very little spinal loading (assuming form is up to snuff) so it’s a fantastic option for those people working around back pain as it forces people to learn to dissociate the hips from the lumbar spine. If anything it helps to slow people down, which is an important factor when trying to learn a new pattern.
All that said, despite the seemingly innocuous nature of the exercise people tend to butcher its execution. In the video below I discuss some common mistakes as well as a few coaching cues I often use to help clean up technique. Hope it helps!