For starters I’m involved with a pretty cool product – The Trainers Toolbox – that’s set to be released next week that’s going to set the fitness industry on fire. I won’t give away too much here, but suffice it to say it’s going to help a lot of fitness professionals.1
Second, we’ve had a cranky toddler on our hands all week this week (wake-up call of 4:30 this morning as a matter of fact), so, basically, FML.
Hence I haven’t had much time to write for my own site this week. Thankfully I have some awesome contributors – like Dr. Nicholas Licameli – who are more than willing to send me articles out of the blue and make me want to buy them a steak dinner.
There are some things that you just don’t hear everyday”
-“Who keeps eating all of the kale!?!?”
-“Of course I understand why my cable bill is $37.97 more this month than it has been in the past 15 months.”
-“I hope I get placed in Ravenclaw or Hufflepuff…please, Ravenclaw or Hufflepuff…”
-“Let’s talk about Fight Club.”
-“A strong core? No thanks, not interested.”
There seems to be a slight stigma surrounding training the abs and core while lying down because, as some say, there are “better” and more “functional” ways to train.
While this may have some truth to it, I don’t mind training the abs and core on the ground. Whether or not something is “functional” really depends on the individual and his/her goals (is a standard plank really “functional?”).
In order to have functional carryover to the task at hand, the training must be specific to the activity (more on this below).
This means that “functional” will be different for everyone.
If you’re a weight lifter or powerlifter, “functional” core strengthening may include tempo reps, pause reps with postural bracing, breathing drills under sub-maximal loads, etc.
If you’re a baseball player (check outMike Reinold and Eric Cressey, if you haven’t done so already), “functional” core strengthening may include plyometric twists, anti-rotation movements, quick accelerations and directional changes, etc. The point here is that “functional” is different for everyone and if the goal is simply to progressively load and train the abdominals, don’t fear the floor.
Today I’d like to share with you an exercise that I call the lying overhead pullover (LOP) (see the video link at the end of this article). I think I invented this exercise, however Chuck Norris and Total Gym do have a variation of it in their manual and let’s be honest, I do not want to get on the bad side of a man who once challenged Lance Armstrong to a “Who has more testicles” contest and won by five.
Other than the Total Gym variation, I have not seen it anywhere else.
How To Do It
Before we dive into how to perform the LOP, let’s have a quick review on what it means to “brace the core:”
“From the top down, we have the diaphragm, from the bottom up we have the pelvic floor, and around the sides we have the deep abdominals that surround the midsection like a corset. To engage the diaphragm, take a breath in through the nose and brace. To engage the pelvic floor, pull up as if holding in gas or urine. To engage the deep abdominals, tighten up the midsection as if putting on a tight belt after Thanksgiving dinner or walking into a cold pool as the water drifts up to your navel.”
It is imperative that you understand how to perform a pelvic tilt and properly brace the core…the entire exercise depends on it.
For more on this, check out my videos right here and here (these are from the archives, so bear with me…but the content is still relevant!).
To perform the LOP, lie on your back in front of a low cable station or a low anchored resistance band. Bend the knees and perform a posterior pelvic tilt by pressing the small of your back down into the floor. Reach overhead and grab the rope or band. Maintaining the pelvic tilt, bracing the core, and keeping the arms straight, pull the rope down toward your knees.
Squeeze the abs for a count, and slowly return to the start position.
Progressions and Regressions
As with any exercise worth writing about, it must have the ability to be modified to better meet individual needs such as level of experience, pain, personal preference, etc. It may seem intuitive that decreasing or increasing the resistance would make this exercise easier or harder to perform, however how changing the range of motion affects the difficulty of the exercise may be less intuitive.
The LOP is an anti-extension exercise, which means it challenges primarily the anterior abdominals to resist spinal extension.
During this exercise, the spine and pelvis collectively become a fulcrum and our arms and legs become levers. The lever arm and extension moment increase simply by stretching out a leg or stretching the arms overhead. As the lever arm increases, it becomes more challenging to prevent the spine from arching off the ground into extension.
By maintaining that pelvic tilt, we are resisting extension.
Looking for a nasty little extended set to take past failure?
Start with the most difficult position and regress in a stepwise fashion to easier versions as muscle failure is reached, again and again.
Another simple way to alter the range of motion would be to add a small crunch to the mix.
This would allow us to not only resist extension, but also overcome it with slight flexion. Be sure to crunch up almost into a 45-degree diagonal as opposed to down toward the feet or straight up toward the ceiling. This will ensure proper tension and alignment with the line of pull and resistance curve of the exercise.
Why I Like the LOP
There is one very important function of the abs that is often overlooked, and that is resisting movement. Sure, everyone knows that the abs flex, side bend, and rotate/twist the spine, but besides causing movement, the abs collectively function to resist movement and stabilize the spinal column.
The LOP challenges that function nicely.
Another reason why I like it is that the LOP trains lumbo-pelvic stability during upper and lower extremity movement.
Why is that important?
In order to perform pretty much any sport, exercise, or functional task, the spine has to provide a stable base for the extremities to move about, otherwise it would be like vertical jumping on sand or firing a bazooka off of a kayak (why you’d have a bazooka on a kayak is beyond me…).
I am not saying that performing the LOP will directly increase power output and safety during running, cutting, kicking, punching, squatting, overhead pressing, etc.
Nope. Sorry, but the principle of specificity still reigns supreme.
If you want to improve your 40 time, better get sprinting! If you want to improve power output when kicking a soccer ball, better get out on that field and kick! If you want to improve your squat, better read this article and of course…squat!
What I am saying is that the LOP is a great way to feel, get accustomed to, and train spinal stability with extremity movement, which is foundational to all of those previously mentioned tasks.
And That’s That (LOP in Action)
So be sure to give the lying overhead pullover a shot. Depending on how it is done, the LOP can be used as a top down ab movement, a bottom up ab movement, or a core stability movement. Feel free to experiment and find what works best for you and your goals.
Enjoy!
About the Author
Nicholas M. Licameli, PT, DPT
Doctor of Physical Therapy / Pro Natural Bodybuilder
Nick believes in giving himself to others in an attempt to make the world a happier, healthier, and more loving place. He wants to give people the power to change their lives in hopes to leave this place better because he was here. Bodybuilding and physical therapy just act as mediums for carrying out that cause. Love. Passion. Respect. Humility. Never an expert. Always a student. Love your journey.
I’m very fortunate that number of quality coaches reach out and offer to submit articles for this site. Granted they have to promise to name their first born after me AND send me a bowl of yellow only M&Ms, but that’s a small price to pay for internet fame.
Thanks to everyone who pinch-wrote for me in 2018 and gave my fingers a brief reprieve.
I’m looking forward to seeing what’s sent my way in 2019….
I listened to Noah speak in person on this topic and was transfixed by what he had to say. A conversation we had after the fact led to him writing this post for my site.
I may as well post something on photosynthesis trends of oak trees in the Northeast, gas prices, or, I don’t know, what my kid had for breakfast this morning.
Everybody performs planks. And 90% of those people perform them incorrectly.
Today’s guest post by TG.com regular, Dr. Nicholas Licameli, sheds light on how to make your planks more effective.
HINT: It has zero to do with performing them for longer durations.
It’s Not What You Do, It’s How You Do It: A Better Plank
The plank.
We know it, we love it, and we know the benefits. However there is a simple way to make it more effective that you can implement immediately. It doesn’t involve any additional equipment and takes less than a second to do.
This simple modification will help not only those who are new to the exercise, but also those seasoned planking veterans.
Take a look at the following two pictures.
Can you spot the difference?
It’s subtle, almost undetectable.
Here’s some more information: The plank on the top can be held for 3 minutes or more, while the plank on the bottom can only be held for 15-20 seconds max.
The plank on the top is engaging only a fraction of the core and abdominal musculature, whereas the plank on the bottom is recruiting nearly every muscle in the body, including the core and abdominals.
Form looks good in both: No sagging or lifting of the lower back and pelvis, serratus anterior is engaged for scapular stability, and the head, neck, and entire spine are in neutral. So what makes the bottom plank more effective than the top?
Let’s find out.
No, Wait, Don’t Go…the Plank IS a Big Deal
The plank is one of the best exercises for improving total body strength as well as the health of your spine. In order to perform the plank correctly and effectively, pay close attention to the position of the lower back and pelvis as well as the direction of the force being applied through the floor.
When in the plank position, imagine what would happen if all friction on the floor disappeared, almost as if doing a plank on ice. Which direction would your elbows and feet slide? Most likely, they would slide out from under you: your arms would shoot forward, your feet would shoot backward, and your face would be imprinted on the dirty gym mat that you sprayed with a dirty plastic bottle filled with an ambiguous pale blue liquid.
Note From TG:No reason for this GIF other than to 1) I couldn’t find a video of someone falling during a plank and 2) it’s freakin hilarious. Sorry for the brief hijack Nicholas.
That is precisely the problem with the top picture.
You’ll notice that my toes are digging into the floor and isometrically pushing away, while my arms are isometrically pressing forward toward my head.
Biomechanically, I am isometrically pressing into shoulder flexion, ankle plantar flexion, hip extension, and spinal extension. While this may be a good way to hit the deltoids and calves (not really), it is not doing much for the core and abdominals.
Why?
Because the core, and more specifically the anterior core (the muscles on the front side), is responsible for spinal flexion and anti-extension. In order to maximally engage those muscles, you must train those movements.
This can be achieved by forcefully, and isometrically, pulling your arms and feet together. Now imagine doing it on ice. What would happen? Our arms and feet would slide toward each other and we’d assume a pike-like position with spinal flexion and anti-extension, which is just what we want.
And Bingo was his name-o…
Why Is This So Common?
Our bodies do not want to be wasteful, so they will do their best to use the least amount of energy necessary to complete a task, unless we tell it otherwise.
With the plank, sometimes due to our body’s natural compensations and other times due to conscious effort, we tend to get into the “position of least resistance,” usually for the sake of increasing the amount of time we can spend in the plank position.
In other words, we make the plank as passive as possible to increase its duration.
Some even wear their plank time like a badge of honor!
Hearing, “How long can you hold a plank?” is slowly becoming almost as common in gyms and health clubs as, “How much do ya bench, bro?”
That’s why it is important to remember the goal.
Unless you are a competitive planker and are scored by how long you can hold a plank, the goal of the exercise is not to increase its duration, but rather to train the core!
Doing planks is kind of like making a homemade dinner, cleaning the dishes, or having sex.
Just doing the activity doesn’t mean it will be good.
The effectiveness of the plank, as well as a homemade meal, the dishes, and sex, depends on the execution.
Don’t treat the plank like a marathon…treat it like a sprint.
Instead of thinking, “How long can I hold a plank for?” think, “How short can I hold a plank for?”
The idea being: The harder the contraction, the shorter the duration. The harder you contract and brace your core, the shorter the plank will be.
Tired of long sets of planks? Start squeezing!
Tips For A Better Plank
1. Squeeze your glutes and contract your abs (rectus abdominis AND transverse abdominis), which will pull your pelvis into a slight posterior pelvic tilt (think slightly rounding your back).
2. In order to contract your abs, you want to engage both your rectus abdominis (six-pack muscle) and transverse abdominis (deep stabilizer muscle, much like a corset). To contract the rectus abdominis, imagine bringing the ribs and front of the pelvis together. To contract the transverse abdominis, imagine the feeling when cold water reaches your navel when walking into a pool.
3. Keep your head and neck in a straight line. DO NOT LOOK UP. Your tailbone, mid back, and head should all be in line with each other (see picture below).
4. Isometrically pull your elbows and feet together. This is the key. Imagine doing a plank on ice or on a slippery hardwood floor with socks and a towel under your arms, as seen below.
5. Once you assume the proper position, maximally contract every muscle from your toes to your fingers, but DO NOT HOLD YOUR BREATH.
6. Imagine giving a big hug with your shoulder blades. Keep the shoulder blades protracted (pressed forward) and be sure they stay snug around the ribcage. This will help engage serratus anterior, which is an extremely important muscle for the health of your shoulders. It is also quite aesthetically pleasing when well developed.
7. When coming off of a plank, slowly lower your knees to the floor. DO NOT let your hips/pelvis drop to the floor.
Don’t rely on the traction of the floor to maintain the plank position, rely on your core.
Would you rather get to muscle fatigue after planking for 10 seconds or 3 minutes? Clearly, ain’t nobody got time for no 3-minute, ineffective planks. Try this modification out and I guarantee your planks will become instantly more effective and you will look at the plank in a new light and learn to love it.
For a video demonstration and explanation of everything I just wrote, be sure to check out my video right here:
About the Author
Nicholas M. Licameli, PT, DPT
Doctor of Physical Therapy / Pro Natural Bodybuilder
Every single thing he does, Nick believes in giving himself to others in an attempt to make the world a happier, healthier, and more loving place. He wants to give people the power to change their lives. Bodybuilding and physical therapy just act as mediums for carrying out that cause. Love. Passion. Respect. Humility. Never an expert. Always a student. Love your journey.
I’m currently in the throes of jet-lag sucktitude.
I’ll be back on my writing content horse next week, but I’ve got a treat for you today. TG.com regular contributor, Dr. Nicholas Licameli, is subbing in for me today and he went to TOWN in today’s guest post.
This is one of the most thorough articles I’ve read in a while on the topic with a metric shit ton2 of information with many additional links to help you nerd out a bit more if you so choose.
The squat is a topic that has gotten a great deal of attention among many fitness and medical professionals since mankind first started lifting heavy things against gravity. Since then, much of the conversation has changed (with the advent of civilizations, roads, running water, Instagram.
However much has stayed the same.
I understand this isn’t the first article written about the squat.
Some of the greatest minds in fitness and strength and conditioning have written on the topic, and I encourage you to dive into the multitude of references that I’ve provided.
My goals for this article are to help make your squat look and feel better, improve performance and effectiveness, un-complicate the complicated, and give you the confidence to perform this foundational movement without fear.
Unfortunately, there are those that say to avoid squatting.
As a physical therapist, I have to apologize because much of that flawed thinking stems from misinformed and unqualified professionals in the medical field that are pleasantly ignorant to current practices.
The squat and hip hinge are foundational to basically all movements in and out of the gym.
Whether you’re hitting a PR on the platform or sitting down on the toilet, you are squatting and you better be using proper technique. I’ve treated injuries as a result of poor squatting in both of those previously mentioned instances. Why avoid the squat in the gym if we’re going to do it constantly throughout our day anyway?
I say train it rather than avoid it.
Why not be prepared and do it right?
The squat and hip hinge require total control of the deep abdominals as well as the hips, pelvis, and entire spinal column. We can all agree that teaching proper abdominal bracing, pelvic positioning, and proper lifting mechanics are of utmost importance for the treatment of musculoskeletal injuries including knee, hip, and low back pain. For some reason however, we don’t all agree that squatting is necessary.
Newsflash…when done correctly, THEY’RE THE SAME THING!
As both a doctor of physical therapy and professional natural bodybuilder, it should come as no surprise that in my opinion, people of all ages and from all walks of life should be squatting. This includes the young athlete just starting his/her training career, those recovering from injury, those trying to prevent injury, and even (and especially) the elderly.
No matter if you are an athlete or a great grandparent, we are all essentially “squatting” multiple times throughout our day, so why not train it, strengthen it, and perfect it?
You can release this muscle or stretch that muscle but if patients and clients don’t know how to squat and hip hinge, we are spinning our wheels and wasting valuable time.
How to Squat
While this isn’t a step by step “how to squat” article, here is a quick and dirty rundown of some things to keep in mind.
There is a plethora of information out there about thoracic spines, knees, ankles, spinal positioning, foot placement, etc., and sometimes it can complicate things, make people fearful, and mystify the movement.
Basically, a proper squat and hip hinge starts (obviously) at the hips with the spine in a neutral position (more on this later). After a breath in, tension should be kept throughout the body and throughout the movement. The entire spine, including the neck, mid back, and lower back, should be kept in a relatively stable and neutral position. The feet should remain actively planted on the floor with the weight evenly distributed.
More on all of this to come.
In the beginning of my lifting career, I struggled with finding the “groove” of the squat. This is partially due to improper mental cueing during the movement. Some of my mental cues during the squat were:
“Arch the back hard to avoid spinal flexion.”
“Keep the head and chest up so they remain in line with the horizon.”
“Sit back and push through the heels.”
“Always squat below parallel.”
While there could be worse things, especially considering that, like most beginners, my sources of information were muscle magazines and of course the biggest guy(s) at the gym, I think these cues can be quite misleading and detrimental to squat technique.
Here’s why.
“Arch the Back Hard to Avoid Spinal Flexion.”
Avoid a hard arch in the lower back.
Don’t let the lower back round of course, but rather maintain the natural arch of the lumbar spine.
Hard lumbar extension will crunch down on the delicate structures of the spine, put the glutes in a less than optimal position to stabilize the pelvis, and place the hip in slight flexion before the movement even starts.
Starting in hip flexion will cause the femur to run out of room in the acetabulum for hip flexion when you want it most…at the bottom range of the squat. This could result in femoral acetabular impingement (FAI) and labrum pathology.
Get out of that hard arch and find your neutral.
“Keep the Head and Chest Up So They Remain in Line With the Horizon.”
Keeping the head and chest up isn’t necessarily a bad thing, however if we achieve that position by hyperextending our backs and flaring our ribs forward, it becomes problematic and essentially unstable.
Cueing a slight posterior pelvic tilt prior to un-racking the weight and maintaining that position throughout should do the trick. This will place the spine and ribcage in more of a neutral position.
We maintain the position by taking a breath, contracting the upper back, lats, mid section (as if putting on a tight belt or walking into cold water up to your navel), pelvic floor (as if holding in gas or urine), and even the feet (more on this to come).
Check out my explanation of what it means to “contract your core” right here. Tony does an awesome job of explaining this here, as does John Rusin here. Quinn Henoch and Ryan Brown also hit the point home here. Eric Cressey nails the upper body and lat set up here.
“Sit Back and Push Through the Heels.”
It’s true that we don’t want to push through our toes and allow our heels to rise off the floor, however it is also true that we don’t want to shift our weight so far backward that the toes lose contact with the floor and most of the force goes through our heels.
Yes, we want to descend slightly backward, but the focus should really be on descending down between our hips.
When we say we put an adversary on “his/her heels,” we are saying that we put them in a vulnerable position and on the defense, which will likely lead to a step backward. Why would we want to put ourselves on our own heels while squatting?
A better cue is to have an “active foot,” evenly maintaining 3 points of contact with the floor: base of big toe, base of little toe, and heel. Tony explains this really well here. This foot position will help stabilize the hips and knees, as well.
Mastering the “active foot” takes practice, but once you feel it, there’s no going back.
For everything you (and your children and their children’s children) will ever need to know about squatting, check out this bad boy by Greg Nuckols.
Find Your Squat
Hey fellow millennials!
Remember what our mothers taught us…we are all special, we are all unique, everyone is a winner, Mufasa died of natural causes, and most importantly, we are all different!
When it comes to the squat, this last point is key.
We are all structured differently, which is why there is no particular squat that is perfect for everyone. Things like foot position, stance width, and squat depth will all be impacted by things like the size of our torsos, length of our femurs, and the structure of our hips and pelvis. We need to find the squat variation that best “speaks” to us.
The classic example of this is hip flexion range of motion and lumbar compensatory spinal flexion.
Much has been written about this topic, and to avoid making this more like a Harry Potter book rather than a guest post, I’m going to refer you to some excellent articles down below.
Keep in mind that a range of motion measurement taken while lying on a treatment table DOES NOT always necessarily correlate to what we observe during an actual movement pattern like a squat and vice versa.
That being said, a 2008 study (stolen by me from afantastic articleby Bret Contreras) showed a 60 degree difference in hip flexion range of motion between the least flexible (80 degrees) and most flexible (140 degrees) subjects out of a total of 200 hips.
That’s quite a large difference, considering exercises like a deep squat require about 120 degrees of hip flexion. Differences in femoral anteversion/retroversion (how much the head of the femur faces forward or backward), acetabular anteversion/retroversion (how much the the hip socket faces forward or backward), and inclination angle of the femoral neck (angle of the neck and shaft) are seen from individual to individual as well as from hip to hip within the same person.
These genetic structural differences all change an individual’s ability to squat.
Thanks Mom and Dad…
Pushing past end range hip flexion in the descent of a squat for the sake of going deep will cause compensations up and down the chain, particularly flexion of the lumbar spine, AKA the dreaded “butt wink” (cue the tire screech and screams).
While some amount of lumbar flexion and “butt wink” is acceptable (we’ll get to that in a minute), too much, too often, in an uncontrolled manner, can be problematic.
So you can see why being married to a certain squat variation can be inappropriate.
If you are an individual that is unable to squat deeply but force yourself to perform deep barbell squats because your lifting partner says so, you’re setting yourself up for injury and a faulty and uncomfortable squat.
When it comes to varying your squat type, be sure to know your goal.
Why are you squatting?
To improve overall strength?
Hypertrophy?
To get a stronger squat?
To impress a member of the opposite sex (spoiler alert, they don’t care)?
To be able to pick up your child without pain?
There are many variations of the squat.
The conventional barbell back squat is just one option and unless you are training for a powerlifting meet, where you will be required to perform the conventional barbell back squat, there is no reason to lock yourself into only one type of squat.
Why not try a goblet squat? Or a sumo squat? Or a front squat? Why not use dumbbells or kettlebells instead of a barbell? If structured correctly, any variation of the squat will improve strength and hypertrophy as well as train the hip hinge and proper bending/lifting mechanics.
What’s the take home? We are all structurally different and it is important to find the squat pattern that works best of us.
Here are some great resources that will help you find the squat pattern that works best for you and your anatomy:
Note From TG: Nicholas is kind to include me amongst such elite company (Note to Self: you owe Nick 1000 Predator handshakes), but mine is easily the least pithy of the bunch.
Neutral Spine…Does It Exist?
Yes and no.
Research has shown that lumbar flexion, particularly at the bottom of a squat (the previously mentioned butt wink), is quite natural in a squatting pattern, particularly at the point in the movement where the hips start to run out of space for further flexion.
I agree with Quinn Henoch that neutral spine is more of a range rather than a set position, so don’t lose sleep over a little spinal flexion.
How much excursion is too much?
You knew the answer before you asked it.
It depends!
That being said, you definitely want to avoid movement at the spine and pelvis as much as possible. A moving base causes leaked energy and therefore less stability and built up tension. This means less force produced, less strength, and less Instagram pictures with a bumper-plate loaded bar on your back.
Don’t Stop Squatting Because You Have Pain Or Feel Restricted
If you experience pain during a squat, SEE A QUALIFIED HEALTHCARE PRACTITIONER.
You want someone that will question the type of squat that hurts, ask when in the range of motion the pain occurs, analyze your squat pattern, ask about weekly volume and load, inquire about recovery and sleep, and do everything in his/her power to keep you squatting.
There are always ways to modify the squat in order to keep training this key movement pattern while training with an injury.
Sharp pain at the bottom of a squat?
Try using a more neutral spine with slight flexion using a goblet squat to free up some space in that acetabulum.
No good?
Try adding a band around the knees during a few warm up sets.
Still no good?
Add a box to squat to at a level just above where the pain is felt.
The point is, you deserve better than a rushed, “Stop squatting for 4 weeks, take these anti-inflammatories, and see me in a month.
Oh, and if that doesn’t work, try foam rolling, cupping, turmeric, an oxygen deprivation mask, and VooDoo floss bands in a bath of apple cider vinegar and creatine.”
Fixing the symptoms with things like medication and surgery without considering the cause is an all too common theme.
These things have their place, of course, however they must be used appropriately. For example, surgery to repair a labrum that was damaged after repetitive impingement due to faulty lumbo-pelvic mechanics would be like fixing ceiling tiles in your living room instead of fixing the leaky roof.
After the surgery, if the individual returns to squatting with the same mechanics that got him/her under the knife in the first place, what good has been accomplished? Doesn’t make sense to repair, install, and paint shiny new ceiling tiles without fixing the roof first. Check out a video I made on this a while back right here.
So What Can We Do To Improve How The Squat Looks And Feels?
This is a tough question, because, as you probably guessed, everyone is different and it depends.
I recommend seeking out a qualified healthcare practitioner that will assess, reassess, and give you the tools to improve your individual squat.
Gone are the days of performing long, drawn out warm ups in the name of injury prevention, mobility, and movement optimization. A warm up should increase your heart rate and mentally and physically prepare you for the specific movements of the day.
The warm up should be active, specific and purposeful, not a cookie cutter series of activities like flailing around on the dirty gym floor or jamming a lacrosse ball into your sciatic nerve in hopes to break up adhesions in your piriformis.
Things like static stretching and foam rolling are passive activities.
In contrast, light cardio, dynamic stretching, loaded eccentrics, and actually getting under the bar and grooving the squat movement with sub-max loads are all active.
Passive activities like foam rolling do have their place, but they should be used appropriately. The benefits of foam rolling are short-lived, so if you’re going to foam roll, I’ve found it best to do it in between warm up sets. Of course, the specific muscles you target will be individual to you, your body, and your squat. For more on this, check out my article and videoas well as this fantastic episode of Mobility Mythsby Quinn Henoch.
Don’t feel obligated to use cardio as the only way to increase heart rate.
A dynamic series/circuit of exercises, combined with specific mobility work using active techniques such as loaded eccentricsand reciprocal inhibition (here and here), followed by some squatting with bodyweight or just the bar, will increase your heart rate just fine, not to mention both physically and mentally prime your system.
You get more bang for your buck.
For more on a proper warm up, including explanations of how to put it all together, check out my current lower body warm up right here as well as a great hip mobility exercisenot in included in my warm up video.
Also, Quinn Henoch (<— can you tell I have a little man-crush on him?) nails it in this episode of Mobility Myths about stretching.
And That’s That
I hope this helps in your journey to finding and perfecting your individual squat.
Remember, there is nothing to fear about the squat and there is no need to overcomplicate this foundational movement. Don’t forget to take advantage of all the resources provided in this article, as they are from some of the greatest minds this field has ever seen. Happy squatting!
Oh, and one more thing…knees drifting over toes is OK.
About the Author
Nicholas M. Licameli
Doctor of Physical Therapy / Pro Natural Bodybuilder
Every single thing he does, Nick believes in giving himself to others in an attempt to make the world a happier, healthier, and more loving place.
He wants to give people the power to change their lives. Bodybuilding and physical therapy serve as ways to carry out that cause. Nick graduated summa cum laude from Ramapo College of New Jersey with his bachelor’s degree in biology, furthered his education by completing his doctoral degree in physical therapy from Rutgers School of Biomedical and Health Sciences (previously the University of Medicine and Dentistry of New Jersey) at the age of 24, and has earned professional status in natural bodybuilding.
His knowledge of sport and exercise biomechanics, movement quality, and the practical application of research combined with personal experience in bodybuilding and nutrition allows him to help people in truly unique ways. Love. Passion. Respect. Humility. Never an expert. Always a student. Love your journey.
The shoulders (delts) are an area that many trainees wish were bigger. They’re also an area that’s often injured. In today’s guest post by Dr. Nicholas Licameli he discusses and breaks down some of his top training tips for shoulder health and hypertrophy.
In order to build a quality and symmetrical physique, all muscle groups must be trained and developed equally. An overdeveloped muscle group can never compensate for an underdeveloped one. That being said, a well-developed set of shoulders, along with a narrow waist, can really enhance a physique and create a nice V-taper.
While the shoulders are one of the most sought after muscles to develop, they also tend to be one of the most stubborn and most commonly injured. Here are my top shoulder training tips to help you on the journey to strong, healthy shoulders.
1) Listen To Your Body
Early in my training career, I remember feeling as if there were some aspects of my training that could not be changed. Compound lifts had to be performed using a barbell only and with heavy, lower rep sets. Dumbbells and lighter/higher rep training were for isolation movements.
For years, I trained in the 6-10 rep range for barbell overhead presses and in the 12-20 rep range for lateral raises, rear deltoid work, and other isolation movements. I never really felt “satisfied” or that “good” fatigue after completing heavy sets of overhead presses.
I eventually took the leap out of my comfort zone and started using dumbbells and a landmine set up for overhead pressing.
What a difference!
I felt a connection to my deltoids like never before. The overhead press soon went from one of my least favorite movements to one of my favorites.
I also started to realize that my lighter warm up sets seemed to feel better (even when not taken anywhere near failure) than my heavier working sets. I took another leap and started training the overhead press in the 12-20 rep range and again, I was blown away at how my body responded. Does this mean I completely removed heavy overhead pressing from my training?
Of course not, but I am definitely not afraid of lighter training.
The take home message here is listen to your body.
If heavy barbell training doesn’t quite “click” for your shoulders, don’t be afraid to change it up.
We now know that if hypertrophy is your goal, overall volume (volume = weight lifted x sets x reps) and progressive overload at an appropriate intensity is what matters.
Note From TG: Technically speaking, for muscular hypertrophy three factors take precedence: Mechanical Tension, Metabolic Stress, and Muscle Damage.
Hypertrophy can be seen by training with heavy weight and low reps as well as light weight and higher reps. Keep in mind that if your goal is strictly to increase strength on the barbell overhead press, you’re going to have to train the barbell overhead press with heavy loads, as specificity is much more important when it comes to strength.
2) Obey Your Anatomy: The Upright Row and Lateral Raise
The upright row seems to have more controversy surrounding it than Donald Trump administering a flu vaccine to a gluten-free, ketogenic, vegan, transgender circus elephant in captivity while drinking creatine sweetened with aspartame.
Is the traditional “muscle magazine” upright row the safest or most effective exercise to build big, strong, and healthy shoulders?
Probably not.
Can it be modified?
Absolutely.
By nature of the movement, the barbell upright row places the shoulder in resisted internal rotation with elevation. This is a less than optimal and, dare I say, vulnerable position because it narrows the subacromial space, which can increase risk of injury.
Does that mean our shoulders will break on the first rep?
No.
Our bodies are resilient and can handle less than optimal positions, but why risk it if we can find a better way? Need a refresher on what the sub-acromial space is and how narrowing it can lead to injury? Check out Tony’s awesome article right here.
Great alternatives to the barbell upright row are the dumbbell upright row and the face pull.
Face Pull
As mentioned above, the barbell upright row puts us into internal rotation, which narrows the sub-acromial space.
External rotation, however, can be a shoulder’s best friend.
The dumbbell upright row frees up our joints and allows us to externally rotate throughout the movement. The face pull reduces the amount of internal rotation at the bottom of the movement and increases the amount of external rotation at the end of the movement.
Many training routines tend to be abundant in internal rotator strengthening (pecs, lats, etc.) while lacking strengthening for the external rotators (posterior rotator cuff, rear deltoids, etc). Both the dumbbell upright row and face pull involve resisted external rotation, which means they can help balance out a traditional training routine (more on this to come).
Note From TG: Speaking of Face Pulls I am reminded of THIS classic T-Nation.com article by Mike Robertson and Bill Hartman on the topic.
The lateral raise is a staple in most shoulder training routines, however if done incorrectly, can be very similar to the barbell upright row.
By internally rotating at the top of a lateral raise, as if pouring a pitcher of water, the shoulder gets placed into resisted internal rotation with elevation, which we now know is not that great of a position.
Why is that a common cue (even Arnold recommends it!)? Because in order to maximally target the middle deltoid, it needs to be directly in line with the force of gravity and the “pouring-the-pitcher” position accomplishes this.
Middle deltoid is directly in line with the force of gravity (good!), however the shoulder is in internal rotation and elevation (bad!)
Anterior deltoid is directly in line with the force of gravity
Bending forward or lying face down in a bench targets the posterior deltoid because it is directly in line with the force of gravity.
Posterior deltoid is directly in line with the force of gravity
So how do we reduce our risk of injury while still maximizing the force through the middle deltoid?
Simple.
Hinge at our hips and lean forward, just a bit.
The line of gravity has now changed. We’re now able to externally rotate (reversing the pitcher pouring motion) while still placing the middle deltoid in perfect alignment with gravity.
Middle deltoid is directly in line with the force of gravity (good!) AND the shoulder is in external rotation (good!)
For a video demonstration and explanation of this, go HERE.
3) Don’t Overdo It…Pay Attention to Volume
When looking at weekly shoulder volume, don’t forget to account for all of the exercises that involve the shoulders as secondary movers.
Shoulder presses, lateral raises, and reverse flyes are not the only exercises that add to weekly shoulder volume.
The shoulders get worked during exercises like bench presses, rows, dips, and even pull-ups and pull-downs. If you have a volume goal you are trying to hit, be sure to keep this in mind to avoid overtraining and overuse injuries. Remember, more is not better…better is better.
4) Don’t Try To Get Too Creative Just For The Sake Of Novelty
Bruce Lee said,
“I fear not the man who practiced 10,000 kicks once, but I fear the man who has practiced one kick 10,000 times.”
Too much variety for the sake of novelty can limit your ability to progress, especially when it comes to shoulder training.
In general, the basic variations of shoulder movements are presses, lateral raises, extension-based movements (face pulls, reverse flyes, etc.), and global stability movements (farmer carries, planks, bird dogs, etc.).
My suggestion would be to find your preferred variations of those movements and perfect, fine tune, overload, and progress them. Yes, change it up every once in a while, but don’t swap out a solid landmine press for a banded, blood flow restricted, single-arm kettlebell press while standing on a BOSU over a pool of sharks with laser beams attached to their heads.
Stay tuned for Part II tomorrow where I offer four more of my top shoulder training tips.
About the Author
Nicholas M. Licameli
Doctor of Physical Therapy / Pro Natural Bodybuilder
Every single thing he does, Nick believes in giving himself to others in an attempt to make the world a happier, healthier, and more loving place. He wants to give people the power to change their lives. Bodybuilding and physical therapy serve as ways to carry out that cause. Nick graduated summa cum laude from Ramapo College of New Jersey with his bachelor’s degree in biology, furthered his education by completing his doctoral degree in physical therapy from Rutgers School of Biomedical and Health Sciences (previously the University of Medicine and Dentistry of New Jersey) at the age of 24, and has earned professional status in natural bodybuilding. His knowledge of sport and exercise biomechanics, movement quality, and the practical application of research combined with personal experience in bodybuilding and nutrition allows him to help people in truly unique ways. Love. Passion. Respect. Humility. Never an expert. Always a student. Love your journey.
Today’s guest post comes courtesy of frequent contributor, Dr. Nicholas Licameli. He covers a topic that’s sometimes controversial:
Neck position when lifting heavy things.
Some people play close attention to it (as they should), while others play it off as “no big deal” and point towards really strong people who seemingly have never had any issues with their neck(s).
“See! They do it.”
Yeah, well, you’re not them. And most other people aren’t either.3
Plan On Lifting or Squatting Something Heavy? Check Your Neck
One of the most common issues I see in the deadlift and squat (and plank, push-up, bent over row, etc.) even in experienced lifters, is forgetting to “set” the head and neck.
Feet gripping floor with 3 points of contact? Check.
Shoulders and scapulae tucked down and back, squeezing the armpits? Check.
Neck straight and chin tucked?…
The hip hinge is the foundation to all movements that involve bending over or squatting. A proper hip hinge starts at the hips (naturally) with your spine in a neutral position.
But “spine in neutral position” does not just refer to the lower back. It includes the often-neglected cervical spine, too.
Too often I see the head and neck extended in an otherwise perfect hip hinge (see image below). I lie awake at night wondering why we lose so many good men out there (playing for the Yankees?4) to poor mechanics and why this mistake is so common…here’s what I came up with.
The extended position of the cervical spine can be very dangerous.
It is akin to having a hard arch in the lower back (the facet joints and neural tissues become compressed) except that the joints, muscles, nerves, and other structures of the neck are smaller and more delicate.
Add the maximal contraction of pretty much every muscle, as seen when performing a deadlift or squat, and it is clear to see why this can be dangerous.
So why do so many of us assume this faulty position?
Part of the reason is because our heads always want to be looking upright. Our brains subconsciously want to position our heads so that we are looking at the horizon.
We all know that the end goal is to stand up straight. We feel as if “looking where we’re going,” will help us get there. In order to maintain proper cervical positioning, we have to fight our subconscious, which is never easy.
[Another reason could be that we want to catch ourselves in that perfect lighting for that perfect selfie…]
But I think a big reason why extending the head and neck is so common is because it creates a shortened lever arm, which improves the biomechanical efficiency of the lift.
Let me explain.
When you bend forward in a proper hip hinge, the hip becomes a fulcrum. As a result, a lever is formed from the hip to the top of the head. The longer the lever arm, the harder the load is to move.
Think of the difference between picking up a dumbbell out to the side of your body (as in a lateral raise) versus tucked into your side (as in a shrug).
When lifting out to the side, the shoulder joint is the fulcrum, the lever arm is the arm, and the load is in the hand at the end of the lever.
Lifting with your arm straight out to the side produces a longer lever arm than lifting close to the body, which makes the load more difficult to lift. This is the same reason why many coaches cue lifters to keep the load as close to your shins as possible during a deadlift. The further the load is from the fulcrum (your hip), the harder it is to lift.
It means that extending the head and neck during a deadlift may be the body’s subconscious attempt to improve the biomechanical efficiency of the lift. It essentially shortens the lever arm by about a “head’s length.” (see images below).
Shortened lever arm by about a “head’s length
To ensure proper positioning, tuck the chin and align the neck with the rest of your spine before lifting the load (see image below).
So next time you deadlift, yes, make sure your hip hinge is on point (and you get that perfect lighting for that selfie), but don’t forget about your vitally important and often neglected head and neck.
Resist the urge to look up!
Your discs, joints, muscles, and nerves will thank you.
Video Explanation
About the Author
Every single thing he does, Nick believes in giving himself to others in an attempt to make the world a happier, healthier, and more loving place. He wants to give people the power to change their lives. Bodybuilding and physical therapy serve as ways to carry out that cause. His knowledge of sport and exercise biomechanics, movement quality, and the practical application of research combined with personal experience in bodybuilding and nutrition allows him to help people in truly unique ways. Love. Passion. Respect. Humility. Never an expert. Always a student. Love your journey.
I’m still in Florida enjoying my vacation (and eating copious amounts of carrot cake). Actually, after reading this article myself and looking at all the jackedness, I’m kinda grossed out by how much carrot cake I’ve been ingesting.
Nevertheless, if you’ve ever been curious as to whether or not there’s any validity to blood flow restriction training and whether it’s something that’s a good fit for you today’s guest post by Dr. Nicholas Licameli will help answer those questions.
NOTE:Be sure to check with a healthcare practitioner before using blood flow restriction, especially those with cardiac or circulatory pathologies.
For a more in depth look at this topic as well as explanations and details of the studies referenced, be sure to check out my podcast HERE.
Blood Flow Restriction Training: Real Deal or Are We Wrapped Up in the Latest Fad?
In order to fully understand the theory behind BFR, it’s important to quickly review how blood flows through the body. This quick review of the circulatory system also appears in my article on compression garments, which can be found right here.
“The system is a cycle with the heart at the core.
Oxygenated blood enters the heart and is pumped (with great force) into the arteries. The arteries carry oxygen rich blood to all the tissues of the body, including muscle.
For simplicity, let’s use the biceps as an example.
As the arteries approach the muscle, they become thinner and thinner until they become so thin that the nutrients and oxygen diffuse across its walls and into the tissue. These super thin blood vessels are called capillaries.
After the blood “drops off” its oxygen and nutrients, it is picked up by more capillaries, which feed into larger blood vessels called veins. The veins passively carry the deoxygenated blood back to the heart. Once back at the heart, the deoxygenated blood gets sent to the lungs to get re-oxygenated, sent back to the heart, and is pumped back into the arteries to start the cycle all over again.
So the force from the initial pump from the heart is enough to send the blood from the heart, through the arteries, through the capillaries, into the veins, and back to the heart all while fighting gravity, plaque build up, etc. (pretty amazing huh?).
So it is easy to see that the velocity of blood flow is MUCH greater in the arteries than it is in the veins. Think of pushing a toy car across the floor. The initial push (the heartbeat) gives the car a decent amount of velocity, however as the car travels further and further away, its velocity lessens.”
What Is Blood Flow Restriction Training?
The goal of BFR training, or occlusion training, is to maintain arterial inflow of blood while occluding venous return during exercise: We want to get that nutrient, hormone, and oxygen-rich blood to the muscle, while delaying its escape.
This is accomplished by the application of a blood pressure cuff, knee wrap, or anything that can be tightly secured around the most proximal (closest to the midline of the body) part of a limb. If we use the arm muscles as an example, the wrap would be tightly secured around the upper arm, as close to the shoulder as possible, causing the blood to pool in the arms.
It is thought to have a positive effect on hypertrophy while using much lighter loads than conventional weight training.
How is it possible to restrict venous return without restricting arterial flow?
Let’s think back to our circulatory system review.
The blood in arteries has a much higher velocity and propulsion force than the veins, so in order to occlude arterial blood flow, a much higher pressure is needed. It is easier and requires less pressure to restrict blood flow in the veins because at that point, the flow of blood is not as forceful. Think of in the movies when someone gets an injury and the blood is squirting and pulsing out. The movie is depicting an arterial injury because of the high velocity of blood.
If a vein were injured, the blood would just ooze out.
Note From TG: I added this scene from Kill Bill because 1) why not? and 2) it repeatedly shows “arterial injuries” Nick referred to above. Also, 3) it’s badass.
How Does It Work?
The exact mechanism by which BFR works is unclear, however, the most likely and agreed upon theory has to do with greater metabolic stress.
Muscles release growth factors and metabolic by-products, such as lactic acid, into the bloodstream as a result of resistance training. These growth factors and metabolic by-products are washed away with normal blood flow. By restricting venous return and allowing the blood to pool, these growth factors and metabolic by-products remain in the muscle for a longer period of time and therefore have more time to interact with corresponding receptors in muscle tissue.
The accumulation of metabolic by-products, such as lactic, increases intramuscular acidity and may promote hypertrophy as well as the release of growth hormone (although acute increases in growth hormone have not been shown to significantly impact hypertrophy, it is still worth noting).
The increase in acidity and the buildup of lactic acid are responsible for “the burn” that we all know and love.
Even though we love the feeling, our bodies do not.
Our bodies fight tooth and nail to increase oxygen flow to the area in order to decrease the acidity and restore homeostasis. It does this by increasing respiration (increased breathing rate) and increasing arterial/oxygen-rich blood flow (vasodilation…the pump), but it can only fight for so long.
When the body is no longer able to manipulate breathing and blood flow enough to balance the acidity of our tissues, we enter an anaerobic (“no oxygen”) state. As we keep working through the burn, the acidity continues to increase until we reach muscle failure. Type II muscle fibers are recruited during this anaerobic state, which is important because they have the most potential for growth.
Blood flow restriction increases the amount of deoxygenated blood in the area, which helps facilitate the creation of an anaerobic environment. The result? We reach an anaerobic environment faster and for a longer duration.
How Do We Do It? How Tight? What Set & Rep Ranges? How Often?
As mentioned above, apply the wrap at the most proximal area of your arms and legs. It is difficult to establish an optimal tightness of application due to individual factors such as limb circumference, body fat level, skin thickness, etc. Studies seem to agree on is a simple rating of 7/10 self-rated tightness.
Photo Credit: John Rusin
Perform 3-5 sets to failure with 20-50% of 1 rep max with the muscle occluded the entire time. Rest periods should be 30-60 seconds between sets. After the final set, remove the wraps and restore blood flow to the muscle.
As far as how often BFR should be used, it is my personal opinion that BFR should be used like any other intensity technique that aims to increase metabolic stress, such as rest pause, drop sets, etc.
Is BFR Better Than Just Lifting Weights? I Mean, People Have Been Lifting Heavy Things and Getting Bigger and Stronger for Centuries…
Keep in mind that research only points us in the right direction for further study and isn’t meant to be the end-all be-all.
Research gives us trends and averages, however we each are n=1.
That being said…
Research shows that BFR training may be more effective for hypertrophy than conventional hypertrophy training with matched loads and just as effective as conventional training with unmatched loads.
This means that BFR causes the same amount of hypertrophy as conventional training while using significantly lighter loads. BFR training has been shown to enhance hypertrophy with weights of about 20-30% of 1 rep max, which is significantly lighter than what is typically required for conventional training.
When comparing BFR training to conventional strength training, research has shown BFR and conventional training to have a similar effect on strength with unmatched loads. This means that lifting lighter loads with BFR can increase strength just as much as conventional training with heavy loads.
When loads were matched (both groups lifting the same weight), BFR was shown to improve strength to a greater degree than conventional training.
That being said, there are studies that show BFR to be inferior to conventional heavy training to improve strength. Research supports that, when it comes to strength, specificity of training is key.
What’s the take home regarding strength? As the saying goes, “If you want to lift heavy things, you have to lift heavy things.”
BFR has also shown some promising results in physical therapy and rehabilitation.
Research has shown that subjects experienced increased serum growth hormone, thigh muscle size, and 1 rep max isometric strength just by walking on a treadmill with BFR applied to the legs.
Research also shows that when BFR was applied to the legs following ACL reconstruction surgery, subjects experienced more strength retention and less atrophy when compared to a control. Strength retention and less atrophy were also observed using BFR following a period of ankle immobilization and a non-weight bearing protocol.
It seems BFR may be quite an effective tool with a wide variety of implications. Variables such as power, speed, endurance, etc. still require further investigation at this time.
Is It Safe?
Be sure to check with a qualified 6healthcare practitioner before adding BFR to your training toolbox.
Contraindications to blood flow restriction training include a history of deep-vein thrombosis, pregnancy, varicose veins, high blood pressure and cardiac disease.
Excessive pressure and prolonged ischemia (decreased blood flow) can lead to necrosis of tissues (cell death). Even though the BFR guidelines outlined in this article do not use excessive pressure and are not being applied for long periods, caution should always be taken.
Stop use immediately and consult a qualified healthcare practitioner if you experience severe pain, dizziness, nausea, or numbness/tingling.
Keep in mind that every time you enter the gym, you are taking a risk. If not respected or properly executed, anything can be harmful. Even with perfect form, injury is a risk.
What’s the Take Home?
With BFR, the goal is to induce fatigue, blood pooling, and muscle burning quicker and withless weight/work.
Wrap at the most proximal area of your arms and legs (under your shoulder and high on your inner thigh) with a 7/10 self-rated tightness.
Perform 3-5 sets to muscular failure using 20-50% of your 1 rep max with the muscle occluded the entire time.
Rest periods should be 30-60 seconds between sets.
After the final set remove the wraps and restore blood flow to the muscle.
While BFR has been shown to enhance hypertrophy and strength, it seems to have more of a positive impact on hypertrophy than strength. For strength, it may be more beneficial to stick to traditional heavy training.
BFR seems to be safe, however a qualified1 healthcare practitioner should be consulted prior to implementing BFR.
Don’t forget… For a more in depth look at this topic as well as explanations and specifics of the studies referenced, be sure to check out my podcast right here.
About the Author
Dr. Nicholas M. Licameli, PT, DPT
NGA Pro Bodybuilder/Doctor of Physical Therapy
Every single thing he does, Nick believes in giving himself to others in an attempt to make the world a happier, healthier, and more loving place. He wants to give people the power to change their lives. Bodybuilding and physical therapy serve as ways to carry out that cause. His knowledge of sport and exercise biomechanics, movement quality, and the practical application of research combined with personal experience in bodybuilding and nutrition allows him to help people in truly unique ways. Love. Passion. Respect. Humility. Never an expert. Always a student. Love your journey.
In addition to the references listed below, please be sure to check out the work of Jeremy Loenneke on BFR as well as StrengthandConditioningResearch.com.
Abe T, Kearns C, and Sato Y. (2006) Muscle size and strength are increased following walk training with restricted venous blood flow from the leg muscle, Kaatsu-walk training. J Appl Physiol 100: 1460–1466.
Boucourt, B., Bouhaddi, M., Mourot, L., Tordi, N., & Ménétrier, A. (2014). Changes in tissue oxygen saturation with calf compression sleeves-before, during and after a cycling exercise. The Journal of sports medicine and physical fitness. 55(12):1497-501
Egerton, T., Beardsley, C. Blood Flow Restriction Training. Strength and Conditioning Research. Retrieved on 7/21/16 from https://www.strengthandconditioningresearch.com/blood-flow-restriction-training-bfr
Kubota, A., Sakuraba, K., Sawaki, K., Sumide, T. & Tumara, Y. (2008). Prevention of disuse muscular weakness by restriction of blood flow. Medicine and Science in Sports and Exercise, 40(3), 529-34. [
Loenneke JP and Pujol TJ. (2009). The Use of Occlusion Training to Produce Muscle Hypertrophy. Strength & Conditioning Journal. 31(3): 77-84.
Menetrier, A., Mourot, L., Bouhaddi, M., Regnard, J., & Tordi, N. (2011). Compression sleeves increase tissue oxygen saturation but not running performance. Int J Sports Med, 32(11), 864-868.
Takarada Y, Takazawa H, and Ishii N. (2000). Application of vascular occlusion diminish disuse atrophy of knee extensor muscles. Med Sci Sports Exerc 32: 2035–2039.
Walk into any weight-room (or mall for that matter) and you’re likely to see a few people wearing a pair of those tight looking thingamajiggies that make them looked jacked.7
Thingamajiggies aren’t their technical term by the way. They’re actually compression garments. They’ve grown in popularity in recent years and there’s a growing debate on their efficacy and use.
Is the juice worth the squeeze or are we being pressured into following another trend? See what I just did there? That’s called word play.
Today’s guest post by Dr. Nicholas Licameli tries to answer the question(s).
NOTE:Be sure to check up with a healthcare practitioner before using compression garments, especially those with cardiac or circulation pathologies.
In order to fully understand the theory behind compression garments, it’s important to quickly review how blood flows through the body.
The system is a cycle with the heart at the core.
Oxygenated blood enters the heart and is pumped (with great force) into the arteries. The arteries carry oxygen rich blood to all the tissues of the body, including muscle.
For simplicity, let’s use the biceps muscle tissue as an example.
As the arteries approach the muscle, they become thinner and thinner until they become so thin that the nutrients and oxygen diffuse across its walls and into the tissue. These super thin blood vessels are called capillaries.
After the blood “drops off” its oxygen and nutrients, it is picked up by more capillaries, which feed into larger blood vessels called veins. The veins passively carry the un-oxygenated blood back to the heart. Once back at the heart, the un-oxygenated blood gets sent to the lungs to get re-oxygenated, sent back to the heart, and is pumped back into the arteries to start the cycle all over again.
So the force from the initial pump from the heart is enough to send the blood from the heart, through the arteries, through the capillaries, into the veins, and back to the heart all while fighting gravity, plaque build up, etc. (pretty amazing huh?).
So it is easy to see that the velocity of blood flow is MUCH greater in the arteries than it is in the veins. Think of pushing a toy car across the floor. The initial push (the heart beat) gives the car a decent amount of velocity, however as the car travels further and further away, its velocity lessens.
What Are Compression Garments Meant To Do?
Compression garments are commercially available from companies such as Under Armour, Nike, and CEP in the form of full-length tights, partial and full-length tops, knee length stockings, and even full-body suits.
For those who don’t wear these just to be trendy, they are typically worn by runners, weightlifters, and other active individuals in hopes to improve performance and recovery (or feel like a superhero in superhero tights).
How to Use Compression Garments?
The garments are worn over the muscles being worked during or after exercise. For example, a runner may wear knee high compression garments in hopes to target performance and recovery of the calf muscles.
As part of an overall recovery strategy, wearing a compression garment over the affected area for 12 – 24 hours in the 1-2 days following exercise seems to be most effective.
Improvements in recovery have been displayed over a wide range of pressures and there has not been an exact or optimal pressure found at this time.
How Does It Work?
Compression garments are thought to function through changes in blood flow, perfusion (blood flow to body tissues) and muscle swelling, however the exact mechanism by which compression garments improve recovery is unclear at this time. They actually were first used as a medical intervention to increase blood flow to the heart (venous return).
Muscle Swelling:
It has been suggested that reductions in muscle swelling following exercise-induced muscle damage may limit further structural damages to the muscle or influence the brain’s fatigue regulation by affecting the signals (chemical or neural) the brain can interpret.
Tissue Oxygen Saturation:
Tissue oxygen saturation refers to how much oxygen from the blood is actually being taken up by tissues.
Aerobic (oxygen present) vs. Anaerobic (no oxygen)
More oxygen to tissues —> greater capacity to do work—> helps prolong the time it takes to get into an anaerobic state (burning and muscle fatigue).
Once we run out of oxygen supply to our muscles, the environment changes to an anaerobic state. It is at this point that we feel “the burn” due to an increase in acidity. This causes us to reach failure.
Basically, more tissue oxygen saturation prolongs the onset of the burn, which prolongs muscle failure, which enhances performance.
So if you’re doing a set of 10-15 reps, the first 6-7 reps will not burn because your muscles are getting adequate oxygen from blood. As you keep going through your set, you begin to feel a burn because your muscles are requiring more oxygen than what is being supplied. This causes the environment to change from aerobic to anaerobic, which causes lactic acid build up and “the burn.”
Can Compression Garments Improve Performance and Recovery?
Studies have shown that compression garments may provide the following benefits to an athlete.
Muscle Soreness: May decrease soreness 24-48 hours following exercise.
Strength: May limit the loss of strength typically seen following exercise.
Power: May help maintain power or limit the loss of power following exercise.
Range of Motion (ROM): May slightly limit loss of ROM typically seen following exercise.
Sprint and aerobic performance: One study showed that they may preserve sprint performance and improve time trials.
What Are the Limitations to Using Compression Garments?
It may not be feasible to wear compression garments for long durations in the days following a training bout due to job requirements, comfort, daily life, etc.
What Type of Athlete Might Benefit the Most From Compression Garments?
Compression garments have been shown to be effective for men and women as well as those performing aerobic or resistance training. Greater overall benefits are seen in higher volume and higher intensity training.
Are Compression Garments Worth Purchasing?
Compression garments can be a cost effective way to improve recovery, however they are not essential.
It is important to note that no recovery technique, including compression garments, will be effective without proper sleep and nutrition.
Getting your Z’s and eating properly to fuel and refuel your body are most important. Seeing a qualified healthcare practitioner, such as a physical therapist, can also improve recovery, prevent injury, and enhance overall health and wellness.
For More Information:
For a more comprehensive and evidence-based look into compression garments, as well as a full reference list used for this article (and absolutely anything else related to training), be sure to check out the great work at StrengthandConditioningResearch.com as well as my video on compression garments and blood flow restriction:
About the Author
Dr. Nicholas M. Licameli, PT, DPT
Love. Passion. Respect. Humility.
His passion lies between his love for the journey of bodybuilding, education, spreading happiness, and helping others. Nick is a doctor of physical therapy and professional natural bodybuilder. He views bodybuilding through the eyes of a physical therapist and physical therapy through the eyes of a bodybuilder. He graduated summa cum laude from Ramapo College of New Jersey with his bachelor’s degree in biology, then furthered his education by completing his doctoral degree in physical therapy from Rutgers School of Biomedical and Health Sciences (previously the University of Medicine and Dentistry of New Jersey) at the age of 24. His knowledge of sport and exercise biomechanics, movement quality, and the practical application of research combined with personal experience in bodybuilding and nutrition allows him to help people from all walks of life in truly unique ways. Never an expert. Always a student. Love your journey.
Foam rolling was never a “thing,” at least in mainstream fitness circles, until the early 2000’s. Since then it seems you can’t lift a weight or make a tuna salad without first taking yourself through a myriad of foam rolling drills to ensure “safety.”
Do I have my clients foam roll? Yes. Do I feel it’s imperative? It depends. In today’s guest post by Dr. Nicholas Licameli, he sets the record straight on what foam rolling is and what it isn’t
In the fitness world, foam rolling has become just about as popular as yoga pants, bright stretchy shirts with motivational and quirky quotes, and transformation pictures on Instagram. That being said, a foam roller can be an effective tool, if used correctly.
Some buzz terms you may have heard when it comes to foam rolling are muscle lengthening, breaking down scar tissue, freeing up adhesions, remodeling of collagen, curing cancer, etc., however recent research does not support these claims as the mechanism by which foam rolling works.
In reality, we as humans cannot produce the amount of force necessary to remodel our tissues. Our tissues are much more resilient than that. It actually takes thousands of pounds of force to accomplish this, which is probably a good thing because we don’t want our tissues breaking up or remodeling when we’re carrying groceries, sitting on a park bench, squatting with 500lbs on our backs, or anytime we put weight into them.4,5,8
Last time I checked, no one is foam rolling with that much force!
But…We Feel Better and “Looser” After We Foam Roll. Why????
The mechanism by which foam rolling works seems to be neurophysiological rather than physical.
Neurophysio what? Neurophysiological.
This means that foam rolling induces a global decrease in muscle tone. Muscle tone is the continuous passive contraction of a muscle controlled subconsciously by the brain. In other words, it’s a muscle’s resistance to passive stretch. Tone is created by a constant subconscious message from the brain telling a muscle to contract. Many times the sensation of muscle “tightness” has more to do with tone and less to do with actual muscle length.
This is similar to how pain is perceived. Pain is a sensory input. Foam rolling adds a sensory input (the pressure) to override another sensory input (tightness or pain) to disrupt that subconscious message between the brain and the muscle to contract or perceive pain.1,6,8 This is why we feel better, looser, and less pain after foam rolling.
A Word (Or two. Or three.) On the Iliotibial Band (IT-Band)
By understanding the neurophysiological mechanism by which foam rolling works, it is now clear why you should NEVER FOAM ROLL THE IT-BAND.
The IT-band is a long tendon that has connections to the hip musculature, lateral quads, and lateral hamstrings…but it is only a tendon, not a muscle.
It is not made up of contractile tissue and therefore cannot have tone. The IT-band becomes tight as a result of increased muscle tone of its muscular attachments.
Think of it like this…imagine attaching the rear bumpers of two tractor-trailers with a chain. Both drivers hit the gas and the trucks try to move away from each other, increasing tension on the chain. In order to lessen the tension on the chain, it’s obvious that you would have the drivers ease off the gas. The chain itself does not cause the tension. The force of the trucks causes the tension.
The same goes for the IT-band. To improve IT-band tightness with a foam roller, focus on the hip musculature, lateral quads, and lateral hamstrings. By rolling directly over the IT-band, you are only causing yourself pain, which is most likely causing a global increase in muscle tone throughout the body.
Great Let’s Get Rolling! I’m Going to Foam Roll Every Muscle of My Body 3x/day For the Rest of My Life!
Not so fast.
The above-mentioned benefits of foam rolling seem to be very short lived. If you spend 10, 20, or 30 minutes foam rolling different muscle groups, by the time you’re done, you’ve likely lost the benefits of the first 5-10 min.
Although the research has not shown an optimal dosage for foam rolling, it has been shown that short bouts of 10-60 seconds is effective.7,8,9 That being said, do not focus on time. Focus on “feel.” Feel that muscle release!
Don’t just roll and roll and roll.
Note From TG: ^^^ Sorry, I couldn’t resist. And, you’re welcome.
Start off with a slow, steady roll covering the entire muscle group scanning the area for tender spots. Think of scanning the area as a blind person would scan a new environment.
Once you find a tender spot, pause and hold on that spot until a release is felt and the tenderness lessens. Follow this up with another slow, steady roll over the entire muscle just like you started. It is true that foam rolling should be a bit painful, but too much pain will cause an increase in muscle tone, which, as previously mentioned, is exactly the opposite of what we want to do.
More pain is not better. Better quality is better.
Foam rolling should be done with a specific purpose targeting specific muscles (see a qualified healthcare practitioner to pinpoint target areas specific to you). Stop mindlessly flailing around on the dirty gym floor rolling every muscle of your body. Foam rolling should address a specific movement that is limited.
Test/retest means you test a movement (like a squat) before and after performing soft tissue work to determine if there was any significant change. A useful way to do this is between warm up sets.
So I Understand That the Benefits of Foam Rolling Are Relatively Short Lived, but Can Foam Rolling Help Achieve Long-Term Improvements in Tissue and Movement Quality?
Yes!
That is where loaded movements come in. During the window following foam rolling, it is important to load the movement that you are trying to improve. This is why I recommend performing soft tissue work between your warm up sets.
It will allow you to test/retest as well as gradually load the movement, given you are gradually increasing load with each warm up set.
Take a squat for example.
You feel tightness and restriction in your hips halfway into the descent of your squat. You test and retest your squat and notice you are able to squat deeper and with less tightness. As you load the squat and work up to your working/heavier sets, this newly achieved movement pattern will be trained.
Training this movement with loads will, over time, lead to long term improvements in tissue and movement quality.2,8 Foam rolling can also be a great way to kick-start the recovery process by tapping into the parasympathetic nervous system, but that’s for a different article.
So do not fall victim to the latest trend or claims from gurus. I hope this helps shed some light on what foam rolling is, what it isn’t, how it works, and how to implement it into your training routine.
Let’s roll!
Author’s Bio
Dr. Nicholas M. Licameli, PT, DPT
Nick’s passion lies between his love for the journey of bodybuilding, education, spreading happiness, and helping others. He views bodybuilding through the eyes of a physical therapist and physical therapy through the eyes of a bodybuilder. Nick is a doctor of physical therapy and professional natural bodybuilder. He graduated summa cum laude from Ramapo College of New Jersey with his bachelor’s degree in biology, then furthered his education by completing his doctoral degree in physical therapy from Rutgers School of Biomedical and Health Sciences (previously the University of Medicine and Dentistry of New Jersey) at the age of 24. His knowledge of sport and exercise biomechanics, movement quality, and the practical application of research combined with personal experience in bodybuilding and nutrition allows him to help people in truly unique ways. Passion. Respect. Humility.
References
Andersen, L. L., Jay, K., Andersen, C. H., Jakobsen, M. D., Sundstrup, E., Topp, R., & Behm, D. G. (2013). Acute effects of massage or active exercise in relieving muscle soreness: Randomized controlled trial. The Journal of Strength & Conditioning Research, 27(12), 3352-3359.[PubMed]
Beardsley, Chris, and Andrew Vigotsky. “Foam rolling and self-myofascial release. “www.strengthandconditioningresearch.com. N.p., n.d. Web 19 Sept. 2016. https://www.strengthandconditioningresearch.com/foam-rolling-self-myofascial-release/
Chaudhry, H., Schleip, R., Ji, Z., Bukiet, B., Maney, M., & Findley, T. (2008). Three-dimensional mathematical model for deformation of human fasciae in manual therapy. JAOA: Journal of the American Osteopathic Association, 108(8), 379-390.[PubMed]
Chaudhry, H., Bukiet, B., Ji, Z., Stecco, A., & Findley, T. W. (2014). Deformations experienced in the human skin, adipose tissue, and fascia in osteopathic manipulative medicine. Journal of the American Osteopathic Association, 114(10), 780-787.[PubMed]
Goats, G. C. (1994). Massage–the scientific basis of an ancient art: Part 2. Physiological and therapeutic effects. British Journal of Sports Medicine, 28(3), 153-156.[PubMed]
MacDonald G., Penney M., Mullaley M., Cuconato A., Drake C., Behm D.G., Button D.C. An acute bout of self myofascial release increases range of motion without a subsequent decrease in neuromuscular performance. J of Strength Cond Res. 2012. (published ahead of print).
“Mobility Myths With Dr. Quinn Henoch- Foam Rolling”. JTSstrength.com. N.p., 2016. Web Sept. 2016.
Sullivan, K. M., Silvey, D. B., Button, D. C., & Behm, D. G. (2013). Roller-massager application to the hamstrings increases sit-and-reach range of motion within five to ten seconds without performance impairments.International Journal of Sports Physical Therapy, 8(3), 228.[PubMed]


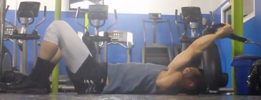
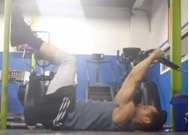
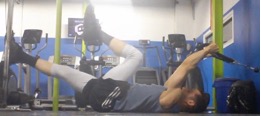
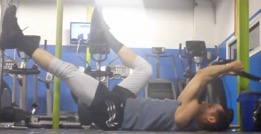

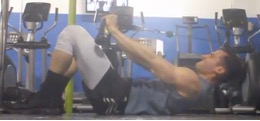
 Nicholas M. Licameli, PT, DPT


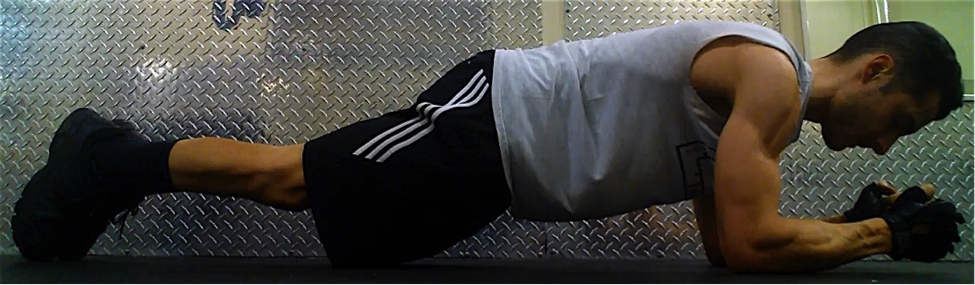
 Nicholas M. Licameli, PT, DPT
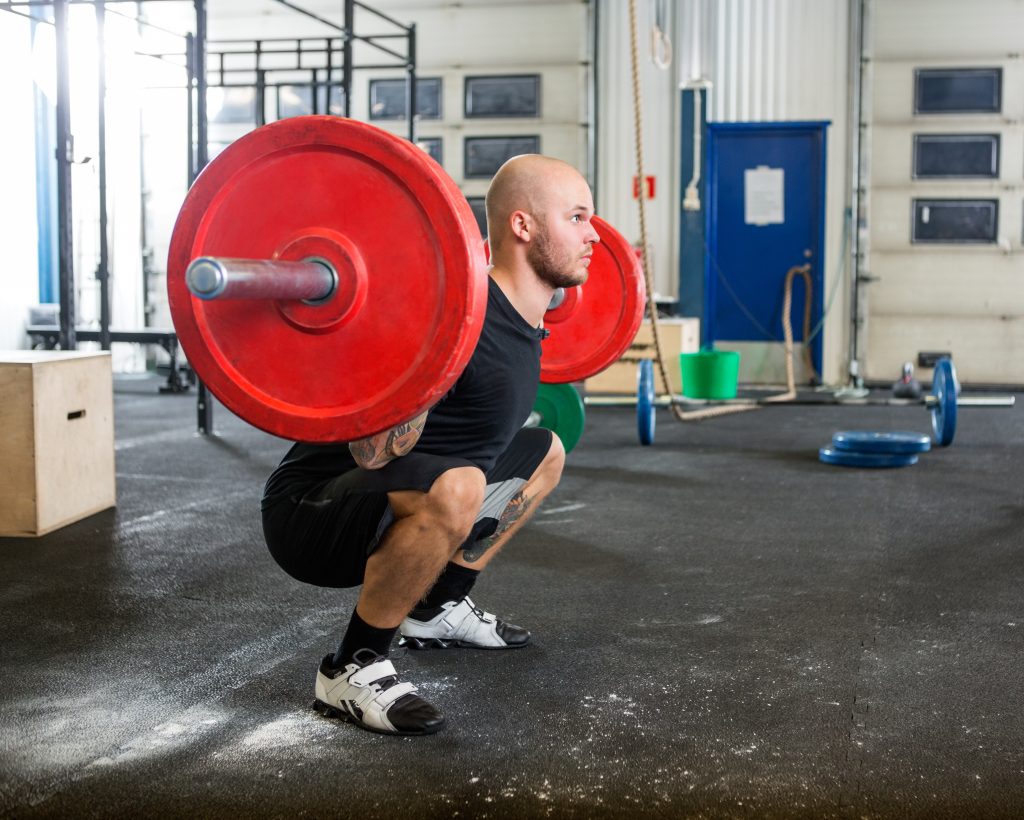
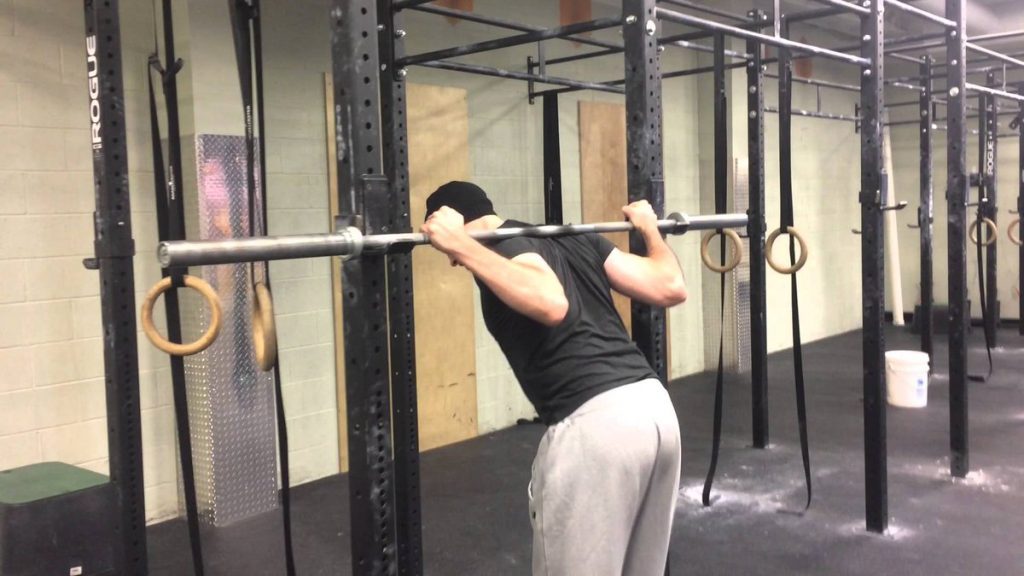
 Nicholas M. Licameli

%2C445%2C286%2C400%2C400%2Carial%2C12%2C4%2C0%2C0%2C5_SCLZZZZZZZ_.jpg)


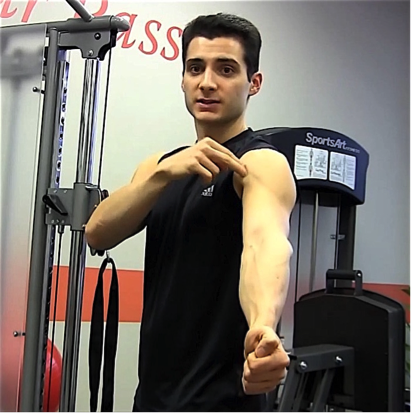
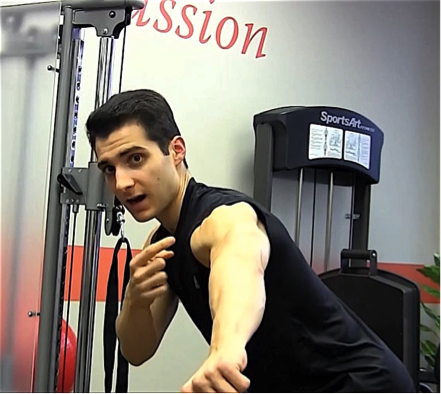
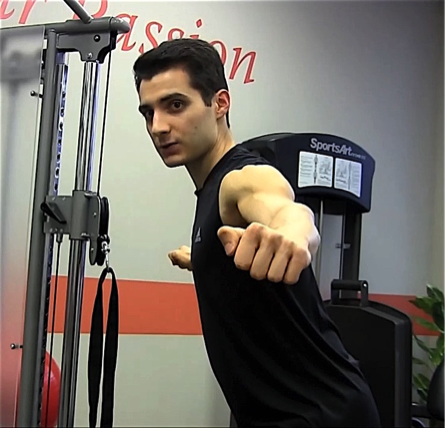
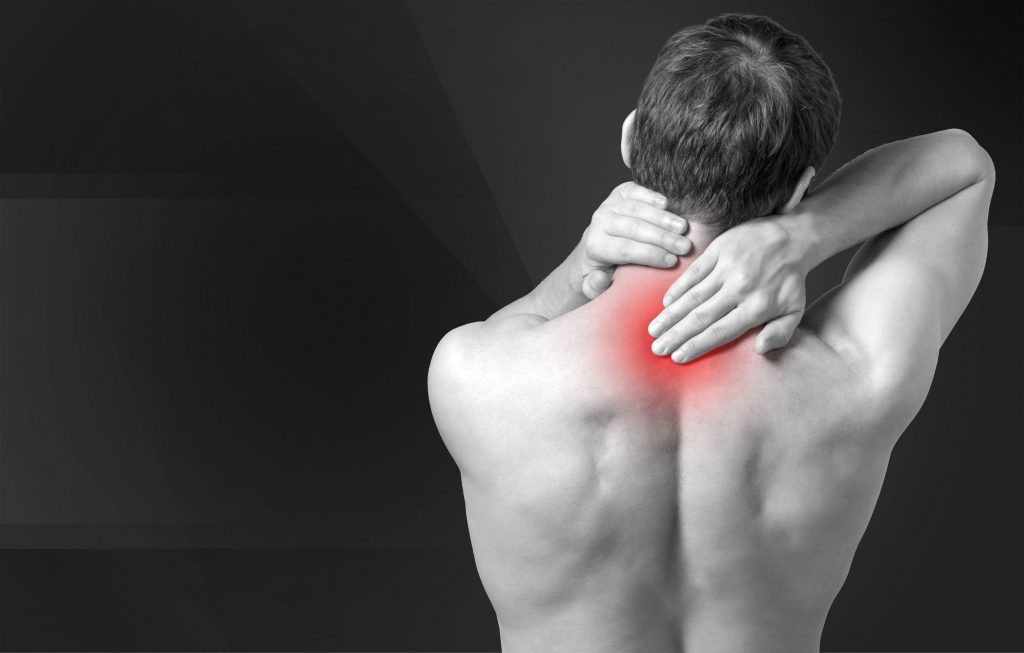
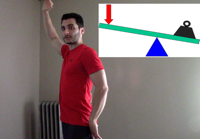


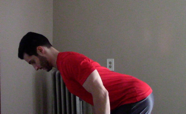
 the world a happier, healthier, and more loving place. He wants to give people the power to change their lives. Bodybuilding and physical therapy serve as ways to carry out that cause. His knowledge of sport and exercise biomechanics, movement quality, and the practical application of research combined with personal experience in bodybuilding and nutrition allows him to help people in truly unique ways. Love. Passion. Respect. Humility. Never an expert. Always a student. Love your journey.
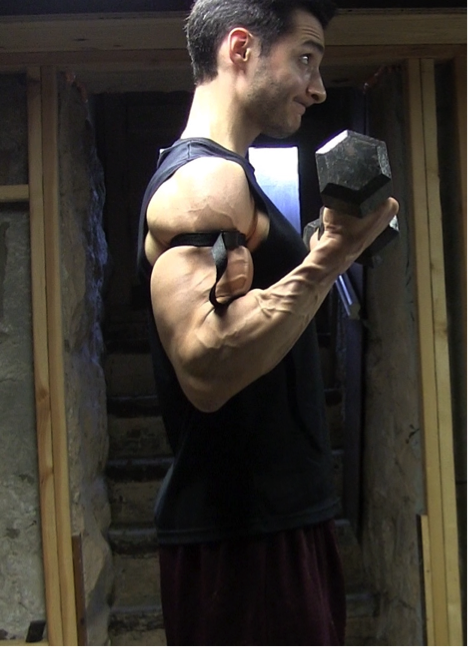
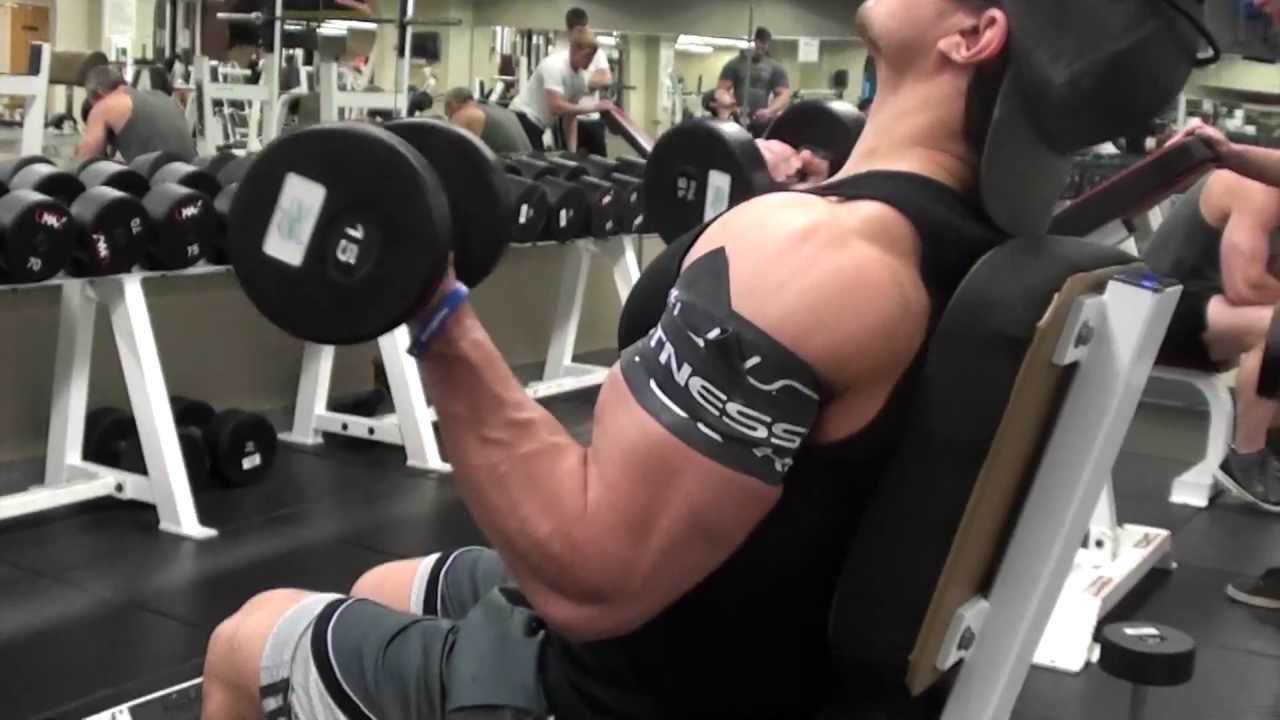
 Dr. Nicholas M. Licameli, PT, DPT
 Love. Passion. Respect. Humility.
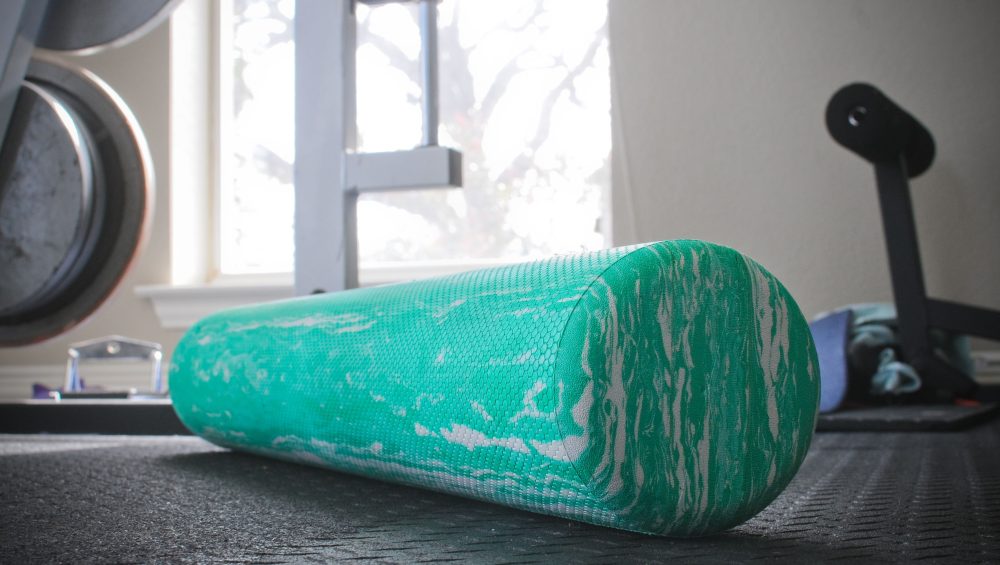

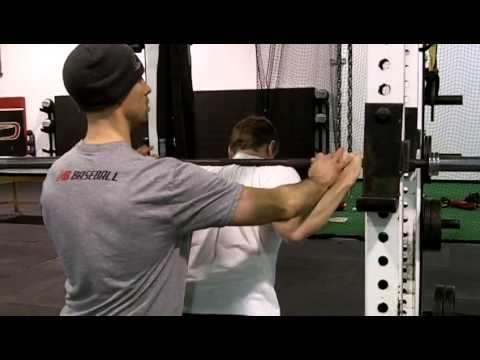
 Dr. Nicholas M. Licameli, PT, DPT

