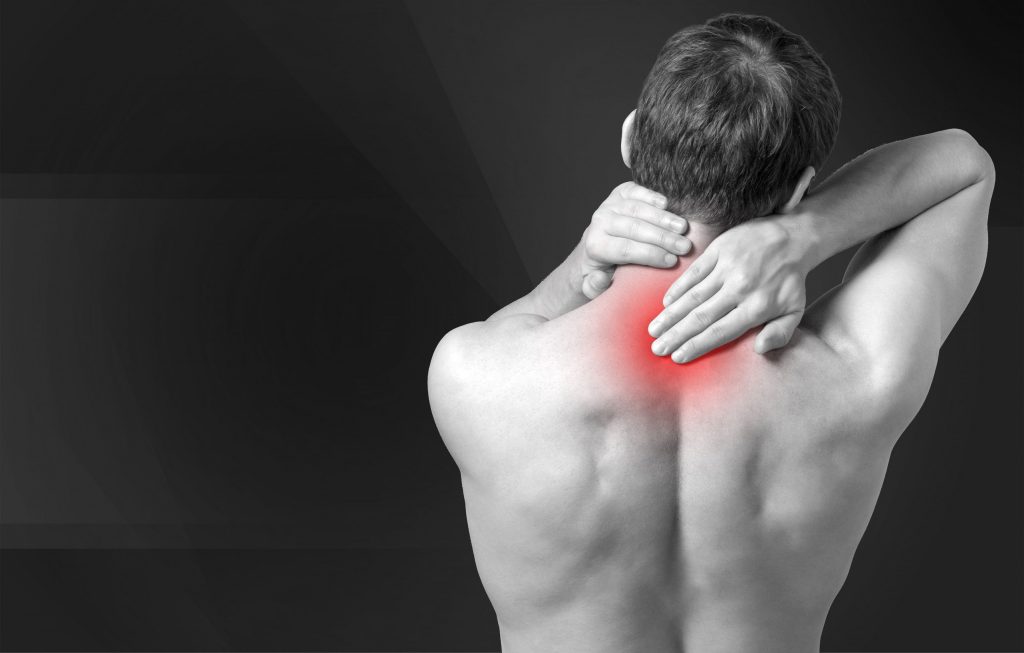
To mirror yesterday’s conversation on training around pain, today’s post delves a little deeper into a specific area that many lifters tend to have issues with:
Not enough bicep curl variations in their program
Forgetting to remove their shaker bottle from their gym bag for week
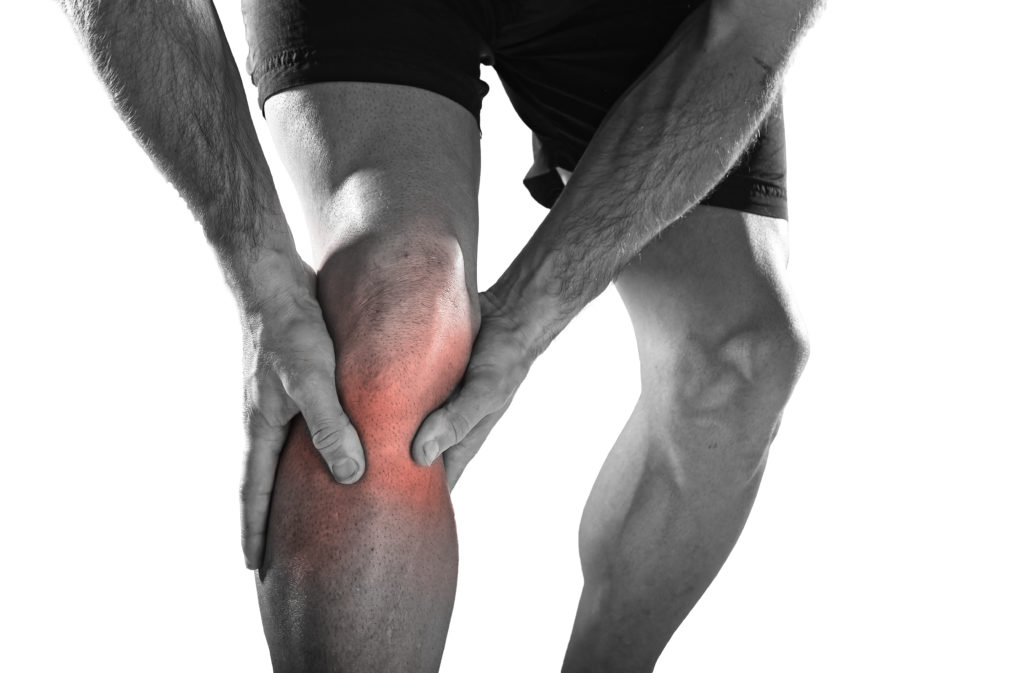
Knees.
The knees are a vulnerable joint and there are myriad of reasons why they can become achy, sore, cranky, or any other similar adjective you want to put here.
Sydney, Australia based physical therapist and trainer, Dane Ford, was kind enough to write this straight-forward article on some of the root causes of knee pain and ways to address them on your own.
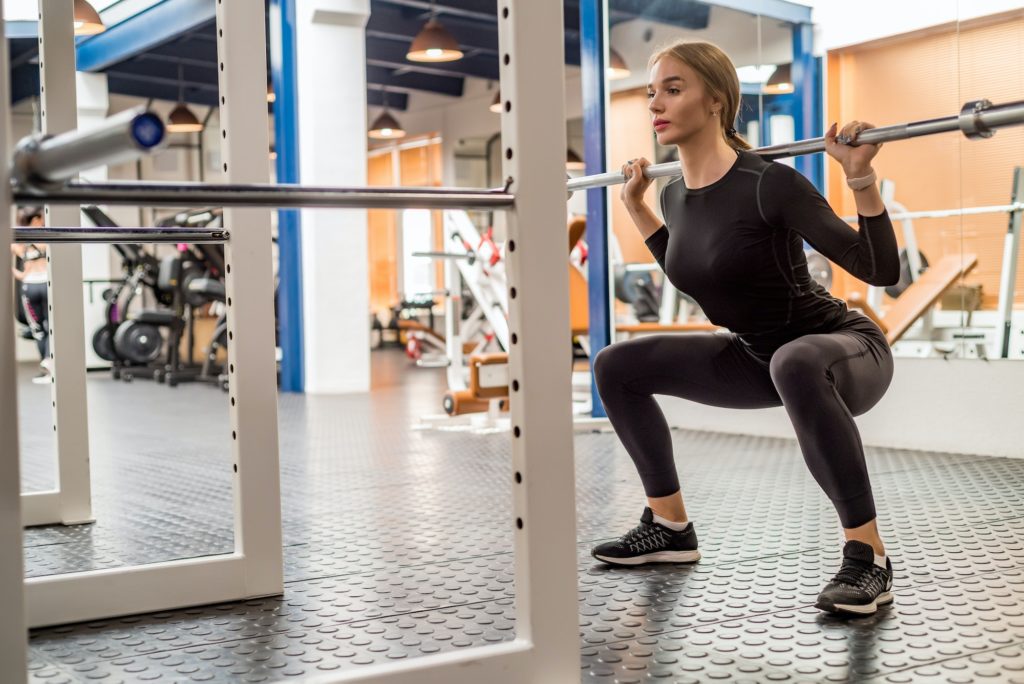
Squatting is an essential part of most people’s fitness routine, and it can be extremely frustrating when you experience sore hips or knees when you squat.
Today I’m going to share four killer exercise variations that will help take some pressure off your knee joints!
No matter what level your fitness is at – whether strength training or just getting healthy again after injury – these tips should work their magic in no time flat.
Let’s get started.
The Goods
Box squat.
The first variation for those who experience knee pain when squatting is the box squat. A box squat will strengthen your quads, glutes, and hamstrings. It’s also a great way to improve your squatting technique.
You’ll need a box squat or a bench around knee height to do a box squat.
Start by placing the box behind you.
Then, position your feet shoulder-width apart and push your hips back.
Next, bend your knees and lower yourself until your bottom touches the box. Pause for a second, then stand back up.
Step-Ups
Step-ups are another great variation for people who have knee pain when squatting. This exercise works your quads, hamstrings, and glutes and is a great way to build lower body strength.
To do a step up, start by placing your right foot on a box or bench.
Then, push off with your right foot and raise your body up until your leg is straight.
Pause for a second, then lower yourself back down.
Focus on keeping the hips level.
Start with a smaller step, and increase the step height as your body allows.
Hip Thrusts
Hip thrusts are a great exercise for people who want to build stronger glutes. This exercise can also help relieve knee pain when squatting by taking the pressure off your knees.
To do a hip thrust, start by sitting on the ground with your back against a box or bench.
Place your feet flat on the ground and raise your hips until your thighs and torso are in line with each other.
Pause for a second, then lower your hips to the starting position.
Progress this exercise by adding weight at your hips, like a barbell or plate.
Banded Crab Walks
Banded crab walks are an excellent exercise for people who want to build stronger glutes and legs. This exercise can also help improve your squatting technique by making it easier to push your knees out over your toes. This is a golden exercise for dealing with knee pain when squatting.
To do a banded crab walk, start by placing a resistance band around your feet. (You could place it around your knees or ankles, but the further down your legs, the harder the exercise will be).
Then, step one leg out to the side as far as the band will allow.
Keep the hips level, and the shoulders stacked over the hips.
Next, step in with the other leg.
Repeat.
Causes of Knee Pain
When addressing knee pain during squats, it’s important to understand some of the common causes. This way, you can be sure that you’re taking the right approach to fix the underlying issue. Here are three common factors which can contribute to knee pain when squatting:
Improper Form
Whilst there is no such thing as textbook technique, using ‘adequate’ form allows you to engage the right muscles when you lift and minimize injury risk. If you don’t utilize adequate form when you squat, the load in certain areas like your knee joints will be increased, instead of having the load evenly distributed through your entire body.
Our body’s tissues all have a maximum tolerable capacity. This means that we need to be able to go hard enough in the gym to stimulate adaptation and promote strength, whilst not overloading ourselves to the point of tissue injury.
Giving your body time to recover with rest or a de-load week every now and then is a great start, to allow proper cell regeneration, repair and adaptation to occur.
Adding variety into our movements is another great option to avoid overuse. Beyond the exercises we’ve covered above, mixing back squats with front squats, goblet squats, or other squatting variations will help to strengthen the squatting movement whilst providing a slightly different stimulus to our tissues, and reducing the overload injury risk.
Bad Shoes
If you’re wearing shoes that don’t provide adequate stability when you squat, then this can put unnecessary strain on your knees.
Be sure to wear shoes that provide you with a solid foundation from which to lift.
Health Conditions Related to Knee Pain
So now that we understand some of the mechanisms that can contribute to knee pain during squats, how do we know which structure in the knee is causing pain?
Knee pain can present as a number of different conditions depending on the injured structure. This can include:
Patellofemoral Pain Syndrome
PFPS or patellofemoral pain syndrome is a condition that affects the knee joint. It’s characterized by pain in the front of the knee and around the patella or kneecap, and is common in those who love to squat.
If you have PFPS, you might experience pain when climbing stairs, squatting, or sitting for long periods.
IT-Band Syndrome
ITBS is a condition that affects the iliotibial band, which is a long strip of connective tissue that runs down the outside of the thigh from the hip to the knee, and normally presents as pain on the outside part of the knee. But squatters need not worry too much about this – ITBS is much more common in runners rather than lifters.
Patellar Tendinopathy
Tendonitis is the inflammation of a tendon, which can occur in any tendon in the body. However, Patella tendonitis presents as pain just below the knee cap. If you perform a lot of explosive movements like box jumps, or fast tempo squats, you should be aware of patella tendinopathy.
Arthritis
Arthritis is a condition that causes inflammation in the joints. The two most common types that can cause knee pain are osteoarthritis and rheumatoid arthritis.
Osteoarthritis is a degenerative disease that causes the cartilage in the joints to break down. This can cause pain in your knees, as well as other joints in your body.
Rheumatoid arthritis is an autoimmune disease that causes the body’s immune system to attack the joints. It may cause swelling and pain around the knee, leading to pain, stiffness, and inflammation.
Load management is key in managing arthritis. This is because we want to keep the muscles around the joint nice and strong, without irritating the joint too much.
How to Prevent Knee Pain When Squatting
Aside from performing some of the killer squat variations listed above, you can do a few other things to prevent knee pain while squatting.
Warm Up Properly
A good warm-up will help to increase your heart rate, loosen up your muscles, and make your body’s tissues more elastic. I recommend doing a light jog or bike ride for 5-10 minutes, followed by some dynamic stretching.
Use the Correct Weight
Another important consideration to prevent knee pain while squatting is to use the right weight. If you go too heavy too soon, it will put extra stress on your knees and could lead to pain. Utilize progressive overload by starting with a light weight and gradually increase the amount of weight you’re using as your body gets stronger.
Blood Flow Restriction Training
Another great way to improve strength whilst using light weight is by incorporating Blood Flow Restriction Training into your routine. This involves using a BFR band to reduce venous blood return from your muscles, making them work harder.
This means that you can use lighter loads to achieve the same result from your workout. BFR training can be a great addition if you are struggling with knee pain from squatting or trying to train with an injury.
Use a Smaller Range of Motion
Squatting through a smaller range of motion by reducing squat depth will reduce the load going through the knee joint, and is a great way to modify the exercise if you are struggling with pain.
Listen to Your Body
If you still experience knee pain while squatting, stop the exercise and rest for a few days. If the pain persists, consult a doctor or physical therapist.
Wrap Up
If you’re experiencing knee pain when squatting, try one of the variations I suggested and see how they work for you. Remember to always start light and gradually increase the weight as your body gets stronger.
And, most importantly, have fun with it! Squatting can be a great way to improve your fitness level and get in shape, but only if you do it correctly and safely. Give these variations a try and let us know how they work for you.
About the Author
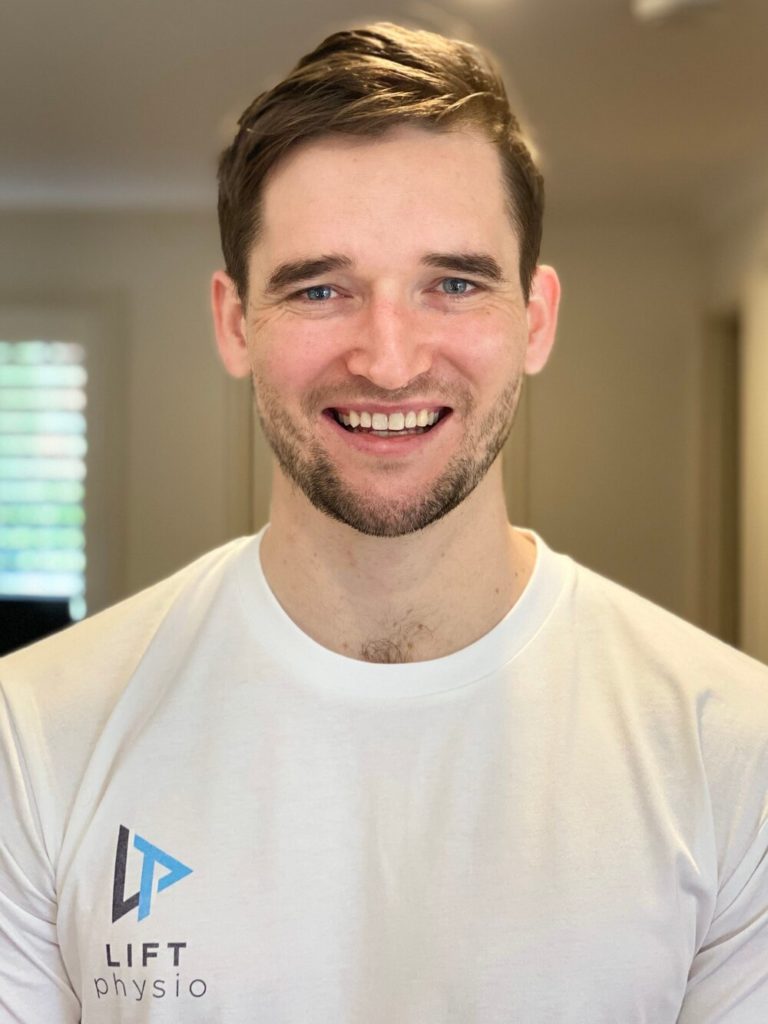
This article was written by Dane Ford, the founder of Lift Physiotherapy and Performance in Sydney, Australia. Lift Physio aims to help you overcome injury, optimize your health, and unlock your full movement potential.
Being human means being enamored by a litany of things in the health/wellness/physical preparation realm. Some people are easily swooned by fancy watches and elaborate looking exercises
Others by cryochambers and Paleo recipes that taste like sawdust.
I am not here to play judgement police. For the most part, everything has a time and place1 and everyone responds differently to different things.
What works for me may not work for you (and vice versa). It’s all good.
Back in 2009-2010, while at Cressey Sports Performance, I was introduced to PRI (Postural Restoration Institute). As a collective, we adopted some of their principles & protocols (specifically positional breathing) and applied them to our athletes’ and clients’ programming, I’d say with a high degree of success.
In the years since, PRI has grown in popularity and is still something I “subscribe” to. However, the key term I want to highlight here is “some.”
I’ve adopted some of their principles.
The thing about PRI (for better or worse) is that it has an uncanny ability to suck people in and plop them into a never-ending rabbit hole of mystery and multi-verses.
Today’s guest post is via Boston-based physical therapist, Mike DeMille, and offers a needed perspective on this phenomenon.
(PS: I’d encourage anyone interested with PRI to check out Mike’s course/mentorship below).
In a world of biomechanics, neurology, complex chronic pain, and a desire to create resilience, it can be difficult to decide as a Physical Therapist or movement specialist what continuing education courses to take and why.
Personally, I have been a PRC (Postural Restoration Certified) Physical Therapist for five years, and anyone familiar with the Postural Restoration Institute (PRI) knows how easy it can be to go down the “rabbit hole”
Note From TG: I wrote a bit about this “rabbit hole” a number of years ago when PRI was first gaining steam in the S&C side of the spectrum. You can check it out HERE.2
After taking different courses, it can be very difficult to sift through the information and add principles to your practice (or programming), while leaving behind minutiae that ultimately won’t contribute to the further results of your clients.
What are those techniques, exercises, prehab/rehab protocol, cues, sick hip-hop rhymes that probably do not need to come along for the ride as you build out your systems as a coach?
That is exactly why we are here today.
After working in a cash-based Physical Therapy and Personal Training setting over the last four years and starting my own clinic (just outside Boston,. MA) I’ve developed rules (or tenets) of information to hold on to and which ones to leave behind.
Let’s dive in.
Think Practitioner/Coach, Speak Client
Your clients do not care what things are called, and neither should you.
Exhale, eccentrically orient, compress, early-mid-late stance, inhaling from an exhaled skeleton expansion, these terms can get complicated, if not bordering on someone speaking Elvish.
A general rule of thumb would be if you cannot explain a concept in very simple terms to your client, then you likely shouldn’t spend a ton of time thinking about it yourself.
I like to think of this as writing a letter with a big bold sharpie instead of a small fine pencil that is difficult to see and read.
For example, if you have a client who you feel like is in a position of lumbar extension and they need to learn how to exhale to help get them out of pain, then you can leave the messaging at just that.
You will create the buy-in from spinning a simple story and allowing your client to feel the difference when undergoing your program. You do not need to explain all of the varying “compensatory strategies” to them in an effort to create belief in your program.
This will more likely than not lead to confusion, in addition to increasing the urge they’ll want to punch you in the face.
Nothing Is New; It Just Has a Fancier Name
Remember that these principles existed long before the most recent course that you took. One of the biggest problems that I see mentees and fresh PTs and movement professionals face is shiny object syndrome.
Understandably, when you go to a course and watch someone’s shoulder flexion increase from 140 degrees to 8000 after a fancy breathing exercise, you want to give everyone that fancy breathing exercise.
Remember, there is a difference between a new technique that creates transient changes, and principles that create long lasting repeatable results.
Examples of a few principles that could make sense in a movement practice geared towards clients with pain:
Sound communication (avoiding nocebo).
Axial skeleton position that creates pressure underneath load bearing joints.
Progressive overload.
Does it feel less exciting to not be blowing all of your clients minds?
Sure it does.
But will these principles give you a sustainable business where you can more accurately sell results to potential clients?
Definitely.
Closing Thoughts
There is nothing wrong with taking new courses, finding helpful information, and creating buy-in with prospective clients, as well as appreciating the nuances of Physical Therapy and Strength and Conditioning.
But let’s not forget: the name of the game is being able to tie your name to something that can produce consistent results, and that is why we decided to take on this profession in the first place.
PRI Pique Your Interest?
Does this message resonate with you? Are you a Physical Therapist or movement professional looking to sift through the information and take the relevant principles into your practice?
Tyler Tanaka and I have created a community where we take individuals that are looking to finally apply the information that they have learned and effectively communicate with their ideal clients to build the business that they have always wanted.
This is your chance to learn the system of two PRC PTs and ask any and every question that you have ever had. In the 10 week Solidify Program you will undergo a detailed curriculum as well as take part in one on one Refinement calls to get your questions answered about those difficult patients that are the ”non-responders” as well as big picture questions about your practice and business.
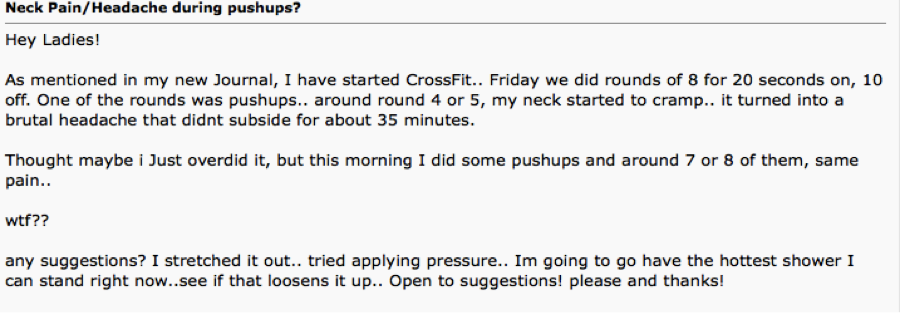
When it comes to neck pain, as a strength coach, I (generally) don’t touch that with a ten-foot pole. It’s case dependent of course, but more often than not, if someone I’m working with walks in with a some significant discomfort in their neck I 1) start hyperventilating into a paper bag and 2) immediately refer out to a someone who has more diagnostic and manual therapy skills.
This is not to say, however, that there aren’t any avenues to take if you’re a personal trainer or strength coach. It’s not like you can’t do anything. In today’s guest post physical therapist, Dr. Michael Infantino, goes into great detail on some things to consider if you ever find yourself in this predicament.
The Gym Is a Pain In My Neck: Two Movements To Cure Them All
Are you struggling with neck pain?
Does the gym make it worse?
Do you find yourself looking at a lot of informative websites for ways to resolve these issues, but wish it were compactly put in one place?
Does this sound like an infomercial?
Well it’s not!
But for just $29/month you can… just kidding.
This article is here to solve all of those problems. Neck pain is often blamed on poor form when exercising. This is absolutely true. Unfortunately this does not answer a crucial question, “why?” Discovering WHY your form is poor is the goal. On top of that, people often fail to recognize other human errors that are contributing to their symptoms. We will provide a guide for figuring out why you have neck pain and how to resolve it.
In most cases, pain attributed to the gym can be tied to the following:
Limitations in the necessary mobility to perform a movement
Limitations in the skill needed to perform a movement
Limitations in the capacity to perform a movement (Strength and Endurance)
Human error [Electrolyte and Fluid balance, Self-Care, Rest, Sleep, Breathing, Posture, Medication and Fear.]
Limitations in MOBILITY: 2 movements to cure them all!?
Limitations in your ability to put yourself in optimal positions during almost any upper body movement are a result of two movement limitations.
Limitations in these positions can lead to a host of different complaints. For the sake of time we are going to pick on NECK PAIN. If you are struggling with one exercise you are likely struggling with another, you just might not realize it.
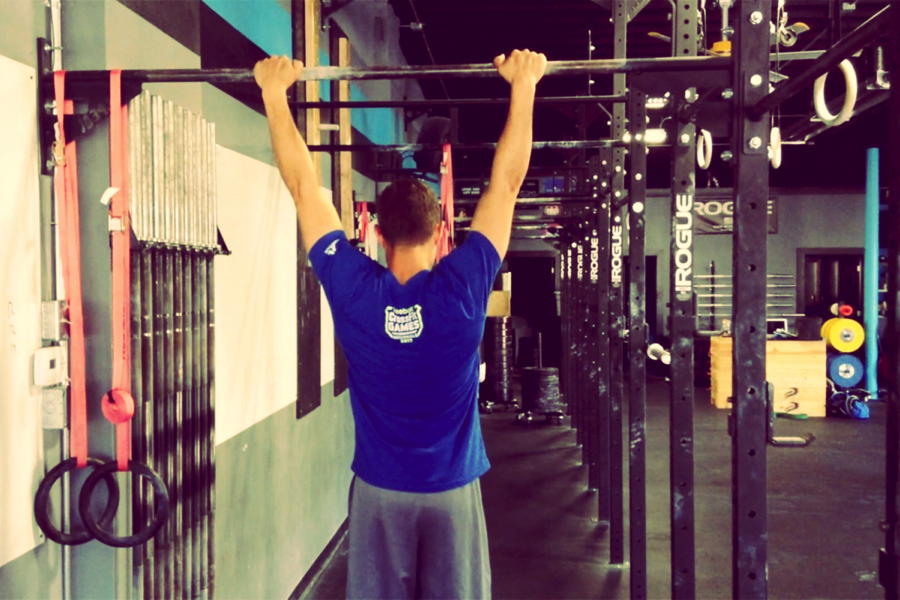
Position #1: Shoulder Extension Test
Movements: Push Up, Pull Up, Row, Dip, Pull Up (top), Jump Rope, Punching someone in the nose because they have one of those weird miniature poodle mixes.
Attempt to perform the ^^THIS^^ motion
Instructions: Keep the neck retracted while extending the shoulders just beyond the trunk without the following:
Increased forward head position
Forward shoulder translation
Shoulder shrug
If you are unable to replicate the picture above you likely have a MOBILITY problem.
If you can’t perform this motion when you aren’t under load, you will definitely struggle when you are. Especially with repeated repetitions and the addition of weight.
Target Areas for Treatment
Soft Tissue Mobility
Pecs
Serratus Anterior
Upper Traps
Stretches and Joint Mobilization
Chin Retraction
Thoracic Extension (arms overhead)
Open Book Stretch
After working these bad boys out I want you to RE-CHECK the test position.
Is it better?
If not, you need to keep working on it.
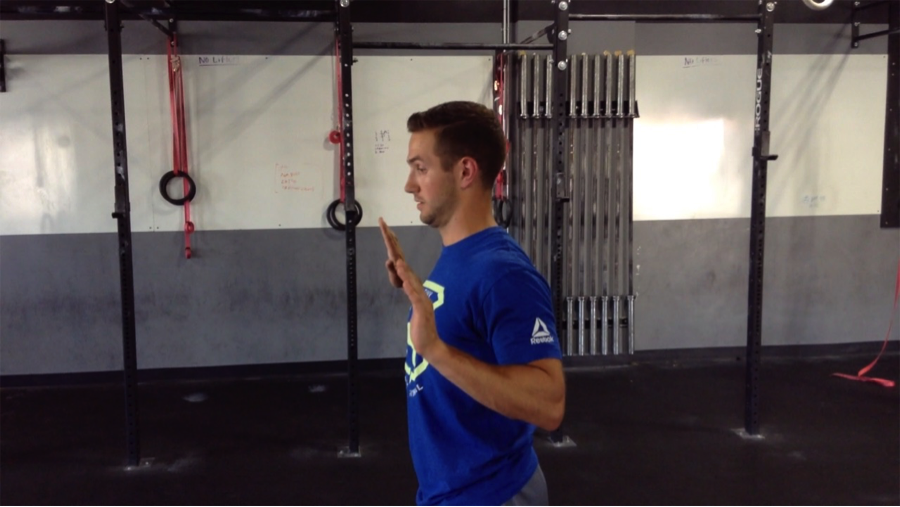
Assuming you now have the necessary MOBILITY to perform this motion, we need to make sure you have the required SKILL with the particular movement you are interested in.
Skill: the necessary strength, stability and coordination to perform the most basic form of a loaded movement (pull up, push up, dip, row, etc.).
Are you able to maintain a good position in the:
Bottom of your push up
Row
Top of your pull up
Bottom of your dip
Jump roping
As you load the arm for a hay maker!
We aren’t as complex as you might think. Many of our daily activities are broken into a few movement patterns.
Follow this sequence:
Create the mobility necessary to perform the pattern in its most basic form. (In this case, Position #1 and #2).
Ensure you have the skill needed to perform your desired movement (Push Up, Pull Up, etc.)
Build capacity with that movement (Endurance and Strength).
If you don’t have the skill to perform a specific exercise or movement, you need to practice. Look at the above definition of skill to make that judgement. If you don’t have the baseline strength to perform one good push up, pull up, dip or row, see below for regressions that will allow you to maintain good form as you work your way back to mastering these moves.
Here are some ideas:
Push Up: Inclined position (Ex. against weight bench or counter), knee push ups
Pull Up: Assisted with a band, inverted row
Dip: Assisted with a band, bench dip
Row: Kind of an outlier since this move typically doesn’t require body weight. Use a weight that allows good form. TRX Row and inverted row are body weight options. Adjust the angle of your body to reduce the difficulty.
The goal here is to demonstrate the ability to maintain proper form throughout each movement with a regression that is appropriate for you.
Joe Muscles next to you may need to take 50 lbs. off his 200 lb. weighted belt during his pull-ups to maintain good form. You may need to work on getting one pull up with good form without any extra weight.
Most of us have one or two good pull ups in our bag of tricks to whip out for an “impromptu” Instagram post. Preventing injury is going to require you to build the strength and endurance to exceed Instagram’s one-minute time cap. DAMN you Instagram!
Adding repetitions and weight to the regression will help you work your way back to a standard pull up, row, dip, push up, etc.
I can’t emphasize this point enough.
We all have high expectations of ourselves. Neck pain after 10 reps is not necessarily a “push up” problem. It may be the fact that you did three other exercises before push ups that started to fatigue the neck. The push up was the breaking point. You need to have a realistic expectation of your current ability, or capacity.
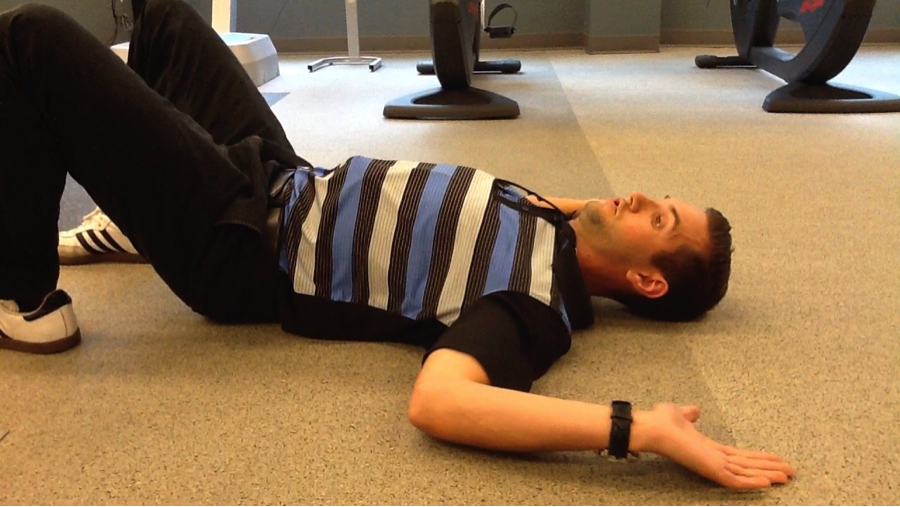
Position #2: Overhead Test
Movements: Overhead Press, Pull Up (bottom position), Snatch
Instructions: Lie on your back with knees bent. Tuck chin (neck flat to ground) with arms flat to the ground in the start of a press position. Press arms overhead by sliding arms along the ground.
Common Faults:
One or both arms come off the floor at any point in time.
Compensatory forward head or extended neck position to keep arms on floor
Compensatory spine arch to keep arms on the floor
Assuming you repeatedly tried to replicate this position without success, once again we have a MOBILITY PROBLEM.
Target Areas for Treatment
Soft Tissue Mobility
Pecs
Lats
Rhomboids
Stretches and Joint Mobilization
Chin Retraction
T-Spine Drop In (or T Spine Extension)
Open Book Stretch (Add: External Rotation at Shoulder)
1st Rib and Scalene mobility
After finding the weak link, it is time to RE-CHECK. If it looks better, great let’s move on. Similar to Position #1, assuming you now have the pre-requisite MOBILITY to perform this motion we need to make sure you have the SKILL necessary.
*If you are having trouble improving your mobility or resolving pain, seek the advice of a qualified medical provider or fitness professional.
Can you maintain the same control and form during your overhead press, snatch, hang position of your pull up (or any variation- kipping pull up, toes to bar)? If not, we need to REGRESS the move. Unlike the shoulder extension position, many of the overhead exercises can be regressed by reducing the weight or working on single arm presses instead of two arms. Other regressions include:
Regressions:
Overhead press: Landmines (Tony goes into more depth in this article).
Snatch: Cleans, Single arm overhead kettlebell squat, single arm overhead lunge
Pull up (bottom): use a resistance band for support, inverted row
Human Error
Now that you have mastered Position #1 and #2, it is time to make sure that you are limiting HUMAN ERROR.
I think everyone should have someone in their life that serves as an extra pair of eyes. Even the best fitness trainers and medical providers in the world have a hard time being objective toward different areas of their own life. Barbers don’t cut their own hair, right? Not positive about that one. Either way, you can’t go wrong with some quality feedback!
Most of us are quick to blame the boulders in our life when it comes to pain, but we overlook the pebbles.
With pain we can’t overlook the pebbles.
The pebbles are diet, water intake, sleep, and self-care habits.
Patients usually tell me that they are doing “better than most” or that they are “pretty good” about optimizing these areas of their life. It isn’t until their spouse shows up to the appointment that we get the whole truth.
I love it!
Proper Fluid and Electrolyte Balance
Paying attention to what you consume pre and post workout is important. Proper fluids and electrolyte intake prior to exercise can help delay muscle fatigue and cramping.
Many people can get by with less than optimal effort when it comes to this category. However, if you are having neck pain you need to give yourself the best chance at success.
“At least 4 hours before exercise, individuals should drink approximately 5-7 mL·kg−1 body weight (~2-3 mL·lb−1) of water or a sport beverage. This would allow enough time to optimize hydration status and for excretion of any excess fluid as urine” (Sawka, 2007).
This is not always possible, I understand. Do your best. Some is better than none.
Warm Up
Proper warm up is also important.
Engaging in a warm up that gradually increases heart rate and muscle flexibility is a great way to prime the muscles. Dramatic increases in blood pressure and heart rate can lead to less than optimal muscle performance and increased risk of exertion headache during your workout.
Your warm up should be focused on getting the heart rate up; along with preparing the body for the movements you are going to perform during your workout (squat, push up, deadlift, clean, etc.).
Taking the time to stretch and do some soft tissue work after exercise will help reduce muscle soreness in the days following your workout (Gregory, 2015).
Leaving your body more prepared for the next workout. It is a great way to improve muscle extensibility and eliminate trigger points that aren’t allowing your muscles to perform effectively (Lucas, 2004).
Adequate rest is also important for recovery.
Going hard every day and not getting adequate sleep does not allow your body to grow and repair itself. Neglecting proper recovery leads to a less than optimal immune system and central nervous system.
Sleep deficits can also lead to an increase in the intensity of pain and alterations in mood. This is some serious shiznit. Can’t express enough how important this category is. I am a huge fan of the “grind.” It just sounds cool. You aren’t meant to grind everyday though, so please take some time to recover.
Breathing and Posture
Proper breathing is something that is often overlooked, but may be contributing to neck pain.
Gritting it out is cool, I highly recommend it. It builds character.
However, regularly holding your breath or clinching of your teeth when exercising can lead to increased tension around the neck. This could end up resulting in tension headaches as well.
Many of us without realizing it spend most of our day performing shallow breaths. We often over utilize the neck musculature. Shallow breathing into the chest can increase tension in these muscles and even increase feelings of anxiety.
It is recommended that people learn how to perform relaxed diaphragmatic breathing to reduce tension in the neck muscles. Staying in sustained postures throughout the day can also be contributing to your neck pain.
Many studies continue to show that sustained postures throughout the day (typically with office workers), especially with a forward head position, can increase neck pain and headaches (Ariëns, 2001).
Symptoms are also more common in people that hate their job.
Really off topic, but it is true …
Consider how stress in your life (emotional or physical) is amplifying your feelings of pain. Emotional pain and physical pain are HEAVILY connected. Check out this video by Tony to learn a little more about proper breathing strategies.
The Advil Fix
This may not seem to fit with the other categories.
Nonetheless, it is super important.
Side effects related to over the counter anti-inflammatory use are becoming common knowledge. Every now and then I run into someone that isn’t aware of the potential risks of regular use.
Popping over the counter anti-inflammatories (i.e. advil) before or after your workouts IS NOT recommended.
It’s like sweeping the dirt under the rug.
“The most common side effect from all NSAIDs is damage to the gastrointestinal tract, which includes your esophagus, stomach, and small intestine. More than half of all bleeding ulcers are caused by NSAIDs, says gastroenterologist Byron Cryer, MD, a spokesperson for the American Gastroenterological Association.”
Fear
One of the reasons that I started RehabRenegade.com was to help share information like this with as many people as possible. Many of the complaints I get in clinic can be fixed SUPER QUICK. Having a basic understanding of how to care for yourself and knowledge of the body can remove the “threat” of pain.
Red flags (serious pathology) represent less than 2% of the cases that are seen in a clinical setting (Medbridge, Chad Cook: Cervical Examination).
The Internet can be a blessing and a curse.
It can either lead you down the right road or scare the living crap out of you. We all know that any injury or illness is usually presumed to be cancer after a late night search on WebMD. Here are some discussions and advice I found on the inter-web related to neck pain in the gym.
Great intentions, but poor advice.
We tend to blame everything on a “pulled muscle,” whatever that means.
Rest?
What year is it?
We stopped recommending straight rest in like 1902.
By all means, take time off from the gym.
This doesn’t give you free rain to lie in bed all day watching re-runs of Game of Thrones.
It’s true… you may have over done it. Your muscles were overworked. Likely leading to a nice amount of local inflammation and some trigger points. The more constructive advice would be to perform some soft tissue work, light stretching and low intensity non-painful exercise to keep that area mobile.
Resorting to pain medication is not a healthy option. Last but not least, mentioning damaged discs and compressed nerves never makes someone feel at ease. Trauma to the neck may be a reason for disc injury. Overdoing your push ups and pull ups is NOT.
Fun Fact: The prevalence of disk degeneration in asymptomatic (without symptoms) individuals increased from “37% of 20-year-old individuals to 96% of 80-year-old individuals. Disk bulge prevalence increased from 30% of those 20 years of age to 84% of those 80 years of age” (Brinjikji, 2015).
Positive findings on MRI are common in people without pain. Don’t get too caught up in images and diagnoses. Do the things we know are healthy. If you hit the gym hard this morning and then followed that up with a CROISSAN’WICH from Burger King, and a cigarette at lunch we have bigger fish to fry.
First and foremost, muscle and joint strain at the neck commonly refers pain to the head. We call this a cervicogenic headache. Rest assured that it is very rare that you have a more serious pathology requiring immediate medical attention. Give the tips in this post a shot, if it doesn’t help by all means see a medical professional. The worst thing you can do is show up to your medical provider without attempting to improve your flexibility, tweak your form or get adequate rest.
If I had a dollar for every time a therapist told someone they had the tightest (fill in the blank) they have ever seen I would be a little better off.
If this poor girl wasn’t worried enough… Now she has the tightest back he has ever seen… really?
As providers we need to be very careful with our words. It is really easy for us to turn neck pain into chronic neck pain.
It is called an iatrogenic vortex.
When people get tied up in the medical system too long they often see symptoms worsen or develop other unexplained diagnoses.
Overview
In most cases, pain attributed to the gym can be tied to the following:
Limitations in the necessary mobility to perform a movement
Limitations in the Skill needed to perform a movement
Limitations in the Capacity to perform a movement (Strength and Endurance)
Human Error [Electrolyte and fluid balance, Self-Care, Rest, Sleep, Breathing, Posture, Medication and Fear]
You could be one small modification away from eliminating your neck pain.
The big takeaway here is to make sure you have the ability to perform various exercises with good skill.
From there, you need the knowledge and self-awareness to know when you have exceeded you capacity.
You also need to look at the big picture to ensure that you are checking the boxes when it comes to living a healthy life. If you are someone that often finds yourself worried or anxious when injury sets in please take a step back and look at the big picture. Use this article to see where your gaps are. If you still can’t get relief please see a medical provider. Nothing makes medical providers happier than working with patients who demonstrate a willingness to learn and grow.
About the Author
Dr. Michael Infantino is a physical therapist. He works with active military members in the DMV region. You can find more articles by Michael at RehabRenegade.com.
References
Ariëns GAM, Bongers PM, Douwes M, et al
Are neck flexion, neck rotation, and sitting at work risk factors for neck pain? Results of a prospective cohort study. Occupational and Environmental Medicine 2001;58:200-207.
Brinjikji, W., Luetmer, P. H., Comstock, B., Bresnahan, B. W., Chen, L. E., Deyo, R. A.,Jarvik, J. G. (2015). Systematic Literature Review of Imaging Features of Spinal Degeneration in Asymptomatic Populations. AJNR. American Journal of Neuroradiology, 36(4), 811–816. http://doi.org/10.3174/ajnr.A4173
Gregory E. P. Pearcey, David J. Bradbury-Squires, Jon-Erik Kawamoto, Eric J. Drinkwater, David G. Behm, and Duane C. Button (2015) Foam Rolling for Delayed-Onset Muscle Soreness and Recovery of Dynamic Performance Measures. Journal of Athletic Training: January 2015, Vol. 50, No. 1, pp. 5-13.
Lucas KR, Polus BI, Rich PS. Latent myofascial trigger points: their effects on muscle activation and movement efficiency. J Bodyw Mov Ther. 2004;8:160-166
Sawka MN, Burke LM, Eichner ER, Maughan RJ, Montain SJ, Stachenfeld NS. American College of Sports Medicine position stand. Exercise and fluid replacement. Med Sci Sports Exerc. 2007;39:377-90.
I’m currently with my family taking a little vacation down in Florida.3 I’ll be checking in at some point this week with some content, but on the meantime I’ve got some awesome people pinch-writing for me this week.
Today’s post is written by physical therapist Dr. Michael Infantino on a topic that’s a pain in the ass foot for a lot of people: plantar fasciitis.
The 411 On Plantar Fasciitis & How to Make It Vanish
Lets set the scene: It’s a little after 5:00 am. As you open your eyes the sun is just starting to peak through your window. To your right, your husband; to your left, the band Maroon 5 casually playing an old hit. “Sunday morning rain is falling, steal some covers share some skin….”.
Just kidding it’s Sunday morning, rain is falling and you are dead set on getting that five-mile run in.
As you take the first step out of bed, the pain in your heel makes you rethink this whole running idea.
Unknowingly to your heel, your mind knows your day is going to drag if you don’t accomplish this feat.
I know the “drive” that runners possess.
The word “drive” and addictive personality disorder can sometimes be inter-changed, but that’s neither here nor there. This post is going to give you the 411 on everything plantar fasciitis is in as concise of a fashion as possible.
To make life easier we will just say heel pain.
Quick Rundown Of Todays Topics:
WHO is more susceptible to developing plantar fasciitis?
WHAT is plantar fasciitis? [Sounds like a skin eating disease.]
WHAT can I do to treat this damn pain? [I know, I put “WHAT” twice. I wasn’t an English Major.]
WHY am I not seeing progress?
WHO Is More Susceptible To Plantar Fasciitis?
Straight from the Journal of Orthopaedic & Sports Physical Therapy Guidelines for Plantar Fasciitis.
Overweight & Un-Athletic
I know, I know. This sounds awful. No one wants to be called overweight. More than that they don’t want to believe they fall into the un-athletic category.
Prime example: My dad (I love you dad). He has gained some lbs. over the years, and I wouldn’t classify him as an athlete by any means at this stage in his life. Despite my opinion, he still thinks he is SUPER.
His workouts usually come few and far in between. To my surprise, he can never quite understand why his body hurts after his impromptu 3-mile sprint (he calls it a jog) once every 3 months.
Runners
Yay runners! You made it into the JOSPT Guidelines. Victory! Wear this as a badge of honor… I think?
Workers That Spend Increased Time On Their Feet (i.e. factory workers)
Fearful Avoiders
No one wants to admit this characteristic. Regardless, it exists. Many people who actually develop chronic pain fall into this category. Your worries about causing more “damage” to your body often make you think bed rest is still a reasonable option.
I am sorry to say that it is not.
Runners, don’t smirk. You fall into the “overboard” category where your “driven” personality encourages you to push through pain. Because it is weakness leaving the body! Sometimes… not always.
The big takeaway here is to accept the fact that your job, your hobby or your current weight just makes this injury more likely. Knowing that this injury comes with the territory allows you to switch your focus to PREVENTION.
Give Me The Low Down On Plantar Fasciitis.
Research has continuously stated that your heel pain isn’t typically an “iitis,” or inflammation.
Ultrasound actually reveals increased thickening of the fascia near the insertion on the heel (Fabrikant, 2011). This sort of debunks the old “RICE” concept when trying to manage this injury.
It is safer to say plantar fasciopathy.
This could mean either an inflammatory or a degenerative process. Degenerative sounds scary. It isn’t. Changes in tissue quality are normal, not everyone has pain with these changes. [This one’s for you Fear Avoiders].
Diagnosing TRUE Plantar Fasciitis, Or “Fasciopathy.”
1st step in the morning reproduces heel pain
Tenderness to touch at the insertion of the fascia on the heel
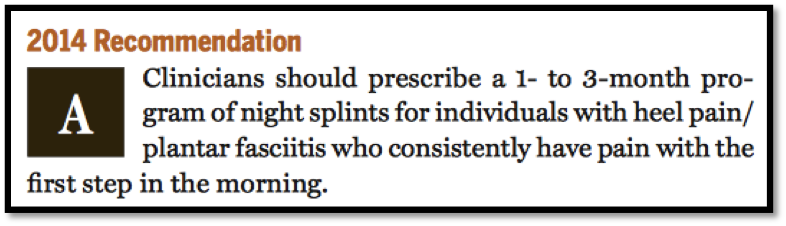
“Both were positive! Am I sentenced to months of night splints, orthotics and stretching?”
Not necessarily. If it is a true plantar fasciitis the research shows that these things can help. They may diminish symptoms, but it’s a Band-Aid.
JOSPT Guidelines
We need to be careful here. Some studies also showed that increased arch height was a predictive factor for pain. Your best bet is to have someone perform a running analysis to see what your foot is doing during the loading phase of running (preferably someone with a ton of knowledge about the human body).
If you don’t display “excessive pronation” or actually lack adequate pronation, an orthotic may not be a good fit. Excessive supination (opposite of pronation) while the foot is in contact with the ground during running or walking could actually be exaggerated with an orthotic.
Leading to ankle sprains.
JOSPT Guidelines
In my experience, night splints are hit or miss. With a true plantar fasciitis it could be a big hit. As I mentioned earlier, it is not actually fixing the source of the problem (the way you move, strength deficits, poor pacing etc). Before you sentence yourself to months of night splinting try to push the RESET button first.
Lets Get Started! Address Limitations In Ankle Mobility First.
1. Trigger Points
Work out those nasty tender points in your calves and the bottom of your feet. Calf trigger points can cause referral pain to the heel and bottom of the foot. Mimicking plantar fasciitis. Trigger points are responsible for reduced mobility, strength and timing of muscles! (Lucas, 2004)
BONUS: Self Instrument Assisted Soft Tissue Treatment (better than the roller stick… in my opinion.)
This is more of a soft tissue mobilization than trigger point treatment. It can actually be a great lead in to trigger point treatment. It helps reduce tone in the muscles. It is also a quick way to scan for areas that are more “stiff” and more irritated (increased trigger points local to that tissue). This is why I prefer it to the roller stick.
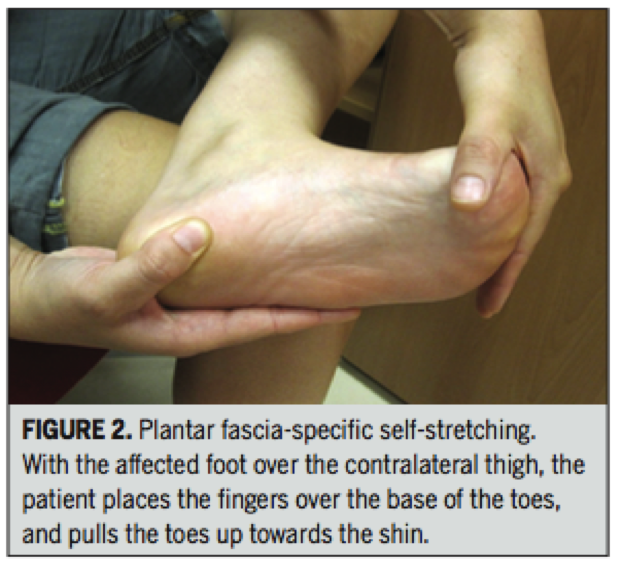
2. Stretch The Calves and Foot Musculature
Stretching feels good and it can help restore motion. BUT do not neglect the importance of strength and endurance at the shin musculature when looking to maintain that new length.
Performing strengthening drills, like the Shuffle Walk (courtesy of The Gait Guys) demonstrated in the video below will prevent increased tone in the calves from returning.
Prescription:
To make this more effective, actively pull the forefoot and toes up as you are stretching.
Pull the toes and forefoot up for 10 seconds (keep the heel down) followed by a 30 second stretch (work into it slow to get the desired effect). Repeat for 3 minutes.
Renan-Ordine R, 2011
3. Attack The Joints
Get the joints in your ankles and feet moving more freely. Don’t forget about motion at that BIG TOE. Without proper extension at the big toe you can forget about actually accessing that new ankle motion.
This means you can’t access that hip extension while running. This equals poor gluteal function. It all goes down hill after that…
1st Toe Mobilization + Shuffle Walks
Banded Ankle Mobilization With Active Dorsiflexion
This one is all over the Internet. From personal experience, having someone mobilize the ankle for you ends up being way more effective. But better than nothing!
Self Ankle Manipulation
Great way to get some quick improvements. Combine with the other techniques!
Gave It A Go For A Couple Weeks And Still No Change?
The loss of considerable amounts of body fat obviously doesn’t occur overnight. Stick with a guided nutrition plan and exercise routine to work on weight loss without further aggravating any painful regions. This may require modifications in exercise choices for the time being.
If You Are An Avid Runner Or Stand A Lot For Your Job Consider The Following:
Regular Shoe Rotation was found to be helpful in workers that spent more time on their feet. (Werner, 2010)
Your shoes really tell a story. Excessive pronation and supination start to wear down parts of the shoe. This exaggerates pronation and supination at the foot leading to increases in the speed at which these motions occur. Potentially leading to increased risk of injury.
Orthotics/Taping
We discussed this earlier. Orthotics don’t always fix the problem, sometimes they can worsen it. Taping to support the foot or promote increase stability at the foot could be a safer and cheaper 1st step.
Strengthening
The focus is typically on reducing “pronatory tendencies” at the foot. Sounds promiscuous, grrrrr! Tony can help you with that one.
Your ability to land in a good position during the loading phase of running, and continually do that over the course of a run is the primary goal; despite the addition of weight (maybe a ruck sack), speed or exertion.
Strangely, I find joy in watching people run. It is easy to tell which people skipped some developmental milestones growing up or didn’t take part in too many athletic events. If you fall into one of those categories I would definitely recommend some training to improve your running mechanics.
Leg Length Discrepancy (LLD)
I was hesitant to mention this because of how common LLD is in symptomatic and asymptomatic populations. However, it is mentioned in one study in the Plantar Fasciitis Guidelines (Mahmood, 2010). In various studies, a LLD of as little as 4-6 mm is considered clinically significant. In rehabilitation and the fitness world neuroscience is getting a lot attention; often disregarding biomechanics. It is probably in our best interest not to sweep this under the rug if we aren’t seeing progress. LLD will have an impact on your mechanics when walking and running.
Lets Wrap This Up!
The important thing to remember is that the recommendations made today are just guidelines based on an overwhelming amount of research. If you are in pain let these tips guide you. Don’t grasp on to them like they are the word of God, Buddha or The Dos Equis Guy. Accept the fact that your job, hobby, weight or lack of athletic ability make you more susceptible to this injury.
Fix the things you can, accept the things you can’t. There is no harm in trying out a cheap orthotic or heel pad for a little relief. If you want to take it a step further see a professional trained in running evaluations to determine needed changes in running mechanics, programming, proper shoe fit and/or orthotic fit. Knowledge is potential power. Go forth and conquer!
About the Author
Dr. Michael Infantino is a physical therapist who works with active military members in the DMV region. You can find more articles by Michael HERE.
References
Cotchett MP, Landorf KB, Munteanu SE. Effectiveness of dry needling and injections of myofascial trigger points associated with plantar heel pain: a systematic review. J Foot Ankle Res. 2010;3:18. http:// dx.doi.org/10.1186/1757-1146-3-18
Eftekharsadat, B., Babaei-Ghazani, A., & Zeinolabedinzadeh, V. (2016). Dry needling in patients with chronic heel pain due to plantar fasciitis: A single-blinded randomized clinical trial. Medical Journal Of The Islamic Republic Of Iran, 30401.
Fabrikant JM, Park TS. Plantar fasciitis (fasciosis) treatment outcome study: Plantar fascia thickness measured by ultrasound and correlated with patient self-reported improvement. Foot (Edinb) 2011;21:79–83. [PubMed]
Lemont H, Ammirati KM, Usen N. Plantar fasciitis: a degenerative process (fasciosis) without inflammation. J Am Podiatr Med Assoc. 2003;93:234-237.
Lucas KR, Polus BI, Rich PS. Latent myofascial trigger points: their effects on muscle activation and movement efficiency. J Bodyw Mov Ther. 2004;8:160-166
Martin, R. L., Davenport, T. E., Reischl, S. F., McPoil, T. G., Matheson, J. W., Wukich, D. K., & McDonough, C. M. (2014). Heel pain-plantar fasciitis: revision 2014. The Journal Of Orthopaedic And Sports Physical Therapy, 44(11), A1-A33. doi:10.2519/jospt.2014.0303
Mahmood S, Huffman LK, Harris JG. Limb-length discrepancy as a cause of plantar fasciitis. J Am Podiatr Med Assoc. 2010;100:452-455. http:// dx.doi.org/10.7547/1000452
Renan-Ordine R, Alburquerque-Sendín F, de Souza DP, Cleland JA, Fernán- dez-de-las-Peñas C. Effectiveness of myofascial trigger point manual therapy combined with a self-stretching protocol for the management of plantar heel pain: a randomized controlled trial. J Orthop Sports Phys Ther. 2011;41:43-50. http://dx.doi.org/10.2519/jospt.2011.3504
Werner RA, Gell N, Hartigan A, Wiggerman N, Keyserling WM. Risk factors for plantar fasciitis among assembly plant workers. PM R. 2010;2:110-116. http://dx.doi.org/10.1016/j.pmrj.2009.11.012
Today’s guest post comes courtesy of Andrew Millett – a good friend of mine and brilliant physical therapist outside of Boston.
The term “bridging the gap” is always brought up when the discussion of physical therapy and strength and conditioning comes up. There’s no doubt a melding of the two when discussing the most successful outcomes for patients and athletes. However, in a day and age where more and more personal trainers are taking it upon themselves to play the role of “therapist” (and vice versa), it’s important to note that, while it behooves us to dip our toes in both ponds, there IS a distinction between the two.
And we need to respect that.
Enjoy.
Bridging the Gap Between Physical Therapy and Strength and Conditioning
In the fields of strength and conditioning, human performance, physical therapy, etc., we interact with people on a daily basis. We learn about their family, their job, their goals, and what they want to get out of their training or rehab. The majority of the people in this field did not get into their respective field for the money.
I am not saying that any of these fields can’t be lucrative. The majority of us share a common bond: the desire to help people.
Whether you are a physical therapist trying to help someone get rid of their pain and get back to doing what they want to be doing or a personal trainer trying to help someone lose some weight, most of us want to help people.
When we see a client who is in pain or has some type of movement dysfunction, most of us want to help them get out of pain, whether or not we are a healthcare practitioner. Personal trainers, strength and conditioning coaches, etc. are well-qualified to assess and correct movement.
There are many schools of thought such as the Functional Movement Screen (FMS), Selective Functional Movement Assessment (SFMA), and Functional Range Conditioning (FRC) – to name a few – that teach trainers and coaches how to assess movement so that they can make their programming more effective based off of how their client presents on their assessment.
More often than not, a strength coach or trainer will see a movement fault they would like to fix in order to optimize their client’s training in order for their client’s to succeed. There is nothing wrong with wanting more for your client and for your client to achieve their goals. When assessing a client, if some type of movement limitation is present (I.e., decreased joint mobility and range of motion), then by all means, use the tools in your toolbox to attempt to correct it.
Tools such as a foam roller, lacrosse ball, or other self-myofascial release device, can be beneficial in attempting to increase soft tissue flexibility that could be limiting a client’s movement pattern.
Self-myofascial release can be very effective for improving movement quality and at reducing pain. By doing something such as this, you are doing your due diligence in trying to help your client to the best of your abilities.
If you use an implement suggested above and someone moves or feels better, GREAT!
If someone doesn’t move or feel any better after something like that, then as Charlie Weingroff has said,
“4th and 10, you have to punt.”
As he described in his DVD, Training = Rehab, if you have a client who has some type of mobility limitation and they aren’t improving, “punt” them, not literally, to another provider…I.e., physical therapist, sports chiropractor, or a massage therapist.
If someone has pain, punt! Per the Functional Movement Screen (FMS), if someone presents with pain, the test is over and they should be referred to a healthcare practitioner.
Now, if you referred all of your clients who are in pain to another healthcare practitioner, you would probably have a lot of free time on your hands.
Most clients have some type of ache or pain they are dealing with.
By “punting” them, this does not mean you have to get rid of them. You can use a multi-disciplinary approach and continue to train them without worsening their pain or dysfunction while they are treated for whatever ails them.
Don’t try to be a jack of all trades and a master of none. Don’t try to be the strength coach or personal trainer who trains their clients, but also attempts to treat their pain or soft tissue dysfunction by performing some form of manual therapy.
This is where you need to know what you are good at and what someone else may be able to do better. If a patient or client presents to me and I know another practitioner that is better at it than me, they are definitely going to continue their care with that better clinician.
Keep the manual therapy to the physical therapists, sports chiropractors, etc. These clinicians have hours upon hours of training on various manual therapy techniques to assist in improving movement, pain, and dysfunction.
By meeting with local PTs and chiropractors in your area and developing a network of providers you can refer to, you should have no problem sending a client to a colleague who can help improve their current state. Your client will think the world of you for having the humility to refer them out to someone who can help them properly.
Even if the physical therapist helps decrease their pain, that client will always remember that you had their best interests at heart and you were thinking of them first.
Think of your client’s needs first, not your ego!
Now, just because I am a physical therapist, doesn’t mean I am not going to “bash” on personal trainers and strength coaches. I have a background in physical therapy and strength and conditioning. I consider myself a hybrid physical therapist, bridging the gap between rehab and strength training.
I know that I am not the smartest trainer or coach out there. I have the confidence in my skill-set to start the programming process and teach and help clients squat, deadlift, lunge, carry, push/pull, etc.
There eventually comes a time where I can have a personal trainer or strength coach take over and continue the process. My goal for my clients when they leave me is that they have some type of basic foundation of the various movements just mentioned so they can effectively and safely progress towards their health and fitness goals.
If you are a physical therapist, sports chiropractor, etc. and you either do not have the confidence in how to teach basic movements and program them OR you have not educated yourself on how to program and teach basic movements, then leave that to the strength and conditioning or personal training professionals.
The message goes both ways: as much as we encourage personal trainers not to be too “bridge gappy,” the same goes for physical therapists.
The major point of this post is not to bash either side of the health and performance spectrum. The point is that we need to coexist and develop connections with various healthcare and performance disciplines so that we are in the position to help the most important person in this process: the client or patient.
About the Author
Andrew Millett is a Metro-West (Boston) based physical therapist
Note from TG:If there was ever a blog title conceived specifically for this website, this is the one. Jason Bourne, an F-16 fighter jet, and a lumberjack punching a grizzly bear in the face while eating a bag of beef jerky could have steel cage match and it wouldn’t be as manly as this title.
Fair warning: parts are a bit “heavy” with technical terms and verbiage, but there are still plenty of insights and suggestions (and videos!) that are applicable to everyone reading, because……
Everyone NEEDS to Deadlift
There are a few absolutes in this world. Some of those absolutes are:
Gravity
The Earth is round
Humans need oxygen to survive.
The Human Body needs food and water to survive.
Another absolute I could add to that list is that…Everyone NEEDS to Deadlift!
Now, that I’ve got your attention, finish reading this article before you decide to send your hate e-mail or hate mail if you are still living in the dark ages.
Let me clarify my point: Everyone needs to do some form of hip hinging in order to maintain good back and lower extremity health.
The movement of hip hinging is a vital component of everyday life.
Whether you want to lift up your kids without blowing out your back or you are trying to deadlift your car for reps, being able to hip hinge properly is an integral component to reducing injury risk as well as attaining a high level of performance.
What is “Hip Hinging?”
Hip Hinging is the ability of a person to maintain a neutral aligned spine while predominately loading the hips and having the primary movement come from the hips in an anterior to posterior direction.
For the visual learners, this is what it looks like:
As you can see from the video, we ideally want a neutral spine position and the majority of the movement comes from the hips moving in an anterior to posterior direction. The knees remain in a soft knee position. This means that the knees are not in a terminally extended (straight) position nor are they overly flexed (bent).
What movements use hip hinging?
The hip hinging move is used for a multitude of movements. It can be used in the:
Deadlift
Good Mornings
Variations of the Glute Ham Raise
Certain Athletic Endeavors
For activities throughout your day, it could include:
Properly picking up your kids.
Lifting a heavy box from the floor to a different location.
Picking a pencil up off the floor.
The list is endless. Being able to properly move through this movement pattern, whether it be for performance or daily life, is a NECESSITY!
How do I know if I can hip hinge?
Well, check out this video below for a quick and easy test to tell if you are hip hinging properly:
Place a broom, golf club, dowel, etc. on your back as shown in the video. Place one hand on the top portion at your head and the other hand at your sacrum (tail bone). Make sure to keep the three contact points between your head, thoracic spine (mid back), and sacrum.
Next, while maintaining “soft knees”, attempt to push your butt back like you are trying to tap the wall with it.
As you are doing this, you are going to need to counteract falling backwards by leaning your upper body/trunk anteriorly (forward). Time and time again, I will see people attempt to do this movement with just pushing their hips backwards and then in turn, fall backwards or lose their balance.
Your hips should always be more superior than your knees. If your hips are in line with your knees in the transverse plane, then you are squatting, not hip hinging.I can equate it going to an upscale club or lounge.
You walk up to the club and there is a line. It is up to the “bouncer” aka the strength coach/physical therapist in this example, to let you past the velvet rope and into Club Hip Hinging.
Once your in the club, there is a VIP section.
In this example, that VIP section is the Deadlifting VIP. If you aren’t on “the list,” then you aren’t making it into the “VIP” section.
For the physical therapists, strength and conditioning coaches, performance coaches, etc. who want to know if someone can perform hip hinging and/or deadlift variations, then screen your clients and patients.
Screening/Assessment
***Disclaimer*** If you are NOT a physical therapist, you need ask your client if you may put your hands on them to screen them. Also, if someone has pain with any of these screens/assessments, structure your programming appropriately and refer out to a PT, sports chiropractor, etc.
Tell them you want to screen them so you can adjust their programming so it is customized for them.
99.9% of people won’t have a problem with this, but you need to look out for yourself and make sure your clients are fine with this.
First piece of information I would like to know is, what does their hip flexion motion look like.
Place your client on the ground and passively/gently move their hip through their available range of motion (ROM).
Then, we want to check and see if they have the passive straight leg raise (PSLR) mobility. Gently raise their leg until you feel some resistance.
Per the Selective Functional Movement Assessment (SFMA), we would like to see 80 degrees of the PSLR. If the client doesn’t have 80 degrees, all is not lost. We have to modify their training regimen. We will get to that later in this post.
Next, if the client has 80 degrees of PSLR, we want to see if they can stabilize in that ROM. Ask them to actively raise their leg, keeping the knee straight up in the air without letting the opposite leg come up off the ground/table. We like to see 70 degrees of active straight leg raise (ASLR).
If they have 70 degrees of ASLR, then we can progress further in our assessment/screening. If they do NOT have 70 degrees, have the client place their hands on the ground. Then press into the ground with their hands and try again.
If their ASLR improves, then they have either a:
Core Stability Issue
Anterior Pelvic Tilt
What the pressing down into the ground/table does is activates the anterior core musculature and in turn, places the trunk in a more neutral position.
Since the hamstrings attach on the pelvis, if the pelvis is in an anterior pelvic tilt, this can cause the SLR to appear limited because it is starting in a stretched position.
If pressing down into the ground/table does NOT improve anything, then try these ASLR correctives:
Active-Straight Leg Correctives (via FunctionalMovement.com)
If there is an improvement in the ASLR, now, have the client stand up and tell them to bend over and touch their toes.
If the client can bend over and touch their toes with ease and without trying to blow a gasket or bouncing up and down, then this is another assessment check point that can tell us that they may potentially be able to deadlift/hip hinge.
The toe touch test comes from the SFMA.
What does the toe touch tells us?
We want to see if the client has the ability to posteriorly shift their hips when performing the toe touch. This tells us that the client can get into their posterior chain to load their hips. When watching someone perform the toe touch, find their greater trochanter (hip bone on the side of their hip region) and watch to see if that area moves backwards during the toe touch
In the first video below, you can see the person can shift their hips backwards.
In this next video, if the person doesn’t perform an adequate posterior weight shift, then they wont be able to touch their toes.
If your patient or client doesn’t have the ability to touch their toes, then try these correctives as recommended by FunctionalMovement.com.
This series of correctives is called the Toe Touch Progression.
First, place a 1/2 foam roller or a 10 lb plate underneath your client or patient’s toes as shown in the picture below.
Then, while maintaining the feet on the plates and the knees straight, instruct the person to bend over and gently try to touch their toes.
Perform 10 repetitions then switch to the heels elevated as shown below and perform 10 more repetitions.
You can also place a foam roller or a small ball between the person’s knees and instruct then to squeeze it during the toe touch. When you instruct the person to squeeze the ball, it up-regulates inner core musculature and places the core/trunk in a better position to perform the toe touch.
Next, have the client perform the toe touch again. If they can know touch their toes or it has improved as compared to before, then we know that this simple corrective has taught their brain/body to learn how to perform a posterior weight shift needed to perform hip hinging and/or deadlifting.
Now, their toe touch may have improved, but in a few hours or when they wake up tomorrow morning, it may be back to the way it was before the toe touch progression corrective.
With the body and the brain when we see a quick improvement such as this one with the toe touch, we are tapping into the Central Nervous System (CNS) and the brain.
It is “teaching” the brain/CNS a new way to move.
As Erson Religioso has mentioned on his website, Modern Manual Therapy, the brain/CNS is easily tricked, but it is difficult to convince. What that means is that with the toe touch, we have opened a window to the CNS that has allowed for a chance or an improvement to the system, we want to do whatever we can to “keep that window open” through various correctives and behavior modification in our daily lives.
If the client’s toe touch hasn’t improved, then there may be something else from a mobility, stability, or motor control standpoint that a licensed healthcare practitioner may need to dig a little deeper to discover why the toe touch hasn’t improved. Refer them to someone in your network, but we will go into more detail now on other ways to train this client even though their toe touch isn’t sufficient enough to deadlift from the floor.
Well, there are many options that you can provide your client to receive a great training effect. The next few examples all work to help load the posterior chain musculature as well as helping to improve core/trunk stability.
Most of these exercises should be felt in the gluteal and hamstring musculature.
Cable Pull-Throughs
Key Points:
Sit back into hips.
Maintain a neutral spine; no rounding or extending of the lumbar spine/TL junction.
Make sure to extend through the hips at the end of the movement, NOT through lumbar hyper-extension.
Hip Thruster/Single Leg Hip Thruster
Key Points:
Start with upper back resting against a bench and hips/knees flexed.
Maintain a “neutral spine” or “ribs down” position.
Extend your hips upwards and squeeze butt at the top.
Finish with your knees, hips, shoulders, and ears in a straight line.
Barbell Supine Bridge
Key Points:
Place an airex pad or exercise mat over hips/under bar to provide some padding.
Maintain a neutral spine, “ribs down” position and drive hips to the sky.
Make sure not to try and lift too high by extending through the lumbar spine.
Elevated Kettlebell Deadlift
Key Points:
Stand directly over the kettlebell (KB).
Push your hips back like you are trying to touch your butt to the wall behind you.
Maintain a neutral spine position.
Grasp the KB, drive your heels through the floor, and lift up through your hips/legs.
Squeeze butt at the top. Make sure to extend your hips and not your low back. Imaginary line should be between your ears, shoulders. hips, knees, and ankles.
Once the client or patient demonstrates proper form with an elevated KB deadlift, eventually lower the elevation height to make the exercise more difficult and eventually perform off the floor as long as proper form is maintained.
Trap Bar Deadlift
https://www.youtube.com/watch?v=p-sA3PG1kGY
Key Points:
Step into the trap bar/hex bar.
Push hips back like you are trying to touch your butt to the wall behind you.
Grasp handles and maintain a ribs down, neutral spine.
Imagine their are oranges in your armpits. Try to squeeze them.
Drive through the heels and extend your hips. Shoulders, hips and knees should be in a line at the top of the movement.
If the client/patient can’t demonstrate proper form with the Trap Bar DL from the floor, then you can place blocks or some other implement underneath the weights to elevate it so they can demonstrate proper form.
Rack Pulls
Key Points:
Step up to bar. Push hips backwards and grasp bar.
Same points as mentioned above.
Can use pronated grip (palms facing you) OR mixed grip (one palm facing you, one facing away from you).
Once someone can demonstrate proper form with these movements, then you can start by progressing towards the floor.
If someone’s goal is to deadlift from the floor and they can do it with proper form and pain-free, then we’re on our way to hitting that goal.
If someone’s goal is to be able to pick-up their kids or move and feel better, then the exercise variations mentioned above are great ways to help with that.
To begin, yesterday, I had just finished my training session when Eric walked up to me and said, “you’re 12:30 eval is here; she’s waiting in the office.” Oops – twenty minutes early. I head over to the stereo to turn-off the Wu-Tang (not exactly a great first impression when M.E.T.H.O.D Man is blaring through the speakers), pound my protein shake, and change shirts really quickly before I head out to greet Paula.
Upon quickly glancing at her health history, I notice something that jumps out and grabs my attention – she noted that she had been suffering from a chronic hamstring strain for the better part of the last two years. Hmmm, interesting. Almost immediately a light bulb goes off in my head and I start to stroke my evil strength coach beard (but more on that in a bit).
Anyways, whenever a new client walks into the facility, we always try to sit down for 5-10 minutes to better ascertain what it is (s)he is looking to do. Generally speaking, this is the time where we try to dig a little deeper, discuss training background, goals, injury history, etc. The form sitting in front of me was otherwise blank, so without even blinking an eye, I ask about the hamstring.
Paula smiled, took a deep breath and let it rip. Without going into too many details, she explained how she had always been an athlete (she was a sprinter in college) and had always lead an active lifestyle – she even did some personal training on the side a few years ago, and really enjoyed it. For all intents and purposes – she’s the epitome of a fitness junkie.
Giving full disclosure, however, she openly admitted that she’s her own worst enemy, and sometimes has a knack for not knowing when to hold herself back. When she first hurt her hamstring, she waited a few weeks, and once it started feeling better, she hightailed it to the track and did some sprints – only to re-injure herself, again, and again, and again.
After what was seemingly her umpteenth hamstring strain, she finally decided to seek some professional expertise and visited a local physical therapist near her hometown. And for many of you, I think you know where this story is going.
To say that a ham sandwich could have done a better job than this physical therapist would be the understatement of the century. Based off of what Paula told me, this therapist did nothing other than give her ultrasound and electric stimulation for a few weeks and then sent her on her way. Incidentally, there was no real formal assessment of her movement quality. Basically, Paula walked in, said “my hamstring hurts,” and the therapist treated the hamstring.
I guess in the grand scheme of things, this isn’t necessarily wrong. For instance, when one of our baseball guys shows up and says his shoulder hurts, as traditionalists, we usually end up looking at the shoulder first and work out way out crossing things off as we go: things like, scapular positioning, thoracic mobility, contralateral hip mobility, soft tissue restrictions, to name a few.
But there’s the rub – WE DON’T JUST LOOK AT THE SHOULDER.
And this is where I feel this particular physical therapist (and the countless other health professionals whom Paula visited) missed the boat entirely.
Leaky Roof Syndrome strikes again!!
It’s akin to someone complaining about a leaky roof in their house, and hiring someone to come in and place a patch over the leak itself – when in fact, the root cause of the leak is coming from somewhere else entirely. Placing a patch over it is just a temporary fix in the long run, and will do nothing but delay the inevitable.
So, fast forward to yesterday and Paula getting visiably emotional while telling her story. Who could blame her? I mean, up until this point, no one had really taken the time to listen and to actually offer any concrete resolution to her problem. All she’s been told is that she has “tight hamstrings,” (which, as I’ve noted in the past, is a bullshit excuse more often than not), and that she just “needs to take it easy.”
All this great advice for a $25 co-pay? Sign me up!
Bringing this to a close, here are a few points of interest from yesterday that I found:
By and large, whenever someone mentions the word “strain,” you can usually (not always) chalk it up to something called Synergistic Dominance. Translating for the non-nerds out there, Synergistic Dominance is defined as a condition when a muscle in a group of muscles, that share similar actions, become more dominant and in turn, another less dominant.
In Paula’s case, during her assessment, I found that she had little (if any) ability to activate her glutes, which is kind of a problem – especially given they’re a very powerful hip extensor. If her glutes are unable to fire, then that means her hamstrings (also hip extensors) have to work overtime to pick up the slack. And, when you put two and two together (poor glute function paired with hamstrings throwing you the middle finger), you get chronic strains.
Furthermore, after taking her through some more tests, I found that she had very little ankle dorsiflexion. Actually, that’s just being nice. She had NO ankle dorsiflexion. She lives in planar flexion from wearing high heels all the time. Is it any wonder, then, that whenever she tries to sprint, she ends up hurting herself?
And finally, as I alluded to above, all the therapy in the world won’t make a bit of difference if people continue to move like shit. Renowned physical therapist, Gray Cook, has popular saying
“fix the pattern, and the muscles take care of themselves.”
It’s so simple, that it’s brilliant. I took Paula through some basic movement drills, and it was readily apparent that her lunge pattern needed some work – her foot externally rotated and knee caved in on each step, and even worse, her hip would collapse; all indicative of really poor hip stability. Sorry, but ultrasound isn’t going to fix that.
In closing, it’s things like this that make my job so awesome – cause here’s a woman that came to us as a last resort, and she left yesterday feeling hopeful that we’d be able to help.
This isn’t to say that we don’t hava a lot of work to do – we do! On top of building some basic strength, and correcting some motor patterns, she’s going to need quite a bit of soft tissue work done. I gotta say, though, that it definitely frustrates me when I hear stories like this, and do nothing but show how “broken” our primary care system is (at times) in this country. And,let me just say that this post wasn’t meant as a “dig” to all physical therapists, chiropractors, physicians, or orthopedic surgeons out there that may be reading.
I understand that with any profession, there are those that do their job very well, and others that, well, don’t. And I am in no way saying that what I found is altogether right or wrong. I But this is one instance where I was pretty fired up about the lack of “giving a shit” this physical therapist had. We can do better than that!
PS: If you found this article useful, or just liked it’s general awesomeness, please do me a favor and “like” it, or maybe re-tweet it. Any way to get the word out there is very much appreciated!


 Dr. Michael Infantino is a physical therapist. He works with active military members in the DMV region. You can find more articles by Michael at