Today’s guest post comes courtesy of long-time friend (and current Head Performance Coach for the Boston Bruins) Kevin Neeld.
His new resource, Speed Training For Hockey, is now available.
Kevin knows how to train hockey players. However, the information below can be applied to any athlete. In short: when it comes to making someone faster the answer is rarely “just go do some sprints.” Digging deeper and understanding inherent limitations from athlete to athlete needs to be considered.

Diagnosing Limiting Factors to Speed Training
Speed is one of the most highly coveted physical attributes in almost any sport, but particularly in ice hockey.
Unfortunately, many speed development programs take a bunch of dynamic warm-up and sprint exercises from track and field, scramble them together, and assume players will get faster.
There are two fundamental flaws in this line of thinking.
First, there is a lot more to speed development than simply sprinting.
Second, the assumption that all players (regardless of age, training background, physical development, etc.) will respond favorably to this type of program is clearly misguided.
The “this is what most people need” logic leading to this type of program is unique to the fitness industry and clearly unacceptable in almost every other area. For example, can you imagine picking your car up from a mechanic, and having he/she tell you…
“I rotated your tires, changed your oil, and topped off your windshield wiper fluid.”
“Why’d you do that?”
“Well that’s what most people need.”
“Yes…but I came in because my car is leaking transmission fluid.”
Having a diagnostic system to help identify limiting factors to speed development will help you avoid both of these mistakes by providing clarity on which physical qualities need to be the focus of a training program, and by tracking progress to ensure the training is actually leading to the results you desire.
Limiting Factors to Speed Development
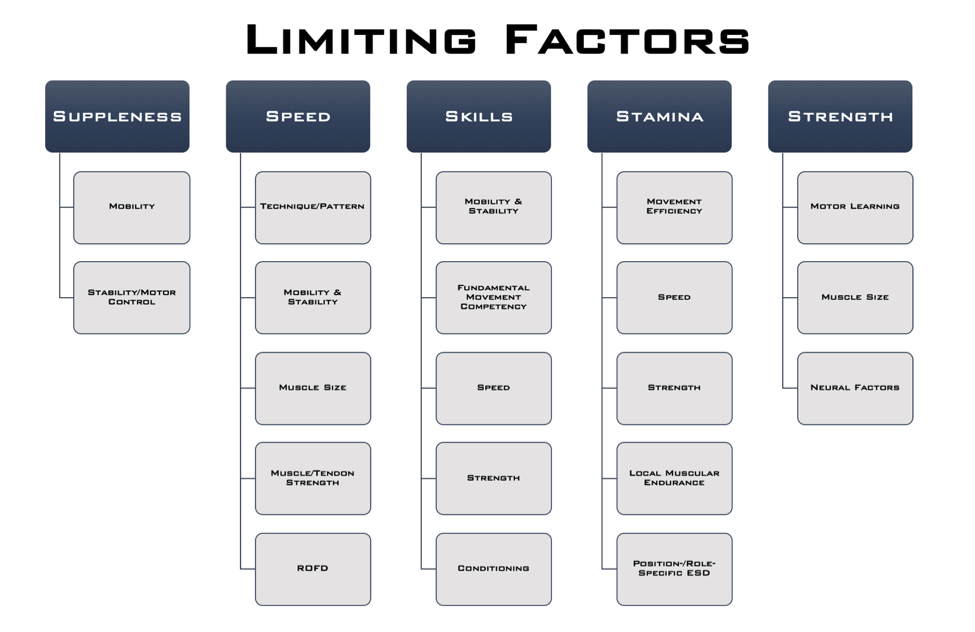
Below is a slide from a talk I gave at the NSCA’s Training for Hockey Clinic a few years ago. While this is overly simplistic, it provides a starting point for understanding the key elements that underlie performance in each area, and therefore what areas need to be “tested.”

Focusing in on speed, there are 4 key areas that contribute to speed development and expression.
1. Technique/Pattern
Speed can be limited by a player’s technique or skating pattern. This is why skating coaches are so important – if players aren’t taught to skate efficiently, to find their optimal skating depth, feel comfortable on their edges, learn optimal transition mechanics, etc., they’ll inevitably be wasting energy and skating slower than they could if they improved their mechanics.
2. Mobility/Stability
That said, from an off-ice training perspective, one of the major goals of training is to remove barriers that may be preventing a player from skating with optimal technique, which brings us down to the rest of the items on this list.
From a mobility standpoint, if a player doesn’t have the ankle and hip mobility to get into an optimal skating position and execute an effective stride, they’ll be leaving speed on the table.
In support of this concept, Upjohn et al. (2008) compared the skating patterns of high and low caliber players, and found that high caliber players set up with their hips, knees, and ankles all flexed more, and this allowed them to have a longer and wider stride length, and greater knee and ankle extension during the push-off phase of skating. In other words, a lower skating position translated into a longer stride length, which allowed for a more powerful push-off with each stride.
In this way, ensuring that the player has the adequate range of motion to get into a deeper skating position can be viewed as speed training.
This research is insightful because it highlights the importance of having adequate ankle mobility. A lack of dorsiflexion, or knees going over the toes, will limit your skating depth, and a lack of plantar flexion, or pointing the toes away from the ankle, will limit your power through the end of the push-off. What isn’t as readily apparent, is how a deeper skating stance will require increases in other components of hip mobility, notably hip abduction or moving the foot out to the side away from the hip.
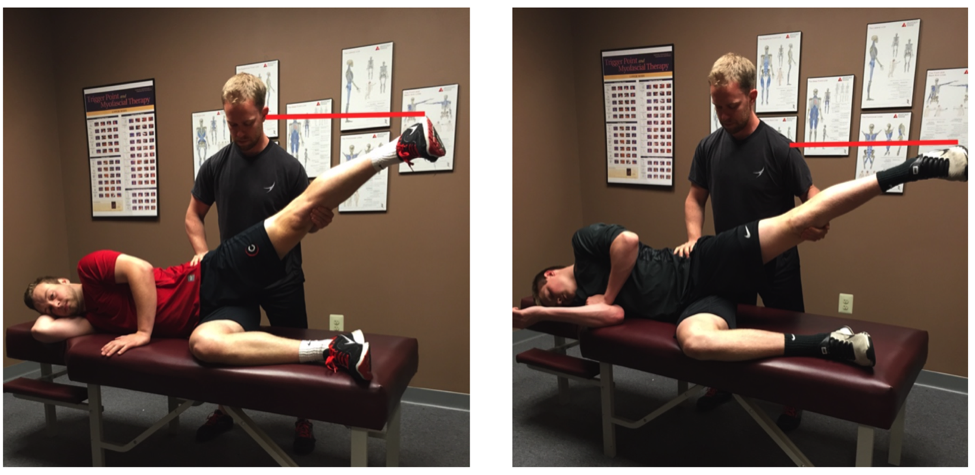
Another way to illustrate this is to consider the lateral split.
The further apart the feet spread, or the further the hips move into this abduction position, the lower the hips drop. So if someone doesn’t possess the hip mobility in this direction, they’ll have to stand up higher to allow for a full stride.
This, along with a lack of ankle mobility, is one of the major reasons players will adopt a higher skating position. Again, all of this just illustrates that mobility in very specific areas can improve skating position, stride length, power through push-off, and ultimately speed. In other words, mobility work IS speed training, and if a player with a mobility restriction just runs more sprints, they’ll be missing out on a huge opportunity to improve their speed.


Note how greater hip abduction range of motion allows the player in red to achieve a much lower hip position, despite being several inches taller than the player in gray.
3. Muscle Size/Strength
Within a similar context, one of the major limitations to skating speed, particularly in high school and younger aged players, is a lack of lower body strength. Strength is a function of both how large the muscles are, listed as “muscle size” on the chart, and how effectively the brain can activate those muscles to produce force.
Strength can limit skating speed in two important ways.
First, if a player doesn’t possess the strength and local muscular endurance, listed in the stamina column, to maintain a low skating position, they’ll start to stand up taller as fatigue sets in. As they stand up taller, their skating stride shortens, they produce less push-off force with each stride, and they slow down.
Secondly, speed is largely determined by how much force a player can put into the ice with each stride. The more force that pushes into the ice, the further the player is propelled forward. By improving the player’s ability to produce high levels of force, you allow them to increase their propulsion with each stride, which simply means that each stride will push them further forward, allowing them to cover more ice with the same number of strides. Force is really just another way of saying strength. So in this way, strength training is really speed training.
Great example of a player possessing significant relative strength in a single-leg pattern.
4. Rate of Force Development
Lastly, ROFD stands for rate of force development. If a player produces the same amount of force, but does it faster, it will shorten the time it takes for them to complete the stride, allowing them to initiate their next stride sooner.
I don’t see this a lot, but in some players that have spent a lot of time developing strength using traditional bodybuilding or powerlifting methods, they’re capable of producing high levels of force, but they do so slowly, so the thing that’s limiting their speed the most is their ability to produce that force at a faster rate.
This is really the first time in this discussion where sprinting, plyometrics, and other more traditional speed and power work has a place in improving a limiting factor to speed.
That isn’t to say that these methods aren’t important in a comprehensive speed development program, but hopefully you now have a better appreciation for how speed training is MUCH more than just simply running.
Relevant Tests for Tracking Progress
There are a lot of performance tests available to help provide insight into limiting factors to speed development, and many of them have merit. Below are a few that I’ve found particularly effective, both in terms of the information they provide and the ease of implementation.
Mobility/Stability
This section could easily be its own article, but in the interest of simplicity, players should have some assessment of ankle mobility, hip range of motion, and single-leg stability. I’ve used several tests over the years to accomplish this, but want to highlight the Y-Balance Test, which has a few notable benefits:
- Performance in this test correlates with ankle dorsiflexion and hip flexion range of motion, two important areas for achieving an optimal skating depth
- The test serves as a reasonable off-ice assessment of stride length
- Some studies have found a relationship between performance in this test and injury risk

The Y-Balance Test is really designed to be an end-range stability assessment, but if you watch how the player goes through it closely, you can get a sense of what may be limiting them from going further. For example, if the knee doesn’t smoothly drift forward over the toes without the heel popping up, the player may have an ankle mobility restriction.
Addressing mobility restrictions and improving single-leg stability should improve performance in this test AND stride length on the ice.
Speed/Acceleration
20-Yard Sprint with 10-Yard Split Time: The body positions, movement pattern, and ground contact time in the first few strides of acceleration more closely resemble the characteristics of skating than top-speed running.
With this in mind, a 10-yard sprint provides valuable information about a player’s ability to accelerate.
However, because hockey players aren’t the most polished sprinters (and they don’t need to be, as mentioned above), there can be a lot of variability in the start. Extending the sprint 20-yards gives a great indication of the players early and late phase acceleration while minimizing the impact a variable start will have on the overall time.
Lower Body Power
Vertical Jump: The vertical jump is one of the most commonly used tests to assess lower body power, and has been shown to moderately correlate to on-ice sprinting speed.
Aside from published research studies, I’ve personally been involved with testing a wide range of players both on and off the ice (youth players, junior teams, NHL Development Camps, NHL Training Camps, Olympic Training Camps, etc.) and the relationship between VJ height and on-ice speed is consistent across all of these groups, making it a suitable option for all players.
Part of the value of the test is that it’s so heavily used that it’s fairly easy to find normative data to look at how a given player compares to others in his or her age group, playing level, etc.
Equipment can be a limitation for some, so using a broad jump (or long jump) is a reasonable alternative. However, I’ve found that broad jump distance correlates with height, so ideally you’d divide the jump distance by height to get a scaled number to track over time.
Lateral Bound: This is a movement included in most hockey training programs, but not one many players are using to track progress.
Compared to the vertical and broad jump, this tests power in a lateral/horizontal pattern, which is more specific to skating, and provides an opportunity to identify side to side imbalances. I’ve also found that in players that are quick on the ice, but don’t have great vertical jumps, they tend to perform well in this test. Including both tests gives a more complete picture of the power profile of the player.
Leg length also plays into jump distance in this test, so it’s important to take a quick measurement of that (or split distance) as well.
I’ve published normative data for players in different age groups here: Hockey Power Testing.
Lower Body Strength
Dumbbell Reverse Lunge (5-RM): For strength testing, it’s possible to get a really good snapshot of the player’s ability to produce force through their lower body with this test.
Similar to the lateral bound, the reverse lunge is a unilateral exercise requiring single-leg stability and dissociated movement between the two legs, two fundamental characteristics of skating. It’s also a fairly easy movement to teach, so it’s safe to implement with players across all age groups.
Strength will fluctuate across developmental years, but by the time players hit high school, they should be able to use at least their body weight in external load (e.g. 90lb dumbbells for a 180lb player).
Wrap Up
There are two major points I want to leave you with.
First, developing speed involves a lot more than running sprints. It’s important to recognize the potential limiting factors to a player developing and expressing higher levels of speed to ensure these are being addressed through a comprehensive training program.
Second, running through these (or similar) tests can be helpful in both identifying individual areas for improvement and ensuring that a player’s training program is leading to the desired results.
The ability to produce force is the foundation for producing force quickly, the recipe for speed. If a player does not have adequate strength, that should be the primary focus. If the player is very strong, but doesn’t perform well in the jumping or sprinting tests, then exercises to improve rate of force development and acceleration should be the primary focus.
A well-designed, comprehensive speed training program should lead to improvements in all of these areas. Addressing a player’s limiting factors is the key to optimizing his or her speed development.
Speed Training for Hockey

This is a no-brainer if you happen to work with hockey players.
What’s refreshing about this resource is that, while Kevin works with NHL players and has worked with many elite level hockey players throughout his coaching career, this is about keeping things simple and honing in on the basics.
This is about making better athletes.
Speed Training for Hockey is currently on sale at a hefty discount for the next two weeks, so act quickly before the price jumps up.


