CategoriesAssessment personal training Strength Training

A Tale of Two Squat Patterns: An Assessment Case Study

I know, I know.

What a dry, bland, title for a blog post.

But if I would have titled it what I wanted to title it:

“That Time I “Fixed” Someone’s Squat In Five Minutes, BOO-YAH, God Damn I’m Good. And While I’m Here Bragging About Myself: Did I Ever Tell You About That Time I Almost Single Handedly Won the Sectional Championship For My High School Baseball Team Back in 1995? Oh, And I Made Out With a Girl Once.”

…that would have been over the top.

Kudos to you for clicking on the link anyway.

You’re cool.

Copyright: saamxvr

A Tale of Two Squat Patterns (But Seriously, Though: I Did Fix It In About Five Minutes

Last week I had a gentleman come to CORE for his initial assessment. After some initial back-and-forth and pleasantries we got into the topic of his training and injury history. He had noted that he had never really participated in strength training before and after digging a bit further he also noted that he’d had a history of chronic lower back pain (L3-L4).

Most people can commiserate.

A vast majority reading these words right now have likely experienced some form of low-back pain in their lifetime.

(raises hand)

It’s never fun and can leave most people in a seemingly never-ending state of frustration and despair. In dealing with many people in the same predicament throughout my career as a coach & personal trainer my goal during their initial session isn’t to spend it telling them how much of a walking ball of dysfunction they are.

via GIPHY

Rather, my objective is to take them through a few rudimentary screens, watch them move, see if anything exacerbates their symptoms, and if so, modify things to see if we can reduce them.

Low back pain is very common and has myriad of root causes:

✅ Tight this
✅ Overactive that
✅ Inactivity
✅ Aberrant movement patterns
✅ Losing a street fight to Jason Bourne
✅ It’s Tuesday

Whatever.

It’s rarely ONE thing, which makes it altogether impossible to look someone in the eyes and say, definitively, “x is why your back hurts.”1

Which is why I prefer to get people moving during their assessment.

It’s easier for me to ascertain and glean a larger picture of things when I can watch someone show me their movement strategies through a variety of tasks.

Don’t get me wrong: I’ll perform several screens on an assessment table: Thomas Test, Craig’s Test, Slump Test, active vs. passive ROM, etc.

However, I also believe it’s important (if not crucial) to get them off the table and have them demonstrate to me how they choose to move.

It’s simply more information.

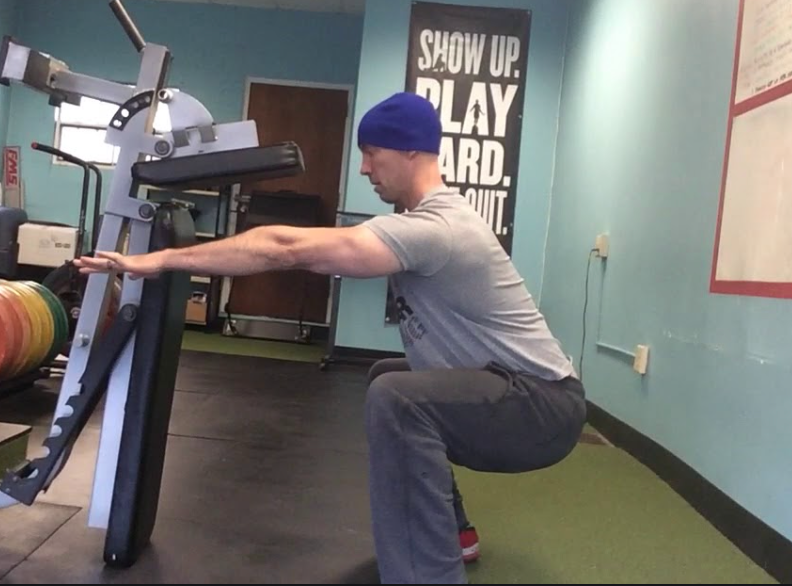
Without any prompting from me (I didn’t want to coach him on how to perform the “test”) here’s what my client’s squat pattern looked like:

Before


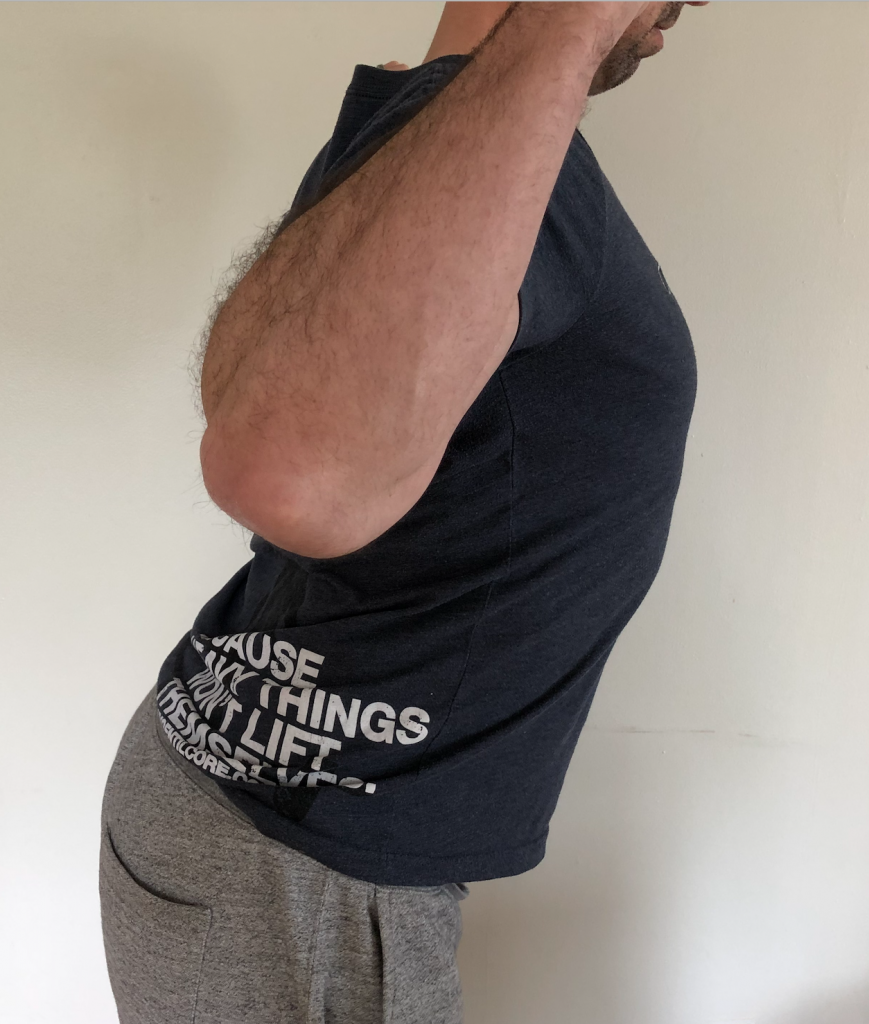
Notice how he immediately “falls” into an aggressive anterior pelvic tilt as a descends toward the floor? Likewise, notice the speed or lack of control as he lowers to the ground?

Furthermore, notice anything as he finishes at the top and “locks out” his hips?

He hyperextends his lower back.

I.e., he finishes with LUMBAR extension rather than HIP extension.

I had him watch the same video above and then broke down in more detail everything I explained here (and that my suspicions were that those may be the culprit of his low-back woes).

I then spent a few minutes breaking down some simple “squat technique tenets” I like to pass along when breaking down the movement with clients.

✅ We talked about foot pressure and corkscrewing his feet into the ground (to help ramp up torque in the hips).
✅ We also discussed the abdominal brace.
✅ I broke down the canister position and how that’s ideal (rib cage down and stacked over the hips)
✅ I reiterated that the squat is equal parts breaking with the hips & knees simultaneously so the net result is squatting DOWN, not BACK.2
✅  I wanted him to think about “pulling” himself down toward the floor rather than falling.
✅  Lastly, I encouraged him to “finish tall” at top; to squeeze his glutes (lightly) rather than ramming his hips forward.

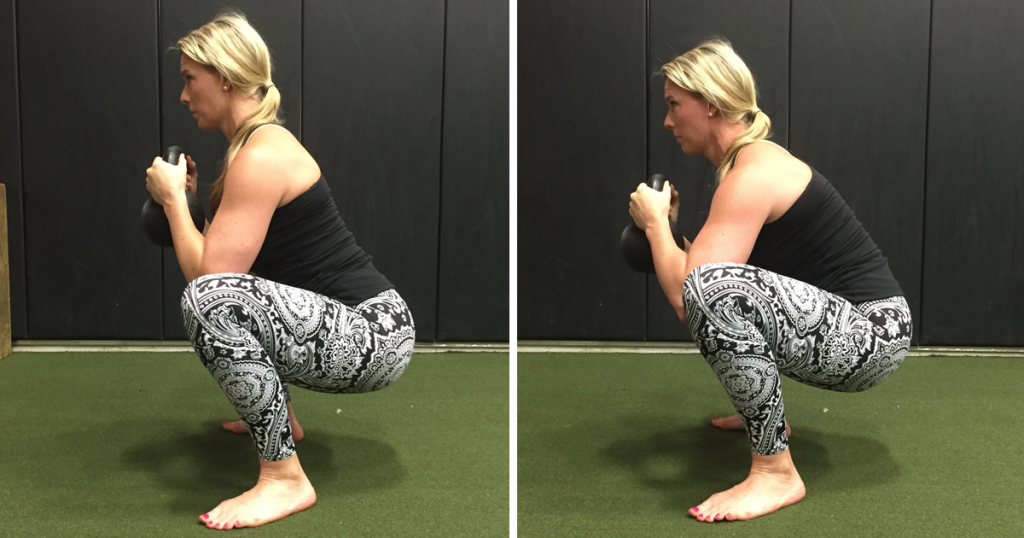
Five minutes later this happened:

After

By no means was it a perfect squat (does that even exist?), but that wasn’t what I was after.

I was seeking PROGRESS.

And I think we achieved that.

Here’s a top (before)/down (after) comparison:


The bigger indicator, though, was that he had zero pain while squatting after these minor tweaks to his technique were made. And it didn’t take me giving him a laundry list of “corrective exercises”  in order to “fix” it.

Sure, I could have told him to foam roll for 37 minutes and stretch his hip flexors, followed by an abyss of varying glute medius exercises…

…and he likely would have felt better as well.

However, we wouldn’t have really addressed anything.

In short: Help people find their trainable menu. COACH them. Show them what they CAN do, rather than barking at them what they can’t.

CategoriesAssessment continuing education Strength Training

How to Effectively Screen the Squat

Today’s guest post comes courtesy of Dr. Michael Mash.

I have a legit man-crush on him ever since I’ve started diving into his online resource Barbell Rehab. As the name implies: Its mission is to help barbell athletes (and aficionados) overcome pain and improve performance WITHOUT being forced into “corrective exercise” purgatory.

In a sense, it’s designed to use barbells (and lifting stuff) to help fix shit. What’s more Tony G than that? Okay, maybe Jason Bourne fight scenes.

Or dragons.

Or an endless cheese plate.

Regardless, Barbell Rehab speaks to my strength coach love language, and as it happens Michael is offering his course to all my readers at $50 off the regular price for this week only.

All you have to do is click THIS link and enter the coupon code TONYG50 to receive your $50 credit.

And even if you’re not keen to saving money (weirdo) you should still give his blog post below a read because it’s riddled with common sense and practical applications you can use TODAY to improve your squat screen or assessment.

Copyright: saamxvr / 123RF Stock Photo

Do You Really Need to “Screen” the Squat?

When it comes to effectively screening the squat, many personal trainers and strength coaches have different approaches. From not utilizing a screen at all, to performing dozens of assessments prior to implementing a bodyweight squat, what is the best way to screen the squat?

Before we answer this question, let’s first talk about the function of a “screen” in general.

What is a Screen and Should We Use it?

According to John Hopkins…

“…a screening test is done to detect potential health disorders or diseases in people who do not have any symptoms of disease.”

If we apply this definition to the squat, one could say that a squat “screen” is a test performed to detect potential joint, muscle, or movement impairments in those who don’t have any pain.

In order for a screen to be effective, a “failed” test must be highly predictive of future injury or pain. If it’s not, this could create a lot of false positives results (a.k.a telling someone they’re doomed for injury if they really aren’t). So on one side, you want to make sure your client is “safe” to squat before loading them up, but you also don’t want to prevent them from squatting if they don’t really need to.

Oh the dilemma!

It’s Tough to Really “Predict” Pain and Injury

As mentioned, in order to analyze the efficacy of a screen, we need to know if it can indeed accurately predict injury. As it turns out, the research isn’t so sure about this.

In fact, it has been shown that one of the most common movement screens, the FMS, is only slightly better than a 50/50 coin flip at predicting injuries. This doesn’t mean, however, that you need to throw the baby out with the bathwater. While both myself and the authors of this paper note that the FMS can be used to see HOW a person moves, it shouldn’t be used as a way to predict injury.

If the FMS can’t reliably predict injury or pain….what can?

Because pain is a multidimensional experience driven by biological, psychological, and sociological factors, it is really a reductionist mindset to blame pain solely on “tight hamstrings” or “poor form” in general.


In fact, factors such as stress, anxiety, depression, lack of social support, job dissatisfaction, and poor sleep and nutrition can ALL affect a person’s pain experience. This is why we need to zone OUT when it comes to “predicting” injury and really take a comprehensive approach. The WAY someone moves is certainly important, but it’s just one tiny piece of a much larger puzzle.

What is an Effective Movement Screen?

So how should you effectively screen the squat? In order for a screen to be effective, it needs to be SPECIFIC, and there’s no better way to be specific than to actually perform the movement itself. Yep, that’s right. The best way to “screen” the squat, is to actually have the client perform a squat.


This process will give you ALL of the information you need in order to make a decision on whether or not they are “safe” to proceed forward with loading the squat.

And guess what?

It doesn’t involve any kind of joint-by-joint assessment, specific muscle flexibility testing, or any other long drawn out processes either.

While the aforementioned approaches can be beneficial to “dig deeper” if someone already has pain, they’re rather unnecessary as part of a screening process in asymptomatic individuals.

For those without pain, here’s a simple process I recommend in order to determine if they are safe to squat.

Step 1: Show Me Your Squat

The first step of our world’s simplest squat screen is to simply ask the client to “show me a squat.” I like to do this for a few reasons. First, it will give you an idea of what they “think” a squat is and how they move in general. Two, it will also give you an idea of how hesitant they are to move.

Some will just drop it low into a perfect squat and others will hesitate to start and move really slowly. You may see the latter example if someone has a history of pain or has fear with movement in general.

This is all useful data to collect on this important first step. If the squat  looks good, congratulations!

Your job is easy today, and it’s time to load them up!

If it needs some work, it’s on to the next step.

Step 2: Coach the Squat

After asking the client to show you their squat, it’s time to coach it. While everyone is going to squat with a different stance width, degree of toe out, and torso angle, it helps to at least have a frame of reference to start from.

I recommend cueing them into a heels shoulder-width stance with a moderate 20-30° toe out, and then asking them to squat as far down as they comfortably can. While this foot placement won’t work for everyone, it’ll work for the majority of people. In this initial bodyweight squat coaching phase, some people may have discomfort or won’t be able to quite get to parallel…and that’s ok.

That’s why we have Step 3.

Step 3: Modify Stance and Depth if Needed

If you coach the client into a shoulder-width slightly toed out stance, and they have pain with this, or they can’t squat very deep, all is not lost yet. Two of the most common pains you’ll see with a bodyweight squat are hip and knee pain. And just because they have pain, doesn’t mean they are injured or need to be referred out to a rehab professional.  It may simply just be the way they are built.

For example, if you take someone with highly retroverted hips, and have them try to squat with a narrow stance with minimal toe out, they may get a “pinch” in the front of their hips at the bottom. This can usually be remedied by widening the stance a bit and turning the toes out more. This doesn’t mean anything is wrong with them…it’s simply the way they are built!

Tying it all together, if someone has pain when you coach them into a bodyweight squat, see if it’s relieved with a simple stance adjustment. This is 100% within your scope to do as a personal trainer or strength coach, as you’re not diagnosing, assessing, or putting your hands on the client at all.

Step 4: Change the Exercise and/or Refer Out

Sometimes the squat pattern itself is so sensitized, that a stance or form adjustment isn’t enough to eradicate pain. If this is the case, I’d recommend NOT proceeding forward with having the client squat, and instead, finding a similar exercise like a rear foot elevated split squat or a lunge variation that they can tolerate.

If the client’s goal is to squat, it would also be best at this point to refer out to a qualified rehab professional as well. This is why interdisciplinary care is so important in the health and fitness world. At this point, as the personal trainer or strength coach, you can continue to train your client with what they can tolerate (full upper body workouts and modified lower body exercises) while the rehab professional addresses the pain itself.

A Quick Note on Squat Depth

Sometimes no matter how much you modify stance, degree of toe out, or hip position, your client won’t be able to squat to “depth.” Depth is defined as when the greater trochanter of the hip goes below the top of the patella from a side view.

In this case, you need to find out if it’s simply because they feel “tight” or if it’s limited by pain.

If it’s limited by pain (even after stance adjustments) then you may want to refer out. If they just feel “tight,” then you can proceed forward with loading them up to tolerance….even if it’s not quite to depth. That’s right. There is no evidence to suggest that squatting above parallel is inherently dangerous.

Rather than spending six months working solely on mobility to increase squat depth, you can work on BOTH simultaneously. Train the squat to the depth the client is comfortable with and tease in mobility drills at the same time.

This one-two punch of increasing mobility and loading through it, will help your clients squat deeper (if that’s their goal) much quicker than not squatting at all.

Tying it All Together

The squat is one of the most beneficial lower body movement patterns to coach your clients through. While everyone will squat with a different stance, degree of toe out, and variation, there’s no need to take clients through an extensive “screening” process prior to loading them up.

Instead:

1️⃣ Ask them to “show me a squat” to get an idea of how they move to begin with

2️⃣ Coach the squat. Cue them into a moderate stance with slight toe out and ask them to squat as deep as they can

3️⃣ If they have pain, see if you can find a stance width, degree of toe out, and depth that is tolerable for them. If so…it’s time to load them up!

4️⃣ If they still have pain after a stance adjustment, it’s probably best to hold on squatting for now and to refer out to a rehab professional for further assessment.

About the Author

Dr. Michael Mash is the owner and founder of Barbell Rehab, a continuing education company dedicated to helping fitness and rehab professionals improve the management of barbell athletes. Check out his CEU approved online course, The Barbell Rehab Workshop at this link and use coupon code TONYG50 for $50 off.

CategoriesAssessment Exercise Technique

Alignment Affects ROM

I had a new client start at CORE recently who, before we even met in person, let it be known that 1) he hated techno and 2) he hated squats.

Well, why don’t you let me know how you really feel?

Personally, whenever I email someone for the first time, my approach is to just, you know, introduce myself, say I’m a big fan, and maybe butter them up with a savory compliment like “oh, and your cat’s adorable.”

I generally refrain from taking a proverbial shit on the things the person on the other end enjoys:

“…and while I’m at it, Tony, I also hate 8o’s cartoons, cheese, rainbows, and your kid.”

I’m exaggerating of course, but once I dug a little deeper and had a bit more back and forth with this individual I got a better sense of his lack of enthusiasm towards squatting.3

Copyright: lightfieldstudios / 123RF Stock Photo

The Smash, Thrash, and Trash Method

When “Ken” came in for his initial assessment he noted that he had, at one point, enjoyed squatting.

Admittedly, those days were more than a decade ago, and despite his current disdain for all things squatting, he was still very much interested in putting them back into his training repertoire and giving them a go again.

The obvious question from me was, “why?”

“If you don’t like back squatting and more to the point, they hurt, why insist on doing them? We can also perform other variations – Goblet, Front, Zercher – that may be a little more back friendly.”

“That’s the thing,” he said, “they didn’t always hurt. When I trained all through college and into my early 30s I never had any issues.”

“But then, you know, I became more sedentary due to life, was stubborn and not taking into consideration I wasn’t 25 anymore, and things just fell apart.”

SIDE NOTE: “Ken” is 47, works long hours mostly at a desk, and I can’t stress this enough, hates techno…;o)

via GIPHY

To speed things up all I’ll say is that, while Ken isn’t the most supple person in the world, nothing during his initial assessment came up as a stern red flag or required an exorcism. Sure, he had a few aches and pains, but nothing outside of the normal “niggles” that come with the territory of lifting heavy things for a large portion of one’s life.

I did notice with his passive vs. active squat screen that his active ROM was limited (while his passive ROM was pretty darn okay).

Pertinent information. And if you want to know why that’s pertinent information read the article hyperlinked a sentence above this one.

He also noted he had worked with several trainers in the past who, like me, noticed his lack of ROM with his active squat.

Seriously, read the article.

It’ll help.

As a result he was used to being given a laundry list of hip mobility drills in addition to a plethora of aggressive soft tissue “smashes” to perform daily:

A1. Take a 88 lb barbell and roll it over your thighs. Have someone stand on it and jump up and  down for added pressure. Doesn’t that feel great!?

A2. Take a lacrosse ball and poke around in your glutes. If you feel nothing, glue on some razor blades to make it more challenging. Splendid!

A3. If neither of those work, go get a chainsaw. RELEASE.

brb

Moreover, Ken was also given poor advice and told to arch his lower back aggressively whenever he squatted because, #powerlifting.

As a result, whenever he hit a certain depth – usually juuuuust as he passed 90 degrees of hip flexion – he’d compensate with more lumbar flexion and exhibit what’s often referred to as “butt wink.”

Photo Credit: GirlsGoneStrong.com

Again, pertinent information.

No wonder his back always hurt when he squatted:

  1. His issue wasn’t a mobility issue, but rather a POSITIONING issue.
  2. Squat cues that work for powerlifters usually don’t work well with non-powerlifters.

Alignment Affects ROM

To be clear: I am not some anti-anterior pelvic tilt lobbyist.

Anterior pelvic tilt is normal.

There’s a natural lordotic curve to the lumbar spine which is accompanied with a slight forward/anterior tilt of the pelvis.

It’s when it becomes excessive –  or people are encouraged to seek it out – that it can (not always) elicit negative repercussions.

Ross et al (2014) noted that:

In 3D modeling of pelvic motion from x-rays of test subjects an increase of anterior pelvic tilt of 10 degrees resulted in:

  • Decreased hip flexion by 6 degrees.
  • Decreased hip internal rotation of  15 degrees.
  • Decreased abductions of 8.5 degrees.
  • Increased contact with positions of impingement.
  • Being put into Hufflepuff.4

In short: more anterior tilt (may) require more spinal motion during squatting exercises compared to more posterior tilt.

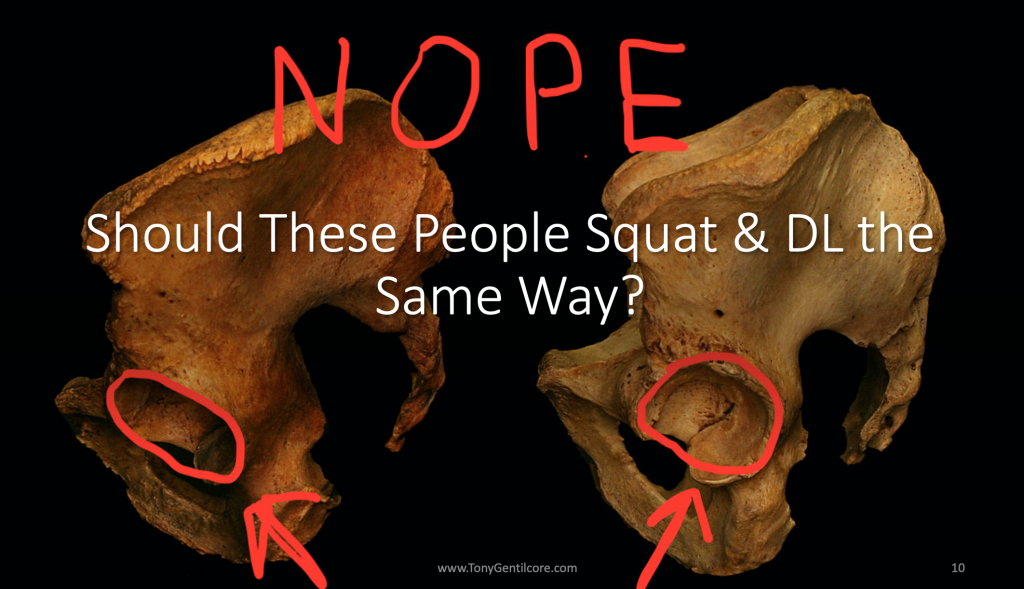
The dotted section(s) to the left represent the acetabulum (or hip socket). As you move down from A to C we lose site of the acetabulum due to increased anterior pelvic tilt. This will incite increased bone on bone contact – or impingement – sooner as we go deeper into a squat.

Now, I am not suggesting we all walk around in more posterior pelvic tilt like a bunch of Ed Grimley wannabes:

However, what I am suggesting is that nudging a little more posterior pelvic tilt so our clients/athletes get out of their aggressive anterior pelvic tilt (and closer to neutral) may be the more appropriate long-term play.

Sure, it may entail “some” releasing of this and “some” mobilizing of that…but not as much as most people think.

Much of the time the more pertinent approach is to have your clients adopt a better bracing strategy in addition to spending more time strengthening the anterior core and glutes (both of which aid in posterior pelvic tilt).

Likewise, I don’t feel cuing people to “arch their lower back” during a squat is beneficial. As pointed out above, increased anterior pelvic tilt resulted in increased impingement of the hip. Once someone runs out of room in his or her’s hips, in order to squat deeper they have to gain ROM elsewhere.

Their soul lower back.

Moreover, the reason many powerlifters adopt a hard arch when they squat is more out of necessity than because it’s better.

  • They wear gear/squat suits (that require an aggressive arch in order to hit passable depth).

Photo Credit: EliteFTS.com

  • People who don’t compete, don’t wear squat suits (and “passable” depth is arbitrary and highly individual anyway).

Circling back to Ken (remember him?), all I had him do in our initial session(s) was to appreciate POSITION. I took away the cue to arch his lower back, and instead had him focus more on posteriorly tilting his pelvis to scoot him closer to neutral (which, remember, is STILL an anterior tilted position).

He was able to squat pain free AND was able to squat deeper without “falling” into that butt wink posture.

I think he’s beginning to like squats again.

Tiesto?

Not so much.

CategoriesAssessment

Assessment: Can Your Clients Actually Do What You Want Them to Do?

There’s a lot that needs to be taken into consideration when assessing a new client.

Their unique injury history (past and present), goal(s), training experience, time constraints, equipment availability, even their favorite 90’s tv teen drama (if it’s not Party of Five we can’t be friends)…

…all are taken into account and cross-pollinated with my educational background and experience to ascertain, to the best of my ability, what will be the best course of action to get said individual from Point A5to Point B6 this means becoming  in the most time efficient and and safe manner possible.

Copyright: viacheslavmaksimov / 123RF Stock Photo


For all intents and purposes the assessment, at least from my perspective, is an amalgamation of muscle testing, movement screens, table work, and good ol’ fashioned investigative work to see whether or not something shakes free or if any “red flags” exist.

But more importantly, the assessment is a splendid opportunity to set the tone, prove to someone that they’re not “broken,” and to help them find their TRAINABLE MENU.

In short, I often joke that my assessment can be described as follows:

“Can the person standing in front of me do stuff?”

There’s only so much muscle testing, table work, looking at range of motion, and “hmmm’ing” and “ahhhh’ing” any one individual can tolerate before (s)he wants to jump through a pane glass window.

To that end, I prefer to make my assessments more palatable by getting the person standing/sitting in front of me more involved in the process and providing the “facade” (for lack of a better term) that they’re being taken through a pseudo training session.

By having him or her MOVE during their assessment I accomplish a few things:

1) I don’t come across as a creepoid by just staring at them for 60 minutes.

2) I get waaaaaaay more information in terms of movement ability, compensation patterns (if any) that exist, and whether or not certain positions (or loads) exacerbate their symptoms.
Active vs. Passive Assessment

One simple way to do all the above is to differentiate between one’s ability to actively perform a specific movement pattern and to passively do it.

My colleague, Luke Worthington, summarized this point beautifully and succinctly in his presentation for The Complete Trainers’ Toolbox:

“What can THEY do?” = Active Assessment

“What can I do FOR them?” = Passive assessment.

Lets us the squat as an example.

When you watch someone perform a standard bodyweight squat – or loaded – you’re bound to see a bevy of things go awry.

Don’t get me wrong, it’s not always a shit show.

Every so often I’ll work with someone for the first time, they’ll demonstrate a well executed squat, and I’ll break down crying like the first time I watched Lady Gaga and Bradley Cooper perform Shallow in the movie A Star is Born.

However, if I’m being honest, this doesn’t happen often.7

Generally speaking there’s always something weird or wonky or twingy whenever I watch someone squat

No one is perfect.

But to that point, I think it’s imperative to differentiate between someone’s ACTIVE ability to do something and their PASSIVE ability to do it.

Watch someone squat and it’s likely you’ll see any one of the following (if not a combination):

  • Knee valgus
  • Excessive rounding of the spine
  • Excessive pronation of the feet
  • Loss of balance
  • A perceived lack of depth (<— which is arbitrary, but if there’s a lot of “effort” to get to a certain depth or it’s just really, really shallow, then that is important to note).

And when we do see any of the above we have a nasty habit of assuming that said individual is dysfunctional, and subsequently end up over corrective exercising them to death.

Fast forward three months (and a cornucopia of hip mobility and ankle dorsiflexion drills) and there’s been little, if any, improvement.

To repeat: Watch someone squat (actively).

That will give you a ton of information.

But don’t stop there; especially if you find they’re having trouble with it.

You should also test them PASSIVELY.


Oftentimes, when you add this extra layer of assessment, in a way that’s less aggressive and provides a bit more stability to the system – FYI: HERE‘s another way to do it in a quadruped position – you’ll find that they CAN do what you’re asking them to do.

Why Is This Important?

In the video above I’m taking my training partner, Justin, through a basic (passive) hip scour/hip flexion screen. If he were a client this would follow an active squat assessment.

I’d want to see if his ACTIVE  movement (he’s doing the work) matched his PASSIVE (I’m doing the work). From there I’d want to compare the gap that exists between the two.

I want that gap to be as narrow as possible.

If his active squat was poor yet I re-assessed passively and saw an improvement – I.e., that he could, indeed, access more ROM – then I can surmise with a high degree of certainty that he doesn’t have a micro-penis he is likely not dealing with something more nefarious, like a bony block or musculature issue.

In this scenario I can do my job as a coach.

I can implement the appropriate “correctives” and/or exercise progressions/regressions to help him learn to squat.

His body showed me he can do it passively, so I need to show it how to do it actively.

If, however, there was no improvement when testing him passively, then:

It’s not my job.

1) I’d still work within my scope and train him within the ROM that’s pain free and that he can control.

2) However, I’d also refer out for more diagnostic testing or manual therapy to compliment his iron work.

Take Home Points

  • The assessment shouldn’t be used as a tool to point out every…single…dysfunction someone has.
  • Besides, what presents as “dysfunctional” actively may just be the body turning on the emergency brakes.
  • Also look at PASSIVE movement.
  • Try to narrow the gap between active ROM and passive.
  • If more ROM is present passively, then do what you do best…coach!
  • If ROM is poor (or pain exists) actively AND passively, you may want to consider referring out.
  • Groutfits make my butt look amazing.
CategoriesAssessment Exercise Technique

Individualizing Your Squat Stance

I’ve often championed the notion that there’s “no such thing as textbook technique.”

How we’re taught to execute certain exercises in a textbook often won’t translate to the real world because, well, we don’t live in textbooks.

This is a theme that’s hit on several times in The Complete Trainers’ Toolbox. Sam Spinelli, one of the contributors, was kind enough to share a bit of an amuse bouche from his presentation “All Things Squats, Knees, and Hips” with everyone today.

To check out the full presentation, as well as contributions from eight other renowned industry leaders, go HERE for more information.

Copyright: leaf / 123RF Stock Photo

Individualizing Your Squat Stance

Humans are these incredibly awesome, adaptable, and diverse creatures.

Within our awesomeness, over time we have adapted to have a diverse set of unique features in our anatomy that provides for a wide range of movement from person to person. This is something that we did not readily acknowledge for a long time and tried to fit people into square holes.

The squat is a perfect example of this topic.

For such a long time it has been advocated to squat with your toes forward and perfectly hip width apart. The unfortunate thing is that this limits a significant majority of people from being able to squat comfortably – or to an appreciable depth.

While some people may be able to do so with practice and working on range of motion, for a vast majority it is just not realistic due to their bony anatomy.

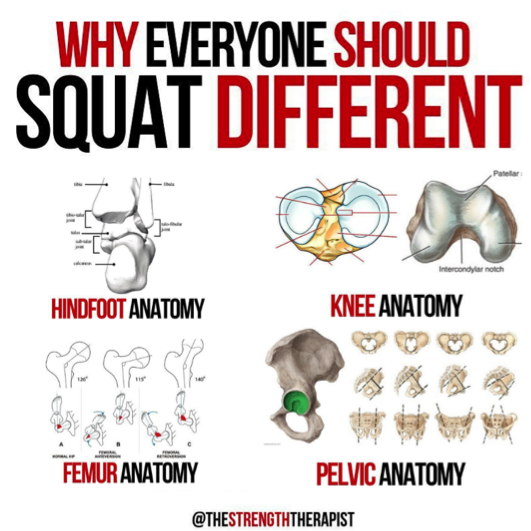
 As we examine the ankle, knee, and hip, we can see that there is significant variation within the bones forming them and the resulting joints.

For example, at the hip we have an acetabulum that can vary in depth of which will impact how much motion a set sized femoral head can have. This will impact the capacity of motion for hip range between individuals, leading to diverse squat stances already. When we begin to layer on the other ways our anatomy differs, it compounds and leads to a breadth of variations in how people may squat.

How Should I Squat Then?

There isn’t a set stance that will accommodate everyone – some people will do well with a hip width stance and slight toe out, others may do better with a narrower stance and feet directly forward. Finding what works best for you can be a challenge at first and require some experimentation.

To help expedite the process, try out these four methods:

1) Find Your Squat Stance – Standing


2) Find Your Squat Stance – Supported


3) Find Your Squat Stance – Seated


4) Find Your Squat Stance – Kneeling


The goal with each is to start with feet together and progress foot/knee width. You will find that one width generally feels better than the others, that’s the one to stick with for now. Then you can start playing around with foot/knee angle and continue experimenting.

This will get you a great head start on your squat stance and making it unique to you.

Two additional details – you may find your stance more comfortable with your feet not symmetrical and you may find that your stance changes with time. These things are normal for many people.

Did I Just Blow Your Mind?

This is just the tip of the iceberg in terms of stuff I cover in my presentation “All Things Squats, Knees, and Hips” in the Complete Trainers’ Toolbox, an online resource that became available this week that also features presentations from eight other industry professionals – including Tony Gentilcore, Dean Somerset, Dr. Lisa Lewis, Alex Kraszewski, Kellie Davis, Meghan Callaway, Dr. Sarah Duvall, and Luke Worthington..

It includes 17 total hours of content covering a wide range of topics every health/fitness professional is bound to relate with. It’s on sale this week at a significant discount, but only until Sunday, February 17th at midnight.

Go HERE for more information.

CategoriesAssessment Corrective Exercise Exercise Technique

The Big Toe and the Squat

Two things with regards to the title of today’s post:

  1. I’m thinking it could pass for the title of the next big children’s book.8
  2. Searching stock images for “big toe” pretty much made me want to throw up a little in my mouth. I’d place it  somewhere between kipping pull-ups and gonorrhea in terms of stuff I’d rather not see with my eyes ever again.

There’s a lot to consider and that can go awry when discussing the squat. To say there’s a plethora of moving parts – not to mention positional considerations (hand position, stance, bar position, etc) – would be an understatement.

One of the last things you’d probably ever consider when it comes to your squat performance is your big toe. Well, I’m here to tell you that it’s a pretty damn important and something you should consider considering.

Also, this is about as non-pukey of a picture as I could find of a toe.

Copyright: alfredhofer / 123RF Stock Photo

The Big Toe & the Squat

What inspired this post was an interaction I had with a new client recently. During his initial evaluation I had him show me his squat because he had mentioned the movement has always bothered his lower back.

He’d worked with previous trainers in the past who had attempted to “fix” things, more often than not resulting in him stretching this, smashing that, performing a cornucopia of positional breathing drills while repeating the Elvish alphabet backwards, and otherwise being over corrective exercised to death

The next step was to bring in an exorcist.

I didn’t do any of those things.9

Instead I did something revelatory.

In fact, I’d be surprised if I’m not nominated for a Nobel Prize for how revelatory what I did was.

Are you ready?

Wait for it…

Wait for it…

I watched him squat.

https://www.youtube.com/watch?v=a1Y73sPHKxw


I’m flummoxed as to why this seemingly obvious “intervention” is often overlooked. I think a lot of it has to do with something John Rusin spoke about during his keynote talk at the SWIS 2018 Symposium:

“We’re in an industry that gets too distracted by bright, shiny objects.”

Watching someone squat is boring.

Having someone stand in a zero gravity chamber while a bunch of lasers attempt to release their psoas isn’t.

We’ve become infatuated with gadgets and gizmos so much so that it’s become much harder to galvanize the masses into trusting what it is they do best……

………..COACH.

To that point, I’m old school and I just wanted to watch my man squat.

I had him take off his shoes and pants, and it’s here where I noticed something.

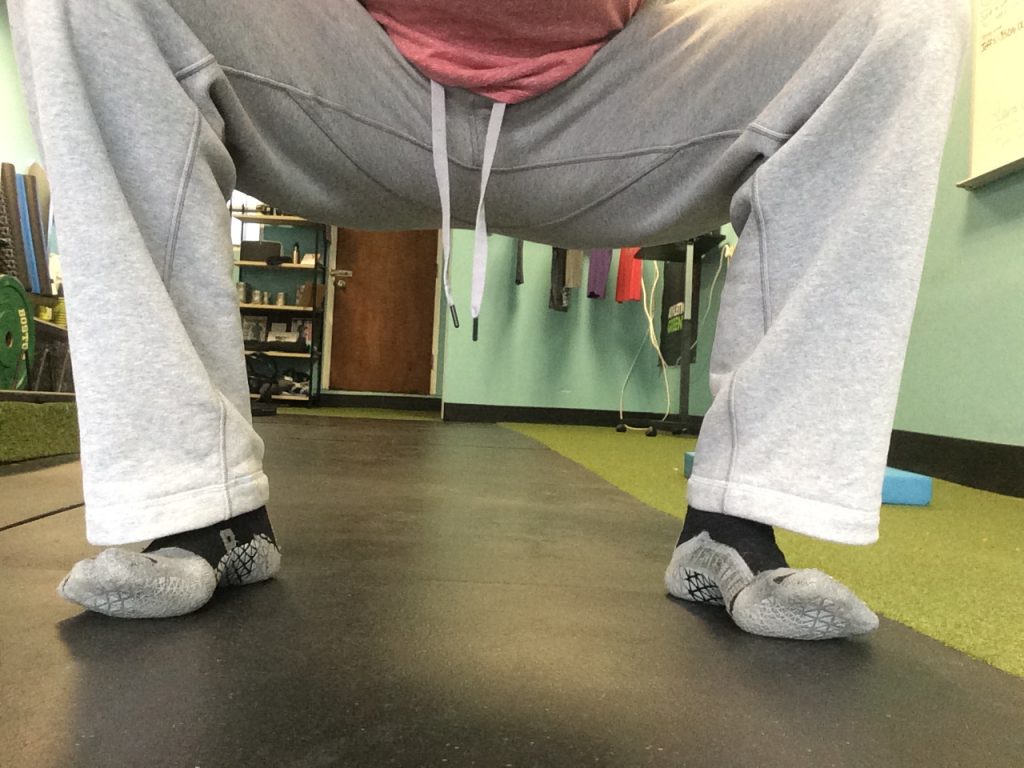
I watched his feet and saw that with every repetition his toes would come up off the ground, like so:

FYI: this is a picture of me doing a reenactment. See you in a few weeks at the Oscars.

Now, for the sake of brevity, it is a conversation to have as to whether or not he was cued into lifting his toes off the ground or not? I’ll nip this in the bud and say for the record that he wasn’t.

He was just never coached on how to squat properly.

As such, it became glaringly clear why his back had always been flipping him the middle finger whenever he attempted to squat (Goblet, front, back, all of them).

When your toes – most often the big toe – comes off the ground you lose your core.


Bullet Points (for those of you too lazy to watch):

  • When toes come up, you lose canister position (ribs stacked on pelvis) and thus lose your core and stability.
  • When toes comes up, you crank into lower back.
  • Think more about foot pressure (pushing into floor and even weight distribution on big toe/metatarsal, small toe, AND heel).
  • Cement toes to the floor.
  • Take your clients’ shoes off when they squat. It will tell you a lot.
  • My biceps looks amazing in salmon colored t-shirts.

But Wait Tony, Some Coaches Cue People to Squat With Big Toe Up on the Way Down, and Then to Push It Into the Ground on the Way Up. Are You Saying They’re Assholes?

No.

Coaches such as Mark Cheng and Cal Dietz  – who are both the shit – often advocate the big toe stays up on the way down during a squat (but the ball/metatarsal still stays glued to the floor) and then press the toe down on way up.

I find this to be okay – and far be it from me to say they’re wrong. They’re both developing outstanding athletes and making people better.

I just find that with all the other mental gymnastics that come along with the squat – big air, ribs down, sit down, not back, spread the floor, drive your chest into the bar, hips through, don’t poop your pants – that it gets a little crowded when you add in the “toes up on the descent, toes down on the ascent” cue.

As I note in the video above I like to cue the idea of foot pressure – with three points of contact – and to cement the toes down during the squat.

Moreover, the objective is not to grip or dig into the floor with your toes.

As Lexington, KY based coach, Drew Watts, notes:

I don’t like “digging” because you don’t want to press the tip of the toe to the ground, more the pad of the toe. Big toe, ball of the foot, 5th metatarsal, heel. Pressing big toe helps the windlass mechanism as well.

Here’s a nice demonstration of everything in action by Essex, Vermont based strength coach, Jess Voyer (who was kind enough to refer to me as a genius in her IG post. 4,000,000 points to Gryffindor):

https://www.instagram.com/p/Bs-xYyEHdmy/

All of This to Say

Don’t be shy to take people’s shoes off.10

Having a keener eye on what their toes are doing during their squat can give you a lot of information and insight.

Toes down = core on = sexier squat.

CategoriesAssessment coaching Program Design speed training

Bottoms-Up Squat Patterning Is the Jam

I was livid.

Not long ago I had a female client come in for an initial assessment and she divulged to me the previous coach she had worked with, in not so many words, inferred she was “dysfunctional” and that she’d likely never be able to perform a decent squat.11

What kind of BS is that? Within ten minutes of the first session you tell someone how much of a walking ball of fail they are? Awesome business model, dude.

I took it as my mission to use that initial session with her and demonstrate to her success; to prove to her she could squat. Maybe not with a barbell on her back, ass to grass, but I wanted to show her that 1) not many people are able to do that in the first place and 2) there are many different iterations of the squat and it was my job to showcase what her best options were given her ability level, injury history, and goal(s).

Screw that coach.12

Copyright: fxquadro / 123RF Stock Photo


The interaction above took place several months ago.

And, not to be too braggadocious, I was able to successfully get her to “squat” within that first session after taking her through a thorough screen and using more of a bottoms-up approach to pattern her squat.13

It all came down to getting her nervous system comfortable in the bottom position and to own it.

Cliff Notes Version:

  • Perform a hip scour to ascertain general anatomy limitations
  • Assess both passive AND active squat pattern(s).
  • See if active “matches” passive ROM (Range of Motion).
    • If so, do they demonstrate enough motor control to, well, control that ROM?
    • If not, is it a mobility or stability issue? I find it’s rarely the former. However mobility tends to be everyone’s “go to” scapegoat.
  • Implement appropriate patterning drills that match the trainee’s ability level and don’t bore them to tears with too many corrective drills that don’t accomplish much of anything.

Non-Cliff Notes Version:

Read THIS —-> Building the Squat From the Bottom

Bottoms-Up Is the Jam

Using the BOTTOMS-UP approach to introduce specific movements – in this case, the squat – is a foolproof way help build your client’s confidence in the movement and to start to nudge a training effect.

NOTE: a baby dolphin dies every time you default to 30 minutes of “ankle mobilization” drills.

This past weekend I was fortunate enough to attend the Clinical Athlete Workshop in Springfield, MA with Dr. Quinn Henoch, Dr. Zak Gabor, and Matthew Ibrahim.

Quinn brought to light two more drills I’m immediately going to add to my arsenal and I wanted to share them with you here.

Check these bad boys out.

Quadruped Rockback Squat Patterning


Tall Kneeling Squat Patterning


Pretty cool, right?

Play around with them yourself. Use them with your clients. Demonstrate to your clients that they can do stuff, and that oftentimes it’s just a matter of breaking down movements into more digestible parts to show them success.

Go to work my Padwans.

CategoriesAssessment coaching Exercise Technique

When to “Fix” Someone’s Squat

I often joke I’m the worst handyman in history. Something breaks in our apartment? I’m the first one calling the landlord. A picture needs hanging? My wife is the go to aficionado in that realm.

A task calls for a Phillips screwdriver? Well, I’ll hand you a Phillips screwdriver. I’m not that much of a moron.

That’s the flat head one, right?…;o)

47626951 - old tools on a wooden table

Copyright: tatom / 123RF Stock Photo

Suffice it to say: I am not great at fixing things. As a matter of fact – and at the expense of losing a few points off my man card – the risk of me setting a fire increases exponentially with the arduousness of the task being asked of me.

Replace a knob on a cupboard = relatively safe. The cat may end up with her fur singed, but the building is still standing.

Change oil in the car = Obama may as well hand me the nuclear codes.

Outside of the weight-room I’m a HAZMAT accident waiting to happen. Put me within four walls, however, surrounded by squat racks, deadlift platforms, barbells, kettlebells, selectorized machines, and maybe a movie quality Chewbacca mask for good measure, allow me the opportunity to watch people exercise and gauge movement quality, and I miraculously turn into Gandalf.

I can fix anything.14

Well, I like to think I have a good eye and can catch wonky movement and fix it.

That’s Assuming Something Needs Fixing

I had a very interesting interaction last weekend at CORE. I was contacted by a dude here in Boston who reached out asking if he could stop by the studio to have me look over his squat and to discuss a few ideas that had been reverberating in his head about bar path, acceleration, and power development.

Specifically he noted he was a high-level powerlifter (600+ lb squat at 181) and that he had been tinkering with his technique of late and wanted another set of eyes on him to see if there was something he was missing.

My first thought was “holy fucking shitballs, that’s a sick squat,” and more importantly I felt compelled to tell him “um, just so you know…I’m not a competitive powerlifter and maybe you’d be better off contacting my boys at The Strength House for more detailed badassery?”

“Nah, I respect the way you’re able to analyze movement and feel you take a balanced approach.”

High praise.

What transpired was pretty cool. It was every bit an educational/learning experience for me as it was for him (I think. He left happy).

To Repeat: this guy squats over 600+ at a competing bodyweight of 181 lbs. An advanced lifter indeed. His approach is unconventional to say the least.

Take this little tidbit of our conversation as an example (not taken verbatim, but it’s close):

“So we see guys all the time squatting 225 lbs in the squat rack, often with poor technique, but then are able to walk over to the leg press and perform 800+ lbs for reps. What gives? How is that possible? I thought to myself “there has to be something there.” I train alone in my home gym which allows me all the time in the world to play mad scientist and to tinker with my technique.

Then it dawned on me: why not leg press my squat?”

Of course, in my mind I’m thinking “well the leg press provides a ton more external stability to the body so there’s your answer.” What’s more there’s typically less ROM involved too.

I was intrigued to see this in action nonetheless, anticipating some sort of leg press to squat Transformer to appear.

I ended up witnessing a meticulous set-up, as well as a masterful demonstration of someone who knows what his body is doing at all times. Unconventional without question. But it worked. A few highlights:

  • His “low bar” position was lower than low bar position. I’m talking mid-arm.
  • Purposeful in-out-in motion of the knees.15
  • A flexed spine. In deep hip flexion, he’d go into lumbar flexion.16
  • He used a staggered stance (left side was a bit behind the right).

For all intents and purposes, many coaches would look at squat like that and start hyperventilating into a paper bag and immediately go into “I gotta fix this” mode.

Guess what I didn’t fix?

My point: everyone is different. No one has to squat the same way. And he’s an a-hole for being a freak…..;o)

Besides, he squats 600+ freaking lbs. He’s obviously trained himself enough to be able to get into (and out of) precarious situations; and he’s never been hurt or in pain.

It was the last point, though, the staggered stance, that he had never noticed or considered.

I don’t fall into the camp that says everyone must squat with a symmetrical stance. This defeats the purpose of individuality and respecting each person’s anatomy. When you factor in varying hip anatomy (varying degrees of APT/PPT, how this affects the ability to both flex and extend the hip, anteverted/retroverted acetabulums, anteverted/retroverted femurs, and varying femoral neck lengths), not to mention that you have two of them, not to mention other anthropometrical factors too, like torso length, femur length…it doesn’t take a genius to understand there’s no one right way to squat.

If a certain squat stance, width, depth, (whatever) feels better and more stable, why not run with it?

NOTE: I’d be doing a disservice by not linking to THIS article by Dean Somerset on the topic. He does a much better job at explaining things.

Back to the staggered stance.

600 lb squatter guy was trying to figure out why it seemed he couldn’t keep the barbell over mid-foot on his descent. I noted the staggered stance and he was like, “huh, I never thought of that.”

He then noted how he had always filmed his squats from the RIGHT side. I filmed from the left and his bar path looked to be on point. So maybe he was being a bit overcritical? Maybe the staggered stance evened things out? I’m sure there’s a biomechanical rabbit hole to be explored here (calling Greg Nuckols?).

When To “Fix” Someone’s Squat

I get it: Many of you reading aren’t elite level squatters, and much of the dialogue above has little merit in your training. The bigger picture, though, I think, is to avoid confirmation bias and sticking solely within camps that always agree with you. Everyone is a different, and there’s always more than one way to do something.

Last weekend, for me, was proof of that.

But I’d be remiss not to point out my standard or “comfort zone” is vastly different between an elite lifter and beginner/intermediate lifter.

Elite level lifters get much more leeway to mess up. More to the point: they’ve messed up enough to know what to do to not to mess up. Yeah, that makes sense. When I am coaching a beginner/novice, though, they’re rope for messing up is much, much shorter.

I still feel it’s important to avoid over-coaching and to allow an opportunity for newbies to figure things out.

But when it comes to squats I tend to have a few “No-No’s” initially.

1) You Round Your Back, a Part of My Soul Dies

Loaded spinal (end-range) flexion doesn’t do anyone any favors. Pick up a McGill book and join the party. I’d prefer to avoid it as much as possible in the beginning. If I see someone flexing their spine during a squat, it’s my job to figure out why?

From there I’m going to try my best to implement the modality or variation that’s going to best set them up for success.

Much of the time it’s getting someone to appreciate how to adopt a better bracing strategy and stabilize.

  • Brace your abs. <— Get “big air” and act as if someone’s going to punch you in the stomach.
  • Learning Active vs. Passive Foot, or spreading the floor with your feet (better yet, a cue I stole from Tony Bonvechio is “find the outside of your heels.”
  • Brace your abs.17


Full-body TENSION (trying to touch your elbows and pulling down on the bar helps here too) is the name of the game. The sooner a trainee learns this, the sooner he or she will clean up a lot of snafus in their squat technique.

Another easy fix is to implement an anterior load.

This is part of the reason why Goblet Squats or Plate Loaded Squats are so user-friendly and help to maintain a better torso position. The load is in FRONT which then forces the trainee to shift their weight and recruit/engage more of their anterior core, which then helps them remain more upright.


2) Knees Caving In (Past Neutral), Heels Coming Off Ground

The knees caving in aren’t always a deal breaker. Many trainees when they first put a barbell on their back and begin to squat for the first time resemble Bambi taking his first steps.

I don’t mind a little knee movement. Much of the time it’s just a matter of getting some reps in and whammo-bammo, the issue resolves itself.

It’s when it hits the point where they go past neutral and/or the heels come off the ground that it can become problematic.

Some things that have worked for me with knees caving:

  • Hey, don’t do that.
  • Think of your knee caps tracking with your pinky toe.
  • Place a band around the knees to provide some kinesthetic awareness. The band wants to push the knees in, they have to push the band out.

I want a squat to look like a squat. It requires ample ankle dorsiflexion, hip flexion, hip internal/external rotation, t-spine extension, among other things.

When someone’s heels come off the ground it’s often because they have no idea how to hip hinge.

Grooving the hip hinge and using props such as a box (box squats) to get someone to learn to “sit back” and use more of their posterior chain is a nice option. This will help keep the heels cemented to the floor.


NOTE: once they master that, the idea is to then perform an equal parts “knees forward, hips back” motion, learning to sit down into the squat (not so much back, back, back). Again, the squat should look like a squat

And That’s Really It

I’m not TRYING to find something wrong with everyone’s squat.

If the 2-3 things above are met from the get go we’re in a pretty darn good spot.

Things like bar position, foot stance/width, hand position, and everything else in between, while significant considerations for some people and staples for entertaining internet arguments, are all going to depend on several other factors (goals, anatomy, experience, ability level, injury history), and in the grand scheme of things are minute comparatively speaking.

CategoriesAssessment coaching Exercise Technique Strength Training

Building the Squat From the Bottom

We all know that squats are a staple movement that span the gauntlet when it comes to helping people get stronger, leaner, and faster.

Blah, blah, blabbidy, blah.

That’s all well and good. But lets be honest.

Squats also help build bodacious bottoms.

There’s a reason why no one has ever written a song titled “Flat Bottomed Girls” or “I Like Average-Sized Butts.”

We like our derrieres fat and big, baby!

Alas, this article isn’t about the human form, appreciating the backside, and how squats help build bottoms.

No, this article is about something else entirely.

How to Build the Squat FROM THE BOTTOM

Dean Somerset and I spent this past weekend up in Kitchener, Ontario (<– that’s in Canada) just outside Toronto co-teaching our Complete Hip and Shoulder Workshop.

Note: you can check out to see if we’re coming to your neck of the woods HERE.

One of the main bullet points Dean and I hit on was squat patterning and how coaches and personal trainers can go about cleaning up their athlete’s or client’s squat technique.

Or, better yet: demonstrate to them some semblance of success.

Just so we’re clear: I think the squat is a basic movement pattern that everyone should be able to perform. I’m not insinuating that everyone should be able to walk into a gym on day #1 and drop it like it’s hot into a clean, deep squat and/or be able to load it to a significant degree.

Not everyone can (or should) squat deep. I’ve written on the topic several times, and for those interested you can go HERE and HERE.

That said, it is a movement pattern that’s important and one that can help offset many postural weaknesses, imbalances, not to mention more colloquial goals like athletic performance and aesthetics.

Assessment

Squat assessment is a crucial component to figuring out what’s the right “fit” or approach for each individual.

I can’t stress this enough: Not everyone is meant to squat to ass-to-grass on day one. Not everyone has the anatomy or hip structure to do it!

But it’s also important to figure WHY someone can’t squat to depth? Is it a mobility issue (which many are quick to gravitate towards) or a stability issue?

Digging deeper on the mobility-stability conundrum, Dean hit on a few important points this past weekend in trying to differentiate what mechanism(s) prevent someone from A) squatting deeper than that think they can squat and B) squatting with a better, more efficient pattern.

It’s a concept I’ve used myself with my own athletes and clients, but Dean did a really great job at peeling back the onion and helping the attendees better understand where they should focus their efforts.

Is it a Structural Issue?

Say someone makes the Tin Man look hyper-mobile when they squat. No matter what they do or how they position themselves, they just can’t seem to squat to an appreciable depth.

Most trainers and coaches would chalk it up to something lame like “tight hip flexors” or lack of hip mobility (which certainly could be the case), and revert to any litany of drills to improve either of the two.

This could very well be the correct anecdote, but I do feel it’s an often simplified and overused approach. I can’t tell you how many coaches have taken this route only to end up barking up the wrong tree.

It’s imperative to dig a little deeper.

Structural issue(s) = bony growth (FAI?), bone spur, and/or geometry of the hip joint itself.

As a trainer or coach you’re not diagnosing anything, and unless you’re Superman18 and have X-ray vision you’re more or less speculating anyways.

Assuming you have the knowledge base and are comfortable doing so, you can ascertain of what each person’s (general) anatomy is telling you by using a hip scour.


Supine (Passive): Have an individual lay on his or her’s back and bring knee into hip flexion. Is it uncomfortable or do they feel any pinching at or near the hip joint? If so, abduct the hip. Does the pinching go away? Do they gain more hip flexion?

This can speak to what their ideal squat-stance width should be.

You can also check hip internal/external rotation. Do they have more or less ROM in either direction? This could speak to more retroversion/anteversion of the acetabulum itself.

In general: those with an anteverted acetabulum (more than enough IR) are going to have crazy amounts of hip flexion. These are people are the ones who can squat ass-to-grass without blinking an eye. Of course, whether or not they can control that ROM is another story.

Conversely, those with a retroverted acetabulum (more ER) may struggle with hip flexion (bone hits bone earlier) and will likely never live up the all the internet trolls’ expectations regarding squat depth.

They’ll likely dominate hip extension ROM, however.19


Supine (Active): You can also have someone test their hip flexion ROM actively (meaning, they’re the ones doing the work). The key here, however, is making sure they use their hip flexors to actively “pull” their knees towards their chest.

Can they do it? Any restrictions?

https://www.youtube.com/watch?v=k3TI-GJNl9w


Prone/Quadruped: Another “screen” to add is in the quadruped position where, again, the person is more stable.

Here you’re checking to see at what point do they lose control of lumbar positioning?

Some people, due to their anatomy, and despite 698 coaching cues being tossed their way, will lose positioning before they hit 90 degrees of hip flexion. You can be the most well-intentioned coach in the world, but unless you’re Professor Dumbledore you’re never going to be able to fit a square peg into a round hole.

So, you work with what’s presented to you. This person will need to squat at or above parallel.

I’m fairly certain the Earth will still continue to spin.

However, what you’ll often find is that they’re able to get into what would be equivalent to a “deep squat” position. Further, if you have them dip down and extend their arms above their head it’s akin to the same position as an overhead squat.

If they’re able to assume this position, it’s a safe bet (although not entirely exclusive) they it’s not a structural issue that’s preventing them from assuming a deep(er) and “clean” squat pattern.


All of it’s information – which may or may not stick – but it’s information nonetheless. And it’ll all help guide you as a coach to figure out what’s most suitable approach for your athletes and clients.

When assessing someone’s active squat pattern they may present as a walking ball of fail and demonstrate a whole host of compensation patterns. This is where some fitness professionals are quick to jump on the “it’s a mobility issue” bandwagon.

Taking the time to perform a more thorough screen (like the ones suggested above), though, is an excellent way to glean whether or not that is indeed accurate.

Squat From the Bottom

Lets assume you figured out it’s NOT a structural issue. You assess/screen someone in the supine/prone/quadruped positions and find they’re able to exhibit a passable squat pattern.

Yet, when they stand up and attempt to squat they resemble a stack of crashing Jenga pieces.

One of the best strategies I’ve found to help address this is to teach/re-groove the squat pattern FROM THE BOTTOM. Basically, start in the end position.

It helps to build context and confidence. In addition, it engrains the CNS to inform the brain “dude/dudette, relax, we got this!”

Assisted Squat Patterning

If I’m working with someone in person, I’ll hold my hands out in front of me (palms up), ask them to place their hands on top of mine (palms down), assume a squat stance, and “groove” their squat pattern (sit back with the hips, push the knees out), and “pull” themselves down into the bottom position of the squat.

I’ll then have them let go, hold that position for a good 3-5 second count, and then stand back up. We start them where we want them to finish. As a result this BOTTOMS-UP approach helps groove technique, but more importantly helps improve people’s confidence at sitting in the hole.

Some other variations you can use:

Squat Walk Down


Suspension Trainer Assist


Have someone grab the side of a squat or power rack (or use a suspension trainer – TRX, Jungle Gym) and use as much assistance as they need in order to get into the bottom position.

Note: Make sure they maintain a good back position.

Once they get into a position they feel they can control and “own,” have him or her let go and hold that position for a 3-5s count.

Then, stand up.

Have them repeat for several repetitions.

You’ll often find that after a few reps things start to click.

Boom

When it comes to squatting, not everyone should be held to the same standard.

  • Perform the screens mentioned above. Do your job.
  • Figure out what the best “fit” is for each person – depth, stance width, foot placement, etc.
  • Use pattern assistance if necessary. Start from the bottom. Build success into people’s training.

Either approach you use – whether it’s partner assisted or with external assistance (rack, TRX) – the main advantage is that it forces anterior core engagement, which in turn helps improve stability, which in turn improves motor control, which in turn makes people into rock stars.

Except without the fame, money, and glory. And amphetamines.

CategoriesAssessment

Squat Assessment: Is It a Mobility or Stability Issue?

Assessing someone’s squat pattern offers a gulf of information – everything from any muscular imbalances or dysfunctions that may exist, to soft tissue restrictions, movement quality, and one’s overall general level of awesomeness.

There are a few factors (and to a larger extent, progressions) that I use when I assess someone’s squat pattern, and it’s not uncommon for me to poke and prod and otherwise tinker around to find out what the root cause may be when someone’s performance is less than exemplary.

Far too often I find that people “assume” a client’s or athlete’s poor squat performance is due to mobility restrictions. Or maybe they just woke up on the wrong side of the bed.  Who knows?

As result, many coaches are left barking up the wrong tree when attempting to address the issue(s), with little to no improvement to show for their efforts. Sometimes weeks or even months after the fact.

In the short video clip below, I discuss one aspect that I find gets glossed over by many trainers and coaches and also provide a way to differentiate between something being a MOBILITY issue or a STABILITY issue.

Hope it helps!