One of my biggest pet peeves about the fitness industry are those people who tend to be absolutists about stuff.
They feel that just because something worked for them that it must mean it’ll apply to everyone, and you’re an idiot or inept if you feel otherwise:
You have to back squat if you want to get strong.
You have to follow a Paleo diet if you want to get ripped.
You have to wear pants when you’re training clients.
It’s all a bunch of hooey if you ask me. Nothing is set in stone, and nothing is going to apply across the board towards a diverse population with varying injury histories, goals, and ability levels.
This train of thought applies towards the deadlift as well.
There aren’t many exercises as maligned or misrepresented as the deadlift.
On an almost weekly basis I’m having a conversation with someone who offhandedly says “so and so mentioned to me how deadlifts are dangerous,” or “such and such said deadlifts are the worst thing ever for your back,” or “I heard deadlifts give you gonorrhea, is that true?”
Listen, deadlifts are no more “dangerous” than any other exercise that’s performed incorrectly (or with too much load/volume that surpasses any one individual’s threshold to recover from).
When performed well, and with the appropriate progressions in place, the deadlift is one of the best bang-for-your-training-buck exercises out there.
It’s also pretty freakin versatile.
Another popular fallacy of the deadlift is that it has to be performed with a straight bar, and that it has to be heavy.
Nothing could be further from the truth.
Picking anything up off the ground – whether it’s a barbell, dumbbell, a bag of groceries, a baby, or Mjolnir – with the knees slightly bent, hips flexed, and with an upright torso, can be considered a deadlift.
Not so dangerous now, huh?
To prove my point check out this gem of a variation.
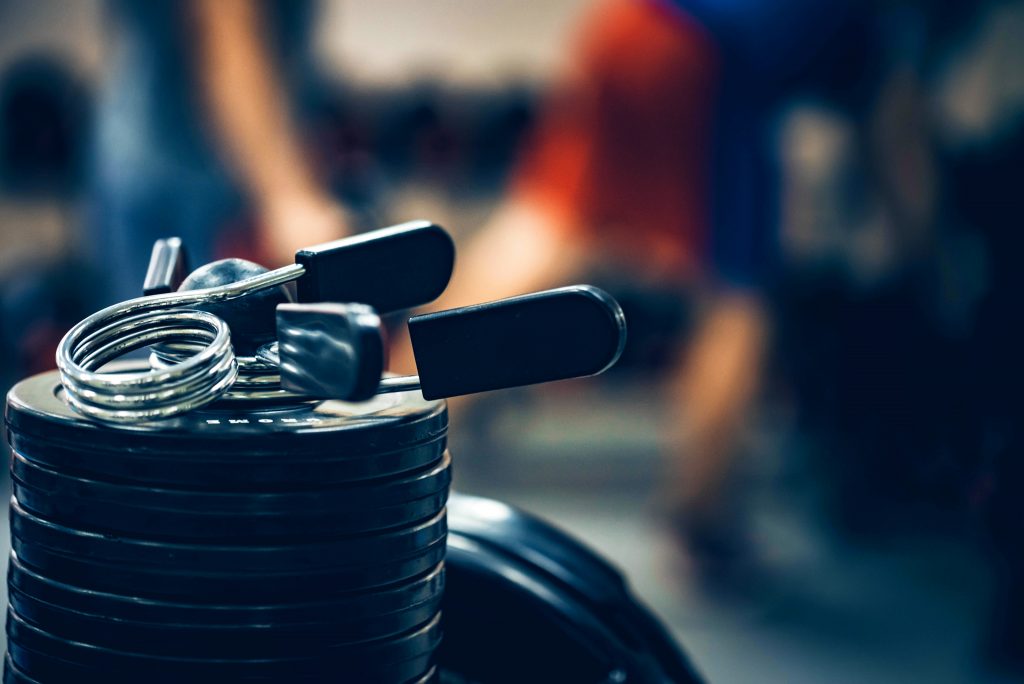
Band Resisted KB Deadlift
Who Did I Steal It From? – Strength & Conditioning legend, Vince McConnell.
What Does It Do? – I had my client, Jessica (who’s in the video above), perform this last night because we’ve been working on troubleshooting through some hip shenanigans.
To put it bluntly, Jessica is strong AF.
Her best deadlift is 350 lbs with a straight bar, and I’m pretty sure she’s undefeated in Fight Club. Thing is, though, she’s always had trouble feeling her glutes during a deadlift.
As with most people, she’s gotten really good at compensating, and every now and again she’ll get a bit of a back niggle.
Not necessarily an injury; but, you know, just an annoying “something.”
This exercise serves a few purposes:
Using a KB – so her center of mass is OVER the load – makes this exercise infinitely more “back friendly.”
Adding the band takes advantage of accommodating resistance where the load gets more challenging at a position where she’s strongest (terminal hip extension).
Too, adding the band, really helps with engaging the glutes to a higher degree at the top of the movement. I don’t know how better else to explain it other than “IT JUST DOES ALRIGHT. WHY DO YOU ALWAYS HAVE TO QUESTION ME?”
Key Coaching Cues – All I did was wrap a Jump Stretch band across two pegs at the bottom of my power rack and then loop the same band underneath the handle of a kettlebell.
Then Jessica lifted it.
And then it was Glute O’clock.
Normally I’m not a fan of high(er) rep deadlifts, but this variation lends itself to me breaking that rule.
Today’s guest post comes courtesy of TG.com regular, and my 1-day-per-week training partner1, Justin Kompf.
Listening, I mean really listening, is a learned skill and takes a lot of (purposeful) practice to master. Those who are able to so, however, are often the ones who separate themselves from the masses in the fitness industry.
I take a deep breath before I knock on my advisor’s office door.
“Keep it together Justin, whatever you do don’t cry”
I take a seat in his office and immediately start crying. We don’t need to go into details, but I was in a tough place.
Fine, my girlfriend broke up with me and I had no idea where I was going with my career. Okay, great, sharing feelings, my favorite.
Can we move on?
I’m sitting in his office, which mind you is surrounded by other offices, just balling.
But as I’m talking, I’m starting to feel better.
Why?
Well, here’s what he was doing. Just listening, providing me with enough silence to think thoughts and say them out loud. He asked me open ended questions without giving advice. That was special for me because up until then I don’t recall ever really being heard like that.
Of course, there are friends I could say anything to, but I never really had this kind of experience before. This experience profoundly changed the way I interacted with people and even changed my approach on coaching.
Empathetic Listening
The other day in a lecture I hammered home the importance of forming relationships with the people you coach.
Given enough time in anyone’s life, something stressful (which is not necessarily bad) or crappy is bound to happen with different magnitudes of crappiness.
Sometimes I like to think of God as Donkey Kong from Nintendo just throwing barrels filled with crap (like bad or stressful events not actual poop) at people. It’s not a bad thing, that’s just life and it happens to everyone but it’s nice when you have someone to help you work through it.
Low levels of crappiness might be failing to get a promotion at work whereas high levels of crappiness might mean going through a divorce or a death in the family.
Many of the clients I train I’m close with, especially those close in age to me. I’m sure lots of other trainers are the same. Over time, trust forms and when things that bother them come up, they know I’ll listen.
This isn’t to say that a lift should turn into a therapy session, because it shouldn’t. But imagine how much a client would appreciate it when something came up and you just said:
“Hey, it sounds like you’re going through some tough stuff, let’s grab a coffee after the session”
How to Do This Empathetic Listening Thing
I don’t have set in stone guidelines on how to accomplish this, but I know when I’ve done it the right way and I know when I’ve failed.
I think one of the biggest issues people have in conversations is that they wait for their turn to talk. They have already concluded what they are going to say next even before the person in front of them has finished talking.
Yes Karen2, you’re guilty of this so pay close attention.
As soon as you’re thinking about what you are going to say next, you’re not fully engaged with the person, so that means you’re not listening.
Side Note: This is also super important for a successful initial consultation with a client if you want to truly understand their goals and why their goals are important.
If you’re going to be a good listener, you need to suspend your thoughts.
Good listeners don’t jump to give advice or relate their experiences to the person in front of them. If you feel like you have something that the person can relate to, try saying:
“You know, everyone’s experience is different, and I don’t want to pretend like we’ve gone through the same thing, but I’ve got a story that I think you might relate to.”
People don’t always talk to get advice back.
They just want to talk because things are tough, and they want to get it off their chest. If they want advice, they’ll probably say “what do you think I should do?”
The last thing that I know for sure is that if you want to be a great listener you need to put your phone down.
All the incredible memes will still be there when your conversation is over.
The Subtle Art of Shutting Up
Listen…
Listening is incredibly important. Yea, sometimes it can be just about as comfortable as being single for the third year in a row at your families Thanksgiving get together.
Right…
But in order to be a good listener, you need to shut up.
Something great happens when a person feels accepted and can speak their mind. You might find out way more about the person you are working with, whether it’s about their goals or about their life, by saying nothing.
Just like lifting, writing, or slipping high brow poop jokes into casual conversations with your highly successful clients, listening is a skill that needs to be practiced.
So, I would encourage all of you to go out their and in the appropriate times, just shut up.
About the Author
Justin Kompf is doctoral student studying exercise and health sciences. He is a personal trainer in Boston at CLIENTEL3.
I’d like to sit here and say I have something cool planned today – like watching a Jason Bourne marathon, or, I don’t know, going to Sears – but, honestly, it’s just a normal Friday for me today.
Writing programs, writing this blog, training, and then maybe a celebratory pizza…;o)
Tomorrow, however, is the real show. My wife and I have a date at Del Frisco’s and then we’re going to go see Widows.
Holla.
Nonetheless, lets get to this week’s stuff to read (and don’t be afraid to send me a Happy B-day note).
Dean Somerset and I have placed our flagship resource – Complete Shoulder & Hip Blueprint 1.0 – on sale all this week at 60% off the regular price.
As if learning anything and everything about shoulders and hips wasn’t enough, I’m going to donate $5 of every sale (from my links) to a local animal shelter here in Boston called Kitty Connection.
This was the shelter my wife and I adopted out cat, Dagny, from when we first moved in together and I like to donate to their cause each year.
The sale only last though this Sunday (12/2), so act quickly.
If I had a nickel for every time a woman said she gets all “big-n-bulky” from strength training and then she was able to produce picture evidence of said “big-n-bulkiness” I’d have zero nickels.
Regardless of the choices we face or the events that happen throughout the day, we have two lenses we can choose to view them from. In one hand is the lens that distorts events as being “bad luck” or “shit” or “unfortunate.” In the other hand is the lens that homes in on what has happened, what is — free from distortion or distraction — and gives us the power to glimpse and choose to see “beauty” or “good” or, at the very least, reality. Without any messy extrapolation.
I’ll be the first to admit I don’t consider myself an innovator in the fitness industry. My talents lie in taking other people’s information3, letting things ruminate for a bit, figuring out how it may apply to my clients, then adding my own spin or take, in addition to a few Star Wars or Jason Bourne references (maybe an f-bomb or two…or three), and then disseminating it to my tribe.
I.e., you.
Much like many of you I peruse Twitter, Instagram, and LOLcats for a little inspiration and to see what other people in the industry are doing to make their clients/athletes better. And, much like many of you, I read an article or watch a video that piques my interest and think to myself…
…”well, FML, why didn’t I ever think of that?“
Today’s edition of Exercises You Should Be Doing is a clear example of this.
The piece of exercise equipment, not the nefarious tool of war.4
It’s one of the more versatile tools in the weight room and I’ve used it to perform everything from deadlifts and squats, to hollow presses and rows, to single leg work and a plethora of core exercises.
I thought I had seen it all. Between stalking Ben Bruno, Joel Seedman, and Meghan Callways’s YouTube pages, I thought I had seen every application of the landmine possible.
I then I saw this.
Hip Flexed Landmine RDL to Reach
Who Did I Steal It From? – Virginia Beach based strength & conditioning coach, Vernon Griffith.
What Does It Do? – I know, I know. Some of you may be watching the video and are like “da fuck?”
But hear me out.
Well, hear Vernon out:
“This is a ground based movement that I have found to be successful in challenging hip mobility, strength and stability. Mobility is A LOT more than just stretching.”
The addition of the landmine is brilliant because it provides a base of “irradiation” (body tension) which helps prevent unwanted movement – namely in the lumbo-pelvic area – and locks the trainee in so (s)he can challenge the hip(s) and core.
Key Coaching Cues – Start in a half-kneeling position (inside leg UP) and be sure to use your top hand to push into the barbell for added stability.
– Lift foot off ground, pushing into barbell to maintain TENSION, and begin to hinge on the flexed side.
– GO SLOW. The whole point of this exercise is to “own” your position(s). Hinge back until the inside leg is fully extended and then squeeze glute for 2-3s count (again, owning the position).
– Reverse the action and return back to starting position, but this time when you’re back to the half-kneeling position, add a reach by pressing the barbell overhead and then contract the opposite (flexed side) glute. Pause for another 2-3s count.
– Repeat for 3-5 reps/side.
– You don’t need to load this exercise very aggressively. I’m only using a 10 lb plate in the video and that was more than enough. An empty bar will work too.
This drill can be used as part of a general warm-up for the hips prior to squatting or deadlifting. Or, even better, as an additional exercise as part of a mobility or GPP day.
I’ve got a guest post from Baltimore based strength & conditioning coach, Erica Suter today. She’s someone I respect a lot not only for her writing prowess (she gives me a run for my money with Lord of the Rings references), but also for her steadfastness in sticking to her guns.
She could easily train professional athletes given her own athletic background, but more to the point because she’s a gifted coach.
However, her preference is to work with youth athletes
And she crushes.
I am always impressed with Erica’s content and commitment to serving our younger generation of athletes. She’s recently released her first product – Total Youth Soccer Fitness – and it’s fantastic.
It’s really a manual for all young athletes and not just soccer, and I think it does a superb job at bringing the pendulum back to the middle. It provides a detailed strength & conditioning component, of course, but emphasizes something sorely lacking in today’s culture…
….fun!
It’s on sale for $67 for the next three days and then jumps to it’s full price of $97. Coaches, parents, Nazguls, act quickly. You won’t be disappointed. Get it HERE.
Besides J.R.R. Tolkien book themes, snowboarding trips, and triple shots of espresso, nothing lights me up more than youth fitness.
After seven years of coaching kids, I guess I have a lot to say on the topic. As a self-proclaimed introvert, my extrovert side certainly shines through any time strength and conditioning for youth athletes comes up. Here’s a common conversation I’ve had countless times:
Parent: “Can you do conditioning for my 10-year-old?” Me: “Like take them to the playground?” Parent: “No, like suicides, laps, timed miles.” Me: “Find another coach.”
Okay, okay, maybe it’s not this dramatic, but you get my point.
Look. I love working with kids. There’s something magical about teaching a beginner the ropes of training and seeing them all the way through their athletic development to college and beyond.
But what I love more is teaching everyone involved in youth fitness that there are safe, fun, and effective ways to get kids better at their sport.
Still, some of these kids are in the wrong training hands. With overuse injuries, sports drop-out rates, lack of passion for sport, and sedentary lifestyles on the rise, I fear the future of the youth athlete.
More often than not, kids are trained wrong.
Whether a coach is misinformed, parents are Googling Messi workouts for their 10-year-old too much, or a new trainer wants to grow his social media following, kids are doing some ridiculous things (most that are unsafe) in the gym and on the field.
With that said, besides sitting at the DMV, there’s nothing worse than perusing Instagram and seeing these things:
– an 8-year-old sprinting up a hill carrying a medicine ball.
– a 10-year-old attached to a sled while dribbling through cones.
– a team of 8-year-olds running sprints around the field as punishment.
– a high school kid doing CrossFit box jumps without mastering jumping and landing mechanics.
Of course, I could make a laundry list here, but instead of complaining, I want to shed light on some of the biggest problems in youth fitness as well as provide actionable solutions.
Let’s do this:
1. People Aren’t Keeping Youth Fitness Simple.
When it comes to training kids, I like to be guided by this mantra: keep it simple, stupid.
A training session with kids should focus on 1-2 skills or performance components you want them to improve, then progress from there. There’s no need to be all over the place and complicate things. If you’re a coach who is trying to teach speed and jumps right into the speed resistance bands, harnesses, sleds, and unicorns to look flashy, who the hell are you?
Worse yet, the kid’s reps are terrible, form is weak, and coordination is non-existent.
So.
I have an idea: tell kids to skip or march and see the whacky coordination show. If they can’t do these simple tasks, what makes you think their linear and multi-directional mechanics will be clean?
Besides asking yourself what skill you want to teach that day, I’d also argue you should ask yourself: “am I developing athletes or social media stars?” before you jump to posting flashy videos on your Instagram.
*drops mic*
2. Youth Athletes Don’t Learn the Basic Motor Skills Enough.
Speaking of keeping it simple, always start with the basics.
Here are some staples to my youth fitness programs:
What’s funny is, these basics set youth athletes up for the “cool” things they get to do later on in their development, like power cleans, deadlifts, pull-ups, lunge variations, and more. Behind every healthy, athletic youth athlete is someone who masters the basics.
Relentlessly.
Vertical Jump Tutorial
Because this much I know: motor skill learning is REAL. Like anything else in life, such as learning math, an instrument, or a soccer skill, this stuff takes a long time frame to master. Like as long as it took Frodo to trek across Middle Earth time frame.
Reflexive Strength
Being able to be coordinated (contralateral) is critical for not only developing optimal speed mechanics, but also for blending the left and right hemispheres of the brain.
Kids who can connect across their bodies through movements like Bird Dogs, Crawls, and Marches can tap into their logical and creative sides. A great book to check out on the benefits of coordination for brain development in youth is Smart Moves.
Here is a fun drill that touches on coordination, balance, and core stability to try:
3. Youth Athletes Aren’t Strength Training Enough.
Let’s get this out of the way: youth strength training does not mean throwing a kid under a barbell right off the bat.
Here are several things that could mean “strength training” for kids:
Now that you see you don’t have to sign your kid up for CrossFit to become the next Lebron, how should we gingerly go about strength training?
Taking the conversation back to the basics, always start with bodyweight first to ensure the kid can move well and execute good form.
Split Squat
Then, once bodyweight looks as pretty as a Starbuck’s peppermint mocha, you can progress to more crazy shenanigans like this:
Bulgarian Split Squat
Here’s a rough template I like to use as far as when to strength train:
– Girls 11-years-old and up
– Boys 12-years-old and up
– However, this may vary based on physical maturity and mental readiness.
How do we know a kid is mentally ready to enter a gym setting with clanking barbells?
– Ask them why they want to go in the gym.
– Notice their body language (proud, head up upon leaving gym)
– If they can’t stop talking about how awesome Coach Erica’s Pull-Up competitions were, they’re a green light. ;-O
4. Youth Athletes Aren’t Having Fun.
While structured training and coaching should done in a controlled environment, sometimes we need to set the seriousness aside and have some fun.
After all, don’t we want kids to fall in love with fitness?
Not just to get better for their sport, but to be inspired to move for a lifetime. In the midst of today’s Fortnite culture, it’s pretty freaking scary how little kids move nowadays.
Think about it: most sports teams practice a few times a week, amounting to a total of 2-4 hours a week of activity. This is meager compared to what we did back in my day. By “my day” I mean the 90s.
Shout out to those of you who played Dodgeball, Capture the Flag, Four Square, and Tether Ball.
Alas, I digress.
We don’t see this anymore. So to inspire kids to move, let’s lean into our creativity as coaches and make fitness fun. Here are several examples of games I’ve come up with over the years:
Example #1
Example #2
Example #3
Of course, these are just glossing over the tip of the iceberg. The good news for coaches is that yes, keep things simple, but sprinkle in creativity as you go to keep kids passionate and engaged.
Teaching must be done to some degree so kids learn, but we have to be cognizant of peppering in the fun.
To that end, let kids be kids.
Total Youth Soccer Fitness
If you’re a coach of young athletes this is for you.
If you’re a parent of young athletes this is for you.
Kids aren’t professional athletes and they should NOT be treated as such. Erica has provided a stellar resource that will help guide you step by step on how to build a well-rounded athlete, but remain cognizant that kids are kids.
First off: Yeah, that’s right I just put the slang version of “Gucci” into the title of a blog post about deadbugs.
Second: I promise I won’t ever do that again
Third: I’ve been swamped with travel the past few weeks (and the subsequent catching up on emails, programs, projects, and life shit-show) and I apologize for my lack of writing prowess. Thankfully I’ve had a handful of regular contributors to the site help to pick up the slack in my absence.
Thanks to Boston based coach, Lana Sova, for today’s contribution.
Fourth: Maybe I should have used “lit?” No? Okay, I’ll GFM.
When it comes to core training, people often fight over which exercises are the best, but that’s kind of like arguing whether Cardi B or Nicki Minaj is a better rapper.
In my opinion (which no one really asked for, but Imma say it anyways because #internet) there is space for both, much like there is a time and a place for different core strengthening exercises.
When people ask me which is the best core strengthener, I give the most boring answer — it depends.
There are many things I take into consideration when I include core strengthening exercises in a client’s program.
Things like goals, training levels, level of lumbo-pelvic control, and mind-body awareness all matter.
Much like the aging process, things are never the same with core training — what could be the best core exercises for a client today will not be the same a year or two from now because they’ve gotten stronger and advanced their skills.
Which leads me to today’s article.
For some reason, when it comes to core training, we go from zero to a hundred in no time. And by “we,” I mean personal trainers. I get it, often we’re tempted to impress clients and show them what we’ve got under our sleeves.
And, often, our clients swear by the fact that they are so advanced they can hold a plank for ten minutes while multitasking and doing 20 other things.
Cue *major eye roll*.
While it’s a good thing to keep your clients happy and help them fall in love with training and working out, there is also a thing called common sense, not to mention the art of giving a client not only what she wants, but also what she needs.
Enter Deadbugs
The deadbug exercise is my all time favorite core strengthening exercise.
When done correctly, it’s one of those exercises that looks easy, but isn’t when you do it yourself.
Progressions to this exercise are diverse and can be lots of fun. And while progressions are great and we do need them to help a client succeed, we also need not forget about regressions.
Deadbugs are one of the exercises where attention to the details matter. It’s easy to spot bad form on a deadbug when you see a client arch her back from the get go. But it’s much more challenging to notice incorrect form when things are not so obvious.
For example, ideally we want a client show us that she can maintain a canister position while performing a deadbug. What’s a canister position? If you live under a rock and never heard Tony speak about this concept, here’s a video for you.
But often, clients will cheat.
Like when I see clients bring their knees closer to their chest to help them with a posterior pelvic tilt.
Or maybe the second they begin to extend their leg out, they lose any core tension; to help them reach the floor, they’ll shift into an anterior pelvic tilt.
It’s our job as coaches to help a client succeed with this exercise without cheating, because the key to their success is doing exercises with correct form.
Happy client AND successful client = Happy coach.
Here are FIVE of my favorite deadbug regressions.
1) Deadbug ISO Hold with a Dowel
Deadbugs are a core stability exercise. This is where I often introduce the concept of an open or closed canister in relationship to the hips and rib cage.
Pssst: (Watch the video earlier in the post.)
Before we start moving the legs and arms and begin to resist any movement in the hip region, it would be a good idea to learn to own the closed canister.
The reason I love this exercise is it helps the client learn how to keep tension in the whole body while also feeling the abdominals working. Adding a dowel to the equation, with the client holding it above her chest while keeping her legs up in a tabletop position, helps her to learn what it means to activate her lats, which can translate to more advanced exercises like bench pressing or deadlifting later on.
I often use the cue ‘’Try to bend the dowel with your pinkies.” Go ahead and give it a try. This should fire up your lats like crazy.
2) Core-Engaged Deadbug ISO Hold with Band
Much like the previous exercise, this variation teaches the client to keep the closed canister position while keeping the tension in the entire body. However, she’ll hold a resistance band above her chest, which acts as a multiplier in creating the tension in the upper body.
3) Core-Engaged Deadbug March
This is an exercises I stole from Florida-based coach William Richards in one of his guest post for Tony on this site.
This is the exercises where, once your client learns how to control the canister position and knows how to create tension in the whole body, she can start moving her legs and making the exercise so much more advanced.
4) Deadbug w/ KB Overhead Hold
This exercise can teach your client how to maintain the canister position with her hands above her head. I like to use this exercise to build up the context for future exercises such as overhead presses.
5) Deadbug with a Pallof Press
This is probably more advanced than the previous exercises; nonetheless it’s still a great regression before you dive head first into all the glorious deadbug variations and completely destroy your client’s core.
It’s great to show your clients advanced movements and spice things up here and there. But before you do so, make sure your client is competent with the exercises and can perform them well. This will help your client show up at the gym more willingly and ultimately reach her goals.
About the Author
Lana Sova is a powerlifter and an in-person and online strength coach in Boston, MA. She helps women to change the way they look by making them strong.
The closest I’ve ever been to calling myself a “ranger” was when I used to watch Walker, Texas Ranger growing up and pretend to roundhouse kick unsuspecting (and imaginary) bad guys in the face.
Oh, and there was that one time I dressed up as the Green Power Ranger for Halloween.6
I am not, nor have I ever been, an Army Ranger.
I did stay up past midnight the other night, though. That’s kinda badass.
A big “thank you” to ACTUAL Army Ranger, Tom Coffey, for pinch-writing for me today as I make my way to Los Angeles this weekend to present.
Fate whispered to the warrior ‘you cannot withstand this storm.’ The warrior whispered back, ‘I am the storm.’
For thousands of years, before comfortable fitness centers dotted every corner, the world’s greatest warriors relied on a steady dose of bodyweight exercises—from building high levels of superhuman strength, to increasing cardiovascular conditioning, and even developing mental toughness bodyweight exercises accomplished it all.
In the rest of this article I want to briefly share with you what my experience as an Army Ranger taught me about getting strong, using only my body.
Life as an Army Ranger
The life of an Army Ranger is quite busy.
Between endless training and extended “business trips” to lands far away there is often more to do than hours in the day. Yet the job requires a certain level of what we’ll call “real world strength.”
Let me give you an example of what I mean: I weighed about 250 pounds in full military gear (+80 pounds above my bodyweight). Do you think you could also throw on 80 pounds of your own gear, pick me up, throw me over your shoulder, and sprint full out for 100 or 200 yards?
That’s what I’m referring to when I say real world strength.
But, no matter what elite military unit you’re talking about there is always a high premium placed on being functionally strong. Admittedly, as much as possible my Ranger buddies and I tried to workout in an actual gym. However, life liked to throw us curve balls and often times we were in situations with no iron around at all.
But not having access to a gym simply wasn’t an excuse to not workout and get weak. So, how did my Ranger buddies and I keep getting stronger when we didn’t always have access to a gym?
The answer: using the best only gym we had available—our body.
Are Bodyweight Exercises Better for Building Strength Than Barbell Exercises?
Ok, before we dive headfirst into this rabbit hole I know someone is going to ask if bodyweight exercises are better for building strength than barbell exercises.
The word “strength” can mean a lot of different things. And, depending on who you ask you’ll likely get a lot of different answers.
Listen, if you want to get strong AF there’s no arguing that picking heavy shit up and hoisting it over your head is the way to go. Unless you’re humongous, green, and your name is Hulk, you very likely won’t be joining the 1,500 pound club by using bodyweight exercises.While you probably definitely won’t build world class powerlifting strength with bodyweight exercise, they do offer tremendous value in building real world strength.
Bodyweight exercises strengthen the body and allow you to express that strength in ways which the barbell can’t.
They can humble even the most experienced of lifters.
I’ve seen, with my own two ocular receptors, guys who can easily squat four wheels crumble like dust when attempting a simple pistol squat (one legged squat).WTF?
How is that even possible?
Ok dude I get it, but how do you build strength using only your bodyweight?
I’m glad you asked.
And, I’m making the assumption here that you’re stranded on a desert island with no gym equipment in sight. This is only to hammer home the point that you literally need zero equipment to make this stuff work.
Obviously, if you start adding gym equipment back in the mix your strength building options skyrocket.
But, that’s easy.
If you learn how to manipulate your body for strength building purposes you become bulletproof. You can literally get strong from anywhere in the world.
Pretty cool, right?
Anyway, below are four ways you can turn lowly bodyweight exercises into serious strength builders.
Did someone order a serving of humble pie?
NOTE:I chose to demonstrate each of these ideas using the pushup. However, you can apply these principles to any number of bodyweight exercises.
1) Remove a Limb (Or Two)
Removing a limb (or two) creates a very unstable environment. Instability causes your muscles to tense harder, and tension is good for building strength. That’s just good science.
Also Useful For:
– Pistol squats
– Single leg hip bridges
– BW romanian deadlifts
– Free standing handstand pushups…if you dare.
NOTE FROM TG:For those watching Tom perform a 1-arm, 1-leg pushup and thinking to themselves “that’s a whole lotta nope,” I’d encourage you to check out THIS article by Nick Tumminello on how to progress towards it.
2) Remove a Limb, Slow Down the Rep, and Add Pauses
Speaking of tension, another great way to increase it is by slowing down your repetitions. This is also known as time under tension (TUT). Pausing at certain points in the rep ensures that you kill all momentum.
Again, this makes the exercise much harder because you have to be stay tense and in control through the entire rep.
There is an inherent difference between taking 30 seconds to perform 1 pushup vs. cranking out 30 pushups. Try a 30 second (or 60 second) pushup and you’ll see what I mean.
Also Useful For:
– Frog holds
– Human flag hold
– Single arm/leg planks
Be Explosive
To be explosive you must be powerful. And power is more or less strength expressed over a very short time. Paradoxically, you must first be strong before you can be powerful. Explosive bodyweight exercises are great for training you to express the strength you’ve built.
Also Useful For:
– Jump squats
– Jump lunges
– Muscle ups
4) The Kitchen Sink Approach
Have you ever opened the drawers under your sink only to find soap bottles, cleaners, yellow gloves, old sponges, bleach bottles, leaky pipes…etc.
I mean, it’s chaos.
The kitchen sink approach is our version of controlled chaos by combining many different strength building elements together. In the video below the spiderman pushup involves using slow reps, removing a limb, dynamic movement, abdominal bracing, and re-distributing weight.
Pro Tip: Make sure that if you’re doing Spiderman pushups in a field with fire ant hills that you don’t unknowingly place your hand directly on top of one. I did this once, and can safely say I’d rather get stabbed by a Nazgul (like twice) than ever do that again.
Desert Island Strength Building Workouts
Ok, now you know how to use bodyweight exercises for strength building. So, my challenge to you is try it.
Below are examples of two ways you can spin basic bodyweight exercises into tough little workouts. And the best part, you can literally do these anywhere, anytime—no equipment needed.
Sample Routine 1- “Destroyer of Legs and Core”
(1)
Three rounds of:
5 pistol squats, per leg → Pause for 1 second at the bottom of every rep
8 single leg hip bridges, per leg → After the 8th rep hold the top of the bridge for 8 seconds (ouchy)
20 second plank w/ left arm lifted
20 second plank w/ right arm lifted
30 second hollow hold
Sample routine 2- “Pushups Seem Harder Today”
(1)
Three rounds of:
3 explosive pushups→ focus on being fast off the ground
(2)
Three rounds of:
2 single arm/single leg pushups, per side
(3)
Four rounds of:
1 thirty second pushup w/ a leg lifted → take 10 seconds to lower, pause above the ground for 10 seconds, take 10 seconds to raise
*On sets 1 & 3 keep your left leg off the ground
*On sets 2 & 4 keep your right leg off the ground
Final Thoughts
Building strength is certainly a noble and worthy pursuit of one’s time. Yes, you’ll make the fastest gains when you have access to all the bells and whistles of a fully equipped gym.
However, when life throws you the inevitable curveball and you don’t have access to the iron, it’s an invaluable skill to be able to bust out a strength workout anywhere, anytime.
I appreciate your time, and I hope you enjoyed the read.
About the Author
Tom Coffey is a former Army Ranger, certified nutrition coach, and currently pursuing a master’s degree in Exercise Science.
Due to his last name, he is on a lifelong quest to brew the absolute “perfect” cup of coffee. You can follow Tom’s quest for coffee brewing perfection, or just read more of his other work, over at his blog: https://tomcoffeyfitness.com
Learning from our mistakes is what we do as humans.
Like that one time I was a teenager taking my driver’s exam and I forgot to put the car back into “drive” after the “reverse” part of my 3-point turn attempt.
Starting your fitness journey when everything is shiny, and the gains are coming thick and fast is exciting. You feel like you can’t do anything wrong because every weight you touch turns to muscle.
OR
You’ve been in this game a while and you still enjoy working out, but the gains have slowed, and you’re frustrated by your lack of progress.
Any errors made at the start are covered up by newbie gains and these slip ups become more magnified the longer you’re in the lifting game.
How do I know this?
I’ve been there.
After training clients for 10 years and training in gyms for longer than I care to remember, I’ve witnessed or experienced these blunders myself that can hold back progress.
And while making mistakes is all part of the learning process, minimizing them while you’re under the bar will help keep you safe, keep you making gains and keep the doctor away.
Think of this as all gain and no pain.
1) Program Hopping
It’s natural to think the grass is always greener on the other side. After all, you’re saturated with new exercise fads and their results look incredible and besides, your program isn’t doing squat.
Change is not a bad thing.
Change is required when you plateau and or when your routine has become stale. However, too much change doesn’t give your body a chance to adapt to your current program because not everything in the weight room happens straight away.
It’s a fine line.
My general rule of thumb is finishing the program first and then evaluating whether it worked or not.
For example, loss of body fat, smaller waist or bigger muscles.
Or if you see no changes after six weeks, then it’s okay to try something new. Which brings me to the next point.
2) Not Tracking Progress
How do you know if a program working when you’re not tracking progress? That’s a rhetorical question.
Look that up, if you don’t know what it means.
If you’re not recording your sets, reps, weight lifted or taking measurements of your waist, hips, arms and legs before, during and after your program, you’re guessing and not assessing.
Because going by what you see in the mirror and the scale shouldn’t be your only measurement of progress. And occasionally testing yourself to see if you can lift more weight than before, never goes astray either.
3) Not Working on Strength
No matter what your goals are in the weight room, whether it’s muscle building or fat loss, all goals are easier by being stronger in the core lifts.
By getting stronger, you’ll have more gas in the tank, and the ability to more work without constantly burning yourself out. And while there’s a whole bunch of strength standards in cyberspace, concentrating on adding more weight to the bar or performing more reps with the same weight is all you need to worry about.
Working in the 2-6 rep range in the core lifts for cycles of 4-6 weeks will get you where you want to go sooner.
4) Not Asking for Help
There’s no such thing as perfect form in the weight room because we’re all put together differently.
You can take a deep dive into cyberspace and find out how to do certain lifts, but nothing beats a trained professional (like me) to pick up on any major technique issues
For instance, I deadlifted incorrectly for years and ended up herniating three discs. If I’d asked for help sooner, I would have saved myself a lot of pain and money. So please, if you’re unsure about a lift, please ask for help.
I wish I did.
5) Ignoring Pain
Common complaints heard in gyms around the world.
“ My shoulder hurts.”
Then he goes straight to the bench press without a warm up.
“Squats hurt my knees.”
Goes back to the point #4.
“My back hurts.”
Then they go straight into their crunch routine.
There are times when stuff hurts, and you feel the need to push through it because you feel you’ll be left behind, or you need to work off the hamburger you ate last night. However, ignoring pain and exercising through it over a long period never leads to anything good.
Please remember the adage ‘if it hurts, don’t do it’.
It will save you from a ton of pain and your wallet from despair.
6) Groundhog Day
Have you seen this movie?
If you haven’t, check out the clip below:
Doing the same routine over and over, for weeks on end when you’re starting out is okay if you’re still making progress.
However, if you’re experience, doing the same program repeatedly and not making gains, then you need your head read.
This goes back to point 1 and 2. Finish the program and track your progress. If what you’re doing isn’t doing it for you, it’s time for a change.
Finishing Up
Yes, mistakes happen along the way but learning from them and limiting them will help you progress in the safest possible manner. Because lying on a Physical Therapist table wrapped in resistance bands is not the definition of a good time.
Author’s Bio
Shane “The Balance Guy” McLean, is an A.C.E Certified Personal Trainer working deep in the heart of Louisiana with the gators.
What follows is what works for ME and MY clients. This shouldn’t be taken as a personal attack against YOU, your favorite coach, or any methodology that’s seemingly at odds with my point of view.
By all accounts you’re still a decent human being, even if you happen to disagree with what I’m about to say.8
Here goes.
I prefer people to squat down rather than back.
I want the squat to look like a squat.
I Can Hear the Cacophony of Moans Now
But, “moment arms!“
And, “hip extension torque!“
“Biomechanics, Tony. WHAT ABOUT THE FUCKING BIOMECHANICS!?!U?!!!AHHHHH!??!JUMPSOFFCLIFF“
Relax: In no way, shape, or fashion am I discounting any those things, nor turning a blind eye to science or evidence-based approaches and modalities.
I’m on your side my fellow anthropometrical nerds.
What I AM discounting, however – but not necessarily turning a blind eye towards (maybe tossing some shade?) – is the fact that, while all those things mentioned above – moment arm lengths, hip extension torque, biomechanics – can be used to make a solid case for squatting the most amount of weight possible, as coaches we often forget two things:
1) Many people could give two shits about squatting the most amount of weight possible.
2) Most people aren’t powerlifters.
Don’t get me wrong: I am all for people training with intent, striving to get strong(er), and pushing some appreciable iron. The tagline for this site is “Because Heavy Things Won’t Lift Themselves” for crying out loud.
That said, I’m also very much interested in the long-game. I want to keep my clients/athletes healthy and set them up for the most long-term training success possible.
One such way I accomplish this is how I prefer to coach the squat. Again, what follows is what works for me and what I feel fits the needs/goals of the bulk of MY clients and athletes.
If you disagree you’re wrong hopefully we can hug it out if we ever meet in person.
Squat Down, Not Back
The video above demonstrates me initiating the squat by pushing my hips back, but specifically getting a lot of motion via the lumbar spine.9
This won’t bode well for most lifters.
Is it wrong?
Well, no.
Plenty of lifters do this and move a lot of weight. However, what often works for powerlifters, wearing squat suits, won’t be the best fit for “natural” non-powerlifters, not wearing squat suits.
Plus I’m pretty sure a a piece of my soul dies every time I see it.
Instead, I prefer this approach:
Take in your air at the top, create a flexion moment (clamp down abs to prevent excessive lumbar movement), and squat DOWN by breaking with knees and hips simultaneously.
For most lifters, most of the time, this will be the better long-time fit in terms of being able to 1) not only squat a decent amount of weight, but also 2) make it less likely your lower back will hate you.10


 Tom Coffey is a former Army Ranger, certified nutrition coach, and currently pursuing a master’s degree in Exercise Science.