1. You can now purchase CORE @ Home for whatever it is you want to pay.
During the first quarantine I started a platform where I’d deliver 20-40 minute workouts that could be performed in everyone’s living room using minimal equipment.
In all I curated 36 workouts using nothing but bodyweight, bands, and kettlebells and/or dumbbells. With many people still reticent to head back to their regular gyms (not to mention the scarcity of gym equipment out there to purchase) I figured this would be a nice opportunity to help.
Too, now that many parts of the US (and world) have started to implement a second wave of shut-downs, this resource is timely.
Whether you want to spend $1 or $100 (if the latter, we’ll be BFFs forever), the workouts are ready and available to start.
This resource is designed for serious gym rats (or for those who’s livelihood is to breed competent gym rats) on how to use the barbell – and not an endless parade of corrective exercises – to prevent/reduce pain & to improve performance.
Dr. Mash goes out of his way to cover everything, from assessment to troubleshooting the most popular lifts, with pristine precision. It’s undoubtedly a wonderful resource for anyone interested in lifting heavy things.
He’s offering my readers a $50 discount off the regular price this week only.
And the offer ends TOMORROW (11/21).
Go HERE and enter the coupon code TONYG50 when prompted.
1. Writing Periodized Programs for Gen Pop Clients
I know this may ruffle a few feathers out there, but I really struggle with the idea of writing periodized (meaning, several weeks or months in advance) training programs for the general population.
When working with a competitive athlete who has their year broken up between an “off-season” and “in-season” as it relates to their respective sport…
…yes, it makes sense to write a more detailed, thorough, and robust plan to prepare them for those rigors
Being more meticulous with managing stress, ascertaining precise volumes & loads, managing rest periods, and possibly even going so far as to measuring things like bar speed are all appropriate when preparing an athlete for a competitive season.
Tom, who’s 49 and works in Human Resources, has two kids at home, a cranky left shoulder, and is just looking to lose a little fat and maybe match his squatting numbers from college isn’t Bo Jackson.
He doesn’t need to prepare for Sunday or hit a 400 ft home runs.1
This is NOT to insinuate I don’t feel general pop clients don’t require planning or structure within their programming. I just don’t feel having them follow a Block Periodized program so that their bench press peaks to coincide with their kids clarinet recital in the Spring is really the panacea for progress.
What’s more, “life” just has a knack for getting in the way:
Kids get sick
Work piles up
Vacations get planned
Fucking global pandemics happen
Certainly, I’m not suggesting to take a haphazard (or “winging it”) approach, but writing training programs several weeks – or more aggressively: months – in advance, while well-intentioned, is rarely going to “stick” with most gen pop clients.
The more cogent approach will almost always be to write 2-4 week micro-cycle programs, but under the assumption that on any given day “Tom” is going to show up for a session and need some tweaking done.
2. Speaking of Athletes Though
My friend Mike Perry, owner of Skill of Strength here in Massachusetts, posted this hilarious (albeit 100% appropriate) meme on his feed today:
I see this happen often: Someone will go on and wax poetic about how “so and so” does “such and such” in the weight room so why can’t I?
To steal a few examples from Mike:
1️⃣ A loaded valgus knee is not dangerous, just look at Chinese weightlifters!
2️⃣ GSP does a ton of gymnastics, that’s what I should be doing!!
3️⃣ Tom Brady only uses bands and look at his success.
4️⃣ Lebron has amazing balance from standing and kneeling on stability balls
There’s one thing that all high-level athletes have that you don’t.
And it’s untrainable.
Natural selection.
Nature picked for them their parents and not yours.
They have superior genetics and would be elite at their sport despite some of the questionable things they do in the weight room.
One athlete may post something on social media where they’re performing some circus-trick exercise and another may post something about how they avoid foods that are colored red.
Don’t do it.
Stop it.
STOP.
You’re not them.
So I guess what I’m struggling with here is resisting the urge to jump into a shark’s mouth every time I see someone – whether a coach or just some rando – attempting to make this borderline moronic argument.2
3. Spelling Calander Calendar Correctly the First Time
Dammit!
Every…single…time.
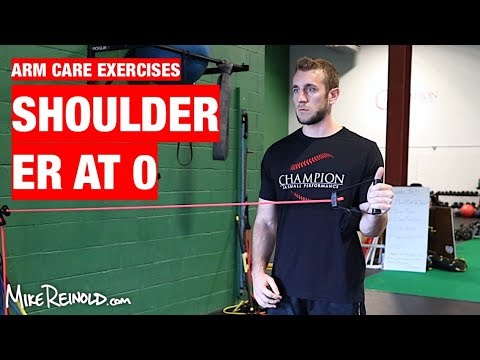
4. Convincing Fit Pros That Rotator Cuff Training Is So Much More Than Band Exercises
I know some will see this and read the following:
“Tony Gentilcore hates band work for rotator cuff exercises. He also hates bacon, oxygen, and kitty cuddles.”
To set the record straight: I have nothing against band work for the rotator cuff.
They’re splendid (when performed correctly, of course).
In terms of EMG activation, band work (as well as Side Lying External Rotations) have been shown to be top dog.
That said, there’s so much more to rotator cuff training and shoulder health in general than just standing (or lying) in-place performing endless repetitions of external rotations.
The shoulder is a dynamic joint and if we wanted to be nit-picky it’s main job is to maintain joint centration where the humeral head stays “centered” within the glenoid fossa.
I’ve long championed the efficacy of implementing rhythmic stabilizations as part of a rotator cuff training strategy.
Note to Self: This video is a decade old for crying out loud; update it.
However, taking things to the next level, my friends at Back Bay Health – Laura & Tim Latham – posted this fantastic idea on their IG today:
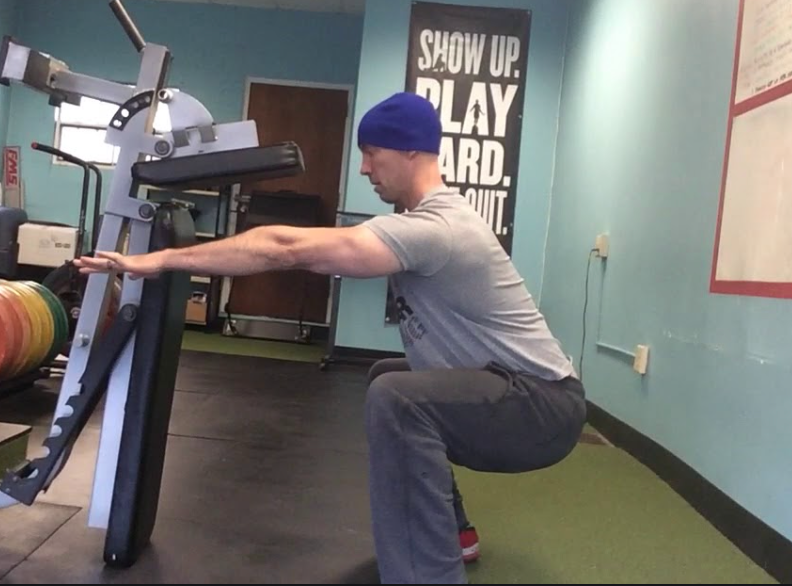
Exercises You Should Be Doing: Wall Press Rotation
When it comes to dealing with hip shenanigans3 I think we’ve done a pretty solid job as an industry at prioritizing OPEN chain exercises.
For those not in the know, open-chain exercises are where…
“…the segment furthest away from the body – known as the distal aspect, usually the hand or foot – is free and not fixed to an object.”
This would make a lot sense given the hip joint – which is a ball and socket joint – is an area designed to be mobile. I don’t need to belabor the point here as there’s an abyss of exercises & drills to choose from.
But you can also peruse Instagram and it won’t take long before you find someone contorting themselves like a pretzel in the name of likes and five seconds of fame.
Which leads to a not-so-obvious digression.
Lately, after having listened to and corresponded with a few of my colleagues, I’m beginning to realize that open-chain exercises are just HALF the answer.
Closed-chain drills need some love too.
Wall Press Rotation
Who Did I Steal It From? – A rockstar (metaphorically speaking): Katie St. Claire. You should give her a follow. She’s legit.
What Does It Do? –
1️⃣ This drill works on pelvic range of motion, but as the preface implies…in a closed chain fashion. The advantage here is that it emphasizes acetabulum motion over a fixed femur.
It feels amazing and serves as a nice drill to implement before some squats or deadlifts.
2️⃣ Too, and as Katie has pointed out, this drill also hammers home foot mechanics. As I flex into hip internal rotation I drive more foot pronation. Conversely, as I extend into hip external rotation I drive more foot supination.
A splendid drill that marries together hip-foot mechanics.
Key Coaching Cues – I’m holding onto an EZ-curl bar, but anything similar – PVC pipe, light barbell, Nimbus 2000 – will do. Be sure to press the rear foot into the wall. You’ll then flex/rotate into hip IR on the standing leg while also accentuating a full exhale.
Exhale into the stretch.
Reverse your action, rotating back/extending as you inhale.
Today’s guest post comes courtesy of Dr. Michael Mash.
I have a legit man-crush on him ever since I’ve started diving into his online resource Barbell Rehab. As the name implies: Its mission is to help barbell athletes (and aficionados) overcome pain and improve performance WITHOUT being forced into “corrective exercise” purgatory.
In a sense, it’s designed to use barbells (and lifting stuff) to help fix shit. What’s more Tony G than that? Okay, maybe Jason Bourne fight scenes.
Or dragons.
Or an endless cheese plate.
Regardless, Barbell Rehab speaks to my strength coach love language, and as it happens Michael is offering his course to all my readers at $50 off the regular price for this week only.
All you have to do is click THIS link and enter the coupon code TONYG50 to receive your $50 credit.
And even if you’re not keen to saving money (weirdo) you should still give his blog post below a read because it’s riddled with common sense and practical applications you can use TODAY to improve your squat screen or assessment.
When it comes to effectively screening the squat, many personal trainers and strength coaches have different approaches. From not utilizing a screen at all, to performing dozens of assessments prior to implementing a bodyweight squat, what is the best way to screen the squat?
Before we answer this question, let’s first talk about the function of a “screen” in general.
What is a Screen and Should We Use it?
According to John Hopkins…
“…a screening test is done to detect potential health disorders or diseases in people who do not have any symptoms of disease.”
If we apply this definition to the squat, one could say that a squat “screen” is a test performed to detect potential joint, muscle, or movement impairments in those who don’t have any pain.
In order for a screen to be effective, a “failed” test must be highly predictive of future injury or pain. If it’s not, this could create a lot of false positives results (a.k.a telling someone they’re doomed for injury if they really aren’t). So on one side, you want to make sure your client is “safe” to squat before loading them up, but you also don’t want to prevent them from squatting if they don’t really need to.
Oh the dilemma!
It’s Tough to Really “Predict” Pain and Injury
As mentioned, in order to analyze the efficacy of a screen, we need to know if it can indeed accurately predict injury. As it turns out, the research isn’t so sure about this.
In fact, it has been shown that one of the most common movement screens, the FMS, is only slightly better than a 50/50 coin flip at predicting injuries. This doesn’t mean, however, that you need to throw the baby out with the bathwater. While both myself and the authors of this paper note that the FMS can be used to see HOW a person moves, it shouldn’t be used as a way to predict injury.
If the FMS can’t reliably predict injury or pain….what can?
Because pain is a multidimensional experience driven by biological, psychological, and sociological factors, it is really a reductionist mindset to blame pain solely on “tight hamstrings” or “poor form” in general.
In fact, factors such as stress, anxiety, depression, lack of social support, job dissatisfaction, and poor sleep and nutrition can ALL affect a person’s pain experience. This is why we need to zone OUT when it comes to “predicting” injury and really take a comprehensive approach. The WAY someone moves is certainly important, but it’s just one tiny piece of a much larger puzzle.
What is an Effective Movement Screen?
So how should you effectively screen the squat? In order for a screen to be effective, it needs to be SPECIFIC, and there’s no better way to be specific than to actually perform the movement itself. Yep, that’s right. The best way to “screen” the squat, is to actually have the client perform a squat.
This process will give you ALL of the information you need in order to make a decision on whether or not they are “safe” to proceed forward with loading the squat.
And guess what?
It doesn’t involve any kind of joint-by-joint assessment, specific muscle flexibility testing, or any other long drawn out processes either.
While the aforementioned approaches can be beneficial to “dig deeper” if someone already has pain, they’re rather unnecessary as part of a screening process in asymptomatic individuals.
For those without pain, here’s a simple process I recommend in order to determine if they are safe to squat.
Step 1: Show Me Your Squat
The first step of our world’s simplest squat screen is to simply ask the client to “show me a squat.” I like to do this for a few reasons. First, it will give you an idea of what they “think” a squat is and how they move in general. Two, it will also give you an idea of how hesitant they are to move.
Some will just drop it low into a perfect squat and others will hesitate to start and move really slowly. You may see the latter example if someone has a history of pain or has fear with movement in general.
This is all useful data to collect on this important first step. If the squat looks good, congratulations!
Your job is easy today, and it’s time to load them up!
If it needs some work, it’s on to the next step.
Step 2: Coach the Squat
After asking the client to show you their squat, it’s time to coach it. While everyone is going to squat with a different stance width, degree of toe out, and torso angle, it helps to at least have a frame of reference to start from.
I recommend cueing them into a heels shoulder-width stance with a moderate 20-30° toe out, and then asking them to squat as far down as they comfortably can. While this foot placement won’t work for everyone, it’ll work for the majority of people. In this initial bodyweight squat coaching phase, some people may have discomfort or won’t be able to quite get to parallel…and that’s ok.
That’s why we have Step 3.
Step 3: Modify Stance and Depth if Needed
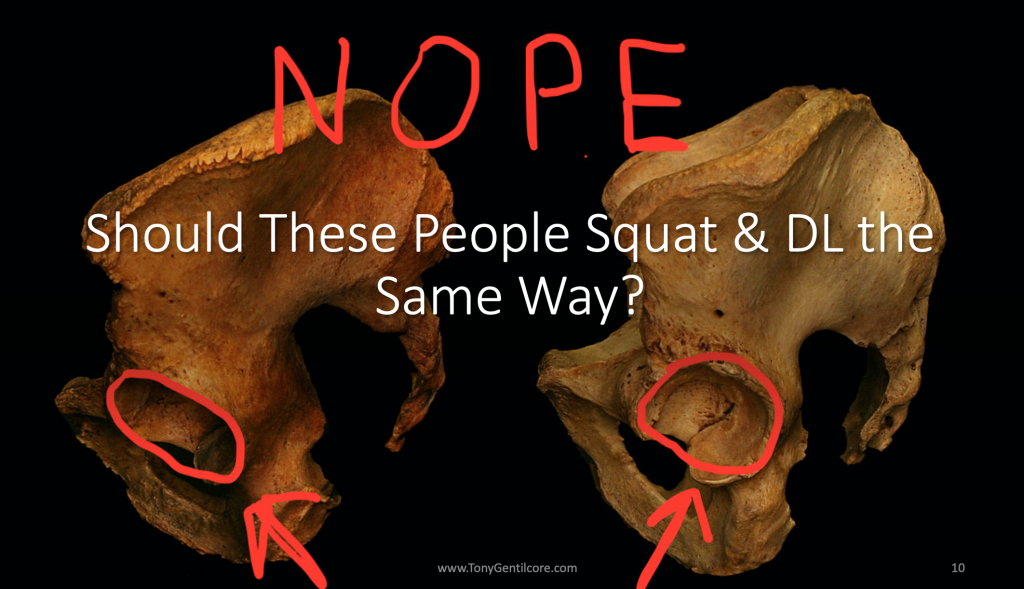
If you coach the client into a shoulder-width slightly toed out stance, and they have pain with this, or they can’t squat very deep, all is not lost yet. Two of the most common pains you’ll see with a bodyweight squat are hip and knee pain. And just because they have pain, doesn’t mean they are injured or need to be referred out to a rehab professional. It may simply just be the way they are built.
For example, if you take someone with highly retroverted hips, and have them try to squat with a narrow stance with minimal toe out, they may get a “pinch” in the front of their hips at the bottom. This can usually be remedied by widening the stance a bit and turning the toes out more. This doesn’t mean anything is wrong with them…it’s simply the way they are built!
Tying it all together, if someone has pain when you coach them into a bodyweight squat, see if it’s relieved with a simple stance adjustment. This is 100% within your scope to do as a personal trainer or strength coach, as you’re not diagnosing, assessing, or putting your hands on the client at all.
Step 4: Change the Exercise and/or Refer Out
Sometimes the squat pattern itself is so sensitized, that a stance or form adjustment isn’t enough to eradicate pain. If this is the case, I’d recommend NOT proceeding forward with having the client squat, and instead, finding a similar exercise like a rear foot elevated split squat or a lunge variation that they can tolerate.
If the client’s goal is to squat, it would also be best at this point to refer out to a qualified rehab professional as well. This is why interdisciplinary care is so important in the health and fitness world. At this point, as the personal trainer or strength coach, you can continue to train your client with what they can tolerate (full upper body workouts and modified lower body exercises) while the rehab professional addresses the pain itself.
A Quick Note on Squat Depth
Sometimes no matter how much you modify stance, degree of toe out, or hip position, your client won’t be able to squat to “depth.” Depth is defined as when the greater trochanter of the hip goes below the top of the patella from a side view.
In this case, you need to find out if it’s simply because they feel “tight” or if it’s limited by pain.
If it’s limited by pain (even after stance adjustments) then you may want to refer out. If they just feel “tight,” then you can proceed forward with loading them up to tolerance….even if it’s not quite to depth. That’s right. There is no evidence to suggest that squatting above parallel is inherently dangerous.
Rather than spending six months working solely on mobility to increase squat depth, you can work on BOTH simultaneously. Train the squat to the depth the client is comfortable with and tease in mobility drills at the same time.
This one-two punch of increasing mobility and loading through it, will help your clients squat deeper (if that’s their goal) much quicker than not squatting at all.
Tying it All Together
The squat is one of the most beneficial lower body movement patterns to coach your clients through. While everyone will squat with a different stance, degree of toe out, and variation, there’s no need to take clients through an extensive “screening” process prior to loading them up.
Instead:
1️⃣ Ask them to “show me a squat” to get an idea of how they move to begin with
2️⃣ Coach the squat. Cue them into a moderate stance with slight toe out and ask them to squat as deep as they can
3️⃣ If they have pain, see if you can find a stance width, degree of toe out, and depth that is tolerable for them. If so…it’s time to load them up!
4️⃣ If they still have pain after a stance adjustment, it’s probably best to hold on squatting for now and to refer out to a rehab professional for further assessment.
About the Author
Dr. Michael Mash is the owner and founder of Barbell Rehab, a continuing education company dedicated to helping fitness and rehab professionals improve the management of barbell athletes. Check out his CEU approved online course, The Barbell Rehab Workshop at this link and use coupon code TONYG50 for $50 off.
Episode 4: You’re Not Broken, Find Your Trainable Menu
I had the pleasure of being invited onto the brand spankin new Performance Hub Podcast hosted by Max Gedge and Coach Karl.
These two guys had the lovely timing of opening up a gym in Melbourne, Australia right as COVID-19 was turning all our lives into a raging dumpster fire.
But I have to say: They’ve kept a positive attitude and have done their best to turn lemons into lemonade. Case in point: They started this splendid podcast…
…and, as it happens, the release of this episode coincides with gyms opening back up in Melbourne!
In this episode we discuss a number of things. Everything from the soul-sucking sucktitude of gym ownership during COVID to the idea of the “trainable menu” to 90’s hip-hop to not my biceps.
Nope I’d never do that…;o)
You can give it a listen on iTunes HERE or on Spotify HERE.
I think a more appropriate title for this week’s iteration would have been…
“Stuff to Read While Trying to Unclench Your Sphincter From Watching the Election Results.”
I need a break, you need a break, everyone needs a break.
THE WEEKLY BRIEF UPDATE
1. You can now purchase CORE @ Home for whatever it is you want to pay.
During quarantine I started a platform where I’d deliver 20-40 minute workouts that could be performed in everyone’s living room using minimal equipment.
In all I curated 36 workouts using nothing but bodyweight, bands, and kettlebells and/or dumbbells. With many people still reticent to head back to their regular gyms (not to mention the scarcity of gym equipment out there to purchase) I figured this would be a nice opportunity to help.
Whether you want to spend $1 or $100 (if the latter, we’ll be BFFs forever), the workouts are ready and available to start.
The world is currently balls deep in a dumpster fire of an election and has the bulk of everyone’s attention. The last thing on most people’s “to do” list is to think to themselves “hey, you know what? I think I’ll write an article on squats or how to improve scapular upward rotation and it’s implications on overall shoulder health.
Or, I don’t know, ear wax.”
Most fitness peeps aren’t in the mood to write this week and there is a dearth of content out there.
That, and I was just too lazy (I.e., balls deep in the aforementioned dumpster fire) to do any reading.
To that end I figured I’d re-share some of my ALL-TIME favorite articles that either gave me a major ah-HA moment OR made me feel more like an idiot.
One of the first articles that really helped me to better understand that rotator cuff training (and shoulder health in general) isn’t necessarily endless repetitions of band external rotations.
I still reference this article repeatedly and send out to clients who end up stuck with their fat-loss endeavors and feel endless steady state cardio and cheat meals are the key.
Sure we were roommates for two years and we started a business together, but Eric was (and still is) a mentor of mine and someone who has had a massive influence on my career.
This was one of the first articles that made me re-think my stance on steady-state cardio and it’s importance for not only overall health, but also how it can have positive implications toward lifting heavy things too.
Whenever someone rounds their back on a deadlift two things happen:
A baby seal dies.
I have to fight off the urge to throw my face into a fire.
Caveats exist, however.
Everyone at some point will round their back.
Elite lifters will do it – sometimes on purpose – to lock out a max effort lift.
Newbie and intermediate lifters will do it – almost always not on purpose – to lock out any lift…🤪
The difference is that elite lifters are strong (and knowledgable) enough to know how to self-correct when teetering with a precarious position (end-range spinal flexion), and mostly everyone else is not an elite lifter.
As I’ve noted repeatedly, if your goal is to become a deadlifting Terminator then the bulk of your accessory work should address either a weakness or technique flaw.
The SLOW START deadlift is a superb choice for those lifters who have trouble with their hips coming up too early and/or have a difficult time with maintaining upper back tension. I’ve been using this with a my clients and it’s been magical to see the progress they’ve made with their technique.
Performing 3-5 sets of 3-5 reps using 50-70% of 1-rep max should do the trick.