CategoriesCorrective Exercise

New (To You) Scapular Stabilization Exercises

I’m still in Europe.1

Today’s guest post comes courtesy of former CSP intern and now current rock-star PA based strength coach, Rob Rabena

Shoulder health is always a hot topic amongst baseball players and overhead athletes. To keep a healthy shoulder, there are a lot of variables that come into play.

Most of these variables are trainable.

Other factors such as pitching mechanics, sport stress, and life stress are hard for the strength coach to control and train. The goal of this post is to provide some new exercise variations to help keep the shoulder healthy – whether you get paid to throw a baseball 95MPH or if you’re Bob from Accounting.

I have always been a big fan of scapular isometric perturbations to train the scapular muscles. I usually do a standing ball to wall at different arm positions.

Lately I have been playing around with different lower body positions as well.

Check them out!

Half Kneeling and Standing Split Stance Ball to Wall Stabilizations


What Does It Do: Trunk and scapular control/stabilization.

Through an added manual isometric perturbation, the athlete needs to control the arm and trunk to not fall over or lose joint position.

This is a fantastic integrated scapular exercise where the athlete needs to not only control the entire body, but also the arm. This exercise helps maintain the head of the humerus in the socket. The athlete should feel the posterior shoulder during this exercise.

Key Coaching Cues:

  • Don’t let me move you
  • Open your fingers wide and feel the ball
  • Feel your foot on the ground
    • Left foot- Left outside heel and left big toe
    • Right Foot- Press your arch into the ground
  • Inhale and fully exhale before beginning
  • Breathe throughout the exercise, don’t hold your breath
  • Reach arm, don’t over pull the scapula down and back
  • I usually place the athlete at end ranges of the shoulder

Science and Research:

Oliver et. al. (2016) found that in the lunge position (the TGU and prone I) had significantly greater serratus anterior EMG compared to other exercises.

A greater EMG during this position is most likely from the scapulae in protraction.

Protraction or reaching can do wonders for shoulder health, scapular health and position of the ribcage. Always take in consideration that EMG studies are not the end all be all when it comes to exercise selection.

Who Should Use It:

Any overhead athlete such as baseball, tennis, swimming, softball and volleyball would be recommended. This can be used to help prevent any future injuries with anyone who has a history of shoulder problems or pathologies.

Program Design:

 2-4 sets of 10-15sec or until athlete fatigues or technique/position is lost.

I would suggest that the half kneeling position can be used at times as a regression to the standing ball to wall variation. The standing Split Stance variation is definitely a progression due to the narrow base of support and difficulty of the exercise.

See the list below to help with program design as well as for training floor regressions and progressions.

Quadruped: Ball on Ground

Standing: Ball to Wall

Supine: Off-Table

Half Kneeling: Open Chain Variation

Progression Order:

  1. Quadruped ball on ground
  2. Half kneeling ball to wall
  3. Standing ball to wall
  4. Standing split stance ball to wall
  5. Supine off a table
  6. Open Chain Variations

Conclusion:

When training the shoulder or scapular muscles, be sure to mix up and progress lower body position when utilizing a manual isometric perturbation.

References:

Gretchen D. Oliver, H. A. (2016, March). Electromyographic Analysis of Traditional and Kinetic Chain Exercises for Dynamic Shoulder Movements. Journal of Strength and Conditioning Research.

Author’s Bio

Rob Rabena, MS, CSCS, is the Director of Sports Performance at Maplezone Sports Institute (MSI) in Garnet Valley, Pennsylvania, where he trains high school, college and professional baseball athletes.

Prior to joining MSI, he was the head strength & conditioning coach at Cabrini College, working with their nationally ranked lacrosse team. In addition to his work at Cabrini, he completed an internship at Cressey Sports Performance in Hudson, Massachusetts in 2012.

Rabena earned his B.S. in Exercise Science with a focus on Health Promotion from Cabrini College in 2011, and his M.S. in Exercise Science with a focus on Strength and Conditioning from East Stroudsburg University in 2012. He is a certified Strength and Conditioning Specialist (CSCS) through the National Strength and Conditioning Association (NSCA).

Instagram- @robrabena3

Twitter- @RobRabena

CategoriesAssessment coaching Corrective Exercise Program Design

A Thoughtful Discussion on Low Back Sparing Strategies. Actually, Less “Thoughtful” More “Meandering”

I often joke that “lifting weights isn’t supposed to tickle.”

When you’re pushing, pulling, carrying, thrusting, and otherwise hoisting things around for the heck of it…you’re bound to end up with a few bumps and bruises along the way.2

Honestly, I can’t think of the last time my body was 100% devoid of any type of soreness or semi-nefarious “huh, well that doesn’t feel fantastic” sort of vibe.

I’m not referring to pain. Nothing that diminishes my ability to live my day-to-day life. Just, you know, sometimes my first step out of bed or sitting down to drop it like it’s hot isn’t the most enjoyable experience in the world.3

(Anyone who’s performed heavy squats the day prior can commiserate).

A lifetime of playing sports and training will do that to a body.

But that’s the point.

Lifting weights and pushing the body outside it’s comfort zone is what allows us to adapt and come back stronger and more resilient; to take on the world (or the squat rack) and tell it to GFY.

All that said: it still sucks donkey balls when the inevitable happens. We take things too far, go too heavy, or move juuuuust the right way for something wrong to happen.

Arguably, nothing stagnates or deflates progress more in the gym than a jacked up lower back.

Statistics will say that we’ve all been there. Or, alternatively, as fitness professionals, have worked with someone who’s been there.

So I figured today I’d shoot from the hip and fire back some quick-hitting suggestions/insights/alternatives to consider when working with someone dealing with low-back pain.

In No Particular Order

1) Except for this one. This is super important.

I’ll kick things off with the grandiose, off-kilter statement that if something hurts…don’t do it.

https://www.youtube.com/watch?v=a1Y73sPHKxw


Fucking profound, right?

Dr. Stuart McGill will advocate for provocative tests/screens to be performed – slump test, toe touch, McKenzie drills, etc – in order to figure out the root cause or possible source of someone’s back pain.

The stark contrast should be done outside of that window. It’s imperative as a coach, trainer, clinician, wizard, to demonstrate pain-free movement to the client/athlete. The objective should be to mute or pump the brakes on pain and start to mold more of a “movement quality” campaign.

Dr. McGill often refers to this as “spinal hygiene.”

2) Speaking of Dr. McGill

You should read his book Ultimate Back Fitness Performance. Specifically pages 1-325.

Spoiler Alert: it’s 325 pages long.

A more “user-friendly” text would be his latest book, Back Mechanic.

3) Back to “spinal hygiene.”

The good Doc refers to this as:

“The daily upkeep of your back. It includes your recovery exercise routine as well as changes to your existing daily motions all day long. Success in removing back pain requires removal of the movement flaws that cause tissue stress.”

This could refer to something as simple and innocuous as teaching someone how to sit in a chair properly, or even how to stand up from a chair.

As counterintuitive as it seems, those who have more flexion-based back pain will feel more comfortable in flexion. Likewise, those with extension-based back pain will feel at home in extension.

It’s weird.

So, often, taking the time to clean up activities and endeavors outside of the gym will be of most benefit.

As the saying goes: “we as trainers/coaches have 1-2 hours to “fix” things, and the client/athlete has 23 hours to mess it up.”

Other things to consider:

  • Walking. This is an excellent fit for those with low-back pain. It’s just important to make sure they’re not defaulting in forward head posture and a slouched posture. McGill refers to this as the “mall strolling” pattern. One should be more upright and swing the arms from the shoulders (and not the elbows). This provokes more of a “pertubation” to the body helping to build spinal stability.
  • Grooving more remedial hip-hinge patterns like I discussed in THIS article. Getting someone to dissociate hip movement from lumbar movement is a game-changer..
  • Pigging back on the above, the hip hinge creeps its way into EVERYDAY things like brushing one’s teeth or bending over to pick something up off the ground (golfer’s lift). Anything that can be done to spare the spine (discs) and make it less sensitive to pain is a win – no matter how trivial the activity.

4) Synchronous Movement

Learning to “lock” the ribcage to the pelvis is another key element to managing back pain. The abdominal brace is of relevance here. Basically the entire core musculature – not just any one muscle (ahem, transverse abdominus (drawing in method) – needs to work in concert and fire synchronously to spare the spine and offer more spinal stability.

One drill in particular that hammers the point home is the Wall Plank Rotation.


Here an abdominal brace is adopted and the objective is to “rotate” the entire body as one unit, locking the ribcage to the pelvis. Many will inevitably rotate through their lumbar spine and then the upper torso will follow suite.

5) Neutral Spine – Always (But Not Really)

The spine IS meant to move.

Neutral spine is paramount, but it benefits trainees to tinker with end-ranges of motions (in both flexion and extension) if for nothing else to “teach” the body to know how to get out of those compromising positions – especially when under load.

During our workshops together, Dean Somerset will often demonstrate to the trainees how squatting into deeper hip flexion (unloaded, and to the point where butt wink happens) can be of benefit to some people. The notion of learning where a precarious position is (and how to get out of it) is valuable.

I’ll use the simple Cat-Camel drill to teach people that it’s okay to allow the spine move.


Also of Note: I’d argue we’ve been so programmed into thinking that all spinal flexion is bad and that a baby seal dies every time we do it, that it’s caused a phenomenon referred to as reverse posturing.

The idea that more and more people are now “stuck” in extension, and thus at the mercy of a whole spectrum of other back issues (spondy, etc).

You can read more about that HERE.

Suffice it to say: we can’t discount Rule #1…helping to build improved spinal endurance/stability.

Plain ol’ vanilla planks come into the picture here.

This:

Not This:

This:

  • Keeping people honest and accountable on proper position (not “hanging” on passive restraints and dipping into excessive lumbar extension) is kinda of important.
  • Rule of thumb is to be able to hold a prone plank 120s, side plank (per side) for 90s. McGill will note it’s a RED FLAG if there’s a huge discrepancy between right/left sides.
  • I prefer more of an RKC style once someone is ready. This helps to build more bodily tension, to the point where everything – quads, abs, glutes, eye lids, everything – are firing. Ten seconds is torture when done right.

However, we can always graduate to less vomit in my mouthish exercises. As much as planks are baller and part of the equation to helping solve someone’s back pain, they’re about as exciting as watching a NASCAR race.

6) A few favs include:

Elbow Touches

https://www.youtube.com/watch?v=AUgz2U65KPc


Progressing lower and lower towards the ground.

Farmer Carries – all of them


Offset Loaded Exercises


I love offset loaded exercises for a variety of reasons. But most germane to this conversation is the fact that there’s a heavy rotary stability component when performing them.

Getting people moving and performing more traditional strength & conditioning drills – assuming they’re pain free and of high movement quality – will help to get them out of “patient mode,” and more excited to stick to the plan.

7) A Few Other Ideas to Consider

Don’t be an a-hole and marry yourself to the idea that everyone HAS to deadlift from the floor and that everyone HAS to pull conventionally.

The only thing people HAVE to do is sign up for my newsletter. (wink, wink, nudge, nudge)

Sometimes we have to set our egos aside and do what’s best for the client/athlete and what’s the best fit for them. I think the trap bar deadlift is a wonderful tool for people with a history of low back pain.

To steal a quote from Dr. John Rusin:

Without sending you back to Physics 101, the forward position of the barbell causes a less than optimal moment arm to stabilize the core position in neutral while moving some serious loads off the floor.

During the traditional deadlift, the center of mass (barbell) falls in front of your body, therefore causing the axis of rotation of the movement to be farther away from the load itself.  This all translates into increased shearing forces at the joints of the lumbar spine, putting all the structures, including intervertebral discs and ligaments at increased risk of injury with faulty mechanics of movement.”

The trap bar deadlift results in a better torso position for most people and less shear load in the spine. For anyone with a history of low back pain this is a no-brainer.

Use an incline bench rather than a flat bench when programming pressing movements. It’s just an easier scenario for most people and less “wonky” of a position to get in and out of.

Too, program more standing exercise variations – standing 1-arm cable rows, pull-throughs, landmine presses, Sparta kicks to the chest.

CategoriesAssessment Corrective Exercise

The Power of Test, Re-Test: How to Supercharge and Add Value to Your Assessment

During the Complete Hip & Shoulder Workshop in Seattle last weekend I spoke on the importance of the test/re-test concept with regards to assessment.

It’s nothing fancy or elaborate.

You test something – whether it be range of motion or maybe a strength discrepancy – implement a “corrective” modality if something’s deemed out of whack, and then re-rest that shit to see if it worked.

If it did….you’re Gandalf.4

If not…#awwwwwkward.

The test/re-test approach helps set the tone for any future “corrective” strategies or programming considerations you’ll do as a coach or trainer.

In addition, and something I’d argue is equally as important, it also provides an added layer of value to the assessment.

If you’re able to demonstrate to someone a significant change or improvement in ROM or reduction in pain/discomfort by implementing a drill or two, and it’s something they’ve been struggling with despite countless interactions with other fitness professionals, what’s the likelihood they’ll bust out their checkbook or Bitcoin wallets (<—depending on their level of geekery)?

I suspect highly likely.

It demonstrates a perceived level of “mastery” and knowledge-base towards the assesser (you) and, in a roundabout, reverse psychology kind-of-way, delves into the “pain center” of the assessee (athlete/client).

In this example it can refer to literal pain such as a banged up shoulder, knee, or lower back. But it can also speak to pain in the figurative sense too. Someone who’s frustrated and “had it up to here!” that they can’t lose weight, or maybe an athlete who was cut from their high-school team would have a degree of “pain” that would incentivize them to take action.

Show someone success or a clear path of action, however little, and they’re putty in your hands.

Of course this assumes you’re not some shady shyster who tries to up-sell the benefits of some super-secret concurrent, 47-week, Easter-Bloc training program you copied from Muscle & Fitness or, I don’t know, organic raspberry ketones laced with mermaid placenta.

People who promote and use smoke-and-mirror tactics are the worst.

But lets get back to the topic at hand.

Test/Re-Test

One of the main screens I use with my athletes and clients is their ability to lift or elevate their arms above their heads.

Shoulder flexion is important for everyone, not just overhead athletes and CrossFitters.

If someone lacks shoulder flexion, and they’re an athlete, it’s going to affect their performance. A baseball pitcher may be “stuck” in gross shoulder depression, which in turn will have ramifications on scapular positioning and kinematics, which in turn will result in faulty mechanics and compensatory issues up and down the kinetic chain.

Conversely, regular ol’ Hank from accounting, who likes to hit the gym hard after work, if he lacks shoulder flexion, he too could have numerous issues arise ranging from shoulder and elbow pain to lower back shenanigans.

Shoulder flexion – and the ability to do it – is a big deal in my opinion. And it’s a screen that should be a high-priority in any fitness professionals assessment protocol.

So lets say I’m working with someone who lacks shoulder flexion. I test it both actively (standing, picture above) and passively (on a training table).

I surmise that it’s limited and that it may be feeding into why a particular person’s shoulder has been bothering him or her.

I can use the test/re-test approach to see if I can nudge an improvement.

Now, as I’ve learned from many people much smarter than myself – Mike Reinold, Sue Falsone, Dr. Evan Osar, Dr. Stuart McGill, Papa Smurf, etc – you shouldn’t rely on any ONE screen/corrective.

Everyone is different, and what works for one person might not even scratch the surface for another.

With regards to addressing (lack of) shoulder flexion5, there are a handful of “go to” strategies I like to use.

And then it’s just a matter of seeing which one sticks.

1) Encouraging a Better Position

In order to elevate the humerus (arm) above your head, the scapulae (shoulder blade) needs to do three things:

  • Upwardly rotate
  • Posteriorly tilt
  • Protract

The ability to do so is vastly correlated with the thorax. Those who are super kyphotic (ultra rounded upper back) will have a hard time elevating their arms overhead. Often, the simple “fix” here is to foam roll the upper back and work on more t-spine extension and you’ll almost always see an improvement.

Bench T-Spine Extension


Side Lying Windmill


But what about the opposite? Those who are stuck in more “gross” extension and downward rotation?

I.e., the bulk of athletes and meatheads.

Here the shoulder blades can be seemingly “glued” down.

In that case some positional breathing drills to “un-glue” the shoulder blades (and to encourage more 3D or 360 degree expansion of the ribcage/thorax) would be highly advantageous.

All 4s Belly-Breathing


It’s amazing what a few minutes of this drill can do with improving shoulder flexion ROM, without having to yank or pull or “smash” anything.

2) Allow the Shoulder Blades to Move

Some people simply don’t know how to allow their shoulder blades to move. A prime example is this past weekend.

An attendee who’s a personal trainer – but also competes in figure – mentioned how her shoulders (especially her left) had been bothering her for eons, and she couldn’t figure out why.

We had her perform this drill.

1-Arm Quadruped Protraction


In reality, both protraction and retraction are occurring, but many people have a hard time with the former.

The idea here is to learn to gain movement from the shoulder blade itself and not via the t-spine.

Here’s another angle (because, triceps):

https://www.youtube.com/watch?v=eyNFNxqFlSc


After a few “passes” with this drill, she saw an immediate improvement in her ROM. What’s more, the following day when she showed up for Day #2, the first thing out of her mouth was “my shoulder feels amazing today.”

That’s a win.

3) Pin and Go

Another route to take is to have the person foam roll their lats. Not many people do this, and there’s a reason why: It’s un-pleasant.

I’ll have the person spend a good 30 seconds or so on each side and then have them stand up and perform a simple SMR drill using a lacrosse ball against a wall.

They’ll “pin” the teres minor down (basically, find the tender spot behind their shoulder and hold it there) and then work into upward rotation.

https://www.youtube.com/watch?v=9OiGt_O1FvY


Another five or so passes here, and I’ll re-test.

Many times I’ll see a marked improvement in their shoulder flexion.

Caveat

NONE of this is to insinuate that anything mentioned above will work for everyone. The idea is to understand that it’s important to “test” a number of modalities and then re-test to see if you find an improvement.

If you do, you’re likely barking up the right tree which will make your corrective approach and subsequent strength training more successful.

If you don’t, well, my bad…..;o)

Categoriescoaching Corrective Exercise

6 Unconventionally Simple Exercises

Note From TG: Today’s guest post comes courtesy of Long Island based personal trainer and coach, Chris Cooper. I had the pleasure of meeting Chris in person a few weeks ago in NYC during the Motivate & Movement LAB hosted by Mark Fisher Fitness.

We discussed training, programming, and, of course, unicorns.6

Enjoy. I think you’ll like this one a lot.

6 Unconventionally Simple Exercises

Simple equals easy, right?

Wrong.

Simple almost rarely means easy. When it comes to exercises, simple just means there is a lot less that can go wrong. Which in most cases leads to a surprisingly difficult yet effective exercise.

One look at the exercises below without experiencing them may lead you to believe they are easy. Test them out for yourself – with proper form and focus – and you will change you opinion instantly.

Last year, while presenting at a personal training conference, I discussed with the attendees the subject of simple exercise selection for their clients. The Pallof press was given as an example as the exercise that appears “simple” however not necessarily easy.

I further explained how countless clients have given me odd looks as I demonstrated and explained it, thinking there is no way it has any effect on their bodies.

Low and behold, they end up shocked by it, exasperated, and boasting about how much they felt it.

Fortunately, there were trainers present who had not been familiar with the Pallof press and thus proved my point, exercises that are “simple” may not be easy to perform. Especially, with the ever changing variations that the Pallof press holds.

Notorious BIG

My programming and exercise selection are notorious for having such exercises…the ones that look clearly simple or as though the client has to do absolutely nothing to complete the task.

That is until the client performs the exercise for themselves.

After finishing the exercise correctly, they are then amazed by the intensity and express that it was the hardest thing they have ever done. Such as the Pallof Press above. Those are incredible moments because you have just taught the client something important about their training:

Not all exercises have to be elaborate or complex.

Simple can get the job done.

Circus Tricks Gone Wild

Many of the exercises that you see being performed in the gym or in workout videos are so complicated and involve many moving parts that it’s hard to know what to concentrate on, let alone the benefit.

Take a look at any ‘Gym fail’ type video, you see people attempting to squat and deadlift on Swiss balls.

It looks as though they were taping a submission for the circus.

Now stop and think, Why?

What training effect are you going to achieve from that? How long did it take to setup that exercise and how many sets did he do that for?

That time and energy could have been used more efficiently and safer by taking a simpler approach to their training, even if it didn’t look as impressive for the internet.

Remember: Simple.

Simple is usually more effective and potentially jaw dropping. A deadlift isn’t complex. It’s simple.

Pick the bar off the floor.

Sure there are subtle nuances to a deadlift that will increase your lift and make it efficient. It boils down to the simple act of picking a bar off the ground.

Listen to Yoda

“Control, control, you must learn control” – Yoda

Maintaining core control in simple movements will carry over into core control in other exercises.

Here are some simple exercises to use in your programming that will leave your clients scratching their heads, wondering what just happened:

1) Elevated Quadruped Hip Extension


  • Take the quadruped position, elevate one of the knees off the ground as though you’re going to crawl with the other on a yoga block.
  • Then throw in a hip extension drill on the non-supported leg.
  • Now you have a great core exercise that forces you to control any side to side hip shift.
  • Want an even bigger test? Put a ball on your back and don’t let the ball fall.

2) Yoga Block Hip Extension


  • Lay prone with the knees bent at 90°, place a yoga block between your feet.
  • Squeeze the block with your feet, then lift towards the ceiling. You should feel your glutes all the way.
  • This is almost like a reverse hyper extension, with limited range of motion.

3) Ring Hold & Tap


  • A great drill that teaches how to keep the upper back tight, which will carry over into multiple exercises, like the deadlift, pullups, or front/back levers.
  • The key to this exercise, besides keeping tension through the lats and upper back, is to actively maintain core stability.
  • When you release your hand from the ring unilaterally, there will be a shift in your weight, core and glute tension will prevent this.

4) Single Leg Foam Roller Bridges


  • Similar to a single leg glute bridge, which is another simple option, the glutes need activation for many people.
  • With one leg bent at 90° and the other extended with the calf on the roller, brace your core and press into the roller to elevate the hips off the ground.
  • Concentrate on the glute firing, and keep the hips from shifting.

5) Rolling Bug


Credit for this one goes to Perry Nickelston. How often are you rolling on the ground? Or better yet, when was the last time you rolled around on the ground? A long time? I thought so. Give these ago, they are harder than they look. Once again, focus on control throughout the exercise.

6) Torsional Buttressing


This a is (Dr. Stuart) McGill exercise through and through.

It is the epitome of simple, yet such a struggle.

The key, much like the other exercises in this list is maintaining core control and not letting the hips shift.

Notice a trend?

Keep the hips from shifting as most of these are unilateral exercises.

Remember, don’t judge a book by its cover. When it comes to simple exercises, looks can truly be deceiving. Just give any of theses a try and you’ll learn firsthand. Complicated exercises leave room for complications. Keeping things effective and simple.

About the Author

Chris Cooper, NSCA-CPT, LMT is a personal trainer with over 9 years of experience in the fitness profession. He is co-owner of Active Movement & Performance, a training facility on Long Island. In addition to being a trainer, he is also a New York State Licensed Massage Therapist, which has allowed him to blend the two worlds to not only get his clients stronger and in better shape, but to also fix dysfunctions to make them better movers overall. His firm belief in education is manifested as an educator for Fitness Education Institute, presenting at their yearly convention, as well as participating as an expert contributor for watchfit.com.

Website — www.amp-training.com
Facebook — AMP Training
Instagram — @amptraining
Twitter — @chriscoopercpt


CategoriesAssessment coaching Corrective Exercise Exercise Technique

Everyone NEEDS to Deadlift

Note from TG: If there was ever a blog title conceived specifically for this website, this is the one. Jason Bourne, an F-16 fighter jet, and a lumberjack punching a grizzly bear in the face while eating a bag of beef jerky could have steel cage match and it wouldn’t be as manly as this title.

My good friend (and Boston(ish)-based physical therapist) Andrew Millett wrote this fantastic guest post today. 

Fair warning: parts are a bit “heavy” with technical terms and verbiage, but there are still plenty of insights and suggestions (and videos!) that are applicable to everyone reading, because……

Everyone NEEDS to Deadlift

There are a few absolutes in this world.  Some of those absolutes are:

Gravity
The Earth is round
Humans need oxygen to survive.
The Human Body needs food and water to survive.

And I’m sure I am forgetting some others.7

Another absolute I could add to that list is that…Everyone NEEDS to Deadlift!

Now, that I’ve got your attention, finish reading this article before you decide to send your hate e-mail or hate mail if you are still living in the dark ages.

Let me clarify my point: Everyone needs to do some form of hip hinging in order to maintain good back and lower extremity health.

The movement of hip hinging is a vital component of everyday life.

Whether you want to lift up your kids without blowing out your back or you are trying to deadlift your car for reps, being able to hip hinge properly is an integral component to reducing injury risk as well as attaining a high level of performance.

What is “Hip Hinging?”

Hip Hinging is the ability of a person to maintain a neutral aligned spine while predominately loading the hips and having the primary movement come from the hips in an anterior to posterior direction.

For the visual learners, this is what it looks like:


As you can see from the video, we ideally want a neutral spine position and the majority of the movement comes from the hips moving in an anterior to posterior direction.  The knees remain in a soft knee position.  This means that the knees are not in a terminally extended (straight) position nor are they overly flexed (bent).

What movements use hip hinging?

The hip hinging move is used for a multitude of movements.  It can be used in the:

  • Deadlift
  • Good Mornings
  • Variations of the Glute Ham Raise
  • Certain Athletic Endeavors

For activities throughout your day, it could include:

  • Properly picking up your kids.
  • Lifting a heavy box from the floor to a different location.
  • Picking a pencil up off the floor.

The list is endless.  Being able to properly move through this movement pattern, whether it be for performance or daily life, is a NECESSITY!

How do I know if I can hip hinge?

Well, check out this video below for a quick and easy test to tell if you are hip hinging properly:

Place a broom, golf club, dowel, etc. on your back as shown in the video.  Place one hand on the top portion at your head and the other hand at your sacrum (tail bone).  Make sure to keep the three contact points between your head, thoracic spine (mid back), and sacrum.

Next, while maintaining “soft knees”, attempt to push your butt back like you are trying to tap the wall with it.

As you are doing this, you are going to need to counteract falling backwards by leaning your upper body/trunk anteriorly (forward).  Time and time again, I will see people attempt to do this movement with just pushing their hips backwards and then in turn, fall backwards or lose their balance.

Your hips should always be more superior than your knees.  If your hips are in line with your knees in the transverse plane, then you are squatting, not hip hinging.I can equate it going to an upscale club or lounge.

You walk up to the club and there is a line.  It is up to the “bouncer” aka the strength coach/physical therapist in this example, to let you past the velvet rope and into Club Hip Hinging.

Once your in the club, there is a VIP section.

In this example, that VIP section is the Deadlifting VIP.  If you aren’t on “the list,” then you aren’t making it into the “VIP” section.

For the physical therapists, strength and conditioning coaches, performance coaches, etc. who want to know if someone can perform hip hinging and/or deadlift variations, then screen your clients and patients.

Screening/Assessment

***Disclaimer*** If you are NOT a physical therapist, you need ask your client if you may put your hands on them to screen them.  Also, if someone has pain with any of these screens/assessments, structure your programming appropriately and refer out to a PT, sports chiropractor, etc.

Tell them you want to screen them so you can adjust their programming so it is customized for them.

99.9% of people won’t have a problem with this, but you need to look out for yourself and make sure your clients are fine with this.

First piece of information I would like to know is, what does their hip flexion motion look like.

Place your client on the ground and passively/gently move their hip through their available range of motion (ROM).

Then, we want to check and see if they have the passive straight leg raise (PSLR) mobility.  Gently raise their leg until you feel some resistance.

Per the Selective Functional Movement Assessment (SFMA), we would like to see 80 degrees of the PSLR.  If the client doesn’t have 80 degrees, all is not lost.  We have to modify their training regimen.  We will get to that later in this post.

Next, if the client has 80 degrees of PSLR, we want to see if they can stabilize in that ROM.  Ask them to actively raise their leg, keeping the knee straight up in the air without letting the opposite leg come up off the ground/table.  We like to see 70 degrees of active straight leg raise (ASLR).

If they have 70 degrees of ASLR, then we can progress further in our assessment/screening.  If they do NOT have 70 degrees, have the client place their hands on the ground.  Then press into the ground with their hands and try again.

If their ASLR improves, then they have either a:

  • Core Stability Issue
  • Anterior Pelvic Tilt

What the pressing down into the ground/table does is activates the anterior core musculature and in turn, places the trunk in a more neutral position.

Since the hamstrings attach on the pelvis, if the pelvis is in an anterior pelvic tilt, this can cause the SLR to appear limited because it is starting in a stretched position.

If pressing down into the ground/table does NOT improve anything, then try these ASLR correctives:

Active-Straight Leg Correctives (via FunctionalMovement.com)

1) Active-Straight Leg Lowering to Bolster

2) Assisted Single Leg Lowering to Bolster

If there is an improvement in the ASLR, now, have the client stand up and tell them to bend over and touch their toes.

If the client can bend over and touch their toes with ease and without trying to blow a gasket or bouncing up and down, then this is another assessment check point that can tell us that they may potentially be able to deadlift/hip hinge.

The toe touch test comes from the SFMA.

What does the toe touch tells us?

We want to see if the client has the ability to posteriorly shift their hips when performing the toe touch.  This tells us that the client can get into their posterior chain to load their hips.  When watching someone perform the toe touch, find their greater trochanter (hip bone on the side of their hip region) and watch to see if that area moves backwards during the toe touch

In the first video below, you can see the person can shift their hips backwards.


In this next video, if the person doesn’t perform an adequate posterior weight shift, then they wont be able to touch their toes.


If your patient or client doesn’t have the ability to touch their toes, then try these correctives as recommended by FunctionalMovement.com.

This series of correctives is called the Toe Touch Progression.

First, place a 1/2 foam roller or a 10 lb plate underneath your client or patient’s toes as shown in the picture below.

Then, while maintaining the feet on the plates and the knees straight, instruct the person to bend over and gently try to touch their toes.

Perform 10 repetitions then switch to the heels elevated as shown below and perform 10 more repetitions.

You can also place a foam roller or a small ball between the person’s knees and instruct then to squeeze it during the toe touch.  When you instruct the person to squeeze the ball, it up-regulates inner core musculature and places the core/trunk in a better position to perform the toe touch.

Next, have the client perform the toe touch again.  If they can know touch their toes or it has improved as compared to before, then we know that this simple corrective has taught their brain/body to learn how to perform a posterior weight shift needed to perform hip hinging and/or deadlifting.

Now, their toe touch may have improved, but in a few hours or when they wake up tomorrow morning, it may be back to the way it was before the toe touch progression corrective.

With the body and the brain when we see a quick improvement such as this one with the toe touch, we are tapping into the Central Nervous System (CNS) and the brain.

It is “teaching” the brain/CNS a new way to move.

As Erson Religioso has mentioned on his website, Modern Manual Therapy, the brain/CNS is easily tricked, but it is difficult to convince.  What that means is that with the toe touch, we have opened a window to the CNS that has allowed for a chance or an improvement to the system, we want to do whatever we can to “keep that window open” through various correctives and behavior modification in our daily lives.

If the client’s toe touch hasn’t improved, then there may be something else from a mobility, stability, or motor control standpoint that a licensed healthcare practitioner may need to dig a little deeper to discover why the toe touch hasn’t improved.  Refer them to someone in your network, but we will go into more detail now on other ways to train this client even though their toe touch isn’t sufficient enough to deadlift from the floor.

Well, there are many options that you can provide your client to receive a great training effect.  The next few examples all work to help load the posterior chain musculature as well as helping to improve core/trunk stability.

Most of these exercises should be felt in the gluteal and hamstring musculature.

Cable Pull-Throughs


Key Points:
  • Sit back into hips.
  • Maintain a neutral spine; no rounding or extending of the lumbar spine/TL junction.
  • Make sure to extend through the hips at the end of the movement, NOT through lumbar hyper-extension.

Hip Thruster/Single Leg Hip Thruster


Key Points:
  • Start with upper back resting against a bench and hips/knees flexed.
  • Maintain a “neutral spine” or “ribs down” position.
  • Extend your hips upwards and squeeze butt at the top.
  • Finish with your knees, hips, shoulders, and ears in a straight line.

Barbell Supine Bridge


Key Points:
  • Place an airex pad or exercise mat over hips/under bar to provide some padding.
  • Maintain a neutral spine, “ribs down” position and drive hips to the sky.
  • Make sure not to try and lift too high by extending through the lumbar spine.

Elevated Kettlebell Deadlift


Key Points:
  • Stand directly over the kettlebell (KB).
  • Push your hips back like you are trying to touch your butt to the wall behind you.
  • Maintain a neutral spine position.
  • Grasp the KB, drive your heels through the floor, and lift up through your hips/legs.
  • Squeeze butt at the top.  Make sure to extend your hips and not your low back.  Imaginary line should be between your ears, shoulders. hips, knees, and ankles.

Once the client or patient demonstrates proper form with an elevated KB deadlift, eventually lower the elevation height to make the exercise more difficult and eventually perform off the floor as long as proper form is maintained.

Trap Bar Deadlift

https://www.youtube.com/watch?v=p-sA3PG1kGY


Key Points:
  • Step into the trap bar/hex bar.
  • Push hips back like you are trying to touch your butt to the wall behind you.
  • Grasp handles and maintain a ribs down, neutral spine.
  • Imagine their are oranges in your armpits.  Try to squeeze them.
  • Drive through the heels and extend your hips.  Shoulders, hips and knees should be in a line at the top of the movement.
  • If the client/patient can’t demonstrate proper form with the Trap Bar DL from the floor, then you can place blocks or some other implement underneath the weights to elevate it so they can demonstrate proper form.

Rack Pulls


Key Points:
  • Step up to bar.  Push hips backwards and grasp bar.
  • Same points as mentioned above.
  • Can use pronated grip (palms facing you) OR mixed grip (one palm facing you, one facing away from you).

Once someone can demonstrate proper form with these movements, then you can start by progressing towards the floor.

If someone’s goal is to deadlift from the floor and they can do it with proper form and pain-free, then we’re on our way to hitting that goal.

If someone’s goal is to be able to pick-up their kids or move and feel better, then the exercise variations mentioned above are great ways to help with that.

CategoriesCorrective Exercise Exercise Technique Exercises You Should Be Doing

Exercises You Should Be Doing: Modified Side Lying Hip Abduction with Leg Slide

When most people – at least within fitness circles – think of “glutes,” they envision bikini models/figure competitors up on stage or people with 400+ lb hip thrust with the ability to crack a walnut/crush a Volvo between their cheeks, in what’s known as the 21st century’s version of “coolest bar trick ever.”

And well, I can’t disagree with either of those examples.

I mean…..GLUTES!

A more poignant and mature fitness professional, however, will note that, the glutes – or gluteal complex (glute maximus, medius, and minimus) – are a major player in a multitude of strength & conditioning (in addition to general health & well-being) facets.

Having strong glutes allows athletes to lift more weight, jump higher, and run faster. While not always the case and a true indicator of athletic prowess, using the eyeball test and comparing athlete A (who has a big ass) and athlete B (who looks as if (s)he has a 2×4 stuck to their rear-end), I’m going to put my money on athlete A.

The glutes also serve a major role in helping to “bullet proof” the body. Athlete or not, many people complain of chronic lower back pain due to “glute amnesia.”

Get those bad-boys strong(er) and firing more efficiently, reduce the likelihood of faulty compensations, and good things tend to always happen.

Exhibit A: Kellie Davis, co-author of Strong Curves, rocking some solid hip thrusts.

Exhibit B: this sexy firefighter rescuing a helpless kitten from a tree.

That said, we can’t always “muscle” our way to strong, efficient glutes. Sometimes we need to implement lower-level, “corrective” type movements in order to appropriately “access” them.

Note to Self: lets tone it down on the quotations marks, mmm-kay.

Modified Side-Lying Hip Abduction With Leg Slide


Who Did I Steal it From?: Chicago based chiropractic physician and strength coach, Dr. Evan Osar.

What Does it Do?: The objective here is to not to say we’re strengthening the glute medius. We’re not, really.

Most people don’t have a weak glute medius. And frankly, doing an endless array of hip abduction or side lying clam variations isn’t going to be the answer. Sure, some people may need to regress things to include a healthy dose of motor control exercises, but at the end of the day, if you want to “strengthen” a muscle, you need to, you know, do traditional strength-building exercises.

That being said, the intent here is to help people access their glute medius as part of the gluteal complex, to increase the brain’s and nervous system’s awareness of that muscle, and to recruit it once we get people into the upright/standing position and lifting heavy things.

Key Coaching Cues: 

We get hip extension, abduction, and lengthening of the anterior hip complex.

  • Entire backside is flush against the wall.
  • Shoulders/hips are stacked on top of one another.
  • Elbow at 90 degrees, knees at 45 degrees. Also, it’s a good idea to place a yoga block or towel between knees to encourage a more neutral pelvic position.
  • Start by pushing the bottom knee gently into the floor.
  • Elevate top foot and then push your heel into the wall, engaging glute max.
  • Slowly straighten leg until fully extended, making sure to keep heel in contact with wall the entire time. Toes will point forward/come off wall when leg is straight.
  • Return back to starting position, and repeat 6-8 repetitions/side for 2-3 sets.
  • THAT’S what it feels like to turn your entire gluteal complex on.
  • Now go train.
Categoriescoaching Corrective Exercise Strength Training

5 Strategies for Healthy Shoulders

Unlike Dan John, I lack the ability to seemingly rattle off an array of quotable quotes with the frequency of a Donald Trump soundbite.

That said, every now and then luck strikes and I chime in with gem like this:

Lifting weights isn’t supposed to tickle.”

Muscles are going to get sore, and joints are going ache. And, in keeping things real, the risk of sharting yourself increases exponentially.

Sorry, it comes with the territory.

Being “sore and achy,” however, while nothing new to anyone who lifts weights on a regular basis, shouldn’t be a regular occurrence…or badge of honor.

Likewise, while the saying “pain is just weakness leaving the body” is a popular one amongst fitness enthusiasts (most often, CrossFit participants and marathoners8)…it’s really, really, really stupid.

Pain is not weakness leaving the body. It’s your body telling you to “quit the shit” and that what you’re doing has surpassed its ability to recover.

Of course, there are different levels of pain. I can have someone perform a set of 20-rep squats or Prowler drags – on their hands, blindfolded, uphill, for AMRAP – and there’s going to be a degree of “pain” involved.

But if pain is present – to the point where, you know, stuff fucking hurts – then that’s something entirely different and something that needs to be addressed…sans the machismo.

The shoulders are a problem area for many lifters and often take a beating. Below are some brief, overarching talking points on how to address shoulder pain/discomfort.

Note: it’s a broad topic, and one teeny tiny blog post won’t be the answer to everything. However, chances are, addressing one – if not several – of the talking point below may be exactly what’s needed to get the ball rolling in the right direction.

1) Stop Doing What Hurts

I had a client approach me recently about his shoulder. The conversation went something like this:

Client: “My shoulder hurts when I do this.”

[Proceeds to do this weird behind the head, shoulder dislocation thingamajiggy]

Me: “stop doing that.”

Client and Me: “LOL LOL LOL LOL LOL.”

Me: “seriously, stop doing that.”

It seems like an obvious thing to do, but if something hurts – whether it be the weird Cirque du Soleil contortionist move my client was doing, bench pressing, or whatever – stop doing it.

At least for now.

I know it’s a hard blow for a lot of guys to be told to stop bench pressing for any length of time, and in fairness, much of the time it’s a matter of addressing a handful of common technique flaws:

  • Better upper back stiffness (learning to pull shoulder blades together and down for improved stability).
  • Learning to engage the lats (to make a “shelf” and to “row” the bar down towards the chest).
  • Maybe tweaking wrist and elbow position (so one isn’t so flared out).
  • Addressing leg drive.

BAM – shoulder doesn’t hurt anymore.

All that said, it’s usually a better play to take out the incendiary movement altogether – maybe for a few days, or even weeks – and take the time to allow tissues to calm down and address any profound weaknesses and dysfunctions present.

2) Earn the Right to Overhead Press

The ability to raise one’s arms overhead – I.e., shoulder flexion – is something that’s not quite as easily accomplished in today’s society.

The left: what most people look like (forward head posture, excessive lumbar extension). The Right: dead sexy. Kinda.

We just don’t spend that much time there. Yet, walk into any commercial gym or CrossFit box and you’ll witness any number of trainees happily pushing, hoisting, and/or kipping overhead.

Often with deleterious ramifications.

Several factors come into fruition when discussing the ability to elevate the arms overhead9:

  • Shoulder: if one lacks abduction/upward rotation on any given side, you could see any number of compensations like lack of elbow flexion.
  • Scapulae: we need upward rotation, protraction, and posterior tilt to get overhead. Most people are lacking in one or all three.
  • T-Spine: does it extend? It should.
  • Lumbar Spine: does it extend? It sure as shit shouldn’t.

This is where assessment and individualized programming comes into play. Some people require a different “corrective” approach compared to others. However, if that’s not your wheelhouse, refer out!

But as a strength and conditioning professional you could still set people up for success by having them perform more “shoulder friendly” overhead pressing.

1-Arm Landmine Press


Serratus Upward Jab

3) Improve Upward Rotation

Many people are “stuck” in a downwardly rotated position – especially those who participate in an overhead sport (baseball for example) or are a lifetime meathead.

Due to lack of anterior core control, tight/stiff lats, soft tissue restrictions, poor programming balance, or a combination of several factors, many tend to live in a state of “gross” extension.

To that end: anything we can do to target the muscles that help upwardly rotate the scapulae – low/upper traps, serratus – would bode in our favor.

Band Wall Walks


1-Arm Prone Trap Raise


1-Arm Band Overhead Shrug


TRX Hinge Row

Moreover, a little TLC to foam rolling the lats would work wonders, as well as addressing anterior core control/strength with exercises like deadbugs.

Too, proper coaching/cueing by not allowing clients to crank though their TL junction or lumbar spine during movement would be stellar. Thanks, appreciate it.

4) Obligatory Commentary On How Breathing Will Cure Everything

I’m a believer in PRI (Postural Restoration Institute) principles and have used it to great success with clients in the past and present.

Helping to “reset” posture with focused breathing drills can be a game changer – especially for those living with shoulder pain.

First, lets address a common fallacy…beautifully articulated by NYC-based physical therapist, Connor Ryan:

Taking the conversation on “gross extension” a little further, we can attempt to apply Connor’s analogy with some focused breathing drills like this:


Doing so:

  • Helps stimulate parasympathetic activity (excessive extension = “impingement” of Posterior Mediastinum leading to constant sympathetic – flight or flight – activity).
  • Allows a window for the thorax/rib-cage to move, which, in turn, allows the scapulae to move.
  • I only perform 1-3 different drills here, lasting, maybe, 2-4 minutes. And then it’s time to go lift heavy shit.

5) Let Your Shoulder Blades Move

A common mistake I see many trainees make is “glueing” their shoulder blades in place during exercises like a 1-arm dumbbell row or even push-ups.

This is not wise.

Scapular retraction (adduction) is important, but so it allowing the shoulder blades to protract (abduct).

In short: the shoulder blades should have the ability to move around the rib cage.

If their always pinned in place, this will often manifest into glenohumeral issues – namely, anterior humeral translation and instability.

Translated into non-geek speak, your shoulder is basically saying:

Simple Shoulder Solution

Strength coach Max Shank just released a handy manual called the Simple Shoulder Solution.

Anyone familiar with Max’s work knows he’s a guy that likes to think outside the box and help get people more athletic.

Much of what I discussed above mirrors much of what Max covers in this manual (with more detail).

In order to best address the function of the shoulder you need to follow the order of operations and handle the surrounding structures first. These are:

1) Breathing and Core Activation
2) Thoracic and Neck Mobility
3) Scapular Mobility and Stability
4) Glenohumeral Mobility and Stability

The main idea here is that if you do not address 1-3 FIRST, you are likely to create more compensation, hypermobility and potential for injury at the Glenohumeral joint.

I can dig it.

Give it a look for yourself HERE.

CategoriesAssessment Corrective Exercise Exercise Technique

Common Mistakes With Shoulder Assessment

Assessment in the health and fitness setting can be tricky, and rife with numerous (common) mistakes some fitness professionals make.

This is especially true when we start talking shoulders.

Mistake #1: the shoulder isn’t just the shoulder. 

As in: it’s not just one “thing.” We’re actually referring to a shoulder “complex” that’s, well, complex.

The “shoulder” is comprised of four separate articulations (glenohumeral joint, sternoclavicular joint, acromioclavicular joint, as well as the scapulothoracic joint), all playing nicey-nice together in order to perform a wide array of movement(s).

All deserve their time under the assessment microscope.

Mistake #2: However, while all areas are important, I do find that assessing and addressing scapular function/positioning is often the key to unlocking answers. Unfortunately, it’s often the area that’s least looked at with regards to shoulder pain/dysfunction.

Mistake #3: shoulder assessment can – and should be – attacked from a few different perspectives.

Far too often, I find, fitness professionals take a static view of what’s going on and that’s it. They’ll have an individual stand there in the middle of a room, utter a few “mmm’s and ahhh’s,” write a few fancy schmancy words like “internally rotated,” “kyphotic,” or “I have my work cut out for me,” and that’s that.

Assessment complete.

Lets go squat!

When in fact, shoulder assessment should be broken down into a few disparate – but not altogether separate – components: Static Assessment, Integrative Assessment, and Dynamic Assessment.

Not to mention one’s ability to fill in a smedium t-shirt. Very important.

All three provide pertinent information that will help better ascertain the appropriate plan of attack when it comes to movement dysfunction, pain, and/or improved performance within the shoulder complex.

I Got 99 (Shoulder) Problems and….

…..My scapulae are the reason for all of them.

Sorry, I’m no Jay-Z. And I know I just butchered one of his classic hits.

But it was the only way I could think of to best articulate my point.

The scapulae (shoulder blades) are kind of a big deal when we begin to discuss shoulder health. It’s an arbitrary number I’m throwing out there with no research to back it up – so please, don’t quote me10  – but 90-95% of the “shoulder” issues I’ve helped address in the past when I was a coach at Cressey Sports Performance as well as the present (now that I am on my own), can be correlated back to scapular positioning and function.

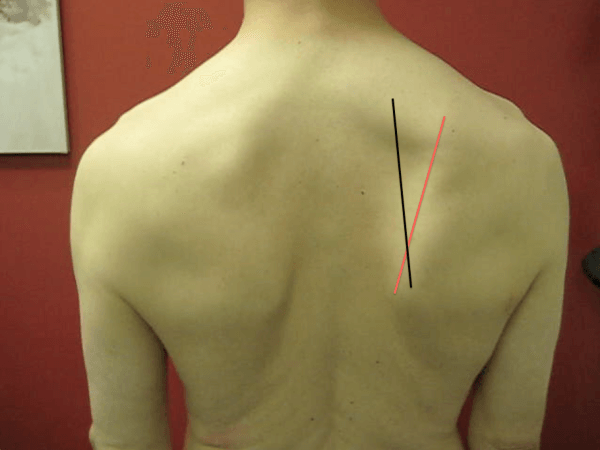
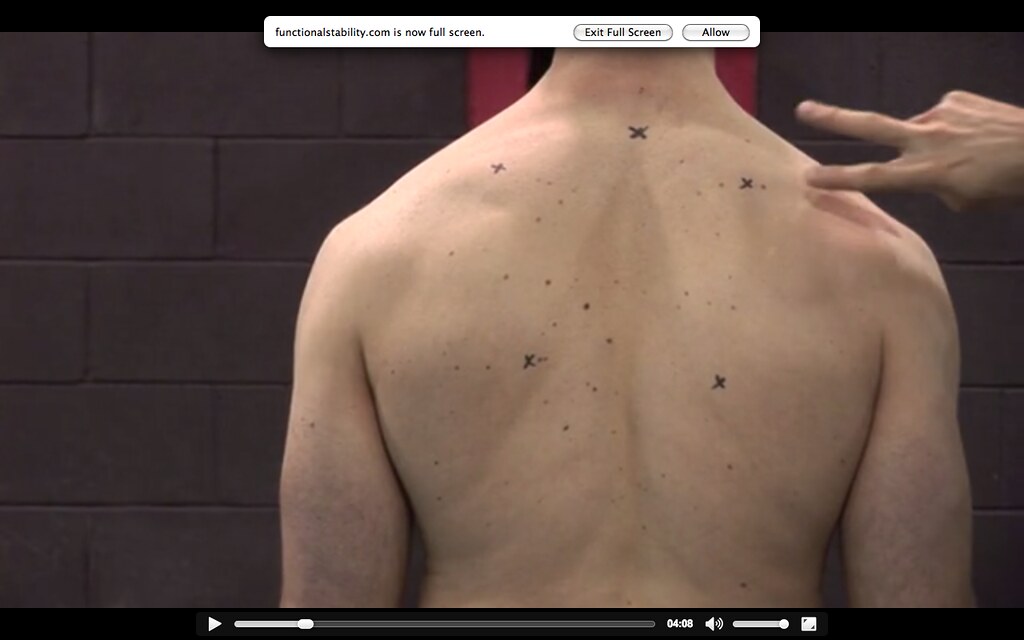
Static Assessment

  • The scapulae should be in slight upward rotation. As you can see in the picture above, this individual is in slight downward rotation statically (both inferior medial borders (the two bottom x’s) of the scapulae are inside the superior medial borders.
  • Both scapulae should rest between T2-T7. The top middle “x” is T2 and you can see this person is below that point and in slight shoulder depression.
  • The medial borders themselves should rest between 1-3 inches from the spine.

If we only used static assessment it would be easy to assume this person is f****d. Many fitness pros would see this, hyperventilate into a brown paper bag, and immediately go into corrective mode.

But as Mike Reinold has poignantly noted time and time again:

“Statically, everyone’s shoulder blades start in a different position (elevated vs. depressed, internally rotated vs. externally rotated, abducted vs. adducted, anteriorly titled vs. posteriorly tilted, Autobots vs. Decepticons), and it’s moot to take static posture at face value.”

Besides, the above picture is of me, and when this was filmed/taken I presented with zero shoulder pain. This isn’t to imply I don’t have anything to work on, but it does showcase that static posture alone isn’t going to tell you all you need to know.

Integrative Assessment

Once we start adding movement – looking at scapulohumeral rhythm (the interplay between humerus and shoulder blade) or one’s ability to elevate arms above their head – sometimes, people self-correct really well.

What presents as “bad, “faulty,” or “shitty (<— depending on your rating system) statically, may very well be passable or very good once you add movement.

When looking at shoulder elevation/flexion, for example, does the scapula posteriorly tilt, upwardly rotate sufficiently (generally looking at 55-60 degrees of upward rotation), and does the inferior angle wrap around the thorax to the midline of the body?

This is something that can’t be determined if you’re only looking at static posture.

Dynamic Assessment

This is basically the part of the assessment where I ask the person to do stuff. Rather than boring someone to tears poking and prodding for an hour and making him or her feel like a patient, I prefer to get them moving and have them demonstrate certain exercises.

The push-up tells me a lot. Not only does it give me insight on their ability to move their scapulae (many times they’re “stuck” in adduction), but it also provides details on their lumbo-pelvic-hip control.

Because, something like this makes my corneas want to jump into a pool of acid:


Note: I understand the point of the video above was to purposely showcase a bad push-up. Mission accomplished.

More importantly, if someone comes to me with pain present, having them demonstrate how they perform certain exercises provides unparalleled understanding of what needs to be fixed.

A common theme I see amongst many trainees is allowing their shoulders to roll forward during execution of given exercises.

A Brief Review: when we elevate our arms above our heads the shoulder blades posteriorly tilt (hug the rib cage) and upwardly rotate. Reversing the action calls for scapular anterior tilt and downward rotation.

Many people “feed” into excessive downward rotation/anterior tilt by allowing the shoulders roll forward during common exercises like rows, push-ups, curls, and tricep press downs.

Stop It

https://www.youtube.com/watch?v=A9ytqrIf-dc


I Said, Stop It!

https://www.youtube.com/watch?v=47xXBhD7SuI


The “fix” here is easy:

Me to Client: “Okay, show me how you’d perform a standing cable row and tricep press down.”

Client: “Um, okay.”

[Then proceeds to emulate technique from the videos above.]

“Yeah, that hurts.”

Me to Client: “Stop doing them that way.”

[Puts client in a better position…shoulders rolled back with posterior tilt.]

Client to Me: “Wow, that feels so much better. You’re so smart and attractive.”

That’s Not All

What’s described above is in no way an exhaustive approach to shoulder assessment, but I hope it at least opened your eyes to the notion that it’s more multi-faceted than many give it credit for.

And on that note, I’d be remiss not to point people in the direction of guys like Eric Cressey, Mike Reinold, and Dr. Evan Osar.

Functional Stability Training – Upper Body is an excellent resource for more insight on shoulder assessment and corrective exercise.

Likewise, Dr. Osar’s Integrative Corrective Exercise Approach is an excellent resource.

And, pimping myself up a little bit, I cover the above and many other shoulder related topics in mine and Dean Somerset’s Complete Hip & Shoulder Workshop coming to the Toronto area in a few weeks (1 week left to take advantage of the Early Bird Special), Seattle, and two stops in Europe in May.

Go HERE for dates and to register.

CategoriesCorrective Exercise mobility Strength Training

Strength Starts Here: Breath, Control, Express Badassery

I always enjoy when I have the opportunity to introduce my readers to someone new; coach’s who are “in the trenches,” doing great things, and are well articulate in conveying their message.

Ladies and gentlemen I give you Chris Abbott. He’s a coach and gym owner based in Chicago. As it happened, he sent me a t-shirt out of the blue as a “thank you” for what I do on this blog. It was a class move and nice gesture to say the least.

Not long after Chris expressed some interest in writing a guest post, and well, it took me all of three seconds to say yes.  I hope you enjoy it as much as I did.

Strength Starts Here

Life is better when you’re strong, and that’s a fact.

Over the years as a trainer I’ve worked with average Joes, stay at home moms, significant weight loss clients, professional athletes, and a wide variety of broken and damaged people ranging from hip replacements and torn labrums to herniated/broken discs and torn knee ligaments – to name a few. Every one of these clients had one thing in common; they all reached their goals by becoming stronger.

Perhaps I’m stating the obvious, but based off of the people I see and work with daily I feel people may know they need to get stronger, may know they need to get in better shape, but they really have no idea how to actually get stronger, hence strength starts here.

Commonalities in Strength

There are certain aspects of strength that are required for success – this goes for sport, individual hobbies, and most importantly quality human movement.

My approach to those aspects can be viewed in the following way; you have attachment sites – your arms at your armpits and your legs at your hips. All movement will come from these attachment sites.

In addition you have your thoracic spine (T-spine).

Your neck, shoulders, and t-spine are all tied together; therefore healthy movement of the neck, head, and shoulders (really the entire upper body) requires healthy t-spine functioning. One could go on to describe how the upper body and more importantly a lack of alternating, reciprocating movement affects your lower body (hips and knees), but that goes beyond this post.

Furthermore, my approach can be summarized by this relationship:

  • Positional breathing leads to increased control
  • Increased control leads to increased strength development
  • Being stronger allows you to do whatever you’d like in life

Let’s break this down a bit further and see how you can own all to generate massive strength gains – and really enjoy life more!

Position and PRI

Are your shoulders really tight or are your scapula maybe just in a poor position which is limiting your range of motion?

This is usually the first time someone looks at me with a sideways head tilt expression of “huh?”

When searching for strength your key to performance will reside within your ability to take a breath properly.

All my sessions start with a common goal; restore proper breathing mechanics and allow your diaphragm to work as a primary breathing muscle rather than a postural stabilizing muscle. This does a few things:

  • Triggers parasympathetic activity in the body which results in the body “letting go” or relaxing more
  • “Letting go” will lead to increased range of motion at the attachment sites and T-spine
  • You’ll feel “lighter” – which never hurts anyone
  • You’ll be more focused – which is awesome just about any time
  • And most importantly, you’ll be in a better position to get stronger

The approach and exercises I use to correct someone’s breathing mechanics (and ultimately help restore control) stem from an organization called the Postural Restoration Institute, PRI for short. The Institute’s director, Ron Hrsuka, has devoted his life to PRI. It’s a powerful concept and one that immediately grabbed my attention after I first took one of their home study course a few years ago.

In a nutshell, PRI’s take on the relationship of posture, movement, and performance begins with asymmetries and the fact that everyone, whether you’re “righty” or “lefty”, has the same features internally – one heart, one liver, etc.

These asymmetries predispose us to shift our center of gravity and throw off our position; which in turn affects our posture, limits our movement abilities, and decreases performance. As a result, areas such as your shoulders, t-spine, and hips (sound familiar?) are placed under distress – compensation patterns develop and your ability to get strong has been diminished.

Positional breathing can be viewed as achieving the following:

  • Re-training your diaphragm from being used as a stabilizing muscle to a primary breathing muscle – this allows your body to “let go”
  • “Untwist” your body, positioning it in more of neutral state thus giving you more joint centration and ultimately greater potential for building strength

Positional breathing will open doors that lead to increased control. Remember, increased control leads to greater strength development so taking 5-7 minutes on positional breathing can and will make a difference during your set of heavy deadlifts. Here are a couple of my favorite positional breathing exercises:

90/90 Hip Lift


All Four Belly Breathing


Control is King

Flexibility seems to be the rabbit everyone wants to chase when something goes wrong.

However, as we just discovered, a lot of your flexibility concerns might in fact stem from your inability to breathe properly and your poor position. It’s not uncommon to see a significant increase in range of motion in your attachment sites after performing some positional breathing exercises.

Now that you’re in a better position, you can more easily gain control!

I view flexibility as your ability to passively pass through a specific range of motion – no ownership here, just swinging by to say hi to grandma.

Mobility on the other hand is your ability to control a specific range of motion – you’re laying the foundation and moving in!

Mobility = Control. Control = Strength.

Therefore Strength = Mobility.

In order to be strong you need to have control – you need to have the mobility needed to perform your sport, hobby, or live as a healthy functioning human being. Perhaps another head tilt “huh?”

Your sport/activity will determine how much control is needed at said attachment site(s) in order for you to perform at a high level.

A gymnast for example needs far more control than a basketball player.

You can name plenty of other comparisons that support this notion. However here’s my argument; wouldn’t you rather be able to control a much larger range than you need so as to not only become freakishly strong, but also increase your longevity by decreasing your risk of injury?

I’m not suggesting a football player be able to move like Neo in the matrix – it’s not needed, in fact for some athletes having too much range of motion is detrimental to performance.

But in the game of life – that’s a much different story and can in fact tell you from personal experience and client experience, yes you do want the increased control!

I’m falling more and more in love with Dr. Andreo Spina’s FRC system and its ability to give you loads of control. More importantly it’s blending very nicely with the positional breathing exercises I have my clients perform.

Dr. Andreo Spina is a world-renowned musculoskeletal expert. His system stands for Functional Range Conditioning. Its focus is on three main goals; mobility development, joint strength, and body control (fits pretty nicely with what we’re talking about).

The end result is people doing some crazy sh** that would likely land most people in the hospital.

A photo posted by Hunter Cook (@hunterfitness) on

I’ve been fortunate enough to learn from colleagues who are FRC certified. I myself cannot wait to join them!

Through various series of controlled articular rotations (think searching through your end range in various joint motions) one can find where he/she is limited. Once limitation is found, applying progressive and regressive isometric loading (PAILs and RAILs as he calls them) can be used to increase your usable range of motion – more control = more room for strength.

From there you can play with lift offs and other fun movements but the overall takeaway is clear; you will gain loads of control which can lead to loads of strength!

One of my favorite non-FRC exercises for control is the Arm Bar as it allows the athlete to simultaneously gain shoulder and t-spine control

Life is better when you’re STRONG

This is the fun part. In my mind the end of my little equation is whatever you want.

If you’re an athlete maybe it’s run faster, jump higher, or get stronger.

Or, maybe it’s longevity – for athletes this can mean millions and millions more in income. For people who are injured or de-conditioned it could mean a fresh start or at least a new perspective on life.

The key I’ve realized is this; no matter what sport you play or what hobby you enjoy, everyone needs to be strong and there IS a relatively easy way to get there. It all starts with a breath followed by owning your body – gaining control.

Once you have control you are in fact in control – do what you want!

Until then, keep practicing.

I myself am a simple man. I’ve become attached to swings and getups everyday for my workout. My workout is short, effective, and to the point. My newest warm-up routine has 1 rule – I can’t use anything other than my bodyweight. This has not only placed me in a great position to start my swings, but also led to some fun movement sessions prior to my “workout”.

To summarize; strength starts with a breath, is enhanced with control, and transforms into greater strength – which leads to all around awesomeness in life.

Be STRONG!

About the Author

Chris Abbott has been a personal trainer for the past 7 years. He and his wife recently moved to Chicago where Chris Abbott Piche started Evolution Strength and Performance – a company dedicated to getting people strong through postural restoration, body weight training, and kettlebell training. He develops programs used for weight loss, total body strength, and overall health and wellness. Additionally, he works with clients who have suffered from back, knee, hip, and shoulder pain.

Along with neighborhood clients, he has worked with a variety of professional athletes including NFL, NHL, MLB, MMA, Pro Lacrosse, and European Basketball.

“I want people to realize there is more to life than the gym, and that life is better when you’re strong. It unlocks opportunities to enjoy life more, become a faster, more powerful athlete, or return to hobbies you’ve been unable to do for years.”

You can learn more from Chris by joining his newsletter or visiting his website. Additionally he’s on instagram and facebook.


CategoriesAssessment Corrective Exercise Program Design

32 Random Thoughts On Training

A few days ago my good buddy, Mike Robertson, posted an article up on his blog titled 31 Random Training Thoughts. It was fantastic and you should take the time to read it. I liked the idea so figured I’d take some time today to toss my hat into the ring and showcase some of my own random thoughts as well. 32 of them. Because, you know bacon.

Starting with this amazing picture…

1. Agility ladders and foot speed drills work wonders on making people better at doing agility ladders and foot speed drills. They DO NOT (at least rarely) translate to better performance on the court/field/diamond/pitch. It’s crucial to actually coach athletes (young and old) to learn to develop force. These drills, along with anything involving cones (the more elaborate the geometric shape the better), which make parents oooh and ahhh, should not be prioritized. Especially for younger athletes.

2. And since we’re on the topic of developing force…it’s just as crucial to coach our athletes how to ABSORB force or decelerate their bodyweight. What good does it do anyone to have all this horsepower and not have the ability to put on the brakes?

3. Also, force development is vector specific. This is why we utilize ‘Heidens’ in many of our programs for baseball players, particularly pitchers:

https://www.youtube.com/watch?v=aOI1exR6pSk


4. The whole notion of “muscle confusion” is lame. Most people don’t need as much variety as they think. If you’re not squatting or deadlifting 2x your bodyweight (for reps) I doubt the limiting factor is your lack of use of chains or bands.

5. More than ever I am convinced that the reason many people miss a lift is due to a poor initial set-up.

6. To that point, the lats play a HUGE role in stability and upper back stiffness (which in turn equates to less energy leaks during a set). It’s difficult to be efficient at any of the “Big 3” without:

– Big lats.

– Learning how to better engage them.


7. Still having a hard time getting a “feel” for what it’s like to fire the lats during a deadlift? This drill may help:


8. One-arm dumbbell rows aren’t a great exercise to strengthen your scapular retractors. They are, however, the bomb when it comes to developing the lats. Just sayin….

9. Cuing someone to arch hard on a squat and to sit back is inefficient, especially for natural/un-geared lifters. Think: “belt buckle to chin” (posteriorly tilt pelvis), pull elbows together and forward (pull down on bar), push knees out, sit down (not back).

10. For the record: the above cue to posteriorly tilt the pelvis brings people from a state of excessive extension TO neutral. That’s a major difference compared to taking someone from neutral to more flexion.

11. Warm-ups should start ground based to standing to adding movement (linear or lateral).

12. By that same token they should start proximally (positional breathing, diaphragm) to distally.

13. Is this not the most baller groomsmen photograph ever taken?

14. People hate doing pause squats, but dammit if they don’t make everyone’s squat numbers go up.

15. A common mistake that people make when bench pressing: not letting the bar settle. Meaning, after receiving a handoff don’t immediately descend the bar towards the chest. Rather, let the bar settle by placing your shoulder blades in your back pocket (posteriorly tilt, lats engage) and gather your bearings before you lower.

16. I’ve repeated this quote several times but I love it so much I’m going to repeat it again.

“When you start throwing a baseball with only your arm, then we’ll worry about doing only arm care exercises.”

Eric Schoenberg, PT, owner of Momentum Physical Therapy in Milford, MA

17. Despite popular belief, you can perform a Turkish get-up with a dumbbell.

18. Speaking of get-ups I like to include them as an extended warm-up. Do this:

– 10 KB Goblet Squats

– 10 KB Swings

– 1-2 KB Get-ups/side

Three rounds. Now go em Tiger!

19. Also, if I were you I’d err on the side of QUALITY for your get-ups rather than how hard you can make them. Progression on these isn’t necessarily about how heavy you can go, but how “effortlessly” you can perform them. Dr. Mark Cheng can perform 48 kg Get-ups; he chooses to stick with 24 kg for the bulk of his training.

20. When assessing shoulders don’t only look at anterior/posterior imbalances (traditional upper cross syndrome), it’s equally as important to look at superior/inferior imbalances (scapular upward/downward rotation).

21. Scapular stability is more or less a misnomer. There aren’t any significant bony structures to warrant a ton of stability. Instead, as Sue Falsone notes, a more appropriate term would be controlled scapular mobility.

Here’s a good drill for that: Band Wall Walks


22. Alignment matters. Always.

23. If you stretch in mis-alignment (think: hip flexor stretch when someone stays in excessive APT) you create more instability. If you strengthen in mis-alignment you create more muscular imbalances.

24. Women: if you want to get better at chin-ups/pull-ups you need to train them more than once per week. Follow the lead of Artemis Scantalides of IronBody Studios: train them 4-6x per week.

Monday: Flexed Arm Hangs/Hanging Leg Raises
Tuesday: Chin-ups or Eccentric Chin-Ups (Rule of 10): 3×3, 5×2, 2×5, etc
Wednesday: Band Assisted Chin-Ups
Thursday: Flexed Arm Hangs/Hanging Leg Raises
Friday: Chin-ups or Eccentric Chin-Ups (Rule of 10): 3×3, 5×2, 2×5, etc
Saturday: Band Assisted Chin-Ups

25. Guys, you suck at chin-ups too. I’d listen to Artemis as well if I were you.

26. Don’t be afraid to include some more athletic movements into your training. Jumping, skipping, sprinting will improve your general day-to-day activities. Even if the most athletic thing you do is gardening….;o)

27. To that end, you don’t need to go 100% with your sprints. I like 60-70% effort “tempo repeats” (40-60 yds) for most general fitness clients. Also, if you cranky knees, sprint uphill. You’ll thank me.

28. Instead of embarking on a “fat loss” plan, focus your efforts towards a performance based goal. I find diverting efforts towards something more quantifiable leads to better long-term success. The amount of work and effort it takes to achieve said goal, assuming it’s realistic and attainable11, more often than not results in the aesthetic markers many people covet.

29. Push-ups are a very UNDERrated exercise. Some cues I always use:

– Squeeze glutes, brace abs (both help to posteriorly tilt pelvis which prevents excessive lower back arch).

– Spread fingers as wide apart as possible and think about “cork screwing” the floor apart. This will create more external rotation torque in the shoulders and provide more stability.

– Chest should hit floor first.

30. Not everyone is meant to squat ass-to-grass. We need to respect anatomy. Hip structure is different person to person, and you’re an a-hole if you hold everyone to the same standard. Some people are built to squat deep (and generally will have limited hip extension), while others are meant to deadlift a bulldozer (and might not be able to squat past 90 degrees). Some people can dominate both and we all hate them.

31. Passive Tests = provides information on one’s available/total ROM. Active Tests = provides information on one’s ROM they can use. If someone tests great passively yet as limited active ROM it’s most likely a stability issue. Don’t always assume it’s lack of mobility.

32. Stop doing kipping pull-ups. Seriously, stop.