CategoriesExercise Technique Program Design Strength Training

The 7 Habits of Highly Effective Deadlifters – Part 1

When I was a junior in college one of my professors had us read The 7 Habits of Highly Effective People by Stephen Covey.

Yeah, I didn’t read it.

But who actually reads in college anyways? I was too busy playing baseball, lifting weights, watching Party of Five, and not hanging out with girls because, well, I was watching Party of Five.

I mean, all I had to do was look at the title and I knew it was going to put me to sleep within five minutes of turning the cover. And besides, was this book going to add 5MPH to my fastball and get me drafted? Pffffft, I think not!

Fast forward five years.

Surprise! Nothing I read added 5MPH to my fastball. Professional baseball didn’t pan out and I was a year or two into my career as a personal trainer. I finally listened to my professor and read the book. And it was game changer.

I won’t bore you with the details – it’s a quick read – but The 7 Habits of Highly Effective People speaks to things like how to be more proactive, why it’s important to think about the future so that you can more concretely figure out what to make a reality, the value of the “win-win” mentality, seeking to understand shit before you open your mouth (<— that’s my own interpretation), and what it means to “sharpen the saw” (I.e., seek out activities like exercise, yoga, meditation, etc. to expedite mental focus), among a handful of others.

Needless to say it’s a book I recommend to a lot of people, and something who’s theme I’m going to rip off today.

The 7 Habits of Highly Effective Deadlifters

Being a massive human being helps (^^^^^^^^^), so I’ll just skip that one and try to focus on some less obvious points.

NOTE: What follows is more of a commentary on deadlift technique with the goal to lift a lot of weight. It’s not going to cater to CrossFit and more of the tap-n-go, bounce off the floor, (high) hinge deadlift.

NOTE II: Please don’t take this as a knock against CrossFit. It isn’t. I get that the tap-n-go approach is more relevant to the demands of a CrossFit class or competition, where high(er) reps are performed. I also recognize that there are some strong people who do CrossFit.

But if you’re a CrossFitter and you’re that easily butt-hurt over me poo-pooing a tap-n-go deadlift, I’ll ask you this: why is the exercise called a DEADlift?

NOTE III: Nothing I mention below is concrete and will apply to every lifter in every situation. While I feel much of what I have to say with resonate with a lot of people, I’m not that much of an egotistical asshat to think that it will apply to 100% of the lifting population. So take that for what it’s worth.

Anyways……..

1. Your Lats Are the Key (Point #1)

In order to move big weights (safely, and long-term) you need two things to happen: you need to place a premium on tension and alignment.

If either of the above are lacking you’re not going to be able to develop as much force.

To the former point (tension), the lats are kind of a big deal.

The latissismus dorsi (or “lats” in bro-talk) are a massive muscle, which, on top of playing a role in humeral extension, internal rotation, and adduction (blah, blah, blah), also has significant play in breathing patterns and more germane to this conversation spinal stability.

In short: get the lats to engage and garner TENSION during the setup of a deadlift, the more stable you’re going to be, and the less likely you’ll look like this:

To do this I like to use any one of the following cues:

1. Squeeze an orange in your armpits

2. Protect your armpits.

3. Phew…your armpits stink.

4. Put your shoulder blades in your back pocket.

All are fantastic external cues to help people get the lats to fire to provide more tension and thus, stability. Despite this, some people may still look at you as if you’re speaking Elvish when you tell then to “turn on” their lats.

Sometimes it’s beneficial to give them more tactile feedback or cues.

Band Lat Activation with Hip Hinge

Or what I like to call “TRICEPS”


Lat Activation (via Mike Robertson)


2. Your Lats Are the Key (Point #2)

Pigging back on the point above, your lats are what “connects” you to the bar. Yes, your hands are grabbing the bar, but it’s where your armpits (where the lats insert) are located – in relation to bar placement – that plays a huge role in deadlifting badassery.

I’m a fairly decent deadlifter. I’ve pulled 3x bodyweight….570 lbs at a bodyweight of 190. I’m no Andy Bolton, but not many people are.

For years I’ve set up with my shins as close to the bar as possible, and while it led to some success it also led to some pesky back issues.

Why?

When setting up as close as possible to the bar, think about what’s happening.
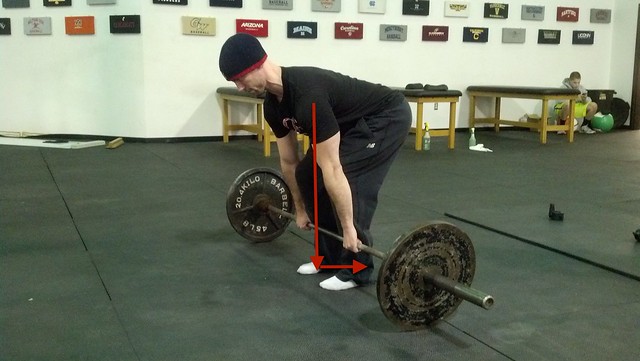
1. My shins are more vertical.

2. And because my shins are more vertical, my armpits are in front of the bar, creating an awkward line of pull I have to overcome.

This not only puts me in a mechanical disadvantage, but over time is going to make my lower back flip me the middle finger. And it has, many times.

In the past few months I’ve had to overhaul my setup so I’m a little further away from the bar in that my shins can translate forward a bit, which then allows me to get my armpits directly over the bar, which in turn puts me in a more mechanical ADvantage (which helps me garner more tension), which in turn makes my lower back happy.

FYI: the picture below doesn’t show that right before I pull, I’ll push my hips back a smidge
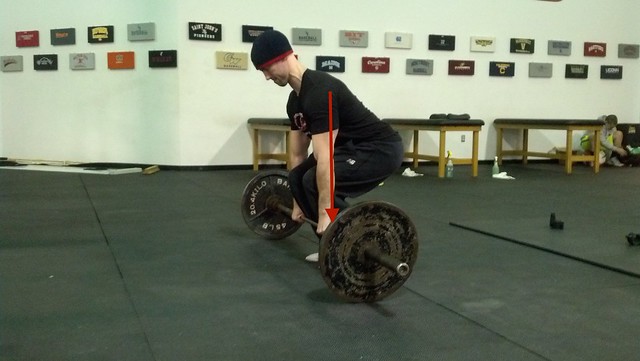
And no, I’m not squatting the deadlift…….;o)

3. Pulling Slack Out of the Bar

Running with the tension theme, another habit of highly effective deadlifters is learning how to take the slack out of the bar.

It’s important to leverage yourself against the weight when you’re setting up. Another way to think about it is to act as if you’re “pulling” yourself (against the bar) into proper position.

This is what it means to get the slack out of the bar or what I like to say instead “bending the bar before you pull it.”

NOTE: I was in the middle of filming a video of this last night when my camera puttered out. Damn you Droid!

Luckily CSP coach, Greg Robins, filmed a video not too long ago on this very concept:

That’s it for today. I’ll be posting part II of this article sometime soon. But in the meantime I want you to recognize the key theme of all the points listed above:

That the setup is very, very, VERY important.

Like almost as important as Bilbo giving Frodo Baggins the blade Sting when leaving Rivendell on his way to Mordor.

95% of the time any mistake or snafu in technique with the deadlift can be attributed to how someone sets up in the first place. Far too often trainees fail to put much thought into it and just haphazardly bend over and pick up the bar. And far too often people end up getting hurt and/or never making any progress.

Place more precedence on getting tension and watch your deadlift take off.

CategoriesExercise Technique Strength Training

Bench Press Tip: Let the Bar “Settle”

I’ve been working my way back from a pesky back injury for the past few months, and while I’ve made some awesome progress as of late (back to full squatting 315 for reps, and just started incorporating some heavy(ish) pulling into the mix), the guy who writes my programs – Greg Robins – has been making me bench press like no one’s business.

This isn’t to imply that “bench pressing like no one’s business” means I’ve been putting up some impressive numbers. To that I say:

“hahahahahahahahamsadasggwe**#1mwhupsas11hahahahhaa”

1. I’ve never been shy to say how much I hate bench press pressing.

2. And the reason for that is because I’ve never been good at it.

3. I hate bench pressing.

Giving myself some credit – my best performance on the bench press (raw, at a bodyweight of 200) is 315 lbs. Albeit it never would have seen a white light in any powerlifting federation, unless the name of it was the NBOTB (National Butt Off the Bench) Federation.

A 315 lb bench press for a raw lifter at 200 lbs isn’t too shabby, but it’s certainly nothing to brag about. However, truth be told the bench press is a lift I’ve never placed a high priority on. And it shows.

So as it happens, “bench pressing like no one’s business” means I’ve been benching a lot lately, which has been both good and bad. Good in the sense that I’m starting to see my numbers creep up to non-abysmal territory again. Bad in that I still hate bench pressing. But like a bro, I need to persevere!

Which brings me to the topic of today’s post. A common mistake I see a lot of people make when benching is rushing into the press itself and NOT allowing the bar to settle after a hand-off. Watch this video to understand more of what I mean.

Let the Bar “Settle” Before You Press

Yes, all the same rules apply to the set up: Shoulders together and down, chest up, slight arch, drive feet into the ground, don’t destroy the back of your pants.

NOTE: Read HERE why getting a hand-off is so crucial.

But learning to settle the bar is something that’s universally glossed over by a lot of trainees.

Hope that cue helps.

CategoriesCorrective Exercise Exercise Technique

Making Difficult Lifts Easier

The word “easier” is subjective in this context.

I mean, can we really make a squat or deadlift easy?

Maybe a better way to state things is to say “easier to perform so that someone doesn’t shit their spine.”

As a strength coach it’s obviously important for me to help get people stronger – especially with the big lifts. Too, and maybe more importantly, a large portion of my job is to “fine tune” technique so that a particular lift or exercise is more user friendly for my athletes and clients to perform.

Almost always everyone I work with is going to be squatting, deadlifting, and performing any number of compound movements to some degree on a daily basis. This DOES NOT mean, however, everyone is barbell back squatting, squatting deep (or ass-to-grass for the brosefs reading), conventional deadlifting, and/or performing max effort anything on day #1.

Much of that will depend on one’s current (and past) injury history, training experience – not to mention goal(s) – as far as what variation of squats or deadifts (or whatever) I’ll start them on. In short: I need to figure out their “Point A” (starting point) before I can get them to “Point B” (squatting 2x bodyweight, hitting a 500 lb DL, arm wrestling a grizzly bear, etc).

Often I’ll need to break down subsequent movements into specific parts in order to groove technique and/or introduce a new exercise into someone’s training repertoire.

Which is the topic of my latest article on BodyBuilding.com. In it I discuss some simple drills I like to use to break down the deadlift and KB Turkish Get-up.

Continue Reading…..

CategoriesExercise Technique

Barbell Bent Over Row Tutorial

Before I get to the real reason you clicked on today’s post, I have two tidbits of exciting news.

1. It’s been announced that (director) Paul Greengrass and (star) Matt Damon are going to be making another Jason Bourne movie, slated for release sometime in 2016. So, ladies, you can have the limelight and enjoy your 50 Shades of of Grey movies….for now. But soon Bourne is coming to kick some sadomasochistic movie going ass!

2. It’s official: the flights are booked, Lisa and I are going to Australia!!!!

I’ve alluded to this trip sporadically the past few months, and final details are still a few days away, but here’s what I can tell you:

Tw0-Day Because Heavy Things Won’t Lift Themselves Workshop in Ballina, NSW located at Raw Fitness and Sports Training, March 7-8.

One-Day Because Heavy Things Won’t Lift Themselves Workshop in Sydney on Friday, March 13…location still to be determined.

I’ll be sure to let everyone know – soon! – all the nitty gritty details (costs, itinerary, final locations, whether or not I’ll try some kangaroo?) within the next week.

Barbell Bent Over Row Tutorial

I’m a huge fan of the barbell bent over row. Not only for the obvious reason(s) – it helps build a yoked up upper back! – but also because as an accessory movement I feel it’s a superb movement which compliments the deadlift.

You see, I think a lot of trainees have it wrong when it comes to their accessory movements.

Many (not all) kind of haphazardly toss some random exercises into their program because they’re hard or because they make them hate life. Which is fine! I like to see people working hard in the gym.

For me, however, the accessory movements you place into a program should serve a deeper purpose. For instance I’m a strength guy. And as such I place a premium on movements like the squat, bench press, and deadlift. You know, movements that get people strong.

Accessory movements, then, shouldn’t be placed into a program just cause. If that’s the case why not place a bunch of names of exercises onto a dart board and leave your programming to chance?

Instead accessory movements should address some form of technique flaw or weakness you have with one of the major lifts. That’s training with purpose!

Today I’d like to share some insights on the bent over barbell row. In the video below I’ll discuss some of the major reasons why I like this exercise as well as delve into more of the nuances of how to perform it correctly.

Look for the video-bomb by Effie the dog towards the tail-end. I was scared things were going to turn into a some sort of viral video”dog gets killed because strength coach drops weights on it” scenario.

WHEW – that was close.

CategoriesExercise Technique Program Design

One Drill to Build Athleticism?

Today’s guest post is not only the last guest post of 2014 (sad face), but comes from good friend and regular contributor, Michael Anderson.

Enjoy!

When you are in your first year of damn near any Exercise Science or Strength and Conditioning program in college, one of your professors will inevitably ask you to define “athleticism”.

One guy will always raise his hand and say “it’s being athletic” and you will laugh at him but really he’s sorta right. Having “athleticism” (to me) means that you contain and exhibit the traits of coordination/balance, power, strength and suppleness (the ability to absorb external forces and remain uninjured) as well as being able to tie those all together into the context of your sport.

As strength coaches, many of us are out there trying to figure out the best ways to improve and fine-tune the athleticism of our athletes. There are a ton of drills that you can use to try and do this, but my personal favorite is the medicine ball shot-put.

It, through several variations, can really do a lot in the way of increasing the way an athlete performs.

Note from TG: Not to take away from Michael’s thunder…..HERE’s a video I shot for Stack Magazine on how we coach some popular med ball rotational drills at Cressey Sports Performance.

Through the several variations I’m going to present, your athletes will be challenged in several ways.

– They will be required to exhibit a good base of balance in their lower body will producing a ton of force through their upper body.

– They will also be asked to demonstrate some coordination and proprioception while throwing the ball hard. If they are missing any of the “links” that connects their feet to the arm pushing the ball then they are going to get a pretty lame sound when the ball hits the wall. When an athlete is able to figure out how to connect each piece of the exercise they should get a really satisfying “pop” from the MB slamming against the wall.

On another note, I believe you should always err on the side of light when performing medicine ball work. I’m 6’1” and 210 pounds and in the following videos I’m using a 6# dynamax ball. Using a ball that is too heavy will result in the movement looking a helluva lot less crisp and explosive.

Half-Kneeling Shot Put


This variation is great for beginners because it takes the lower body totally out of the equation; the fewer things for a novice to think about, the better.

The half-kneeling position will allow the athlete to create a strong position to keep their hips stable while allowing for good torso rotation if you have the requisite mobility. Without the proper mobility, this drill won’t feel quite as powerful as it should and you’ll want to work a little more on your upper body and hip mobility. Athletes who have a tough time figuring out how to brace their lower body to create power will benefit from this drill as well.

Base Position Shot Put


This is the seated box jump variation of the shot puts. It requires the athlete to start in a complete stable base position and create forward propulsion of the ball without any countermovement whatsoever.

The big benefit I find with a static start like this is that athletes are forced to learn how to brace and fire muscles without just relying on momentum to get things going. Weaker athletes who tend to rely on their springs rather than muscles will find this drill awkward and will probably hate it a lot. This will also be a good opportunity for you to teach them how to drive off their back leg and snap their hip to create force from the ground up.

Rockback Shot Put


This is probably the first variation where your athletes are going to feel like they can produce some serious power. Start them in the base position and have them transfer their weight over their trail leg and load up their back hip.

Once they feel comfortable with their weight shift they can explode forward and pound the ball into the wall. This is my favorite drill to teach athletes how to drive off of their back leg to initiate the movement. This drill will allow for enough force production that they will start to need to bring their trail leg around for a little bit of a decelerative effect.

I like the rockback to be a controlled movement rather than just all-out ballistic. I feel that this allows the athlete to understand the movement that you’re looking for better than just trying to bounce off of their back leg to take advantage of the stretch-shortening cycle as much as possible.

Step-Behind Shot Put


All things considered, this is my favorite medicine ball drill. From the first time I learned it (from a CSP blog, surely) I knew it was a good way to produce a bunch of power. It took me a little longer to understand just how useful a drill it was to get athletes doing athletic things.

It’s a very complete drill: the footwork requires more coordination than you’d think, the forward momentum created plus the power from the throw requires the athlete to decelerate properly, and the lower body and upper body are doing two different things at the same time.

If the athlete is unable to link all of these pieces together they are going to end up performing a pretty flaccid medicine ball throw. Much like the rockback exercise, I think the step-behind portion of this is best performed with a measure of control rather than being completely explosive from the get-go.

Crow Hop Shot Put


This is the most technical medicine ball drill that I’ll give to most athletes; if they can’t perform the step-behind shot put without a high level of proficiency then asking them to perform this drill is going to be like watching a monkey hump a football.

The “crow hop” is a movement that baseball players use to gain some momentum in a short amount of time/space to create more power to deliver the ball further/harder.

We can use that same movement to our advantage to teach athletes how to create a bunch of power as soon as their feet hit the ground. This requires a high level of reactivity from the athlete, or else the movement will become awkward and cumbersome. Teaching an athlete how to transfer fluidly from one movement (in this case, a hop) into another one (a lateral push to throw the ball) will have a great carry over effect to their sport of choice.

Sport Specific?

I hate the phrase “sport specific” because it’s been so bastardized in the last few years, but these are some of the most sport specific drills that you can do in the weight room. Teaching athletes how to move laterally, create rotational force starting at the their feet and transferring it up into their torso and how to decelerate their body after force production will help just about any athlete in any sport.

Spend some time working these drills into your athletes programs over the next several months and take some measures to see how their performance increases. Have a great day and go lift some heavy shit!

Additional Commentary from TG

How we implement med ball work in our programming depends, in large part, on where we are in the year. In the very beginning stages of the off-season, our baseball guys are pretty banged up and the idea of throwing anything, much less a med ball, is about as enticing as a colonoscopy. That said we’ll still implement *some* med ball drills, albeit at a very low volume.  However, it’s not uncommon to OMIT then altogether depending on total innings pitched, etc.

Once we enter the meat and potatoes of the off-season we’ll hammer a TON of med ball drills. We’ll typically try to hit one rotational drill and one overhead drill (per training session) 2-3x per week. Although we’ll also divide it up like this:

Monday: Overhead Med Ball, Box Jumps, Lower Body strength training.

Tuesday: Rotational Med Ball, Upper Body strength training.

Wednesday: Movement (skipping, marches, linear sprint work)

Thursday: Overhead Med Ball, Box Jumps, Lower Body strength training.

Friday: Rotational Med Ball, Upper Body strength training.

Saturday: Movement (heidens, change of direction work)

Sunday: eat dead animal flesh.

As we inch closer to the competitive season and guys start throwing bullpens and preparing for Spring Training, we’ll tone down the med ball work and reduce volume significantly.

However, outside of rotational dominant sports (where it’s almost mandatory), placing med ball work into the mix regardless of what sport you play or if you don’t play a sport and you’re just Ron from Accounting or Hillary from Scottsdale, can be highly advantageous and fun!

What’s more, I’ve found that med ball training is about as close to a self-limiting modality as you can get. Meaning just about anyone, regardless of experience (and assuming there’s no contraindications), can implement it into their program without much of a learning curve and risk of injury. Granted you make look like you have two left feet out of the gate. But as with anything, with a little practice and consistency, you’ll look like an athlete before you know it!

Author’s Bio

Mike Anderson is a graduate of the UMass Boston Exercise Science program and spent a year interning with Boston University Strength and Conditioning. After spending five fun years physically developing absolutely savage doctors and teachers as a personal trainer in Brookline, MA he is now residing in sunny Cleveland, OH and works as a Performance Coach at Michael Johnson Performance at the Spire Institute in Geneva, OH. You can read his blog HERE or email him at [email protected] if you have any questions.
CategoriesCorrective Exercise Exercise Technique

Fix Your Knees, Get Bigger & Stronger

It’s kind of hard to achieve the holy grail of brohood – i.e., bigger, faster, and stronger (and tanned) – if you’re constantly banged up and/or hurt.

Our knees take a beating as it is, but if you’re a meathead this statement is exponentially true.

But even if someone says “my knees hurt!”……what does that even mean? Knee pain, or how smarty pants people refer to it – anterior knee or patellofemoral pain – is a very subjective term and doesn’t help explain the mechanism or cause of the pain in the first place. Hell, many scientist can’t even explain or agree what the term pain means or where it manifests from!

I guess to be more precise I should allude to the actual diagnoses of patellofermoral pain. There are many and it’s hard to pinpoint one major culprit over the other. We have patellar compression syndrome, patellar instability, general biomechanical syndrome, direct patellar trauma, soft tissue lesions, and overuse syndromes to name a few.

Too, we can’t deny that many people just move like complete shit. And while squatting is often poo-pooed or pointed to as Public Enemy #1 with regards to eating up someone’s knees, quite frankly (and more often than not) their squat pattern is atrocious. Sometimes all it takes a one minor tweak to their technique which can make all the difference in the world.

And then there’s other stuff like how to coach someone to perform a more “knee friendly” lunge, addressing weak hips, addressing alignment, mobility deficits, and engraining in people that you can always, ALWAYS train around an injury.

In my latest article on T-Nation.com I discuss all of the above and then some.

Continue Reading……

CategoriesExercise Technique

Kettlebell Swing: How to Cue the Hinge and Never Perform a Squat Swing Again

There’s just some things in life you don’t do.

1. You don’t punch kittens in the face1. That’s just common sense (and really cruel).

2. Guys: you don’t not pay for the first date. And ladies: the fake purse grab at the end of dinner makes us guys feel good, and we appreciate the sentiment; but at some point, say between dates #3-71, you don’t need to continue the charade.

At some point you should eventually actually pay for something.

3. You don’t hang out at Chuck-E-Cheese when you’re an adult. That’s Creepy McCreepypants territory.

4. You don’t wear white socks with dress pants2.

5. And, for the love of all that’s holy, you don’t squat the kettlebell swing.

I’d argue it’s the most common mistake that many people make with their swing technique. For starters, it’s wrong. I don’t care who you are or who you were coached by, even if it was Captain America, squatting the KB swing is not correct. It just isn’t.

How’s that for a scientific explanation?

Second, and more importantly, “squatting” the swing (to the point where the KB drops below the knees) increases the lever arm and places much more stress on the lower back. Often, whenever someone complains that KB swings bothers their back the culprit is one of two things: 1) not engaging their glutes enough and 2) not incorporating a hip hinge.

Today I wanted to share a simple tactile cue I learned from Dr. Mark Cheng (Senior Instructor for StrongFirst) you can use to help groove more of a hip hinge/hip snap pattern when swinging. Basically you need to stay upright A LOT longer than you think (and much longer than most are comfortable with) before you break the hips and hinge back.


ADDENDUM: I’ve noticed a few comments on various social media outlets where people have noted there ARE viable reasons to perform a squat swing and that it does have its place. I guess agree. Sorta.

There’s a time and place for everything I suppose. But even for those who DO perform a squat swing, there’s still a significant hip hinge involved.  Yeah, yeah, there’s “research” to back up a squat swing and how it can improve “x” factor; but then again, there was research back in the day that said smoking wasn’t carcinogenic.

The eye sores that I see a lot people performing (where it’s entirely a squat) is wrong. You’d have a hard time convincing me there’s a legitimate rationale to do swings that way.

Nevertheless, I guess I should have re-worded things to say this: My main beef are for those people learning the swing in the first place. The hip hinge is such an integral movement which reduces the learning curve when introducing new movements drastically.

Maybe a better way to articulate my thoughts would be this: learn the hip hinge swing first, get really good at it, and THEN you can play around with the squat swing, if that’s what floats your boat. Weeeeeeeeeeeee.

CategoriesExercise Technique Program Design

Get the Most Out of Your Farmer Carries

This won’t come as a newsflash to those who read my blog on a regular basis, but I heart beef jerky, Gandalf, lightsabers, snuggling, butterfly kisses, farmer carries3

As far as exercises which have a lot of carry-over to performance as well as every day life events and doing their part in, pardon my french, “fixing shit,” 4 farmer carries are the bees knees.

In my latest article on MensHealth.com I discuss why farmer carries are worthy of “bees knees” status, in addition to offering up a handful of ways to implement them into a program

Get the Most Out of Your Farmer Carries

Also, I submitted the article before filming the video below. It shows me performing one round of a killer Kettlebell Get-Up, Carry, and Swing finisher that 1) is featured in the article and 2) I think you’ll enjoy. Depending on what your definition of “enjoy” is.

If it means something along the lines of eating a bowl of cookies-n-cream ice cream or getting a foot massage think the opposite of that.

CategoriesCorrective Exercise Exercise Technique

A Simple Way to Pattern the Hip Hinge

Sometimes I think to myself how much of a moron I am.

And I don’t say that lightly. I’m 100% serious. I’m a moron. Or, to use a more “Tony’esque” term…..an asshat.


Lets rule out the obvious offenses like that time, as a freshman in my first college start, I threw a 3-2 hanging curveball to the clean-up hitter. I still think that ball has yet to land.

Or that other time I thought it would be hiiiiiilarious to sneak up behind my girlfriend in college – whom I knew hated to be scared – and scare her.

Her immediate reaction was to punch me in the mouth and give me a fat lip. Needless to say I learned that night where she stood on the whole fight or flight spectrum.

But at least I’m not as moronic as the guy on a recent episode of Forensic Files I watched who killed a woman and, upon using her credit card at a convenience store, signed his own name on the receipt.

Or this girl who did this……

https://www.youtube.com/watch?v=y50POlvKRyw


I’ve had my moments, as I’m sure everyone reading can commiserate with, where I demonstrated less than exemplary common sense.

But when I say I’m a moron/asshat/pick chosen adjective here, I’m also referring to my profound inability to think of stuff that many of my esteemed colleagues seem to do with as much ease as breathing.

At least once or twice a week I read something or watch something that makes me have a Homer Simpson moment where I slap myself in the forehead, yell “DOH,” and wonder why it never dawned on me to come up with the same idea or concept.

Ben Bruno gets the most recent tip of the hat.

A Simple Way to Pattern the Hip Hinge

I’ve written on the importance of the hip hinge and some basic drills I like to use to help groove it HERE. The Cliff Notes version goes something like this:

“It’s important because I said so.”

 [Drops mic, exits stage left]

Okay, in all seriousness the sooner someone hones their hip hinge the sooner they’ll be putting the leverages and torques they’re placing on the body in a more advantageous or “user friendly” setting. I.e., learning to move through the hips (and greasing hip extension without compensating with lumbar hyperextension) in addition to less stress on the knees and lower back when performing exercises like squats and deadlifts.

Likewise, once the hip hinge is cleaned up it makes the learning curve when introducing new exercises down the road much more expedited.

While out in LA teaching a workshop Ben Bruno stopped by to say hello and was nice enough to take the attendees through a quick 30-minutes session on cool ways to use the landmine. He showed this ingenious way to use it to groove the hip hinge:

The placement and counterbalance of the bar lends itself so that the trainee has no where to go BUT to hip hinge in order to lower the bar. If they don’t they’re going to hit themselves in the boy or girl down there parts.

It’s more or less the most intuitive way I’ve come across to help someone “feel” the hip hinge yet!

Understandably, some people may cry afoul about the hands/arms moving towards the floor, but remember all I’m trying to accomplish is helping someone feel the hip hinge happen in the first place! Once they have that, then I can work on upperback and lat tension when deadlift and squatting.

As an FYI: you don’t necessarily need the landmine apparatus in order to perform this drill. You could just as easily place a barbell up against a wall or kitty corner between two walls and accomplish the same objective.

Give it a try yourself or with your clients struggling to master the hip hinge and let me know how it goes.

CategoriesExercise Technique Miscellaneous Miscellany

Miscellaneous Miscellany Monday: Get-ups, Deadlifts, and B-Days

1.  I have a love-hate relationship with Turkish get-ups.

Photo Credit: John Maguire

As a coach I love them in the sense of how much bang-for-my-training-buck they provide. I get asked all the time from my athletes and clients “what the hell do these get-up thingamabobbers do anyways?” To which I respond: what don’t they do?

Dean Somerset wrote an excellent article last week on T-Nation HERE which mirrors many of my own thoughts on the matter.

But to expound a bit more, you can think of get-ups as loaded yoga. Yes, I can use the word “yoga” in a sentence and not throw up a little in my mouth….;o)

Truth be told: 98% of the dynamic warm-up drills that we use on a regular basis at Cressey Sports Performance are derived and have their base in yoga. Likewise, a fair number of basic strength training moves like planks (and all their iterations), yoga push-ups, and certain lunge variations have their ancestry in yoga.

So it’s not like yoga doesn’t deserve some credit!

Taking the thought process a bit further, can you name another exercise which incorporates so many valuable components as the get-up? We have lying, rolling, glute activation, bridging, scapular stability, overhead static hold, core stability/strength, half kneeling, and lunging; and then a reversal of all of that. About the only thing get-ups don’t do is remember to set the DVR to record the latest episode of The Walking Dead, GODDAMMIT!!!!

As a trainee I hate get-ups.

1. No exercise does a better job at highlighting any glaring weaknesses up and down the kinetic chain. Whether it’s limited hip flexor length, having hip mobility that would rival the ROM of a pregnant rhino, poor scapular stability, or weakness in general, get-ups are going to humble you.

2. Using a more personal anecdote, get-ups just take F.O.R.E.V.E.R to perform. Coming from a guy who thinks anything that requires more than five reps is cardio, the fact that it takes upwards of one minute to complete ONE SIDE of a get-up makes me want to punch myself in the neck. It’s so annoying.

The thing is: when performed correctly, that’s how long a get-up should take!

Dr. Mark Cheng was kind enough to make a cameo appearance two weekends ago at mine and Dean’s Excellent Workshop in LA.

He spent a solid 90 minutes taking all the attendees through the kettlebell swing and get-up. I learned more in those 90 minutes than anything I’ve watched or read in the past five years (no offense to those who’s DVDs I watched and books/articles I read!).

Side Note: Mark is the guy James Fell interviewed for THIS article a few years ago that time Jillian Michaels tried to pretend she knew what she was talking about when it came to whatever it is she was trying to demonstrate here.

– For example, why are they called TURKISH get-ups in the first place? Why not Canadian get-ups or Vulcan get-ups? Why do the Turks get all the love?

It seems back in the day, and I assume present day too, the Turks were kind of badass. I forget what term Mark used, but he described the form of grappling they typically trained their warriors in, and how they used to do so all oiled up.

You know how hard it is to grip or grab something that’s all wet or sweaty, right? Well imagine that only 100x more challenging and homoneurotic (depending on what your definition of an ideal Friday night is)5

Anyways, waaaaaaay back in the day, in order to even be considered “man enough” to train and to learn how to fight the Turks made it a prerequisite you had to perform a get-up with close to a 100 lb kettlebell (give or take a few lb’s). While fighting a grizzly with your free hand!

Okay, I made that last part up….but still. WTF!!!!!

Point: Turks. Well played.

– Another tidbit I didn’t realize was that Mark is the guy who implemented the high bridge into the get-up! This isn’t to say he feels this is the correct way to do the get-up, but rather to suggest there’s more than one approach to any given component.

To transition from the seated overhead position to the half kneeling position you can do so in a variety of ways depending on preference and/or limitations. You can use the basic leg sweep, the leg switcharoo (<— where you essentially stay seated the entire time, switch leg positions, then stand up), the two-legged squat approach, or the high bridge.

– According to Mark he was toying around with the high bridge one day (as it emulated a specific move in his favorite form of fighting), and he and Gray Cook had an Ah-HA moment! The high bridge, when you pause to think about it, “clears” people from hip flexor limitations. If they can’t get full hip extension, their hip flexors may be a limitation.

Again, as Mark adamantly noted, the high bridge IS NOT a requirement!!! He’s not married to one way or the other with regards to completing the movement. It just comes down to personal preference.

– The get-up should be a controlled movement!  If you have to speed up in order to complete any one step, you lack stability. Speed = instability!!!!

As I alluded to above, when done correctly, the get-up should take upwards of 60s PER SIDE!!!

– Mark prefers to using anywhere from 20-24kg for his get-ups and “grease the groove.” He can go higher – much higher – but that’s not necessarily the point of the exercise. It’s to do shit right (my words, not his. But I know he wouldn’t disagree).

In short: SLOW DOWN!!!!!!

2. Thanks to everyone who went out of their way to send me B-day wishes yesterday. As you can tell I had a rough day.

Lisa snapped this pic in the middle of the afternoon as I was taking a nap. I fell asleep watching The Hobbit: An Unexpected Journey for the 17th time.

Don’t worry, though. I recovered nicely, took off my lame hat, and Lisa and I went to an amazing dinner last night with our friends Pat and Brianne.

A quick nod to Sarma (located in Somerville, MA) for an unreal menu and dinner.

3. Deadlifts!!!!

Last year my good friend, Dave Dellanave, released what I felt was one of the best deadlift(centric) resources I had ever come across  – Off the Floor.

It just so happens that after receiving feedback and testimonials over the past year, Dave’s fine tuned his program and has added a bunch of new content and add-ons.

As if listening to a guy who has deadlifted 3x bodyweight on three different deadlift variations – not to mention owning a few world records to boot – wasn’t enough, Off the Floor now includes three different programs (beginner, intermediate, and advanced), a slew of new grip challenges, in addition to just under an hour of new video content (including Dave talking about the concept of autoregulation).

It’s off the hook and something I feel would be an excellent addition to anyone interested in improving their deadlift; or just their overall level of badassery in general.

For more info you can go HERE (<—- link to an article, not a sales page).

4. Seriously, how freakin cute is my cat?