Categoriescoaching Exercise Technique

Plan On Lifting or Squatting Something Heavy? Check Your Neck

Today’s guest post comes courtesy of frequent contributor, Dr. Nicholas Licameli. He covers a topic that’s sometimes controversial:

Neck position when lifting heavy things.

Some people play close attention to it (as they should), while others play it off as “no big deal” and point towards really strong people who seemingly have never had any issues with their neck(s).

“See! They do it.”

Yeah, well, you’re not them. And most other people aren’t either.1

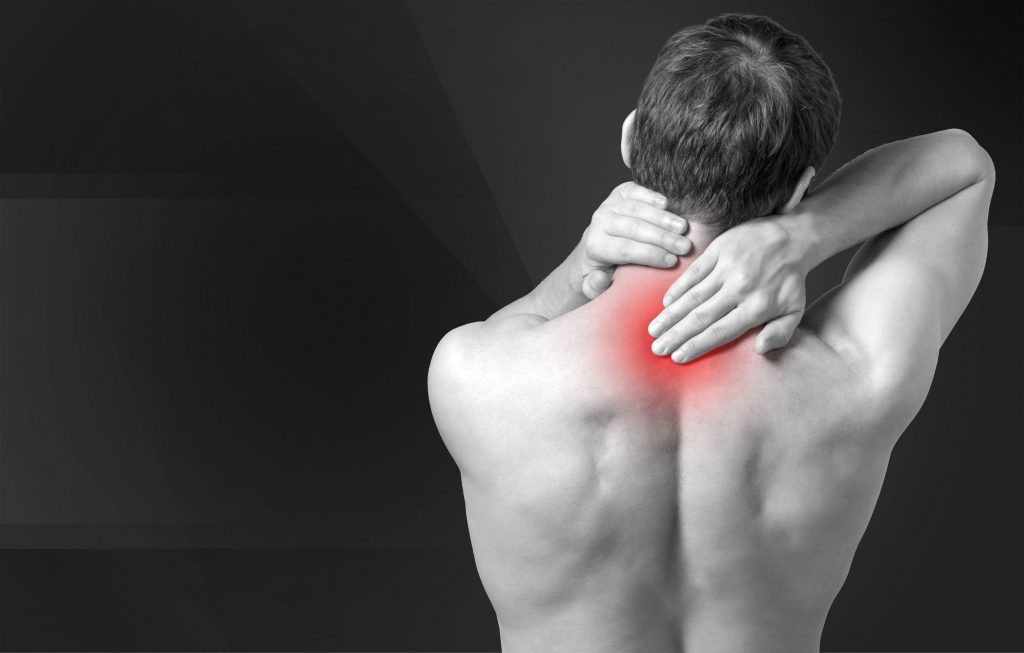
Copyright: olegdudko / 123RF Stock Photo

Plan On Lifting or Squatting Something Heavy? Check Your Neck

One of the most common issues I see in the deadlift and squat (and plank, push-up, bent over row, etc.) even in experienced lifters, is forgetting to “set” the head and neck.

  • Feet gripping floor with 3 points of contact? Check.
  • Pelvic floor engaged? Check. Transverse abdominis braced? Check. Diaphragm engaged? Check.
  • Shoulders and scapulae tucked down and back, squeezing the armpits? Check.
  • Neck straight and chin tucked?…

The hip hinge is the foundation to all movements that involve bending over or squatting. A proper hip hinge starts at the hips (naturally) with your spine in a neutral position.

But “spine in neutral position” does not just refer to the lower back. It includes the often-neglected cervical spine, too.

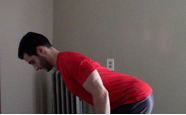
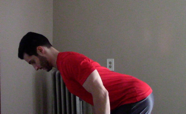
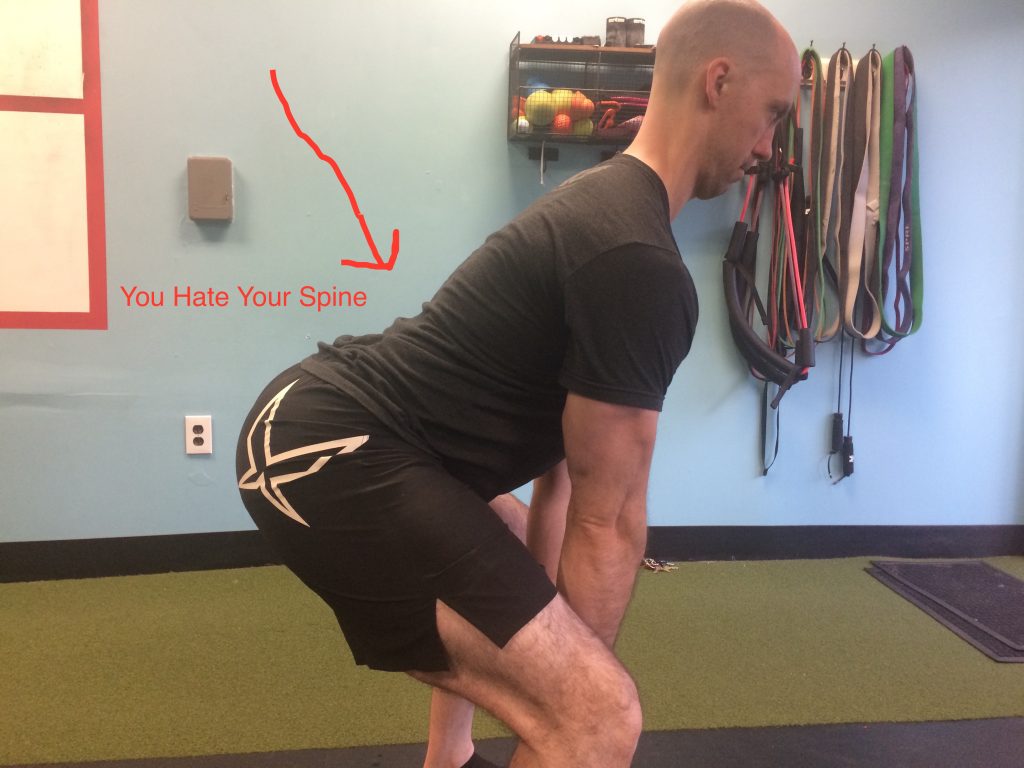
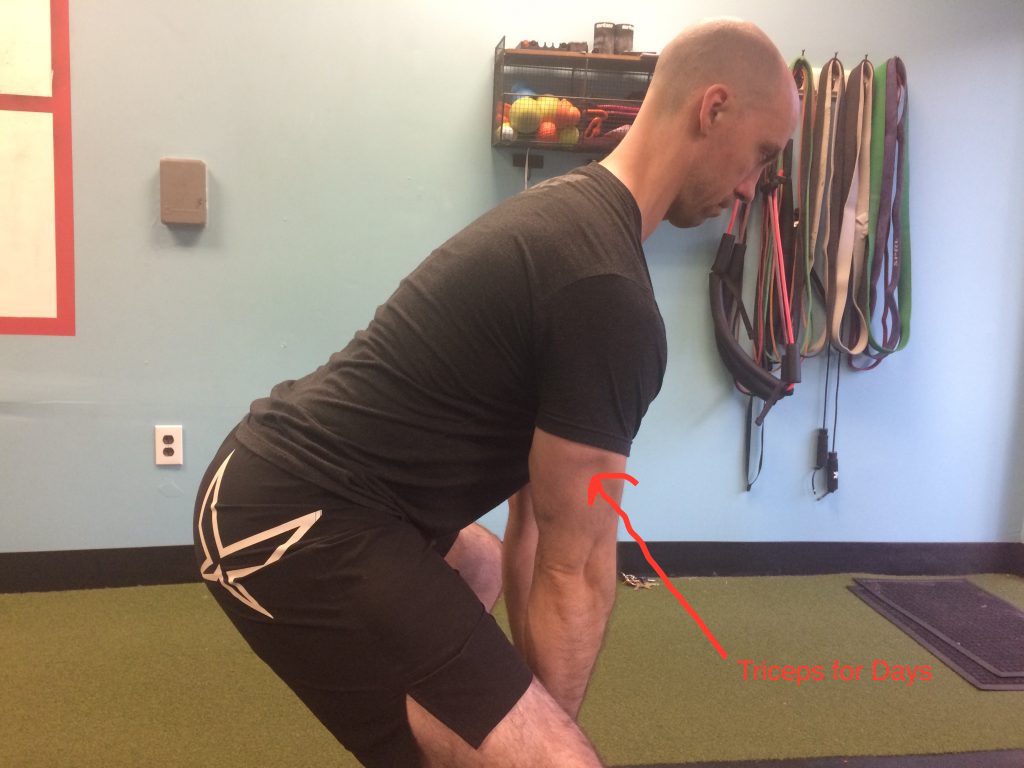
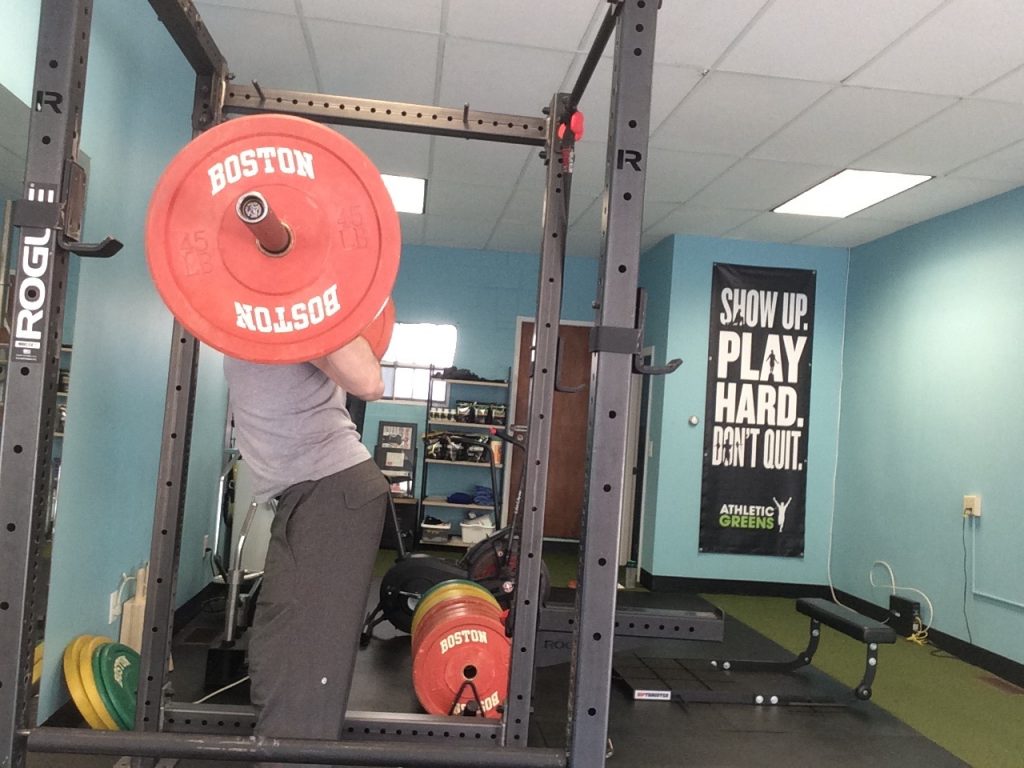
Too often I see the head and neck extended in an otherwise perfect hip hinge (see image below). I lie awake at night wondering why we lose so many good men out there (playing for the Yankees?2) to poor mechanics and why this mistake is so common…here’s what I came up with.

The extended position of the cervical spine can be very dangerous.

It is akin to having a hard arch in the lower back (the facet joints and neural tissues become compressed) except that the joints, muscles, nerves, and other structures of the neck are smaller and more delicate.

Add the maximal contraction of pretty much every muscle, as seen when performing a deadlift or squat, and it is clear to see why this can be dangerous.

So why do so many of us assume this faulty position?

Part of the reason is because our heads always want to be looking upright. Our brains subconsciously want to position our heads so that we are looking at the horizon.

We all know that the end goal is to stand up straight. We feel as if “looking where we’re going,” will help us get there. In order to maintain proper cervical positioning, we have to fight our subconscious, which is never easy.

[Another reason could be that we want to catch ourselves in that perfect lighting for that perfect selfie…]

But I think a big reason why extending the head and neck is so common is because it creates a shortened lever arm, which improves the biomechanical efficiency of the lift.

Let me explain.

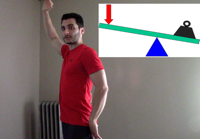
When you bend forward in a proper hip hinge, the hip becomes a fulcrum. As a result, a lever is formed from the hip to the top of the head. The longer the lever arm, the harder the load is to move.

Think of the difference between picking up a dumbbell out to the side of your body (as in a lateral raise) versus tucked into your side (as in a shrug).

When lifting out to the side, the shoulder joint is the fulcrum, the lever arm is the arm, and the load is in the hand at the end of the lever.

Lifting with your arm straight out to the side produces a longer lever arm than lifting close to the body, which makes the load more difficult to lift. This is the same reason why many coaches cue lifters to keep the load as close to your shins as possible during a deadlift. The further the load is from the fulcrum (your hip), the harder it is to lift.

What does it all mean Basil?3

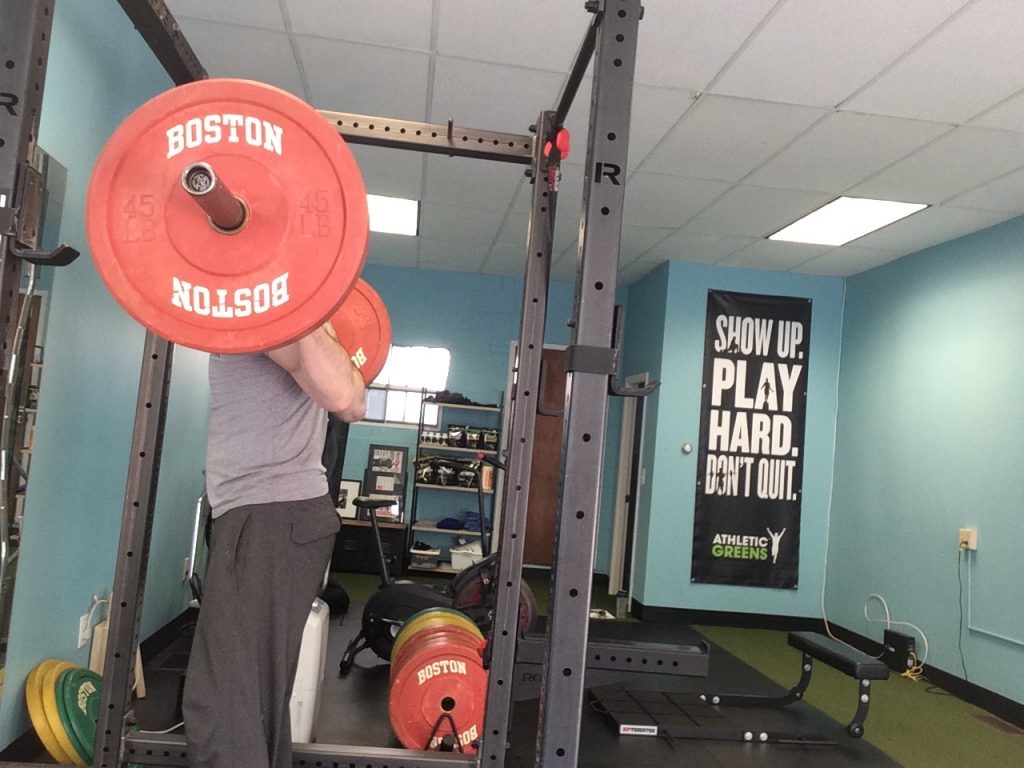
It means that extending the head and neck during a deadlift may be the body’s subconscious attempt to improve the biomechanical efficiency of the lift. It essentially shortens the lever arm by about a “head’s length.” (see images below).

             Shortened lever arm by about a “head’s length

To ensure proper positioning, tuck the chin and align the neck with the rest of your spine before lifting the load (see image below).

So next time you deadlift, yes, make sure your hip hinge is on point (and you get that perfect lighting for that selfie), but don’t forget about your vitally important and often neglected head and neck.

Resist the urge to look up!

Your discs, joints, muscles, and nerves will thank you.

Video Explanation


About the Author

Every single thing he does, Nick believes in giving himself to others in an attempt to make the world a happier, healthier, and more loving place. He wants to give people the power to change their lives. Bodybuilding and physical therapy serve as ways to carry out that cause. His knowledge of sport and exercise biomechanics, movement quality, and the practical application of research combined with personal experience in bodybuilding and nutrition allows him to help people in truly unique ways. Love. Passion. Respect. Humility.   Never an expert. Always a student. Love your journey.
Youtube:

Instagram:

Facebook

CategoriesExercise Technique personal training Program Design

Breaking Down the Turkish Get-Up

For some people seeing the words “Turkish Get-Up” in the title of an article elicits a gag reflex or makes them want to jump into a live volcano.

Even I’ll be the first to admit it’s not the most exciting exercise to talk about.

However, that doesn’t mean it’s altogether invalid or that it doesn’t deserve our undivided attention. It’s an exercise that has carryover to many facets of fitness whether you’re a beginner or elite athlete.

Call me crazy, but I wholeheartedly believe it has a time and place in everyone’s programming.

In today’s guest post by Calgary based personal trainer, Linden Ellefson, he breaks down the movement into more manageable, bite-sized tidbits that’ll (hopefully) convince you to give it a try.

Enjoy.

Copyright: photominus / 123RF Stock Photo

Breaking Down the Turkish Get-Up

In fitness, there aren’t any magic exercises… any more than there magic fat loss pills or magic devices that will get you jacked injury-free.

You have to put in the work and train intelligently.

That said, every once in awhile the fitness fairy godmother graces us with an exercise that performs beyond expectations.

Case in point: The Turkish Get Up.

The Turkish Get Up:

* Improves hip and shoulder mobility
* Improves core strength
* Can be a great conditioning tool
* Makes your look great

But wait, there’s more (as they say on infomercials.)
This Turkish Get-Up can fix a lot of problems before they even come up.

An example is bulletproofing your shoulder to reduce the risk of injury. Even NFL teams are trading the bench press for the Turkish Get Up

Shoulder, chest, and arm development will skyrocket due to the amount of time you spend keeping the kettlebell above your head.  

It will iron out any left to right imbalances, meaning that your bench press and squat will likely improve because both are being trained equally.

Because your hip moves in multiple planes of movement, you train your hip more than up/down and forward/back like a squat or deadlift. This helps prevent injury.

Another benefit of this exercise is that since there are so many pieces to the exercise, you can work on improving each step to get better at the whole.

If you aren’t drooling with anticipation to master this exercise and be the envy of your entire gym, we can’t be friends.

You’re going to need:

Overhead Mobility: Can you put your arms overhead so that your biceps rub your ears without your lower back compensating?

Hip Hinge: Can you move your hips independently of your lower back? If so, then feel free to give this a shot!


Obligatory “If You’re Hurt, Then Read This” Warning: If you are currently going through an injury, then you need to see a physical therapist or doctor to get out of pain first. Do that, THEN you can learn your turkish get-ups.

Lets Get to the Breaking Down Part

While this exercise may look complicated when we look at the whole, there are actually five different parts you’re going to learn about. Here’s what they are.

  1. Drive to the elbow
  2. Press to the hand
  3. Bridge the hips
  4. Sweep the foot underneath
  5. Half kneeling position
  6. Stand Up

If you watch this video, you’ll know how technical this movement is.


This is best learned by having someone coach you through it. If you have access to a competent coach, be sure to learn this from them.

Note From TG: You can find competent coaches by perusing both the StrongFirst & RKC (Dragondoor.com) websites.

If you like learning by reading, read along!

A Couple Keys to Keep in Mind.

  1. There is a concept known as active and passive shoulder. When you have an active shoulder when someone pulls on your hand, your whole body would come with it. When you have a passive shoulder, it means that your shoulder moves independently of your body. We’re looking to keep your shoulder active the entire time.
  2. You’ll naturally press into the hand that’s holding the kettlebell, but I also want you to press into the ground with your bottom hand like you’re a wide receiver trying to stiff arm the safety as you run to the endzone for a touchdown. This will allow you to keep the shoulder in a safe position, not increasing your risk of shoulder pain.

Ready to learn? Let’s start then.

Drive to the Elbow

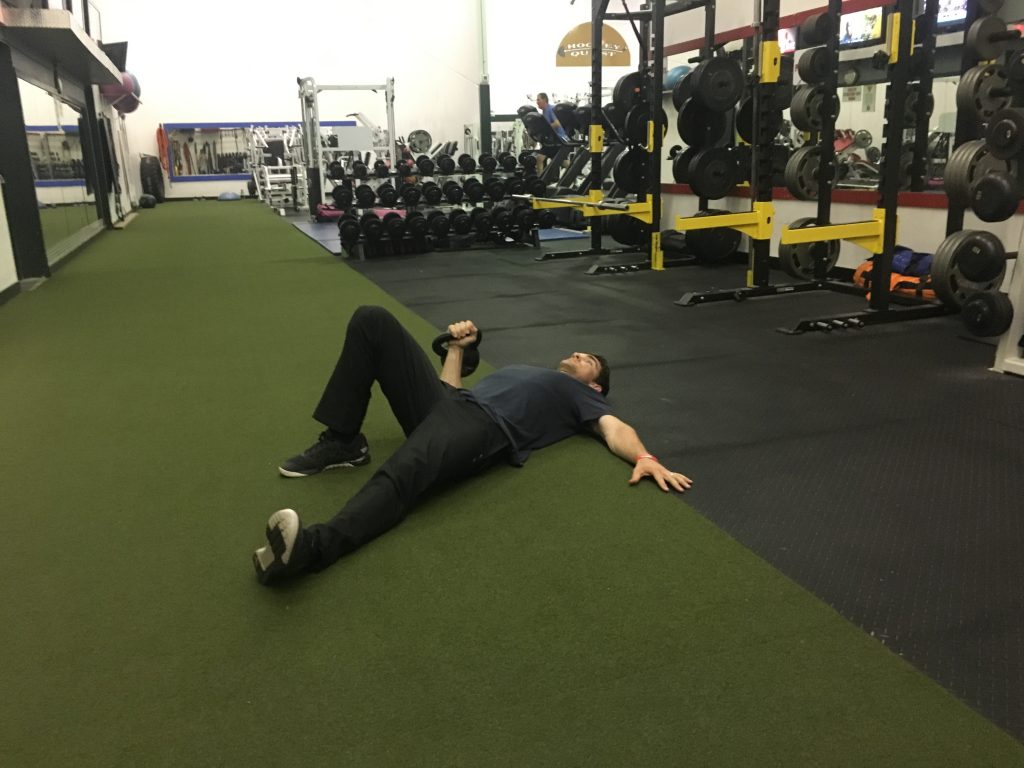
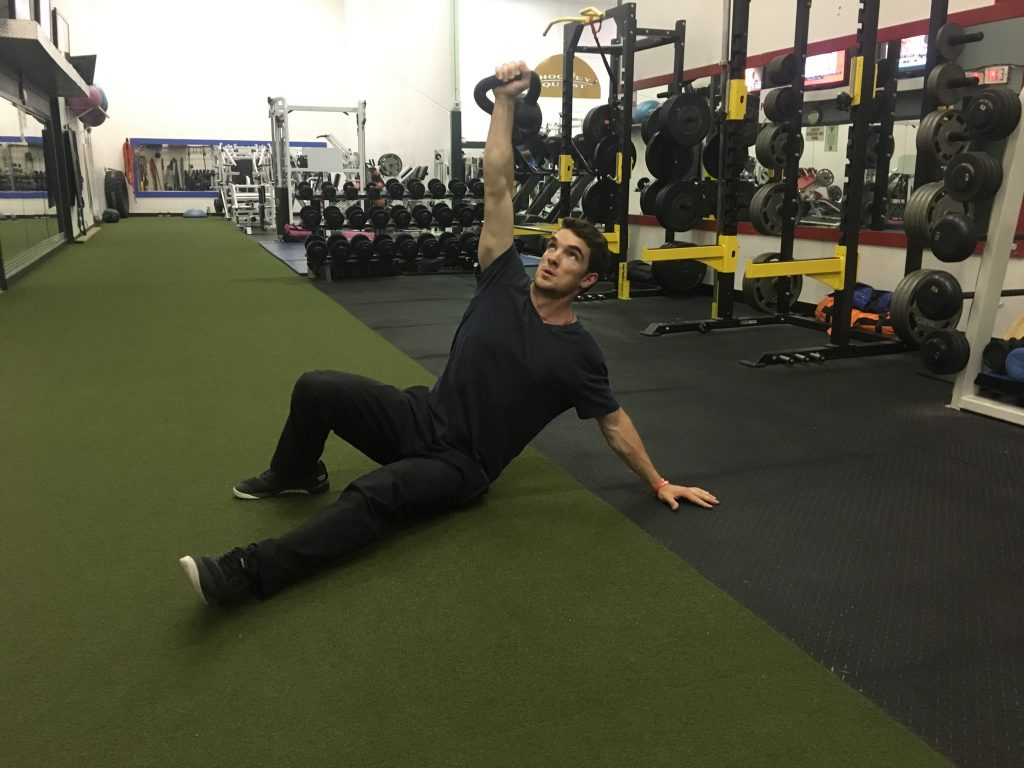
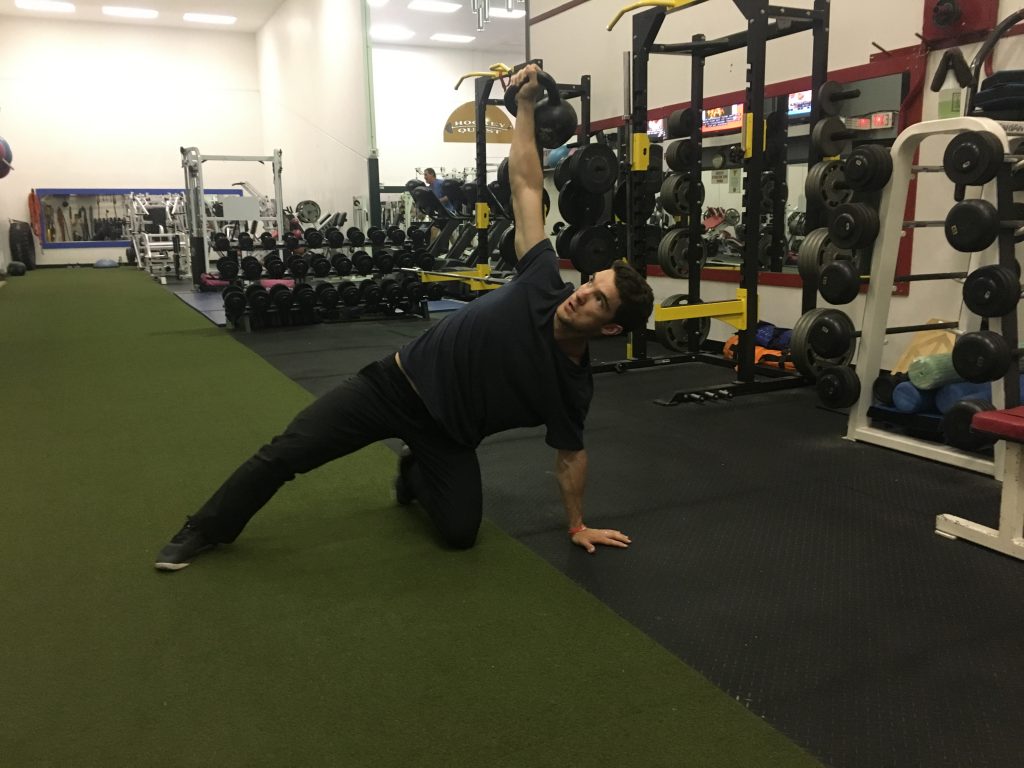
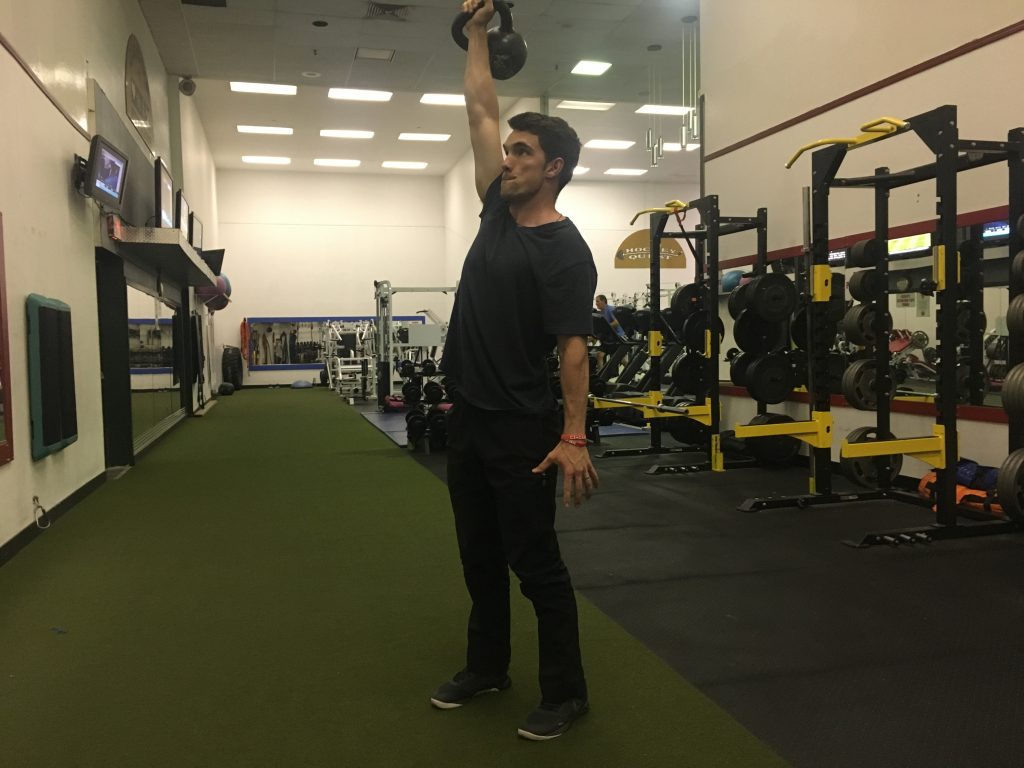
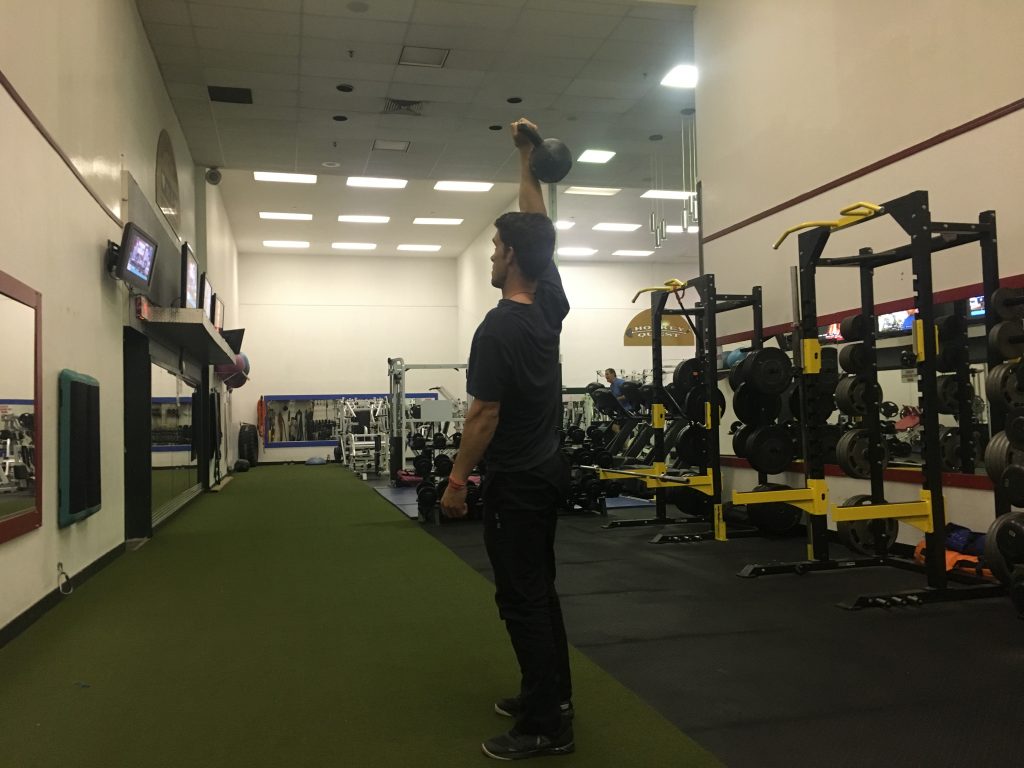
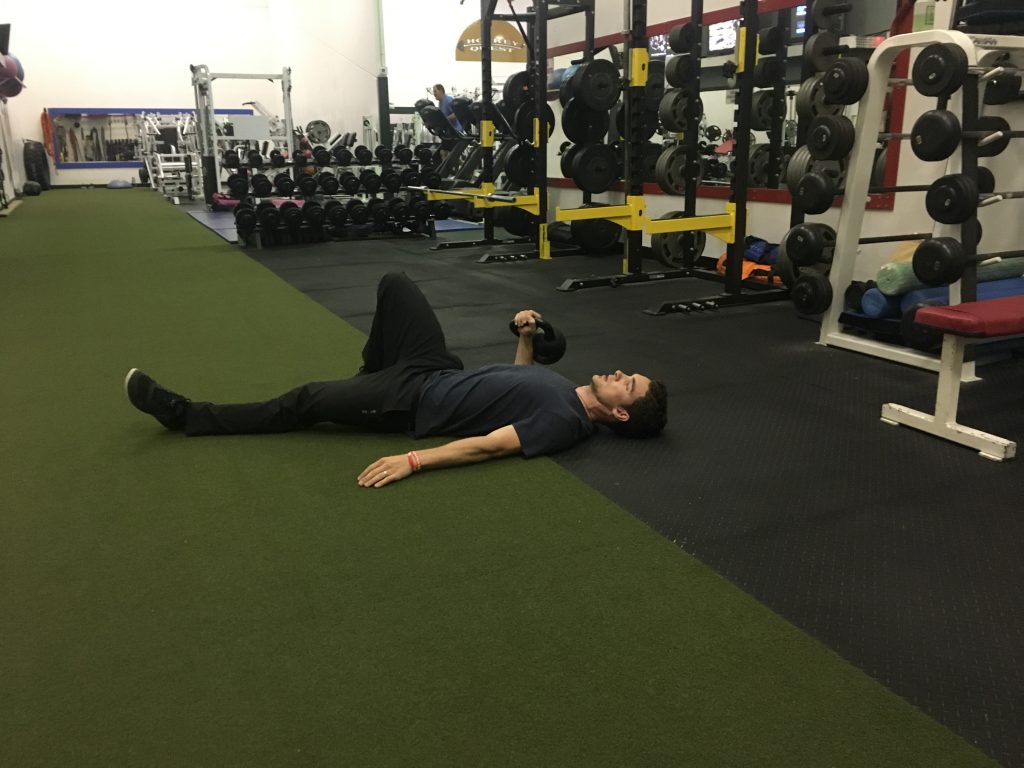
Assume you’re using your right hand. Start with the kettlebell directly above your elbow at a 90 degree angle. Your right knee is at a 90 degree angle with your foot on the ground. You will look like the following:


From here, drive the kettlebell across your body as if you’re going to punch someone. Push with your right leg as well.

As you drive the kettlebell in the air across your body make sure you push through your elbow into the ground. When you do this, your shoulder is less likely to get injured.

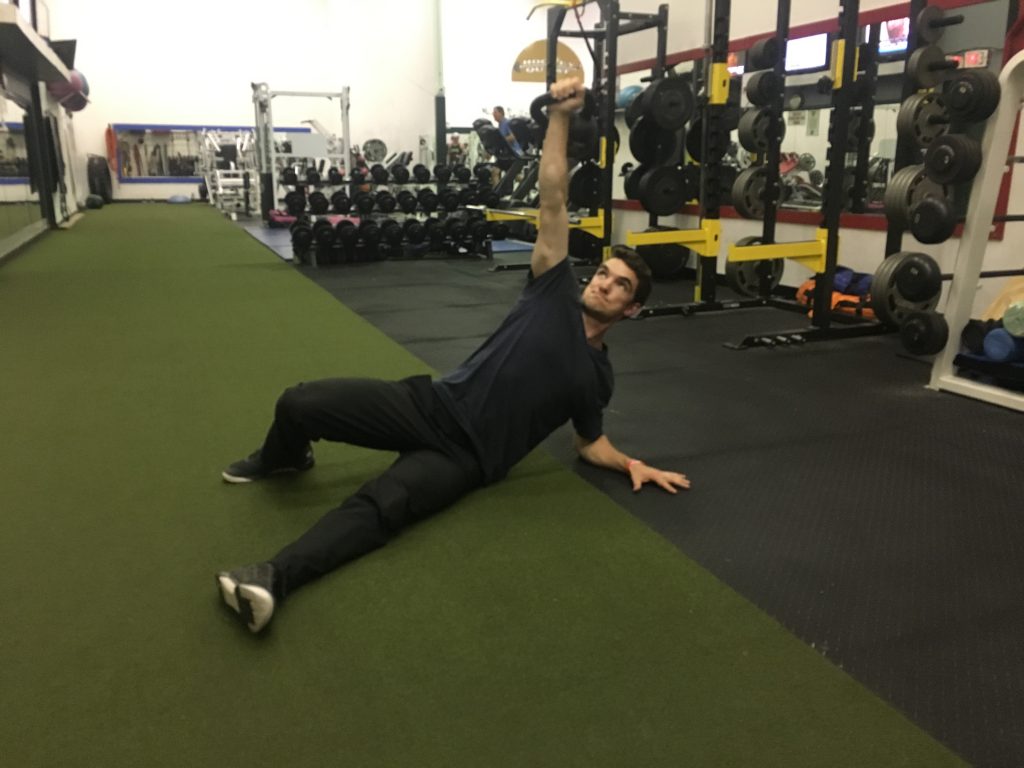
Part 1 done! At this position, you should feel your back turned on, your shoulders nice and warm, and core turned on too. Finish position below:

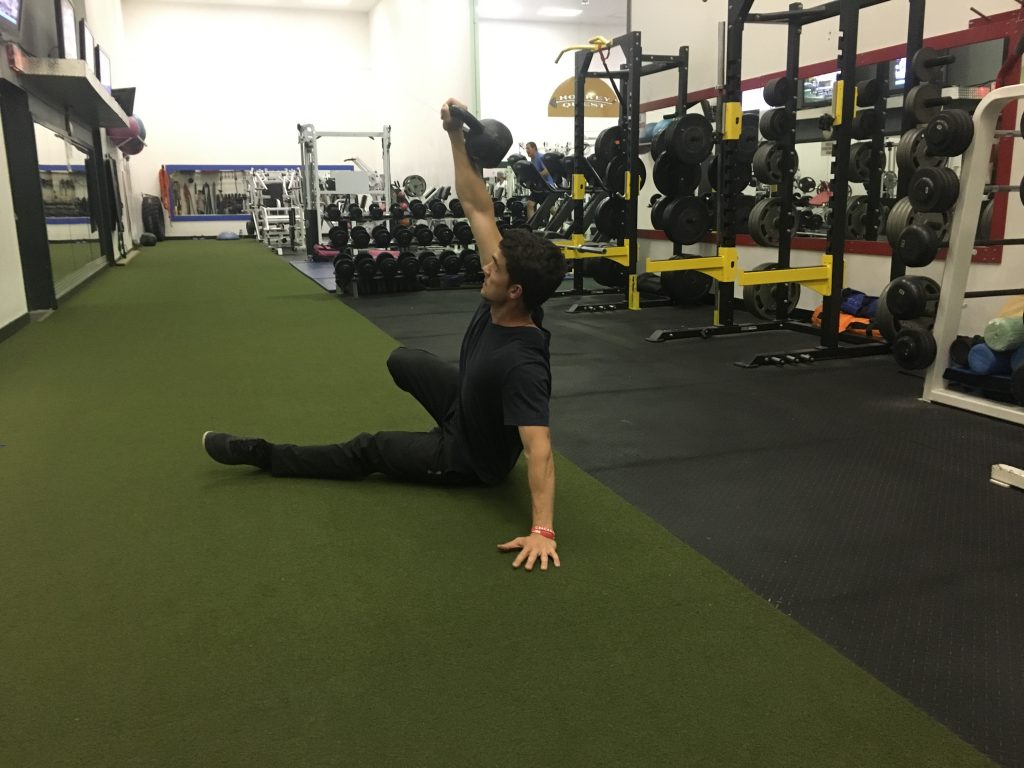
Press to Hand

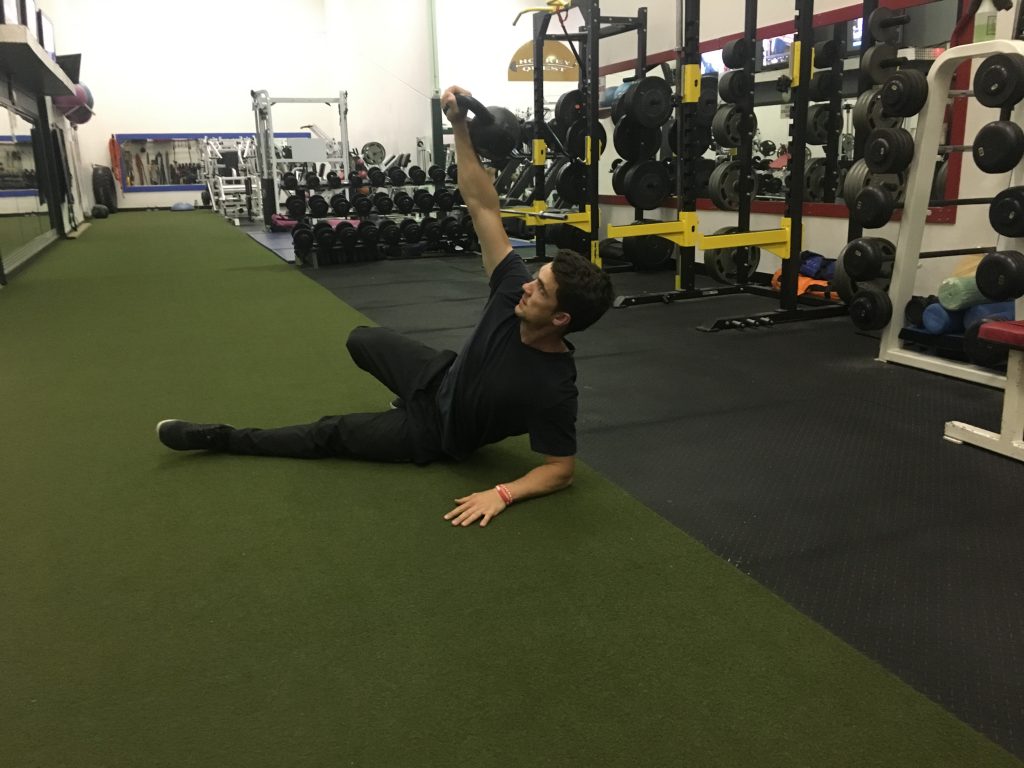
With your right hand in the air, extend your left elbow and squeeze your tricep as you press up onto your hand, just like a tricep extension. When you finish you will look like the following:

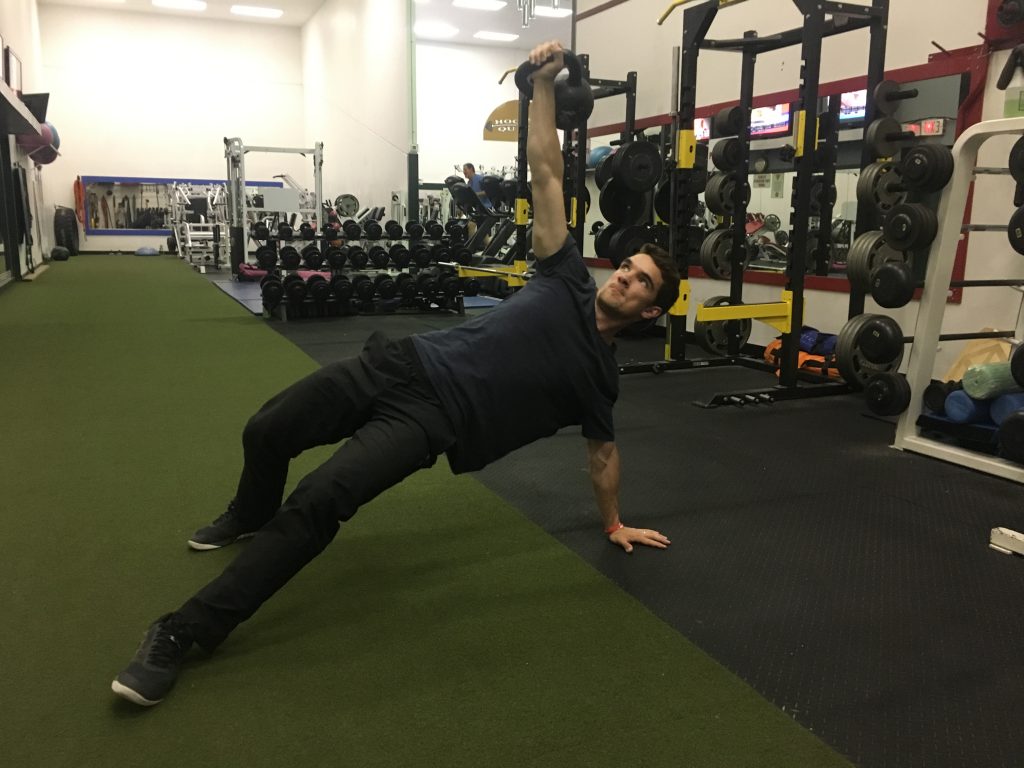
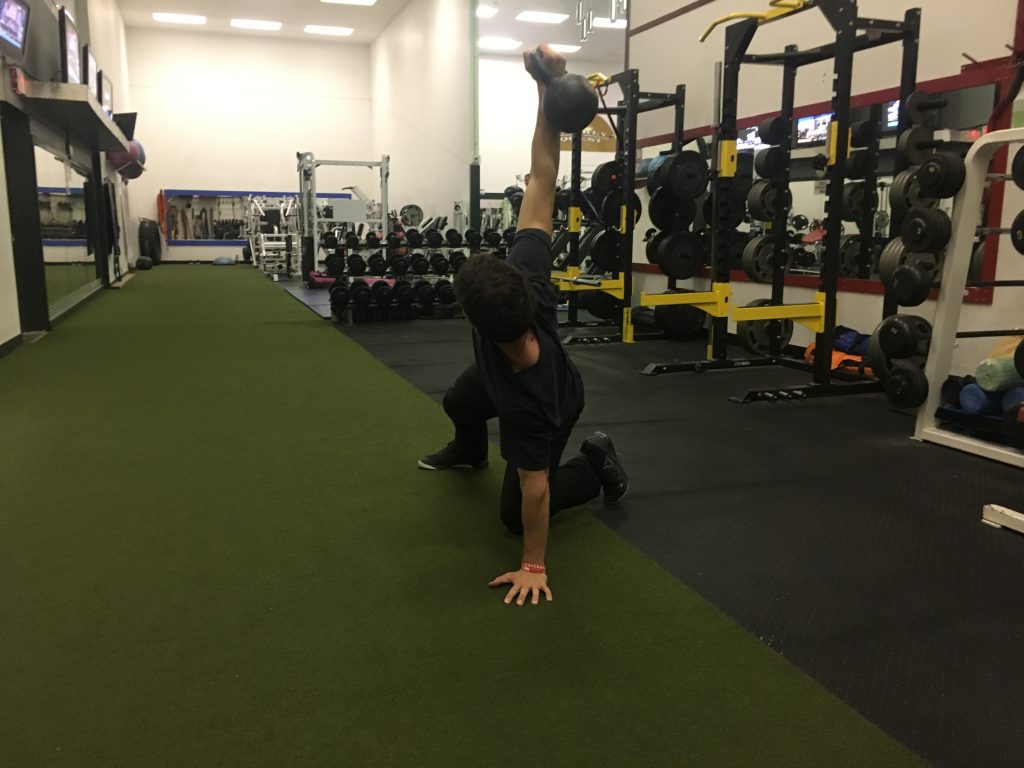
Hip Bridge

This step can cause the most problems with trainees. Make sure your both the bell hand and the hand on the ground are stable. When here, drive your hips up in the air by aggressively squeezing your glutes.

Like a deadlift.

Or other fun activities 😉

The higher you can get your hips, the easier the next step will be.

This is the finish position:

Note From TG: As an alternative, and I hope Linden doesn’t mind me poking my opinion into the mix, I’m not married to trainees always performing the high bridge option. Both Gray Cook and Dr. Mark Cheng (the latter likely should get more credit) note that this is a “speed bump” or fork in the road to the get-up.

Meaning we have some options.

There’s the high-bridge option which is delectable option for those with optimal hip mobility and hip flexor length.

And then there’s the non high-bridge option where one more or less sweeps the leg – Johnny Lawrence style – and transitions to the half kneeling position from sitting.

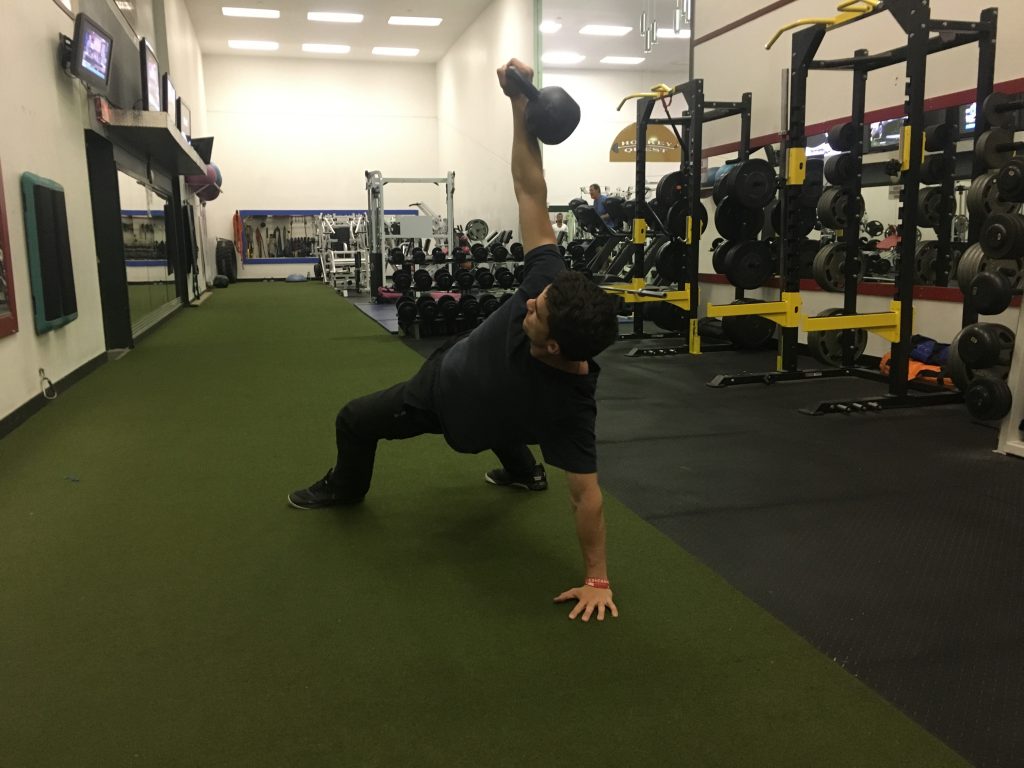
Sweep the Leg

From here, you’re going to take your LEFT leg, and sweep it underneath your right leg and place your left knee directly underneath your hip. Your right arm will still be in the air, and your left hand directly below your right. You will look like the following picture:

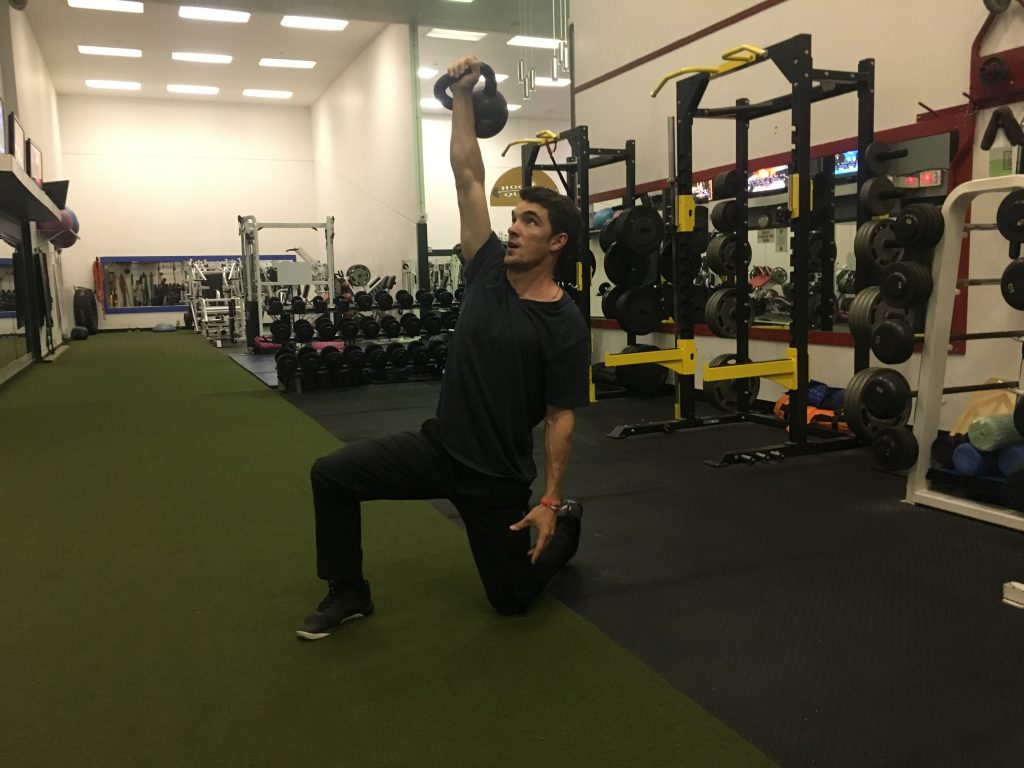
Half Kneeling Position

This isn’t a movement, but the position you end in. You DON’T use your back to get to a kneeling position with the bell above your head. Instead, you’re going to brace your core, squeeze your butt and push your hips underneath your upper body as you press the weight up.

Your butt is fully engaged here as you keep the weight up. Keep your core tight as the tendency here will be to use your lower back to keep the shoulder stable.

The picture of the position is below.

Note From TG: Hey, it’s me again. This is yet another speed bump to the Get-Up. The most popular option to transition to the half-kneeling position is the “windshield wiper” the back leg and position into half-kneeling. 

This is fine.

However, it can oftentimes feel wonky to a lot of trainees. 

Another option I like is this:

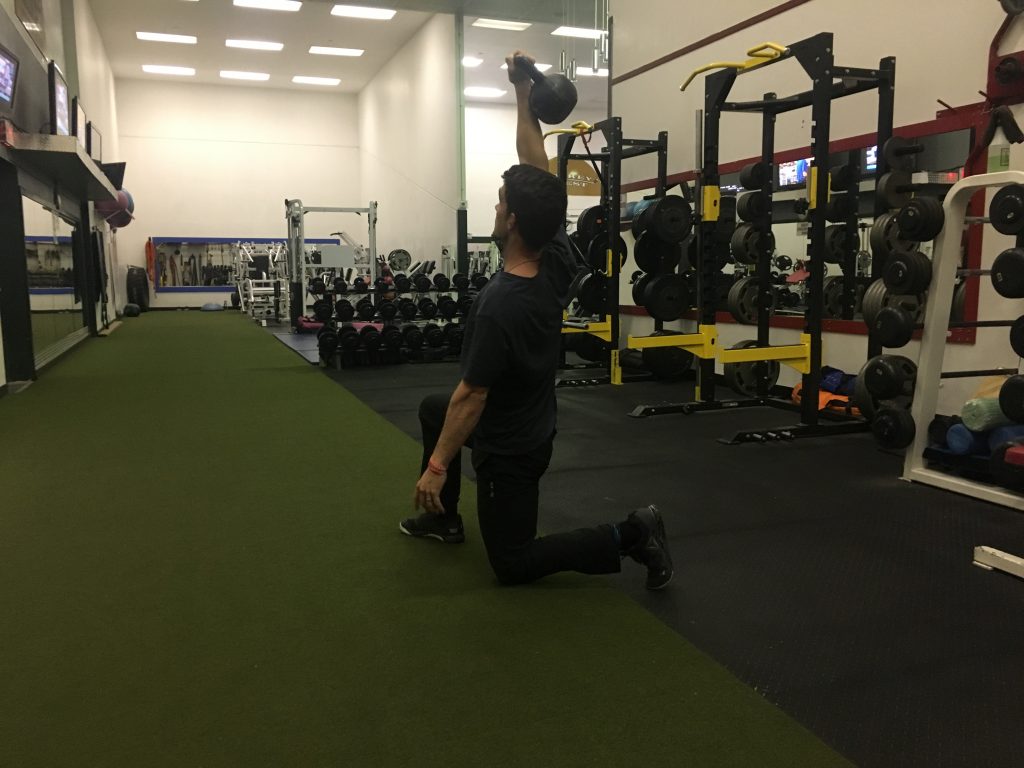
Stand Up

This is essentially where we stand up from a lunge. With the weight over our head, we’ll stand up using the entirety of our legs. Stand up from there.

Finished position below:

With that, we’re going to reverse this whole process to lie back down.

If you understood all that and put it into practice, then you might have successfully completed your first turkish get-up.

OR you might have picked up a couple cues to clean up your relatively hideous one.

Where Should You Put It In Your Workout?

Without understanding how to put it into your workouts, it does you no good. There are three places where I would suggest using them.

  1. As a Warm-Up. Since this uses every muscle, depending on your workout for the day, you can emphasize different steps to get specific muscle groups prepped.
    Doing upper body? Spend 3 Seconds in each position until you Sweep the Leg. Got a killer deadlift workout coming? Spend 3 Seconds in each step from the hip bridge on.
  2. Use it as part of your strength programming. This can work as your second or third exercise in an upper body day or your full body workouts. Due to the length of this exercise, if you’re looking to get stronger, I would suggest sets of 3-5 reps with a heavy bell. Start with 35lb as a man, and 15-25lb as a woman.
  3. Use it for conditioning. With a lighter bell than you would use for your strength work, set a timer for 10-15 minutes and see how many good quality Get-ups you can do in the time frame. Alternate your hands every rep or after every second rep. Challenge yourself to be better next time.

If you want a good challenge, one of my new favourite conditioning combos is to use turkish get-ups and overhead walking lunges together. Check out the video below to see how to perform it.

If you follow this step by step guide, along with download the accompanying video, you’re going to master this exercise in no time. Use this exercise, abuse it, and thank the fitness fairy godmother for this one when you get a chance.

About the Author

Linden Ellefson,

Bkin, CPT

Linden is a Calgary, Alberta personal trainer and online coach. He loves good coffee, his Boston Terrier Taco, and a great workout. Most of all, he loves making his clients the strong, pain free, athletic beasts they were meant to be.

To find out more from Linden connect with him at www.lindenellefson.com Facebook (he’s the only Linden Ellefson), or on Instagram.

CategoriesExercise Technique Program Design Strength Training

9 Ways to Progress the Landmine Press

At the expense of coming across as the cantankerous, meanie-head strength coach for saying it, I’m going to go a head and say it anyways:

Exercise, for most people, most of the time, should be mind-numbingly monotonous.

Boring.

It should be boring.

Copyright: AlienCat / 123RF Stock Photo


I get it: boring isn’t sexy. And it sure as shit doesn’t help sell DVDs or keep people’s attention at 3 o’clock in the morning watching the latest infomercial on how performing 47 different bodyweight calisthenics while juggling two machetes – you know, to keep the body guessing – is the key to your ultimate body.

BONUS: If you order within 30 minutes you’ll also receive a month’s supply of grass-fed acai berries soaked in the belly-button sweat of a Centaur.

Because, why the fuck not? And, science.

People have been sold on the idea of incessant novelty and variety being the determining factor in getting results at the gym.

I disagree.

“The greatest gap in most people’s training isn’t lack of novelty, but rather lack of mastery.”

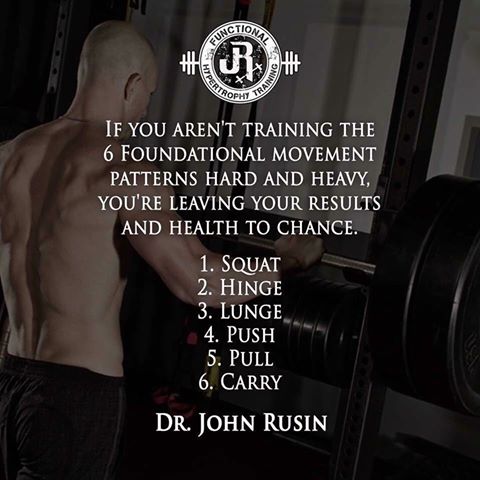
It’s telling, then, that many of the most popular training programs around and top coaches in the industry often predicate their roots and training around these basic movements: squat, hinge, push, pull, lunge, carry.4 That’s it.

That’s about as un-sexy as it gets.

However, what’s often lost in the age of exercise ADD is that those six categories alone can be broken down into hundreds of iterations when you factor in variances in grip used, stance used, sets/reps, load, tempo, speed of movement, not to mention barbell vs. dumbbell vs. kettlebell vs. bulldozer (depending on how ginormous of a human you are).

There’s more than enough variety to keep even the most strident exercise enthusiast satiated for a fitness lifetime.

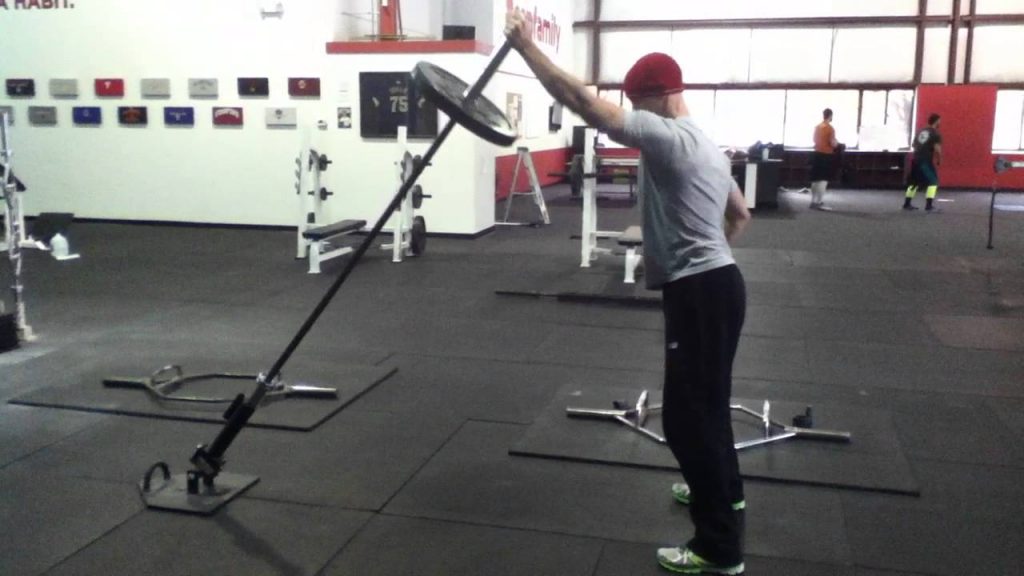
To that end, I can see why some people aren’t as enamored with the Landmine Press as others.

Upon first glance it’s the vanilla ice-cream or NASCAR of the strength and conditioning world.

“Oh, you mean, like, you just press the barbell up and down like that? At an angle? Repeatedly?

Cool.”

via GIPHY

It’s nerds like me who can see the bigger picture and can appreciate how valuable of an exercise/drill the Landmine Press is.

I’ve waxed poetic enough in the past on the importance of overhead mobility and people’s lack of ability to do so in a safe and efficient manner.

You can check THIS article out; or THIS one; or THIS one; or not.

I’m cool either way.

In the end, it’s a fantastic, joint-friendly way to perform “fake” overhead pressing for those who lack the requisite range of motion to do so.

Pressing up and down, at an angle, indeed, while seemingly boring, helps keep people out of their “danger zone”…yet still glean an effective training effect that helps build strong shoulders, core, and general levels of badassery.

And as much of a champion of monotony as I am, I can appreciate that, after a certain amount of time, it’s often prudent to up the ante and provide more excitement and, GASP, variety to the movement.

Here Are Some of My Favorite Progressions/Regressions/Lateralizations (Whatever Word Piques Your Interest Most) of the Landmine Press

1) A Quick Primer on Set-Up and Execution


In general, much how I program my warm-ups, I prefer to progress my landmine variations from the ground to standing. When you adopt a tall kneeling or half-kneeling stance you take joints out of the equation (ankles, knees, hips, lumbar spine) and provide less of a window for people to default to aberrant movement patterns that can cause injury or exacerbate any painful symptoms they may have.

2) Tall Kneeling 1-Arm Landmine Press


I should note there are a handful of tenets with regards to technique across the board:

  1. Abs and glutes engaged. Both will nudge people into a little more posterior pelvic tilt and less likely to crank through their lumbar spine.
  2. If you are performing these 1-arm at a time I like to cue people to make a fist with their free hand to encourage more full-body tension.
  3. The shoulder of the working arm should not “dip” or round forward on the lowering phase.
  4. Keep the chin tucked.
  5. When appropriate, there should be a slight “reach” (or shrug) at the top to more fully engage the upper traps (which play a role in scapular upward rotation).
  6. Also when appropriate, play some Wu-Tang.

3) Half Kneeling 1-Arm Landmine Press


This is probably my favorite variation regardless. I like this one because we’re hitting a lot of problematic areas at once: shoulder health (upward rotation), rotary stability, hip flexor length, and glute activation (on kneeling side).

I prefer to coach people to dorsiflex the toes of the back foot (dig them into the ground), but in the end it comes down to whatever feels better for the person.

4) Half Kneeling Sideways Landmine Press


This is one I stole from my buddy Dean Somerset.

Here we’re training more in the frontal plane, which is important…cause we should get people out of the sagittal plane once they master it.

NOTE: you could also combine this one into a 1-arm clean-to-press hybrid movement if you wanted.

Honeybadger don’t give a shit.

5) Plain Ol’ Boring Standing 1-Arm Landmine Press


You can toss in a few curveballs here. You can adopt a staggered stance (one foot in front of the other), which makes things more challenging due to a narrower base of support.

You can also add bands into the mix.

6) Band Resisted Landmine Press


I like adding bands because it provides an added challenge to the anterior core musculature, in addition to forcing the lifter to control the eccentric portion of the lift more.

We can also make the case it “saves” the shoulders even more in that the band automatically decelerates the movement at the top.

Also, on a side note: When the hell are Jon Snow and Daenerys going to hook up on Game of Thrones?

7) Side to Side Landmine Press


This is a great option for when you want to be a little more aggressive with loading.

8) 2/1 Technique Landmine Press


The 2/1 technique is a concept I picked up from Christian Thibaudeau years ago, and something I’ve used in my own programming and that of my clients ever since.

We all know that we can handle more weight on the yielding (eccentric) portion of any lift compared to the overcoming (concentric).

The 2/1 technique takes this into account.

The idea is simple: Press up with both arms (preferably, in an explosive manner) and lower with one under control.

9) Deep Squat 1-Arm Landmine Press (<– Only For Those Who Want to Hate Life)


I hate this one so much. And by hate, I mean love.5

Assume a “deep” squat position and press away.

This can also be performed 1-arm at a time.6.

10) Z Landmine Press


I wasn’t sure where to place this one, so I guess I broke my “from the ground up” rule here.

Whatever, it’s my blog, I can do whatever I want.

Like, yell out “I’m Batman!” or post a picture of a unicorn shitting rainbows and cupcakes.

This one is a doozy and requires someone exhibits sufficient t-spine extension to perform well. Even though it’s a ground-based variation I’d be reticent to place have beginners perform this one.

That’s It, Folks

I hope you learned a few new variations in today’s post. If you have some of your own you’d like to share please feel free to post them in the comments section here or on Facebook.

BONUS Option

Because nine sucks, here’s a 10th variation.

Viking Landmine Press


If you have the Viking attachment (which you can purchase HERE) you can add another nice variation, which includes a neutral grip option.

Helmets sold separately.

Categoriescoaching Exercise Technique

Why I Love These 2 Simple Cues to Clean Up the Front Squat

There was a time in my training career when I despised front squats. I hated them in fact. They never felt good.

Copyright: gekaskr / 123RF Stock Photo


But when does any form of squatting feel “good?”

I mean, that’s the last adjective I’d use to describe them. A back massage feels good. Hitting a walk-off home-run feels good. Hell, I’d argue getting kicked in the balls feels good compared to a heavy set of front squats.

The set-up is kinda wonky and you’re always at the risk of suffocating yourself – not the greatest feeling in the world when you’re trying to lift heavy things. Then there’s that annoying part where the barbell inevitably starts to roll off the shoulders.

Each repetition is a battle against gravity (and patience).

It sucks.

The front squat JUST SUCKS.

That said, I’d be remiss to ignore the front squat is still a staple exercise I prefer to incorporate myself and something I have most of my clients perform as well.

Why?

  • They’re joint friendly – almost always a better option for those with a history of lower back and knee pain.
  • They allow most people to attain a deeper depth.
  • They’re (arguably) easier to perform compared to back squats. They allow a more upright torso (which plays into the deeper depth thing), and for anyone who lacks the requisite upper back and/or shoulder mobility (abduction/external rotation, T-spine extension) front squats are a superb option.
  • They help build a monster set of legs, help bulletproof the core, and turn your back into the size of Rhode Island.

I’d go into more of the particulars but 1) I’m lazy and 2) my good buddy, Eric Bach, already did and wrote an excellent article on the front squat HERE that I could’t possibly top.

Go read it, seriously.

Anyways, as much as I tend to belly-ache about how much the front squat makes me want to slam my face into a brick wall, I do prefer performing them over back squats.

Mainly because, and I can’t believe I’m about to say this…

I’m 40 now, not 25.

It’s not lost on me that my 25 year old self would Sparta kick my 40 year old self in the pancreas for uttering the “I’m 40 now” line.7

However, while I don’t expect my N=1 anecdote to reflect everyone else’s experience, if I were a betting man I’d put everything on black that a vast majority of people reading feel the same way.

Stuff just feels different at 40 compared to 25.

Relax internet, I still back squat.

But not as much as I used to, and not nearly as heavy. If I were to be honest, I back squat juuuuuuust enough to maintain a decent enough number in addition to having enough of a carry over to my deadlift. After that I don’t give a shit.

I’m not a powerlifter, so who cares?

Besides I DO feel I get more out of the front squat (see reasons above), and more importantly it just feels better and doesn’t beat me up as much. And while I’m not winning any internet dick measuring contests by posting this, I have worked up to a 300+ lb front squat which is nothing to sneeze at.

My 2 Favorite Front Squat Cues

The biggest issues I find with most trainees with regards to the front squat is bar placement on the shoulders and the fact the bar has a tendency to roll off the shoulders. Both are annoying, but both have a simple solution.

Check out this video below – it’s short – to find out my two “go to” cues for cleaning up front squat technique. I hope it helps.

NOTE: T-shirt game is on point.

Categoriescoaching Exercise Technique

Landmine Press: Cues and Mistakes. And How To Make It More Functional

I’ve long been an advocate of the landmine press. Not only is it one of my favorite “shoulder friendly” pressing variations, but it’s one of my favorite pressing variations in general.

It gets you jacked and ripped and your shoulders feeling like a million bucks. If it’s performed correctly.

The landmine press doesn’t come without it’s own set of snafus and mistakes. Below is a quick video I shot that breaks down a few “big rock” things to consider as far as execution and common mistakes people make when performing it.

(Cough, cough, hint hint): If you want to dig a little deeper on shoulder (and hip) shenanigans you should check out Complete Shoulder and Hip Blueprint, currently on sale at $100 OFF the regular price through July 5th.

Do it. DO IT.

Landmine Press Cues and Mistakes


BONUS “Functional As Shit” Landmine Variation

Categoriescoaching Exercise Technique

Deadlifts Are Only Dangerous Because You’re Unable to Coach Them

I doubt there’s any more dichotomous exercise in existence than the deadlift. Those who like it, really like it. Those who hate it, really hate it.

Copyright: andreypopov / 123RF Stock Photo


On the “Like It” side of the fence are powerlifters, people who like to lift heavy things, Gandalf, and otherwise those who view it as a basic movement pattern (hip hinge) which helps people get bigger, faster, stronger, more resilient, less likely to breakdown, and less likely to die during the impending zombie Apocalypse.

Gracing team “Hate It” is an eclectic group as well. While there are exceptions in each example given below, in my experience, those who have beef with the deadlift tend to be primary care practitioners, some physical therapists, some chiropractors, some fitness professionals, 90% of yoga instructors, every person with a vested interest in selling a product preying on women’s irrational fears of getting bulky, and rabbits.

I can’t explain it. Rabbits are weird.

Believe me when I say this: The list above is not concrete. I have many friends and colleagues who are physical therapists, chiropractors, yoga instructors, and the like who are fans of the deadlift and use it routinely with their clients/athletes/patients.

It’s just that, more often than not, whenever I do hear someone speak ill of it, it’s almost always someone with a lot of letters next to his or her’s name (or with limited experience in the weight room).

Take this recent email I received from a chiropractor friend of mine:

To answer your question:

1. Seriously, I can’t explain the rabbit thing.

2. A Pars Fracture is one of the most common causes of low back pain in general population clients, but also adolescent athletes. It involves a small connecting bone in the lumbar spine called the pars interarticularis, and it’s an area that’s (generally) compromised when excessive extension and rotation of the spine enter the mix.

As far as youth athletics is concerned, I saw this a lot in my time at Cressey Sports Performance as a result of one of two scenarios:

  • A sedentary kid jumps right into playing a rotational sport (baseball) without any window of preparation. These were the kids who would wait until a week or two before the season started before participating in any strength & conditioning work.
  • An overzealous kid (or, rather, parent) plays a sport, one sport, year round, and develops a pattern overload injury.

In both cases there can be deleterious effects, at worse, a condition called Spondylolisthesis or “spondy” or end-plate/pars fracture.

With regards to general population, many of the above still applies. But usually it’s a sedentary lifestyle resulting in poor hip mobility, t-spine mobility, which then compromises spine integrity resulting in faulty movement mechanics.

I.e., being “stuck” in extension.

As an example:

Deadlift Setup: Overarch/Gross Extension/Gross in General

Deadlift Setup: Doesn’t Make My Corneas Want to Jump Out of Their Sockets

In the first picture there’s an exaggerated extension pattern, which, over time, could (not always) have negative ramifications on spine health.

If so, fix it!

Clean up/regress the pattern to where someone is successful, limits compensation patterns, and can “own” the movement. Remember: A deadlift isn’t just a loaded straight bar on the ground.

Don’t demonize an entire exercise and label it the root cause of a specific type of back pain because you’re unable to coach it well or understand how to scale it correctly to fit the needs, injury history, and ability level of an individual.

What’s to say any ONE thing is the culprit in the first place? We don’t really know what cause back pain:

  • Lack of hip internal rotation.
  • Repetitive flexion, repetitive extension.
  • Weak anterior core.
  • Weak glutes.
  • Kitten cuddles.

It could be anything.

I think any health/fitness professional who frames any one exercise or modality as all-encompassing “dangerous,” at all times, for every individual, and is the root-cause of any one specific injury, is doing the industry a disservice.

The words we use and how we frame things can set a toxic precedent.

Messages That Can Harm People With Back Pain

Note: I found this list somewhere on the internet and saved if for a time I’d need it, like this. I have zero recollection where I found it, and I don’t even remember there being a source.

Regardless, thank you to the person(s) who made it. Please don’t sue me for plagiarism.

Promote Beliefs About Structural Damage/Dysfunction

  • “You have degeneration/arthritis/disc bulge/disc disease/a slipped disc”
  • “Your back is damaged.”
  • “You have the back of a 70 year old.
  • “It’s wear and tear.”

Promote Fear Beyond Acute Phase

  • “You have to be careful/take it easy from now on.”
  • “Deadlifts are dangerous/you should avoid deadlifts from now on.”
  • “Your back is weak.”
  • “You should avoid bending/lifting.”

Promote Negative Future Outlook

  • “Your back wears as you get older.”
  • “This will be here for the rest of your life.”
  • “I wouldn’t be surprised if you will always be in pain.”

Here’s my response to all of that:

via GIPHY


Messages That Can Heal People With Low Back Pain

Promote a Biopsychosocial Approach to Pain

  • “Back pain doesn’t mean your back is damaged. It means it’s sensitized.”
  • “Your Back pain can be sensitized by awkward movements, postures, muscle tension, inactivity, lack of sleep, stress, etc.”

Promote Resilience

  • “It’s very rare to do permanent damage to your back.”
  • “Your back is one of the strongest structures of your body.”

Encourage Normal Activity and Movement

  • “Your back gets stronger with movement.”
  • “Motion is lotion.”
  • “Protecting your back and avoiding movement can make things worse.”

Because It’ll Make You Feel Better To Say It

  • “The next time you tell me deadlifts are bad or dangerous, I’m going to tell you to eat a bag of dicks.”

Or, Maybe Don’t Do That and Take This Sage Train of Thought From Dean Somerset

“Anything “could” be bad if done improperly, or for the wrong reasons, wrong volume/load, or in people who don’t qualify to do the exercise. I would say it’s best to not blame the exercise as a cause, but to understand the mechanism of the injury and see if the exercise could contribute to it or not. There’s a lot of injuries that can come from deadlifts, not limited to only pars fractures.
I wouldn’t avoid programming them for people due to this alone, but would progressively build people up to doing them well and under control with a load that is within their abilities to perform and recover from appropriately.”

We owe it to ourselves (and the industry) to be a little more open-minded, responsible, and less magnanimous at making such boisterous claims.[WU-TANG’s FOR THE CHILDREN.[/efn_note]

CategoriesExercise Technique Program Design Strength Training

An Ode to the Meadow’s Row

As odes are concerned, you can relax: this post is not a poem.

However if I were to give my poem writing skills a test-drive it may look a little something like this:

Meadow’s Row, Meadow’s Row.

Thou shall build superior backs.

Lats, lats.

More lats.

I like bacon.

Copyright: 20er / 123RF Stock Photo


Seems how I won’t be giving Langston Hughes a run for his money anytime soon, lets get into the meat and potatoes of the Meadow’s Row and why I like it so much.

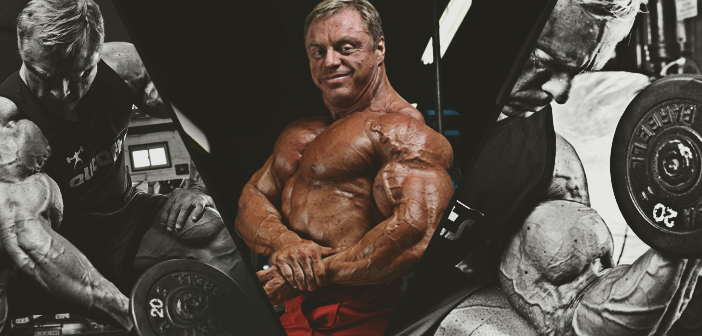
First off, John Meadows, the guy who popularized the movement, is a brick shit house:

It’s long been a staple exercise in his routines, and, if you want a back the size of Nebraska, like John, you’d be remiss not to start peppering it into your exercise routines as well.

I’ve been a big fan of the Meadow’s Row for awhile, ever since I first saw John mention it in THIS article over on T-Nation a few years ago. It wasn’t until earlier this week, however, when I posted the picture below on Instagram that I felt compelled to write about it.

Julian getting an early introduction to one of my favorite back exercises: the Meadow’s Row.

A post shared by Tony Gentilcore (@tonygentilcore) on

Basically, someone saw the picture and asked if I’d discuss coaching cues and provide a few videos?

Given I’ve been in a little “coming up with new content funk” I was more than happy to oblige. So, here you go.

The Meadow’s Row


What Does It Do? –  I’d like to preface everything by saying I do feel it’s important for most trainees – especially beginners and intermediates – to pump the brakes a little and learn to perform a strict 1-Arm DB Row first.

You can start HERE.

But also, check out THIS article from Lee Boyce.

The 1-Arm DB Row should not be performed in a straight up and down motion. This often leads to faulty mechanics and people “rolling” their shoulder(s) too far forward due to excessive humeral extension.

The resultant abducted and anteriorly tilted scapular position makes it cumbersome to target the upper back muscles, which is kinda the point of the exercise in the first place. So, there’s that.

Rather, the more kosher way to perform them is to have the DB move in an “arc” fashion; forward and back. This does two things:

  1. When conjoined with the cue “bring your elbow to your hip or back pocket” it prevents the elbow from going past the midline of the body, avoiding that “rolling” of the shoulder mentioned above.
  2. It matches the fiber orientation of the lats, which is what we’re really trying to target.

Side Note: I also agree with Lee that you can only be so strict with the DB Row for so long before it loses its moxy.

Meaning: I think it is important to be strict – at first – so that you can target the scapular retractors (namely, rhomboids). However, it won’t take long before the limiting factor of how much weight you can use is, you know…being strict.

As Nick Tumminello notes in THIS excellent article, two things to consider are the Resistance Curve and Strength Curve of any exercise.

The Resistance Curve: This refers to how the load changes throughout the range of motion based on changes in lever-arm (or moment-arm) length.

The Strength Curve: This refers to how your strength changes throughout the range of motion of a given exercise, which is due to a principle of physiology known as the length-tension relationship or the length-tension curve.

Photo Credit: T-Nation.com

Muscles have the lowest potential to produce force when they’re either fully elongated or fully contracted – somewhere in the middle is when they produce the highest amount of tension.

Moreover, when performing a horizontal row (like a 1-Arm DB R0w) the lever arm gets LONGER at the end range of the concentric motion (when your humerus is perpendicular to the ground).

As Nick notes:

This is why you often see lifters pull the weight halfway with good form, then jolt it the rest of the way when doing exercises like barbell bent-over rows and one-arm dumbbell rows. It’s also why you see so many people turning their torso towards their rowing arm as they pull the dumbbell in on dumbbell rows, along with seeing people staying too upright on bent-over barbell rows and one-arm dumbbell rows, or leaning back to far when performing seated rows or machine rows.”

Anyways, I’m a firm advocate for coaching strict technique in the beginning. But we also need to recognize said strictness can be a limiting factor if muscle growth is a goal.

And, it is…..always……….;o)

By all means, be strict!

Just know you (likely) won’t be turning any heads or building an impressive upper back with your “strict” 45 lb rows.

So What is it About the Meadow’s Row That I Like So Much?

  • It builds ginormous backs.
  • Specifically, it hammers the lats (which is your largest back muscle).
  • It makes you feel like a badass diesel motherfucker.
  • It’s fun to do, and nice change of pace from plain ol’ vanilla DB Rows.
  • A great option to go heavy if your gym is lame and doesn’t have heavy DBs.

Key Coaching Cues: 

1. Use straps.

Don’t listen to internet trolls who will tell you you’re “cheating” if you use straps. They brag about 225 lb deadlifts and their parents still pay their phone bills.

Use straps. You don’t want your grip to be the limiting factor on these.

2. John himself advocates you open up your hip closest to the bar. As in: the hip closest to the bar should be higher than the outside hip. I believe he prefers this method as it puts the lats on stretch a bit more.

Either way, play around with hip position and see what feels best for you.

3. I like to support my torso with my “free” hand by resting it on my opposite knee. I feel this takes the burden off my lower back.

4. I still use the same cue: “elbow to back hip or back pocket.”

5. Try to feel a slight “stretch” in the bottom position, when arm is straight.

6. Holy shit, lats for days.

Another option would be to perform the Meadow’s Row with a Meadows Attachment.


The thinner handle helps with grip issues, and won’t result in demerit points if you’re adamant on not using straps.

In addition, you can also play around with different handle positions to see which one you prefer or feel most. There’s no right or wrong here.

NOTE: You can purchase the attachment HERE on Elitefts.com.

And That’s That

If you haven’t already, give the Meadow’s Row a try today. It’s one of my favorites and I’m sure you’ll learn to appreciate them as well.

Categoriescoaching Exercise Technique Strength Training

Stuff I Used to Say, When I Was An Idiot: Squat Edition

I remember the first time I saw Eminem perform. I was at my apartment in between classes watching a little TRL on MTV. It was spring break, 1999. I was in my living room. Many of my friends were somewhere else, not in my living room, galavanting around on some beach in Cancun soaking up some rays and debauchery.

Customary during Spring Break week MTV was also in Cancun, and hoping to catch a glimpse of my friends – and Britney – I tuned in.

Hi, my name is, what? My name is, who? My name is, chka-chka Slim Shady.

Mouth agape with a spoon full of Fruity Pebbles I was like, “what in the what is this?”

Eminem something er other now? Trying to impregnate Spice Girls?

“Pfffft, whatever,” I thought. “He won’t last.”

Ten #1 albums, 45+ million records sold, and one not so sucky movie – 8 Mile – to his credit, I guess you could say I was an idiot.

Eminem didn’t do so shabby for himself.

And while I could sit here and reminisce over you8other past pop-culture snafus I made….

  • Chicks will always dig stone washed jeans.
  • Robert Downey Jr will never make it as Iron Man.
  • ABC’s What About Brian? (2006) will become the next Grey’s Anatomy or Lost. It’ll be a sure fire hit.9

…lets not bask too much in my ineptitude.

I mean, Adele?

She’s okay. I guess.

Speaking candidly, my “misses” can extend to the coaching side of the spectrum as well. I can think of a few things I used to think or say back in the day that, upon reflection, were pretty idiotic.

What are some examples you ask?

Good question.

1. Telling People to Arch…HARD.

Like many people interested in lifting heavy things I used to read – and still do – anything and everything by the likes of Dave Tate, Jim Wendler, and Louie Simmons.

All three are strong mofos and have, arguably, put out some of the best training advice on getting strong within the past few decades.

I mean, are you going to argue with this guy?

Or this guy?

Or him?

Uhhhh, no.

They’ve all contributed to the greater good of the industry and many of us owe our PRs to any number of articles or resources they’ve produced throughout the years.

That being said, I had to audit myself a few years ago when it came to coaching the squat. After being introduced to the concepts of PRI (Postural Restoration Institute) and listening to other strong dudes like Chad Wesley Smith speak on the topic, I wondered if cueing people to “arch, hard!,” and to” sit back” were the right things to be saying to the bulk of my athletes/clients when they were getting under the bar?

Copyright: Kurhan / 123RF Stock Photo

Very few were competitive powerlifters and even fewer were geared lifers. I.e., none wore squat suits when training (which require an aggressive arch and sitting back to reap the benefits).

To be clear: There are still many very strong dudes (and coaches) who advocate squatting with a hard arch, and that’s their prerogative. The thing to appreciate, however, is that what works and is ideal for a geared lifter won’t necessarily (read: rarely) ever translate well to a non-geared lifter.

If I were to balance the “I want to be brutally strong AND not shit my spine on this next set” teeter-totter, I’d opt for not arching (aggressively).

The ribs & diaphragm are pointing in one direction (up) and the hips & pelvic floor are pointing in another (down).

Put simply, this is all sorts of fuckeduppery not a stable position.

We’re placing a ton of shear load on the spine.

What’s more, this will invariably force the lifter to initiate the movement by sitting back (rather than down. You know, a squat). As a result, often, the chest will fall forward, and the cue we default to is “arch, arch, arch, chest up, chest up, chest up.

This only feeds instability.

A better, I believe, approach (again, for non-geared lifters) is to tone down the arch and adopt what’s been referred to as the “canister” position.

Giving credit where it’s due, the first person I ever heard use this phrase was Dr. Evan Osar. A simple analogy he used was to think of your pelvis as one ring and your rib cage as a bunch of other rings.

We want all those rings to be stacked.

This will nudge us into a more stable, joint-friendly environment

Now, a minor glitch in this way of thinking is that some people think this infers going into posterior pelvic tilt, where we flatten out the lumbar spine.

This is not what’s happening. As you can see in the picture above, my hips are still behind the bar (still very important) but there’s less of an aggressive arch. Telling people to posteriorly tilt their pelvis towards spine neutral is different than telling them to flatten out their spine.

From there it’s a matter of owning the canister position and to squat down rather than back.

2. Knees Forward Instead of Knees Out

The “push your knees out” cue is something I’ve slide-stepped away from within the past year.

To defend my position I’ll need to piggy back off my comment above – the squat, for most trainees, is more about “sitting down” than it is “sitting back.”

I want the squat to look like a squat.

This means there will be forward translation of the tibia over the toes (but not so far that the heels come off the ground) and that there is equal parts knees coming forward and hips going back.

The net result = down.

My good friend, smart-as-balls physical therapist, and owner of Resilient Performance Physical Therapy (in NYC), Dr. Doug Kechijian, stated it best in a Tweet recently:

That’s right: it’s okay, nay, better?, for the knees to travel forward.

Cueing someone to break with their knees almost always negates the need to remind them to push their knees out.

They’ll do it automatically:


I’m all for using less coaching to clean up someone’s technique. The last thing most of your clients need is you barking a plethora of cues at them: “chest up, knees out, eyes forward, chin tucked, what’s the square root of 47?”

Play around with knees breaking first and then sitting down. My suspicions are that things will feel cleaner, more powerful, and the squat will feel like a squat.

Huh, weird.

ADDENDUM: NONE of this is to say I’m right. These are nothing more than cues and approaches that have worked for me in recents months/years with my clients and athletes. You may think I’m batshit crazy, and that’s cool.

I mean, to reiterate, I’ve been wrong on many things prior.

Amazon.com? Such a stupid idea.

I hope you’ll consider these suggestions however, and play around with them yourself. I think you’ll be surprised.

Categoriescoaching Exercise Technique

2-KB Front Squat: A Simple Looking Exercise That’s Anything But

Being a “good” coach and writing effective training programs isn’t about inserting the most demanding or most obnoxious looking exercises for your athletes & clients.

Peruse social media and you’ll inevitably come across any number of fit pros vying for everyone’s attention with elaborate looking exercises ranging from Quasi-isometric deadlifts vs. chains (from a deficit on one leg) to flag-holds with band abduction (think about it).10

I’m being facetious. But I’m not far off from being dead serious.

I’m lame, and could really care less about garnering “likes” by wooing people with circus acts.

Copyright: vadymvdrobot / 123RF Stock Photo


When I watch some of the things coaches put up on their IG feed or YouTube channel I have to wonder if they think about the following:

1.  What’s the likelihood that 3% of their audience can reproduce a modicum of what they’re viewing?

“Look at me, Weeeeeeeeeeeeeeee.”

2. How is said exercise going to help them?

I’m not trying to be a Johnny Raincloud here. I understand that, sometimes, people just want to do shit to do shit.

Great.

Do it.

There doesn’t always have to be a reason or rationale backed up by a Mel Siff quote.

However, too, I feel those who do have an audience and do pride themselves on sharing actionable content (and not just selfies) with the masses, share a responsibility to be practical – more often than not – with the content and information they’re relaying.

Just my two-cents.

Excuse me while I step off my soap-box.

On that note, lets talk about one of my favs.

2-KB Front Squat

I’m not the only coach who’s a fan of this squat variation. Others like Mike Robertson, Artemis Scantalides, Molly Galbraith, and pretty much every coach in the history of ever who’s been affiliated with StrongFirst or RKC certification are fans.

It’s one of my “go-to” squat variations that I use with athletes and general population clients alike for a variety of reasons:

1. It’s un-paralleled with how it helps people learn to appreciate FULL-body tension. The anterior placement of the load forces the core to fire like crazy and helps to promote ideal positioning of the torso:

  • Less rib flair and more of a “canister” position where the pelvis and rib-cage are stacked on top of one another, in addition to the pelvic floor and diaphragm. The abdominals are called into action to resist an excessive arch.

As a result…

  • A more upright torso comes to fruition which helps to offset excessive shearing of the spine. NOTE: this is NOT to insinuate a forward lean is wrong or “bad” when squatting, it’s not. In fact, it’s warranted and needs to happen. However, for a large chunk of people, especially in the beginning stages, it’s more “joint-friendly” to adopt an upright torso, accumulate reps there, and then progress to advanced variations where more forward lean enters the picture.

2. It’s a great way to load someone without crushing them.

To steal a train of thought from Artemis Scantalides:

The double kettlebell front squat allows you to train a decreased load for the same physiological effect. So even though you are not squatting as much weight, because of the asymmetrical shape of the kettlebell, and the placement of the kettlebells in the rack position, you are able to maintain squat strength by training the double kettlebell front squat regularly.

3. It humbles people. Even large humans who can seemingly squat Ohio will find this variation challenging. It doesn’t take much. Two, 24 kg bells will make many huddle in the corner sucking their thumb.

Below is a quick video I shot this AM which goes into slight detail on some of the components of the exercise, namely the set-up, how to transition the bells to the starting position, and basic cuing.

Hope it helps.

Quick-n-Dirty 2 KB Front Squat Tutorial

CategoriesExercise Technique muscle growth Strength Training

Dumbbells Are Better Than Barbells For Pec Development: There, I Said It

This post is about training the pecs.

Sha-ZAM.

Copyright: pjphotography / 123RF Stock Photo


Full disclosure, I was going to use this picture as the main image for today’s article:

Copyright: wrangel / 123RF Stock Photo

However:

1. This guy’s pecs weren’t “pecy” enough.

2. Yellow peppers are gross.11

Every dude who lifts weights wants an impressive, well-defined chest.12

For men I think it’s pretty much engrained in our genetic code to A) miss the toilet seat when peeing and B) to want to train our chest whenever possible. In the most primal sense possible, we could make the case that a muscular looking chest is our version of a peacock spreading his feathers.

It’s a sign of masculinity, bravado, (perceived) sexual prowess, and encourages the ability to do this in public whenever the occasion arises…which, is all the time:

via GIPHY

I am no different.

Throughout my lifting career I’ve always placed a premium on training my chest and it should also come as no surprise that 97% of the guys I’ve coached throughout the years have prioritized the same.

We’ve been programmed to think that barbell variations are the best way to build an impressive chest. And although I’d be remiss not to note that many guys with big bench press numbers do, in fact, have enviable pecs, I’d note there are far more guys with average (if not laughable, by powerlifting standards) bench press numbers who would make He-Man swoon with their chest development.

Having a 300 lb bench press – while baller and worthy of a fist-bump – isn’t a requirement for building respectable pecs.

Again, to reiterate, this is not to downplay the bench press.

Hoisting some heavy-ass weight off your chest, repeatedly, is never a bad approach. But if we take a look at the actual anatomy of the Pectoralis major muscle and it’s function(s) we can note why, from a developmental standpoint, dumbbells are almost always a better option.

Pectoralis major

Actions:

1. Flexion of humerus.

2. Adduction of humerus.

3. Medial rotation of humerus.

4. Cutting of diamonds (when maximal pecification is achieved).

NOTE: We could, also, divide the Pectoralis major into two separate “areas.” The sternal head, mostly responsible for humeral extension, as well as adduction, and the clavicular head which is mostly responsible for humeral flexion.

Barbell variations limit things because they don’t allow for any humeral adduction. This is why, if pec development is the goal, dumbbell variations are a better play because THEY ALLOW MORE ADDUCTION, GOSH! How many times do I have to tell you.

Regular, plain ol’ DB Bench Presses are fine and will get the job done. However, what kind of post would this be if all I did was say “go do some DB Bench Presses.”

Lame. That’s what.

So, here are some of my (other) favorite dumbbell variations that are (hopefully) new to most of you reading.

1. DB Press – Accentuated Eccentric


Nothing too revolutionary here. All I’m doing in this video is accentuating the lowering (eccentric) portion to help attenuate more muscle fiber damage and subsequent muscle growth.13

I like to keep people in the 3-5s range as far as the lowering portion is concerned and aim for 8-12 repetitions. A sneaky trick I’ll often implement is a MAX set on the last set. So it may look something like this:

Set #1 = 10 reps

Set #2 = 8 reps

Set #3 = MAX reps

But you can always use straight weight or a pyramid scheme or whatever. It’s all good.

2. DB 1-Arm (Offset) Press


This is a nice way to address any strength imbalances between one side and the other. Too, it adds an intense core-stability (rotary stability) component as well, as you have to fire all you have as to not fall off the bench.

3. DB Alternating Press


This is a classic variation I always revert back to. I like this one as it kinda-sorta emulates a 1-arm press. Plus, it requires a fair amount of scapular stability on the straight-arm side as you perform the set.

4. DB Elevator Press


This is a play on something Ben Bruno discussed with Goblet Squats not too long ago. Here, the idea is to lower the DB 1/4 of the way, then back up, then lower 1/2 down, then back up, then lower all the way down, then back up again.

That’s one rep.

It sucks, but in a “holy shit, my pecs are so juicy right now kind of way.”

I’ll often shoot for 6-10 repetitions.

5. DB “Reverse Batwing” Press


This variation is the counterpoint to Dan John’s Batwing Row exercise. Here, you’ll hold one DB a few inches above the chest as you perform all your repetitions on the other side.

Switch, and repeat on the opposite side.

Ouch.

6. DB Squeeze Press


This is probably my favorite DB exercise to hammer the pecs. Here you promote both actions of the pecs into one hybrid exercise.

The idea here is to squeeze the DBs together as you press up and down.

7. DB Press w/ Intraset Iso Holds


Hot off the presses – at least for me – I stole this one from Jim Smith of Diesel Strength & Conditioning.

The idea here is to, again, increase time under tension (TUT) in an effort to increase metabolic demand and muscular damage.

Start with a 10s isometric hold at top. Another 5s hold half-way down. And then another 5s hold a few inches above the chest. Then perform 8-10 repetitions.

If you really want to hate life, after you perform your reps, repeat the three separate iso-holds again on your last set.

8. DB Floor Flye – Hollow Position


This isn’t a press, but it’s still a very effective exercise to build the pectorals since it’s 100% adduction. I got this idea from strength coach Joel Seedman as it’s also a nice variation that hammers the core too.

Moreover, since it’s performed on the floor it can be considered a more “shoulder friendly” flye variation since it limits the ROM and keeps trainees out of the “danger zone.”

And there you go.

Now go pecify those pecs people.