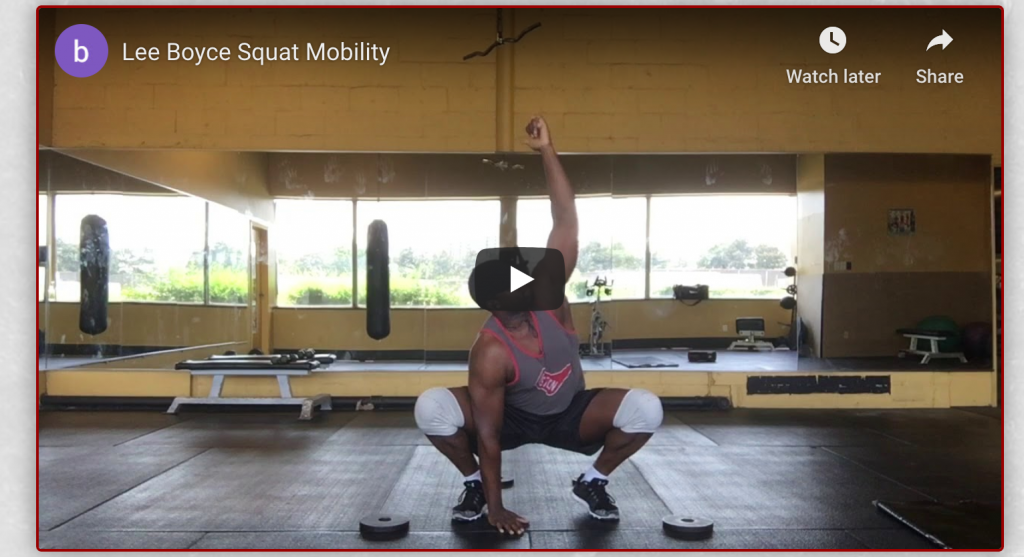
To me, the conventional deadlift (feet closer together, hands outside knees) is the most advanced variation of the deadlift and likely not the best starting point for most lifters.
Yet, purists out there would prefer passing a kidney stone through their eyeballs than ever consider reverting to a sumo style.
Whether it’s someone’s anatomy (short arms and/or long torso) or mobility deficits (hip flexion ROM, thoracic spine extension, or even ankle dorsiflexion) the conventional style deadlift might not be a great choice…for now.
A sumo-style deadlift (wider stance, hands inside the knees) may be the better option. It allows for a more upright torso, decreasing shearing forces on the spine, which can make things infinitely friendlier.
Stop being a slave to your ego and realize you don’t have to pull conventional all the time (or ever) despite what that dude at the YMCA who competed in one powerlifting meet back in 1998 told you.
You can’t go more than a few clicks on the internet before you inevitably come across some coach or trainer discussing the merits of positional breathing and how it can help improve performance in the weight room (and on the field).
(👆👆👆 I guess this depends on what part of the internet you peruse…BOM, CHICKA, BOM BOM 😉 😉 😉 )
Nevertheless, if you’re someone who geeks out over the human body and movement in general “positional breathing” is a term you’ve definitely come across.
And you likely still aren’t understanding it’s relevance.
I have a treat for you today. Dr. Michelle Boland (a Boston based strength & conditioning coach and one of the smartest people I’ve ever met) was kind enough to offer to write on the topic for this website.
Positional Breathing: The Implementation of Training Principles
Note From TG: For a bit of an “amuse bouche” on the topic of positional breathing I’d encourage you to check out two posts I wrote on the topic HERE and HERE.
Identify
Our role as fitness professionals is to determine what is important for our clients. In order to do so, we need to identify what is important, formulate principles, and then follow through with implementation.
A way to identify and formulate what is important to us as trainers, is to create principles. Principles are simply what you believe in and what you teach your clients. Principles serve as a hierarchy of reasoning for your training methods, which include your choice of exercises, organization of training sessions, program design decisions, and communication strategies.
In this article, I am going to review my first two training principles:
Training Principle 1: All movement is shape change (influence from Bill Hartman)
Training Principle 2: Proximal position influences distal movement abilities
Formulate
Movement is about shape change.
We change shapes by expanding and compressing areas of the body.
Movement will occur in areas of the body that we are able to expand and movement will be limited in areas of the body that, for some reason, we have compressed. The ability of an athlete to transition from expanded positions to compressed positions informs their ability to change shape and express movement.
Movement occurs in a multitude of directions depending on both position and respiration. Certain positions will bias certain parts of the body to be able to expand more freely, allowing increased movement availability. Respiration can further support the ability to expand and compress areas of the body, as an inhalation emphasizes expansion and an exhalation emphasizes compression.
(👇👇👇 Just a small, teeny-tiny taste of importance of positional breathing 👇👇👇)
Position selection is my foundation of exercise selection.
Positions such as supine, prone, side lying, tall kneeling, half kneeling, staggered stance, lateral stance, and standing can magnify which areas of the body that will be expanded or compressed. Additional components of positions can include reaching one arm forward, reaching arms overhead, elevating a heel, or elevating a toe. Furthermore, pairing phases of respiration within these positions will further support where movement will be limited or enhanced.
The position of the proximal bony structures of the body, such as the rib cage and pelvis, can greatly enable or restrict movement. Positional stacking of the thorax and pelvis provides an anchor for movement. Respiration then provides the ability to create expansion in the thorax and pelvis, thus providing expansion areas of the body, within joint spaces, allowing our limbs to express pain-free movement.
Lifting heavy weights can often compress areas of our body and reduce our ability to expand and rotate through our trunk and hips, limiting movement, and negatively affecting our ability to perform. Remember, expansion begets movement freedom, so adding positional breathing work or pairing movement with respiration can create opportunities for expansion.
Implement
Where is a good place to start with positional breathing work?
Start by thinking about what you already do.
Then, apply your new lens of where you want movement to occur.
Finally, label the positions of the exercises and pair respiration within those movements. Pair an inhalation when you want to enhance expansion and an exhalation when you want to enhance compression. Here are a few examples of how I implement my two training principles into exercise selection. Movement within each example can be supported or limited with changes in position, respiration, or execution.
1. Supine Reach
The supine position is combined with a bilateral arm reach forward with the intention to expand the upper thorax during inhalation. The position can also be used as a tool to teach stacking the thorax over the pelvis by cueing a hip tuck and soft exhale to move the front side of the ribcage downward. Our “stack” IS the set-up position for your main loaded, lift exercises (squat, deadlift, etc).
Check out how the inhalation expands the upper thorax and the exhalation creates compression.
Now you will not be able to take your eyes away from those two movement strategies.
2. Staggered Stance “Camporini” Deadlift
The staggered stance position is going to magnify the expansive capabilities of the lower, posterior hip of the back leg. The staggered stance position allows you to use the front leg to push back to the side of the back leg and align the pelvis and thorax back and to the side of the back leg.
The opposite arm reach allows you to transition the weight to the back leg. The expansive capabilities can be enhanced in the posterior hip with an inhale during the hip movement backwards (hinging).
3. Low Cable Step-Up
The staggered stance position puts the hip of the elevated leg in flexion (expansive) and the hip of the leg on the ground in an extension (compressive) biased position.
The addition of an opposite arm cable hold expands the backside of the upper back (avoid resisting the cable). The posterior hip of the elevated leg will compress as the individual pushes their foot into the ground and moves against gravity to perform the step-up.
At the bottom position, expansion can be enhanced in the posterior side of the flexed hip and posterior side of the arm holding the cable during an inhalation. Coaching cues may magnify expansion and compression within areas of the body by pairing respiration within phases of the exercise. Try inhaling at the bottom position and exhaling during the movement/step-up.
4. High Hip Reverse Bear Crawl
The bear crawl exercise is performed in a prone position. The additional component of the high hips and reverse direction promotes expansion in the upper thorax and posterior hips. You can coach continuous breathing through the movement or pause at certain points to inhale.
This is a fantastic warm-up exercise!
5. Tempo Squat Paired with Respiration
The squat starts in a standing position.
The assisted squat will also include a positional component of both arms reaching forward (same as goblet squat, zercher squat, or safety bar squat) which encourages the ‘stack’ position of the thorax and pelvis. The assisted squat is an example of turning positional breathing work into fitness. The squat movement requires both expansive and compressive capabilities within various phases of the movement in order to be able to descend and ascend against gravity.
The exercise can be used to teach people to change levels with a stacked, vertical torso. As a general notion, inhale down and exhale up.
6. Medicine Ball Lateral Stance Weight Shift Load and Release Throw
The exercise is performed in a lateral stance position.
Here, we are adding fitness with an emphasis on power, to positional breathing work!
Pair an inhalation with pulling the medicine ball across the body (transitioning weight from inside to outside leg) to bias expansion of the posterior hip of the outside leg. Then pair an exhalation with the throw to bias compression, exiting the hip of the outside leg.
This exercise also encourages rotational abilities and power through creating expansion and compression in specific areas of the body. For example, if you want to promote right rotation, you will need right anterior compression, right posterior expansion, left posterior compression and left anterior expansion abilities.
Conclusion
The use of positional breathing activities can improve our abilities to move with speed, free up range of motion at the shoulders and hips, rotate powerfully, and move up and down efficiently. My training principles are derived from this concept. My specific strategies are implemented through exercise selection, cueing, teaching, and pairing respiration with movement phases.
The ‘stacked’ position emphasizes a congruent relationship between the rib cage and pelvis (thoracic and pelvic diaphragm) and I believe it can serve as a foundational position to support movement. I want to thank Bill Hartman for exposing me to this lens of movement.
Implement these strategies with your clients and you’ll discover that positional breathing work WILL help your clients squat, hinge, run, rotate, and move better.
Principle Based Coaching
A strategy such as positional breathing work for better client movement is only as good as your ability to implement and communicate it with your clients. We become better at implementation and communication through analysis and development of our PRINCIPLES.
In this webinar, we will take a step back and learn the skills to formulate principles, make new information useful, AND IMPLEMENT information. At the end of the webinar you will know how training principles can be used to:
Make new information useful to YOU, YOUR clients, and YOUR business
Clarify your coaching decisions
Develop a more pinpointed coaching eye
Plan more effectively to get your client results
Gain confidence in your abilities and formulate your own coaching identity
2020 has not been a favorable year for the masses.
In particular for fitness industry which has been decimated due to the global COVID-19 pandemic. Many brick and mortar gyms (as well as commercial gyms) were forced to shut down indefinitely for several months – some, unfortunately, forever – due to the crisis. And as a result many fitness professionals have been forced to face a stark reality…
…that there’s an integral if not imperative impetus to adapt.
In short: It behooves every fit pro to consider adopting (or at least leaning into) a more “hybrid” approach to the services they offer and how they go about scaling and growing their business.
For those who want to skip the foreplay click HERE. <— You can try the Online Trainer Academy FOR FREE for 30 days and become a Certified Online Trainer.
The harsh reality is most people are not going back to the gym anytime soon. Certainly the bulk of that is due to the fact many don’t have a gym to go back to anyway, but also because there’s been a mad dash of everyone beginning to pimp out their respective at home gyms.
If there’s anything this dumpster fire of year has taught the fitness industry it’s that having the ability to provide a competent and streamlined ONLINE service to your current and prospective clients has never been more important.
I’ve long championed the idea that having a HYBRID fitness business – one that allows you to work with people both in person & online – is wise.
My first online client was back in 2005-2006.
Smart phones weren’t really that smart yet.
I used a carrier pigeon an Excel spreadsheet to deliver my programs.
Even more dumbfounding: My clients paid me via check through the regular mail.
The online space as come a looooooong ways since I first started.
More to the point: While there are a number of websites and resources out there that will help you get started, The Online Trainer Academy has had a several year head start on ALL of them and is really the only one I trust (not to mentions offers all the tools you’ll need to be successful).
3. Get instant digital access to the entire OTA curriculum, including:
the seminal 338-page textbook, The Fundamentals of Online Training (V3.0)
video lessons to accelerate your learning
your step-by-step workbook (so you can build your business as you go)
4. If after 30 days you’re loving your results, do nothing and you’ll be charged your 1st (of 12 total) monthly payments of just $87.
(A quick allegory: I know some will scoff at the cost after the free trial. But let’s put that into quick perspective. The TOTAL cost for the year would be roughly what ONE paying online client would pay you for three months of your services. If you pick up one paying client – and you most definitely will – the program will have paid for itself.
Smoke, smoke bomb, mic drop, exit stage left.)
And if within 30 days you decide the program isn’t for you? No worries! Just let the folks at OTA know and they’ll cancel your access and won’t charge you a penny.
This is your chance to remove all doubt from your mind—at zero cost and zero risk to you.
You have absolutely nothing to lose. You can cancel anytime in the first 30 days, and you won’t pay a cent.
Why not take immediate advantage of this amazing limited-time offer, and enroll in OTA right now, today?
–> Go ahead—click HERE to try OTA for $0 for 30 days. <–
ANSWER: Equal parts I picked the right parents, never missing a universal bench day (every Monday) through the 90’s, and lastly…watching and rewinding incessantly the “Arnie gets tooled up” montage from the movie Commando.
Pecs by proxy.
2️⃣ “Tony, why don’t you start your own podcast?”
ANSWER: Because I’d rather jump into a shark’s mouth.
The only way I’d fathom starting my own podcast is if I could spend half of it talking about how to make people stronger than Mack trucks and the other half discussing geeky movie shenanigans like my favorite movie tracking shots (Copacabana nightclub scene from Goodfellas or the car attack/chase scene from Children of Men), or why it is J-Lo’s derriere hasn’t been given it’s own movie trilogy.
Come on Hollywood!
The truth, however, is that I don’t feel I’d be able to drum up enough interesting content to warrant a podcast. I’m a rather dull person.
As it happens, though, I’m invited onto 1-2 podcasts per month anyway…so I kinda already do have a podcast.
First up is the Total Fitheads Podcast hosted by Ali Spagnola and MaxNoSleeves (<– I honestly couldn’t find Max’s last name…haha).
(But, let’s be real: NoSleeves is baller and I can think of nothing cooler than putting some sort of moniker next to one’s name. Hmmm, I’m thinking TonyGiveMeAllTheCreatine might work. Yes, no, maybe so?).
Ali and Max are two meatheads who just like to invite cool & interesting people onto their show to talk shop. I had a blast recording this episode and really appreciated their spontaneity and spunk.
Next up I was able to catch up with my friend Andrew Coates on his brand spankin new podcast. It’s so shiny and glorious and delicious (which doesn’t make any sense).
Andrew has very easy-going interview style and honestly believe he and I could have kept talking for another hour. But unless your name is Joe Rogen (or Space Ghost) no one listens to 2+ hour podcasts…;o)
There’s no shortage of “debates” in the health/fitness space. Ideal neck position during a deadlift is also a hotly debated topic and I can appreciate both sides of the argument. Here’s my take and what has worked well for me and my clients.
Maintaining a “neutral” spine during a deadlift is paramount.
It’s the first commandment of deadlifting.
Neutral in this sense means “maintaining the spine’s natural lordotic (lower back) and kyphotic (upper back) curvature.”
Coaches will start hyperventilating into a paper bag if they see an athlete round his or her back during a deadlift. Okay, so why do we not hold the same standard to the cervical spine or neck? Is the neck not part of the spine?
I prefer people adopt a chin tucked or “packed” neck position:
👉 It reinforces the neutral spine, which the neck is part of. I understand the other side of the argument. There are many examples of people extending their head back during a deadlift (i.e. a not-packed neck) and they’ve been fine.
👉 But in the beginning stages, a packed neck is my preference. Then as someone grows more proficient with the movement they’re allotted more leeway. Besides, what often happens during a max effort attempt – extended neck, and yes, sometimes a rounded back – should not be held to the same standard as a sub-maximal attempt or to someone just learning the lift.
👉 In terms of how to cue the proper neck position, I like to have lifters stare at a target 10-15 feet in front of them on the floor. This helps with better neck position and actually helps increase full-body tension.
What would your life look like if there were no limits?
If the above question has you thinking about life from a different lens, then I did my job, and you do not have to read the rest of the article.
If life was only that easy- right?
But we both know you aren’t here for the easy way out, and Because Heavy Things Won’t Lift Themselves, let’s get warmed up for some heavy lifting, but not by using our god/goddess-like structures we’ve all sculpted during the quarantine.
Today, we are going to train using our brains.
Whatever challenge you face in life, asking the right kinds of questions can help you achieve massive breakthroughs. I’ve spent most of my life looking for answers until I went through a tough transition in life and discovered self-sabotage patterns and how my mind was holding me back from doing dope shit in life.
Self-sabotage exists for a reason.
It perceivably keeps us safe from our fears and prevents us from stepping outside our comfort zones. But if we can find ways to get past the voices holding us back, we can turn the impossible to possible, and limits become limitless.
What is Self-Sabotage
In a nutshell, self-sabotage occurs when a pattern of behaviors creates a conundrum of limiting beliefs that hold you back from achieving goals and stepping outside your comfort zone. When you embark on a self-discovery journey, whether through lifting heavy weights, running, yoga, or any other way to challenge your mind and body, patterns from your past sneak up in subtle ways and interfere with your growth.
It’s not your fault because your subconscious (the little voices in your head) creates templates throughout your life based on past experiences. Anytime you start to approach the edge of life you are used to, you mess up and revert to old routines.
(I did this a lot, and still, catch myself).
You might even be aware of this pattern, but you reject the thought and look for more answers. You try new things. You process information, and for some reason, never able to change. Self-sabotage has taken you hostage.
Maybe you are afraid of failure and give up on yourself. Or scared of rejection, and never stand up for what you value. Perhaps you are scared of what others think, and seek validation in all you do. While well-intended, the intention does not support unlocking the doors to do dope shit with your life.
How do you recognize self-sabotage and call yourself out before your limiting beliefs take over?
I wish I could say I had all the answers to those questions, and I’m willing to bet Lisa, Tony’s wife can help you with this area of life. But to keep things simple, let’s talk about some basics.
Note From TG: Lisa’s written a number of great articles on this site revolving around motivation and mindset. You can check them out HERE.
Also, you can visit her Instagram page (HERE) where she does a splendid job at interweaving fitness and psychology with her daily posts. Or, you can check out her website HERE. Finally, on an aside, she can likely beat me in an arm-wrestling match. She’s pretty jacked.
Because like heavy deadlifts help create a fantastic physique, acknowledging patterns of self-sabotage gives you the tools to break away from the limiting beliefs holding you back.
Let’s Pick Some Heavy Ass Weights Up!
To get started, you must call out these areas before you begin any transformation and catch them before the repeat in your life. Think of it as selecting specific exercises for a specified training session to hit a massive PR.
Every time you acknowledge and name the area in life, holding you back, you build a new set of skills to push past your comfort zone. Sure, you can skip this step and get amazing results, but eventually, the subtle signs of self-sabotage will catch up to you, and before you know it, you are right back where you started.
These areas of life are ubiquitous, yet many of us have no clue how to overcome common obstacles because we become victims of the stories we tell ourselves.
I’m too old
I’m too fat
I’ll never be able to look like “x.”
I’ll never change
I’m not strong enough
I’ve always been like this
You fill in the blanks
The sad part is when we have beliefs like these, we hardly ever test our limits. Life at best becomes a chase, and we seek to find surface-level answers to problems deep-rooted from our past. When viewed from this perspective, self-sabotage makes sense.
We’re all under pressure from today’s world, forcing us to make quick decisions without ever taking a step back to ask more questions. The paradox in our chase for life is many of us are never satisfied because the things we think we want never align with our values.
Which brings me back to you, and my original question.
What would your life look like if there were no limits?
I ask my clients this because it opens up doors for them to dope shit, not because it’s a dope question, but because questions like this demand, they choose a path in the face of uncertainty.
You are what you choose, and an uncomfortable truth many are not willing to face is we can never choose two things at the same time.
Or as the old English proverb says, you cant have your cake and eat it too.
The right kinds of questions can challenge you to see maybe you don’t know much about life, if anything. And the more invitations we give ourselves to ask better questions, the more we take full responsibility for our lives and punch our comfort zones in the kidneys.
Here is why this matters
The hardest part of any transformation is understanding what you want and value because without doing so, your brain will hunt for negativity in life. Psychologists refer to this concept as ” negativity bias: the idea that we’re always searching for negativity to see the dangers around us, but when we embark on a transformation of any kind, it doesn’t serve us well.
We all want to look good, feel good, have amazing relationships, and be happy. But no one ever wants to take full responsibility for the choices in life when we experience uncomfortable feelings associated with growth.
The truth is, nothing in life comes easy. You already know this, but because you focus on all the things you don’t want, you stay inside your comfort zone even if your comfort zone leaves you feeling depressed, burned out, exhausted, and resentful. When your behaviors and choices don’t match up with what you say you want, you’ll let self-sabotage ruin your entire life.
If you’re ready, I’d like to invite you beyond self-sabotage so you can go on to do dope shit in life.
How To Beat Self-Sabotage
Write down all the areas on your life holding you back, and the stories you continue to tell yourself. Notice how those stories make you feel and how often they prevent you from growth. The more honest you are, the more success you’ll have, changing them later on.
One of the biggest ones in my previous life was
“I am always broke…”
My story prevented me from saving money because I was afraid of my numbers and avoided them like the plague. This story made me feel like a failure, and I was in a constant state of financial stress.
After you acknowledge these beliefs and how they make you feel and hold you back, write down the opposite of this belief to help you prove this belief is not valid.
Self-Sabotage- I am always broke
New Story: I have never been honest with my numbers and have enough skills and experiences to live with abundance.
After you tell yourself a new belief, design a plan, and take action to prove to yourself you are worth the new life you say you want. Anytime you find yourself in a block, come back to the beliefs and write the opposite feeling holding you back. It will not be easy; you will get uncomfortable; change does not happen overnight. But the results will be worth the struggles.
Remember, the goal is not perfection, but consistency. You might not like what you discover in these exercises, but this is your life, and there is no time for fucking around if you want to go all-in on and doing dope shit.
About the Author
George Kalantzis is a coach, writer, and dad, committed to helping people do dope shit in their lives. He is a seasoned Marine Corps combat veteran with over ten years of experience coping with high-pressure and constantly changing environments.
1. You can now purchase CORE @ Home for whatever it is you want to pay.
During quarantine I started a platform where I’d deliver 20-40 minute workouts that could be performed in everyone’s living room using minimal equipment.
In all I curated 36 workouts using nothing but bodyweight, bands, and kettlebells and/or dumbbells. With many people still reticent to head back to their regular gyms (not to mention the scarcity of gym equipment out there to purchase) I figured this would be a nice opportunity to help.
Whether you want to spend $1 or $100 (if the latter, we’ll be BFFs forever), the workouts are ready and available to start.
Meghan has increased her IG following by 35,000 people in one year. In this article she shares some common sense tactics that will undoubtedly help increase your viewership too.
This is a tricky question and one I’m asked often when discussing how I coach up the deadlift.
We have to be cognizant of balancing what will likely help prevent injury (namely a bicep tendon tear), but also allow for optimal performance and turn you into a deadlifting Terminator.
My approach is pretty simple:
Use a double overhand grip during your warm-up sets until it becomes a limiting factor or you’re unable to maintain your grip during your work sets.
Switch to an alternate (under/over) grip to help keep the bar from rolling out of your hands.
👇👇👇👇👇👇 THIS NEXT ONE IS IMPORTANT 👇👇👇👇👇👇
3. Alternate your alternate grip (left and right facing you or facing away) with every subsequent set.
I’ve personally had zero issues – with regards to injury or developing any “grip imbalances” – utilizing this approach with myself or with my clients.
SIDE NOTE: Yes, person who will inevitably bring up the hook grip. That’s an option too. We get it: You’re better than us.
SIDE NOTE (Part 2): Speaking of the hook grip, check out THIS article on the topic. It contains everything you’ll need to know.
Today’s guest post from fitness/health coach, Alex McBrairty, will no doubt resonate with many people who read this site.
If you’re even remotely health/fitness conscious chances are, at some point in time, you’ve been the recipient of some shade (or even backlash) from friends and family members during your journey toward a healthier lifestyle.
They’ll often judge you or even sabotage your efforts.
What’s up with that? Shouldn’t it be obvious they’d be your closest source of support?
Your Friends Are Primed To Be Unsupportive of Your Health Goals. Here’s Why
Imagine this common scenario: You’ve made the decision to start a fitness plan. You know it’s going to require changing your eating and exercise habits. You’ve stocked healthy food in the house, you’ve been keeping to a regular workout routine, and you’re seeing noticeable changes.
Then your friends invite you out to eat with them.
You’re hesitant because you know it’ll be tough to stay on track, but you agree to go anyway. Once you arrive and sit down, your friends begin ordering cocktails.
You stick with water.
Then it begins.
You hear one of the following phrases:
“Come on, it’s just one night. Have fun with us!”
“You’re not as much fun since you’ve started this diet.”
You roll your eyes because it’s hard enough to say no to your old habits, and they aren’t making it any easier. Your friends roll their eyes because you aren’t participating in your usual behaviors.
This is a common experience for anyone beginning to make healthy lifestyle changes, and yet it’s still surprising. What makes our friends and family, those people closest to us and who care about our wellbeing the most, the ones most likely to try and sabotage us?
Birds of a Feather
Humans are social creatures. We are drawn to be part of groups for our survival—whether our ancestors needed to join a village to ensure their safety against predators and enemies, or we, as teenagers, needed a group of friends to ensure surviving high school.
Being a part of a group is a hard-wired human trait.
Being part of a group also is more than just a mechanism for survival.
As it turns out, our social habits play a large role in shaping how we view ourselves and our place within the world. Our sense of self, or self-identity, is created based on all of the experiences, interests, and accomplishments we have throughout our lives.
What comes to mind when you describe yourself to others?
Or when others describe you to another person?
Those are likely the things that help craft your self-identity.
For example, a large part of my self-identity is fitness. I exercise every day and have built a career in the fitness industry as a coach. I take a lot of interest in fitness, and it’s become a core part of my identity. Having a clear self-identity is important to help us navigate our place in the world. It helps us decide what activities to participate in and who to associate with.
Another large part of this self-identity is formed based on the social groups we join. Most often, people decide to join a social group because they believe themselves to be similar to the other members of the group. The friends who make up your social circle tend to be interested in the same things you are.
As members of groups with specific interests, behaviors and values, we reinforce or adopt these same qualities within ourselves. Our social identity, the part of our self-identity that we form based on the groups we join, helps us establish a large piece of who we are.
When our self-identity gets wrapped up in our social groups, we will also display what psychology researchers call “in-group favoritism”: we put our group above other groups.
This creates the “us vs. them” mentality frequently seen in social contexts.
One obvious example can be seen between two competing sports rivals. The fans of each team display a very clear “us vs. them” mentality in how they interact with one another: trash talking, disparaging comments, and clear dislike of the other team’s fans. This “us vs. them” mentality creates a shared bond between group members, signaling to everyone in the group that “you belong here.
By The Rules
Throughout our history of organizing into groups, we have always needed rules to ensure cooperation among members of the group. These rules reflect shared values and help establish a collective identity. Countries create formal rules by passing laws. We all have a sense of what it means to be American, just as citizens of Great Britain know what it means to be British.
These rules and shared values help us easily distinguish who are members of “our group” from those who are outsiders.
This isn’t just a quality of sovereign nations.
Groups of any size show evidence of this rule-setting behavior. Even your social network, your group of friends or your nuclear family, have established rules that group members are expected to follow.
In the case of your friend-group, you might have rules aimed at the types of clothes you wear or the types of activities you do together.
If my friends and I typically enjoy movies together, suggesting we go hiking would be wildly outside the boundary of what is expected. Similarly, during the holidays my family has a specific sequence of events that we follow. We eat dinner at a certain time, with much of the same traditional holiday food specific to my family.
Afterwards we open gifts, stopping halfway through for dessert. If I were to suggest we eat dessert immediately following dinner, or that we open gifts before dinner was ready, it would be violating the holiday rules my family has established.
Interestingly, within our social networks many of these group rules are implicit.
We don’t always consciously think about them. Usually, we adopt a certain way of behaving by observing how others act within the group. I don’t explicitly know that my friends don’t like hiking (maybe I do from prior experience), but I know not to ask because no one has shown interest in that before.
During the holidays, I don’t know how my family would react if I started opening gifts before dinner, because I’ve never seen anyone do it before. The absence of this behavior leads me to believe it’s probably not an appropriate thing to do.
These implicit group rules help reinforce the shared identity among group members. It also reinforces the difference between “in-group” members and “out-group” members. When I bring my girlfriend home for the first holiday, she doesn’t know what rules to follow and this makes it easy to identify her as an outsider of the family.
Every group that we’re a member of—country, state, social, professional, sports teams, etc.—has a specific set of rules that we adhere to in order to maintain our membership status.
Why Positive Change Gets Backlash
So back to the original question: Why do our friends and family not support our healthy lifestyle changes in a manner we expect?
These changes are good for us, after all, and as the people who care about us most, shouldn’t they be on board?
In some cases, we even find they are the ones sabotaging our progress!
It’s bad enough when we feel like our friends don’t support our goals. What’s even more peculiar is that we can often catch our friends giving praise and admiration to some other stranger, usually a celebrity or an acquaintance, for doing the exact same thing they just gave us grief about! Why are they quick to give a total stranger praise for doing the same thing they’re hassling us about?
What’s happening is a unique psychological phenomenon called the “Black Sheep Effect.”
This refers to a group’s tendency to more favorably view unlikable outsiders than unlikable insiders.
Let’s think about this in the context of everything we’ve learned about groups so far.
We join groups (our friends) because it helps establish or reinforce a part of our identity. Then, we create rules within the group to reinforce and protect this identity, creating a clear distinction between people outside our group from those within. Then, as an individual we decide to make healthy lifestyle changes that ultimately change how we behave in social situations.
Now we’re likely violating the implicit group rules and threatening the identity of the group. This results in backlash from our friends because we’re changing our habits.
It should start to become clear why this is happening. Your social group doesn’t want you to fail or to remain unhealthy. Everyone in the group has been socially programmed to protect the identity of the group, and your new behaviors are threatening that.
This is where the backlash comes from.
To explain why your friends can give praise to a stranger for doing the exact thing you’re doing, look to the Black Sheep Effect. The stranger making healthy lifestyle changes is violating your group rules (as an outsider), while you’re also violating the group rules (as an insider).
Your friends favor the outsider who breaks the rules more than the insider because the outsider is expected to break the rules. Imagine having something stolen from you by a stranger. Now imagine having something stolen from you by a close friend.
This second scenario stings a little more.
The Solution
Knowing why this is happening is the first step, but we ultimately want to be able to do something about it. It doesn’t feel good to be ridiculed like that. The changes themselves are hard enough to deal with, let alone subtle or not-so-subtle sabotage from people who should care about your well-being.
The first thing you should do is to make your goals clearly known to your group members.
If you want to go a step further, ask them to help keep you accountable.
By making it clearly known why the changes are happening, it gives your friends an explanation for why you’re deviating from the normal behaviors of the group. Additionally, by asking them for help in holding you accountable to these changes, you’re reinforcing the implicit group rule to help fellow group members.
Here’s how this Jedi-mind-trick works: we feel compelled to help our friends, but if we help them break the group rules then we’re also breaking the group rules. Now we have to justify to ourselves why it’s OK that we break the group rules.
This is cognitive dissonance in action.
Cognitive dissonance is the state of having inconsistent thoughts, beliefs and behaviors. We don’t feel good when our beliefs and our behaviors are misaligned. For example, if we eat junk food while believing that we shouldn’t be eating junk food, this creates an uncomfortable mental state.
To resolve this issue, we typically either reduce the importance of our belief or justify our actions. In the case of junk food, we might convince ourselves that we “earned” it as a reward for something. In the context of recruiting our friends to help us break group norms, if they believe that breaking the group rules are bad, but their actions are to help you break those very rules (because they’re following the rule of being a good friend), then they need to resolve this inconsistency.
The most likely way they’ll resolve this is to convince themselves that breaking the group rules for healthy changes isn’t all that bad.
Now you’re a modern-day Obi-Wan.
Once you’ve recruited your friends to help you succeed in meeting your goals, the next step is to be very consistent in your new behaviors.
The reason you’re getting backlash is because your behaviors are new and different from what’s been established. However, the more you participate in these new behaviors, the more they become normalized.
When I first began my fitness journey, I got a lot of backlash for my new exercise habits and how I ordered food at restaurants. Now, however, my friends and family don’t even bat an eyelash when I disappear to work out or order a salad when we’re out to eat. It’s just become a normal part of who I am. The more you perform the new behaviors and make them visible to your friends, the more your friends will get used to this new version of you.
The more normal it all becomes.
Putting It All Together
We join groups out of human nature, we stay because they help define us, and we dislike when group rules are broken. Your friends give you a hard time because changing your lifestyle breaks the rules that probably contributed to connecting with these people in the first place.
Fortunately, this backlash isn’t a personal attack, but is the result of their identity being threatened by your new choices.
To overcome this backlash, recruit these friends to help you reach your goals and stay consistent in these new behaviors until they become your new normal. Then the backlash ends, your friends become more accepting, and your healthy behaviors become a part of your new identity.
About the Author
Alex McBrairty owns A-Team Fitness in Ann Arbor, Michigan. Obese as a child and teenager, he blends fitness and psychology to help his clients discover their own hidden potential. He has a bachelor’s degree in psychology from the University of Michigan and is certified by the National Academy of Sports Medicine. His articles have appeared in Breaking Muscle and The Personal Trainer Development Center, and he’s contributed to USA Today, Men’s Fitness, Prevention, and SparkPeople.com.
1. You can now purchase CORE @ Home for whatever it is you want to pay.
During quarantine I started a platform where I’d deliver 20-40 minute workouts that could be performed in everyone’s living room using minimal equipment.
In all I curated 36 workouts using nothing but bodyweight, bands, and kettlebells and/or dumbbells. With many people still reticent to head back to their regular gyms (not to mention the scarcity of gym equipment out there to purchase) I figured this would be a nice opportunity to help.
Whether you want to spend $1 or $100, the workouts are ready and available to start.
I just dig anything and everything Smitty puts out there and he’s always striving to make the industry better. This is one of the most comprehensive programs that will help you make progress in the gym while keeping your joints from hating you.
Ageless Athlete 3.0 is on SALE through this weekend.