Many people spend an inordinate amount of their time in a ball of flexion that having “access” to requisite amounts of t-spine extension is a commodity it today’s day and age.
What’s more, many of the drills and exercises prescribed to people in order to gain that extension is so poorly executed or altogether the wrong fit that it’s not uncommon for some people to spend years chasing their tail.
Take for example the plain ol’ vanilla t-spine extension off the foam roller.
It’s a great exercise, and a simple one, when done right.
Thing is: many people do it wrong, which I explain in THIS article from last year.
In the same light, I want to highlight a similar drill I came across recently that I really like and have been implementing with my own clients.
What Does It Do? – Allows to “lock” people in position to get movement from the area we actually wan to get movement from.
The T-spine isn’t really supposed to extend that much; to the point where it emulates the picture shown above. In that scenario said person is allowing the rectus to lengthen too much – resulting in excessive rib flair – and gleaning motion from the lumbar spine.
The Anchored T-Spine Extension tries to eliminate all of that.
Key Coaching Cues – First, it’s important to “clear” people for adequate shoulder flexion. If they’re unable to extend their arms overhead without compensating through RA, lumbar spine, or even via excessive elbow flexion, then this won’t be a good fit for them.
Second, I like to tell people to picture an imaginary line from their belly-button to nipple line, and that as they lower their hips that that line shouldn’t lengthen too much.
In effect, much like the regular t-spine extension drill off a foam roller most are accustomed to, when done right, most will be very surprised at how little motion there actually is with this drill.
But that’s the thing: This is not a ROM drill per se. It’s a getting motion from the right area(s) drill.
I like to use this drill as a catch-all warm-up drill. It’s relevant for any upper body work that requires scapular retraction, depression, or even upward rotation, as well as any lower body work that requires someone to maintain an upright/extended torso.
It can also be used as a filler exercise during rest sets.
Straight sets, pyramid sets, drop sets, cluster sets…
…it can all be rather confusing to the newbie lifter, or even seasoned veteran. How many sets should you do? What exercises are the best fit? What about rest? Is it normal to not feel the right side of your face?
All are pertinent questions and with today’s guest post Dallas based personal trainer, Shane McLean, helps to clear the air.
Enjoy.
What You Need To Know About Sets
When I first started lifting, I had no idea about all the different types of sets.
When I went to the gym, I would saunter over to the dumbbell rack and bust open my biceps with some curls.
And when I did curls, I did them it front of the mirror and the whole gym knew about it.
However, my biceps remained small and so did I.
That’s until I started learning about all the set schemes that exist in the iron universe. Like most boys when they started out lifting weights, I did the workouts from muscle magazines hoping that it would make me look like the guys on the cover.
That didn’t work out at all but, it was the first time I heard about pairing sets together, known as supersets. You mean you could pair exercises together, increase training efficiency and build muscle all at the same time?
My mind was blown.
This led me further down the rabbit hole of all the different set methods which in turn led me to be armed with a coffee cup, a clip board, a stopwatch and telling people what to do with a dumbbell while wearing comfortable pants.
Yes, that’s right I’m a Personal Trainer.
Now you can benefit from my 25 years in the iron game, with eight of those years writing programs for people that get results.
Read on and learn things.
NOTE: These are guidelines and there will be exceptions to the information presented here.
1) Straight Sets
What Are They? – Doing just the one exercise for one or multiple sets with rest in between sets
The Best Use For Straight Sets? – They’re often used for barbell exercises like deadlifts, squats, presses and rows. All your energy is focused on getting stronger with that one move.
Types of Exercises That Straight Sets Work Best For? – Compound barbell/dumbbell like those discussed above.
How Many of Sets Should You Do?– It depends on how many reps in each set. More reps mean less sets and less reps mean more sets. Another factor is load. The closer you are to your one rep max, you’ll do less reps more sets and vise versa.
For example- 3 sets – 3 reps 90% 1 rep max. Or 4 sets of 5 reps 83% 1 rep max.
How Much Rest Between Sets?– usually 2-3 minutes rest between sets.
2) Supersets
What Are They?– Is one set of an exercise is performed directly after a set of a different exercise with minimal rest in between them.
The Best Use For Supersets?– They’re ideal for building muscle, fat loss and for those who have a limited amount of time to train.
Types of Exercises Supersets Work Best For?– Really anything goes here. Barbell, dumbbells, kettlebell, bodyweight, resistance bands and machine exercises all work. You can use compound (exercising multiple muscles groups) or isolation (single muscle) exercises.
Different Types of Supersets
1. Compound supersets, when both exercises work a similar body part.
For example:
1A. Squat
1B. Lunge
2. Non-competing supersets, pairing a lower body exercise with an upper body exercise.
For example:
1A. Squat
1B. Dumbbell bench press
3. Isolation/compound supersets which you pair a single joint exercise with a compound movement or vise versa.
For example:
1A. Triceps extension variation
1B. Barbell bench press
How Many of Sets Should You Do? – Anywhere from 2- 5 sets (depending on how much time you have to train) and repetitions can range from anywhere between 6- 15 reps per set.
How Much Rest Between Supersets? – Limited rest between the exercises themselves and anywhere between 60-120 sec rest between supersets.
3) Tri-Sets
What Are They? – Doing 3 different exercises back to back to back.
The Best Use For Tri-Sets?– They are ideal for fat loss, muscle building and for people who want maximum training efficiency.
Types of Exercises Tri-Sets Work Best For?– Really anything goes here also. Barbell, dumbbells, kettlebell, bodyweight, resistance bands and machine exercises all work. Furthermore, having all the equipment close to you will cut down on transition time between exercises.
Different Types of Tri-Sets
You can use them to bring up a lagging body part.
For example, shoulders:
1A. Single arm shoulder press
1B. Lateral shoulder raises
1C. Reverse fly
Or mobility tri sets to help improve your movement.
For example, hip mobility exercise for the squat:
1A. Goblet squat
1B. Push up
1C. Half kneeling hip flexor stretch
Or when pushed for time you can combine strength and cardio exercises to get the best of both worlds.
For example:
1A. Leg exercise
1B. Upper body exercise
1C. Cardiovascular exercise 30- 60 seconds
How Many of Sets Should You Do? – Usually 3- 4 sets and anywhere between 6- 15 reps per exercise.
How Much Rest? – Limited rest between the exercises and 90-120 seconds rest after each tri-set.
4) Timed Sets
What Are They?– Doing an exercise for certain amount of time or completing the programmed reps in a certain amount of time.
The Best Use For Timed Sets?– They can be used for building muscle but they’re excellent for incinerating body fat.
Types of Exercises Timed Sets Work Best For?– Any piece of equipment that allows for an easy transition between exercises is a winner. For example, barbell, dumbbell, bodyweight, kettlebell and resistance bands.
Different Types of Timed Sets
Every minute on the minute sets where you complete a certain amount of reps and then rest the reminder of the minute before moving on to the next exercise.
For example:
1A. Goblet squat- 8 reps
1B. Row- 8 reps
1C. Goblet reverse lunge- 8 reps on each leg
1D. Chest press- 8 reps
1E. Biceps curls – 8 reps
Or you can scrape the reps and it’s just you versus the stopwatch where you try to do as many reps as possible in a pre-determined timeframe. For example, a full body circuit using bodyweight, barbells and dumbbells.
1B. Push variation- Incline push up, Push up or Dumbbell bench press.
1C. Single leg exercise- Reverse lunge, Forward lunge or Side lunge
1D. Pull variation- Rack pull, Dumbbell bent over row or Standing cable row.
1E. Core- Alternating side plank, Mountain climbers or Front plank.
How Many of Rounds Should You Do? – It depends how long you’ve got to train. Using the above examples, these circuits takes 5 min to complete so 3- 5 rounds would suffice.
How Much Rest?– You rest when you’re done.
5) Ladder Sets
What Are They? – One big superset when you compete the reps of both exercises in an ascending or descending order. For example, 10-9-8-7-6-5-4-3-2-1 or 1-2-3-4-5-6-7-8-9-10.
Best Use For Ladder Sets – They’re great way to finish your training and to add volume to a body part that needs working on. Furthermore, they can be used for a stand-alone training when pushed for time.
Types of Exercises Ladder Sets Work Best For?– Bodyweight, kettlebells, medicine balls, battle ropes and dumbbells work great.
For example, the kettlebell swings/medicine ball slam combo:
Instructions:Do 20 reps each of the swings and the slams and go down by 2 each time you perform a round until you reach two reps for each exercise (for example 20-18-16-14….2). If you don’t have access to medicine balls, substitute in battle rope slams.
Battle Rope Slams
Med Ball Rotational Slam
https://youtube.com/watch?v=YHgXAFY4H1Q
How Many Rounds Should You Do?– Just one will do, if you’re doing it right.
How Much Rest? –Again, you’ll rest when you’re done.
6) Cluster Sets
What Are They?– Sets with a predetermined rest period between reps within the same set.
For example:
Load the barbell to 85-90% of your maximum, a weight you could normally lift 3 times.
Do one rep and rack the bar.
Rest 10 seconds.
Do another rep and rack the bar.
Rest for 10 seconds.
Do this 4-6 times total
Best Use For Cluster Sets– They’re best used for building strength but be warned, when using heavier weights with shorter rest periods while increasing volume can lead to fatigue.
For example, (4×2) x5 sets – is 5 total clusters of 4 mini sets of 2 reps with 10 seconds rest in between. That’s 40 reps at 85-90% of your 1 rep max.
Types of Exercises Cluster Sets Work Best For?– Barbell exercises like squats, presses and rows but can be used for chin-ups also.
How Many Sets Should You Do?– Anywhere from 3- 6 clusters.
How Much Rest Between Clusters? – 3 minutes or more between clusters because of their demanding nature.
7) Drop Sets
What Are Drop Sets? – Is a method where you perform an exercise and then reduce the weight (usually 15- 30% drop) and continue for more reps until you reach failure.
Best Use For Drop Sets– Ideally, it’s your last set of the day. This method is used to add muscle and volume to a body part. However, it’s not for the faint of heart because you will feel the burn.
Types of Exercises Drop Sets Work Best For – Barbell, dumbbell and machine exercises.
A Different Type of Drop Set
Rather than dropping the weight and lifting till failure, you can perform mechanical drop sets where you use the same weight the entire time. You start an exercise in a mechanically weaker position to one in which you’re in stronger position.
For example, the dumbbell bench press mechanical drop set:
https://youtube.com/watch?v=KfYNhAGAm0w
This is a truly sadistic method for building muscle, but it works. If you want more ideas, read this excellent article by John Romaniello.
How Many Drop Sets Should You Do? – Once per training and probably no more than twice per week.
How Much Rest? – If you’re doing it right, you’ll need a nap.
Wrapping Up
Wow, you got to the end and you’re probably hungry. Please go get some protein.
Now, you’re armed with the knowledge to take your training to the next level and to hulk smash your way through any plateaus. Happy lifting.
About the Author
Shane “The Balance Guy” McLean, is an A.C.E Certified Personal Trainer working deep in the heart of Texas. Shane believes in balancing exercise with life while putting the fun back into both.
I had to take a break from The Fitness Summit last year for two reasons:
1. Eating way too many cookies.
2. But mostly because I succeeded in making a baby and my wife would have tossed me so much shade if I was all like “Hey Babe, going to KC for three days. Toodles.”
Well this year I’m back and excited to take part in a Fitness Summit first. Dean Somerset and I will be putting on a Pre-Conference day where we’ll spend a few hours test driving some new material as a follow-up to our Complete Shoulder & Hip Blueprint.
Tentatively titled The More Completer Hip & Shoulder Blueprint.
We’ll be taking deep dive into squat and deadlift technique: discussing ankle, foot, hip and upper extremity considerations in conjunction with regressions/progressions and programming. Whether you’re a coach or just someone who likes to lift heavy things you’ll undoubtedly learn something. And if not, cool, you still get to hang out with us for a few hours.
Registration is now open for returning and new attendees. Come experience one of the best fitness events of the year.
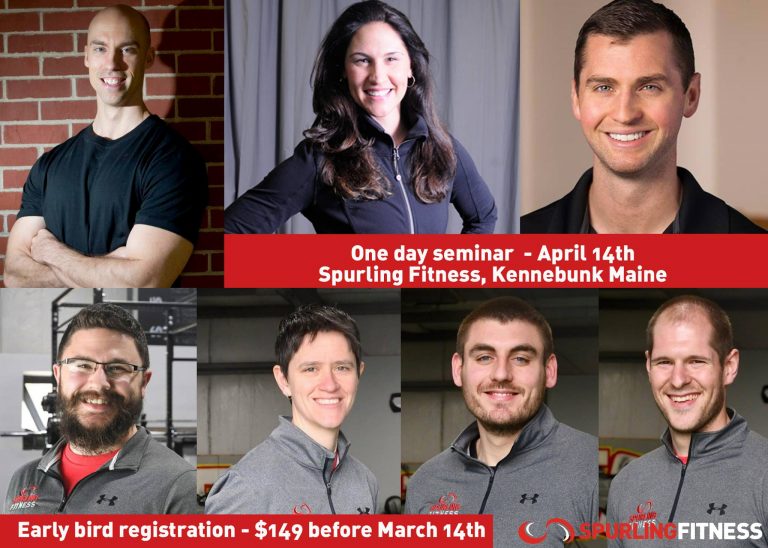
I’m excited to announce that both myself and my wife, Dr. Lisa Lewis, will be presenting at the inaugural Spurling Spring Seminar at Spurling Fitness in Kennebunk, ME in a few months.
If you live in New England and you’re a fitness professional you won’t want to miss it. Early bird special is currently in effect.1
This FREE multi-day course by John Berardi will help give coaches the knowledge and resources necessary to help their clients decide what the best diet is for them…
…whether Paleo, ketogenic, low-carb, high-carb, intermittent fasting, or the all cold cereal diet (<—not a thing, but it should be)
And even if you’re not a coach it’ll help make the waters less murky on the topic of diet and nutrition and what may be the best fit for YOU and YOUR goals.
All you have to do is offer your email and you’ll get instant access. Don’t worry, John won’t spam you. Because, he’s not a dick.
Here’s an effective drill to help improve t-spine extension. A common mistake many people make is getting too much motion from lumbar spine. This helps eliminate that: pic.twitter.com/xltqoNRdeM
If there’s one topic I’m asked to write more on it’s programming.
What, when, why, and how do I do what I do?
I may make this more of weekly or monthly series depending on how this first iteration goes.2
Lets see what happens.
When To Choose Sumo Deadlift Over Conventional
I like to think of myself as a middle of the road kinda guy. I try not to veer too far to the left or right on any given topic.
Except for Attack of the Clones.
That was and always will be a dumpster fire of a movie.
On pretty much anything else however, especially as it relates to strength & conditioning, I tend to default to the more temperate “it depends” defense.
Back squat vs. front squat? It depends.
Concurrent vs. undulated periodization? It depends.
Raspberry ketones vs. purified unicorn tears filtered through a Leprechaun’s beard ? Kale.
What about deadlifts?
Well, you guessed it…….
……..it depends.
Despite the title of the post I’m not in favor of one variation over the other. In fact, if I had to choose a variation I feel is the best fit for most trainees most of the time I’d pick the trap bar deadlift.
If I had to place a number on it, I’d say 90-95% of the clients I have historically worked with – this includes eight years at Cressey Sports Performance – started with the trap bar deadlift and progressed from there.
75-80% have kept the trap bar as their “home-base” deadlift variation throughout their training career.
However, when it comes to choosing between the sumo deadlift (wider stance, hands inside the knees) and conventional deadlift (narrower stance, hands outside the knees) the key determining factor(s) are:
What’s the person’s goals?
Which variation puts them in the best position to be successful and not shit a facet?
So in the spirit of “this is just information, relax, I still have my clients/athletes conventional deadlift” here are a handful of reason’s why I’d gravitate towards sumo.
1) Anatomical Considerations
Taller people or those with long femurs/torsos are likely going to have a hard time pulling conventional.
Anyone who has worked with basketball players can appreciate this. Long spines require attention to detail.
The trap bar is a great choice with this population, but so too are sumo deadlifts or block pulls (where the barbell is elevated to a height that allows them to get into a maintain good position).
Another point to consider are those who picked the wrong parents. For example, people with shorter arms will have a challenging time with conventional deadlifts.3
We also have to consider general movement quality. We live in a day and age where people don’t move a lot, and as a result have the movement quality of a pregnant rhinoceros.
If someone doesn’t posses the requisite ankle dorsiflexion, hip flexion, and/or t-spine extension to get close(r) to the floor without “falling” into lumbar flexion, why are we trying to force conventional deadlifts on them?
2) Previous Experience and Injury History
The conventional deadlift requires more forward lean compared to its sumo counterpart.
This places much more shear loading on the spinal erectors.
This isn’t necessarily a bad thing.
Conventional deadlifts are a fantastic option for those who deem their back a weak link and may be looking to strengthen their spinal erectors.
However, sometimes we need to pump the brakes.
Anyone with a history of back issues/injuries may find the conventional deadlift too aggressive. To that point, some may prefer the sumo deadlift and find it more suitable since they’re able to keep a more upright torso.
3) Speaking of Weak Links
The sumo deadlift, as counterintuitive as it may sound, is more quadricep dominant than people give it credit for. Strength coach Kevin Cann of Total Sports Performance (located in Medford, MA) puts it more eloquently than I:
“The sumo deadlift is basically a high squat. The greatest quad demands in the squat are coming up out of the hole. Since the sumo deadlift begins higher than the sticking point for the squat, the demands on the quads will be less than the squat, but greater than the conventional deadlift.“
I’ve found for those trainees who need to work on their quad strength the sumo deadlift is often a great accessory movement to consider.
4) Because, Fuck Purists
I dislike absolutism.
I lose respect for those coaches who act like children and allow their egos to dictate how they interact with others.
The “my way is the only way to train people” diatribes gets old.
I’ve had more than a fair share of coaches get defensive with me because I like the sumo deadlift and because I tend to use the trap bar with many of my clients/athletes.
I remember a case in particular where a coach chastised me on social media for having the gaul of utilizing the sumo deadlift over conventional with a new client (even though, as I had explained, she had repeated occasions of the latter hurting her back).
In both her passive and active assessment she was unable to prevent her spine from going into excessive lumbar flexion in conventional stance (from the floor, and to a lesser extent elevated). This was likely due to anatomical barriers. I wasn’t certain, because I don’t have X-ray vision, but it was my best guess.
We reverted to sumo stance and sha-ZAM: she was able to maintain a pristine position with her spin AND it didn’t hurt her back.
Anyhoo, despite my attempt at marinating in a moral victory, this particular coach went on to wax poetic that “well, I’ve never had anyone walk into my gym and not be able to conventional deadlift….so you SUCK Tony.”
I was like….
https://www.youtube.com/watch?v=TAryFIuRxmQ
I could be projecting and I honestly have no idea why some coaches are so steadfast with their infatuation with the conventional deadlift. If I had to guess it’s because there’s this notion that sumo deadlifts are cheating.
Last I heard there’s no gold star given out to people who only conventional deadlift.
If we wanted to get all sciency and stuff, the hip extension demands are THE SAME for both variations. Unless you’re Gandalf (if so, can we hang out?) and can lengthen someone’s femur, the moment arm (the distance between the joint’s axis and line of force acting on it) doesn’t change.
Furthermore, to steal another gem from Kevin Cann, the distance you lose in sagittal plane when adopting a conventional stance, you tend to pick up in the frontal plane when you switch to sumo.
Generally speaking, in terms of which is “harder:”
Sumo Deadlift = more difficult off the ground, easier at lockout.
Conventional Deadlift = easier off the ground, more difficult at lockout.
In the end, it has nothing to do with cheating. It’s about recognizing that the two variations are just… different.4
And that some people are just insufferable fuck-faces.
Talking much less writing about the 1-Legged RDL isn’t the most exciting thing in the world. Here’s where it ranks on my “Stuff That Gets Me Really Excited About” List:
1: Ice cream. 2-717: Reading Wikipedia pages for every Wu-Tang Clan member. 718: Cleaning up my cats weekly furball vomit. 719: Valentine’s Day. 720: 1-Legged RDL’s. 721: Poodles/Ebola.
But hear me out…this is important shit.
While many may echo the same sentiment above, it’s hard to downplay the importance of the 1-Legged RDL.
Being able to access the hip hinge (and being able to perform it on one leg) is crucial for a variety of reasons: Ranging from improved joint health (specifically dissociating hip movement from lumbar movement) and improved movement quality to improved hip/rotary core stability and enhanced athletic performance.
BONUS: And, for what it’s worth, I’m pretty sure “good hip hinge” is one of the top criteria people search for when puttering around on Tinder.
Even if that’s not the case I’m willing to bet if you put something like “Hip Hinging Is Hot” as your profile heading and followed suite with some candid pictures of you deadlifing a variety of things like a barbell, a bag of groceries, a litter of bunnies, you’d get more matches.
Getting back on task, today I wanted to highlight some of my favorite exercises and drills to help groove and progress the 1-Legged RDL.
I find a lot of trainers/coaches are quick to add these into a client’s program, when the fact of the matter is…they’re a rather advanced movement.
Taking the time to properly progress someone based on their current ability level (and needs) will go a long ways with breeding success and rapport with your clients.
Lets dive in.
But First: Some Universal Coaching Cues
Two common technique flaws I see with most people are:
1. Helicopter Hips
2. Letting go or “losing” their shoulders.
Helicopter Hips
This is where you’ll see someone’s hips kinda rotate upwards towards one side as they hinge back into their leg.
No, no, no, no, no, no, NO.
Don’t Lose Your Shoulders
This is probably the most common snafu with the 1-Legged RDL. Simply put this is where someone will round their shoulders/upper back as they hinge back.
I said, NO.
Progressing the 1-Legged RDL
For most people I think it’s smart to start from the ground, work to standing variations, and then add movement/load after that.
NOTE: What follows isn’t an exhaustive list, but will get the job done for the bulk of people.6
Handcuff Hinge
I feel it only makes sense to start with BOTH hips. We have to master the bilateral hip hinge before we have any shot at mastering single leg variations.
I think Dan John was the first to popularize this drill. There’s just something about this variation that provides the requisite feedback to “feed” the hinge.
NOTE: I also think your standard variety Glute Bridges and Hip Thrusts work well here too.
Split Stance RDL
I also like to call this one a “Fake 1-Legged RDL.”
While still technically bilateral, this variation allows the trainee to front load the front leg while simultaneously using the opposite leg as a balance point as they hinge back.
Skater Hinge RDL
A fantastic progression from the above exercise.
This one really begins to set the table for increasing range of motion as well as grooving the hinge itself in addition to hip separation.
I like to tell people to think about driving or pushing the KB through their chest and to “protect their rib cage with their arms” to help create more full-body tension.
Wall Assisted 1-Legged RDL
Once they mastered the “hinge” component, now it’s time to take away a point of contact. However if balance is still an issue an easy fix is to use the wall to assist.
Start with bodyweight and then add external load once they get comfortable with that (and can extend the leg fully).
https://www.youtube.com/watch?v=EazaXmRPA3A
Assisted 1-Legged RDL w/ Reach
Another option would be this gem I stole from the crew over a War Horse Barbell in Philadelphia, PA.
Don’t Worry: Even though the Pats lost the Superbowl to the Eagles this past weekend, we’re still friends. I guess.
1-Legged RDL ISO Hold
Many will scoff at this drill as easy.
Many will suck at it.
It’s okay to LOL at them.
1-Legged RDL ISO Hold w/ KB Swap
And if you really want to LOL at your clients, give them this drill.
They’ll feel stuff firing they never knew existed.
Deadstart 1-Legged RDL
One trick I keep in my back pocket to help people really get a feel for this exercise is to start in the bottom position.
I’m sure there’s some hoity toity term I could be using here to explain things, but all I’ve got for you is that there’s something about starting in the “end” position that helps people contextualize the pattern.
Try it.
I think you’ll agree.
https://www.youtube.com/watch?v=VkfUrsGCXGE
I’m Done
There’s more I could add but 1) no one made it this far, did they? and 2) I’m hungry.
But First…(Speaking Engagements, Stuff I’ve Written, & Other Tidbits Curated To Showcase How Important I Am)
1) Happy Birthday Julian
I was terrified a year ago today.
I remember standing in a coffeeshop across the street from the hospital getting a little teary eyed thinking to myself “holy shit, Lisa and I are parents and in a few hours they’re sending us home. No more cafeteria, no room service, and no more team of nurses on standby to help.
We’ll be alone, with this crying, pooping, and please, for the love god stop crying thing.”
SPOILER ALERT: It’s a year later. Lisa and I survived; as does every other sleep-deprived parent.
Lisa and I are so thankful for Julian and for our family and friends who have helped to fill Julian’s love tank along the way.
I’ve had the honor of presenting at two previous iterations of the Motivate & Movement LAB (the brainchild of MFF’s Harold Gibbons) and it’s unequivocally one of the most unique events in the fitness industry.
Think: TED Talk, but with deadlifts and lots of f-bombs.
Anyways, the next LAB is this coming February, and will feature myself, Dan John, Pete Dupuis, my wife (Dr. Lisa Lewis), and several of the MFF coaching staff including Brian Patrick Murphy and Amanda Wheeler.
I had to take a break from The Fitness Summit last year for two reasons:
1. Eating way too many cookies.
2. But mostly because I succeeded in making a baby and my wife would have tossed me so much shade if I was all like “Hey Babe, going to KC for three days. Toodles.”
Well this year I’m back and excited to take part in a Fitness Summit first. Dean Somerset and I will be putting on a Pre-Conference day where we’ll spend a few hours test driving some new material as a follow-up to our Complete Shoulder & Hip Blueprint.
Tentatively titled The More Completer Hip & Shoulder Blueprint.
We’ll be taking deep dive into squat and deadlift technique: discussing ankle, foot, hip and upper extremity considerations in conjunction with regressions/progressions and programming. Whether you’re a coach or just someone who likes to lift heavy things you’ll undoubtedly learn something. And if not, cool, you still get to hang out with us for a few hours.
Registration is now open for returning and new attendees. Come experience one of the best fitness events of the year.
Always like David’s perspective on things and this no different.
Social Media Shenanigans
Twitter
I get asked a lot about progressive overload. No need to make it more complicated than it needs to be. 1. Write your shit down. Track it. 2. The following week look at what you did, then do more.
Save the fancy algorithms for breaking the space-time continuum.
Today’s guest post by Dr. Michael Infantino of RehabRenegade.com covers an often glossed over culprit of shoulder pain….the bicep tendon.
It can be an annoying area to treat/work around and when not addressed can derail anyone’s training for a long time.
However, an injury with the bicep tendon isn’t always as tumultuous as it may seem, and sometimes can be tackled with some simple fixes.
Enjoy.
Bicep Tendonitis? When In Doubt Check These 5 Muscles Out
Knowledge and wisdom are not one in the same. A profound statement for an article that is going to discuss pain at the plain old bicep tendon. The reason I bring this up is because an endless amount of information is available to you through the internet.
When you search bicep tendon pain you will likely run into 100,000 articles that talk about pain local to the bicep tendon. I could make an argument that less than 1% will discuss techniques that you can implement to independently resolve your pain.
That is our plan for today.
Before we start drawing up a six week rehabilitation plan for your shoulder or sending you to the nearest orthopedic surgeon, lets attempt some quick fixes. Please, do not mistake a quick fix with a half-hearted attempt.
Refrain from replacing the whole roof when a few shingles will do.
Step one is making sure you are an appropriate candidate for this article. Let’s rule out a bicep tendon rupture!
Schedule an appointment immediately with an Orthopedic Physician if:
1. You heard a sudden “ pop” at the shoulder, along with swelling and bruising around the bicep.
This typically occurs when you are trying to “man up” and carry something that is a tad bit too heavy for you. Often a result of your best friend refusing to pay for a moving company.
2. You have a nice “Popeye” deformity at the bicep.
This doesn’t imply that you have impressive biceps. It means you tore the bicep tendon.
Other Reasons For Concern:
Weakness and pain local to the bicep when flexing the bicep or rotating your palm up to the sky with the elbow partially bent. This does not indicate a rupture, but a partial tear is still possible.
I don’t think I tore my bicep tendon. What else could cause irritation to the bicep tendon?
It is common for the bicep tendon to be a pain generator because of its location. The bicep tendon is often impinged between the humerus and surrounding structures in the shoulder (usually the acromion and the coracoid process).
Keep in mind that impingement is normal.
We have nice “cushions” named bursae that are built to tolerate this compression. It is when this compression becomes too frequent or too intense that we see injury occur at the bicep tendon. We tend to see this in people who perform a lot of overhead activities in athletics or with work requirements.
It hurts when I rub my fingers across the bicep tendon. Doesn’t this mean it is a bicep tendon problem?
Simply rubbing your finger across the bicep tendon is not an accurate way to diagnose a bicep tendon injury. This is the most common mistake I see by medical providers and those with a certification in WebMD browsing. This is not a specific or sensitive test for diagnosing a bicep tendon injury. (Gill, HS)
What is the best way to determine if the bicep tendon sustained an injury?
The gold standard would be an ultrasoundfrom a physician (Skendzel, JG). Isolating the bicep is the next best method. Resistance to the bicep, or lowering yourself in a reverse grip pull up is also useful information.
It is possible that you have developed some inflammation local to the bicep tendon. Most of the special tests specific to the bicep do not have great statistics. We can make a more accurate diagnosis by considering how you sustained your injury and the movements that provoke your pain.
Could pain at the front of my shoulder be related to something else besides the bicep tendon?
Absolutely. Muscles throughout the shoulder and neck can refer pain to the front of the shoulder. The same way that organs can refer pain to different regions of the body.
Let’s check out 5 muscles that commonly refer pain to the front of the shoulder.
Note From TG: A lacrosse or tennis ball work well for all the drills demonstrated in the video, but my preferred “tool” is the ACUMobility Ball by ACUMobility.com.
Use the coupon code GENTILCORE at checkout for an additional 10% off your purchase.
Deltoid
People often forget that the muscle fibers of the deltoid run over the bicep tendon. When you feel pain while pressing around the bicep tendon it may actually be an irritated deltoid.
Biceps
Another no brainer if you are having pain around the bicep tendon. Overuse of the biceps or a quick force applied to the biceps (eccentric force) can cause trigger points to develop in this muscle. If you notice increased discomfort around the bicep some soft tissue work and a few days off from the “gun show” should help.
Pectorals/Subclavius
The real problem here could be too many chest days and not enough leg days!
Poor resting posture during the day and poor technique with exercise are often the true culprits. Falling into a slumped position on a regular basis can put the pectorals in a shortened position.
This faulty posture can lead to excessive impingement, as well as increased tone and trigger points in the pectoral muscles.
The subclavius runs deep to the pecs. It attaches between the clavicle and the first rib, often referring pain to the front of the shoulder. You can usually address this spot while working on the upper fibers of the pecs.
Scalenes
These muscles run on the front, side and back portion of your neck.
The scalenes are one of the many muscles responsible for moving your neck. If you tend to adopt a forward head posture or a slight tilt of the head to the left or right these muscles may be engaged more often than necessary.
Having a forward head posture means that you are passively hanging on these muscles for support during the day. This can lead to increased tone and trigger points. We also tend to see issues in the scalenes show up following a whiplash injury.
The scalenes are also involved in breathing. If you tend to be an upper chest breather these muscles may be taking a beating. Keep in mind, adopting this breathing style can lead to increased tension in the neck and thorax, as well as feelings of anxiety. After you do some soft tissue work, be sure to be more aware of posture and work on accessing your diaphragm.
Infraspinatus
The infraspinatus in one of the four infamous rotator cuff muscles.
It runs right on top of your shoulder blade.
Dysfunction in this muscle tends to show up regularly with shoulder pain. Trigger points in the infraspinatus are a problem because they alter timing and strength of this muscle (or any muscle). This alters normal mechanics at the shoulder with overhead activities. Often leading to an unstable shoulder with excessive impingement taking place.
We wrote another article in the past that discussed how referred infraspinatus pain also resembles carpal tunnel syndrome. This is not the easiest muscle to treat on your own, but don’t skim over it.
Final Consideration:
In some instances, performing soft tissue work around the shoulder will do the job just fine. This does not mean we can overlook the pieces that may have contributed to this injury in the first place. Your goal is to control what you have the ability to control.
What can you control?
1. You can normalize the tissues surrounding the shoulder.
Treat local trigger points, normalize muscle flexibility and reduce stiffness. The goal is to restore normal shoulder mechanics to the best of your ability. Treating muscle stiffness and trigger points helps optimize the timing and strength of the muscles around the shoulder to enhance stability.
2. You can also modify your activity for the time being.
If a certain activity worsens your pain, back off. It is possible that your shoulder is inflamed and needs some time to recover. This is not a fast pass to weeks off from the gym with your best friend Netflix. This means more attention on soft tissue work and flexibility. You also want to gradually return to exercise. Experiencing some discomfort during exercise is ok.
“Poke the bear, but don’t take it to dinner.”(in reference to pain)
– Adriaan Louw
Interested in a FREE Mobility Program to treat pain at the front of the shoulder? Click here
About the Author
Dr. Michael Infantino is a physical therapist. He works with active military members in the DMV region. You can find more articles by Michael at RehabRenegade.com.
References
Gill HS, El Rassi G, Bahk MS, et al. Physical examination for partial tears of the biceps tendon. Am J Sports Med 2007; 35:1334.
Skendzel JG, Jacobson JA, Carpenter JE, Miller BS. Long head of biceps brachii tendon evaluation: accuracy of preoperative ultrasound. AJR Am J Roentgenol 2011; 197:942.
Stephen M Simons, MD, FACSM, J Bryan Dixon, MD Section, Biceps tendinopathy and tendon rupture
Uptodate.com
Taylor SA, O’Brien SJ. Clinically Relevant Anatomy and Biomechanics of the Proximal Biceps. Clin Sports Med 2016; 35:1.
I’ve had the honor of presenting at two previous iterations of the Motivate & Movement LAB (the brainchild of MFF’s Harold Gibbons) and it’s unequivocally one of the most unique events in the fitness industry.
Think: TED Talk, but with deadlifts and lots of f-bombs.
Anyways, the next LAB is this coming February, and will feature myself, Dan John, Pete Dupuis, my wife (Dr. Lisa Lewis), and several of the MFF coaching staff including Brian Patrick Murphy and Amanda Wheeler.
I had to take a break from The Fitness Summit last year for two reasons:
1. Eating way too many cookies.
2. But mostly because I succeeded in making a baby and my wife would have tossed me so much shade if I was all like “Hey Babe, going to KC for three days. Toodles.”
Well this year I’m back and excited to take part in a Fitness Summit first. Dean Somerset and I will be putting on a Pre-Conference day where we’ll spend a few hours test driving some new material as a follow-up to our Complete Shoulder & Hip Blueprint.
Tentatively titled The More Completer Hip & Shoulder Blueprint.
We’ll be taking deep dive into squat and deadlift technique: discussing ankle, foot, hip and upper extremity considerations in conjunction with regressions/progressions and programming. Whether you’re a coach or just someone who likes to lift heavy things you’ll undoubtedly learn something. And if not, cool, you still get to hang out with us for a few hours.
Registration is now open for returning and new attendees. Come experience one of the best fitness events of the year.
I’ll go a head and say it: I feel this is one of the single most important courses I have ever taken.
If you train women it behooves you to understand the intricacies surrounding this topic: pelvic floor dysfunction, prolapse, incontinence, etc.
Dr. Sarah Duvall covers everything from assessment/screening to corrective exercise (tons of attention to proper breathing mechanics) to training considerations immediately postpartum (1-4 weeks) onward to a year plus.
What’s more, what I truly dig about Sarah’s approach is that she advocates women to eventually “lift shit to fix shit” (my words, not hers). Sooooo, there’s that.
FYI: TODAY (1/26) is the last day to register for this go-round. However you can use the coupon code TONYG at checkout for an additional $50 off your purchase. You know, cause I’m awesome.
Is it supposed to happen? Does it get better? What can you do to lessen the amplitude?
Lance chimes in with some simple advice.
Social Media Shenanigans
Twitter
DB presses hurt your shoulders? Maybe try a neutral grip. Squatting hurts your lower back? Maybe brace more or don’t squat so low (to a box). There I just fixed the issue without giving you 147 different “corrective exercises” to try.
If you missed Part I of Dr. Licameli’s guest post, you can check it out HERE. Now, you could read today’s post and get the gist of what was said yesterday, but you run the risk of missing out on some nitty-gritty details.
Kinda like watching Blade Runner 2049.
You could watch it without watching the original, but you’re missing out on some important context.
*** This is the part where’d you know what points 1-4 were all about.
5) Don’t Push Through Pain…Not All The Time, Anyway
There is good pizza and there is bad pizza. There is good pain and there is bad pain. Differentiating the difference is of utmost importance when training the shoulders.
We’re not talking about delayed onset muscle soreness (DOMS), which is felt 1-2 days after training.
We’re talking about pain during training.
What follows are some guidelines to help you navigate your way through pain.
KEEP IN MIND, THESE ARE GENERAL GUIDELINES. IF YOU HAVE PAIN, BE SURE TO SEE A QUALIFIED HEALTHCARE PRACTITIONER!
I stress finding a qualified healthcare practitioner. A qualified healthcare practitioner will explain all of this, in addition to providing several options to keep you training while recovering from injury.
Let’s face it…not all physical therapists have spent much time under a bar. Some have spent time at the bar or even at barre class, but many have no experience or expertise in weight lifting or bodybuilding. You deserve your goals to be taken seriously. You deserve more than things like, “stop squatting for 4 weeks” and standing internal and external rotation with a band to “strengthen” the rotator cuff…or is it rotator cup…no, it’s rotary cuff…rotary club!
That’s it.
Characteristics of good pain:
-How Does It Feel?: Muscle burn; usually symmetrical right to left.
-Onset: Gradually increases as the set progresses.
-When Does It Stop?: At the completion of a set.
Characteristics of bad pain:
-How Does It Feel?: Sharp, numb, tingling; intensity may be asymmetrical right to left.
-Onset: Quickly; may be felt after only the first few reps
-When Does It Stop?: Days, weeks, months…; stays well after the set is completed, however may also end at the completion of a set.
If you find yourself experiencing bad pain, it may not be the end of the world. Bruce Lee also said, “Be like water.”
Water has the flexibility to take the shape of whatever container it is placed in, while still maintaining its identity…water.
In a similar way, our training can be modified without losing its identity or effectiveness. Try to modify your training. Sharp pain when pressing overhead with a barbell? Try a landmine press. Unable to perform a reverse flye? Try a face pull. Keeping the same exercises and modifying training volume may also do the trick.
6) Don’t Overdo It With The Classic “Rehabilitation” And “Injury Prevention” Exercises. There Are Hidden Benefits In Some Classic Movements.
It is no one’s fault but our own that, as a profession, physical therapy has a certain reputation when it comes to injury and injury prevention. The misconception is that in order to reduce pain or prevent injury, a hefty dose of classic “rehabilitation” exercises need to be added into an already packed training regimen.
For me, and many out there like me, gone are the days of separating “therapeutic exercise” from “regular training.” Say goodbye to blocking off a half hour pre and post workout to foam roll and perform straight leg raises and clamshells. If you look closely, you can find what you need for healthy shoulders right there in your existing training routine. Here are some examples:
Face Pull: Trains scapular retraction and external rotation. Great for scapular stability, rotator cuff strengthening, and balancing out internal vs. external rotation.
Farmer Carry/Overhead Carry: Excellent way to train postural, scapular, and global rotator cuff stability, not to mention full body/core strength.
Plank on Ball with Protraction and/or the Ab Wheel: Great way to dynamically train serratus anterior, core stability, and scapular stability.
Plank with Band Around Wrists with Protraction: Great way to train external rotation as well as dynamically train serratus anterior, core stability, and scapular stability
Landmine Press: With proper scapular movement (more on this to come), this is an excellent exercise to dynamically strengthen serratus anterior and improve scapular neuromuscular control.
Pull-up/Pull-down: With proper scapular depression at the initiation of the pull, this is a fantastic exercise to target the lower traps, which play a key role in scapulohumeral mechanics. Full range of motion and a long eccentric will also help lengthen the lats, which can limit shoulder mobility.
Squats/Deadlifts: Train “shoulder packing” position. A proper warm-up prior to these lifts will also include thoracic mobility work.
Seek out experts like Tony Gentilcore (obviously), Andrew Millett, John Rusin, Jeff Cavaliere, Quinn Henoc, Mike Reinold, Mike Robertson, Eric Cressey, Dean Somerset, Zach Long, Joel Seedman, Ryan DeBell, Teddy Willsey, and many more.
But if you have pain, GO SEE A QUALIFIED HEALTHCARE PRACTITIONER FIRST!
7) Symmetry…Don’t Forget External Rotation and Thoracic Mobility
As previously mentioned, weightlifters tend to be very “internal rotation dominant,” and for good reason.
Let’s look at the muscles that internally rotate the shoulder.
Just to name a few: pec major, lats, subscapularis, teres major, front deltoid.
Let’s take a look at the muscles that externally rotate the shoulder: infraspinatus, rear deltoid, teres minor.
The muscles that internally rotate the shoulder are of greater number and greater size (the pecs and lats are two of the strongest muscles of the upper body). The external rotators are less in number and much smaller. Give those external rotators a fighting chance to create some balance! Don’t neglect them!
It’s important to note that just performing an equal amount of presses and rows/pull-downs will not improve shoulder rotation symmetry because, as previously mentioned, both the pecs and the lats internally rotate the shoulder. So even though pull-downs and rows are “back” exercises, they still train the lats and therefore still train internal rotation.
Some of my favorite exercises to train external rotation are face pulls, W raises/pulls, reverse flyes with external rotation bias, wall slides with a band, and planks with a band around the wrists.
Adequate thoracic mobility is crucial to optimal shoulder function. If the scapulae are the foundation of the shoulder, the thoracic spine is the ground on which the foundation is built.
Thoracic mobility should be included in almost every warm-up, regardless of the body part being trained. One of my favorite thoracic mobility exercises is a kneeling protraction sit-back into a lat stretch with deep breathing. Be sure to check out this video of a sample lower body warm-up routine that includes this exercise.
8) Don’t Pin Down The Scapulae
It happens all the time.
An idea comes out and soon gets morphed into an extreme.
“Dynamic stretching may be better than static stretching pre-workout” turns into, “Don’t ever do static stretching because it’s a waste of time.”
“Foam rolling may help improve short-term soft tissue restriction and range of motion” turns into “I have to foam roll for 30 min when I wake up as well as pre workout, post workout, and before bed in order to break up adhesions and prevent injury.”
The idea of “shoulders down and back” seems to have experienced a similar course. Yes, keeping the shoulders in a retracted and depressed position with a properly extended thoracic spine will place the muscles, nerves, and joints in a structurally advantageous position as well as open up the subacromial space by about 30%. It also allows for unrestricted overhead shoulder range of motion.
However, the scapulae must move, and they must move correctly. The scapula is the base and foundation of the shoulder and dysfunction can most certainly lead to injury.
Note From TG: Check out THIS article I wrote a while back touching on the same topic; in this case how it relates to performing a DB Row correctly.
Generally, the scapula remains relatively stationary during the first 30 degrees of shoulder abduction (lifting the arm out to the side as in a lateral raise), with the movement coming primarily from the glenohumeral joint. As abduction continues past 30 degrees, the scapula begins to move and the glenohumeral joint and scapulothoracic joints move in about a 2:1 ratio.
This means that at 120 degrees of abduction, the glenohumeral joint has contributed about 80 degrees and the scapula has contributed about 40 degrees. If the scapula remains pinned “down and back,” range of motion will be restricted and the glenohumeral joint will be forced to overcompensate. This dysfunction will likely limit performance and increase risk of injury.
In addition to upward rotation, the scapula also needs to protract (glide forward) during both overhead and pulling movements. Serratus anterior is one of the main muscles responsible for protraction as well as for adhering the concave surface of the scapula to the convex surface of the ribcage. Pinning the scapulae down and back is not what we need…we need controlled, scapular motion.
I’m Done
If at least one person benefits from these tips, I have done my job. My hope is that you will keep these tips in mind and reap the benefits of strong, healthy shoulders. You’re putting the work in, now let’s capitalize on it.
About the Author
Nicholas M. Licameli
Doctor of Physical Therapy / Pro Natural Bodybuilder
Every single thing he does, Nick believes in giving himself to others in an attempt to make the world a happier, healthier, and more loving place. He wants to give people the power to change their lives. Bodybuilding and physical therapy serve as ways to carry out that cause. Nick graduated summa cum laude from Ramapo College of New Jersey with his bachelor’s degree in biology, furthered his education by completing his doctoral degree in physical therapy from Rutgers School of Biomedical and Health Sciences (previously the University of Medicine and Dentistry of New Jersey) at the age of 24, and has earned professional status in natural bodybuilding. His knowledge of sport and exercise biomechanics, movement quality, and the practical application of research combined with personal experience in bodybuilding and nutrition allows him to help people in truly unique ways. Love. Passion. Respect. Humility. Never an expert. Always a student. Love your journey.
The shoulders (delts) are an area that many trainees wish were bigger. They’re also an area that’s often injured. In today’s guest post by Dr. Nicholas Licameli he discusses and breaks down some of his top training tips for shoulder health and hypertrophy.
Enjoy.
In order to build a quality and symmetrical physique, all muscle groups must be trained and developed equally. An overdeveloped muscle group can never compensate for an underdeveloped one. That being said, a well-developed set of shoulders, along with a narrow waist, can really enhance a physique and create a nice V-taper.
While the shoulders are one of the most sought after muscles to develop, they also tend to be one of the most stubborn and most commonly injured. Here are my top shoulder training tips to help you on the journey to strong, healthy shoulders.
1) Listen To Your Body
Early in my training career, I remember feeling as if there were some aspects of my training that could not be changed. Compound lifts had to be performed using a barbell only and with heavy, lower rep sets. Dumbbells and lighter/higher rep training were for isolation movements.
For years, I trained in the 6-10 rep range for barbell overhead presses and in the 12-20 rep range for lateral raises, rear deltoid work, and other isolation movements. I never really felt “satisfied” or that “good” fatigue after completing heavy sets of overhead presses.
I eventually took the leap out of my comfort zone and started using dumbbells and a landmine set up for overhead pressing.
What a difference!
I felt a connection to my deltoids like never before. The overhead press soon went from one of my least favorite movements to one of my favorites.
I also started to realize that my lighter warm up sets seemed to feel better (even when not taken anywhere near failure) than my heavier working sets. I took another leap and started training the overhead press in the 12-20 rep range and again, I was blown away at how my body responded. Does this mean I completely removed heavy overhead pressing from my training?
Of course not, but I am definitely not afraid of lighter training.
The take home message here is listen to your body.
If heavy barbell training doesn’t quite “click” for your shoulders, don’t be afraid to change it up.
We now know that if hypertrophy is your goal, overall volume (volume = weight lifted x sets x reps) and progressive overload at an appropriate intensity is what matters.
Note From TG: Technically speaking, for muscular hypertrophy three factors take precedence: Mechanical Tension, Metabolic Stress, and Muscle Damage.
Hypertrophy can be seen by training with heavy weight and low reps as well as light weight and higher reps. Keep in mind that if your goal is strictly to increase strength on the barbell overhead press, you’re going to have to train the barbell overhead press with heavy loads, as specificity is much more important when it comes to strength.
2) Obey Your Anatomy: The Upright Row and Lateral Raise
The upright row seems to have more controversy surrounding it than Donald Trump administering a flu vaccine to a gluten-free, ketogenic, vegan, transgender circus elephant in captivity while drinking creatine sweetened with aspartame.
Is the traditional “muscle magazine” upright row the safest or most effective exercise to build big, strong, and healthy shoulders?
Probably not.
Can it be modified?
Absolutely.
By nature of the movement, the barbell upright row places the shoulder in resisted internal rotation with elevation. This is a less than optimal and, dare I say, vulnerable position because it narrows the subacromial space, which can increase risk of injury.
Does that mean our shoulders will break on the first rep?
No.
Our bodies are resilient and can handle less than optimal positions, but why risk it if we can find a better way? Need a refresher on what the sub-acromial space is and how narrowing it can lead to injury? Check out Tony’s awesome article right here.
Great alternatives to the barbell upright row are the dumbbell upright row and the face pull.
Face Pull
As mentioned above, the barbell upright row puts us into internal rotation, which narrows the sub-acromial space.
External rotation, however, can be a shoulder’s best friend.
The dumbbell upright row frees up our joints and allows us to externally rotate throughout the movement. The face pull reduces the amount of internal rotation at the bottom of the movement and increases the amount of external rotation at the end of the movement.
Many training routines tend to be abundant in internal rotator strengthening (pecs, lats, etc.) while lacking strengthening for the external rotators (posterior rotator cuff, rear deltoids, etc). Both the dumbbell upright row and face pull involve resisted external rotation, which means they can help balance out a traditional training routine (more on this to come).
Note From TG: Speaking of Face Pulls I am reminded of THIS classic T-Nation.com article by Mike Robertson and Bill Hartman on the topic.
The lateral raise is a staple in most shoulder training routines, however if done incorrectly, can be very similar to the barbell upright row.
By internally rotating at the top of a lateral raise, as if pouring a pitcher of water, the shoulder gets placed into resisted internal rotation with elevation, which we now know is not that great of a position.
Why is that a common cue (even Arnold recommends it!)? Because in order to maximally target the middle deltoid, it needs to be directly in line with the force of gravity and the “pouring-the-pitcher” position accomplishes this.
Middle deltoid is directly in line with the force of gravity (good!), however the shoulder is in internal rotation and elevation (bad!)
Anterior deltoid is directly in line with the force of gravity
Bending forward or lying face down in a bench targets the posterior deltoid because it is directly in line with the force of gravity.
Posterior deltoid is directly in line with the force of gravity
So how do we reduce our risk of injury while still maximizing the force through the middle deltoid?
Simple.
Hinge at our hips and lean forward, just a bit.
The line of gravity has now changed. We’re now able to externally rotate (reversing the pitcher pouring motion) while still placing the middle deltoid in perfect alignment with gravity.
Middle deltoid is directly in line with the force of gravity (good!) AND the shoulder is in external rotation (good!)
For a video demonstration and explanation of this, go HERE.
3) Don’t Overdo It…Pay Attention to Volume
When looking at weekly shoulder volume, don’t forget to account for all of the exercises that involve the shoulders as secondary movers.
Shoulder presses, lateral raises, and reverse flyes are not the only exercises that add to weekly shoulder volume.
The shoulders get worked during exercises like bench presses, rows, dips, and even pull-ups and pull-downs. If you have a volume goal you are trying to hit, be sure to keep this in mind to avoid overtraining and overuse injuries. Remember, more is not better…better is better.
4) Don’t Try To Get Too Creative Just For The Sake Of Novelty
Bruce Lee said,
“I fear not the man who practiced 10,000 kicks once, but I fear the man who has practiced one kick 10,000 times.”
Too much variety for the sake of novelty can limit your ability to progress, especially when it comes to shoulder training.
In general, the basic variations of shoulder movements are presses, lateral raises, extension-based movements (face pulls, reverse flyes, etc.), and global stability movements (farmer carries, planks, bird dogs, etc.).
My suggestion would be to find your preferred variations of those movements and perfect, fine tune, overload, and progress them. Yes, change it up every once in a while, but don’t swap out a solid landmine press for a banded, blood flow restricted, single-arm kettlebell press while standing on a BOSU over a pool of sharks with laser beams attached to their heads.
Stay tuned for Part II tomorrow where I offer four more of my top shoulder training tips.
About the Author
Nicholas M. Licameli
Doctor of Physical Therapy / Pro Natural Bodybuilder
Every single thing he does, Nick believes in giving himself to others in an attempt to make the world a happier, healthier, and more loving place. He wants to give people the power to change their lives. Bodybuilding and physical therapy serve as ways to carry out that cause. Nick graduated summa cum laude from Ramapo College of New Jersey with his bachelor’s degree in biology, furthered his education by completing his doctoral degree in physical therapy from Rutgers School of Biomedical and Health Sciences (previously the University of Medicine and Dentistry of New Jersey) at the age of 24, and has earned professional status in natural bodybuilding. His knowledge of sport and exercise biomechanics, movement quality, and the practical application of research combined with personal experience in bodybuilding and nutrition allows him to help people in truly unique ways. Love. Passion. Respect. Humility. Never an expert. Always a student. Love your journey.