We’re not quite at the same level (or stratosphere) as the Cosgrove’s (Alwyn and Rachel), but in the past year it’s been pretty cool to see my wife, Dr. Lisa Lewis, gaining some attention from my neck of the woods.
(Not So) Humble Brag Alert
As most who read this website know, Lisa is a psychologist with a doctorate in Sports Psychology. She has a special interest in mindset, mindfulness, and exercise/behavioral psychology, and as it happens this is an area or niche that’s been receiving a ton more attention in the fitness industry of late.
We all tend to be our own worst enemy and Lisa can speak to many of the mental roadblocks and clusterfuckery (<– my words, not hers) that can often hamper progress or even prevent people from starting to exercise in the first place.
It’s been a treat to see people reach out to her for her expertise.
In the past year:
She’s performed several I Am Not Afraid to Lift workshops with Artemis Scantalides (the next one with Lisa is this November here in Boston. You can go HERE for more information and to register).
She and I have been invited to Austin, TX and London to put on our Strong Body-Strong Mind workshop.
She’s also seen her name in print in the likes of Women’s Health Magazine and EliteFTS.com.
And while she’s a doctor, she’s also a doctor who lifts. #fitnessstreetcred
To say I’m proud would be an understatement. And to say I’m excited to see what the future holds for her (and us) would be even more of an understatement.1
One of the bigger “events” of late was Lisa being invited onto The FitCast a few weeks ago to record an episode.
She CRUSHED It. I’m totally not biased.
You can listen to her episode HERE (and look for another episode in a few more weeks. She and Kevin recorded Part II a few days ago).
Yesterday I made a cameo at a sports training facility located just outside of Boston where I was asked to come in and speak to the staff about writing. More specifically, they asked if I could come in and offer tips and insights on how they could go about writing more engaging content for their members and general public.
At first I was mystified. Me? Come in and speak about writing and the writing process? I’m not even a writer. I mean, I write, sometimes coherently. But I’m just a strength coach who happens to dabble in “writing.” What could I possibly have to offer that couldn’t be covered in, say, Stephen King’s On Writing or THIS excellent piece written by my boy Bryan Krahn a few years ago?
Then I thought about it for a second and looked at the facts:
1. On this website alone, counting this masterpiece (<— only a slight exaggeration), I’ve published 1,843 posts. Holy shit.
2. According to Alexa.com, today (September 21, 2016), my site ranks as the 275,122nd most visited in the world (77,401st in the U.S). I’m coming for you Yahoo. And it’s just me, a one-man show, tapping away on my keyboard.2
For the record: You’re doing pretty good for yourself if you’re under the 1-million marker.
3. I’ve also had the honor of having my work printed in many of the most reputable fitness sites & publications in the industry: T-Nation.com, Men’s Health, Men’s Fitness, BodyBuilding.com, STACK, and Women’s Health respectively.
4. And while it has nothing to do with anything, it’s a fact my cat is the cutest thing ever. #beautifulbeautifulprincess.
A photo posted by Tony Gentilcore (@tonygentilcore) on
I say none of this to brag.3 However it demonstrates I must be doing something right and that the content I put out on a weekly basis is resonating with a fair number of people out there. Thanks by the way.
So, in no particular order, here are some of the tidbits I shared yesterday.
It’s Never Been Easier to Be Heard, But It’s Never Been Harder to Get Heard
* Apologies to whomever this quote is attributed to. It’s awesome – thanks.
Think about it: it’s not very hard to get your stuff out there; the barrier to entry is nothing more than clicking “publish” or “send” on your computer screen.
The internet has allowed an amazing opportunity for people to have their voice heard when it otherwise would be muffled. Blogging and the advent of social media has opened the floodgates to everyone’s prose; and, unfortunately, word-vomit.
And therein lies the dilemma.
As wonderful as the digital age has been at giving everyone a “voice,” it’s also the ultimate catch-22. I.e., EVERYONE has a voice.
It’s never been harder to get heard amongst the cacophony of Tweets, Facebook updates, Instagram posts, articles, blogs, and endless e-books from trainers who have been in the industry for all of two months.
All the more reason to up your game and get a leg-up on the competition so you can better separate yourself from the masses.
1) Write, A Lot
I realize this is akin to me telling someone who’s thirsty to go drink some water, but I can’t stress this point enough.
Almost weekly I’m asked by fitness professionals how they can go about getting better at writing. The snarky Tony wants to say:
“Stop emailing me about writing, and go write.”
But I don’t do that. I’ll offer these quick-hitting tips:
Ideally, write for 60-90 minutes every day. As Ann Handley noted in her wonderful book, Everybody Writes, writing doesn’t always mean you’re writing the next To Kill a Mockingbird. Writing an email counts as writing. Writing a Facebook update counts as writing. Writing a detailed biography of your favorite characters from He-Man: Masters of the Universe counts as writing. It all counts. If you don’t have 60-90 minutes, start with 30. If you don’t have 30 minutes, who are you, Barack Obama?
Figure out when you’re most creative. The last thing I want to do after a full-day of coaching is to sit down at my desk at 8 PM and attempt to write. I’d rather throw my face into a wall. However, in the morning, when my wife leaves for work, that’s my magic time. And yes, I understand that that sounds very creepy. Everyone is different, so figure out when your inner Vonnegut appears and roll with it.
Once you have momentum, it’s VITAL you stay CONSISTENT.
“Someone once asked Somerset Maughham if he wrote on a schedule or only when struck by inspiration. “I write only when inspiration strikes,” he replied. “Fortunately it strikes every morning at nine o’clock sharp.”
― Steven Pressfield, The War of Art: Break Through the Blocks & Win Your Inner Creative Battles
2) You’re Right; Nothing You Say Is New
One of the common themes I run across with new writers is their proclivity to bum themselves out before they even start.
“What could I possibly write that hasn’t already been said?”
You’re right: nothing you say will be new or revolutionary. However, whether you’re writing on deadlifts, undulated periodization, or, I don’t know, sharing a recipe on Paleo M&Ms (I’m not surprised if this exists)…it hasn’t been written in your voice and with your perspective.
Your experiences and your opinions matter to your readers. Don’t forget that.
3) Finding Your Style
Writing style is one of those things that can help differentiate you from everyone else. I’m a firm advocate in writing how you talk, which is why, sometimes to my detriment, turns some people off to my writing.4
I have a potty mouth.
I swear when I talk, and I swear when I write. I can’t help it. And, there are many, many, really fucking good writers who are right there with me.
Writing how you talk takes practice (see #1), but it breeds authenticity. And even though it’s in written form and not face-to-face, people can sense it. And they will relate to it.
Of course, I am not implying you have to swear when you write. If that’s not you, don’t force it.
If you’re funny, be funny. If you’re not, you don’t have to be.5
If you’re someone who nerds out on PubMed on a Friday night (go you!), then nerd out when you write. There are plenty of dorks out there – myself included – who will read that.
“The internet is a scary place to try to establish yourself as a knowledgable authority. Droves of keyboard warriors are constantly at the ready to cut you down and point out your inaccuracies, especially when it comes to exercise. If you can’t back up your statements with a combination of scientific research and experience, you’ll quickly be tarred and feathered by the masses.”
Nothing is more authentic than writing on topics you’re passionate about and/or have first-hand experience with. I’m pretty good at deadlifting, assessment, and program design. That’s my wheel house and where the bulk of my writing gravitates towards. Breaking down the nuances of Intermittent Fasting or the Kreb’s Cycle? Not so much.
Also, be careful here. Just because you’re “passionate” about something doesn’t mean you should write about it. I’m passionate about deadlifting 8000 lbs and winning a rap-battle vs. Nas. Doesn’t mean I’m going to write about it.
5) Content Is King. What Your Content Looks Like Matters Too
I’m a firm believer if you’re someone putting out quality content consistently, it will get noticed. It won’t happen overnight, or maybe this year, but it will happen. Stay patient.
How many of you reading ever think about what your content LOOKS like, as in how it appears on the screen?
It matters.
Introduction: 1st paragraph (and sometimes the 1st sentence) with either engage people or make them click away. Try to ensure it compels people to keep reading.
What’s the point of the article or post? How is this going to help them?
Main Content: meat and potatoes of the post. You better fulfill that promise from your intro. I’m spitballing, but most blog posts should be in the range of 500-1500 words. It’s blog post, a quick hitting topic or idea, a train of thought…not a dissertation.
Avoid long paragraphs. Nothing shuts off people’s attention more than no spacing.
Use Sub-Headlines: most people scan and rarely read a post word for word.
People love numbers and bullet points.
Use Videos and pictures to break up text.
And speaking of pictures, Copyright is no joke. Sign up for an image service like 123RF or Stock Unlimited. Google Images is like playing with copyright infringement fire.
I’ll End With These Gems
Grammar counts. Tick for tack, someone is going to place more credence on an article that can differentiate between there/their/they’re than one that doesn’t. Grammar Nazis are annoying, and nothing is worse than someone who takes time out of their day to point out you spelled a word incorrectly, but to their credit they know when to call a spade a spade.
Tip from Bryan Krahn: whatever you end up writing, in the end, chop 20% of it. Note: I didn’t do that to this post because fuck that guy…;o)
Voracious reading begets vehement writing. Read those writers you admire. All of them, not just fitness writers. You’ll hate them because they’re so good, but you’ll learn.
For many people the first choice when their shoulder begins to hurt or if they lack mobility is to start cranking and yanking on it. This is rarely the right approach, and as Andrew Millett (my good friend and Boston based physical therapist) points out in today’s post…there a far better and far more effective approaches.
The shoulders, specifically, the glenohumeral joints, are typically very mobile joints. They need to flex, extend, abduct, adduct, horizontally abduct and adduct and internally and externally rotate in multiple planes and positions in relation to the body. Even though the shoulders are a common area of mobility, many people will present with limitations in at least one aspect of glenohumeral motion.
There are various reasons why someone may have limited shoulder mobility.
Bony Limitations
photo credit: pediatric-orthopedics.com
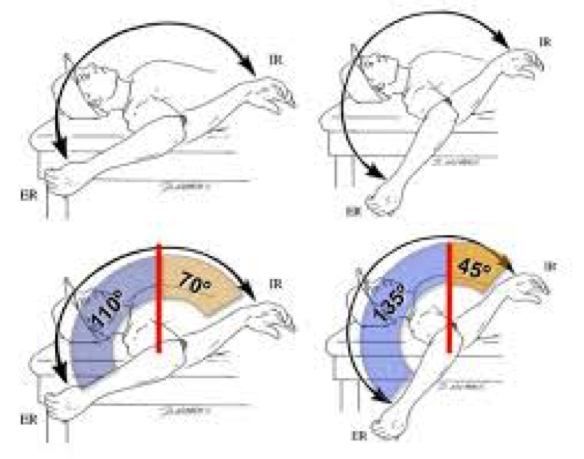
People who engaged in various overhead sports such as baseball, softball, etc. have been shown on multiple studies to have changes to the glenoid and humeral head. In baseball players specifically, they can appear to have a loss of internal rotation range of motion as compared to their non-throwing shoulder and an increase in external rotation range of motion as compared to their non-throwing shoulder.
This change in range of motion is commonly due to humeral retroversion. Humeral retroversion is the alternation of the humerus and humeral head in relation to the glenoid fossa from years of repetitive overhead activity, specifically throwing.
This is typically only seen in overhead athletes. This differentiation in range of motion side to side in external and internal rotation is considered “normal” for this population. As long as External + Internal Rotation aka Total Motion is within 5 degrees of the non-involved shoulder, then that is considered normal.
Note from TG:In other words, loss of IR in a throwing shoulder is an adaptive response and is normal! It doesn’t necessarily have to be fixed.
With that said, we do not want to crank on someone who has “normal” total motion, but may lack internal rotation on one side versus the other. Asking your patient or client if they engaged in overhead sports as a child is a good clue to this. Then measuring their motion will give more information.
We will get into more detail later on how to improve their motion if their is more than a 5 degree difference in total motion.
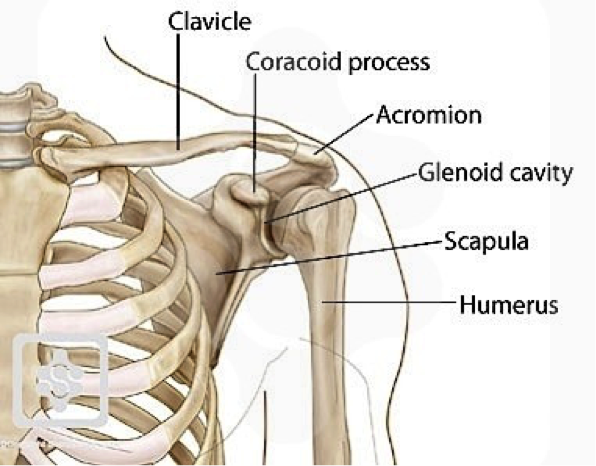
Another bony limitation at the shoulder can be acromion type. The acromion is a bony structure that is present in all people that is part of the scapula.
Photo credit: ipushweight.com
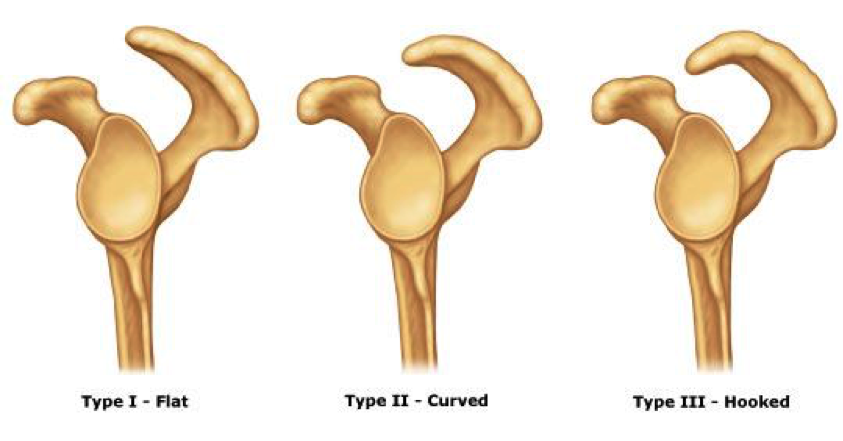
All acromions are not created equal though. There can be 3 varying types of acromions.
As you can see in the picture above, a type I acromion is relatively normal in appearance. In type II and III, there is more of a curved/hooked appearance to it. This alteration in can cause pain and limited motion when reaching overhead.
The only way to definitively know if someone has a type II or III acromion is through radiographic imaging. Programming may need to be altered to more horizontal pulling/pushing variations instead of overhead work if someone doesn’t have full overhead mobility due to a type III acromion.
For most people with a type II acromion, physical therapy can help to improve range of motion and decrease the effect of the acromion on shoulder motion and pain. For most people with a type III acromion, more often than not, surgical intervention is what will help.
Capsular Limitations
In the majority of the joints in the body, there is something called a “capsule” surrounding the joint. A capsule is synonymous to a ziploc bag encompassing the joint.
In this capsule, there are “folds” in certain aspects depending on where the arm is positioned. Due to an old injury, surgery, etc., this capsule can become “tight or stiff.” Now, without getting into too much detail about why it is tight/stiff or why there are capsular limitations, the only way to determine if there is capsular limitations, is by a licensed healthcare practitioner, ie. PT, chiropractor, etc.
Typically, older populations may have more capsular limitations OR if someone has had a long standing injury or prior surgery to the shoulder, they may present with decreased ranges of motion because of the capsule.
The only other area that can be attributed to decreased ranges of motion due to the joint capsule itself that affects the shoulder, would be the thoracic spine. Lack of thoracic spine extension and/or rotation can limit shoulder flexion, external rotation, etc.
To test for limited thoracic spine mobility, try Quadruped Passive Thoracic Rotation:
Normally, passive rotation should be 50 degrees in the general population. If it is less than that, that can significantly limit shoulder range of motion.
Soft Tissue Restrictions
Now, this is the more common of all three of the factors that can limit shoulder mobility. Excluding clients who are hyper-mobile, the majority of clients and patients have some form of increased soft tissue tone in one if not more areas of their body.
At the glenohumeral joint, there are a few “big” than can contribute to limited shoulder mobility.
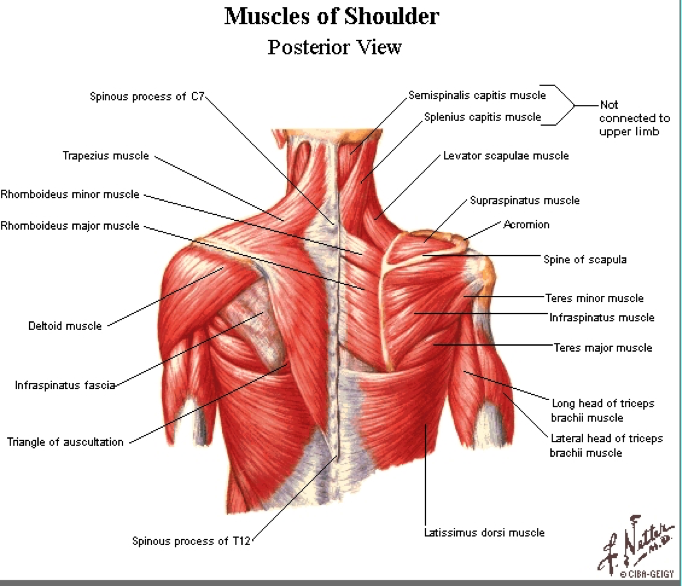
Muscles that can limit shoulder external rotation are:
Pec Minor
Teres Major
Latissimus Dorsi
Subscapularis
Muscles that can limit shoulder internal rotation are:
Infraspinatus
Teres Minor
Now, you’re probably thinking that I just “copied and pasted” most of those muscles from one section to the other. The latissimus dorsi is a huge contributor to limited overhead shoulder mobility due to its attachment on the trunk into abduction and flexion. It can also limit external rotation as it is a shoulder internal rotator.
Pectoralis minor can limit overhead motion because of its attachment on the coracoid process of the scapula and the rib. Decreased pectoralis minor tissue extensibility can cause an anterior tilt of the scapula limiting humeral motion on the glenoid.
Subscapularis can limit overhead motion due to its attachment on anterior side of the scapula and on the humerus. Teres major attaches on the scapula as well as on the humerus and can limit overhead mobility as well.
Infraspinatus and Teres Minor limit internal rotation of the shoulder due to its attachment points on the humerus and scapula.
Typically, one if not more than one of the aforementioned muscles can limit overhead mobility. Instead of performing intense stretches and forcing the glenohumeral joint into motions it just does not have, we need to ASSESS and then ADDRESS any limitations that are present.
Assessment
Active Motion
To assess someone’s active ranges of motion, ask them to move.
Have them perform:
Shoulder Flexion
Shoulder Abduction
Shoulder Medial Rotation
Shoulder Lateral Rotation
“Normal” ranges of motion for general population clients would be:
Shoulder Flexion: 180 degrees OR humerus in line with the client’s ear.
Shoulder Abduction: 180 degrees OR humerus in line with side of body
MRE: 3rd digit finger tip to contralateral inferior angle of scapula
LRF: 3rd digit finger tip to superomedial border of contralateral scapula.
Now that you have assessed someone’s active motion, we need to assess it passively to fully determine if someone has a true mobility limitation.
Passive Motion
Perform the same motions passively into flexion, abduction, MRE, and LRF. Do not force these motions or push through tightness or pain. If you cannot passively bring the client’s arm to the aforementioned areas mentioned in the Active Motion section, then we know the client has a true mobility limitation.
Addressing the Issue
If someone presents with limitations in passive shoulder flexion, abduction, MRE, or LRF, performing some form of Self-Myofascial Release (SMR) can be beneficial.
Then, re-test passive motion to see if there has been an improvement in mobility. If there has, then you know you have worked on the appropriate areas.
If there has NOT been an improvement in mobility, refer out to a manual therapist (PT, sports chiropractor, massage therapist, etc.)
If the mobility has improved, then we want to use appropriate mobility drills to help groove the patterns that were just improved.
Make sure to keep scapulae retracted by using wall or door jam.
Once scapulae is fixed, gently bring arm across body.
Hold 5-8 seconds pre-training or 30 seconds post-training.
By fixating scapulae, it will provide a more focused stretch to the posterior aspect of the shoulder.
Latissimus Dorsi Stretch
Key Points:
Use opposite side hand to fix scapulae to rib cage.
Once scapulae is fixed, hold onto a stationary object and sit back.
Gentle stretch should be felt in the lat.
By fixating the scapulae to the rib cage using the opposite hand, it provides a truer stretch to the lat vs tractioning the glenohumeral joint.
Motor Control
Once there has been an improvement in mobility, we want to make sure that the brain and the body knows how to access that “new” mobility. We need to make sure to re-pattern the proper movement patterns to avoid falling back into an poor compensations.
For shoulder re-patterning, various movements that help to promote proper movement patterns such as:
Forearm Wall Slides
Back to Wall Shoulder Flexion
Quadruped Assisted Reach, Roll, and Lift
Now that we have improved the mobility by addressing increased soft tissue tone, re-patterned those movement patterns, now we want to incorporate them all together.
Movements such as:
Turkish Get-Up
Kettlebell Bottoms Up Baby Get-Up
There you have it! Instead of mindlessly stretching your shoulder, address any potential limitations and get back to training effectively!
About the Author
Andrew Millett is a Metro-West (Boston) based physical therapist
Director Clint Eastwood’s (American Sniper, Mystic River, Million Dollar Baby) latest movie Sully is, ironically, not centered around a random guy with the last name Sullivan or some obscure neighborhood bar located in the outskirts of Boston.
It centers around the real-life event surrounding USA Airways Flight 1549 piloted by Chelsey Sullenberger (Tom Hanks) and Jeff Skiles (Aaron Eckhart), which left New York’s LaGuardia Airport en route to Charlotte, NC on the morning of January 15, 2009 and 208 seconds later performed an emergency and unprecedented landing (more like an aviation”bellyflop”) into the Hudson River.
(Not really) a Spoiler Alert: all 155 passengers on board miraculously survived.
Very well known for his thrifty movie-making approaches I was half-expecting Eastwood to show a dramatization of the entire crash sequence – which he did, twice, in very much a sphincter clenching way – and after all was said and done, pan the camera towards Hanks (Sully), have him say something like “yeah, that’s right, I landed that shit,” and then fad to black, roll credits.
Basically the ultimate mic drop.
And this is why I have never won an Academy Award or have never been paid money to make a movie.6
There are no real surprises to the events themselves, and I can understand why some may think to themselves “why did this movie need to be made in the first place? We all know what happens.” I can respect that.
Could the argument be made that it’s a predictable plot? Sure. This is standard procedure with any movie made about an historical event. I think it’s a stupid argument to make. We all know the Titanic sinks and yet that didn’t stop James Cameron from 1) making a metric shit-ton of money and 2) making me ball my eyes out.
So, yeah, the plot is predictable, but it doesn’t make what happened any less fascinating. However, the meat and potatoes of the plot isn’t so much about the event itself…but rather how it affects “Sully” and the rest of the people involved.
Not surprisingly, after an event like that, there’s going to be a degree of “WTF just happened?” and wonderment about whether or not the right call was made?
Could he have made it back to LaGuardia?
Did he have to land the plane in the river?
Could the higher-ups involved with reviewing the whole scenario be any more dickish than they were?
The movie, while depicting a miraculous event, had more to do with the aftermath and how Sully dealt with the inquisition on his actions, and also, too, his transition from a guy “doing his job” to instant celebrity and hero and guy I want to pilot every flight I’m on from here on out.
In a time where we’re surrounded by a social and political environment fueled by hate, bigotry, ignorance, and a lot of dark and sinister adjectives…it was refreshing to head to the theater for 90 minutes and be reminded that human beings can be pretty darn calm, cool, and collected. It was nice to see and be reminded that something good can happen.
My wife is away this weekend with my mother-in-law as the latter is being inducted into her alma mater’s Athletic Hall of Fame.7 This 100% means I’ll be catching up on some movie watching and chilling with my cat on the couch for the next two days. You know, because I live life dangerously.
What are your plans this weekend? More exciting than mine I hope.
There is no other coach I have been obsessed with of late more so than Joel Seedman. Quite frankly, he’s someone who is consistently putting out phenomenal information and has a take on many topics I’ve never heard before.
I respect that.
In this article he breaks down eccentric/isometric training, which is named many other things – pause reps, iso holds, yielding isometrics, eccentric quasi isometrics, extreme isometrics, yo mama is fat, it’s all the same. He LOVES eccentric training and after reading this article I can see why. LOTS of good stuff to pick up and apply.
NOTE: the term “Porcelain Post” was invented by Brian Patrick Murphy and Pete Dupuis. Without getting into the specifics, it describes a post that can be read in the same time it takes you to go #2.
Huh, I guess that was more specific than I thought.
I received a pretty cool email this morning from a college athlete of mine (Division I baseball) whom I worked with this past summer.
To give a little back story he had trained with me at Cressey Sports Performance a few years ago when he was in high-school, and had reached out to me this past May after completing his Junior season at school.
He walked into CORE and after going through the particulars – a thorough assessment, discussing his season, what he felt he needed to work on, his nagging back pain, his favorite GI Joe character, you know, the important stuff – he had this to say:
“The time I felt best was when you were writing my programs.”
With my chest sticking out a little further we broke things down and came up with a game plan for the summer, particularly with regards to how we were going to tackle his chronic back issue that had been hampering him for a few seasons:
As with any baseball player (and pretty much every athlete in the history of ever) we were going to hammer anterior core strength/stability to encourage more posterior pelvic tilt and implement drills to learn to dissociate hip movement from lumbar movement. Read: a metric SHIT-ton of deadbugs and birddogs. Not sexy, but whatever.
Work on regaining appropriate scapular upward rotation via actual scapular movement and not extending through lower back or shrugging.
Learn to control rib-position (limit rib flair and thus excessive extension) via positional breathing drills. There’s a lot of magic that happens when you teach someone the importance of a full exhale.
Also, teaching the importance of the reach and allowing the shoulder blades to move around the ribcage (again this whole extension thing rears its ugly head).
And, last but not least…still lift heavy things. Albeit doing my job as the coach to “pump the brakes” when needed and not fall into the trap of “lifting heavy at all costs because that’s what athletes do.” Truth be told: this mentality is probably why this athlete kept getting hurt in the first place.
To this last point (not lifting “heavy”), I wanted to showcase that it was more about the QUALITY of the movement and taking the time to 1) do stuff right and 2) understand how building a wider base (via more volume with SUB-MAXIMAL loads) will help with reaching a higher (strength) peak.8
Now, most guys at this point would roll their eyes and think I was going soft. However, this athlete was on board and willing to trust the process. So went to work for three months.
I received this email this morning:
“How’s it going? I wanted to tell you that yesterday we had our first testing day and I got 515 on a one rep max for trap bar deadlift! The best part is my back felt good after!”
He nailed a 515 lb deadlift despite having never gone above 405 all summer (on the last week we trained together).9
We still got after it all summer. He had his fair share of squatting (2 KB Front Squats), single leg work, carries, glute bridges, rows, Pallof presses, push-ups, and me making fun of him for having never watched The Usual Suspects. That’s sacrilege if you ask me.
However, the vast majority of his “strength” work was done in the 60-80% range and we were meticulous with making sure that every rep was pain free and that technique was solid.
I’d make the case that because we addressed alignment and stability issues along with movement quality, and got him into a better position, that he was then able to express his “true” strength more effectively when the time came.
Another fantastic guest post today from Shane McLean. This time he tackles the importance of unilateral strength training and offers some neat ideas as to the best accessory movements to compliment the “big 3.”
Don’t you love “that” guy who always stands between you and the dumbbells while doing single arm curls and making faces only his mother could love? What if I told you that he’s actually on to something, minus the faces and grunting?
Bilateral exercises (not biceps curls) should form the foundation of your strength program because this is where you’ll get most of your gains. However, unilateral training often gets neglected in the quest to get bigger and stronger because it’s just not as sexy (or cool) as a big squat, deadlift or overhead press.
However, unilateral training will help you get stronger, improve the big lifts (by shoring up weakness) and provide the following benefits.
Reduce Muscle Imbalances
Due to activities of daily living almost everybody has a dominant and non-dominant side. For instance, carrying more groceries on one side over the other over time may get one arm stronger.
During bilateral exercises such as a press or squat variation, your dominant side can pick up the slack for the weaker side.
Have you ever seen a lifter struggle to lock out one side over the other during a barbell bench press? I rest my case. Improving your “weaker” side will reduce your injury risk and help increase overall lifting numbers.
Improved Muscle Recruitment
Unilateral training makes you work harder and recruit more muscle fibers to perform the exact same movement, such as a split squat.
Taking one leg out of the equation forces your abductors and core to stabilize your pelvis while the working leg performs a split squat. Working more muscle with less weight will help correct strength imbalances between sides, also.
Core Work Without Crunches
When training unilaterally, you automatically throw your body off balance, forcing your core muscles to engage in order to keep yourself upright.
Trust me when I say that’s a good thing.
And we can double-down on the core training ante by utilizing offset loading:
Programming Guidelines
Unilateral exercises are best performed as an accessory movement after your big lift for the day.
Choose one or two single limb movements per session and perform three to four sets on both sides. The repetitions performed will depend on your goal.
For example:
Strength: 4 – 6 reps
Hypertrophy/Fat Loss: 8 – 15 reps
If you have a strength or muscle size imbalance always start with the weaker/smaller side first and let the weaker side determine the weight/reps you do on the stronger side.
Without further ado, here are my top two accessory exercises you should be doing to improve your squat, dead lift and press numbers. Sorry, this is a biceps curl free zone.
1) Deadlift
Suitcase Carries
Not only will carries change your life in three weeks, according to Dan ‘the man’ John, they can strengthen grip imbalances between hands which can be a limiting factor when pulling heavy from the floor or opening the pickle jar.
When you’re doing carries (you do, right?), pair them with a movement that doesn’t demand a lot of grip strength, so you can get more out of it. For example:
1A. Goblet squat/press variation.
1B. Suitcase carry- (25-50% of your bodyweight) 30 steps one hand then 30 steps with the opposite hand.
Form considerations – cues “shoulders down and back” or “chest up” work well here. Checking your form in a mirror will help if you having trouble knowing if you’re overcompensating or not.
Front Racked Kettlebell Bulgarian Split Squat
These were first introduced to me by Anthony Dexmier to improve my pulling ability from the floor. Let’s just say after doing them, we weren’t the best of friends.
Hardcore dead lifters knows that hip mobility, upper back strength and leg drive are essential elements for pulling heavy, and this exercise covers all those bases, if somewhat brutally.
Pairing this exercise with a single arm row variation is a real upper back whammy that you’re sure to enjoy. For example
1A. Front racked kettle bell elevated split squat – 12 reps on each leg
1B. 3 point dumbbell row – 12 reps on each arm
Form considerations – Perform a bodyweight elevated split squat and notice where your big toe is, and then place weight plate in front of it. This will give you a reference point and shorten your set up time between sets. This is courtesy of the one and only Jordan Syatt.
Keep a nice tall chest and your wrists in neutral during this entire movement and smile through the pain.
2) Bench Press
Landmine Press
The single arm landmine press is a mix between a vertical and horizontal movement which makes this great for individuals who lack the shoulder mobility for overhead pressing and for those looking to improve their press numbers.
Note From TG (to Shane): How could you not include a link to THIS article I wrote discussing how to assess overhead mobility and drills to help improve it?
Why Shane…….WHY?!?!?
The beginning of this exercise (initial push of the shoulders) is the hardest part of the movement. This will assist you with pushing the bar off your chest during the bench press or pushing the barbell overhead from a dead stop. The extra core work doesn’t go astray either.
This press can be done from a variety of positions. For example, it can be done standing, tall kneeling and this half kneeling variation courtesy of Eric Cressey:
Pairing this landmine variation with a hip flexor stretch works well and provides an active rest between sides and sets. For example
Form considerations- Make sure the barbell is close to the front of your shoulder and actively squeeze the barbell. This provides Irradiation, allowing you to produce more force and lift more weight. This also turns on the rotator cuff, which helps with shoulder stability.
Single Arm Dumbbell Floor Press
The reduced range of motion of the floor press makes this a great triceps builder (when the elbows are close to your side) and will assist you in getting stronger with the lockout part of any press variation.
The single arm variation will turn on your core and shoulder stabilizers due to the offset load that can get neglected during bench/overhead pressing. It’s a shoulder saver because it eliminates the lower half of the press where the shoulder is externally rotated and nasty things like shoulder impingements can happen.
Pairing this with a side plank or a suitcase carry gives your shoulders and core the extra work they deserve. For example
1A. Floor press
1B. Side plank variation 30 sec/ Suitcase carry – (25-50% of your bodyweight) 30 steps one hand then 30 steps in the opposite hand.
Form considerations- Grip the dumbbell tight or strangle the handle and keep the elbow close to your side but not touching. Touch the entire upper arm to the ground at the start of each rep.
3) Squat
Single Leg Negative Calf Raise
It’s a common issue to lack ankle mobility as we wear shoes that inhibit the movement of the ankles, like wearing high heels, for example. The ability to dorsiflex the ankle (how far the knees can go over the toes without raising the heel) can get compromised and this can show up in the squat.
As the squat movement has to come from somewhere, lacking dorsiflexion can negatively affect the joints further up the kinetic chain especially the knee, and who hasn’t had sore knees (and everything else) at the end of an intense squat session?
If hammering away at ankle mobility isn’t working for you, try this single leg negative calf raise drill from Dr. Ryan DeBell before your squat session. This will help with ankle dorsiflexion under load.
Form considerations- Having something solid to hold on to is a must. If you have pain bending the knee during this drill, please use a pain free range of motion. Do 5-10 reps on each leg before you squat. Your knees will thank you.
Barbell Reverse Lunge- Front Squat Grip
Most lunge variations are interchangeable because they work on knee stability (knees that go out instead of in) and core (reduced base of support) hip mobility (active stretch of the hip flexors) and help build your quad strength and size. Sounds like everything a good squat needs, right?
This variation does this and more. The front squat grip works on your anterior core upper back strength and thoracic mobility which are also needed for a strong squat.
Pairing this with an upper back or anterior core exercise in a superset works well. For example
1A. Barbell Reverse Lunge – Front Squat Grip – 8-12 reps on both legs
1B. Chin up
Or
1A. Barbell reverse lunge- Front squat grip 8-12 reps on both legs
Form considerations- Start on the light side until you nail the technique and feel confident that you’re not going to bite the floor. Keep the ears away from the shoulders and maintain an upright torso during this exercise.
Wrapping Up
Don’t forget about unilateral training when it comes to getting bigger, stronger and more awesome. Including these exercises into your routine will improve your lifting numbers and overall balance and will help keep you off the lifting DL.
You can throw in some single arm curls (for the girls) to keep Ron happy, if you must. J
Author’s Bio
Shane “The Balance Guy” McLean, is an A.C.E Certified Personal Trainer working deep in the heart of Dallas, Texas.
No, Shane doesn’t wear a cowboy hat or boots. After being told that his posture blows by Eric Cressey, he has made it his mission to rid the world of desk jockeys and have fun while doing so.
After all exercise is fun and never a “work” out.
You can follow Shane on Twitter HERE, and Facebook HERE.
A few things to hit up before we dive into this week’s list:
1) Somercore/Gentilset Last Hurrah of 2016
A quick reminder that Dean Somerset and I will be hosting our last LIVE event of 2016 together next month in Minneapolis, MN (the weekend of October 15th).
The stellar folks at Movement Minneapolis were kind enough to offer their four walls to host our Complete Shoulder & Hip Workshop. You can check out all the details along with sign-up information HERE.
The early bird rate (save yourself $100) is currently in place and will end this week.
Also, speaking of the workshop, Dean and I filmed it last Spring over in Norway and are planning on releasing it as an 11+ hour digital product titled the Complete Shoulder & Hip Blueprint in the next coming weeks. Catchy title, right?1
2) COREssentials
I’m going to be starting a new 6-week “beginner course” at CORE starting Monday, October 3rd called COREssentials.10
The idea is to champion FOUR things:
1. Building Autonomy
2. Building Accountability
3. Building Competency
4. Building Community
5. BONUS: Building Biceps, Glutes, (or whatever)
Okay, that’s five things…but hopefully you get the idea. The program is going to focus on beginner and intermediate level lifters who may either be lost in their training – just kind of haphazardly piecing together workouts with no rhyme or reason – or maybe intimidated altogether, and the goal is to build all of the above and focus and purpose with training.
The Deets
START DATE: Monday, October 3rd, 2016.
1. Groups will meet 2x per week at CORE (250 Cypress St, Brookline, MA) in predetermined AM and PM time slots.
2. Sessions will be 60-75 minutes in length where the coaches (myself, along with Jarrod Dyke, CSCS) will stress the basics – teaching participants various bodyweight, kettlebell, and (sometimes) barbell based movements designed to set the stage for continued success and growth (you know, that autonomy thing mentioned above).
3. There will also be a nutrition/mindset component as well. Shannon Wheel, a Boston-based Registered Dietitian, will be holding several sessions throughout the course of 6-weeks covering nutrition as well as helping participants develop behavioral-based habits to compliment the training.
Too, my wife, Dr. Lisa Lewis, a behavioral and exercise psychologist, will be offering a mindset component designed to augment the process. She’ll tackle what goes on in our heads, and how to best curtail the roadblocks and negative self-talk that often hampers progress.
4. Weekly “homework/reading” assignments will be part of the process, along with email correspondence from the coaches to help keep participants on task.
5. There will also be a lot of EDM and 90’s hip-hop played (if I’m coaching anyways), and the likelihood of spontaneous dance or rap battles breaking out will be very high.
If you’d like more information for you or someone who may know in Boston who may be a good candidate for this program please use the “Contact” function HERE.
And now lets get to this week’s list of stuff to read:
Loved this post by Artemis. She gets very personal, and tells her story of what strength means to her and how she’s had several paradigm shifts at different stages of her life.
I feel like her picture needs to be next to the word “badass” in Wikipedia.
If the length of the title didn’t give it away, this is a doozy. I suggest grabbing a cup (or two) of coffee and get comfortable. This will rock your world.
Today’s post is more or less an addendum or brief update to THIS article I wrote a few months ago answering the question “how much weight should I be using?
Copyright: maximkostenko / 123RF Stock Photo
For many lifters – rookies in particular – it’s a perplexing task to figure out what’s an appropriate load to be using on any given lift or exercise. Is it too little, too much, just right? It’s a Goldilocks paradox to say the least.
Some people have an innate sense of intuition that kicks in and are able to figure things out over the course of a few weeks or months. They’re able to adopt the concept of consistent progressive overload (making the effort to do more work over time) and make continued improvements and progress towards their goal(s).
[NOTE: keeping a daily training log helps tremendously here. If you’re not doing this 1) please smack your forehead 2) do it again and 3) no, really, do it.]
Others, however, lack the Spidey-sense. I mean, I get it: walking into a weight room is daunting enough. You have some guys grunting louder than an elephant passing a kidney stone, and the fume of AXE body spray you have to walk through is enough to give you a contact high. Those two things alone are super intimidating for some people.11
What’s more, there are a bevy of other factors to consider: optimal # of sets/reps, rest periods, tempo, exercise order, and, of course, how much weight to use? And then, most important of all, is technique on point? It’s no wonder some people end up feeling like this:
To no fault of their own many fall into the trap of “winging it” and haphazardly choosing a weight to use for any particular exercise and stay there; week in and week out, month after month, and in worse case scenarios, even years, and often end up frustrated due to lackluster results.
How many times have you heard this from a friend, family member, or colleague:
“Can you please put some pants on? I’ve been working out for [insert “x” number of weeks/months/years here] and I never seem to get results.”
My suspicion is that 9/10 times the culprit is the fact most people are UNDERestimating their ability and not challenging themselves enough.
This is where AMRAP (As Many Reps as Possible) sets can be handy. If I program an exercise for 8-10 reps, I’ll sometimes have the last set be for AMRAP. If, on the last set, they hit 10, maybe 11 reps I know they’re using a weight that’s challenging enough. If they end up hitting 23 reps I know they’re low-balling themselves and we need to up the load.
I’m fortunate in that I live in this pretty baller strength & conditioning bubble where I can control most – if not all – the variables when it comes to the clients and athletes I train.12
Especially for those I work with in-person.
I’m there to observe how they’re feeling on any given day, to watch technique and bar speed, and I can serve a judge and jury when it comes to weight selection during any given session.
Where things become suspect is when I’m not there to offer advice in person or when I’m working with a distance-based client and am unable to provide instant feedback.
How do I help them gauge whether or not they’re using enough weight? Or maybe too much? What happens then?
In recent years I’ve grown to be more of a fan of using percentage-based trainingwith the programs I write, particularly for those whom I do not work with in a one-on-one fashion. I’m a firm believer in programming out workouts with specific weight and rep guidelines – if for nothing else to give them a sense of purpose or “goal” for the day. Hit “this” number then do “that.”
That said, lifters don’t always feel the same everyday. Some days they feel like a rockstar and end up deadlifting a bulldozer for reps. Other days the feel like they got run over by a bulldozer, and what was planned for that day just isn’t going to happen.
This is where the concept of AUTOREGULATION enters the conversation. Coaches like David Dellanave and Jen Sinkler have done a fantastic job of speaking to this phenomenon (more specifically referred to as BIOFEEDBACK) in recent years and how it behooves trainees to use ROM testing to figure out what variation of a particular lift is the best fit for that day.
Here’s an example (say it’s deadlift day…yay):
Perform a toe touch screen, and note where you begin to feel tension.
Set up as if you were going to do a conventional deadlift and perform a few reps.
Re-test your toe touch. Is it better or worse?
If the former, you know you’re good to go with conventional deadlift that day. If it’s latter, maybe perform the same sequence, albeit with a sumo stance or Jefferson stance?
Re-test and see if there’s an improvement. If so, roll with that variation for the day.
Travis Pollen wrote an excellent review on the concept HERE.
We can take the idea of autoregulation and use it to dictate our loads on a daily basis too. More to the point: we can start to introduce the concept of Auto-regulatory Progressive Resistance Exercise (or APRE).
“A beginner gets stronger just by lifting. Any program works for a beginner. An intermediate powerlifter needs strength specific programming to get stronger. An advanced lifter with many years of competitive experience, lifting very heavy weights, needs to program recovery into his work outs. The beauty of the APRE (Auto-regulatory Progressive Resistance Exercise) programs is that all categories of lifters from novices to experts can benefit with this type of program.”
It’s by no means a new concept. Many coaches have written about it in the past (and I have linked to their respective articles in this post).
In short, APRE is a great way to introduce flexible training and to better match loads you use to how you feel on a daily basis.
I’ll explain in a second, but the cool thing about this approach – and as Eric Helms noted in THIS review via the NSCA – is that it proved very successful in one study compared to traditional linear progression with regards to strength gains.
“The APRE group improved by an average of 21 lb more in the 1RM bench press test, 35 lb more in the 1RM squat test, and three repetitions more in the bench press to fatigue test than the LP group.”
Granted it’s only one study – and a relatively short-lived one (6 weeks) at that – but holy shit.
APRE is a four set system. The first two are build-up sets with the second two involving two sets to failure. The third set is a “test” set where you perform as many reps as possible with your 3RM, 6RM, or 10RM. From there, depending on how many repetitions you get, you adjust the weight on your fourth (and last set).
This is a brilliant system, and one that can be implemented to help people better ascertain their weight selection on any given day depending on how they feel.
Lets use an example (squat – 6 RM protocol): 315 lbs
Set #1 = 50% of 6RM x 10 reps (155 lbs)
Set #2 = 75% of 6RM x 6 reps (235 lbs)
Set #3 (Test Set) = AMAP with 6RM (315)
Here is where day-to-day shenanigans come into play. How much sleep someone got the night before, hydration levels, stress at work, stress at home, and any number of other factors can affect performance on any given day. The TEST SET serves as a form or AUTOREGULATION.
Depending on the number of reps completed in the test set will dictate the load on the LAST set. See chart above.
Set #4 = ???
Can you see the value in this approach? Especially when it comes to weight selection with main lifts such as squats, deadlifts, and bench press?
I hope so, because it’s very effective and simple to implement. And I know what some of you may be wondering: “what about the 3RM and 10RM protocols?” Well, as it happens, Tim Henriques constructed a BOMB spreadsheet that you can download for free – HERE – which allows you to pluck in numbers at your discretion for each protocol. Holla!
Now you have no excuses not to push yourself harder in the gym. Go get it.
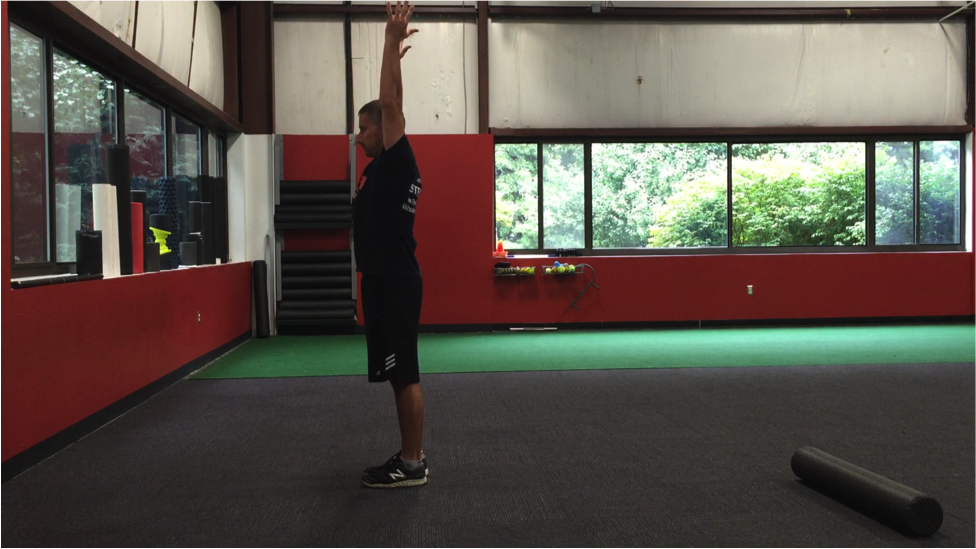
Admittedly, today’s “Exercise You Should Be Doing” doesn’t highlight anything visually badass like, say, deadlifts vs. chains, recoiled sled high pulls(<– seriously, check that out), or, I don’t know, juggling chainsaws while balancing on a BOSU ball.13
Nope, today’s exercise recommendation is very plain looking and is about as vanilla as they come. It’s not flashy and it (probably) won’t win anyone any additional Instagram followers. But oh is it a doozy and one I feel is going to raise some eyebrows and surprise people at how challenging it really is.
Supine Straight Leg Hip Extension with Alternate Hip Flexion
What Does It Do: Not only is this great for glute activation, but because of the alternating nature of this drill (bringing one leg towards you chest at a time) it also serves as a fantastic core exercise as you must resist the hips from rotating to any one side. In fancy schmancy technical terms: you’re working on rotary pelvic control, or rotary stability.
Many people are incapable of controlling their lumbo-pelvic region and it’s no surprise we see a high incidence of SI joint issues, chronic low-back pain, and many other dysfunctions up and down the kinetic chain within this population.
Drills such as deadbugs, birddogs, Pallof presses, and planks are all exercises that tackle this head on. However, I hope this quick post will encourage people to add this exercise to their repertoire as well.
Key Coaching Cues: Place your feet (heels) on an elevated platform (no higher than 12″) and extend (elevate) your hips off the floor. From there place your fingers on the front of your pelvis (ASIS) and slowly flex on hip, bringing your knee towards your chest. The idea is to use the kinesthetic feedback of fingers on the ASIS to keep your pelvis level throughout the duration of the exercise.
For added badassery, you can progress things by place a light band around your toes.