Categoriescoaching Exercise Technique

Bench Press Technique: How to Not Hand-Off Like a Jackass

Remember those “The More You Know” PSA (Public Service Announcements) from the late 80’s and early 90’s?

They often ran during primetime shows on NBC and even during Saturday morning cartoons. Oh man, remember Saturday morning cartoons?

  • Transformers
  • GI Joe
  • Dungeons & Dragons
  • Alvin & the Chipmunks
  • Bionic Six
  • Captain Planet1

Those were the days.

The ads would typically feature a celebrity facing the camera and speaking in an earnest tone espousing the dangers of drugs, smoking, and not going to school.

All sound things to be earnest about, no doubt.

Sadly, a PSA was never made championing the idea that wearing a jean jacket with jeans wasn’t the key to gaining the attention of the opposite sex. Also, impressing girls with Star Wars quotes never worked either.2

But the “real” PSAs were always clear, concise, and cutting….scratching the surface of deeds that were for the greater good.

We should bring those PSAs back, albeit this time targeting the fitness crowd.

PSA #1: How to Hand-Off on the Bench Press

It sounds pointless and borderline trivial…but learning how to hand-off on the bench press is an acquired skill, and something that will drastically affect someone’s performance with the exercise.

Raise your hand if this has ever happened:

It’s bench day and as you work up towards your heavier sets it’s becoming a little harder to maintain appropriate upper back tightness as you un-rack the weight. Reluctantly, you decide to scour the gym floor to ask someone for a hand-off.

Finding someone who knows the intricacies of a “good” hand-off is on par with finding a ship other than the Millennium Falcon that can do the Kessel Run in less than 12 parsecs.

Note: I was a virgin till I was 21. Weird, I know.

What usually ends up happening is that after you spend time getting your shoulder blades in the right position (retracted and depressed/posteriorly tilted), driving your upper back into the bench, turning your lats on, and getting your foot position correct….it’s instantly negated when the guy/girl handing off haphazardly performs an explosive upright row with you attached to the bar.

They lift the bar up, rather than helping to “guide” the barbell into position.

Fail.

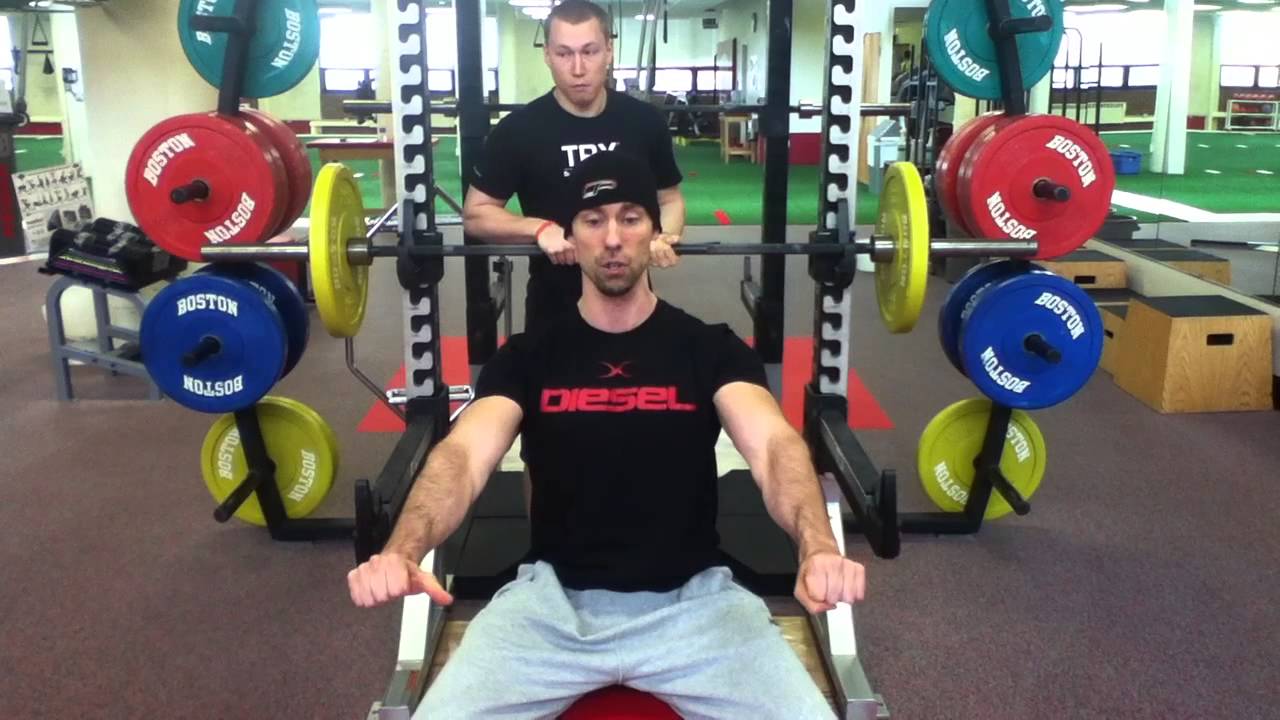
You have to get tight. Especially in the upper back. Without getting into the extreme details, I like to coach guys to place their feet on the bench (relax, it’s only for a few seconds), grab the bar, raise their hips, and drive their upper back into the bench. Simultaneously, I’ll tell them to consciously think to themselves, “together and DOWN” with the shoulder blades.

I then tell them to bring their feet to the ground – heels up/heels down is predicated on personal preference – and then “scoot” themselves up the bench to get even tighter.

It looks like this:

Why go through all that trouble to get tight, compact, and ready to hoist a barbell off your chest, only to NOT get a proper hand-off and/or lose all of it when you un-rack the bar?

Think about what happens when you un-rack a bar on your own, or you receive a piss-poor hand-off: the shoulders protract. As a result, the scapulae abduct and (most likely) anteriorly tilt as well, and stability is compromised.

Impressive bench press go bye-bye.

It’s my hope this video will help:


NOTE: I had every intention of filming a new video today, but then realized I had this one on my YouTube channel already. No sense reinventing the wheel.

A few points to consider that I didn’t cover in the video:

1. To reiterate: The “spotter” or hander-offer guy isn’t lifting the bar off the j-hooks, but rather “guiding” the bar to the starting position.

2.  Moreover, the lifter shouldn’t think of it as pressing the bar up and into the starting position, but instead “pulling” into position. Kind of like a bastardized straight-arm press down (albeit on your back).

3.  Getting down the cadence of 1….2….breath….lift off is the key here. It’s going to take some practice, which is why I highly advocate finding a training partner you trust.

3.  If at any point the guy providing the hand off starts chirping, “all you, all you, all you” when he’s clearly got his hands on the bar, immediately rack the bar and scissor kick him in the face.

Categoriescoaching Conditioning

Finishers That Will Finish You

Anyone familiar with the video game Mortal Kombat will appreciate the slight reference to it in the title of today’s post.

Finish him.”1

Today’s guest post from Cressey Sports Performance coach and Strength Camp Coordinator, George Kalantzis, showcases some “killer” finishers that you can use at the end of your workout to add some extra conditioning or make you hate life.  Whatever floats your boat.

Enjoy.

46688753 - fit people working out in weights room at the gym

Copyright: wavebreakmediamicro / 123RF Stock Photo

You want to be shredded and understand that you need to train hard to get results. For many a great way to help expedite the process is to add high intensity short duration workouts to your training regimen.

What is A Finisher And How Do You Use Them?

A finisher is simply a short burst of high intensity training performed at the end of a workout that will drastically improve your conditioning levels and bring out that six pack. The cool thing about finishers is that you can use pretty much anything from your own bodyweight, to ropes, sleds, and barbells.

The sky is the limit when it comes to finishers.

When Do I Use Finishers?

For someone who is training 3x per week, full body routines, you could add those at the end of your workout for maximum fat burning effects. For those that prefer the traditional upper/lower split 4-5x’s a week, the type of finisher you would add depends on the amount of volume during your session.

For example, if you are lifting heavier earlier in the week, it would be wise to challenge your body in the same way so that your workout does not interfere with recovery. And on days that you have decided to take it lighter, maybe you could add in that extra finisher.

Lets say I squatted heavy on Monday, I would follow the workout with some 400 meter repeats for best results, and maybe towards the end of the week I would choose to do something less hellish like a slow intensity cardio based session.

Copyright: nndemidchick / 123RF Stock Photo

Everyone is going to be different and ultimately it is going to depend on your fitness level, the amount of time you have available, any other external stressors that you may have going on within your life.

The following workouts are designed to be finishers at the end of a workout and should last 5-10 minutes depending on your conditioning level.

You could also use them as an extra conditioning day during the week or when strapped for time. These circuits will be sure to jack up your heart rate and send your metabolism into overdrive.

Finisher City

1) Dumbbell Shoulder Carry/Renegade Rows

Grab a pair of dumbbells and choose wisely. This is a great circuit that can be used as pre-work to fire up the core and shoulders or as a finisher.


2) Kettlebell Complex Finisher

The KB finisher is probably one of my favorites to use in my own workouts and with clients. It really challenges your endurance and strength in one and is fun because you switch between three different exercises to prevent boredom.


3) Battle Rope Core Crusher

When you think about getting shredded, there is no better tool than the battle ropes. The cool thing about ropes is that you can pretty much take them anywhere from outside to inside, and they are so versatile that anything can go. Check out this core crusher . Be warned, it is not as easy as it looks, and 20-30 seconds of work can typically get the job done.


4) Sprints

What good would finisher be without sprinting? Sprint intervals have been shown to increase testosterone levels and prevent decline it’s decline so what are you waiting for?

Here is some of my sprint favorite to use:

  • 400 meter sprints for best time at least 90 second rest in between

Sprint for 15 seconds light job for 45 seconds Repeat 4-5x’s, increasing the number of rounds every week as you progress. This number is not set in stone, and any shorter interval bursts with a minimum a 2:1 rest to work ratio will do the trick.

Very tough : Want to really challenge your endurance and jack up your heart rate? Try 800 meter sprints, but you have been warned, these are not easy!

Conclusion

If you want to get shredded, will most likely help. They require a tremendous amount of effort but will be sure to boost your testosterone levels while elevating your fat loss levels. Use them at the end of the workout or during your off days for maximum results.

About the Author

George began his time at Cressey Sports Performance as an intern in the fall of 2013, and returned in 2014 as CSP’s Group Fitness Coordinator, overseeing all Strength Camp coaching and programming responsibilities.

George is a veteran of the United States Marine Corps and was awarded an honorary discharge after eight years of service. He possesses an MBA from Southern New Hampshire University and is currently attending massage school to become a licensed massage therapist.

Outside of CSP, George maintains a fitness-related blog that can be found at www.sgtkfitness.com.

He and his wife Shawna reside in Manchester, NH.

CategoriesStuff to Read While You're Pretending to Work

Stuff To Read While You’re Pretending To Work: 8/26/16

Hate to rush through this but I have a date. A deadlift date that is.

45344440 - barbell and discs in a weightlifting gym

Copyright: jtrillol / 123RF Stock Photo

I’m meeting up with two buddies of mine today – Dave Rak and Matthew Ibrahim – at BU to toss around some iron and possibly follow-suit with eating of the dead animal flesh.

Just a bunch of bros being bros.

We’re meeting up pretty early and I wanted to make sure to compile my list this week before heading out. See? My readers come first…..;o)

3 Reasons Why Runners Need To Lift Weights – Chris Cooper

Next time a friend, colleague, or family member who’s a runner says something like this:

“I don’t need to strength train because I run, my legs are plenty strong.”

Try not to be too obvious with your eye roll.

AND

Have him or her read this article.

The Diminishing Returns of Strength Training – Graham Ballachey

This is an older post I came across (written in 2014) which I felt was really interesting and brought up some valid points.

NO one – at least within my circles – would ever state that getting strong is a bad thing (or dangerous). To quote Bret Contreras:

“If you think lifting weights is dangerous, try being weak. Being weak is dangerous.”

However, there comes a point in every lifter’s journey where he or she must ascertain “how strong is strong enough?” At what point are the aches, pains, twinges, and incessant DOMS worth it?

Likewise, this is a tough nugget to crack with athletes. Many are drilled into thinking that stronger is always better. To a large degree, it is. However, part of the role as a strength coach is to sometimes pump the brakes and surmise that there’s little (if any) additional athletic benefit in taking someone’s deadlift from 450 to 500 lbs. Is the risk worth the reward?

Anyways, interesting read and nice parameters given for strength numbers for many to strive for – at least to start.

Why Am I So Fat? – Sara Benincasa

My inner feminist took over after reading this post, and I had to share. The double standard in our society with women and body image is a travesty, and this was a very entertaining read. As a quote-on-quote “writer” myself, I admired this very much. I mean, what’s not to admire with the well placed penis joke?

Reminder

Dean Somerset and I will be at Movement Minneapolis (you know, in Minneapolis, MN) the weekend of October 15-16th presenting our Complete Shoulder & Hip Workshop. It’ll be our LAST live event for this course in 2016 (and the foreseeable future).1

You can go HERE to sign-up and for more info.

ALSO

This is right around the corner:

CategoriesNutrition

The Day I Gave Up Chicken Meat. At Least Temporarily

“Motherfucking coffee.

Email received from my wife Lisa on Tuesday, December 1st, 2015 at 10:28 AM

35273778 - two people talking while drinking coffee.

Copyright: imtmphoto / 123RF Stock Photo

That’s all it said. That’s all it needed to say. I knew Lisa was pissed. And was probably thiiiiis close to tossing her computer out the window.

I’ll be honest: when I read those two words I couldn’t help but chuckle. Of all the things to come back positive on her Pinnertest, we were both keeping our fingers crossed that coffee was going to be safe.

For one, Lisa loves coffee.1

And two, on my side of the fence (a non-coffee drinker), I bought her what’s equivalent to the Cadillac of Nespresso machines for Christmas a few years ago. If we come to find out coffee is on the “hit list,” does it just become an expensive paperweight, albeit one that makes delicious caffeinated beverages?

Alas, there it was, plain as day…coffee: a “Level 1” intolerance.

Lets Back Up a Bit

Without going into too many personal details, Lisa was having a conversation with a friend of ours (Eric Gahan of Iron Body Studios) last year on the topic of diet/nutrition and food intolerances. The two of them steered towards digestive and skin issues and how both believed some of the foods they ate may be playing a role in each.

The idea of food intolerances or elimination diets is nothing new in the industry. In fact, many books extolling the virtues of eliminating “this” (gluten, dairy) or “that” (meat, anything that’s delicious) have been written. And many “gurus” have been made (and made a lot of money) as a result.

41069134 - a gluten free breads on wood background

Copyright: xamnesiacx / 123RF Stock Photo

By and large, much of the dialogue you see in the mainstream media on food intolerance is sensationalistic and wishful thinking at best, and predatory at worst.

Many charlatans will prey on people’s fears on a particular food (0r category of food) and try to convince them that if they don’t eat or eliminate said food(s) they’ll lose weight2, get a six-pack, be able to deadlift a bulldozer, win the Boston Marathon, balance their checkbook, solve global warming, become a Navy SEAL, and/or have endless threesomes.


I’m a skeptic. And I’m right there eye-rolling with the best of them. Most of the time, anyways.

In fact, on the seemingly pseudoscience of it all I agree with much of what Mike Samuels had to say recently:

If you’ve been reading my messages for any time whatsoever, you’ll know my response to these will be – B.O.G.U.S.

On the whole, any tests you can buy off the Internet are kinda crappy.

BUT …

What I would say (and the point of this email) is that how you feel when you eat a certain food does matter. Bloated after a bagel? Maybe bread’s not your thing. Feel crappy following a big cheese-fest. Perhaps your guts don’t love dairy as much as you do.

It’s worth a try.

It doesn’t mean you have to ban anything, it just gives you the data to make an informed decision over what the best foods for you are.

Hard to argue with that.

However, sometimes people need a little nudge or some form of “expedited” information to help point them in the right direction. A starting point if you will.

And that’s where Eric and Lisa’s conversation from above led to her taking the Pinnertest.

The Pinner…What Now?

The Pinnertest:

Pinnertest Kit

From the website:

The Pinnertest makes use of the MicroARRAY – ELISA Method IgG (blood) test for determining permanent food intolerances.

It does NOT test for food allergies.

Food allergies can kill you.

Food intolerances, on the other hand, can lead to things such as indigestion, IBS, bloating, skin issues (acne), and even unexplained weight gain in rare cases.3

The latter – indigestion, skin issues – is what served as the impetus for Lisa taking the test. After listening to Eric speak about his experience and how the Pinnertest helped to “pin point” a few food(s) he never would have thought of as culprits, and after hearing all the success stories of many of his clients taking the test…she was in.

To remind you of the result:

“Motherfucking coffee.”

And there were other foods that popped up too, like green peppers for example. Which was amazing, because Lisa avoided green peppers since they always “disagreed” with her whenever she ate them.

She now had some proof to back up her inclinations.

Egg yolks were a +2

Coffee (at +1) was the biggest blow, however. There are varying “levels” of intolerance with the Pinnertest:

  • Level 1 (Low Reaction)
  • Level 2 (Moderate Reaction)
  • Level 3 (High Reaction)

Or, if I were in charge of naming them:

  • Aw, Man, This Kinda Sucks (Level 1)
  • No, Really, This Sucks Donkey Balls (Level 2)
  • Fuck (Level 3)

Per the recommendation of Pinnertest, Lisa omitted all of the above from her diet for three months. Even coffee. I don’t know how she did it, but she did. She was a champion, instead opting for lots and lots of tea (and long, mournful stares at the Nespresso machine).

Low and behold, friends and colleagues who hadn’t seen her for a few weeks started to comment on her skin and how much better it looked. She noticed the difference too. Stuff she had dealt with for much of her life had resolved.

After the three months was over she had her first shot of espresso. I wish I had filmed her reaction. It was on par with Frank the Tank from the movie Old School:

In the time since she’s experimented with varying degrees of coffee consumption and has figured out what’s “worth it” on her end. The Pinnertest helped make the decision making process and planning a little easier.

So, Tony, What’s the Deal With Chicken?

As you may have guessed after a bit of pressing from Lisa, I finally ended up taking the test myself.

Again, not to get too personal, I fart. I fart a lot.

Granted not nearly as much as when I was a bachelor living off of nothing but chicken breasts, Ramen noodles, and boxes of cereal…but, you know, I have my days…….;o)

In addition, I have been battling some dermatitis on my face for many years. Sporadically I’ll get red blotches and flaky skin on my face which, as you can imagine, makes the ladies go crazy.

Not!  (<— Sorry, Roman, for the exclamation point)

I still managed to snag this one, though:

Dinner at Lure

After some pining from Lisa (and the kindness of the people at Pinnertest to send me a complimentary kit), I was in too.

Here’s me watching the video of the How, What, and Why’s of the Pinnertest (FYI: It’s super easy):

Watching Pinnertest video

Here’s me signing the form:

Filling Out Pinnertest Form

Here’s me pricking my finger with a needle:

Pricking Finger

And here I am sending off my sample to get tested (and crossing my fingers that dairy was going to be safe. No cheese or ice-cream = rip shit city):

Sending Kit Off

Fast Forward Two Weeks…The Results

I got my results back (via email) two days ago. And as you probably guessed one of the foods that came back to avoid (a +2) was…chicken.

Chicken?

Yes, effing chicken.

What’s a meathead to do? Chicken is like, the thing, a food group in of itself. When it doubt eat chicken.

This is analogous to telling James Bond he’s intolerant to Vespers, or that E.T. is intolerant to Reese’s Pieces, or that a vegan is intolerant to, I don’t know, sawdust.

The rest of my results included:

+2 Reaction: chicken, shrimp, carrot.4
+1 Reaction: potato (<— dammit), grape.

[Thankfully things like dairy, red meat, wheat, and Adamantium were in the clear.]

I never would have guessed chicken (or any of the others for that matter), and as it happens the day I received my results I took this picture of my face. My beautiful, beautiful face:

Red Blotch

See those red blotches? They weren’t as profound the day prior. Guess what I had for dinner no less than twelve hours before?

Curry chicken.

Interesting.

So What Now?

I asked Georgie Fear, a Registered Dietitian I respect a ton and author of the book Lean Habits, to chime in. Here’s what she had to say:

CategoriesExercises You Should Be Doing

Exercises You Should Be Doing: Barbell Shovel Hold

Up here in New England we’re very familiar with shovels.

51302774 - snow removal. orange shovel in snow, ready for snow removal, outdoors.

Copyright: bubutu / 123RF Stock Photo

Particularly during our long, cold, New England winters.1

The shovel I’m referring to in today’s post, however, has nothing to do with that kind of shovel. Unlike traditional shoveling which sucks – and ranks somewhere between getting a colonoscopy and listening to Donald Trump speak as things I’m not rushing to do – the “shovel” variation I’m highlighting today is (hopefully) more palatable and something you’ll find use for in the weight-room.

HINT: you totally will.

Barbell Shovel Hold


Who Did I Steal It From: Kinda, sorta myself. I wrote about a similar exercise a few years ago – the shovel lift – but came across a quick write-up by Boston-based coach, Matthew Ibrahim, describing this variation…which I felt was brilliant.2

What Does It Do: First and foremost this is a great exercise to help train rotary stability. The asymmetrical – or offset – nature of this exercise makes it a perfect fit for those struggling with chronic back pain. One must “fight” to maintain a neutral and upright torso position. Not only will this target the more superficial or global musculature – glutes (you need to actively fire these bad boys), erectors, abdominals, traps, rhomboids, obliques – but also the deep, stabilizing musculature as well. Think: the “deeper” muscles like TvA, multifidi, etc.

Note: if you perform this exercise while simultaneously performing positional breathing (inhale with FULL exhale, dialing in on rib position) you’ll hammer those deep, stabilizing muscles).

Because the drill is performed in a more or less isometric fashion, it lends itself as a very user-friendly option that pretty much anyone can do.

As a corollary, even with quote-on-quote “healthy” individuals/athletes, it serves as a welcome way to train core stability and possibly as a way to increase full-body time under tension. To that end, it could serve as a nice way for some trainees to add muscle mass to their frame.

Can you dig it?


See what I did there?

Key Coaching Cues: I feel the thrilling (<— kidding) video above makes things self-explanatory. You load a barbell with anywhere from 10-45 lbs. (start conservative, it’s harder than it looks), un-rack, and hold.

Brace your abs, squeeze your glutes, flex your quads, and think about squeezing oranges in your armpits to add even more body tension. Hold for a 5-10s count, rack the barbell, rest for 5-10s, and repeat for a total of 3-5 “reps.” Then repeat the same process with the load on the other side.

Shoot for a total of 3-5 “rounds.”

I’ve been using this as a quick “finisher” with some of my clients/athletes and they love it.

CategoriesExercise Technique Program Design

Upgrade Your Deadbug

Today’s guest post comes courtesy of Dallas based personal trainer, Shane McLean. If you forced me to make a short list of things I love, that list would include things like ice-cream (all of it), GoodFellas quotes, anything my cat does, old-school Transformers cartoons, and an empty laundry mat.1

And, you know, my wife would make the list too. Oh, and deadbugs. The exercise…not, literally, dead bugs. Gross.

Read below to watch some (hopefully) new-to-you variations.

Ever witnessed a “watch me pull a rabbit out of my hat” moment?

36535764 - magicians rabbit. closeup image of a cute white bunny looking out from the magicians black hat isolated on white background

Copyright: yacobchuk / 123RF Stock Photo

Mine was around three years ago at a fitness mastermind in Frisco, Texas which had the one and only Eric Cressey in attendance.

During his demonstration he got hold of a minor league baseball player who presented with limited shoulder flexion. After some positional breathing exercises and a few deadbug reps, the player then stood up and demonstrated his improved shoulder flexion range.

It was just like magic.

Ever since then, the deadbug has been a staple programs for myself and my clients. You could almost say it was love at first sight, if you believe in that kind of stuff.

Tony has written extensively on this subject, so I will not harp on, but the benefits of deadbugs are numerous, including

  • Reinforces contra lateral limb movement
  • Improves lumbo- pelvic stability
  • Reinforces correct breathing patterns
  • Being on the floor provides you with more stability and kinesthetic feedback
  • Prevents misalignment and encourages good posture

It’s definitely an exercise that provides a lot of ah-ha moments when done correctly. It may look easy to the meatheads who have never done it before, but once I drag them away from the mirror, they know it’s the real deal.

But when they ask me why it is called the deadbug, the best explanation I can give is this.

If you need to be reminded of what the dead bug is, watch Tony perform this with impeccable form.

Notice how serious he is:


Correct deadbug form consists of:

  • Low back in neutral (encouraging posterior pelvic tilt)
  • Breathing in through the nose before the rep starts and fully breathing all the air out through your mouth during the rep
  • Slow and controlled limb movement
  • No rib flaring and arching of the low back

The standard deadbug is a great warm up exercise and can be used for recovery/mobility purposes between sets of lifting heavy. This is the version you should be doing the majority of the time.

However, like a lot of things that we do over and over again, we get bored and need a little spice. When you’ve nailed the standard version and want to upgrade, take a few of these variations out for a test drive.

You’ll be the coolest person in the gym. Trust me, I’m a trainer.

1) Pullover Deadbug

Kettlebells and the deadbug is a match made in heaven, like peanut butter and jelly or bicep curls and mirrors.

The instability and the resistance of the kettlebell combined with the standard deadbug movement put extra demand on your core stability, shoulders and lats.

Did I mention it also works the chest? Now I have your attention.


Pairing this exercise with a movement that demands core stability and a neutral spine works best. For example

1A. Squat/Deadlift Variation

1B. Pullover Deadbug 6- 8 reps per leg

Or seeing you’re already down on the floor, pair it with a single arm floor press for a great upper body/core workout.

1A. Pullover Deadbug 6-8 reps on each leg

1B. Single Arm KB Floor Press


2) Weighted Deadbug

Adding light weight plates in each hand (2.5-5 pounds) slightly increases the intensity, but the real benefit is that the resistance helps slow down the movement as the weight plate descends towards the floor.

You get to enjoy the deadbug even more.


Typically, I use this movement as part of a warm up, but if you’re feeling extra ambitious, pairing this with a plank variation will give your core a double whammy.

For instance:

1A. Weighted deadbug 6-8 reps each leg

1B. Plank with plate switch (Thanks Tony)


3) Stability Ball Deadbug

The virgin deadbuger can run into trouble with contra lateral limb movement and often extend the same arm and leg. They get frustrated and can feel uncoordinated.

Enter the dragon stability ball.

Using the stability ball as a reference point helps teach the movement because using the same arm/leg will cause the stability ball to drop to one side and the client will feel the tension required for correct form as well.

Actively pressing your opposite arm/leg into the ball combined with diaphragmatic breathing will light a candle under your core that you’re sure to enjoy.


I program this variation into the warm up but this can be included in a core tri-set. For example.

1A. Stability Ball Deadbug 6-8 reps on each side

1B. Stability Ball Hip Ext./Hamstring Curl 12 reps


1C. Stability Ball Rollout 8-12 reps


A young Eric. Those were the days.

5) Bosu Ball Deadbug

Yes, the Bosu ball is good for something.

Bosu balls’ instability is excellent for upper body/core work and can take your deadbug to the next level. You’ll have to work to find your balance point but if you fall off, at least it’s not very far.

Please make sure no one’s filming, for your sake.


Pairing this with any Bosu ball exercise works as long as it’s not squats. For example

1A. Bosu Ball Deadbug 6-8 reps on each side

1B. Bosu Ball Side Plank 30 seconds on each side

https://youtube.com/watch?v=tjzuv9O6Q1E


Bonus – Click HERE for another great variation of the deadbug Tony highlighted a few weeks ago on this blog: Deadbug with Extension + Reach.

Wrapping Up

The deadbug, and its variations, deserves a prime time position in your routine because of all the benefits it provides. Don’t worry, you’ll will not look weird because all the cool kids are doing it.

About the Author

Shane “The Balance Guy” McLean, is an A.C.E Certified Personal Trainer working deep in the heart of Dallas, Texas.

CategoriesStuff to Read While You're Pretending to Work

Stuff To Read While You’re Pretending To Work: 8/19/16

Bookshelf

Dean Somerset and I will be in Minneapolis, MN the weekend of October 15-16th putting on our Complete Shoulder & Hip Workshop. Not only will this be our last event together in 2016, but it’s likely to be our last LIVE CSHW event for the foreseeable future.

It’s kind of on par when N’SYNC performed for the last time. Except it isn’t.

So don’t miss out, go HERE and hopefully we’ll see you there.

3 Ways to Clean Up Your S.L.R.D.L – Sean St. Onge

Pay no mind to the asshat demonstrating the really shitty S.L.R.D.L above. It’s just for show…;o) Sean St. Onge of 212 Health & Performance breaks down some tried and true ways to clean up your single-leg RDL. Awesome stuff!

Happy Before(s), Happy After(s) – Jen Sinkler

I don’t live a slouchy, sad-faced life, regardless of what my body-fat percentage or state of muscularity is. Right now or ever.”

I’ve never read anything like this before. Leave it to Jen to always surprise me with her candor, no BS zest for life, and amazing prose.

Improving Overhead Position and Shoulder Mechanics – Chris Duffin & Brad Cox

I’m a huge fan of two things in this article:

1. Acumobility products. I was fortunate enough to bump into Brad (Cox) and Julian (Cardoos) at the Perform Better Summit in Providence a few weekends ago where they handed me a few of their products to try out. All I have to say is RAVE reviews from myself and my clients.

2. Chris Duffin himself. The man is a beast (and super smart). Nuff said.

3. Also, shoulder shenanigans. That’s three things, but what can I say: I’m a shoulder nerd.

Categoriesmuscle growth Program Design Strength Training

The Pecification of Pecs

In case you aren’t picking up what I’m putting down from the title of this post, what you’re about to read is not about climate change, political reform, or ranking the best painters and architects from the Rococo Era.1

No, no…what you’re about to embark on is a little journey and discussion on pecs. You know, these guys:

27301664 - strong athletic man fitness model torso showing six pack abs. holding towel

Copyright: pjphotography / 123RF Stock Photo

Every since man first noted how lifting heavy things – rocks, tree trunks, people – over and over again often resulted in a more muscular physique, he’s been obsessed with building his pectoral muscles, or pecs for short.2

“Obsessed” is a bit of a downplay here. You know how young teenage girls are obsessed with Justin Bieber and how their lives were ruined the other day when he decided to delete his Instagram account?

Well, that pales in comparison to how much guys are obsessed with training their chest. Take that away from them, and you’re bound to see an uptick in the sales of pitchforks.

So, um, yeah…guys like to train their pecs.3 The question, then, is why do so few have sub-par pec development?

Walk into just about any gym on the planet on Monday, Tuesday, Wednesday, Thursday, Friday, Saturday, or Sunday and you’re bound to see any number of guys finishing up the 47th set of bench press.

What gives?

NEWSFLASH: The Bench Press Isn’t a Super, Duper Pec Developer to Begin With

[Cue Dramatic Chipmunk here]

https://www.youtube.com/watch?v=a1Y73sPHKxw


Sorry fellas: it isn’t.

I get it. Me saying the bench press isn’t the most “pecy” exercise is akin to me saying Kate Upton isn’t attractive, or that pizza isn’t delicious, or that The Empire Strikes Back isn’t the best Star Wars movie.4

Don’t get me wrong, it’s still a very effective exercise to build both mass and strength (there’s a reason why the bench press is 1/3 of the holy trinity or “Big 3” of any successful strength & conditioning program). Hoisting a barbell off your chest thousands of times is going to result in something happening.

However, if you want to get geeky about it, and if your goal is to actually build your pecs (and not necessarily gain some powerlifting street cred), then you could make an argument that the bench press isn’t the ideal way to go about things.

Your pec (namely, Pectoralis Major) muscles have two origin points:

  • Clavicular Head – on the anterior border of the (medial half) of the clavicle.
  • Sternal Head – on the anterior surface of the sternum.

As far as actions are concerned, the Clavicular Head aids in flexing the humerus; the Sternal Head aids in extension and adduction of the humerus…neither of which are optimally “stimulated” with the bench press.

Do the pecs get targeted during a set of bench press? Yes, absolutely. Does the bench press, typically, allow for a person to use the most weight in overloading their chest musculature? Yep. And does Dr. Brad Schoenfeld, in his recently released book, Science and Development of Muscle Hypertrophy state, repeatedly, that one of the major drivers of hypertrophy (muscle growth) is mechanical tension?

YES…GOSH. GET OFF MY BACK!

The bench press can (and should) be part of an overall approach to building pecs that would make Superman swoon. However, as Schoenfeld notes:

“Research indicates that mechanoreceptors are sensitive to both the magnitude and temporal aspects of loading.”

In non-Elvish speak this basically refers to the differentiation of peak concentric, eccentric, and isometric actions of muscles and how research demonstrates that time under tension is often the de-facto consideration with regards to hypertrophy.5

Cool, we’re all on board with that.

However, in addition, Schoenfeld notes:

“Mechanoreceptors also appear to be sensitive to the type of load imposed on muscle tissue. Stretch-induced mechanical loading elicits the deposition of sarcomeres longitudinally.”

During the barbell bench press, the pecs are rarely (if ever) taken through their full ROM, and this can be a significant strike against why it’s not the best choice when it comes to developing pecy pecs.

https://www.youtube.com/watch?v=1ytCEuuW2_A


What to do, what to do?

1) Relax, You Don’t Need To Ditch the Bench Press

Not that I was worried this was going to happen, mind you.

The bench press is still relevant to the discussion…it’s just sometimes, you know, a bit overplayed. To that end, it bodes in your favor to experiment. Flat, decline, incline, close-grip, wide-grip, rest/pause, clusters, high-rep, low rep, whatever the case me be…..use them all.

However, if your goal is to really engage the pecs you may be better off doing all of the above with DUMBBELLS.

Dumbbells allow for a bit more wiggle-room with ROM (humeral extension), in addition to involving more of an adduction component.

Also, if you wanted to up the ante even more, try some squeeze presses:


2) Perform More DB Flyes

Yeah, I said it. DB flyes, yo.

Now, of course, I wouldn’t say this should be your main movement of the day (since you’re less likely to use a ton of weight on these compared to bench variations), however flyes are an excellent secondary or accessory movement to compliment things.

Namely because they really work the pecs in adduction…..something that doesn’t happen with a barbell.

These can be tricky with regards to shoulder health, so if you’re someone with a history of shoulder issues, one way to make these are more “user friendly” is to perform Pause DB Floor Flyes:

https://www.youtube.com/watch?v=d1lVf6–0aQ


Doing so will help you stay out of end ranges of motion that may compromise the shoulder, yet you’re still working the pecs in an action they’re designed to do (at least concentrically): humeral adduction.

3) Push-Up Adduction Holds

I stole this concept from fellow strength & performance coach, Eric Bach. Assume the starting position of a push-up, but then instead of going up and down…try to “bunch up” the floor with your hands and hold for a 10-20s count.


You want to talk about feeling a major burn/pump in your pecs, this it. And, to bring flyes back into the conversation try this killer superset I also stole from Eric Bach:

A1. Push-Up Adduction Hold x 10-20s
A2. Pause DB Floor Flyes x 8-10
A3. Bounce a quarter off your chest x infinity.

4) Add Accentuated Eccentrics

The idea of accentuated eccentrics was first introduced to me by Christian Thibaudeau back in the early 2000’s.

It’s no secret to any meathead that the eccentric portion of a lift (yielding, lowering) is where we’re strongest and where the most muscle damage occurs.

This can elicit profound gains in muscle and strength.

One method to take advantage of that fact is accentuated eccentrics, the more popular of which are super slow eccentrics and negative training.

Taken from Thibaudeau’s Accentuated Eccentric Training article from T-Nation:

“Super Slow Eccentrics

This technique is fairly simple: using a moderate to heavy load (60-85% of your max) you execute a super slow yielding phase while lifting (overcoming) the bar explosively. The following table gives you the parameters to use depending on the load you select:

Load Yielding Portion Reps/Set Load Yielding portion Reps/Set
60% 14 sec. 3 75% 8 sec. 2
65% 12 sec. 3 80% 6 sec. 1
70% 10 sec. 2 85% 4 sec. 1

This type of accentuated eccentric training is fairly easy to do and can yield impressive muscle size and tendon strength improvements.

Negative Training

“Negatives” basically refer to performing only the yielding portion of an exercise and having spotters lift the bar for you. You should use a load that’s between 110 and 130% of your maximum when performing negatives. The time of the action (lowering) depends on the load:

10 seconds if the load is 110-115%

8 seconds if the load is 115-120%

6 seconds if the load is 120-125%

4 seconds if the load is 125-130%”

Another, albeit less sexy approach, is to add an accentuated eccentric during a set of push-ups. I know Dr. John Rusin is a fan of these. Often I’ll have my athletes/clients perform a set of 5-10 reps and then hold their last rep in the bottom position for a count of 10-20s:


Again it’s a nice way to emphasize the eccentric portion of a lift AND increase time under tension (under stretch).

And that’s it on my end.

Have any tricks of the trade to add yourself? Share them below in the comments section or mozy on over to Facebook and leave a comment there.

CategoriesAssessment Corrective Exercise Strength Training

Strong Traps, Healthy Shoulders

A funny thing happens whenever I inform someone (namely, guys) they need to hit their upper traps more. The immediately go into Bane mode:

Visions of heavy barbell shrugs, breaking Batman’s back, and walking around asking people “do you feel in charge?” run rampant.

It’s all well and good, I have nothing against shrugs. I draw the line against breaking people’s backs though. BAD BANE, NO!

Shrugs are undoubtedly a great exercise to build the upper traps. And the upper traps are kind of important when it comes to the ability to bring one’s arms overhead – they’re one of three muscles that help to upwardly rotate the scapula.

Via my time as a coach at Cressey Sports Performance (and even now) I work with a lot of people with shoulder issues. Training the upper traps directly has gotten a bad rap in recent years. But for athletes and lifters who are stuck in spine-extension based postures and can’t raise their arms overhead, training the upper traps can be a game changer for overall shoulder health and performance.

The key? Ensure they’re trained with upward rotation.

Continue reading my latest article on T-Nation.com HERE.

CategoriesExercises You Should Be Doing

Exercises You Should Be Doing: Hollow Position Plate Rotation

Like many of you I have been watching the Rio Olympics and often picking my jaw up from off the floor witnessing the feats of power, speed, agility, and artistry that many of the athletes display.

Whether it’s watching Usain Bolt float to the finish line or shaking my head in disbelief as Katie Ledecky almost laps the competition during the finals, it’s impressive to watch and witness years of dedication and hard work culminate into a two-week span of giving a shit about sports I never knew existed.1

As is the case every four years, much of our attention (and jaw droppiness) is fixated on the seemingly physics defying feats all the gymnasts showcase.2

Simone Biles would be exhibit #1.

To put it bluntly, she is a superb athlete and is raising the bar to standards we’ve never seen before. However, to be fair, what gymnasts as a whole are able to do seems better suited for The Matrix than real life. It’s just, you know, Simone is a real-life Trinity.

There’s no way any of us mere mortals can emulate what they do. Right?

Right. You are correct. No one is impressed by your shirtless somersault.

You may be surprised, though, that one of the most traditional “introductory” movements that most gymnasts learn on day #1 is one of the best (and most underrated) core/abdominal exercises everyone can perform; and should perform. Even you.

It doesn’t require a ton of skill nor two easy payments of $19.99. All you need is your own body and some attention to detail.

The Hollow Body Hold

I wrote about the Hollow Body Hold (and how it can be used to help women get better at doing chin-ups/pull-ups) HERE. It’s a wonderful way to teach trainees what it means to attain full-body tension, as well as helping to drive home some context (on the floor) of what needs to happen if or when someone is ready to hang from a bar.

NOTE: I think you should totally read the entire article linked above, but I’ll post the video here too. But only because because I know most you have the attention span of that dog from the movie Up (and because I love you).


Hollow Hold = body tension. This is key. As Men’s Health fitness advisor, BJ Gaddour, notes:

“The hollow-body hold allows you to properly transfer force from your upper body to your lower body without any energy leaks. The stronger and more stable you are in this position, the more power you’ll have when squatting, throwing, pushing, pulling, jumping, hitting, kicking, or sprinting.”

For most, the regular ol, “vanilla” hollow hold will be more than enough. However, if you’re interested in upping the ante try this other variation:

Hollow Position Plate Rotation


Who Did I Steal It From: the happiest person on Earth, Jen Sinkler.

What Does It Do: makes you hate life takes all the benefits of the original hollow hold, but now adds the challenge of keeping the torso “engaged” while in the presence of movement.

Key Coaching Cues: begin by assuming the “v” position as with any standard hollow hold and lower to a position you’re able to maintain. Press feet/ankles together! While holding a pair of 2.5-5 lbs. plates you’ll rotate each in as large of an arc as you can handle – starting overhead – without deviating from position.

Of course, the contraindication here – in terms of total ROM – is whether or not one has ample shoulder flexion to begin with. Those with limited ROM can still perform this exercise, but will need to be aware of compensatory patterns (excessive forward head posture, losing lower back position on bench).

Assuming a green light, try to cue yourself “palms up” in both the top and bottom positions. This will make it a little more shoulder friendly (less narrowing of acromion space and help drive a little more scapular posterior tilt).

Much like Jen, I like to shoot for higher reps on this exercise – anywhere from 10-30 total repetitions – and to ensure each is performed in a controlled manner. I.e., once you enter “it looks like you’re having an epileptic seizure territory” you should stop there.

Give it a try and let me know what you think.