Categoriescoaching Exercise Technique Female Training Strength Training

3 Squat Variations You Haven’t Tried Yet, But Need To

Today’s guest post comes courtesy of Jennifer Vogelgesang Blake – or JVB as she’s affectionately called – a coach at The Movement Minneapolis, competitive powerlifter, and author (along with Jen Sinkler) of Unapologetically Powerful, a new resource designed as a go-to source for learning the “big 3” lifts, and removes the intimidation often attached at their hip.

Or weight clamps in this case.

Anyone can (and will) benefit from this resource – especially beginner and intermediate lifters who are even the slightest bit interested in competing and/or honing their technique.

And, I’d be remiss not to mention I feel this is a home run for any woman who may be on the fence about this whole “lifting heavy things” thing.  

Without further ado, I’ll let JVB take it from here. Enjoy!

3 Squat Variations You Haven’t Tried Yet, But Need To

I’m going to be bracingly honest with you. If I were forced to choose, with my feet to the fire, I would have to own up to liking to squat more than I like to deadlift.

(I can picture Tony Gentilcore’s eyes firing up like Darth Sidius in The Empire Strikes Back and pledging an oath to never host a guest blog from me on his site ever again. This is what they call “going out on a limb.”)

I don’t think it’s unusual for lifters to hold a slight allegiance to one or the other. Both big lifts remind me of a bricklayer laying bricks: strengthening the quads, hams, back, and core are going to construct a house no one is going to be able to knock down. Even so, to me, there’s something really thrilling about loading a bar onto your back and refusing to let it plaster your face into the ground.


Squats open up the lifting in a powerlifting meet.

Of the three main lifts (back squat, bench press, and deadlift), squats come first. I’ve come to regard this lift as the party starter—it sets the tone for the rest of the day.

Starting the meet off strong gets your mind in a good place and a great result there infuses confidence into the following two lifts. Feeling strong also improves your mental game.

On that note, make all versions of your squat the same sort of tone-setter.

There are so many riffs on the movement: bilateral variations, such as kettlebell goblet squats and barbell front squats, are excellent for targeting anterior core strength, and unilateral variations such as Bulgarian split squats, skater squats, and pistol squats are key for giving both legs the chance to work, and to even out strength imbalances.

These variations are like the sprinkles on a cupcake, though: while I like to sprinkle that ish liberally, I know that these sprinkles alone do not a great, big, fluffy cupcake make.

I acknowledge that I need to work on my similes, but you don’t have to be a powerlifter to embrace cupcakes and the following three lifts, you only have to be interested in improving your strength everywhere—but especially in your core and in the bottom position of a squat. If you are, chances are good that you could give your current back squat PR a nice bump if you incorporate them regularly.

Barbell Squat-To-Box

First things first: what’s the point of having a big squat if it’s not a big, full-range-of-motion squat? Quarter squats don’t count when you’re going for bragging rights.

Depth issues sometimes come down to a lack of awareness in how low you are actually getting.

Heads up: Don’t confuse the Barbell Squat-To-Box with Barbell Box Squats, a variation in which you actually sit on the box. This is a touch-and-go movement and will help you learn what it actually feels like to squat to proper depth.


Zercher Squat

When David Dellanave, owner of The Movement Minneapolis, originally showed me how to do the Zercher squat, I was like, “Really? Why would I want to hold the bar like that?” His answer, “It’s going to get you really f#cking strong, that’s why.”

Zercher squats hammer your quads like crazy, and you’ve never experienced an ab workout quite as intense as a set of heavy Zercher squats. Getting your body strong in weird positions will make lifting in more conventional position that much more lovely.

Zercher squats require that you hold the weight in the crook of your elbows while you complete the movement. The Zercher isn’t just limited to the squat, either: you can also Zercher hold, carry, and deadlift. Because of the position of the weight on your body, this variation is killer for strengthening the upper back.

Hot Tip: Wrap the bar in padding or even a yoga mat for greater comfort.


Pause-in-the-Hole Squat

Many lifters rely on the stretch reflex, that rubber-band-like contraction that happens when the muscles stretch at the bottom of the squat, to bounce out of the hole. There’s nothing inherently wrong with taking advantage of this phenomenon, which is particularly handy when attempting to move the most weight your body can handle.

But, there’s something to be said for eliminating the bounce and building strength from a dead stop in the bottom position.

It means you’ll be less likely to stay stuck in the hole.

Pause-in-the-Hole Squats are a favorite for addressing this issue because your position must inherently stay tight from the top position and hold tight throughout the bottom pause (lest you topple) before driving out of the hole. The extra time under tension will fully hammer home the need to keep the upper back tight and entire core braced, as well as build static strength in the lower back, hips, and abs.

Pausing at the bottom is undeniably challenging, even when your form is shipshape, so lessen the weight accordingly.


About JVB

Jennifer Vogelgesang Blake’s leggings might be pink but her weights aren’t. A personal trainer at The Movement Minneapolis, she is a powerlifting coach and competitor with a passion for helping her clients discover and grow their strength, inside and out.  She’s here to spread the good word that strong is empowering and because of that, really, really fun.

Unapologetically Powerful is here!

Are you ready to become Unapologetically Powerful? If you’re even just a little bit interested in improving your back squat, bench press, and deadlift, and building lean, beautiful muscle, you’re going to love digging into this program.

Unapologetically Powerful is your go-to resource to learning all about the “big three” lifts, and removes any intimidation from training for and competing, should you decide to, in the sport of powerlifting.

Trainers Jen Sinkler and JVB have teamed up to provide you the answers to all of your powerlifting questions—and get you radically and unapologetically strong. Here’s what’s in the program:

  • A comprehensive training manual that includes Beginner and Early Intermediate 12-week powerlifting programs with a detailed introduction to biofeedback training.
  • An extensive guide on how to compete for first-time powerlifters who want to step onto the platform.
  • A complete exercise glossary with clear-cut written coaching cues and images.
  • A MASSIVE video library of more than 140 exercise demonstration videos. Every movement in the program is in the video library, with detailed coaching cues to walk you through each exercise step by step.
  • A revamped version of Lift Weights Faster geared specifically toward powerlifters.

Unapologetically Powerful is on sale for HALF OFF now through midnight Friday, December 11. For more info, click HERE.

CategoriesExercise Technique Female Training personal training Program Design Strength Training

How To Improve Chin-Ups and Pull-Ups From the Ground

Excuse my language: but fuck what the scale says.

I hate that the scale is often deemed the end-all, be-all measure of progress; the litmus test innumerable people gravitate towards to gauge their success when it comes to their health and well-being (or worse, self worth).

I’ve written on this topic before – Should You Use Scale Weight As a Measure of Success? – so I won’t go too off tangent here. Besides, if I do I’ll get all worked up, emotional, and inevitably end up having to resist the urge to Sparta kick a random wall in my apartment.

But in case you’re too cool for school to read the article it can be summed up as follows:

  1. See that scale in your bathroom?
  2. Toss it out the window.
  3. But be sure no one is standing underneath it.
  4. Because, you know, you run the risk of someone wanting to fight you. Or, you’ll kill them. Which would suck.
  5. Just read the article will ya?

Why Performance Based Goals Matter

Whenever I start working with a client (male or female) I almost always “nudge” them towards a performance based goal, rather than something arbitrary like:

“I want to lose 10 lbs.”

Or

“I’d like to look like Hugh Jackman when he’s Wolverine.”

Or

“I want to lose fat here (<— points to body part).”

Or

“I want to mud wrestle Rhonda Rousey.”

Save for the last one, which is creepy as hell1, none of these “goals” speak to anything concrete or quantifiable.

It amazes me how often the magic number is “10 lbs” whenever someone refers to losing weight, as if that number really means anything. Likewise, will looking like Hugh Jackman as Wolverine make you a better human being?

Yep, probably

This isn’t to belittle these goals or begrudge the people who make them. Honestly, if either of them are what helps keep people motivated to train and to stay consistent with their training I’m all for it.

I just feel these types of goals pale in comparison to setting concrete, measurable, performance-based goals. Goals like deadlifting 1x, 1x5x, or 2x bodyweight, or bench pressing bodyweight for reps, or being able to bang out a clean, full ROM, bodyweight chin-up/pull-up.

THESE are the markers of true progress IMO.

Here’s a video of Lisa hitting 5-reps during one of the 17,9422 snow storms we had last winter in Boston.

I feel it’s these types of goals which give people more intent and purpose in their training. Moreover, from my own experience as a coach, it’s these types of goals which (almost always) result in people attaining their aesthetic goals as well.

And, as an added benefit: more often than not, the whole notion that “scale weight” means anything is tossed to the curb (especially as it relates to the toxic mindset and environment that many women impose on themselves).

I dig that.

The sooner I can get them to say “sayonara” to the scale, the better.

So, Speaking of Chin-Ups/Pull-Ups

I work with a lot of women as a coach, and it’s not uncommon for many to express how they’d love to eventually be able to perform a chin-up/pull-up.

Unfortunately, for some, the negative self-talk takes over.

Whether because they’ve been programmed to think otherwise from magazines which tell them that lifting 3-5 lb dumbbells is what they’re supposed to be doing, or from ill-informed and ill-intentioned trainers in the past who bought into the bullshit and “vomited” said bullshit in their direction …many are left thinking themselves:

“I’ll never be able to do that!”

With that mindset: you’re 100% correct.

However, with the right information, support, and plan…it is possible.

[The video below highlights a 6-Week Chin-Up Challenge I wrote for Women’s Health back in 2013, where a number of the participants succeeded].

I’ve had a slight change in strategy of late, though. My initial “step” to training the chin-up/pull-up with the bulk of my female clients3 starts from the floor and not from the chin-up/pull-up bar.

Say Whaaaaaaaaaaaaaaaat?

Much of the credit goes to Artemis Scantalides. It’s been the information I’ve gleaned from her that’s been the main influence on my revamped approach.

The biggest “take home” point is allowing people to understand and respect the importance of getting and maintaining full-body tension, and then taking that tension and applying it to the bar.

Many are unable to grasp this concept and frankly, until they do, aren’t ready to hang from a bar.

This can be done in several ways, and it doesn’t require anything elaborate or fancy.

1. Push-Ups

Yep, plain ol’ vanilla-flavored push-ups.

Improve someone’s ability to perform a push-up, and inevitably you’ll see improvements in the sexier lifts like deadlifts, squats, and chin-ups/pull-ups.

Why?

Better lumbo-pelvic-hip control and a better understanding of core tension (specifically: Anterior core control).

The sooner one learns to “own” the push-up, the sooner he or she will own the weight room. And I don’t mean “girl push-ups” either. You know, the ones that girls are supposed to perform with their knees on the ground.

I think those a stupid and set a dangerous precedent.

Girls can (and will) do push-ups. We just may need to augment them to better set them up for success.

Elevated Push-Up


Band Assisted Push-Up


One variation a really like that better emulates carry-over to the chin-up/pull-up is:

Push-Up Walkout to Plank

https://www.youtube.com/watch?v=_2DzjiJsllc


2. Rollout Variations

Along the same lines as the push-up, I also find a ton of validity in rollout variations. Many of the same benefits apply: cuing of bodily tension (brace abs, squeeze glutes), better anterior core activation, and improved lumbo-pelvic-hip control.

What’s more: the rollout – from the extended position back to an upright position – very much “copies” the pulling motion akin to the chin-up/pull-up.


Both exercises are crucial in introducing tension and bodily awareness and help to build context in a more “user friendly” manner. It’s not uncommon for me to program one or the other – choosing from a wide array of variations – every training session for some trainees.

Another teaching tool I’ve been using a lot of late (thanks to Artemis and other coaches like Karen Smith) is something called the Hollow Position.

The Hollow Position (w/ Stick)


This move has been a game changer for me as a coach, and something I’ve been incorporating into many of the programs of my new clients in Boston, like Alex in the video above.

The Key Points to Remember

  1. They must press both the ankles and hands together. This will create TENSION.
  2. The legs and upper torso must move simultaneously (the spine needs to stay in a anatomically neutral position).
  3. The objective, to start, is to build-up time under tension. For many, 5 seconds will be challenging. It may be best to perform 3-5 repetitions of 5s holds (with 5-10s rest in between), and build up from there. With Alex I’m working up to one, strict 30s hold. She loves it/hates my guts.
  4. Adding the stick helps to build context even more, which will translate nicely once someone “graduates” to the bar.
  5. Once they do progress to hanging from a bar, the hollow position is still paramount. From there we can train both the bottom and top of the chin-up/pull-up with hanging leg raise variations and flexed-arm hang variations (ensuring maintenance of hollow position and “sucking” the shoulder blades into the sockets).

And Most Important Of All….

Once I clicked “publish” on this article: there are 30 Days, 8 Hours, and 43 Minutes until Star Wars Episode VII premiers.

Not that I’m keeping track or anything…..

CategoriesExercise Technique

4 Easy Ways to Improve Classic Lifts

I’ve been on a “less is better” stick to the basics kick lately with my writing4.

Last week I wrote an article on T-Nation on why I feel “muscle confusion” is wack, and this week I have a new article on BodyBuilding.com with a similar vibe…

…extolling people to make the “classic” moves (squats, deadlifts, rows, presses, etc) a priority, but to also do versions of those lifts to help improve technique.

This image came up when I did a search for “classic exercises” in Google. I thought it was hilarious, and ran with it.

It’s a good article with some solid advice (if I do say so myself5). But I understand if your eyes glaze over. I get it: an article telling you to focus on the basics is about as exciting as watching NASCAR. Or this video:

However, I do offer some neat6 exercises you may find interesting and worth giving a try.

SHA-ZAM (<— You should read this)

CategoriesExercise Technique Program Design

The Deadlift: Beginner Basics

I came across this comment yesterday on Twitter from a friend of mine who’s an accomplished trainer and someone I respect a lot:

How many articles can be written about the deadlift? And when writing, does the author ever say to self, “maybe I should wait on this one.”

I can’t say I disagree with his tone. I mean, I get it. There are metric shit-ton7 of deadlift articles out there, and I’ve helped contribute my fair share.

Sorry!

The way I see it: Michael Bay keeps making those god-awful Transformers movies due to popular demand. Deadlifts are popular. So, yeah, there’s the correlation.

Just run with it.

I’ll admit that there’s really nothing new to say about deadlifts (except that they’re not god-awful), and I can understand the degree of eye-rolling by some coaches when the internet is hijacked for a few days with a flood of articles and blog posts on the topic; not coincidentally all of which happen to coincide with the revamped re-release of a stellar resource like David Dellanave’s Off the Floor: A Manual for Deadlift Domination.

For what it’s worth: there are a lot of people who stink at deadlifting and are eager to learn how to perform them right and learn how to implement them into a well-structured, properly progressed program.

I like to think of myself – and this website – as a resource that helps point people in the direction of quality information. Information from friends/coaches I trust (and more often than not have a personal relationship with) and information I know will help many people.

I can do it in a way that’s non-douchy and provide unique, useful content – because I know what I’m talking about – as an adjunct to the material (like I will do below).

Or I can do one of two things:

1. Be annoying internet marketing guy

“HEY EVERYBODY BUY THIS MANUAL/DVD BECAUSE I SAID SO, AND BECAUSE I LIKE DEADLIFTS (even though I don’t train anyone in real life). AND BECAUSE I HAVE A TRIBAL TATTOO ON  MY ARM! “

2. Stay silent and rely on videos like this to educate people


I choose neither.

And on that note here’s some words I put together for you to read.

The Deadlift: Beginner Basics

The deadlift is a “simple” movement, and I’d argue the least technical of the “big 3” (squat, bench press, deadlift). Which isn’t to say it’s easy to perform nor doesn’t require some attention to detail. But for all intents and purposes we can describe the deadlift as follows (courtesy of renowned strength coach, Mark Rippetoe):

“Bar is on the ground. One bends over to pull the bar, with straight arms, off the floor and up the legs until the knees, hips, and shoulders are locked out.

And then you piss excellence all over the place.”

That last part was added by me.

Another perspective is that of Dan John:

Squat = maximal knee bend and maximal hip bend. In other words, the squat is a squat.

Deadlift = minimal knee bend and maximal hip bend. In other words, the deadlift is a hip hinge.

[NOTE: for some ideas on how to groove a solid hip hinge before adding an external load, check out THIS article on How to Hip Hinge Like a Boss.]


Benefits of the Deadlift

  1. It Gets You Stronger

Deadlifts have been around since the beginning of time. And while I can’t back that up with any scientific evidence, it’s true.

Of Note: I can’t tell you how many times I’ve trained at a gym other than my own and after a set of deadlifts someone will approach me and comment: “hey, that thing you’re doing. Is that, like, CrossFit?”

I’ve grown out of my hatin on CrossFit phase – I recognize the good it’s done with getting the masses excited to exercise, and better yet, lifting weights – so I generally just chuckle it off and inform the commentee that, “No, I’m not CrossFitting,” and that “No, CrossFit didn’t invent lifting weights.”

Anyways, deadlifts have been around for a while and there’s a reason why they’re a staple in every single successful strength-training program ever written, ever. (citation needed).

They work.

If strength is the goal, you need to incorporate movements that allow you to lift a bulldozer boatload of weight. Deadlifts fit that bill.

  1. It Builds Muscle

A funny thing happens when someone starts deadlifting consistently. They add muscle to their frame. More specifically they add muscle to the areas which can’t be scene by the mirror and are often most neglected – the posterior chain (glutes, hamstring, erectors).

Which serves as an appropriate segue to the next benefit…

  1. It Improves Performance

What kind of performance? I don’t know…any kind of performance.

Hitting a baseball or golf ball further, dunking a basketball, improving running efficiency (the more force you can develop and put into the ground, the more efficient you are at propelling yourself towards the finish line), the ability to walk down a flight of stairs and not break your hips in half, making yourself harder to kill, the bedroom (BOM CHICKA BOM BOM), it’s all fair game and part of the conversation.

One of the best explanations I’ve ever heard comes, again, from strength coach, Dan John. He was asked one time by an athlete of his “what muscle does (insert name of any exercise you want here) does this exercise work anyways?”

I don’t recall he was being asked about the deadlift, but his answer is fitting nonetheless:

“You know that muscle that allows you to jump really high, over the defending cornerback, to catch the football for the game winning touchdown? That muscle.”

Fuckin A.

In reality, however, we don’t have to correlate the deadlift to just athletic performance.

It carries many other “real life” benefits with it outside of the football field, baseball diamond, soccer pitch, or basketball court (to name a few).

Anything that requires a basic hip hinge pattern – while maintaining a neutral spine – can be labeled a deadlift.

Grandma bending over to pick up a potted plant? That’s a deadlift.

The random woman picking up her child at the local playground? A deadlift.

Franco Columbo moving his father’s car out of a cramped parking space in the documentary Pumping Iron? You guessed it, deadlift.

  1. It Makes You Bulletproof

Now just to be clear, that’s a metaphor. Deadlifts won’t actually make you bulletproof. Don’t be stupid. Bullets hurt. And will kill you.

Bulletproof in this context is just a more nerdy way of saying “prevent injuries.”

From an athlete’s perspective: Deadlifts will (hopefully, nothing is guaranteed) help prevent injuries like ACL tears as well as nagging injuries to the knees – like tendinitis (acute inflammation) and tendinosis (chronic inflammation or actual degeneration of soft tissue) – due to the fact the posterior chain is so heavily activated and strengthened.

From a non-athlete’s perspective: Deadlifts will help to “offset” many of the postural imbalances and dysfunctions that tend to manifest when forced to sit at a desk all day in front of a computer.

Think of what’s required in order to perform a deadlift: ample ankle dorsiflexion, hip extension, thoracic spine extension, and pelvic control, amongst other things…all of which tend to diminish when seated for long periods of time.

Plus, deadlifts help to address any pent up aggression that may spill over from work. I.e., they’re a much better alternative to stabbing your boss or annoying co-worker in the neck. Unless they deserve it.

In that case, stab away.

Note: video below doesn’t include any stabbing, but it’s hilarious nonetheless.


One last thing to consider is Wolff’s Law and Davis’s Law.

You can’t discount physics.

The former states that bone in a healthy person or animal will adapt to the loads it is placed under. The latter states the same thing, except with regards to soft tissue.

Deadlifting = strong bones + soft tissue. You need a minimal essential strain (MES) in order for tissue to adapt. Likewise, in order to strengthen tissue, you need to load it. Sorry, but your cute little leg extensions and leg curls all in the name of “being more spine friendly” aren’t going to get the job done.

Key Coaching Cues and The Importance of Getting (and Maintaining) Tension

David actually nailed all the key cues to use with regards to cleaning up deadlift technique in yesterday’s post.

To repeat:

These probably aren’t going to be groundbreaking, but time tends to prove out what works best, and these have been around for a while.

  • Chest up – let me read the writing on your shirt.
  • Pull the bar into your shins, you’re going to keep contact with your body through the entire pull.
  • Take the slack out of the bar by making it “clink”.
  • Pull your shoulder blades down into your back pockets.
  • Push the floor away, and stand up tall.
  • Optionally, if someone over-extends or arches, I like to explain that you want to try to cinch your ribs down to your pelvis. I don’t like “ribs down” as this never seems to make sense to people.

That’s it. I found that those five or six cues fix 99% of the issues I see.

Another component to consider – and one I feel is crucial – is the idea of getting and maintaining tension throughout a set. Many people lack the wherewithal to engage their lats from the start, and hence lack upper back stiffness. One of two things inevitably happens: they round their upper back or the hips shoot up first.


To counteract this I like to cue people to pretend as if they’re trying to squeeze an orange in their armpits. Research backs up the efficacy of using more external cueing when coaching clients, and this cue works like magic much of the time.

However, in the event that that doesn’t jive, a simple drill I’ll use is to attach a band to the barbell itself and the trainee/athlete must learn to pull the bar close to the body AND KEEP IT THERE the entire time.


The band will want to pull you forward, and the objective here is not to allow that. That thing you feel? Those are your lats.

Get More Juicy Information

That is no where near everything I’d like to cover with regards to the deadlift for beginners (the part where I explained the benefits is section of a treatise I’m writing for the Personal Trainer Development Center that I hope will serve as “go to” source on anything/everything deadlifts,” but hopefully it gives you some insight and “ammo” as to why it’s an excellent exercise to include in your training and that of others.

I’d encourage you to check out Off the Floor: A Manual for Deadlift Domination for more similar content in addition to a full manual, programs, a video library, and a bevy of other goodies.

It’s on SALE this week only and you can go HERE for more information.

CategoriesAssessment coaching Exercise Technique rant

Why I Dislike the American Kettlebell Swing

To any overly patriotic or political zealots out there who may have misread, note the title does not say “Why I dislike America.”

To everyone else, notice too that the title doesn’t say “I hate the American kettlebell swing.”

Hate is such a strong word anyways; more appropriately reserved for things like Hitler, ebola, global warming, Gwyneth Paltrow playing the role of a health & fitness authority, poodles, and skinny jeans.

Oh, and side walk solicitors.8

No, I dislike it. Or maybe, “mildly need to resist the urge to jump through a glass door whenever I see it done.”

But not hate.

I’ll explain why below.

What’s a Kettlebell?

It first may be prudent to get some particulars out of the way. Like, for instance, explaining what a kettlebell is in the first place?

Well, that’s what’s Wikipedia is for:

The kettlebell or girya is a cast-iron or cast steel weight used to perform ballistic exercises that combine cardiovascular, strength and flexibility training. They are also the primary equipment used in the weight lifting sport of girevoy sport. Russian kettlebells are traditionally measured in weight by pood, which (rounded to metric units) is defined as 16 kilograms (35 lb).

In other words: it’s one of those “cannonball with a handle” looking thingamajigs that you see all those people at your gym pushing, pulling, hoisting, and tossing every which way in an effort to 1) perform a legitimate exercise such as a swing, get-up, snatch, clean & press, Farmer carry, amongst many, many others 2) perform an exercise that makes absolutely no sense for its intended design and/or use.

Like this:

Although, giving credit where it’s due, this is kind of badass. Albeit from a cost-benefit standpoint I see little upside.

And 3) to look cool. <— Research backs this up.

Kettlebells are a very useful piece of equipment, a piece of equipment I use often with my own athletes and clients, but I do find some people take an elitist attitude towards them to the point where things like barbells and dumbbells are considered obsolete or inferior (which I feel is an absurd stance to take).

It’s a minority take, but a take nonetheless.

The Kettlebell Swing

Splitting the conversation further is the swing; one of, if not the most popular exercise performed with a kettlebell.

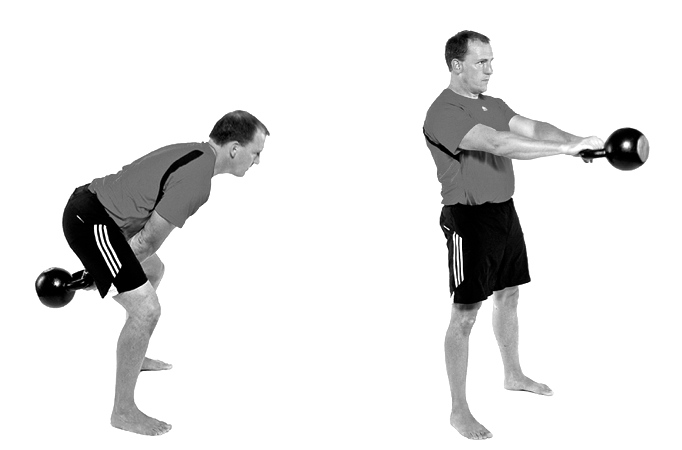
FMS and Strong First instructor, Brett Jones, showcasing the Russian Style (and I’d argue, correct) swing.

I’ve written several articles in the past expounding my take/approach to the swing and I’m not going to belabor my point(s) here. If interested you can peruse THIS, THIS, and THIS article. We can high-five later.

I’d also encourage you to seek out information from the likes of Dan John, Dr. Mark Cheng, Jen Sinkler, Neghar Fonooni, Gray Cook, and Iron Body Studios (Artemis Scantalides and Eric Gahan):


All the coaches/peeps mentioned above advocate the “Russian” style swing as opposed to the “American” style. To which I say, “Samsies.”

What’s the Difference?

Russian Style = less ROM, more vodka.

American Style = more ROM, because, why not? And, America!


There are adamant supporters in both camps, and both make solid cases for why their style is the style everyone should be using.

And, as far as internet pissing contests are concerned, it’s an “argument” that ranks right up there with the low bar squatters vs. high bar squatters, steady state cardio vs. HIIT cardio, meat eaters vs. vegetarians, and you better bet your ass this calls for a Rocky vs. Drago reference.

I have to say, though, the “American” advocates have a far less stellar rationale (it’s just my opinion of course) for their style.

Let’s discuss shall we?

My Case Against the American Style Swing

I posted the following question on Twitter yesterday:

Little Help: can anyone provide benefits/advantages for the “American” KB swing?

I received this well-thought out response (which made me chuckle):

“Looks more hardcore in METCON.”

However the bulk of responses fell in the line with:

“To practice the movement for CrossFit competition. Sport specific practice, in essence.”

“It is measurable in the context of the bell has to be fully extended overhead to be a rep is the only thing I can think of.”

It’s hard for me to counterpoint that train of thought. I get it, I respect it, and I can appreciate any “specificity” that’s involved. You don’t get better at swimming by riding a bike just like you don’t get better at American style swings by not doing American style swings (for competition).

CrossFit competitions are one thing (and even then, why?). Where I feel things get dicey are for those CrossFitters who don’t compete and when personal trainers/coaches start using the American style with their regular clientele who, again, don’t compete and more importantly, have poor movement quality…all because they watched the wrong YouTube video, or Jillian Michaels DVD.

Mind you, there are plenty (not a lot) of people who can perform an American style swing and not make my corneas bleed.

It’s a learned skill just like any other exercise – with a right way and wrong way to do it (I think) – and I’m sure it’s not too hard to find passable images on Google.

However, lets not kid ourselves…most people who do it end up looking like this:

Or this:

Maybe it’s the cynical coach in me speaking, but all I see is forward head posture, excessive lumbar extension (both primarily compensation patterns for limited shoulder flexion mobility; or the ability to get your arms over your head, and lack of lumbo-pelvic-hip control; or limited anterior core strength/stiffness), and a local physical therapist salivating.

And who knows: maybe the pics taken above were rep # 117 of a WOD, where technique is bound to take a hit. Either way, my back hurts looking at it.

I am not at all against people training overhead.

I just feel the vast majority of people need to earn the right to do it.

(Check THIS out for more details on that front).

Many people just don’t have ample enough shoulder flexion and/or lumbo-pelvic control to get their arms overhead without blatant compensations and (potentially) serious ramifications down the road – much less be competent enough to add load and repetitions (unfortunately, usually both).

Someone was kind enough to link to THIS article on Twitter written by CrossFit serving as a rebuttal to everyone else’s rebuttal that, for 90% of people 90% of the time, the American swing, and I’m paraphrasing here, fucking stupid.9.

See! An example of a better, “passable” American swing where the hips get through into more terminal extension. Understandably the criteria for a CF competition isn’t to get the hips through, it’s just whether or not the arms get overhead.

From the article itself:

“On first being introduced to the kettlebell swing our immediate response was, “Why not go overhead?” Generally, we endeavor, somewhat reflexively, to lengthen the line of travel of any movement. Why? There are two reasons.

The first is somewhat intuitive. We don’t do half rep pull-ups, we don’t do half rep squats, and we don’t do half rep push-ups. If there is a natural range of motion to any movement we like to complete it. To do otherwise seems unnatural. We would argue that partial reps are neurologically incomplete.”

I’ve already pointed out my disdain for assuming everyone can train overhead. It’s just not true, and I applaud any CF box or affiliate who take the time to properly screen their clients beforehand to better ascertain who can and cannot perform movements overhead…safely.

Shout-outs to Coolidge Corner CrossFit and CrossFit Resilience (two boxes I know screen their clients).

I almost shit a kettlebell when I read that second paragraph.

First off, every gym does half rep everything. Walk into any gym, anywhere, and you’re bound to see people “cheating” their lifts. Some lifts warrant partial reps – block pulls, Anderson squats, board presses, etc. There’s a ton of efficacy for partial ROM lifts, typically to address a technique flaw or weakness in one of the “big 3.”

But I’m sorry, CrossFit isn’t anything special, needs to be held to the same litmus test, and recognize that people cheat their lifts just as much there as in any other gym (commercial, collegiate, private, or otherwise).

All of that comes down to coaching anyways.

Secondly, You don’t do partial rep pull-ups?

Um, what the hell are kipping pull-ups then? They’re certainly not full- ROM. Puh-lease.


Here’s another doozy from the same article:

“From physics we know that the higher we lift something, and the more it weighs, the more “work” we are performing. Work is in fact equal to the weight lifted multiplied by the height we lift the object. Work performed divided by the time to completion is equal to the average “power” expressed in the effort.

When we swing the kettlebell to overhead, the American swing, we nearly double the range of motion compared to the Russian swing and thereby double the work done each stroke.”

Who says you have to increase ROM (and do more work) to make an exercise better? It’s the American way I suppose. We work more, take less vacation, and are otherwise stressed to the gills because we’re a-holes like that.

More is better, right?

With the swing – as with more conventional exercises like the bench press, squat, and deadlift – it’s not (always) about how much more work you can do (by increasing ROM) to make it better or harder or more effective. With the latter examples it’s about doing LESS work to improve efficiency and to take better advantage of one’s unique anatomy and leverages.

This is why many coaches advocate a low-bar position when squatting or why we tinker with deadlifting style to get the hips closer (laterally speaking) to the bar. Some do better with conventional deadlifts while others do better with Sumo. It depends.

Lastly, with regards to the American swing being more “powerful” compared to the Russian style I’ll defer to THIS excellent post by Mike Young on why that’s not the case.

I’ve also seen it argued that the American swing produces more force due to the increase in ROM. Sorry, but force output is more about forward motion, not up (the bell actually slows down the higher you go).

Not to mention – from a personal standpoint – I feel there’s more room for error with the American style swing. Taking compensation patterns and physical limitations out of the discussion, the increased ROM often lends itself to the bell traveling well below the knees for most people, which can lead to much more “stress” to the lumbar spine – something I’d like to avoid altogether.

Although the KB snatch is very similar, so I guess the real culprit is one’s ability to “clear” the hips and get overhead.

Additionally, I’ve heard stories of people losing the bell overhead, where it ends up flipping over and the bell falls.

In the End

This is not an attack on CrossFit or any coach who uses this particular style – relax. Far be it from me to tell any coach what he or she should be doing with their clients. If they want to coach their swings American style, have at it. They have their reasons.

It’s also not about pandering to which style is right or wrong. However I do feel the Russian style is more optimal and a better fit for most people. Why fix what isn’t broken?

All of this is my opinion – one it’s hopefully coming across in a respectful, “huh, that makes sense” kind of way – and as with anything in this industry the right answer as to whether or not the American style swing is a good fit for you is…it depends.

It depends if you compete in CrossFit. If so, I get it. I guess.

It also depends on whether or not you have the requisite shoulder flexion and anterior core stability to go overhead. Most people don’t.

It also depends on the cost-benefit. I argue there’s little upside to performing it. It does make your METCON finisher look more hardcore. Yay?

CategoriesExercise Technique

A Common Dumbbell Row Mistake: Let the Shoulder Blade Move!

I love training the back. To me nothing sends the message of “I lift weights” more so than someone who has an impressive looking backside.

And one of my favorite exercises to train the back is the 1-arm DB Row.

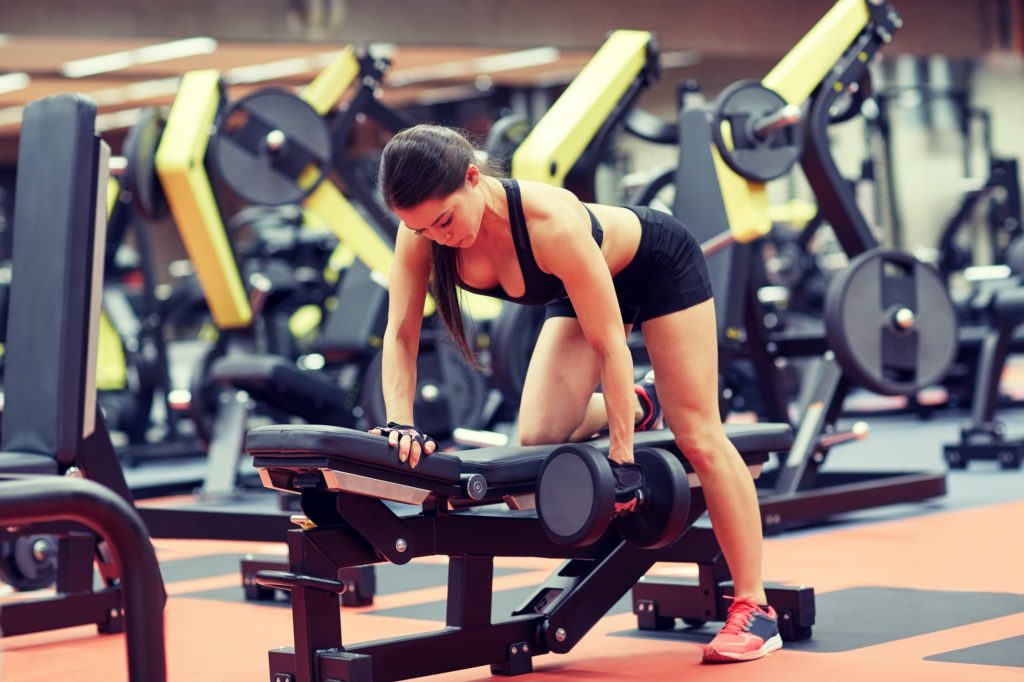
young woman flexing muscles with dumbbell in gym


That said, most people don’t perform it correctly. In fact, I’d bunch both the 1-arm DB row and push-up together as two exercises most people roll their eyes at and think are easy, but fall woefully short in terms of passing the eyeball test.

You know the saying: if it looks like crap….

I’m not going to belabor the obvious talking points here. Most people understand that a good DB Row is performed with:

  1. An anatomically “neutral” spine position: the upper doesn’t round, and the head doesn’t protract forward.
  2. The elbow not going too far back (to the point where there’s excessive glenohumeral extension, and subsequent anterior laxity of the shoulder).
  3. To the point above, the arm should move in more of an “arc” movement (forward to back) rather than straight up and down. While there is scapular retraction happening (more on this below), I feel the 1-arm DB row is more of a lat exercise than it is an upper back exercise. I like to cue people to think about bringing their elbow toward their hip rather than straight up and down.

However, none of this matters if your name is Matt Kroczaleski and you’re a beast:


NOTE: don’t hate on me for the music. Chris Howard had control of the stereo during CSP after hours.

As noted above I do feel the 1-arm DB row is a fantastic upper back builder, but that it’s more suited for lat development than it is building superior scapular retractors. This isn’t to say it can’t (or shouldn’t be used) in that fashion, it can! But if we can appreciate the fiber orientation of the lats in conjunction with the actual arm (arc) action being performed with the exercise, we can then better appreciate why it shouldn’t be at the top of the exercise hierarchy with regards to training scapular retraction.

But lets discuss scapular retraction.

A common cue used with the 1-arm DB Row is to retract (adduct) the scapulae (shoulder blade) and then to “pin” it there throughout the duration of the set. Like this:


I believe this is wrong and goes against common shoulder joint mechanics. By pinning the shoulder blade in place you’re essentially forcing yourself to gain the brunt of motion through the glenohumeral joint, which can lead to more anterior (forward) translation of the joint itself; causing more anterior laxity.

In addition, keeping the shoulder blade retracted the entire time can lead to rhomboid dominance, which in turn can (not always) result in muscular imbalances such as downward rotation syndrome; a term popularized by physical therapist Shirley Sahrmann in her book Diagnosis and Treatment of Movement Impairment Syndromes.

And as we all know, downward rotation syndrome kills kittens. True story.

You don’t want to kill kittens do you?

Instead I prefer to coach people to allow their shoulder blade to move; or breath. Like this:

The shoulder blade should move around the rib cage.

So instead of gluing it in place, the shoulder blade has room to breath – can move – and can work in a more synergistic fashion with GH joint. You work the scapula both concentrically and eccentrically.

NOTE: you still want to avoid end-range on the way down and control the load. You should feel a nice “stretch” in the bottom position – not to the point where you’re “hanging” on passive restraints – and then return back.

It’s a subtle tweak, but has a profound influence on the efficacy of the exercise and shoulder health in general.10 Give it a try the next time you perform the 1-arm DB row and notice if you feel a difference.

CategoriesExercise Technique Program Design speed training

3 Exercises To Help You Squat Deeper. Without a Single Mobility Drill

Today’s guest post comes courtesy of fellow Cressey Sports Performance coach, Tony Bonvechio (AKA: the other Tony). He’s got some excellent pointers on squat technique and how you can go about improving squat depth without mention of a single mobility exercise.

Enjoy!

I didn’t like hip-hop music until I met Tony Gentilcore. I’m more of a heavy metal guy, but when TG handles DJ duties during staff lift, I can’t help but get amped up to the sounds of the 90’s Hip Hop or Dirty South Pandora stations.

Note From TG: Tribe Called Quest Radio. You’re welcome.

So when Ludacris poses the esoteric question, “How low can you go?” during a heavy squat workout, it gets me thinking how I can get my clients to safely improve their squat depth.

TG is right when he says not everyone should (or needs to) squat as low as possible. But outside of our baseball players at CSP, I deal primarily with powerlifters who need to squat below parallel in competition. If they can’t get low enough, their squats won’t count, so we prioritize hitting depth in training.

When we combine deep squats with heavy loads and we know not everyone can hit depth (defined as the hip joint passing below the top of the knee joint) easily, how do we get there in the best position possible.

Well, you could stretch, foam roll and mobilize every joint head to toe. Or you could just learn how to squat.

The second option is my favorite. In my experience, nine times out of 10, a person’s inability to squat to depth is NOT a mobility issue but rather a squat strategy issue. Simply picking the right squat accessory exercises to hammer home an optimal squat pattern will almost always improve depth and strength. Here are my three favorite squat exercises to help you drop it low and crush heavy weights.

Squatting: Upright vs. Hip Hinge

First, here’s a harsh reality: an upright squat will always be the most mechanically efficient squat. If you’re pointing your nipples at the floor to use “hip drive,” you’ll never maximize the contribution of your legs and abs. There’s a reason every 1,000-pound squatter (raw or geared) stays almost perfectly vertical through their torso instead of leaning forward.

https://www.youtube.com/watch?v=bSs6_THxn5A


Are YOU gonna tell Malanichev to lean forward with 1,036 pounds on his back? Didn’t think so.

Here’s what happens far too often when people try to squat: they puff their chest up (thoracic extension), which pulls the ribcage up. They take a big breath, which is entirely ineffective because you can’t get good intra-abdominal pressure with a poor rib cage position. Then, they push their butt back as they squat down (lumbar extension, anterior pelvic tilt and hip flexion simultaneously).

Like a seesaw, as one side drops (the chest), the other side must go up to maintain balance (the hips). Not surprisingly, you can’t hip depth if your hips are shooting up and back to keep you from falling forward.

This scenario also effectively minimizes the space the head of the femur has to glide in the hip socket while limiting the contribution from your anterior core to keep your torso upright. What happens? Your hips get stuck so you fall forward to try to get lower. All bad news if you want to squat low and heavy safely.

That said, the optimal squat pattern is going to have an upright torso, knees out and slightly forward of the toes and the hips between the knees. This is much preferred to leaning forward with a vertical shin and over-arched lower back if greater depth is desired.

Here’s how to dial in that optimal pattern:

1. Front Squats

Front squats can cure your depth woes by teaching you to sit straight down between your knees instead of sitting behind your knees. You simply can’t sit back and dump your pelvis forward or you’ll dump the bar, so you internalize proper positioning. Carry this same strategy over to your back squat and you’ll be in business.


That’s why we use so many front squat variations at CSP. It immediately dials in a solid ribcage position and forces you to stabilize with your anterior core instead of your lumbar extensors.

I’ve lost count of the number of athletes who get stuck above parallel with a back squat or body weight squat but can magically sit their butt to their heels with a front squat. Kind of throws the mobility excuse out the window, huh?

By learning to keep the ribs down, chest up and knees out, you create proper alignment for nailing a deep squat. If you struggle with depth, try front squatting for a few weeks before returning to the back squat and I’m confident your depth will improve.

2. High-Bar Pause Squats

Also called Olympic squats because of their popularity with weightlifters, high-bar squats bridge the gap between front squats and a powerlifting-style back squat.

https://www.youtube.com/watch?v=Q6fQ6UPES24


A low-bar position (i.e. holding the bar across the rear deltoids instead of the traps) has ruined many a squatter’s depth. You might be able to handle more weight because it keeps the bar closer to your hips, but it doesn’t matter one bit if you can’t hip depth because it pitches you forward too much.

Switching to a slightly higher bar position has helped many of my lifters get lower. Similar to the front squat, it lets you stay more upright so you can lock the ribcage down and stabilize with your abs instead of your lower back.

Adding a brief pause at the bottom position builds confidence in the hole, which eliminates much of the fear associated with squatting low. This also forces the lifter to initiate the reversal by staying tall and driving the knees out.

Try high-bar pause squats as your second exercise on a squat day. Pause anywhere from 1 to 5 seconds and do sets of 3-8 reps. You can pause at the lowest position, right below parallel, or even on the way back up to target specific sticking points.

Note From TG: These suck donkey balls. You’ll hate life, but they work. Get it done.

3. Squat to Pins

Not to be confused with an Anderson squat where the bar starts on the pins, squatting to the pins hammers home the same technique points as a front squat but is even more sinister and unforgiving.


By lowering the bar to the pins and pausing, you’ll have virtually no room for error in torso position. If you sit back and lean forward, you’ll immediately get stuck as you try to squat back up. Only by staying tall, driving the knees out and keeping the bar over the mid-foot will you be able to stand up.

Few exercises build control and confidence like squatting to the pins. These not only cured my falling-forward problem, but also eliminated my knee cave issues by forcing me to spread the floor and keep tension in my hips.

Cues to Cure Your Squat Woes

Remember these useful cues as you practice these squat variations:

  • “Belt buckle toward your chin” – This prevents unlocking the pelvis as you sit down.
  • “Take all the air out of the room” – This stabilizes your spine by filling your belly and lower back with air.
  • “Bend the bar around your traps” – This locks in the lats to help you tay upright.
  • “Spread the floor apart” – This tenses up your hips and glutes to keep your knees out.

Notice there’s not a single instance of “chest up” or “sit back” on that list. Ditch these antiquated strategies for the ones above and you’ll be hitting depth more consistently while getting stronger.

Optimizing the “Big 3.”

Want to learn these strategies in person? Come see me and Greg Robins at our Optimizing the Big 3 seminar at Warhorse Barbell in Philadelphia on September 19.

There are only a few spots left, so sign up today.

CategoriesExercise Technique Exercises You Should Be Doing Strength Training

The Most Underrated Exercise in Strength and Conditioning? It’s Not Deadlifts.

While I can’t say it’s always been the case (I’ve grown less dogmatic and immature as a coach the older I’ve gotten11, I operate under the guise that every exercise has its time and place.

Except for maybe this one.

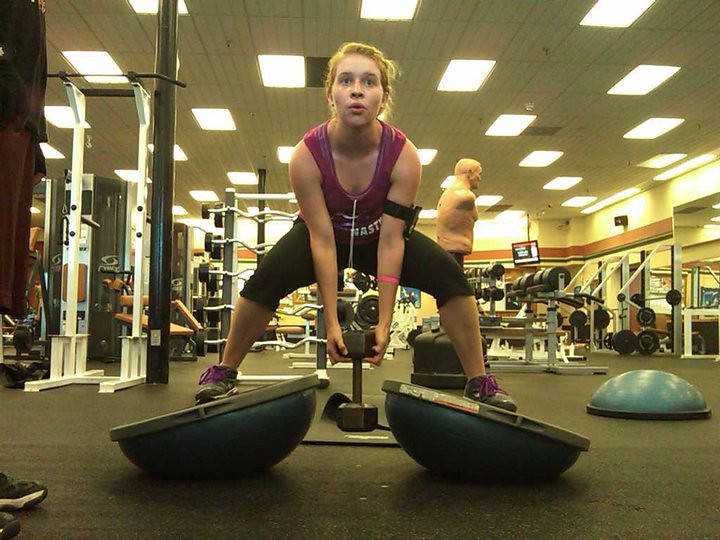
If she were juggling a pair of chainsaws while standing on the BOSU balls I could see myself giving a nod of approval.

I used to scoff at any coach or trainer who had the audacity to have his or her client leg press instead of squat.

Roll my eyes whenever I saw leg extensions or leg curls programmed.

And don’t even get me started on the gym coat rack Smith Machine.

I was a gym snob through and through. Borderline douchey. I still am to a small degree. But I’ve toned it down considerably as the years have passed.

I mean, for what it’s worth: I’ve actually been including more low intensity aerobic training in my own training (and that of my athletes), which is something I would have punched myself in the face for in the not so distant past.

I’d like to think of it as a form of evolvement on my end. More to the point, I’m not so singular in my train of thought on any given topic12 In short: I’m more open and less of a dick.

In fact, my thoughts on the topic mirror that of Bret Contreras (in THIS post):

“If there’s one movement that I absolutely loathe, it’s the “movement” that attempts to convince readers to avoid certain exercises altogether.”

Flipping the script, though, rather than waxing poetic on exercises not to do, today I wanted to instead discuss an exercise I feel is vastly underrated and underutilized.

Dare I say…most people reading should make it a point of doing it more often.

(Double) Anterior Loaded KB Front Squats


This is an exercise I’ve been using for years at Cressey Sports Performance and have always understood its benefits. I’ve used it with many beginner and intermediate lifters, and for those who feel they’re above this exercise and think they’re “too elite,” I’d defer to strength coach, Joe Kenn, who uses it exclusively with many of his NFL athletes too.

Side Note: I’d encourage you to listen to his interview on Mike Robertson’s Physical Preparation Podcast HERE.

Why I Heart This Exercise

1. I’m not an anti-back squat guy. We incorporate it – and it’s many iterations – at CSP often. I do feel there’s a cost-benefit to the exercise and that it has to be paired well to the athlete/person given their injury history, training experience, and overall goals.

Having said that, the Anterior Loaded KB Front Squat (from now on referred to as ALKBFS because I’m lazy and don’t want to type it out every time) lends itself to be a much more “back friendly” variation that most anyone can do on day #1.

The fact the load is more anterior (and not directly over the spine) seems an obvious advantage.

2. The ALKBFS elicits an almost unparalleled “core” challenge. Because the load is more anterior, one must fight like crazy not to tip over.

I.e., this is an excellent drill to help teach/coach people to maintain t-spine extension. You’ll still want to encourage a flexion moment, but because this variation encourages more extension it allows people to stay more upright.

It won’t take much to humble even the strongest back squatter. I’ve seen numerous trainees (both male and female) second guess their weight selection.

3. Moreover, for those with upper body imbalances or mobility issues – which may make back squatting difficult – the ALKBFS is great option. If someone doesn’t have the requisite shoulder abduction/external rotation ROM it doesn’t make much sense to slam a square peg into a round hole.

Of course we can utilize a Safety Squat bar, a giant cambered bar, or even have them perform a traditional barbell front squat, which makes the aforementioned imbalance moot. However, I encourage you not to disregard this movement just to be a contrarian.

4. Another reason why I like the ALKBFS so much is that it can transform or melt itself into more of a “hybrid” exercise if one so chooses.

Who’s to say we couldn’t transition from a KB clean to a squat? Or a KB clean to a squat to a press? Or a KB clean to a squat to a press to an overhead farmer carry? Or a KB clean to a squat to a press to an overhead farmer carry to sniper roll off a loading dock, Jason Bourne style?

The possibilities are endless.

You could even perform them offset style:


Give them a try today and let me know what you think.

CategoriesCorrective Exercise Exercise Technique

The Difference Between External and Internal Impingement of the Shoulder

Shoulder impingement.

Not to play the hoity toity Jonny Raincloud card, but the words themselves – shoulder impingement – is a garbage term.

It doesn’t really mean anything.

To one degree or another your shoulder is always being “impinged.” So when you or your trainer or someone with more letters next to their name (or the Easter Bunny) says “you have shoulder impingement” when your shoulder hurts, they’re not really saying anything significant and just playing the Captain Obvious card.

Thank you, that will be $149.99. Cash or credit?

Facetiousness aside, I should backtrack a bit and note that shoulder impingement isn’t a completely useless term – I mean, plenty of people still say anterior knee pain to diagnose, well, anterior knee pain – it’s just, you know, mis-managed.

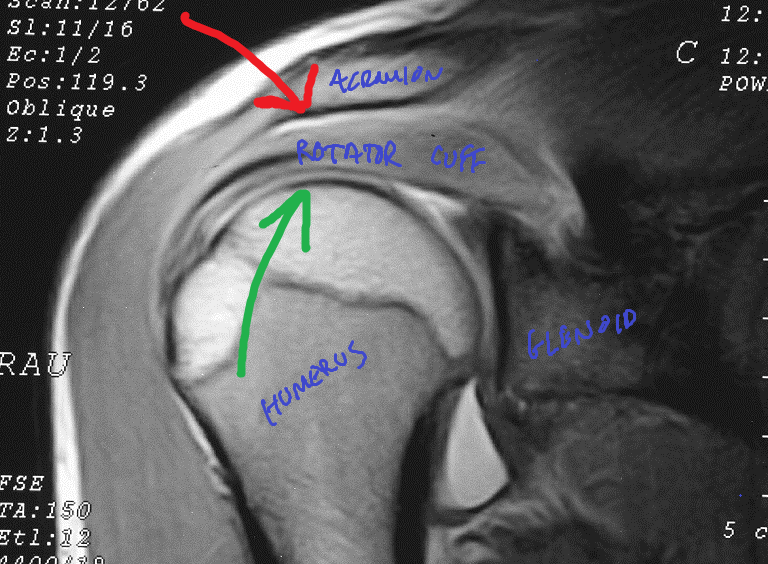
The thing about shoulder impingement is that it’s very much a real thing. Like I said, everyone lives with it. While it’s a watered down description, when people refer to impingement they’re typically referring to compression of the rotator cuff – usually the supraspinatus, and over time, the infraspinatus and biceps tendon – by the undersurface of the acromion.

[Except for when it’s not and we’re talking about INTERNAL impingement. More on this below.]

This happens all the time – even in quote-on-quote healthy shoulders. It’s inevitable. It’s anatomy.

But the degree of impingement is what we’re really alluding to here.

In other words: the rotator cuff (RC) gets “impinged” by the acromion due to a narrowing of the space between the two.

In (other) other words: you have an ouchie. Or, for the non-PG people in the crowd “your motherfuckin shoulder hurts!”

98% of the time this type of impingement results in bursal-sided rotator cuff tears, and as Eric (Cressey) has noted on numerous occasions “happens more with ordinary weekend warriors and very common in lifters (not to mention much more prevalent in older populations).”

The thing that irritates me is that telling someone they have a shoulder impingement – assuming there’s pain present – doesn’t speak to the root cause of why their shoulder is flaring up in the first place.

Is it structural?

Tissue quality?

Lack of mobility somewhere? Relative stiffness elsewhere?

A programming flaw?

They wore green on a Thursday?

Moreover there are different kinds of impingement (external and internal; and the former has different categories: primary and secondary) which manifest in different ways, in different populations, and will require different approaches.

It’s beyond the scope of a blog post to peel back the onion on everything related to shoulder impingement – for that you may want to check out Eric Cressey and Mike Reinold’s Functional Stability Training series. But I did want to take some time to provide some information and help any trainers or coaches or anyone in the general population reading be able to differentiate between the different types of impingement and the mechanisms behind them.

External Impingement (AKA: Meatheaditis)

This is the one that’s relevant to most people reading, and the one we’re discussing when referring to anything related to the rotator cuff being impinged by the acromion via bursal-sided impingement.

Here someone can usually point to pain on the front of the shoulder and things like overhead pressing, bench pressing, and approximation hurt.

In addition to pain during those activities, another way we can distinguish if it’s (most likely) external impingement – is by implementing two simple screens.

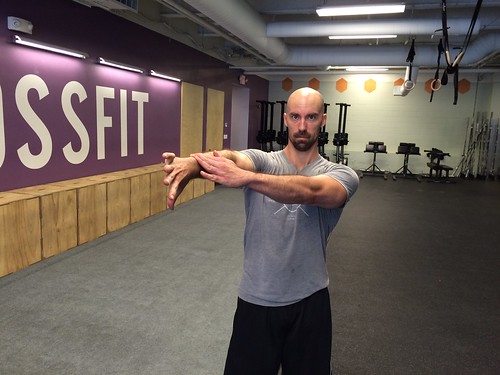
FMS Impingement Clearing Screen

This is the exact screen the FMS uses to “clear” someone for impingement. Place palm of one hand on opposite shoulder and, without allowing your palm to come off the shoulder, lift your elbow.

Empty Can Provocative Screen

Place one arm in scapular plane thumb facing down and gently press down with other hand.

Pain with either of the two?

I’d seek out a reputable health professional to do a little more digging.

Read (NOTE TO PERSONAL TRAINERS AND STRENGTH COACHES): you’re not diagnosing anything. These are screens. Nothing more, nothing less. It’s information.

Also, on more of a side note: the empty can screen should NOT be used as an actual exercise. It’s a provocative test (placing people into impingement), used to ascertain if pain is present. Why anyone would use this as an actual exercise is beyond me.

That’s like saying, “Oh, banging your head against a wall hurts? Lets do more of it!” 

Anyhoo, like I said those are two very easy screens you can add into your arsenal to help gather information.

But this still doesn’t speak to WHY someone may have external impingement. And here’s where things get even more interesting.

Primary External Impingement

This can be considered more of a morphological/structural issue (and as it happens, what we have less control over).

Ever watch some old-timers train and they’re able to perform endless sets of overhead presses, upright rows, and bench pressing without their shoulder(s) ever hurting?

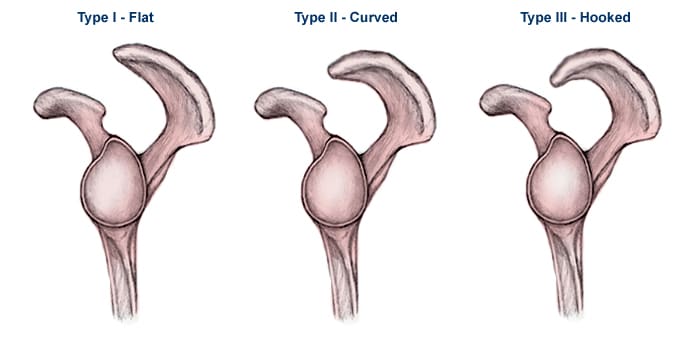
Most likely it’s because they have a Type I acromion.

Then there’s you, who just thinks about upright rows, and your shoulder flips you the middle finger. You may have a Type II acromion (more narrow space).

Outside of an x-ray (and surgery) this is something you’re never really going diagnose and solve. But it can speak to how you’d alter your programming to better fit your anatomy.

Secondary External Impingement

This is where the rest of us live and plays into more lifestyle factors. This is more or less things we have control over.

Things like poor scapular positioning (too depressed, too elevated, too abducted, too adducted, all of which affect upward/downward rotation), poor T-spine mobility, poor tissue quality, poor exercise technique, rotator cuff weakness, unbalanced programming, lack of lumbo-pelvic hip control, stiff/shorts lats, inefficient breathing patterns, and host of other factors can come into play here.

Here’s where it’s the trainer’s or coach’s job to figure out which of these is the culprit (often it’s a number of them).

Internal Impingement

Unless you’re involved in overhead athletics, chances are you don’t have this.

With internal impingement someone with describe it as “inside” the joint and will generally point towards the back of the shoulder. Too, it will typically only hurt when they’re in excessive external rotation (think: cocked back/lay-back position for a pitcher).

As Mike Reinold notes: “as you move into humeral external rotation, the more aggressive it is, the more likelihood one will feel a pinching sensation towards the posterior-superior aspect of the glenoid.”

This basically alludes to the “inside” feeling described above.

Internal impingement deals with more of the ARTICULAR side of the rotator cuff, and specifically refers to the contact between the articular side of the supra/infraspinatus and the posterosuperior rim of the glenoid.

The more external rotation (lay back) one goes into, the more internal impingement will arise

And, as Reinold notes, “we don’t get internal impingement from sitting at our desks. It happens when people use their arms in an extreme abducted & externally rotated position.”

So, in short: unless you’re throwing a baseball during your lunch hour (or fighting centaurs13, you don’t have internal impingement.

Regardless in this scenario we’d want to place a premium on addressing scapular position (improve upward rotation), as well as address any shoulder instability. Overhead athletes are notorious for having super lax shoulders, so anything we can do to improve that – rhythmic stabilizations – would be ideal. That, and make sure they perform exercises like push-ups and row variations correctly.


And That’s That

Whew, I hope that all made sense. Like I said this wasn’t meant to be an all-encompassing diatribe on everything shoulder impingement, but I hope I was able to get you out of the weeds a bit on the topic.

Oh, And There’s This

This post is just the tip of the iceberg in terms of all the things I cover as part of mine and Dean Somerset’s Complete Shoulder and Hip Blueprint:


We discuss and breakdown anything and everything as it relates to shoulders and hips, obviously. Including but not limited to anatomy, assessment, corrective exercise, performance training, programming, etc, in addition to analyzing World of Warcraft strategies. Because, nerds rule.


Complete Shoulder & Hip Blueprint HERE.

CategoriesCorrective Exercise Exercise Technique

Rotation Helps Improve SI Joint Pain: A Doctor Even Says So!

Today’s guest post comes courtesy of Dr. Erika Mundinger14, who’s presentation on how to deal with SI joint pain (specifically how ROTATION can help!) at The Fitness Summit a few weeks ago really impressed me.

I asked if she’d be willing to help me out while I was away, and she was more than happy to oblige. 

Enjoy!

A couple of years ago, a fellow physical therapist at the clinic where I work asked with a quizzical and concerned look, “What do you think of that Jefferson deadlift everyone is doing at your gym? Lifting and twisting?” My response evoked an even more quizzical look — that in my four years coaching the Jefferson deadlift, I had yet to see someone get hurt.

Now I know that a PT saying it’s OK to lift and twist is bold and brazen. But lets be clear, I’m NOT saying this:


What I am saying is that I’ve seen rotational movements, when trained properly, actually help clients and spine patients get out of pain.

When I see clients and patients with a back injury that results from twisting it’s not necessarily because they were twisting in the first place. Often it’s because they were trying to twist, bend, or reach into a range of motion not available to them.

In layman’s terms, they were trying to move beyond their limits. So, my contention is that instead of avoiding rotation in training, we can find safe ways to use rotation to help get people out of back pain — and potentially prevent back pain at all.

So since we naturally move in to rotation why would we not want to train rotation?

One clear answer is because if we lack mobility we could get hurt lifting in to rotation. But does that mean we should NEVER place a client or ourselves in to these positions? Or should we start training rotation so that when they find themselves in this position again the chance of getting hurt is minimized?

I vote for the latter.

Lets back up for a moment and take a look at how the spine and pelvis move together. When you move for day-to-day functional activities, are you moving in singular, robotic motions? When you squat down to pick up something off the floor are you assuming the same back squat position you do at the gym? Typically one foot is slightly forward, one foot back, the front foot may be more flat on the floor with the other foot raised on to a toe, and there’s a slight twist in the spine and pelvis. In fact our pelvis twists with every single motion we do.

Take a look at walking, for example, as one foot is forward and one foot backward the pelvis sits forward and down on one side and up and back on the other.

The hips, pelvis, and spine move together in a three-dimensional pattern. And as a result we have a three-dimensional system that stabilizes our pelvis as our joints bend and rotate.

Posterior Sling

The posterior sling involves the erector spinae, multifidi, and thoraco lumbar fascia. As they contract, they tilts the sacrum forward and pull upward, locking the SI joints in to place with a vertical force vector.

Posterior Oblique Sling

The posterior oblique sling involves the glute max, glute med, biceps femoris combined with the opposite lat create a diagonal force compressing the SI joint together.

Anterior Oblique Sling

The anterior oblique sling involves the external oblique, internal oblique and transverse abdominis with the oppsite adductors compress the pubic symphysis and stabilize the anterior pelvis.

If we lack mobility, or if we have a muscle imbalance in one or more of these slings, the stabilizing force of our pelvis can neither allow for mobility when we need it, nor stabilize where we need it. This causes more load to be placed on the spine and SI joints, possibly leading to injury.

Now let’s be clear about one thing: If there is a lack of mobility at the pelvis and spine, there is also most likely a lack of mobility at the hips. It would certainly be irresponsible of us to address one area without addressing the other.

However, the beauty of training rotation is that we get to address many of the sticky spots because in a 3-D system, we can’t move one without the other.

As always, if the exercise is uncomfortable, don’t do it. Furthermore, if the exercise feels great on one side but not so great on the other — don’t be afraid to train only one side. Forcing a motion on a side that feels uncomfortable will also cause injury.

Typical question: “But won’t I be uneven?” My typical response, “You’re already uneven, which is why we are now having this little chat.”

Here is an example of someone who trained Jeffersons with the intent of improving motion. Upon first attempting Jeffersons, one side felt great while the other side, well, not so much.

When looking at spine, pelvic, and hip motion we could see that an underlying scoliosis was one contributor to the problem. So he trained Jeffersons on just the side that felt comfortable. With time, as motion started to improve on that side, so did motion on the other and gradually he was able to perform the movement on both sides. The results were very impressive.

Not only did his general strength in rotational patterns improved, but so did the position of his spine. (photo reprinted curtesy https://www.dellanave.com/follow-your-body-to-better/)

So how do we do this?

Obviously if there is an imbalance, and certainly if there is a pre-existing injury, the last thing we are going to do is perform a loaded rotational movement. It is no secret that rotation places more load on the facet joints and requires more work from muscles increasing torque. But if we start with the motion itself, unloaded, or lightly loaded, with modifications were necessary, we build a solid platform on which progression can occur.

More Rotational Deadlifting


As Tony mentioned in a previous post, rotational deadlifts challenge the transverse plane of mobility, not to mention help fire up those oblique slings we use for diagonal stability. But what if it hurts to this, or you don’t have mobility to do this?

The above video is a great modification for beginners of this motion or those who have some trepidation in approaching this movement.

Valslide Curtsy Lunges


Don’t feel limited to rotational picking-up of things. Rotational lunges also provide a great opportunity to gain motion, not to mention they are a good butt burner.

After I taught this exercise at the Fitness Summit, a comment I received a lot via email/text/twitter from the attending trainers was “My clients love to hate this motion.” They love it because it feels so good, but hate it because the glutes are on fire, but then love it again because the glutes are on fire.

I have seen those with SI dysfunction quickly relieve symptoms performing this movement, even unloaded.

And Of Course the Jefferson

This is such a great exercise because it really caters to where our asymmetries in the pelvis may be.

You can stagger your stance if deadlifting with an even stance is hard. You can reduce shearing forces on the SI joint that can occur with single plane deadlifts because ALL three slings are engaging. And it reduces torque on the spine that a conventional deadlift can create because the load is directly under your center of mass, not in front of it.

David Dellanave of the Movement Minneapolis has great coaching and training tips HERE.

Summary

Ready to start twisting?

The first step is: Don’t be afraid to play around with rotational movements. Pick some exercises you already know and like, then start by staggering the stance a bit, or add even a few degrees of rotation. Follow what feels good.

Disclaimer: These are not exercises to push through, and this is not the time to pick the heaviest weight so you can look strong or boost your ego. That will lead to trouble — trust me. There are very safe ways to do this. If done mindfully, clients can gain not only improved mobility, but overall strength within that mobility. As always, listen to pain, don’t push past your current range of motion, and start where you are, and not where you want to be.

About the Author

Erika Mundinger is a licensed Physical Therapist and a board-certified orthopedic specialist working in the Twin Cities area. She practices orthopedics and sports medicine with advanced training and practice in manual therapies, corrective and functional exercises, and treatment of spinal disorders. She works at TRIA Orthopedic Center, the Twin Cities’ premier ortho clinic, treating athletes from professional to “weekend warrior” levels as well as general orthopedics and is a member of the clinic’s Spine Team, helping to better advance patient access to professionals specialized to manage care of spinal disorders and injury.

In 2002 she received her B.S. in Exercise Science from Montana State where she was involved in exercise physiology research and outdoor sports. In 2007 she received her Clinical Doctorate in Physical Therapy at the Mayo Clinic. She will receive a board certification as an Orthopedic Specialist in March 2015.

Mundinger is also an active member, coach, and physical therapist at the Movement Minneapolis and is trained in the Gym Movement Protocol. She actively applies this biofeedback training with clients and her own patients. She also works with several trainers outside of the Movement to help bridge the gap between physical rehabilitation and returning to fitness and recreation.