CategoriesAssessment Exercise Technique

What We’re Really Saying When We Discuss Breathing

I read a recent article by my good friend, Jordan Syatt, on the Personal Trainer Development Center’s website titled No One Ever Got Better Solely From Diaphragmatic Breathing Exercises and I liked it for two reasons:

Photo Credit: Shawn Rossi

1. It’s a message that needed to be said. Breathing drills (and to be more specific, diaphragmatic breathing drills) aren’t going to add 50 lbs to your deadlift, nor improve your vertical jump, and they certainly aren’t the “x-factor” when it comes to improving one’s sex appeal.

Last time I checked no one ever thought to themselves, ” Whoa, that’s one sexy Zone of Apposition goin on there. I need to get naked with that person, like, right now!”

I’m sure there’s someone out there with some sort of creepy ribcage/thorax re-setting fetish, but for the sake of argument lets just agree that breathing drills won’t land you on the cover of People Magazine anytime soon.

2. Jordan gave props to Cressey Sports Performance in the article. What what!

There’s no denying that “breathing” is all the rage right now – especially in the fitness industry. And more to the point, there’s no denying that the peeps over at the Postural Restoration Institute (PRI) are leading the charge.

Funnily enough: while the breathing hype has gained momentum in the last 2-3 years, PRI has been around for DECADES. I guess it just goes to show there’s a tipping point for everything.

I wrote a post a few months ago calling some trainers out who go a little too far down the PRI rabbit hole. I highlighted the fact that I like PRI; I use PRI; I just feel it’s crippling many fitness professionals who take it too far.

One of my biggest pet peeves is when trainers and coaches forget that they’re trainers and coaches and stop training their athletes and clients. Instead they start treating them, which isn’t their scope of practice in the first place. Worse is that their clients rarely (if ever) get a training effect!

I’m sorry but if your client is 30 lbs overweight or just interested in going to a Bootcamp class, they don’t need to be breathing into a balloon for 20 minutes.

Having Said That…..

At CSP, because we work with a lot of athletes who live in a constant state of (spinal) overextension, in addition to general fitness clients who come in with a wide variety of movement dysfunctions, we have found that these drills are a nice fit for our demographic. It’s borderline voo-doo(ish) how much improvement we can glean – both from a postural standpoint and pain reduction standpoint – from having someone focus on their quality of breathing for a few minutes.

There’s a bit of self-auditing required, though. I.e., It’s not going to be an ideal fit for some coaches and trainers.

Take for example a trainer who, while attended mine and Dean Somerset’s workshop in LA last weekend rolled his eyes and made the off-handed comment, “if I did this stuff with my clients, I’d be fired” as I was taking the attendees through a few drills.

1. No shit Sherlock! If the bulk of your clients are celebrities more interested in shadow boxing and looking good for the camera, then of course you’re not going to place a premium on alignment and how breathing mechanics play a role in improving it.

2. So, yeah, placing some emphasis on breathing and breathing mechanics isn’t a good fit depending on who you work with.

Thanks for the insight, dick.

I’ve stated this in the past, but it bears repeating here: GETTING PEOPLE STRONG IS CORRECTIVE!!!!!! This happened to be the larger point I was trying to make which said trainer seemed to overlook. Or maybe he missed it because he was too busy texting on his phone the duration of my presentation.

Okay, okay….not a big deal Tony. You know, people are busy and need to keep in touch with their clients. It’s not th end of the wor…….GODDAMMIT!!!!!! [punches wall].

Why I stress this point is important, because when I do talk about breathing drills and how we incorporate them with our athletes and clients at CSP (regardless of sports played, injury history, and postural imbalances), it’s important to understand that it takes up roughly 2-5% of the total training volume.

That’s it.

Call me crazy, but that’s a pretty awesome minimal investment of time given the profound effects it can have!

Which begs the question: What effects DOES it have?

From my perspective here are a few bullet points.

NOTE: a MAJOR shout out to Michael Mullin, ATC, PTA, PRC, Mind-Jedi Level II for much of what follows. He’s visited the facility a handful of times to enlighten the CSP staff on some PRI basics.

1. Airflow drives the nervous system. More importantly, the respiration you learned about in school is gas exchange. BREATHING is movement.

2. Taking this a step further, much of the advantage of the PRI approach – and why addressing breathing patterns is important – is that it leads to better outcomes for clients and athletes. Teaching and grooving more efficient breathing is every bit as important as teaching and grooving a proper hip hinge or squat pattern.

3. People who present with a more scissor posture will have a harder time recruiting and using their diaphragm.

In short, the diaphragm is kind of a big deal, and because many of us are locked into a scissor pattern in conjunction with a left rib flare – what PRI refers to as a Zone of Apposition – we have a hard time breathing correctly.

Ideally the diaphragm will act as a superior and inferior “canister,” descending/compressing when we inhale and elongating/doming out when we exhale….which in turn provides optimal stability up and down the kinetic chain.

Unfortunately, due to the aforementioned scissor posture (to the far right in the pic above), we tend to see more anterior translation of the diaphragm locking us into more extension, which in turn doesn’t allow it to perform optimally.

For the more visual learners out there, here’s how the diaphragm should work:

4. All of this to say: these drills help to “encourage neutral.” The body WILL NEVER by symmetrical due to our anatomy, but when someone lives in extension these drills help to get someone closer.

5. Likewise, the brain wants efficiency and will do whatever it takes to get you there. If you watch how most people stand, they’ll revert to what’s known as a Left AIC (Left Anterior Interior Chain) stance, like this….

The right side of the pelvis will be more internally rotated and ADD-ucted and the left side will be more externally rotated and AB-ucted. This, too, causes all sorts of wackiness and effects posture all up and down the kinetic chain. PRI helps to address this and tries to “encourage neutral.”

6. Lastly, if nothing else, the real benefit to all this is that it helps people to chill the eff out.

Exercise drives the sympathetic nervous system and put people on “alert.” I like to incorporate basic breathing drills to engage the parasympathetic nervous system and help people to tone it back down closer to homeostasis.

In addition, anecdotally, so many people are type-A, live in a sympathetic state, and are always “switched on” that they’re unable to relax. Breathing helps to turn on the parasympathetic nervous system and allows people to smell the roses so-to-speak.

There’s obviously A LOT more to all of this and I’m only scratching the surface with this post. It’s a topic that requires a bit more time (and I encourage you to seek other resources if it interests you). That said, everything I alluded to above hits on a few BIG ROCK points that I hope resonates with everyone.

Whether it’s a good fit for YOU and YOUR clients is a discussion that needs (and should) to be considered. In the end, like anything….it depends

CategoriesExercise Technique

How to Improve Tension In the Deadlift

My former editor at T-Nation, Bryan Krahn, used to cringe sometimes when I sent him an article. It seemed every other article I sent him would hover around the topic of deadlifts.

Top Tips to Improve Your Deadlift

Deadlifts For Mass Gains

Deadlifts For Athletic Gains

How Deadlifts Can Spice Up Your Sex Life & Are Actually An Underrated Kitchen Condiment!

Which is Better: Deadlifts or Oxygen?

Every now and then I’d get a note back…

“Dude, enough with the deadlift articles! If I have to read another word on the hip hinge I’m going postal!”

I’d take the subtle hint and lay low on the deadlift content for a few months. But inevitably I’d revert back to my old ways.

As it happens, THREE of my articles (including four of Eric’s) made T-Nation’s list of 22 Most Popular Deadlift Articles.

I’m like, so popular.

I feel like I should pat myself on the back. It’s been a few months since I’ve written anything specific about the deadlift on this site. That’s right on par with Food Babe going a few days without fear mongering us to death and telling us drinking Pumpkin Spice will give us a third nipple or Carrie Bradshaw going more the five minutes without talking about shoes!

Alas, I’m Talking Bout Deadlifts Today

More to the point, I want to take a few moments to talk about TENSION!!!! Getting (and maintaining) tension throughout a set is one of the keys to solid deadlift technique. It’s the key to technique for A LOT of movements, but today I’m going to focus on the deadlift.

I’ve discussed this point in the past, but it bears repeating: One of the dead giveaways that someone lacks tension during their pull is if 1) their upper back rounds1 and 2) their hips come up too early.  Like this:

In both scenarios I’ll almost always attack lat activation/engagement and upper back tension.

With regards to the lats I’ll approach it in a few ways:

1. I’ll have the lifter assume their starting stance in the bottom position and then kinda poke a prod their armpits/lats and tell them to “get tight/stiff here.” That’s pretty easy. Hopefully they’re not too ticklish.

2. Once I have that, I’ll then tell them to “pretend like you’re squeezing an orange in your armpit during the entire rep and you’re trying to make orange juice.” Again this helps to fire the lats more effectively (external cues usually work a lot better than internal cues), which in turn helps transfer force more efficiently as well as provide a ton more spinal stability.

If neither of those two cues work, a simple drill I like to use is this:

Band Lat Activation w/ Hip Hinge

NOTE: with beginners with poor kinesthetic awareness, before I have them touch a barbell I’ll start them off with this drill so I can kill two bird with one stone. I’m getting to feel what it’s like to engage their lats WHILE grooving a hip hinge.

With regards to the upper back there’s a little more to things than just telling someone to “get your back tight!” Moreover, some lifters make the mistake of literally pinching their scapulae (shoulder blades) together in an effort to get “tight.”

This is wrong. And will actually work against you.

Instead I’ll tell trainees to “set their shoulders,” and to think about placing their shoulder blades in their back pocket. What this does is posteriorly tilt the scapulae (NOT retract). Retracting the shoulder blades makes your arms shorter which will make it harder to get to the bar.

Additionally, the preferred cue helps to elicit more upper back tension.

Watch this video to see what I mean:


CategoriesCorrective Exercise Exercise Technique Rehab/Prehab

Stretching Isn’t Always the Answer: 3 Common Mistakes

I’m an avid reader. At any given time I’m reading 3-4 books at once. I’m always working my way through something related to my field. These are what I like to call the “hafta reads.”

Meaning, I hafta read “x book” in order to stay sharp and on top of things related to my profession (HERE are some of my favs).

Not coincidentally these are also the books which (sometimes) take me F.O.R.E.V.E.R to get through, which shouldn’t come as a surprise. Topics like humeral anterior glide syndrome or the Patheokinesiologic model of movement doesn’t make for light reading.

In addition I like to read a fair amount of non-fiction, particularly self-improvement books or books on behavioral economics. As you can surmise, I’m always the life of the party!

I have a 40 minute commute to and from work each day, so I’ll also be working my way through a book from Audible.com, assuming I’m not listening to ESPN or EW Radio.

And like any true nerd I’m always game for a good piece of fiction, particularly science-fiction.

I started reading The Martian by Andy Weir two days ago, and I cannot put it down. Without giving away too many details it’s about astronaut Mark Watney (who’s sense of humor given his circumstances is impressive) and how his crew was forced to evacuate the planet while thinking him dead.

Only he’s not!

Mark is stranded on Mars’s surface with no way to signal Earth that he’s alive. OMG I’m biting my fingers nails as I type this!

It’s sooooo good. And not for nothing, is currently being made into a movie starring Matt Damon and Jessica Chastain and directed by Ridley Scott.2

As is the case every time I read something, I try to find parallels between what’s being written and how I can apply a certain theme or idea to what I do as a coach.

If you can believe it, I found something.

The Martian is about a guy who’s stranded and alone on a desolate planet. I, along with many of my colleagues, often feel stranded and alone when it comes to going against the grain on some common fitness myths and fallacies.

Take for instance……..stretching.

Ever notice how everyone has tight hamstrings or tight hip flexors? Also ever notice how having “tight hamstrings” (and stretching them) is the answer for everything?

Low back pain? Tight hamstrings.

Your butt “winks” at the bottom of a squat? Tight hamstrings.

Chronic hamstring strains? Tight hamstrings!

Bad hair day? It’s tight hamstrings, yo!

Facetiousness aside, this isn’t to imply that there aren’t people out there who have short or stiff hamstrings (or short and stiff anything). They do! Likewise, by all means, there are millions of people who could benefit from stretching those sons-of-bitches, and could benefit from some additional stretching in general.

There’s no denying the many advantages that static stretching provides. I’m not hatin. Although, I’d be remiss if I didn’t state that how most people stretch (and for what length of time they stretch) really does nothing other than increase the tolerance to the stretch.

I.e., you’re not “lengthening” anything.

In order to increase the length of a muscle you need to either 1) lengthen bone (um, ouch!) or 2) in the case of someone who truly presents as short or stiff, increase the total number of sarcomeres in series (which takes a metric shit-ton of stretching).

Ask physical therapist Bill Hartman how long someone really needs to stretch in order to have a significant affect and/or to add sarcomeres, and he’ll tell you the starting point is 2-3, 10 minute holds per day. Working up to 20 minute holds.

That cute 30-second “stretch” you’re doing isn’t really doing anything.

However getting back to my original point, I do find the default suggestion of telling someone to “just go stretch” is a bit overused. While a great piece of advice for some people, it could be a nightmare for others and the exact reason some people remain in pain and never see much improvement(s).

And it’s with that I’d like to highlight some common stretching mistakes and misconceptions.

1. Are You “Tight” or Just Out of Whack?

You’d be surprised how often it’s the latter. Simply put: most people aren’t so much tight as they are misaligned.

It goes back to something physical therapist and strength coach, Mike Reinold, brought up in casual conversation not too long ago.

Which is more important to hammer first: stability or mobility?

Those trainers and coaches who swing on the stability side of the pendulum tend to be the overly cautious type who have their clients stand on BOSU balls.

Those on the mobility side snuggle with their copy of Supple Leopard every night.

Neither approach is inherently wrong so much as they’re flawed (if haphazardly assumed as “correct” for every person, in every situation).

If you strengthen (stabilize) in misalignment you develop imbalances. If you stretch (mobilize) in misalignment you develop instability.

Take someone who presents with excessive anterior pelvic tilt. It’s not uncommon for said person to complain about constant “tight” hamstrings, and no matter how often they stretch them, they stay tight.

You would think that after weeks, months, or sometimes even years of non-stop “stretching” they’d see some improvement, right?

Wrong.

The reason why they feel tight all the time has nothing to do with their hamstrings, but rather pelvic positioning. Unless you address the position of the pelvis – in this case, excessive anterior pelvic tilt – you can stretch the hamstrings until Taylor Swift writes a song about not being broken up with (<– not gonna happen), and you’ll never see improvement.

Think about it this way: in this scenario the reason why the hamstrings feel tight is because they’re lengthened and firing on all cylinders. By stretching them you’re just feeding into the problem in the first place!

We could easily chalk this up to the classic Lower Cross Syndrome as popularized by Dr. Vladomir Janda and stretch what’s tight (hip flexors, erectors), and that would be a step in the right direction. Cool.

But I feel for most people that’s not going to solve the problem and raises another issue altogether (which I’ll discuss below).

For most people the bulk of their efforts should revolve around including more things which encourages posterior pelvic tilt. Things like…..

Posterior Pelvic Tilt Hip Thrust

Cueing PPT When Squatting and Deadlifting

Reverse Crunches

Deep Squat Belly Breathing w/ Lat Stretch

** Oftentimes the lats are stiff/short and pull people into more of an extension posture. This breathing drill helps to turn off the lats while also cueing PPT.

https://www.youtube.com/watch?v=SndY5ctyU8U

2. You’re Doing It Wrong

You know how I said above that performing hip flexor stretches (stretching what’s tight) may be beneficial but that it brings up another issue altogether.  No? Oh, you skipped that part? Well, FML!

Let me repeat:

We could easily chalk this up to the classic Lower Cross Syndrome as popularized by Dr. Vladomir Janda and stretch what’s tight (hip flexors, erectors), and that would be a step in the right direction. Cool.

But I feel for most people that’s not going to solve the problem and raises another issue altogether (which I’ll discuss below).

Stretching the hip flexors is fine and dandy, and a good idea…..assuming you’re doing it correctly.

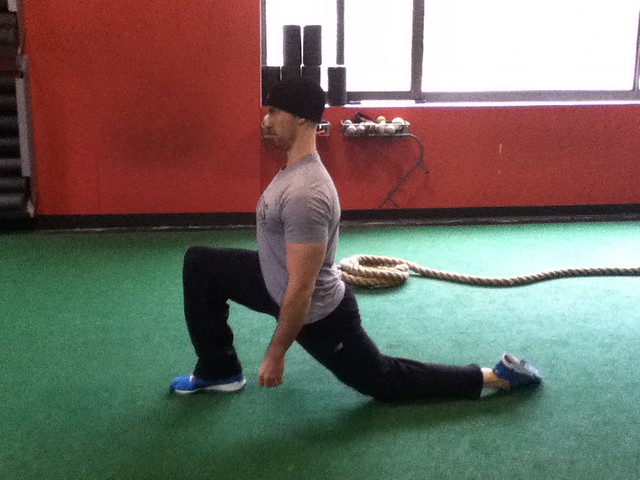
Here’s how most people stretch their hip flexor, though:

Most aren’t cognizant of pelvic positioning and just go into MORE anterior pelvic tilt and end up hanging on the ligaments of their lumbar spine. This is NOT a hip flexor stretch, and I’d argue is doing more harm than good.

Instead, I coach people to do what I like to call “doing shit right.”

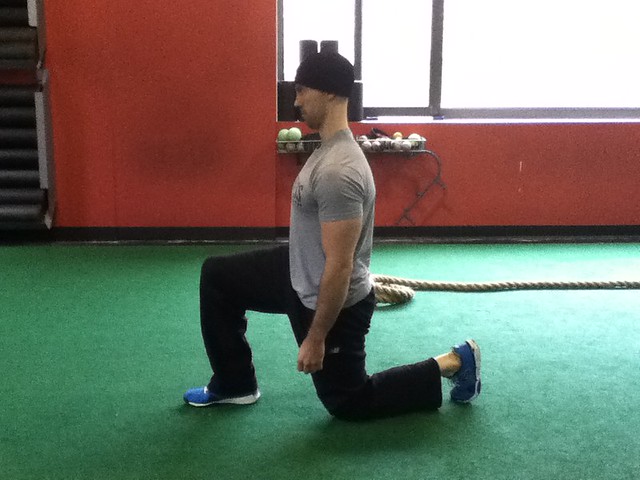
Here’s how you perform a proper hip flexor stretch:

– In the half kneeling position, think chest up.

– Dig the toes of your trailing leg into the ground (toes point into the floor).

– On that same side, squeeze the glute of the trailing leg…..HARD!!! This will posteriorly tilt the pelvis. This cue alone will DRASTICALLY increase the effectiveness of the stretch.

– From there, without cranking through the lower back, gently shift your weight forward a few ticks. It won’t take much. The idea here is to move into a “deeper” stretch through the hip joint itself and not the lumbar spine. SQUEEZE THAT GLUTE!!!!

If you’d like to up the ante, because the rectus femoris crosses two joints – the hip and knee – you can place one hand on the wall for support and reach back and grab the ankle of the trailing leg with the other hand and perform the stretch in that fashion. Honestly, though, most will feel plenty enough of a stretch without doing that.

3. Are You “Tight” or Just Unstable?

I posted this Tweet the other day:

This sorta mirrors my comments above – when discussing alignment – but deserves a bit more love here.

I can’t tell you how many athletes (particularly baseball players) and even general fitness clients I’ve assessed who adamantly tell me how “tight” they are (and have been told how tight they are from physical therapists) only to pass every range of motion test with flying colors and test a 5/5 (technically 9/9) on the Beighton Laxity Score.

In geek speak it’s called protective tension.

Yet, there they are……stretching, stretching, and doing more stretching.

STOP IT!!!!

These people have so much ROM and are so unstable that the body perceives it as a threat and as a results ends up putting on the emergency breaks (your body doesn’t want you to hurt yourself!).

Muscle will hold tension in the presence of implied instability of associated joints. Muscles will relax when the implied instability of the associated joint(s) is improved.

Stretching a tight muscle without improving stability will result in a muscle that remains tight.

As classic example is the person who has a poor squat pattern due to “tight hips.” They lean forward too much, their knees cave in, and they present with all sorts of compensation patterns because they’re so tight.

Of course, they’ve been doing nothing but stretching and implementing a litany of hip mobility drills to address the problem. To no avail.

Try this: have that same person hold a 5-10 lb plate with their arms extended out in front of their body and see what happens.  PRESTO……..more often than not you’ll see a profound difference on not only how the squat looks, but how deep they can go.

Holding the weight out front serves as a counterbalance (easier to hip hinge back) and forces the anterior core to engage. Hence provides more stability.

And this phenomenon can be applied to other things as well. As Dean Somerset has noted on several occasions, “muscles do not have origins or insertions, merely anchors to bone.” The body is essentially one muscle connected by fascia. Anyone who disagrees can read Thomas Myers’ Anatomy Trains and get back to me on that.

Or you can watch this video by Dean and see how he’s able to increase one’s hip ROM by having them perform a few repetitions of planks (done correctly).

NOTE: this is the type of voodoo stuff Dean and I go over in our workshops. We’ll be in LA in two weeks.

So, are you tight or just unstable?

Is stretching always the answer?

Are you even stretching the right way? Hmmmmmmmm.

CategoriesExercise Technique Program Design

New Warm-Up: Keiser Flow

Today’s guest post is brought to you by Boston University Assistant Strength and Conditioning coach, Jill Zeller.

I started training and making cameo appearances at BU two or so years ago when one my good friends, Dave Rak, was a GA there. He left (now a S&C coach at University of Washington), and the staff at BU were nice enough to let me continue to stop by. I’m sort of like that character Milton from the movie Office Space who just continues to show up to work despite technically no longer being an employee.

Without the stapler fetish of course.

Nonetheless, it’s a beautiful facility and the staff is fantastic.

As it happens, Jill and I were discussing “flow” warm-ups recently and she had a nice idea on how to incorporate a Keiser system into the mix. I asked her if she’d be interested in writing about it, and this is what she came up with.

Enjoy!

PS: if you don’t have access to a Keiser system, no worries! You can just as easily use a standard pulley system.

In the last few years many coaches have been discussing developmental patterns that challenge people to breathe and crawl to increase their movement quality. The term Flow has been used by many strength coaches to describe a series of drills that effortlessly seem to blend together while constantly challenging the athlete to stabilize and mobilize.

Note from TG: Fun, random Tony fact (and my apologies to Jill for highjacking her article). When Lisa and I first started dating she had mentioned that one of her favorite books was Flow, written by renowned psychologist Mihaly Csikszentmihalyi. 

In it he describes the “optimal experience,” and that what makes an experience genuinely satisfying is the state of consciousness called…….flow.

During this state, Dr. Csikrerweufushjahkswqoiojfsyi describes people as typically experiencing deep enjoyment, creativity, and a total involvement with life.

Examples include people who enjoy cooking, gardening, tinkering with their car, or for the more geeky of us, engaging in a full blown Magic the Gathering marathon. Whatever the case may be, we’re in it…with laser like focus.

The day after our first date, I bought the book as a way to prove to Lisa “see? I was listening!! I like you so much that I bought your favorite book from Dr. Whateverhisnameis. We should totally make out!”

Um, yeah, that book is still sitting on my bookshelf unopened. Someday I’ll crack it open and give it a go.

This FLOW warm-up follows the ground up approach incorporating an upper body push, pull, core and lower body squat and hinge pattern.

The Ground-Up Approach

Starts with some form of diaphragmatic breathing because this is the number one pillar you need to master before any other movement. Once you can exhale longer than you inhale, push your rib cage down towards your hips and engage your pelvic floor, you can begin.

Photo Credit: Supremedalekdunn

The first movement is a dead bug, which we all know Tony is obsessed with. It’s actually kind of creepy.

This is a supine core exercise. We start supine because if you cannot master your lumbo pelvic position supine you have no business moving into quadruped, half kneel or any other positions against gravity that offer a lesser base of support. Do 10 reps each side.

Note from TG: this ground-up approach highlights the SFMA’s 4×4 Matrix and serves as an excellent framework for customizing corrective exercise as well as programming considerations in general.

For example a 1-1 would be a supine glute bridge with a band wrapped around the knees (for proprioceptive feedback). A 4-4 would be something like a traditional squat or deadlift.

While rules are always meant to be broken, when you’re dealing with clients or athletes who exhibit stability/motor control dysfunction, the 4×4 Matrix acts as a foundation for addressing things through progressive postures, loads, and reflex activation.

NOTE: full video demonstration ALL the moves below.

From supine we have a smooth transition into the next core drill….Side Plank Row.

This is anti-lateral flexion exercise compounded with a one-arm horizontal pull. This is stability, mobility and strength in one exercise. The whole kinetic chain is working as you stabilize your core and row with your top hand using your rotator cuff muscles and rhomboids. Repeat 10 each side.

We progress into the quadruped position for Bird Dogs.

Bird dogs are a level harder than a dead bug because they challenge the base of support through your anti-rotary muscles and lumbar stabilizers. Repeat 10 on each side with a one second pause at end range without any lumbar movement. (Ladies: Make sure you’re far enough from the keiser that your pony tail doesn’t get caught in it..Just saying).

In the tall kneel position we transition to doing a One-Arm T with a Press. The tall kneeling position challenges our lumbo-pelvic position. The T forces us to have proper scapula stability and abduction. After abduction we add another horizontal press for an extra anti-rotary component.

Do 10 each side.

From a tall kneeling position we narrow the base of support to come into a ½ kneel position or an in-line position. To reiterate, it’s important to be cognizant of where our diaphragm and pelvis are in this position. Are we locked in?

Here we perform an anti-rotational press, the Pallof Press. Do 10/side.

We are finally approaching a standing position.

Hold the keiser handle at belly button height and have the athlete squat. By holding the keiser distal from your body you’re slightly pulling your thoracic position into flexion so you have to use your core stabilizers to maintain proper spinal alignment through a squat pattern.

Do 10 Core Engaged Keiser Squats.

The last exercise is a Single Leg Deadlift to Row. This teaches the hip hinge in a unilateral fashion. It’s a great regression when teaching an SLDL because the tension on the keiser allows you so sit back into the hip on the ground while extend and slightly internally rotate the hip moving through the sagittal plane. At the top we row to exaggerate hip extension upper body pulling.

The objective of this warm up is to go through many movement progressions within one seamless action. I.e., flow.

Athletes can appreciate the difficulty of each movement tier but still see the final outcome. (A standing position).

Lets See the Whole Thing in Action!

Repeat this twice and you have completed numerous core exercises, two upper body pulls, two upper body presses, one unilateral, one bilateral, a squat pattern, and a one leg hip hinge pattern in about 5-10 minutes.

You’ll definitely break a sweat and be more prepared for your subsequent training session. Plus, it serves as a nice change of pace and breaks up the monotony of most warm-ups. Give it a try today and let me know what you think in the comments section!

About the Author

Jill Zeller is an Assistant Strength and Conditioning coach at Boston University as well as one of the Head Strength and Conditioning coaches at Mike Boyle Strength and Conditioning.

She loves to deadlift. And give high-fives.

You can check out Jill’s Facebook page HERE, and follow her on Twitter HERE.

CategoriesExercise Technique Exercises You Should Be Doing

Exercises You Should Be Doing: Core Activated Deadbug w/ KB

I know for some reading, the idea of reading another post on deadbugs is about as exciting as watching paint dry, or worse, listening to Taylor Swift’s new album. I can commiserate to a degree.

I can hear the cries now:

“I mean really, deadbugs? Come on Tony, I thought you liked to lift heavy things and stuff?! Deadbugs are for pencil necked personal trainers who like to pretend they’re physical therapists and masturbate to their NASM workbook.”

Photo Credit: Studio 950

First off: ^^^^^ Those aren’t the deadbugs I’m talking about. Not to mention, for all I know these bugs are still alive. Cool pic though.

Second: That’s just mean. I’d never say anything like that quote above, or make that sort of correlation or accusation! Maybe 83% of the time. But outside of that, never.

Third (and most importantly): there’s a reason why I continue to sing their praises.

Deadbugs (and in the same ballpark, Birddogs) Work! Like, A lot

Just ask the group of coaches Dean and I took through the gauntlet this past weekend. I think 100% of them had a new found appreciation for how challenging the two can be. When done correctly.

I’m not going to reinvent the wheel. I already wrote an extensive post on deadbugs HERE that you can check out. Namely, I go into a bit more detail on their benefits and demonstrate where most people go awry in their execution.

I’ll give you a hint: back position and BREATHING!!!

And to toss another talking point into the fire: we can break breathing down into two separate categories. How I teach someone to breath as it relates to force development and performance (sympathetic activity) is 180 degrees the polar opposite compared to how I go about coaching someone to breath for stability, alignment, and relaxation (parasympathetic activity).

This is something I plan on delving a bit more into at a later time. There’s a ginormous onion to peel back with that discussion!

Stay tuned.

Photo Credit: postbear

Nevertheless, I wanted to share a new deadbug variation that I came across recently that I think you’ll all enjoy.

Core Activated Deadbug w/ KB

Who Did I Steal It From: Crossfit Coolidge Corner coach, Andrea Rodgers

What Does It Do: Assuming you’ve got your deadbug technique down like a boss (for the love of god, just read THIS), this variation serves as a nice progression to further engage the core, which in turn helps to encourage more posterior pelvic tilt, but also adds a nice scapular stability component into the mix as well.

Key Coaching Cues: It’s important to start from the fetal position as shown in the video to help get the KB into place. Using a lighter load won’t be that much of a deal breaker – I don’t care how you get the KB into place – but the heavier you go, the more likely you’ll put undue stress on the shoulder (especially anteriorly) if you DO NOT start on your side and roll to your back.

I know it seems borderline nit-picky, but it does make a huge difference.

The arm holding the KB should be locked and in a straight line (be cognizant not to hyperextend your elbow).  You don’t need to “pack” your shoulder per se, but rather just think about “setting” it in place (scapular posterior tilt). Knuckles should be flush to the ceiling to ensure a neutral wrist position.

From there you’ll perform your standard deadbug keeping the arm holding the KB in place and lowering the same sided leg and contralateral arm. As always, be sure to keep the lower back against the floor, inhale before you start (both your belly AND ribcage should move), and then exhale your air as you lower your limbs.

Once fully extended – your lower back should still be flush against the floor – the heel of the lowered leg should “hover” an inch or so off the floor, and you’ll hold that position for a 2-5s count.

Return back to the starting position, inhaling as you do so, and repeat for a total of 5-8 repetitions. Perform the same process on the opposite side.

Give it a try today and let me know what you think!

CategoriesExercise Technique Program Design

Cueing Posterior Pelvic Tilt When Squatting and Deadlifting? Have I Gone Mad?

One of the more popular cues trainers and coaches use when teaching the squat and deadlift is to arch the lower back….hard.

There’s a legitimate reason why, too. Squatting and deadlifting under load (consistently) into lumbar flexion is a major no-no, and usually results in any number of lower back dysfunctions and injuries. All someone has to do is open up either one of Dr. Stuart McGill’s seminal books on the topic – Low Back Disorders or Ultimate Back Fitness and Performance – to be slapped in the face 10x over with research study after research study proving this point.

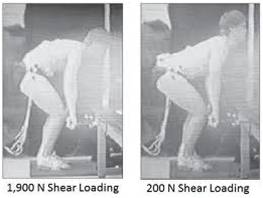
Cueing someone to avoid (loaded) flexion and to arch their back while squatting and deadlifting engages the muscles of the back – erectors, iliocostalis, longissimus, multifidi – which not only helps to both stabilize and strengthen the spine, but also aids in offsetting and drastically reducing shear force.

It’s a hard to debate this point and has long been accepted as the “correct” way to cue proper form and technique.

However, the fitness industry runs on a perpetual pendulum of extremes – the middle ground is for pansies – and if doing “x” amount of something is good then doing even M.O.R.E of “x” must be really good. Weeeeeeeeeeeeeeeeeeeeeeeeeeeeeeeeee.

Arching the back is fine.  Excessively arching the back, long-term, not so much. Just like we would shit an EMG study over excessive spinal flexion, excessive spinal extension is just as deleterious and detrimental to the spine.

In extreme cases:

Repetitive, excessive spinal flexion = disc herniations

Repetitive, excessive spinal extension = end plate, pars fractures.

It’s no coincidence we’ve seen the rise of things like Spondylosis, Spondylolisthesis, and other extension-based dysfunctions in the fitness and athletic realms – in both young and old(er) populations.

In younger populations a large portion of the blame can be pointed to more and more kids being less active, ill-prepared, and/or specializing in one sport too soon (pattern overload).

In older populations the blame can be directed towards some of the same culprits, albeit I’d also argue a major monkey-wrench is how we as coaches and trainers have been cueing our athletes and clients for the better part of a decade (if not longer) into OVER-arching during their squats and deadlifts.

It’s great for lifting a metric shit-load (a shade more than a metric boat-load) of weight, but not so great for long-term back health.

In the video below I break down why cueing more posterior pelvic tilt (in addition to owning your rib position) during squats and deadlifts may be more advantageous in the long run. Remember: All we’re trying to do is encourage people back to “neutral,” from an excessive extension pattern, and to own that position during their lift(s). So, instead of thinking of it as “arch and sit back,” it should be “find neutral, set/own ribs,bace, and sit down.”  I think this not only has merit with regards to back health, but performance as well. Give it a looksy.

Side Note:  Eric Cressey discusses the same concept (in more detail) in Functional Stability Training for the Lower Body if you want to dive more into the topic.

Cueing Posterior Pelvic Tilt During the Squat and Deadlift

CategoriesExercise Technique Program Design Strength Training

Q&A: Does Age and Heavy Training Take a Toll on the Spine?

As you can imagine I get a lot of emails on a daily basis.  I get emails from friends, colleagues, clients, Nigerian Princes wanting to give me all their money, and I also get a fair number of emails from people I don’t know asking me any number of health and fitness questions.

Below is a question I received the other day which I had never received before and something I felt I could elucidate on here in more detail (while at the same time helping others who may have the same question).

Q: Can people squat and deadlift because they have strong backs, or do they have strong backs because they squat and deadlift?

After squatting and deadlifting for the first time in 8 years, I found that my back (lower and thoracic) is by far the weakest it has ever been – it holds my numbers back substantially and if I push just a little too hard, my back feels like its about to go.

Not only that but my back stays incredibly tight the following days.

Prior to this hiatus, I was almost bullet-proof and could do nearly everything without pain. I’ve since had chronic tightness in literally every muscle, but switching to unilateral lower body movements resulted in a dramatic training difference with no after pain or tightness.

I may have my biases, but is this why I see so little older individuals continuing to squat and deadlift the numbers they used to? Or to reiterate, do those rare older individuals who squat and deadlift heavy already have strong lower backs to begin with, or did they build up this strength by squatting and deadlifting heavy?

Lastly, is unilateral lower body movements substitutes for squats when long-term joint health is concerned? Thanks!

Spencer

A: Thanks for the question, Spencer. There are a few angles I’d like to take to answer this.

1.  I kinda-sorta hit on the topic earlier this year when I wrote THIS blog post on Programming Strategies for the Old(ish) Meathead.

I’m 37 now, and while I don’t consider myself old by any stretch of the imagination – although Lisa and I love early bird dinners before 5:30 PM on the weekends, and I’m usually in bed before 9 PM – I understand that what I used to do in the gym when I was 25, and what my body was able to handle back then, no longer holds weight (<—- HA! Pun totally intended).

This isn’t to say I don’t still get after it, but I’d be lying if I said that I haven’t accumulated a few aches and pains throughout the years and that I haven’t had to “tone down” my training to a small degree.

The article linked to above taps into some of my thought process(es) with regards to programming strategies for guys who don’t feel like Batman or Superman anymore.

2. A believe a little dose of expectation management needs to be addressed here.  You mentioned that it’s been eight years since you last squatted or deadlifted with any frequency. Don’t you feel that that plays a bit of a role in the grand scheme of things?

Are the squats and deadlifts themselves to blame for your soreness and tightness? Maybe. Or should we point the finger at the eight year absence from any significant loading?

I remember back in the summer of 2008 I decided to play in an over-30 adult baseball league. I had obviously thrown a baseball here and there up to that point, but I hadn’t played competitive baseball or thrown any significant innings since the summer of 1999 and 2000. An eight year hiatus itself.

Me, circa 1999, my senior year at Mercyhurst University. I had hair back then. The good ol’ days.

On the batshit scale on which WTF “why is my arm killing me?” was measured, what was to blame more: the actual act of throwing a baseball, or the fact I took an eight year break from throwing a baseball?

I went from zero innings pitched over the span of eight years to over 70 innings pitched in one summer.

To be fair (to myself), I did hold my own that summer. I went 8-1 with an ERA under 1.00 and had over 100 Ks in those 70 innings.

Funny story:  my best game that summer was the first game after my then girlfriend broke up with me out of nowhere. I showed up to the game and struck out 20 batters in nine innings. Granted, I was probably crying on the mound during the entire game…..but my fastball was un-hittable that day!

I even tossed a no-hitter that summer. I didn’t suck or embarrass myself during the season. But by the end, my arm was hanging on a thread.

The only person to blame was myself because I didn’t do much to properly prepare myself.

It’s analogous to what you’re going through, Spencer, and what I’m sure a lot of people in the same situation are going through.

3. Barring any current injury, the body will adapt to whatever stress you place upon it.

Consider Wolff’s Law and Davis’s Law.  You can’t discount physics. The former states that bone in a healthy person or animal will adapt to the loads it is placed under. The latter states the same thing, except with regards to soft tissue.

Deadlifting/squatting = strong bones + soft tissue. You need a minimal essential strain (MES) in order for tissue to adapt. Likewise, in order to strengthen tissue, you need to load it.

Neither of the two just happen. So no, I don’t believe people “just automatically have strong backs,” therefore they can squat and deadlift to their hearts content with little ramification(s).

I do believe heavy training (which I understand is all relative) does take a toll on the spine. However, I also believe that if someone takes the time to learn and hone technique, implement appropriate progressions based off their needs and ability level, and refrain from taking eight year breaks, that they’d best set themselves up for long-term success….;o)

Lastly, as far as unilateral lower body training is concerned and whether or not that’s a more “joint friendly” substitute for squats……..it depends.

There’s no denying that performing unilateral movements will lead to less axial loading on the spine. But we could also make the case that how people squat – even when it’s not with heavy loads – can place more stress on the joints, particularly the spine and knees.

– Are you squatting with an overly rounded back? How about the exact opposite end of the spectrum: are you overarching?  Both can be detrimental.

– Are you ensuring upper back stiffness when you set up to squat?

– Are you performing more of a “quad dominant” squat or a “hip dominant” squat? With the latter, you’ll need to sit back with the hips more, push the knees out, and use more of your hips and posterior chain to perform the movement.  This can make a profound difference on not only how the squat feels, but performance as well.

It is possible to make squats more knee friendly.

All of this is not to say everyone has to squat and deadlift.

Especially the older we get.

Sometimes it just doesn’t feel good no matter how on-point someone is with their technique and programming. If either of the two movements aren’t a good fit, they’re not a good fit. It’s not the end of the world.

But I do know plenty of people older than myself who are still deadlifting and squatting with abandon and do quite well.

That being said: I feel the above suggestions are an excellent way to audit yourself and to troubleshoot a few things.  Hope that helps!

CategoriesExercise Technique

Master the Kettlebell Swing

Before we get to the meat of today’s post I have a few housekeeping items to relay:

1.  Today is the last day to take advantage of the 30% discount for my Deadlift Specialization Program.

The program itself will never go away (ever!!!) and will always be available to start whenever you’d like, but this will be the only time you’ll be able to purchase month #1 at a discount.

All you have to do is type in IncreaseDeadlift30 within the Coupon Code area at checkout and you’re all set.  God, you’re good looking!

2. iOS users have had the luxury of using the WeightTraining.com workout logger app on their phones or iPads for several months now.  The app is FREE and allows users access to WT.com’s extensive library of over 2500 exercises and 400+ workout plans.

TODAY marks the release of the Android version.  Holla!!!!!!!

You can get more details and download it HERE.

Which is to say, you can purchase my Deadlift Specialization Program (which is really a program designed to get you strong. Wolverine strong) and follow it on your iOS or Droid phone. Which is cool.

And if some trainer or uppity douche at your gym gives you flak for having your phone out on the weight room floor under the impression you’re doing something lame like checking Instagram or sexting with your significant other or co-worker or lab partner (hey, I’m not judging), you can just say “back off!! I’m getting my deadlift on with TG!!!!”

Master the Kettlebell Swing

The kettlebell swing is a fantastic exercise, an exercise I feel offers a gulf of benefits, and one I feel everyone should do.

The thing is:  it looks simple to perform, but it’s not quite that simple to execute.

The biggest mistake I see people make is not being able to distinguish between a squat swing (wrong) and a hip-snap swing (correct). This is a non-negotiable fact.

Squat swings are dumb (and a small piece of my soul dies every time someone performs one). A hip-snap swing, on the other hand, opens up Pandora’s box to a whole world of awesome.

The key, though, is ensuring someone has patterned the hip hinge motion.

There’s that, and then there’s a bunch of other stuff that us trainers and coaches like to get nit-picky about. In my latest article on T-Nation.com I discuss some ways to pattern the hip hinge in addition to two common mistakes many people make with their KB swing technique.

Continue Reading…….

CategoriesExercise Technique Strength Training

3 (Not So Common) Mistakes People Make (That Many Don’t Think About) When Trying to Improve Their Deadlift

I don’t claim to know everything.

Sure I can regurgitate all the muscles that attach to the scapulae, list all the muscles involved with posterior pelvic tilt, name all the members of the starting line-up for the 1990 Oakland Athletics, recite line-for-line the “I will find, and I will kill you” monologue Liam Neeson uses in the movie Taken, and, on a good day I can crush my multiplication table.

I know stuff, but I don’t know everything.

One of the exceptions, however, is the deadlift. I know the deadlift. As a strength coach it makes sense. I mean, it’s my job to help get people freaky strong, and it’s kinda hard to do so without at least a casual relationship with the deadlift. Don’t worry I always buy it dinner first….;o)

Moreover, most serious weightlifters recognize that the deadlift is what often separates the men from the boys.

As an example here’s Cressey Sports Performance athlete, Dave Stanton, deadlifting 600 lbs for an easy set of three.  With no belt (at a bodyweight of 192 lbs).

Yes, we recognize he’s bouncing the weight off the floor a little bit.  Relax, internet.

David is a bit of an outlier. A freak if you will. We often joke at the facility that he’s a deadlifting savant because he’s always been good at it. It’s as if he was built to deadlift – look at those leverages!

But that doesn’t mean he hasn’t had to work his ass off in order to get to this point.

He’s been training with us for over four years, and has spent a lot of time working with us under our supervision.

Using David as our inspiration and model, I wanted to discuss what I feel are some things that a lot of trainees overlook when it comes to their approach to the deadlift.

1. Not Placing a Premium on Technique, Technique, Technique

Playing the Captain Obvious card, it goes without saying that in order to get better at the deadlift, you need to deadlift. It’s the Law of Specificity played to it’s most specific tune.

Quarterbacks don’t get better at throwing a football by playing Madden.

Chefs don’t get better at food preparation by watching Top Chef.

And you don’t get better at deadlifting by watching Youtube videos or by just “showing up” at the gym and doing leg curls.  YOU NEED TO DEADLIFT!!!!

More to the point, you need to hone technique. Technique trumps everything.

Not all deadlift variations are created equal. When most people think of a deadlift they automatically leap to the conventional deadlift, which, by all accounts, can be argued as the most advanced variation.

Not everyone can show up on day #1, walk up to a bar, pick it up off the ground, and make it look passable. I.e., not make me want to pour battery acid into my eyes.

Which is why it’s important to regress the movement to fit the current ability level and needs of the lifter. Learning the hip hinge pattern is vital and serves as a precursor more advanced exercises down the road.

There are a million and one different ways to regress the deadlift to help someone learn to hip hinge, which is why I feel it’s such an invaluable exercise.

At the lowest level we have drills which help engrain the motor pattern we’re looking for and to teach “neutral” spine:

Wall Tap Hip Hinge

KB Behind the Head Hip Hinge

Band Lat Activation w/ Hip Hinge

Once we’re confident they’re able to groove the hip hinge and control their spine, we can then start adding load with more rudimentary deadlift exercises like kettlebell deadlifts, suitcase deadlifts,  and “potato sack” or DB deadlifts.

From there, when we want to start adding more appreciable load the order we typically use at Cressey Sports Performance is Trap Bar Deadlift —> Sumo Deadlift —> Conventional Deadlift —> Dude, you’re like Han Solo now.

And, to be honest, it’s not until someone has a good 1-2 years of solid, legit training that we start implementing more superfluous things like chains, bands, and the like.

There’s plenty we can do with JUST a barbell.

Below is a video I originally shot for the release of Mike Robertson’s Bulletproof Athlete, which goes into more detail on some of the ways I progress (and cue) the main deadlift variations.

So to reiterate – TECHNIQUE is kind of important.  Learn it. Also, take into account the importance of properly placed progressions. Not everyone is Gandalf and can walk into a gym on day one and crush a perfect deadlift.

Also, if you want to read something that will give you a deadlifting boner I’d suggest reading THIS magnum opus by Mike Robertson, or check out any of THESE 22 articles listed by T-Nation as the best deadlifting articles on their site.

2. Speed Work? Technique, Technique, Technique (Part II)

Listen, most people who train don’t need to worry about “speed work.” Yes, getting faster and honing bar speed is a factor in improving strength, but for most people, most of the time, it’s a complete waste of time.

Let me explain.

First off, unless you’re pulling (at least) 2x bodyweight I don’t feel adding in speed work or a dynamic speed day – or any other connotation you use to pretend like you train at Westside Barbell – into your training repertoire is going to serve as the x-factor.

Lets just call it what it is.  TECHNIQUE WORK!!!!

Using sub-maximal loads forces people to dial in their technique, and THAT’S where I feel the true value of “speed work” lies.

Instead of calling it a speed work, I just call it a technique work and I try to implement it into most people’s programs at least once per week (especially if they’re trying to work on a specific movement, like the deadlift).

It may look something like this:

Week 1: 12×1 @ 55% 1RM

Week 2: 10×1 @ 60% 1RM

Week 3: 8×1 @ 65% 1RM

Week 4: 6×1 @ 70% 1RM

I’ll typically allot 30-45s rest between each rep.

Another approach I use (with more intermediate and advance lifters) is to have someone use 70% of the 1RM and to then set a timer for 10-15 minutes and they perform ONE rep every minute, on the minute for the allotted minutes.

Week 1: 65% at 10 Min

Week 2: 65% at 12 Min

Week 3: 70% at 12 Min

Week 4: 70% at 14 Min

Either way the idea is to use lower loads to HAMMER technique (which in turn is going to help with bar speed and overall performance in general).

3. Lack of Upper Back Strength

Like it or not, most people have weak upper backs and they don’t train it enough. I’m a HUGE proponent of adding in some form of dedicated upper back work in every training session.

I think this serves several benefits:

1.  It will undoubtedly help with deadlift technique in the long run.

2. From a posture standpoint, it will help to offset the endless hours we all spend in front of our computers watching LOLCats working.

3.  A thick, wide, upper back just looks badass.

To that end, I feel most trainees should go out of their way to add in some upper back work – both horizontal AND vertical – into their programs.

Now, this doesn’t mean you have to go balls to the wall and load yourself heavy every session, but it stands to reason most people won’t be doing themselves a disservice by incorporating this mindset.

I like to add in some high(er) rep TRX Rows or face pulls on my lower body days, and I’ll sometimes perform heavy chin-up variations too.

On upper body days, I’ll almost always be including some form of heavy barbell row or DB row.

Make no mistake:  a strong upper back will help you deadlift more weight.

Pick Things Up and Put Them Down

And it’s on that note I want to remind everyone that my new Deadlift Specialization Program hits on all the above points (and then some).

It’s a FOUR-month program that will not only turn you into a deadlifting Jedi, but you’ll get hella strong to boot.

What’s more, not only do you get a program written by me, but you also get the advantage of using WeightTraining.com’s user friendly platform to receive workout reminders, track and log your workouts, and watch videos, all by using your smart phone.

I also included a 30% discount that will last for the next 24 hours (through Wednesday, September 10th), because I’m cool like that  All you have to do is type in IncreaseDeadlift30 within the Coupon Code area at checkout.

For more information and to get your deadlifting on go HERE.

CategoriesExercise Technique Program Design

Why the Box Squat is Overrated

There are a lot of things I don’t do anymore that I used to.

1. Unlike when I first moved here eight years ago, I no longer refer to Boston as Beantown. That’s a big no-no amongst locals.  Doing so is as sacrilegious as wearing a Laker hat or a Derek Jeter jersey down Boylston!

2. I don’t watch Saturday morning cartoons. That much.

3. I don’t start hyperventilating into a brown paper bag anymore if a baseball player walks in on day one and lacks internal range of motion in his dominant throwing shoulder. As Mike Reinold brilliantly states HERE, glenohumeral internal rotation deficit (GIRD for short. Who wants to write all that out?) is a normal adaptation to the throwing shoulder.

4. I no longer feel Star Wars Episode I: The Phantom Menace is the weakest chapter in the Star Wars saga.  That title goes to Episode II: Attack of the Clones.

5.  And, I don’t pick my nose in public.*

Wanna know what else I don’t do?

I Don’t Place Box Squats Into Any of My Programs

Yes, yes I did.

Well, I do place box squats in my progams and I don’t.  Let me explain myself a bit further.

So that I can stave off the barrage of hate mail and people reaching for their pitchforks at the notion of me saying something so batshit crazy….

……..I like box squats.

While the box squat is considered a fairly advanced movement (and it is), it might come as a surprise to know that we use them quite often with beginners at CSP – particularly with regards to teaching proper squatting technique.

Lets be real, most people don’t come remotely close to squatting to acceptable depth (for the record, this equates to the point where the anterior surface of the thigh is BELOW the knee joint), let alone performing anything that you’d actually, you know, call a squat.

Most guys kinda bend their knees a little bit and call it squatting, like this guy. 

Nevertheless, the box squat is a superb way to keep people honest with depth and “groove” the proper pattern we’re looking for: to break their descent with their hips, push their knees out, and learn to sit back a tad more. Doing so targets the posterior chain to a higher degree and increases the lever/moment arm of the hips to take on a larger brunt of the load (rather than the knees).

I understand there’s a bit more to it than that and that this is a pretty extensive topic which people write books about. Cut me some slack, I’m trying to simplify things here.

Besides, considering most people have ADD as it is and won’t read past the first two paragraphs anyways, I figured something short and to the point would, oh look, a shiny!

Where was I again?

Right, box squats.

In short, box squats serve a purpose and I do utilize them quite often with beginners and some intermediate lifters to help groove technique and coach appropriate depth.

Outside of the learning curve, and once someone exits the beginner stage, for RAW lifters I don’t feel box squats serve a purpose or have a place in a training program.

Note:  for those wondering what the hell I mean when I say “raw lifter,” all I’m referring to is someone who is not a competitive powerlifter and doesn’t use gear to lift.  I.e., a squat suit.

When someone wears a squat suit it changes the dynamic of the lift. You HAVE to sit back more aggressively compared to not wearing one.

Powerlifters utilize the box squat because it’s specific to their sport. They have to sit back because if they don’t they’ll be a crumpled up ball of fail on the platform.

Past a point, for raw lifters, the box squat creates too many bad habits.

1.  Teaches people to sit back more than they could/should.

2.  Teaches people to “relax” on the box and to rock their weight back up. This works for geared powerlifters because A) they’re strong enough to stay out of those last 2-3 degrees of end range flexion of the spine and B) the suit is there to help provide more stability.

Stealing an awesome quote from the guys over at Juggernaut:

“Do not focus on excessively sitting back onto your heels if you are a raw lifter, this is not advantageous because you don’t have a suit to sit back into. There will be some forward movement on the knees in the lift and that is fine. A short movement of the hips backwards and then squat down from there. “Back, back, back” isn’t for you, it is more “down, down, down”.

10 Steps to a Great Squatting Technique

And there you have it. That’s my current line of thinking regarding box squats. If you’d still like to grab pitchfork, go for it.  But hopefully I did a good enough job making my case.

EDIT:  to say that I also find box squats are a great fit for those who are unable to squat (deep) due to knee issues, Femoral acetabular impingement, other musculoskeletal issues, or simply their own anatomy.

Here are a couple of articles I wrote on the topic:

How Deep Should I Squat?

Does Everyone Need to Squat Deep?


* = actually, that’s a lie. I totally do.