CategoriesCorrective Exercise Exercise Technique

Deadlift and Grip Pain

Q: My fellow lifter in Germany has long maintained that the things that happen to me under the bar are just plain weird. As it happens, I’ve not yet seen anyone write on this (if you did and I missed it, just point me there!); I hope you’ll be able to help me figure out what on earth is going on.

I love deadlifts, but it seems they absolutely hate my right forearm. At all of 95lbs, double overhand, I start feeling a mildly painful strain at the elbow when I close my hand. As the weight goes up, the pain gets worse.

Last year, I ignored the pain thinking it was something that would get better with time. Instead, by the time I got to 190lbs, the pain was so hideous that I couldn’t even open the refrigerator door without wanting to cry. It took five months of strict rest for it to heal.

I definitely don’t want to go through that again! What annoys me even more is that 190 is well short of what I could break from the floor if whatever-this-is wasn’t doing what it’s doing (left arm has no issues at all). What on earth is going on here, and how do I make it stop???

A: Hi Jackie, thanks for writing and sorry to hear about your grip issues.  I know how frustrating it can be to be hurt and unable to train like you’d like, so hopefully I can offer some insight.

But first, given you’re writing to me all the way over from Germany, can you answer me just one minor question?

What is up with the obsession German’s have with David Hasslehoff??????

I’m not going to sit here and pretend that I didn’t idolize the guy back in his Knight Rider days, and I certainly have to give my man kudos for rocking the 80’s mullet and chest hair like a boss…….

But German’s take things to a whole different level and go bat-shit crazy for the guy.

What gives?

Please, tell me, it’s killing me.

Okay – with that out of the way, lets state the obvious:  while it’s pretty much impossible for me to make any definitive assertions over the internet without being able to observe you in person, I have a few comments/insights.

1.  It sounds like you need to get some aggressive soft tissue work done. Honestly this is the best piece of advice I can give you and takes precedence over everything else.

The forearms and by extension – the elbow – is a very “claustrophobic ” area where a lot of “stuff” converges in a small area resulting in a lot of friction that takes place amongst muscle, ligaments, facia, and other soft tissue.

On the medial side you have all the muscles in the forearm that flex the wrist (I could list them all here, but it’s early and I don’t feel like it. But trust me: they’re there) which connect to the medial epicondyle via the common flexor tendon, with the pronator teres (which I suspect is going to be a HUGE player for you) attaching nearby.

The same can be said on the lateral side:  you have all the muscles in the forearm that extend the wrist which connect to the lateral epicondyle via the common extensor tendon.

Posteriorly you have all three heads of the trciep attaching to the olecranon via another common tendon.

And lastly, anteriorly, you have the attachment points of the bicep brachii, brachioradialis, and brachialis on the elbow.

See what I mean?  There’s a lot going down in one teeny tiny area.

We call it a Zone of Convergence, and it stands to reason that if your forearm is that painful whenever you grab a pencil, let a lone a barbell, you have poor tissue quality in that area.

Just resting – while it may alleviate the symptoms temporarily – won’t get at the root of the problem.  To that end, I can’t stress enough how crucial it will be to seek out a reputable manual therapist – someone who can perform Graston or Active Release Therapy – to treat that area.

As I noted above I have my suspicions that the pronator teres (which, as the name suggests, pronates the forearm) is on fire and that you need to take a bit of a grenade approach in terms of addressing the entire spectrum.

While manual therapy takes priority, you can take the self myofascial release route and use something like The Stick on the forearms, biceps, and triceps.

2.  Another less obvious – albeit equally as important – thing to consider is something that many people overlook.  While soft tissue restrictions in the forearm and elbow area make a lot of sense and is a great place to start, it’s not uncommon for everything to manifest itself higher up the kinetic chain into the brachial plexus area – upper traps, neck, etc.

The brachial plexus is basically an area where a network of nerves start at the spine, run through the neck, and all the way down to the elbows, forearms, and to each finger

If you’re someone who spends a fair amount of time in an office staring at your computer, that area is notorious for getting gunked up (<— how’s that for a technical term?) and it may bode in your favor to have a manual therapist perform some work there as well.

Moreover, this is also an opportune time to run an audit on your breathing patterns.  If you’re someone who’s a “chest breather,” meaning whenever you take a breath you tend to rely on your accessory breathing muscles like the upper traps, levator, scalenes, etc, it’s no wonder you’re jacked up!

Think about it:  you take upwards of 20,000 breaths everyday.  Not that every breath is going to be “optimal,” but it stands to reason that if you’re a dysfunctional breather bad things may happen.

Taking the time to address something as simple as how you breath, becoming more of a “belly breather,” and learning to use your diaphragm more efficiently, can go a long ways.  More than you think.

Check out THIS post I wrote last year on the topic.

3.  As a corollary to the above, it’s also important to run a check on your technique on stuff like push-ups, rows, and chin-ups.  If you’re someone who has a tendency of shrugging everything – and relying too heavily on the upper traps to do everything – that’s just going to feed into the issue(s) at hand.

While addressing soft tissue quality and breathing patterns are high on the “to do” list, it’s going to be a waste of time if all you’re doing is heading back to the gym and shrugging everything.

So, you might as well give yourself an audit on those things too.  Just something to consider. I know everyone thinks their technique is spot on, but I can assure you that everyone needs a little tweaking.

I realize it wan’t the sexiest answer in the world, but hopefully it helps a few people out there.

But seriously, Hasslehoff……what’s the deal?

CategoriesExercise Technique Program Design Strength Training

Weightlifting For Everyone: How Anyone Can (Kinda) Olympic Lift and (Probably) Not Suck at It

Today is my girlfriend’s birthday.  And anyone who knows Lisa knows she looooooooves her birthday – to the point where it shouldn’t even be considered a birthDAY, but a birthWEEK.

In any case we have a jam packed day today – a late breakfast, a tandem workout “date,” and then we’re heading to a fancy schmancy spa for the afternoon.  Holla!  Followed by a decadent dinner of chicken wings and pizza.

Yeah, it’s going to be an awesome day.

Thankfully my good friend, Michael Anderson, who’s written several guest posts on this site before, came through in a pinch and sent along this gem.

Enjoy!

The topic of weightlifting  (when used as one word it references the sport of Olympic Style weightlifting) has become a hot topic lately and is polarizing in many ways.  Some coaches live and die by it and still other coaches won’t touch it with a 7-foot barbell. As usual, the answer lies somewhere comfortably in the middle.

Note from TG:  I wrote a post not too long ago on Why I Don’t Use the Olympic Lifts (<—-maybe you should check it out. It’s not as polarizing as the title makes it seem.  Promise).

With the popularity of CrossFit rising at a rapid rate, the sport of weightlifting has finally become something that the masses are aware of. For many years it has been the “other” iron sport; hidden behind the behemoths of powerlifting, the veiny striations and posing briefs of bodybuilding and the ESPN coverage of strongman. I myself have been training as a weightlifter with Coach Ivan Rojas of Risto Sports since last April and had been “training” (i.e. dicking around) for another six months prior to that.

The polarizing topic for many coaches is not whether or not weightlifting is beneficial for athletes, but whether or not it is beneficial enough to employ in their programming.

Some coaches, like Wil Fleming  have great success with it, while others find it cumbersome to teach and can do a host of other things in the time it would take to make someone proficient in the competition lifts (snatch, clean and jerk).

Note from TG:  speaking of Wil Fleming, for anyone interested in learning more about Olympic lifting I can’t recommend his resource Complete Olympic Lifting enough. While I don’t go out of my way to coach the OLY lifts, I still do own this DVD and think it’s fantastic.

I agree with both sides.

For some populations it’s just not worth teaching them all of the steps to have a decent looking snatch, or the stress that the clean and jerk can put on your wrists. Too, some athletes just shouldn’t have a loaded barbell overhead, and to do so would be irresponsible of the coach.

But that doesn’t mean they can’t benefit from some variations of the classic lifts that are both easy to teach and will produce some of the great benefits that you can get from the full variations. One of the marks of a great athlete is the ability to contract, relax and contract explosively all at the exact right moments; this skill is exactly what weightlifting is all about.

NOTE: these are NOT necessarily weightlifting-specific exercises, but variations that are applicable and beneficial to a certain population.

Also, know your population. If you are working with athletes with particular contraindications then don’t force them into an exercise they shouldn’t be doing. There are no contraindicated exercises, just contraindicated lifters (thanks Tony and Eric!).

Note II: I am not a professional weightlifter, I’m quite aware that my form is not perfect. If you have some constructive criticism please let me know, but don’t just remind me that I am painfully slow.

Power Clean

In terms of weightlifting variations that can help create better athletes, the power clean is at the top of the list. There’s not much that I could say about the power clean that hasn’t been said already (and said better than I’m able to), but it fits this list of variations very well.

You produce power, move big weights, get stronger and then dominate the world.

The biggest limiting factor would be the athlete’s mobility to pull off the floor or their ability to get their elbows around to catch the bar in the correct rack position. If your athlete can’t get down to the bar in a good position, then start them from a hang position or from blocks. If they can’t rack the bar due to mobility restrictions, then take some time and work on it; it’s not a particularly complex position and your athlete would benefit from the mobility required to do it.

(For the most in-depth look possible at this exercise, please refer to THIS post by Wil Fleming.

Snatch Pulls

Let me start by saying that I despise snatch pulls.

With Coach Rojas we finish almost every training session with a few sets of snatch pulls; it’s the dingleberry on the ass of a long, hard workout when all you want to do is shower and eat.

However, they are an exceptionally simple and beneficial exercise and are a staple in the program of nearly every weightlifter on the planet.

The snatch pull is the first half (give or take) of the full snatch and ends at complete triple-extension of the hips, knees and ankles. Complete a big shrug and use your hips to absorb the weight when it comes back down. If your athletes don’t have the mobility to get down to the floor with a snatch-grip, you can pull from blocks or from the hang position.

You can also try adding in a pause at the knees to help reinforce this position. This is a great way to develop a strong hinge pattern that transfers into powerful hip extension. It also does a great job of building the entire posterior chain.

Note: I don’t personally find snatch high pulls  to be a great lift to teach athletes. If you don’t fully understand how it carries over to the classic snatch then it’s too easy to form  deteriorate while they just try and muscle the weight up as high as they can. 

Jerk Behind The Neck

The jerk is the most violent and explosive movement in weightlifting and, arguably, in all of sports.

In competition jerks are done from a front rack position, but for training purposes jerks from behind the neck work because they don’t put nearly as much strain on your wrists and elbows.

The pre-requisite for this exercise is being able to support a loaded barbell overhead without putting yourself at any risk for injury. Assuming that, this exercise is a fantastic way to develop leg drive, uni-/bi-lateral lower body stability and a ton of core stability. You can use either a power-jerk (bi-lateral) or a split-jerk (uni-lateral) to complete the lift, and you can either eccentrically lower the barbell to your shoulders or you can use jerk boxes and just drop it to avoid any eccentric stress at all.

That’s It, Yo

At least one of these three variations should fit into nearly any training program for any athlete. The amount of time it takes to coach them is pretty minimal and the benefits that your athletes will be able to see are significant.

Add them into your program as your first exercise after your warm-up and, generally speaking, do 4-6 sets of 2-3 reps.

Do not use weights that require any sort of grind. The name of the game is power production (aka how fast can you be strong); so make sure the barbells are always moving at top speed.

Add these into your programs for a little while and see what kinds of benefits you can get. Have a great day and go lift some heavy shit!

About the Author

Mike is a Boston area personal trainer and also completed a successful stint interning with Boston University Strength and Conditioning.

Mike is also finishing his degree in Exercise and Health Science at the University of Massachusetts Boston. He loves bacon, beer and his 7 year old pit bull Lexi. You can reach him with any questions, comments or notes of affection at [email protected]. You can also visit his website HERE.

CategoriesExercise Technique Strength Training

Deadlift Critique 101

In any given week I receive a fair amount of emails ranging from readers who just want to say thanks for writing such a kick-ass blog (you’re welcome!) to momma Gentilcore reminding me that 1) I forgot [insert relative’s name here] birthday and that I better get on my high-horse and send a card stat and 2) it’s getting cold outside.  Bundle up!  Love you!

And, of course, I get a fair number of emails from people asking me anything from programming questions to why does their shoulder hurt? to why it is I am so uncannily interesting, witty, and awesome.  And everything else in between.

In every sense, the emails I receive span the entire fitness spectrum – and I try my best to answer every……single…….one.  Speaking of which, if you could just hold on one quick second as I answer this one I just got in my inbox :

Dear Victoria Secret Models,

Yes!

It’s silly really, but a group of them reached out and asked if I’d please stay at least 500 yards away from them at all times be their personal oil boy at their next photo shoot.

Anyways, oftentimes I’ll have someone reach out and ask if I’d be willing to take a gander at their technique on certain lifts and to see whether or not I’d offer any insight or cues to help them clean things up.

8 times out of 10, it’s usually the deadlift.

Sometimes it’s easy.  I’ll watch a video, things won’t look pretty, and I’ll forward along some simple cues that will help, and then point them in the direction of posts like THISTHIS, and THIS.

Other times it’s a bit tricker because someone’s technique may need a little more TLC and attention to detail. A great example would be the video below, which was sent to me last week from someone who will remain nameless.

**When I asked his permission to use his video for a blog post  he asked if it would be okay if I’d omit his name altogether.  I think he was thinking I was going to throw him under the bus and include him on some rolling playlist of epic deadlift fails.

I reassured him that that wasn’t going to be the case, and all I wanted to do was to make this into blog post so that my advice could be read by others who may be making the same mistake(s).

We internet high-fived and well, here we are.

Speaking of which, here’s the video

My Thoughts/Words of Wisdom

1.  First and foremost: props for walking onto screen wearing that hat like a boss. I’d almost liken it to a Walter White’esq/Heisenberg fashion prop, but I know all you’re doing is deadlifting and not cooking a vat of meth.

**Bonus points for a Breaking Bad reference!

2. One of the glaring “mistakes” I see right off the bat is setting up too far away from the  bar.  I like to tell people to make sure their shins are right up against the bar, or at the very least to be an inch or two away (to allow for a little dorsiflexion).

By setting up too too far you’re just going to make more work for yourself and increase the distance the bar has to travel – not to mention we could make a case that you’re going to place a bit more shear load on the spine.

So, for starters:  get closer to the bar upon the initial set-up.

3.  Another major point to consider is the initial movement upon descent towards the bar.  If you pause the video at the 9-second mark, you’ll notice that “Heisenberg” initially breaks with his knees translating forward, essentially squatting down towards the bar.

Instead, what I’d prefer to see is more of a hip hinge/pseudo RDL pattern to start.  I like to cue people to push their hips back. But usually a more pertinent EXTERNAL cue is to tell them to try to push their hips back so that their butt taps an imaginary wall behind them.

So, in a lot of ways, what’s going to happen is we’re trying to set up from a “TOP-DOWN” position, which is something Dr. Kelly Starrett discusses at length in his book Becoming a Supple Leopard.

The goal, then, would be to initiate by pushing the hips back and to continue hinging back, performing to what mounts as an unloaded RDL, accumulating massive tension in the hamstrings, and when there’s only a few inches left, THEN you’ll bend over to grab the bar.

Which brings us to the next point.

4.  Setting the hips too low

This coincides with the whole squatting vs. hip hinging discussion from above. I think the bulk of this issue will clean up itself once you learn to hip hinge into proper position, so I won’t belabor this point too much. But it stands to reason that a nice “check point” would be to take notice where you feel tension.  In the video above, I can guarantee to you feel the bulk of it in your quadriceps.  If so, you know you’re setting up with your hips too low.

5.  Another key point to consider is getting tension in the lats and upper back.

If I were standing there coaching Heisenberg, 1) I’d tell him to put on some loud, belligerent “my mother never loved me music” to fire the place up a bit more and 2)  I’d stand in front of him and have him set up a bit more vertical or upright. I’d want him to make sure that whatever lettering is on the front of his shirt is facing me the entire time.

You can think to yourself “chest up,” “chest tall,” “proud chest,” “arch like a mofo,” whatever works.

From there, I’d tell him to use the bar to “pull” his chest up and to engage his lats.  You’ll notice in the video that when he starts his first pull to break inertia his shoulders are still fairly rounded (24-second mark).

Speaking in geek speak for a second:  I want him to use the bar to “set” his lats and to get more posterior tilt of the scapulae.

This will work wonders in terms of garnering more tension and to provide more stability to the spine as a whole (as well as placing him in a more ideal position to pull).

6.  More tangentially, while I understand that it’s called the “deadlift,” and you’re lifting the barbell off the floor, there’s a bit more to it than that.

I think one major mistake that a lot of people make is that they feel as if the deadlift is nothing more than casually lifting the bar off the floor.

Instead, what needs to happen is that you need to get more tension in your hamstrings and glutes and generate force into the floor, “pressing” or “pushing” yourself away (through the heels), and then focus on driving your hips forward until you lock the weight out.

Again, freeze framing the video at the 26-second mark, you can see that Heisenberg’s shoulders and upper back aren’t “stiff” (shoulders are rounded) and that his knees aren’t locked out. Not to call him out or anything, but he’s just kinda haphazardly lifting the bar as if it were an egg he didn’t want to break or as if he were at some swanky tea-party and didn’t want to offend anyone.

Now, I understand it’s an un-loaded bar.  But what the fuck?  Lift it!!!!!!

More privy to the point is that he’s seemingly just trying to hoist the bar off the floor without generating any tension or force into the ground.

Finish the lift.  Get those hips through!  Lock it out!

7. And lastly, to reiterate the point above, he just needs to make sure that on his descent towards the ground he initiates the process by breaking with the hips going back, and not the knees forward.

It’s going to take a little practice, and some attention to detail, but I think all told he’s not too far off from where he needs to be.

Moving forward I’d recommend the following:

1.  A drill that I love to use with newbies to help groove the hip hinge is one that Dean Somerset uses quite a bit as well – the KB Behind the Head Hip Hinge

Here the objective is to brace the abs hard and to hinge through the hips and NOT the lower back. Incorporating this as part of a warm-up or as a filler exercise several times throughout the week would be money.

2.  Don’t be scared to load the deadlift.  It’s actually going to feel a bit MORE awkward to try to hone in on technique with just the bar.  So, don’t feel as if you have to limit yourself to the bar to get better.  Sometimes it’s advantageous to load an exercise to get a better “feel” for it.

3.  Also, don’t be afraid to deadlift more the once per week.  I know it’s in vogue to tell newbies to just perform the major lifts once per week to lessen the risk of injury – and that’s fine  – but conversely it’s kind of hard to get better at anything only performing it once every seven days.

I’m actually not opposed to including some form of deadlift technique work every training session assuming someone isn’t going to be an asshat and perform heavy singles every chance he or she gets.

4.  Don’t go use a high(er) rep protocol.  I think anytime a newbie starts performing high-rep deadlifts, things are going to get dicey real quick from a technique standpoint. To that end, I’d much prefer to keep the reps in the 3-5 rep range (but keep the intensity low).

And that’s about it.  A lot to digest, I know – but hopefully this discussion helped to shed some light on how I generally go about cleaning up one’s deadlift technique.

If anyone else has some food for thought, I’d love to hear it.

CategoriesExercise Technique Rehab/Prehab

Lift Big by Bracing, Not Arching

As far as current fitness debates are concerned the argument over which is better for long-term progress in the gym – bracing vs. arching – is right on par with people arguing over whether or not a potato is considered “Paleo, (1),” whether or not high- rep Olympic lifting (ALA: CrossFit) has any efficacy (2), or figuring out which is smarter: Tracy Anderson or a ham sandwich (3)?

  1. Um, it’s a freaking potato! It grows in the ground.  Newsflash:  That broccoli you’re eating didn’t exist in the Paleolithic era, and I know for a fact Gronk and his friends didn’t crush “Paleo” chocolate brownies back in the day you uppity douche.
  2. Sorry, but I’d trust a coach who advocates high-rep Olympic lifting about as much as I’d trust Formula One racer you drives a Prius.
  3. Come on, do we really need to debate this one?

Nevertheless, the growing dichotomy between bracing and arching – especially as it relates to hoisting heavy loads and how it parlays into optimal performance – has gained steamed within the last few years.

As a coach and as someone who trains a wide array of athletes and clients for newbie status all the way up into the professional ranks, and as someone who’s job it is to keep people healthy for the long haul, I can say that I tend to lean more towards the camp who advocates bracing.

In my latest article for T-Nation I explain why.

Continue reading you sexy beast you…..

CategoriesExercise Technique Exercises You Should Be Doing Rehab/Prehab

Deadbugs: The What, Why, and How

I know what some of you may be thinking:  “Really, Tony, a post on deadbugs?  What’s next….telling us how much you love Twilight or that you’re adopting another cat?  You haven’t gone soft on us now have you?”

<—– LOL, get it??  I actually put a picture of a “dead bug” here, when I’m actually just referring to the exercise.  High five!

Full confession time.  Okay, I admit it: back in 2008 I read the first Twilight book.  But only because I wanted to see what all the hoopla was about and see for myself why so many people were going bat shit crazy over it.

Well that, and it was a dark period in my life. I was single at the time and was going through some existential phase where I was trying to figure out what everything means.  Vampires wasn’t the answer.

I read it, didn’t care for it, and moved on with my life.

As far as the cat thing.  I plead the 5th…..;o)

With regards to deadbugs, however, in many ways I feel they get a bad rap and that they’re one of the more UNDERrated core exercises out there.  Perhaps a more apropos way to explain things would be that deadbugs are almost universally seen as a “sissy” exercise and a waste of time by many trainees, meatheads, and athletes alike.

I couldn’t disagree more.

I was recently asked by MensHealth.com to provide a “hot list” of some of my favorite go to core exercise that I either use with my athletes and clients, or that I pepper into my own training as well.

While I offered the prerequisite favs like Pallof press variations, stir-the-pot, and carry variations, I purposely OMITTED deadbugs for a few reasons:

1.  I didn’t want the incessant eye rolling pointed in my direction.

2.  Despite their perceived “easiness,” deadbugs are actually an exercise that are absolutely butchered by, well, everybody.

3.  As such, I took the greedy way out, held back, and decided to keep deadbugs to myself and dedicate an entire post on them in an effort to persuade everyone reading that they’re the bees knees (and that they should take the time to pay a little more attention to detail).

Getting the obvious out of the way:  deadbugs are an exercise that, for all intents and purposes, help with motor control and can be seen as a “baseline” exercise to ascertain whether or not someone has any glowing imbalances that need to be addressed.

Let me explain.

While it’s fairly common in the athletic realm, more and more we’re seeing people in the meathead/weekend warrior or what I like to call the “I like to lift heavy things category” present with an overextended posture or anterior pelvic tilt.

While this isn’t necessary anything to write home about – there IS a “range” of acceptable anterior pelvic tilt – it does become problematic when it’s excessive and otherwise leads to other imbalances up and down the kinetic chain.

For starters, those in excessive anterior pelvic tilt will almost always have extension based back pain – where the facet joints, posterior discs, etc are placed in an ungodly amount of stress which can manifest into more profound issues like spondylosis (end plate fracture) down the road.

Mike Robertson has a cool term for this called Flawed Active Stability – whereupon you’re cueing the body to engage the paraspinals and spinal erectors, effectively crushing the spine, in an effort to gain stability.

What’s more, in general, because of the misalignment associated with APT, it’s not uncommon for people to experience chronic pulled hamstrings, anterior knee pain, hip pain, and a myriad of other issues.

All of this to say: it just plain sucks donkey balls and can really mess with one’s training in the long run if not addressed or at least kept under wraps.

But again, I’m just stating the obvious.

Do Your Deadbugs, Yo!

Deadbugs are a fantastic way to teach the body to “encourage” more posterior pelvic tilt while simultaneously enhancing motor control and to engage the lumbo-pelvic-hip stabilizers to do their job.

As note above, most people flat out do a piss poor job when it comes to performing deadbugs correctly.  Here’s a great example.

Upon first glance those don’t look too shabby, right?  Offhand those look pretty good.  But with a closer look we can definitely comb through some common technique flaws that many should be able to appreciate.

1.  Before anyone makes fun of me for tucking my t-shirt into my sweatpants, just know that I did it for a reason. Which was to show how most people perform their deadbugs:  with an excessive arch in their lower back and with their rib cage flared out.

Well that and we had people visiting the facility from Australia yesterday and I didn’t want to make things awkward by walking around with my shirt off.

Admittedly, it’s still hard to see in the video above, but if you were in the video with me (oh, hey, hello!) you would easily be able to fit your hand in between the floor and my lumbar spine.  This shouldn’t happen and essentially defeats the purpose of the entire exercise.

And this is why I tend to lean more towards deadbugs from the get go – rather than birddogs – because the floor provides more stability and kinesthetic feedback to the body.

2. Another mistake is that people tend to rush this exercise.  Many will just haphazardly flail their arms and legs around hightailing it through the set.  While we could make a case that extending the arms and legs may be too much of a progression and we need to REGRESS the exercise – read THIS for more ideas – much of the time it just comes down to slowing people down.

All that said, lets take a look at what PROPER deadbug should look like.

I know it doesn’t look much different than the first video, but I assure you there’s a lot to consider.

1.  My shirt’s still tucked in.

2.  My lower back is flush against the floor – and I’m encouraging more posterior pelvic tilt.

3.  Moreover I’m also taking a massive breath and inhaling THROUGH MY NOSE to focus more on a 360 degree expansion into my torso.  In other words:  I’m not just breathing into my stomach, but also trying to expand sideways and INTO the floor as well as my ribcage (but without allowing it to flare out too much).

4.  From there I lower contralateral limbs – controlled, in an effort to resist extension – while FORCEFULLY exhaling my air through my mouth.  I do this until ALL my air is out.

By doing this a few things happen (and I apologize in advance for all the enumerations in this post):

1. I slow myself down.

2. The diaphragm is better engaged.

3.  Many don’t think of this part, but with all my air exhaled out, I now have nothing to help stabilize my spine except the muscles themselves.

It’s not uncommon for people to literally start shaking as they proceed with their set. This is okay – so long as you maintain proper spinal position – as it just demonstrates that the muscles in the surrounding area are now doing their job more efficiently.

I’ll typically shoot for 2-3 sets of 5-8 repetitions PER SIDE.

And there you have it.  It’s nothing flashy or Earth shattering, but I guarantee that if you go a head and try to perform your deadbugs in this fashion you’ll notice how much MORE challenging they can be, and they’re anything but a sissy exercise.

Give it a try and let me know what you think.


CategoriesExercise Technique Program Design

Cleaning Up Kettlebell Swing Technique

I don’t consider myself a kettlebell expert, but I stayed at a Holiday Inn Express once so that has to count for something.

Note from TG:  For those non-American folk who may be reading and have no idea WTF staying at a Holiday Inn Express has to do with anything let alone kettlebell training, maybe watching THIS clip will help.

For those who did get the joke:  Bwahahahahahahahahahahahaha.

In all seriousness, while I’ve never taken the RK or HKC or the Strong First course (it’s on my fitness bucket list though), or climbed Mt. Everest, I like to think that despite those minor short comings, I still know a thing or two when it comes to coaching the kettlebell swing, among other KB related exercises.

And while I’m on the topic, I always find it comical when I hear stories from my clients who travel and they tell me how, at certain gyms they’ve come across, they’re not allowed to use the kettlebells without a trainer’s supervision, as if they run the risk of poking their eye out.

Yet, upon watching said “certified” trainer (99.9% of the time not certified through Dragon Door or Strong First) demonstrate a KB workout, whether it entails swings, get-ups, cleans, or snatches, my client’s have to keep their corneas from perpetually bleeding because the trainer’s technique is just god-awful.

Like Jillian Michael’s god-awful:

All that said, because I don’t want to get all fired up and throw my laptop through the window, today I just want to hit on two often overlooked technique snafus that a lot of people make with their swings.

Number One:  making the mistake of allowing the KB to drop BELOW the knees.

I wrote a blog post on the difference between a squat swing (wrong) and a hip snap swing (right) a while ago (HERE), and I think anyone who’s curious should check that out first before going any further.

Outside of that, I stole the above gem from the one and only Neghar Fonooni, and it’s something that really made a lot of sense to me when I heard it, and high-five to myself, was something I was instinctively coaching already.

Most of us have heard the often quoted cue from Dan John about keeping the KB closer to the body and “attacking the zipper.” This works well, but I still often find that many trainees will allow the KB to drift below the knees which can wreak havoc on the lumbar spine.

This is more of an “eyeball” what-you-see-is-what-you-get observation, but if it’s something you find yourself or your clients doing, it would be a good idea to, you know, stop it.

Number Two:  allowing the KB to “get away.”

This was actually something I snaked from one of my clients who heard it from Dr. Stuart McGill who I think heard it from Han Solo. But I can’t back that up.

When we transition from the hike pass to the actual swing and end up with our arms full extended out in front of us, it’s important not to let the bell itself to “get away” and cause more shear load on the spine.

I always like to tell people they’re going to snap/push their hips through and the arms are just along for the ride.  When their arms are fulling extended, the objective is not to be holding on for dear life, they’re going to “relax” for split second, and pull the KB back down towards the swing portion.

During the “relax” portion, however, they want to be fast (and loose) at the top, but not to the point where the KB is going to jolt their spine (for lack of a better term).

The short video below (just a bit over two minutes) tries to hit on both points.  I hope it helps.  For those celebrating Labor Day Weekend – enjoy!

CategoriesAssessment Corrective Exercise Exercise Technique

The Perfect Assessment Tool?

Lets be clear from the start: there’s really no such thing as a “perfect” assessment. I’ve seen coaches and trainers spend as little as ten minutes assessing their clients, as well as those who take roughly the same time it would take to read the Harry Potter series, and both have been equally as successful with getting results.

Although, in the case of the latter, I’d argue that some fitness professionals spend an inordinate amount of time assessing things that don’t really matter and/or are outside their scope of practice in the first place.  Big toe dorsiflexion?  Really?

The person standing in front of you is 25 lbs overweight and moves about as well as a one-legged pirate.  It’s not rocket science. Get them moving.  End of story.

Nevertheless when it comes to assessment I’ve always lived by the mantra of “different strokes for different folks.”  As an example, at Cressey Performance, we work with a metric boat load of baseball players which is a unique population with regards to the demands placed on their body.  Much of what we look at with them – comparing total glenohumeral ROM between dominant and non-dominant sides, for instance – may not be relevant to someone that walks into the facility who’s just looking to get a little stronger, fix their nagging lower back pain, or not be embarrassed to take their clothes off with the lights on.

That said, how we go about assessing our athletes and clients at Cressey Performance suits our needs, our facility layout, and our business model.

Put another way:  how we go about doing things isn’t to say that we’re right and everyone else is wrong; nor is it to imply that our way is the end-all-be-all of assessment; nor is it suggest that everyone should kneel before us General Zod style:

It all mounts down to what we’ve found works for us. It’s as simple as that.

However, I will say that I do (and always will) feel the push-up is an unsurpassed assessment tool that should be a staple in most assessment protocols.

Not many “tools” can give as much information and feedback to the fitness practitioner than the push-up, and it behooves anyone to dismiss it.

Did you hear me?  I said it behooves you!  I’m bringing back old-English people, so you know I mean business.  You’re just lucky I didn’t grab a white glove, slap you across the face, and challenge you to an old-fashioned bare knuckled boxing match.

Taking actual technique out of the equation (it amazes me how many guys come in to see us with cranky shoulders, only to have some of the worst push-up technique this side of Charlize Theron in the movie Prometheus), the push-up assessment parlays very well to a variety of populations.

With our baseball guys – and even our general population clientele – it gives a good scope to see how well their scapular stabilizers (particularly the lower traps and serratus anterior) are working – if one or both are weak, the scapulae will be more anteriorly tilted and abducted (not “hugged” against the rib cage) which can result in compromised stability.

Too, and an often overlooked component, is anterior humeral glide.  You can see this in someone’s standing posture very easily, but it also becomes very pronounced when you watch someone perform push-ups, or just hold the push-up position isometrically.

This can be detrimental in that if it’s not corrected or just left to it’s own vices can lead to increased anterior instability of the shoulder, which as we all know, not only kills baby seals, but also makes your shoulder hate you.

Using a more glaring and obvious anecdote, push-ups are also a fantastic assessment tool because they make it abundantly clear where someone’s weak points are.  And almost always, many are going have weak lumbo-pelvic-hip control – to the point where they’ll be hanging on their lumbar spine as well as rocking a nasty forward head posture.

On the flip-side many may also demonstrate a dominant rectus abdominus pattern, which typically means their external obliques are non-existent and they probably spend way too much time in front of a computer stalking people on Facebook.

Again, in both scenarios it’s just valuable feedback for you which will dictate that person’s programming moving forward.

Another dimension of the push-up assessment that I never really thought of before – and something I stole from Mike Robertson – is the concept of ‘core delay.’

In short, instead of starting someone in the standard push-up position – away from the floor with arms fully extended – you start from the floor.

In this way you can see whether or not someone has adequate stability or if there’s a delay in firing, and the hips come up first.

The key is to make sure that whoever it is you’re testing is completely relaxed on the floor, and then you just observe and make a judgement call from there.

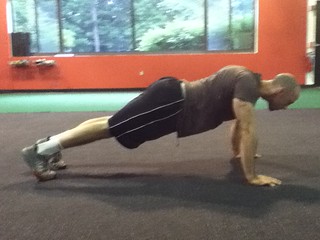
The first rep would be considered a “passable” rep and shows that the person (me) has good core stability.  They (me) were able to keep the spine in a “neutral” position and everything seemed to fire simultaneously.

And, not to mention their (um, me) triceps were gunny as shit……;o)

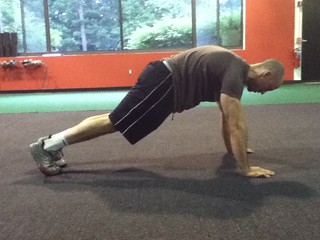
With the second rep, though, there was a little wackiness, and you’ll notice how my hips shoot up first and my lumbar spine goes into immediate hyperextension.  This shows a ‘core delay,’ which is just a fancy way of saying “dude needs to work on getting his glutes to fire to posteriorily tilt the pelvis more, along with the external/internal obliques and RA.”

In the end I just feel utilizing the bottoms-up push-up is another great way to evaluate clients and to better ascertain where their weaknesses lie and how their programming may manifest moving forward.

Agree?  Disagree? Tell me more below.

CategoriesExercise Technique Strength Training

5 Ways to Make Bench Pressing More Shoulder Friendly

The bench press. There’s no mistaking it’s popularity.  Walk into most gyms and you’re bound to see an inverse relationship between the number of bench press stations available and squat racks. Likewise, it’s no coincidence that there’s a lot barrel chested guys walking around with chicken legs than vice versa.

I get it, though. As dudes (and yes, women can enter the conversation too, but they’re not nearly as enamored) it’s almost engrained in our DNA out of the womb to bench press.

Ask any guy what he did the first time he stepped foot in a gym and nine times out of ten he’s gonna say “come on man, I benched.”

No exercise is as glamorized nor put on pedestal as the bench press.  Moreover, no exercise eats up one’s shoulders like the bench press.

That said, the bench press isn’t going away anytime soon (not that it should, it’s a fantastic exercise), but below are a few suggestions on how tweak it so that your shoulders are less likely to hate you.

1.  Uh, Stop Benching (Just for a Little While)

Whenever I start working with someone and they start to describe how much their shoulder hurts one of the first questions I’ll ask is what their benching frequency is like.

More often than not, to put it lightly, it’s a lot.

And while I realize it’s borderline asinine for me to say (because it seems so obvious), I’m going to say it anyways:  stop benching.

If bench pressing hurts your shoulder, stop doing it Sherlock!

But since most guys will react by pounding their feet to ground and screaming, “no, no, no, NO!” and then act as if I just ruined their world and said “you’re not leaving this table until you finish your veggies Mister!” I’ll usually lighten the blow by telling them that I only want them to lay low for a week or two, just to see if their symptoms subside.

In the interim I’ll suggest they ramp up their horizontal rowing frequency to the tune of 2:1 or 3:1 (pull:push) ratio and start adding in more push-up variations (which will usually end up being more of a challenge than they think).

Guys often scoff at push-ups, but you’d be surprised as to how many can’t perform them correctly, let alone be able to do ten straight.

I LOVE push-ups in that they’re a closed chain exercise (bench pressing is open chain) which allow for a little more wiggle room for the scapulae to actually move.  Conversely, with the bench press, the shoulder blades are glued to the bench itself which can be problematic down the road.

Sure, setting the scapulae in place for stability and transference of force is paramount, but considering the long-term ramifications that can have on shoulder health, it “may” not be ideal for some.

In any case, it’s amazing how much better most shoulders will feel after a couple of weeks of laying off the bench press and addressing muscular imbalances by including more rowing into the mix.

Speaking truthfully, outside of the powerlifting realm I’d be perfectly content with nixing benching altogether for most guys and just opting for push-up variations and dumbbell work.  But since pigs will fly before that happens, and guys are going to want to bench press no matter what, here are some more options.

2.  Change Your Hand Position

Utilizing more of a narrow or close grip variation will undoubtedly be more “shoulder friendly” in the long run.  When we bench with a wider grip it’s a lot easier for the elbows to flare out, which in turn makes the shoulder more vulnerable, unstable, and want to flip us the bird.

Don’t go too narrow however.  The one caveat with using a super narrow grip is that we’ll tend to “crowd” ourselves once the bar reaches chest height and the scapulae will dip into anterior tilt and cause more anterior humeral glide (which again, will lead to more instability, not to mention a pissed off bicep tendon).

My general rule of thumb for close grip is roughly shoulder width apart, maybe a teeny tiny bit less depending on the person.  For a frame of reference, here’s a picture I snaked off of Mike Robertson’s site:

3.  Get a Hand-Off For the Love of God

If you ask any powerlifter or strength coach how important the initial set-up is for the bench press, they’ll inevitably say it’s VERY important.

I don’t want to get into the specifics here – you can easily go read anything Dave Tate has written on the topic – but suffice it to say it’s crucial to set a stable base of support when benching.  And that’s going to entail setting your shoulder blades together AND DOWN!!!

A lot of guys will set up properly only to lose everything once they go to un-rack the bar.  In order to un-rack the bar they’ll have to protract and abduct the shoulders which kind of defeats the purpose of going through the trouble to set up.

For whatever reason some guys are stubborn when it comes to getting or asking for a hand-off, as if it’s some kind of hit on their manhood.

You’re asking for a hand-off, not for a pedicure.  Not that there’s anything wrong with getting a pedicure from time to time. They’re actually quite lovely sometimes.  Er, I mean, that’s what I’ve heard at least.

*runs off in the other direction*

Anyhoo, I actually dedicated an entire blog not too long ago on the importance of getting a proper hand-off and the benefits of doing so, so I won’t belabor the point here.

For those too lazy to click on the link, here’s the video component for your viewing pleasure.

4.  Board Presses

We actually have a checklist of progressions that we like our clients and athletes to go through before they actually touch a standard bench press.  It starts all the way down with push-up isometric holds (pain free ROM) all the way up to the end game of bench pressing like a boss.

Somewhere in the middle are board presses.

Board presses are beneficial for a variety of reasons

1. For the sake of this conversation they’re fantastic because they allow us to limit the ROM so that benching it’s pain free. But we’re still benching, so psychologically it’s a huge win for most guys.

We can start with a 4-5 board press and work our way down three, two, and then one…..so it’s a nice sliding scale of progressions.

2.  A bit off topic, board presses are also a fantastic way to teach the body to hold more weight.  Because of the reduced ROM, we’re able to load the bar heavier and you can program your CNS to “feel” what it’s like to hold a heavier load.

3.  Plus, board presses are an awesome exercise to hammer the triceps.

5. Decline Bench Press

Eric Cressey noted this point yesterday during a staff in-service and is something he’s goes into much more detail on in his Elite Training Mentorship series.

When we’re referencing true “impingement” syndrome with most guys, many will light up when they reach roughly 80-90 degrees of shoulder flexion.

With the decline bench, it’s not uncommon to see 10-15 degrees less shoulder flexion and subsequently guys tend to stay outside of that “danger” zone.  So, this is yet another way to make benching a bit more shoulder friendly, and serves as a nice progression leading up to regular bench pressing down the road.

CategoriesExercise Technique Strength Training

Deadlift Dominance: 5 Tips to Build Massive Pulling Power

Note:  the following is an excerpt from my latest article on BodyBuilding.com (full article is linked to at the bottom).  

I think it’s pretty awesome.  And if you think it’s pretty awesome too, then please (pretty please) “Like” it on the BB.com website and share it on all of your social media.  I’ll be your BFF forever!

If you don’t this it’s awesome – no hard feelings.  I’ll just be over here crying myself to sleep.

If I had to make a list of things I like in no particular order, it would look something like this:

  1. Turning right on red
  2. Anything involving Jason Bourne, ninjas, or zombies
  3. LOLCat videos
  4. Getting people strong
  5. Deadlifts

I’ll admit that as a strength coach, I’m biased when it comes to the last two. To me, nothing trumps strength. And nothing gets people stronger than good ol’ fashioned deadlifts.

Guys can brag about their squat numbers despite only hitting quarter reps, or even brag about a big bench press that’s more like an upright row for their spotter, but you can’t cheat a deadlift.

It’s you versus the barbell. You either rip that son of a bitch off the floor, lock it out, or not. The deadlift lends itself very well to gauge progress. It’s up to you, and brute strength, to break initial inertia off the ground. If you’re able to lift more weight over time without blowing your sphincter, you’re making progress!

Contrary to popular belief, there’s more to deadlifting than just bending over and hoisting a barbell off the ground. The following tips will undoubtedly clean up your technique and improve your deadlifting dominance.

Continue Reading……..

CategoriesExercise Technique Exercises You Should Be Doing

Pull-Throughs for Elite Strength

“It’s Fourth of July, I think I’m gonna try to eat clean today.”

– Said no one. Ever.

Like many of you reading I’m recovering from a day of gluttony.  Although giving myself some credit, I wasn’t all that bad.  Instead of hitting up a few BBQs, Lisa and I decided to keep our Fourth a bit more low key and opted to head to the beach instead.

We packed a cooler full of fruit, chicken, guacamole, and Coke Zeros (we like to live lifer dangerously), along with some summer reading material (I was finishing up the book Decisive, Lisa was reading whatever it is girls read on the beach) and we soaked up some vitamin D.

When we got back into the city, though, I treated myself to an ice-cream sundae and then crushed an entire bag of honey wheat pretzels.  Holla!

In any case I’m not going out of my way to do a bunch of work today, and as such I’m just going to link to an article I had published on T-Nation the other day on the pull-through (which I feel is one of the most UNDERrated exercises out there).

I hope you  check it out, and I’ll be back on Monday with some new content!

Pull-Throughs for Elite Strength <=== Click Me