But if I would have titled it what I wanted to title it:
“That Time I “Fixed” Someone’s Squat In Five Minutes, BOO-YAH, God Damn I’m Good. And While I’m Here Bragging About Myself: Did I Ever Tell You About That Time I Almost Single Handedly Won the Sectional Championship For My High School Baseball Team Back in 1995? Oh, And I Made Out With a Girl Once.”
A Tale of Two Squat Patterns (But Seriously, Though: I Did Fix It In About Five Minutes
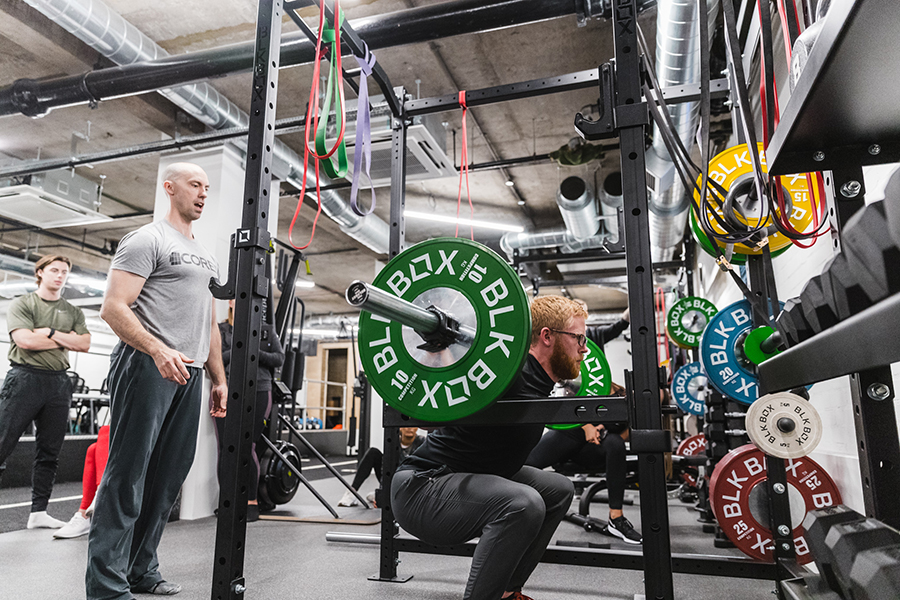
Last week I had a gentleman come to CORE for his initial assessment. After some initial back-and-forth and pleasantries we got into the topic of his training and injury history. He had noted that he had never really participated in strength training before and after digging a bit further he also noted that he’d had a history of chronic lower back pain (L3-L4).
Most people can commiserate.
A vast majority reading these words right now have likely experienced some form of low-back pain in their lifetime.
(raises hand)
It’s never fun and can leave most people in a seemingly never-ending state of frustration and despair. In dealing with many people in the same predicament throughout my career as a coach & personal trainer my goal during their initial session isn’t to spend it telling them how much of a walking ball of dysfunction they are.
Rather, my objective is to take them through a few rudimentary screens, watch them move, see if anything exacerbates their symptoms, and if so, modify things to see if we can reduce them.
Low back pain is very common and has myriad of root causes:
✅ Tight this
✅ Overactive that
✅ Inactivity
✅ Aberrant movement patterns
✅ Losing a street fight to Jason Bourne
✅ It’s Tuesday
Whatever.
It’s rarely ONE thing, which makes it altogether impossible to look someone in the eyes and say, definitively, “x is why your back hurts.”1
Which is why I prefer to get people moving during their assessment.
It’s easier for me to ascertain and glean a larger picture of things when I can watch someone show me their movement strategies through a variety of tasks.
Don’t get me wrong: I’ll perform several screens on an assessment table: Thomas Test, Craig’s Test, Slump Test, active vs. passive ROM, etc.
However, I also believe it’s important (if not crucial) to get them off the table and have them demonstrate to me how they choose to move.
It’s simply more information.
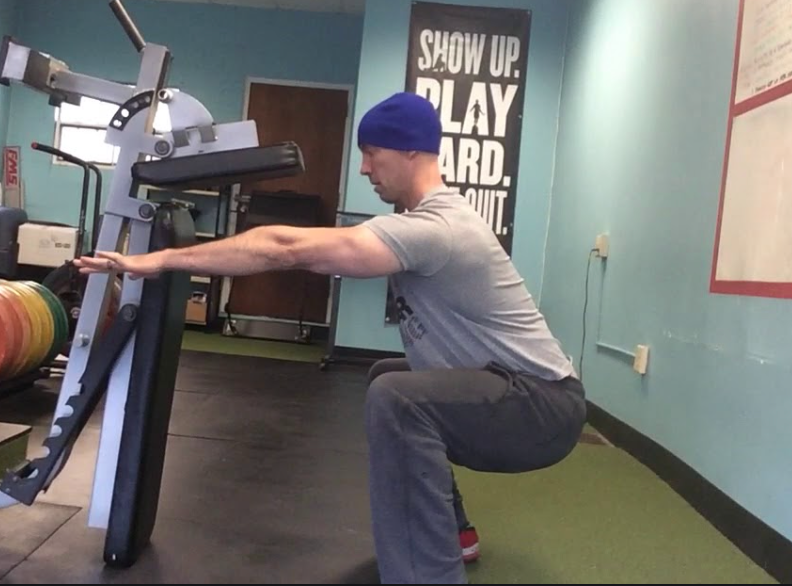
Without any prompting from me (I didn’t want to coach him on how to perform the “test”) here’s what my client’s squat pattern looked like:
Before
Notice how he immediately “falls” into an aggressive anterior pelvic tilt as a descends toward the floor? Likewise, notice the speed or lack of control as he lowers to the ground?
Furthermore, notice anything as he finishes at the top and “locks out” his hips?
He hyperextends his lower back.
I.e., he finishes with LUMBAR extension rather than HIP extension.
I had him watch the same video above and then broke down in more detail everything I explained here (and that my suspicions were that those may be the culprit of his low-back woes).
I then spent a few minutes breaking down some simple “squat technique tenets” I like to pass along when breaking down the movement with clients.
✅ We talked about foot pressure and corkscrewing his feet into the ground (to help ramp up torque in the hips).
✅ We also discussed the abdominal brace.
✅ I broke down the canister position and how that’s ideal (rib cage down and stacked over the hips)
✅ I reiterated that the squat is equal parts breaking with the hips & knees simultaneously so the net result is squatting DOWN, not BACK.2
✅ I wanted him to think about “pulling” himself down toward the floor rather than falling.
✅ Lastly, I encouraged him to “finish tall” at top; to squeeze his glutes (lightly) rather than ramming his hips forward.
Five minutes later this happened:
After
By no means was it a perfect squat (does that even exist?), but that wasn’t what I was after.
I was seeking PROGRESS.
And I think we achieved that.
Here’s a top (before)/down (after) comparison:
The bigger indicator, though, was that he had zero pain while squatting after these minor tweaks to his technique were made. And it didn’t take me giving him a laundry list of “corrective exercises” in order to “fix” it.
Sure, I could have told him to foam roll for 37 minutes and stretch his hip flexors, followed by an abyss of varying glute medius exercises…
…and he likely would have felt better as well.
However, we wouldn’t have really addressed anything.
In short: Help people find their trainable menu. COACH them. Show them what they CAN do, rather than barking at them what they can’t.
This article is not going to dive into the x’s and o’s of program design.
For that you can peruse my Resources Page and find plenty of options to fit your fancy. Instead, today, I wanted to peel the onion (so-to-speak) and discuss the layers of program design that rarely get discussed.
How to Make Your Programs Programs Your Clients Will Actually Follow
This post is going to hit on the more nitty-gritty and nuanced stuff.
The stuff that is the culmination of equal parts time under the bar, experience, and not sucking. The stuff that, while I feel are very important and what helps to separate the great coaches from the sub-par ones, might come across as trivial or inane to some, and certainly won’t win me any additional Instagram followers.
Wow, I’m really selling it here aren’t I?
Lets dive in.
1. It’s Not About You
No, really, the programs you write have nothing to do with you.
Sure, you’re writing them and it’s your expertise and coaching people are paying for. However, the program should be about your client/athlete and reflect their needs and goals.
I think it was Alwyn Cosgrove who first coined the phrase
“You should write programs, not workouts.”
On top of that, and equally Earth shattering, is a common quote I often defer to from the great Dan John:
“The goal is to keep the goal, the goal.”
Any Joe Schmo with biceps and a weekend personal training certification can write a hard workout that will make someone hate life.3
Writing a program – one that’s individualized – serves a purpose, addresses one’s unique injury history, caters to his or her’s goals, takes into account ability level, and on top of all that, is flexible, takes some thought, professionalism, skill, and attention to detail.
Listen, I am all for getting people strong (which, granted, is subjective) and I can appreciate anyone who places a premium on having their clients squat, deadlift, bench press, and deadlift.
Deadlift is listed twice….because, deadlift.
However, if your client is a newbie or is just looking to lose 10-20 lbs, or could care less about benching 2x bodyweight, the program should reflect that.
There’s two extremes that generally end up happening:
1. Trainer/coach doesn’t give a shit. Client shows up, trainer is ill-prepared, and what follows is some smorgasbord of laziness, complacency, and fitness industry cliches. I.e., client is paying for a babysitter who just so happens to show them how perform a shitty looking lunge.
2. Trainer/coach does give a shit. Albeit is too much of a narcissist to recognize that because he or she prefers to train like a powerlifter, Olympic lifter, bodybuilder, or CrossFitter, doesn’t mean ALL of their clients need to train the same way too.
Before you know it you have:
14 year old’s who have never mastered a squat performing Tri-Phasic 1-Legged Pistol Squats vs. Bands while dragging a sled
35 year old house wives working on their quad sweep
55 year old CEOs with poor shoulder flexion performing kipping pull-ups for AMRAP.
Makes sense.
At the end of the day people are more apt to follow and stay invested in a program – long-term – if they know it’s catered to them and has their best interests in mind.
Like it or not, this is a SERVICE industry….and while I recognize there’s a bit of head-butting between what people need to be doing and what they want to do, it’s your job as the fitness professional to find and include that balance.
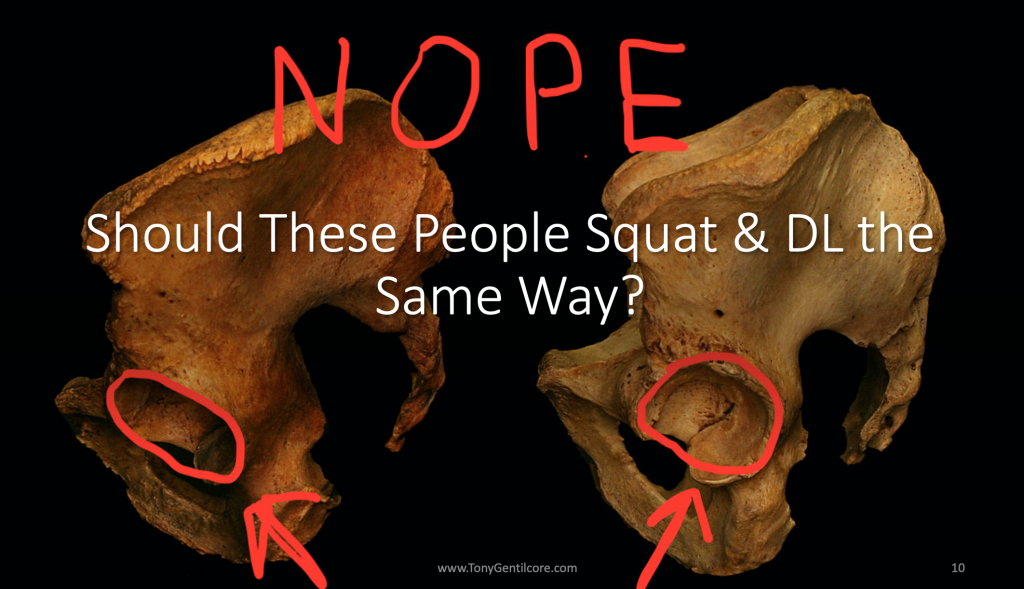
2. Avoid Fitting Square Pegs Into Round Holes
Yo, check it.
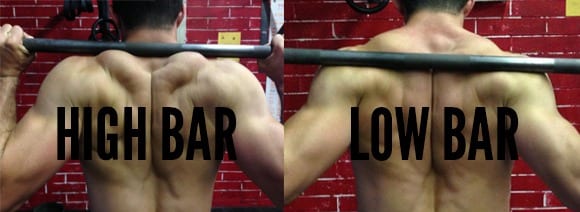
1️⃣ No one HAS to back squat. And if they do, no one HAS to use the low-bar position.
2️⃣ No one HAS to pull from the floor. And if they do, no one HAS to use a straight bar.
3️⃣ No one HAS to bench press. And if they do, no one HAS to use a crazy excessive arch. Or use a barbell for that matter.
4️⃣ No one HAS to listen to A Tribe Called Quest radio on Pandora. But you kinda do. Trust me.
Another “trap” I see a lot of fitness professionals fall into is marrying themselves to any ONE way to do or perform anything.
For lack of a better way of putting it: I fucking hate this way of thinking.
I lose a lot of respect for coaches who are that narrow-minded and unwilling to understand that there are other coaches out there getting just as good (sometimes better) results not doing what they’re doing.
Piggy backing on what was mentioned above (on individualization) – everything kinda falls under this umbrella…from exercise selection, order, and even the variation.
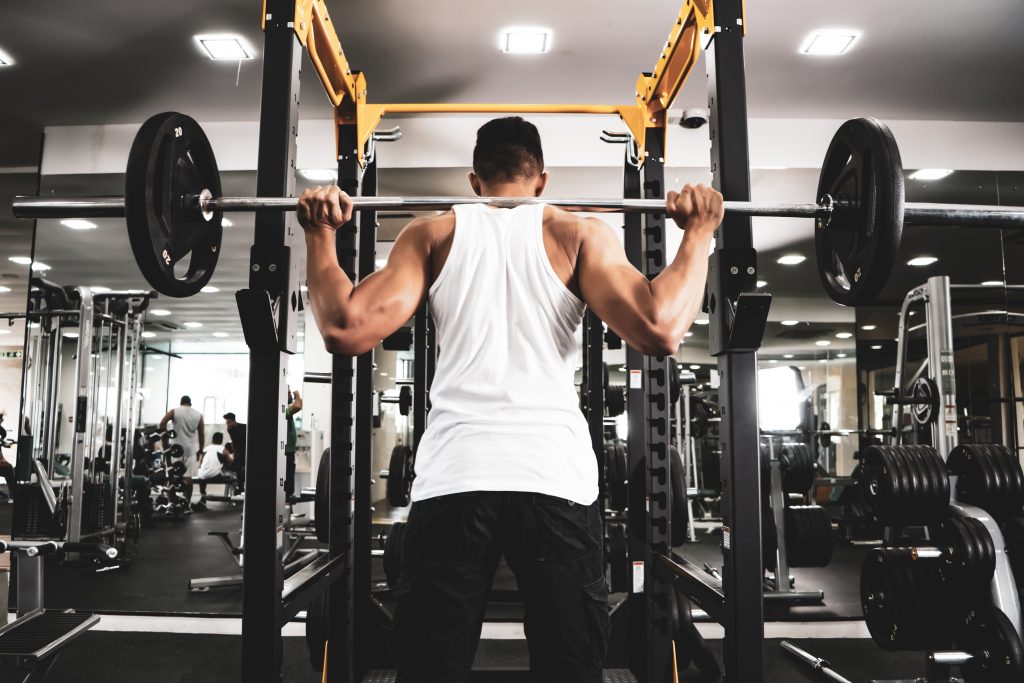
I mean, if someone has the shoulder mobility of a pregnant rhinoceros it makes zero sense to force them into back squatting, let alone using a low-bar position.
Photo Credit: Menno Henselmans
It won’t do them any favors and will likely frustrate them as it will feel weird (possibly even hurt) and will do little in building a greater degree of competency.
If I felt squatting was still important for them and it fit into their goals, a better way to build success (and competency) would be to use a SSB (Safety Squat Bar) variation or maybe even Anterior Loaded KB Front Squats:
Here I can still groove a sexy squat pattern but take the upper body restrictions out of the equation.
Likewise, with deadlifts, no one outside of a powerlifter or weightlifter must pull from the floor. It’s a rare instance – kinda like a Centaur or a vegan dish that doesn’t taste like wallpaper – when someone walks into my gym on day one and can demonstrate the mobility (and stability) requirements to do so safely.
Honestly, my first order of business with many people is to help them find their hip-hinge before I worry about lifting anything heavy off the floor.
To that end, if someone lacks the ankle dorsiflexion, hip flexion, or t-spine extension to get into proper position, maybe a trap bar would be a better option?
I find it’s a more “user-friendly” way of introducing the deadlift.
What’s more, in terms of stress and sheer loading on the spine, the trap bar will be a better option for most people anyways. With a straight bar the center of rotation is further away from the bar, whereas with a trap bar it’s right smack dab INSIDE.
https://www.youtube.com/watch?v=p-sA3PG1kGY
Want to make your programs programs your clients will actually follow?
One of the best strategies is to include exercises and movements that best fit their ability level, shows them success, and helps to build competency.
Everyone is different. Respect that.
3. Other Stuff I Was Going to Elaborate On But This Post is Already Long Enough
As in, write down and keep track of what your clients are doing per session (and encourage them to take ownership and do it themselves).
A funny thing happens when people start to keep track of what they do session to session. This little thing called progressive overload manifests and people start seeing results.
It motivates them.
Soon they’re lifting weights (for reps) they couldn’t sniff three months prior.
And it’s a beautiful thing.
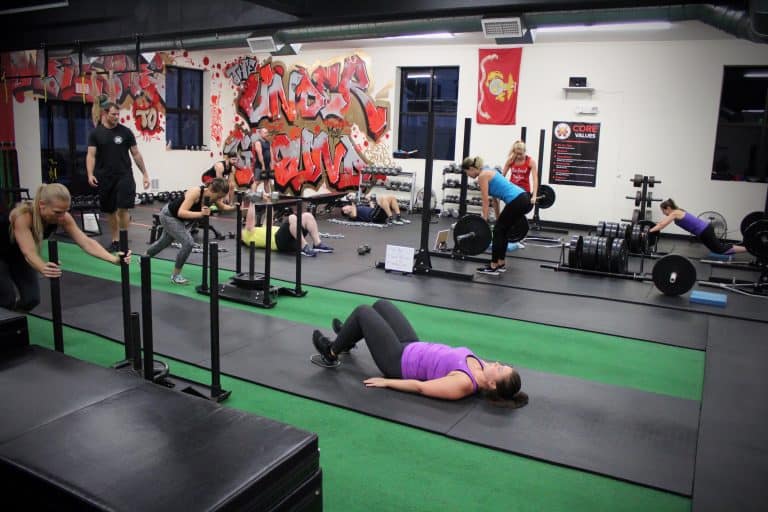
2. Experiment with Semi-Private Training
My good friend and former business partner, Pete Dupuis, wrote a fantastic article on this topic that you can read HERE.
It’s not for everyone, but I find the semi-private training model works like a charm to help motivate people. There’s a lot to be said about being surrounded by like-minded individuals and training amongst a group of people who will push you, encourage you, and call you out when you skip sessions.
3. Know When To Back Off
This coincides with what I mentioned above when I said a program should be flexible.
You may have programmed for a client to work up to a few heavy sets of triples on their deadlift on a particular day, but they show up and it’s readily apparent they had a horrible night’s sleep, or maybe they’re just mentally exhausted from resisting the urge all day to Sparta kick their boss in the throat.
Regardless, whatever was planned is…just…not…going…to…happen.
You better have a plan B in your back pocket.
4. Don’t Forget To Put In Stuff They WANT To Do
It bears repeating, this is important: I’m all for playing the “there’s a reason why you’re paying me, I’m the expert” card.
But it’s only going to work in your favor to toss your clients a bone and not take yourself so seriously sometimes.
My female clients love it when I put in some extra glute specific work at the end of their training sessions. My male clients are 100% down for a quick 5-minute “Sun’s Out, Guns Out” arm finisher.
Pants optional.
5. Sprinkle in Some Markers
As in, don’t be afraid to write in prescribed loads you want your clients to hit.
I find many people are notorious for underestimating their ability (or maybe hesitant to push the envelop) and need a little nudge from their meanie head strength coach.
Here’s an example of what I mean, a snidbit of a program I wrote for one of my female clients last month:
Week 1: Trap Bar Deadlift
3 sets of 5 reps @ 155 lbs
Week 2: Modified Sumo Stance Deadlift
Warm-up
Hit 200×1
Then 3 sets of 4 reps @ 180 lbs.
Week 3: Modified Sumo Stance Deadlift
Warm-up
Hit 205×1
Then 3 sets of 2 reps @ 190 lbs
Week 4: Modified Sumo Stance Deadlift
Warm-up
Hit 215-220×1
Fist pump x infinity
Then 3 sets of 5 reps @ 160 lbs
One of her goals, before the end of the year, was to hit a 200 lb (straight bar) deadlift. She crushedthat goal, a few months early mind you, because I didn’t baby her and gave her some markers to hit.
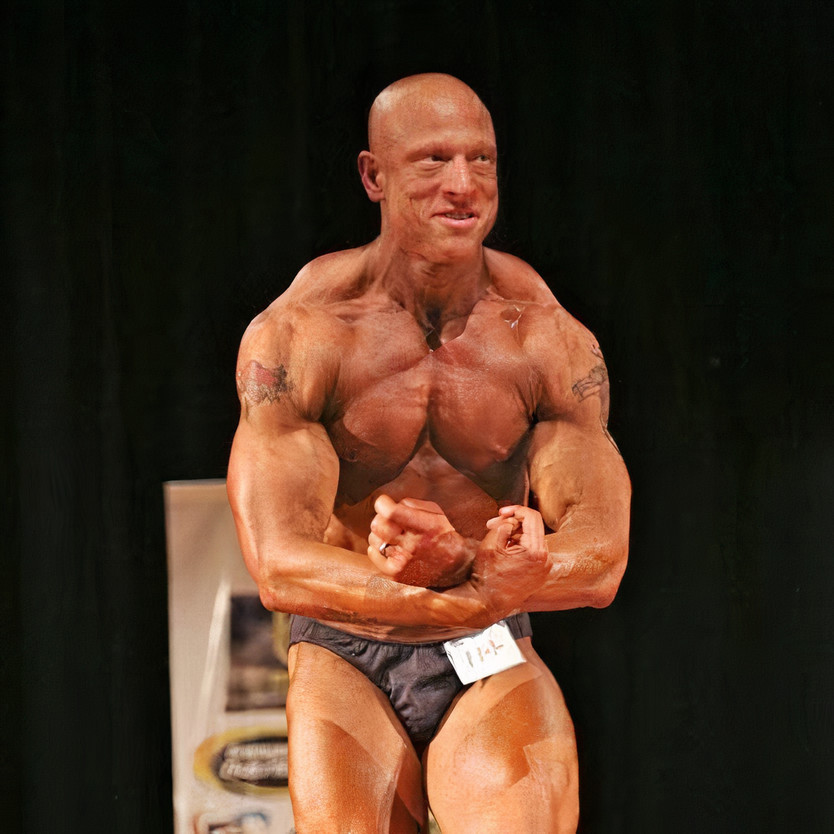
Today’s guest post comes courtesy of NJ based personal trainer and strength coach, Chris Marzarella. When it comes to best practices for getting both strong and ripped you have those who feel powerlifting is the best way, and those who feel more of a bodybuilding approach is the key.
Why not use elements of both at the same time?
I.e., PowerBuilding.
Check out Chris’s program below and maybe give it a go!
Train like a superhero to get that superhero physique.
This is a high-volume training routine.
It keeps elements of powerlifting and bodybuilding, two of my favorite things aside from NJ pizza, Guinness beer, and a Cohiba Black.
Note From TG: I had a Guinness once. Key word: once…😂
I am offering you a way to keep both in a program.
You will continue to make gains using both methods.
You do not want to do this program on a cut or during a dieting phase. It is demanding. I do not suggest staying on this program for more than 16 weeks.
It…is…demanding.
You need to have calories. I would prefer you to have 35% protein, 35% carbohydrates, and 30% fats. For a quick and dirty calculation, multiply your body weight x 12. This will give you enough calories. If you fare lower with less carbs, adjust the ratio, but don’t expect to make (as much) progress with a low(er) carb approach.
And please, for the love god, do not attempt this program following a keto approach.
Higher volume requires more calories for optimal recovery. If you try to do this cutting a dieting phase, you are shortchanging your results. Why put yourself through hell and not have enough brick and mortar to build that house of your dreams?
Conjugate Method
The conjugate method is born out of both Soviet Union and Bulgarian training systems. It was popularized by legendary powerlifter and coach, Louie Simmons of Westside Barbell.
The foundation of this program is centered around selecting a compound move and trying to progress each each week by even a small amount of weight.
The format of the conjugate week looks like this:
Maximum effort upper (Bench Press variation)
Maximum effort lower (Squat / Deadlift variation)
Dynamic effort upper
Dynamic effort lower
In this program you will stay on a lift for a period of one to three weeks.
Even if it’s a 2.5 lb. gain, it’s STILL progress.
Another thing to consider, and something that’s often glossed over, is FEEL of a set. Technically, you can stay with the same load for multiple weeks and just focus on making that load feel less effortful.
That’s progress too.
However, the main concept to anchor in your mind is that even a seemingly small increase is still an increase.
To that point, you may want to consider purchasing a cheap set of fractional plates.
After one to three weeks, you’ll change a small component of the lift.
From there you will want to consider varying your lifts slightly every few weeks.
If you did a competition bench press, change the grip to a narrow grip or something that makes it different. If you did a competition squat with a belt, train without a belt. Change the first bench press into an incline bench press. A back squat can now become a front squat.
The choices are endless.
The Format
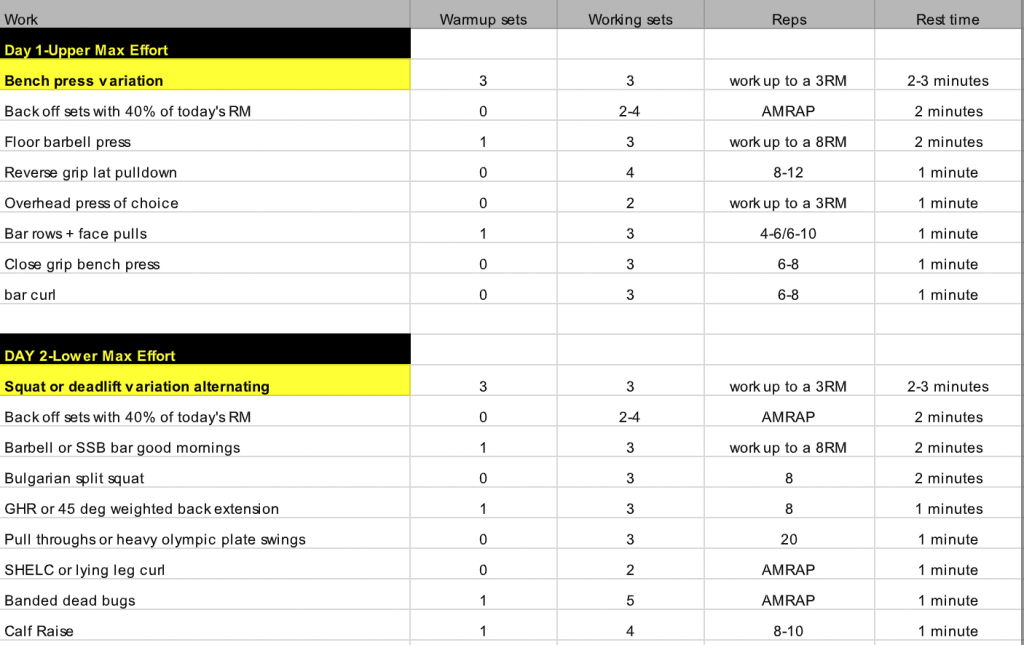
We will keep the two max effort days the same. We are going to use higher volume with a push-pull-legs format for the latter half of the week so that it looks like this:
Day 1: Max Effort Upper
Day 2: Max Effort Lower
Day 3: Rest and Recovery
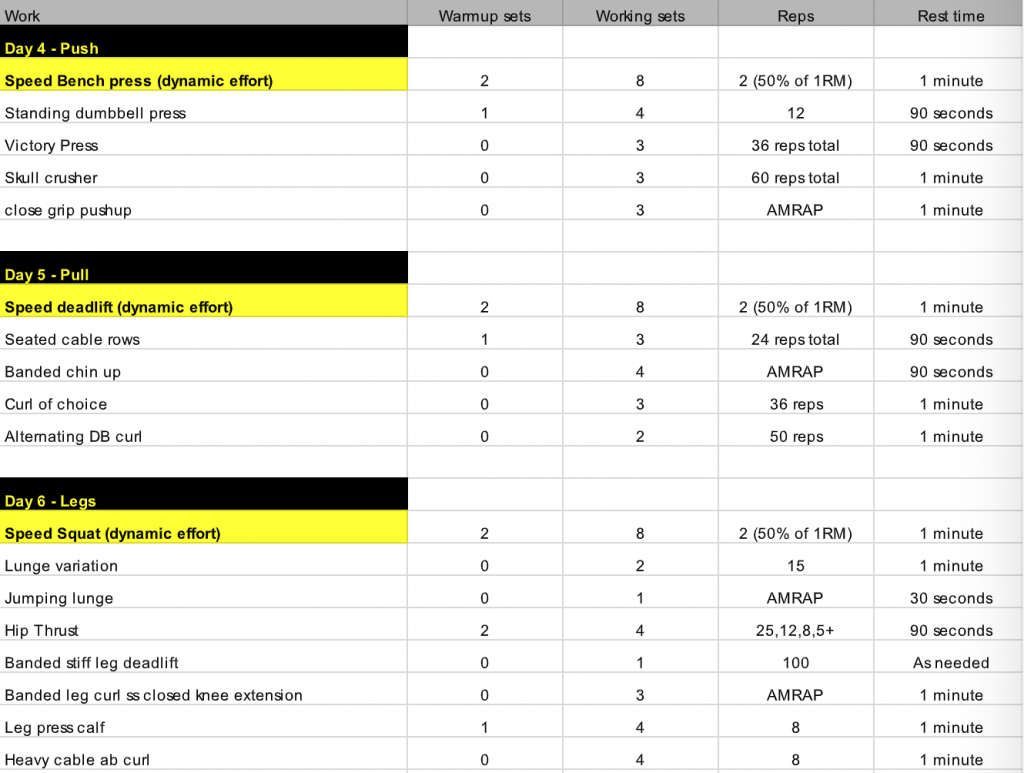
Day 4: Push
Day 5: Pull
Day 6 : Legs
Day 7: Rest and Recovery
The Program
Recovery Day Options
Warm-Up: 3 Minutes on bike, elliptical, or walk outside.
15 Minutes HIIT: Choose one of the following modalities:
Tire flip: Set timer for 15 minutes, and flip the tire. Rest only as needed.
Sprints on Elliptical: Warm-up two-minutes, high burst intensity for 20 seconds/low intensity 40 seconds, repeat ten times, cool down for three minutes
Ball Slam – 15 seconds slam the ball/45s rest – repeat 15 times.
Sled Push – Set a timer for 15 minutes. Walk with bodyweight amount on sled. Rest as needed.
Workloads in the beginning of the week will focus on the compound lifts and getting you stronger. So, think: squat variation, deadlift variation, and bench press variation.
Your accessory work (subsequent exercises) should focus more on your weak points and/or technique flaws with the main lift(s).
For example, if your glutes are weak, select an exercise (after the main lift) that targets that weakness. If your shoulders are the weak point on your bench press, select an overhead press variation.
The program above should serve more as a template than something that’s set in stone.
Variations
Don’t go so far away from your primary lift movement pattern that you use three or more modes of overload.
Don’t use a Swiss ball, plus bands, plus a barbell, while using a Slingshot to vary the basic bench press. What do you think this is…
…Instagram?
Instead, change your grip, use a different range of movement like an incline bench. Change the rep tempo, pause inside of the rep.
Anything can work to continue training the basic movement.
One small tweak is all you need to count as a variation.
If you squat with a belt, spend three weeks squatting without a barbell. Maybe consider performing a Pin (or, Anderson) Squat.
Paused squats, slight changes.
As far as deadlifts are concerned, you can choose to deadlift off blocks. Deadlift with a squat shoe, use a Trap Bar, deadlift with a band around your waist and planted into a power rack.
How about Slow Start Deadlifts?
Changes need to match the lift.
Getting Stale On Accessory Movements
Change a little something about the lift.
For example, if you are doing a good morning, but not progressing, change the movement to a stiff leg deadlift. You still have that hip hinge, but you are changing it enough to create a new stimulus.
Give the exercise time to work.
Do not change it every three weeks. Stick to it for 4-6 weeks.
Final Details
Where you see AMRAP sets, stop one or two reps shy of failure. Don’t go bananas. You are risking injury.
Where you see total rep numbers, I like to get as many reps as possible on the first set. Then whittle it down to a total of reps needed.
Unsure of when to move up the weight? Use auto regulation. Do the required amount of reps for the sets. On the final set, take it to failure. If you get 2-3 additional reps, add 5 lbs next time. If you get more than that, add 10 or more. Choose wisely or you risk injury.
Plan a recovery workout. It should include a HIIT training session, a series of stretches, mobility work and a cool down period.
Give this program all you have for twelve weeks.
Remember: Treat it as a template. I encourage you to change things to fit your injury history and ability level. The important thing here is the structure.
Seriously, twelve weeks.
Go hard, but be smart (and consistent). Boring often works the best anyway.
You’ll be strong AF and looking like Batman (the Affleck Batman, not the puny Keaton one) in no-time.
About the Author
Chris Marzarella is a trainer and strength coach and owns a studio located in Brick, NJ. He is available online and in person in Ocean and Monmouth County NJ.
He runs a dry land strength and conditioning camp in Tinton Falls at Rock Sports Club. The program is for young swimmers with the NJ Racing Team. He has trained clients and athletes for over 25 years. He is also a competitive NPC classic physique athlete.
Today’s guest post comes via TG.com regular Travis Hansen.
I’ve long championed the notion that most people, most of time fail to understand the significant power that dedicated strength training has on one one’s ability to lose body fat.
We’ve been programmed to think the key to fat loss success is “surviving” endless, laborious hours on a treadmill. That approach “can” work, but speaking personally I’d rather swallow live bees.
Thankfully, Travis uses less hyperbole to explain why strength training should be a staple in anyone’s fat loss endeavor.
At this point it’s pretty obvious that nothing is going to give you more leverage with regards to getting results (and results that will stick long-term) than proper strength training.
There’s a bevy of real-world examples around the world, and the science & research back it all up too.
There are several studies that have investigated the effects aerobic and anaerobic training have on weight loss, fat loss, and the maintenance or increase of muscle mass.
The consensus among the scientific community is that both methods contribute to fat loss, but anaerobic training (weights, sprinting, etc.) is hands down better.
Per unit of time, anaerobic training is better. However, it cannot be utilized/practiced as much because of fatigue factors, so you need a blend of both.
Just so we’re all on the same page: Me stating I feel most people should focus a little more on strength training to help with fat loss is NOT me saying I am against performing cardio. This is akin to an analogy I recently saw Dr. Spencer Nadolsky make:
“When I say “weight lifting is good for you” and then people say “I can’t believe you’re not promoting aerobic training!” It would be like me saying “strawberries are good for you” and someone saying “I can’t believe you’re not promoting broccoli!”
The best approach to fat loss is a synergistic one: Eating for your goals as well as performing BOTH strength training and cardio.
Just remember that anaerobic training can (and should) be primary and aerobic is a far secondary.
And the science heavily supports this stance.
Science also supports that Tony is jacked (👈 Tony wrote that)
When it comes to training, a great analogy for attempting to create as much caloric expenditure as possible can be derived from establishing a proper foundation of training methods from the bottom up.
You can refer to this as The Fat Loss Pyramid.
The most potent and powerful contributors to total fat loss start at the bottom and then decrease in their value as you climb the pyramid.
We still seem to have this model backwards.
As counterintuitive as it may seem to some, a majority of calorie burn should come from weight training as the vast majority of research over the decades have showcased it’s superior effects that can’t be entirely achieved or replicated through other popular methods (i.e., HIIT, steady state, fasted cardio, etc).
It’s not lost on me the the notion of weight training being a primary method for fat loss is still dumbfounding to some people. But it shouldn’t be if you consider the science on the topic.
Note From TG: This is why I’m a fan of the saying “what makes muscle, keeps muscle.”
“Fat loss plans should alternatively be referred to as “muscle maintenance” plans. The idea should be to maintain or keep as much muscle as possible while in a caloric deficit. The easiest way to do so is to lift heavy things – remind the body to hold on to precious lean tissue.”
The Science
The infamous study by Dr. Schuenke tells us exactly why strength training should be first and foremost when it comes to optimal fat loss training. (1).
Schuenke and his team took seven healthy men and had them perform a 3-exercise circuit utilizing the squat, bench press, and power clean.
The circuit was performed three times amounting to twelve total work sets and lasted 31 minutes.
The results were remarkable!
Aside from the few hundred calories the subjects burned during the session, they burned about 600-700 calories in addition to that number over the next 38 hours post-exercise. This phenomenon is known as “Excessive Post-Exercise Oxygen Consumption,” or EPOC for short.
EPOC is the amount of energy required to return our metabolism back to pre-exercise levels. It can take minutes with certain training types such as aerobic training and hours to days with high intensity work such as resistance training and max effort sprinting. There are at least five studies that clearly show weight training increases EPOC for 1-48 hours above resting levels. (2)
Through heavy resistance training and sprinting, the amount of energy needed by the body to recover the damage has been said to be much higher than with “traditional” cardiovascular training. The damage itself requires energy and time to repair, which increases our body’s protein turnover and calorie burn.
Protein turnover is simply the amount and rate of protein that is lost per day. There is also an increase in the activity of our body’s functional battery, which is the nervous system.
Also, several fat burning enzymes and hormones elevate as well.
Along these same lines, the recently popular “constrained energy” study showed that individuals who possessed more muscle mass had a substantially high RMR (Resting Metabolic Rate), contrary to popular belief.
Recall that muscle mass in and of itself doesn’t burn a whole lot of calories, but the higher RMR could help explain all of the energy cost from repair that is being done on days that follow strength training. To help really put all of this into perspective, using strength training as an unparalleled and superior form of cardio creates a “2 workouts in 1” training effect until your body begins to adapt to training later on down the road.
On a final note, the increase or maintenance of your muscle will also burn a few extra calories per day as well, which could add up over time.
Another study had researchers assign overweight subjects to three groups; diet-only, diet plus aerobics, diet plus aerobics plus weight training.
The diet group lost 14.6 pounds of fat in 12 weeks.
The aerobic group lost only one more pound than the diet group. (Their training was three times per week beginning at 30-minute sessions and progressing to 50 minutes over the 12 weeks).
And the weight training group lost 21.1 lbs. of fat, resulting in 30-40% more than diet and aerobic-only groups.
What’s revealing is that the addition of aerobic training didn’t result in significant fat loss over just dieting alone. (3)
Now it’s only fair to also point out that even though these studies above do highlight the superiority of weight training for creating the most EPOC, and perhaps even calorie burn and fat loss from a workout, from the data I’ve collected with clients and the protocols we’ve utilized for years, the effects of EPOC may begin to diminish over time as you become more experienced and adapted to weight training according to at least one study by Abboud et. all 2013. (2)
Losing Muscle on a Diet = 👎
On a final note, it should be recognized the effects of losing muscle mass can have on hunger levels, weight regain and energy regulation long-term, so make sure you and or your clients make strength training the foundation of your training program.
But here is one more nail in the coffin if you aren’t sold yet.
Dr. Brad Schoenfeld provided a study a while back through social media that demonstrated what is called “Collateral Fattening” when muscle mass is lost on a diet.
Basically, the body perceives muscle loss as a threat which drives up fat gain through different pathways and hunger signals.
If that last couple sentences isn’t enough to make resistance training your primary option when it comes to fat loss training I don’t know what else to say. Only heavy lifting can preserve and grow muscle, even though similar blood marker responses can be seen with interval training, minus actual muscle growth and maintenance, unfortunately.
One Final Word
And now that you’ve clearly seen what the science has to offer, let’s talk about some other equally important factors that should seal the deal when it comes to strength training for fat loss.
Frankly, aerobic training is FAR more limited when it comes to training options and it’s safe to say this is going to drive quicker adaptation and lower energy outputs. The availability of exercises for resistance training splits and circuits is literally infinite.
Some people like repetition and monotony, and others vouch for constant variety, and both are fine and will yield results. However, if you or someone you know wants to absolutely incinerate body fat then find a comfortable and effective resistance training protocol from a reputable professional and you wont be disappointed.
About the Author
Travis Hansen has been involved in the field of training for over a decade, and he has over 60,000 hours of hands-on training experience.
He graduated with a Bachelor’s degree in Fitness and Wellness, and he holds three training certifications—from the ISSA, NASM and NCSF.
He was the Head Strength and Conditioning Coach for the Reno Bighorns of the NBA D-League during their 2010 season, and The University of Nevada-Reno golf team in 2015.
He was the former Director of the Reno Speed School. He has worked with hundreds of athletes from almost all sports, ranging from the youth to the professional ranks.
He is also the leading authority on speed development for the International Sports Sciences Association. For more info check out his website.
References
#1-Schuenke MD, Mikat RP, and Mcbride JM. Effect of acute period of resistance exercise on excessive post-exercise oxygen consumption; implications for body mass management. European Journal of Applied Physiology 86: 411-417, 2002.
#2-Abboud, George. Effects of Load-Volume on EPOC After Acute Bouts of Resistance training in Resistance-trained Men. Journal of Strength and Conditioning Research: July 2013-Volume 27-Issue 7-p 1936-1941.
What could I possibly have to say when it comes to the delicate intricacies of postpartum anything?
Well, as it happens, I’ve worked with many women during and after their pregnancies throughout the years, and have had pretty good success with mansplaining the inner workings of a uterus helping them understand that, whether they’ve given birth seven months ago or seven years ago, strength training can help with myriad of postpartum issues.4
…when I say “lift shit” this DOES NOT insinuate anything close to maximal effort.
For starters: I’m not an asshole.
Secondly: All strength training is not powerlifting. It’s still feasible to have someone lift appreciable loads – even postpartum – and not assume I’m attempting to turn them into Stefi Cohen.
But more to the point: I’m not an asshole.
I understand, to the best of my Y chromosome having abilities, the intricacies and delicateness that coincide with the months postpartum.
It’s not a time to rush back into things and to race oneself back to pre-pregnancy gym numbers.
The first few months are all about rebuilding the base (specifically to address the pelvic floor and diaphragm, to get the “core” connected again, and to progress from there).
After that, a person’s capabilities and foundation matter more than whatever time frame it takes to get them deadlifting appreciable weight again.
As far as the BIG no-no’s to avoid immediately postpartum:
Plyometrics – burpees (please, stop), jumping, stairs, and running.
Anything coming close to max-effort loading.
Front abdominal exercises (planks, sit-ups, push-ups, leg lifts, or anything that makes the abdominals bulge anteriorly or uses the core to support a lot of bodyweight).
FWIW: Any sort of Fight Club is out of the question during this time as well.
For many women their postpartum approach = kegels (and that’s it).
Alternatively, a more germane (and, not coincidentally, successful) approach to postpartum training is:
Kegels
Teaching a GOOD breath – focusing on the canister position.
Cementing all of the above with “strength.”
Kegels are a fantastic (and proven) tool to use to help with pelvic floor dysfunction. Teaching them the right way (and when appropriate) helps to connect and educate the pelvic floor. As it stands, women who did dedicated pelvic floor training = 17% less likely to report incontinence.
However, when OVER used kegels can lead to an overactive pelvic floor. Compound that with the all too common scenario of very little attention being made toward the efficacy of positional breathing drills – I.e., emphasizing the canister position (pelvis stacked underneath the ribcage; or reduced rib flare) – and you have a recipe for disaster.
Photo Credit: Inspired Physiotherapy
Left Image = Canister Position (diaphragm stacked on top of pelvic floor)
Right Image = not that.
Positional breathing begins with teaching a GOOD inhale. This entails 3D (360 degree) expansion of the ribcage. With a good inhale the diaphragm contracts down and it able to “let go” and relax. Moreover, as Sarah notes in her course, every (good) inhale can push down on the pelvic floor which is okay.
Bearing down is one thing. This is not ideal.
However, with a proper inhale, the idea is to push the “ground floor of the house to the basement.” In other words: the inhale EXPANDS pelvic floor. Then, a full, accentuated exhale brings everything back to the ground floor.
For the visual learners out there this may help (graph taken from Sarah’s course):
Again to reiterate:
“Inhale = pushes down onto pelvic floor (get it to the basement)….exhale = RELAXES.”
Taking the time to really build context and to hammer home the importance of the canister position will be a home run for many (if not most) postpartum women.
A simple example would be something like a deadbug, performed with a full 360 degree inhale followed by a drawn out, full exhale (without aggressive bearing down of the abdominals):
Tony, Did You Forget About Lifting Things?
Puh.
Not at all.
Strength training is the part where we “cement” all of the above into place. It’s crucial to build pelvic floor awareness (kegels) as well as function (positional breathing drills). If someone is unable to do this right, I am NOT going to load them.
However, assuming the work has been done I see no reason not to.
First we start with TIMING of the breath with the bodyweight squat. Inhale on the way down (pelvic floor expands and relaxes).
Exhale on the way down (pelvic floor comes back up and contracts).
Once that is mastered, then we can begin to THIS IS SPARTA. BACK SQUAT MAX EFFORT, BABY.
Just kidding.
I just use common sense and progress accordingly with something like Goblet Squats and always remain cognizant that I DO NOT want any aggressive bearing down of the abdominals and to keep IAP in check. The pelvic floor is just like any other muscle and needs progressive overload too.
Being postpartum is not a disease and I find it increasingly frustrating that many women are programmed into thinking that the only approach is with kegels and kegels only.
It’s a far more multi-faceted approach that requires attention to detail and dare I say…
In recent years whenever I am asked by other health/fitness professionals what course I’d recommend they look into my immediate answer is Dr. Sarah Duvall’s PCES course.
It’s without hesitation the most valuable continuing education resource I’ve come across in recent memory, and it’s also had the most impact on my own coaching.
Every pregnancy is different.
Every woman who is postpartum is different.
There are a LOT of women out there and you WILL undoubtedly need to know this information and know how to apply it.
As it happens, Sarah just opened up access to the entire PCES 2.0 course:
34 hours of content loaded with a tsunami of lectures, videos, and case studies.
CEUs available
Save $250 off the regular price through May 21st. Access to the course shuts down on 5/25.
FYI: Payment plans available.
This course will teach and show you the appropriate assessments/screens to use as well as the corrective strategies to implement to address everything from pelvic floor dysfunction to incontinence to rectus diastasis. In addition, and this is what I dig the most about Sarah’s approach, is that strength training can and should be a part of the process.
Remember: You only have till midnight on 5/21 to SAVE $250 and access to the course ends on 5/25.
Uttering the phrase “looks like someone has a case of the Mondays.”
Cocaine
Partaking in social media drama, buffoonery, and general hijinks.
For me there’s a cost/benefit to all of the above. Take my cat, Dagny, for example. I love her to pieces. But I still get the feeling, whenever she looks at me for more than three seconds, she’d murder me in a nanosecond with a machete if only she had opposable thumbs.
I have my reasons for the other stuff too.
With regards to the latter, however, I was recently lured in like a moth to a flame when I saw a Tweet from a well regarded and highly respected fitness professional commenting on “lifting heavy” and playing sports…
…and how people should avoid the former if participating in the latter.
I have to say, before I dive into my own thoughts on Dan’s thoughts, reading the subsequent comments was quite entertaining.
They ranged from people agreeing to the statement5 to what can only be described as a few peacocks spreading their feathers.
I.e., Triggered!
A few coaches read the comment and reacted as if someone informed them creatine was the same as steroids or, I don’t know, one of their athletes didn’t squat to depth.
I could just smell the inflated lat syndrome emanating from my screen.
Admittedly, I too rolled my eyes a bit.
That said, I felt the initial statement was a bit too ambiguous. To me, it was more about garnering eyeballs & drawing attention to his funnel link than providing anything of real substance.6
What sports are we referring to? MMA? Lacrosse? Backyard wiffleball?
What level of sports are we referring to?
What’s the ability level & experience level of the athletes in question as it relates to the weight-room?
What’s considered “heavy.”
Is there no such thing as in-season and off-season training modifications in this mysterious world where athletes shouldn’t lift heavy things?
To Dan’s credit, he did elaborate further:
“The reason is because both are taxing to the nervous system. Mind you when I talk “sport” I mean one played at a high intensity (ie. basketball, soccer, surfing). Trying to play your best while chasing PR’s will likely cause injury.”
I didn’t quite understand where he was going with his sport examples. I’d make the argument that any athlete of any sport – particularly if it’s being performed at a high level – needs to be prepared for that sport. I don’t care if we’re talking about soccer or bowling.
Okay, maybe bowling is a stretch…;o)
Much of that preparedness comes from a well-rounded, properly progressed IN-SEASON and OFF-SEASON strength & conditioning program.
Off-Season Training = Initially focuses on recovery to combat a long competitive season as well as to address any deficits/weaknesses that accumulated along the way. That then transitions to a more traditional strength & conditioning program catered to helping the athlete improve strength, speed, movement capacity, ROM, ability to run through a brick wall, etc.
In-Season Training = Reducing training frequency/volume – depending on playing time (starter vs. 10th-11th man off the bench in basketball), position (everyday player vs. pitcher in baseball), game schedule (football vs. softball) – albeit under the guise that the objective is to LIMIT as much drop off as possible of the gains made in strength, speed, etc during the off-season.
Not to mention, in-season strength training is a splendid way to help reduce the incidence of injury as a season progresses and fatigue and wear-n-tear on the body accumulates.
KEY POINT: Reduction in frequency (volume), not intensity.
It’s my experience – and that of many other coaches – that intensity (as a percentage of one’s 1-rep max) is far less taxing on the CNS than volume (sets x reps x frequency). In fact, it behooves most athletes to keep intensity somewhat high during SOME of their in-season training.
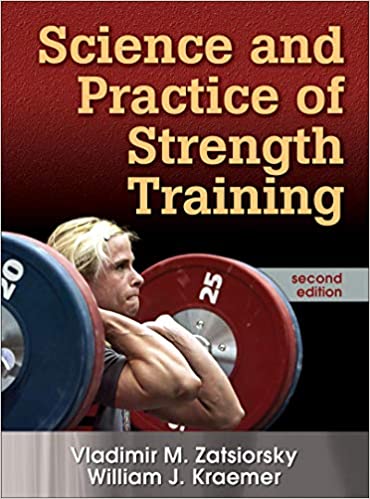
As Vladimir Zatsiorsky states in his seminal book, Science and Practice of Strength Training:
“Training with weights ~90% of one’s 1-rep max (I.e., heavy, but no anywhere near PR heavy):
Recruits the maximum number of motor units.
Ensures the fastest MU’s are activated.
Discharge frequency (rate coding) is increased.
Activity is synchronous.
Improves coordination between synergistic muscles.
Increases potential for future hypertrophy gains.”
Moreover, Zatsiorsky notes that from a velocity standpoint, it’s been shown that power output increases as the weight lifted decreases from 100% of 1RM to 90% of 1RM. In fact, for the back squat and deadlift, power output for a load at 90% 1RM may be twice as high as the 1RM load due to the large decrease in the time required to complete the exercise with the lighter load.
In other words: Lifting light(er) loads faster = best of both worlds?
Additionally, strength “lingers.”
You don’t have to do a lot of it in order to maintain it.
In his book, Block Periodization, Dr. Issurin notes that maximal strength has a “residual duration” of 30 +/- 5 days.
In non-Klingon all this means is that, in order to maintain strength, you only really need to remind the body every 2-3 weeks (or so) of what it takes to keep it. This is splendid news for in-season athletes.
This means that 2-3 heavy(ish) sets of 2-5 reps (in the 85-95% range) every few weeks is enough to maintain most of their strength levels.
Australian strength coach, Nathan Kiely, sums things up nicely:
“Maintaining neuromuscular strength in-season is critical. And a load that wouldn’t have developed it in the first place, won’t do enough to retain it either.”
To that end, NO COMPETENT COACH is chasing PR’s in-season. I just wish Dan would have said THAT initially instead of the blanket statement of “if you play sports you shouldn’t lift heavy.”
Because, I agree – it makes zero sense to max out or chase PR’s during a competitive season.
As one commenter commented:
“Chasing PRs and 1 RM in season are pointless. But if you program correctly and tailor workouts to your athletes sport intensity, schedule and allow recovery time. PRs are just going to happen organically.”
The statement reminded me of something I heard renowned strength & conditioning coach, Buddy Morris, say during a presentation years ago:
“Tony, can we be BFFs? Whenever an athlete of mine hits a PR – especially in-season – I shut em down for the day.”
Word.
In Short: When dosed intelligently you can do both.
I’ve always been painfully slow off the floor when I deadlift.
Like, you could be watching the movie Titanic and I’d juuuuust be getting the barbell off the floor by the time you got to the part where Rose lets go of Jack.
If this sounds like you, you may need some more squats in your life.
A few years ago I made a concerted effort to prioritize my front squats (and upping my squatting volume in general) and was finally able to conquer a 600 lb pull.
The additional squatting undoubtedly helped improve my quad strength and ability to push away from the floor when I initiated my pull.
Heed my warning, though. If your deadlift volume is up it’ll behoove you to opt for more front squats or high-bar back squats since both will allow you to maintain a more upright torso (less shearing on spine). If your deadlift volume is on the low end, feel free to implement more low-bar back squatting.
👇👇👇 Check out a sample training split below (after the video) 👇👇👇
Here’s a quick example of how I’d structure the deadlift to squat ratio based off deadlift frequency:
Deadlift 1x Per Week (2 Lower Body Sessions)
Day 1:
A. Back Squat: 5×2 @ 60%, 60s rest
B. Deadlift: 2×2 @ 85%
C1. Deadlift – For Gainz: 4×4 @ 70-75%
C2. Deadbug Variation 4×5/side
C3. Stab Someone in the Face 4×3
Coincidentally enough I choose the picture for today’s guest post before actually reading it.
Oops, a minor editorial mistake.
You see, as you’ll learn below, placing a barbell on your back during single leg exercises – while not a wrong strategy to partake – does have a distinct disadvantage.
HINT: More load isn’t always the “x-factor” with regards to making exercises more challenging.
Suffice to say, lesson learned (but I’m too lazy to go back and find a different picture).
I hope you enjoy this excellent piece by two colleagues of mine – Dr. Michelle Boland (a phenomenal local coach here in Boston) and Tim Richardt (a former coach at CORE who’s now located in the Denver area) – that gave me a few Ah-HA moments.
Quarantine have your legs and butt looking skinnier than Gollum’s?
An excellent example of commitment to a singular goal, but not of muscular development.
Get your quads, glutes, and hamstrings looking more bountiful than a post-Mordor-crumbling Shire feast with these single leg exercises!
We’re done with the Lord of the Rings references now, we promise.
We’ll explore loading options, body positioning, front versus rear foot elevation, and direction of center-of-mass (COM) movement to help you taste those sweet, sweet single-leg gains.
Let’s get right to it…
#1 Front Foot Elevated Zercher Split Squat
Load Position Advantage
Holding the weight in the crook of your elbows allows for more relaxation of muscles on the backside of your trunk, enabling increased depth WHILE circumventing grip strength as a potential rate-limiter for loading.
A barbell placed in the traditional “back rack” may rob you of comfortable hip range-of-motion (ROM) due to compression of muscles on the backside of your trunk.
Loading in the Zercher position lets you maintain more VERTICAL displacement throughout the movement, and more pure-up-and-down displacement means more stimulation of muscles that DO vertical displacement (i.e. glutes and quads), leading to more gains and more eventual jealousy from your high school ex after they see your jacked wheels on Facebook.
No barbell? We can accomplish a similar effect with 2 DBs.
Vertical displacement whilst keeping a STACKED position during a split squat, vital to loading muscle tissue (yay!) and minimizing joint strain (boo!), is reviewed, HERE.
Why Front Foot Elevation?
Elevating the front foot shifts your COM backwards, meaning the muscles of the front leg can relax to a greater degree to allow for more depth during the lowering (eccentric) portion of the movement. Additionally, raising the front foot shifts the trained range of motion into deeper degrees of hip flexion, leading to greater mechanical stress placed on the musculature that extends the hip (dat booty).
Bonus; Heel Up?
Try elevating your front heelto enable increased loading of the knee and hip whilst maintaining the “vertical stack” during this drill.
Be sure to maintain heel contact and allow your knee to drift forward over the mid-foot to allow for more hip and knee flexion.
#2 Staggered Stance Retro RDL
Why Backwards is Better…
The Staggered Stance Retro RDL allows you to use the front leg to push your COM backwards towards the leg that’ll be doing all the work. This exercise HAMMERS glutes and hammies, and is a great stepping stone towards an eventual unassisted SLRDL.
The KEY distinction between the conventional RDL (or Heels on Wall Variation) and the staggered stance retro RDL is the direction of your COM travels. In the rear foot single leg deadlift, your COM translates forward, whereas in the staggered stance retro RDL, your COM migrates backwards.
Going front foot supported allows for more of a sit “back” scenario encouraging a more advantageous orienting of the hips to access ROM (remember: more ROM, more loading, more gainz) as well as reducing the challenge of NOT falling forward onto your (pretty) face.
Why Single Arm Loading?
We love a single KB held in the opposite hand (in reference to the back leg), as this encourages rotation of the ribcage TOWARDS that rear leg. Rotation towards the side we’re loading means we’re able to load muscles of that hip to a greater degree, and the combination of an opposite hand reach AND a front foot support ensure we’re loading the back leg’s hamstrings and glutes as much as we possibly can.
Technique
Some pointers with the Front Foot Supported Single Leg Deadlift:
Position the non-working leg in front of the working leg and use the front (non-working) leg to push the back (working) leg backwards. This results in a hip “shift” TOWARDS that back leg.
The arm opposite the working leg holds the KB and maintains a path over the big toe of the back foot. That reach further supports the shift you obtained in step 1.
Sit your hips back in space, feeling loading on the heel, base of the big toe, and base of the little toe. Reverse this motion by pushing through this “tripod foot” back to the starting position.
#3 Rear Foot Elevated Split Squat
Jack Up That Back Foot
The Rear Foot Elevated (RFE) Split Squat is a variation that places greater emphasis on the front leg. This exercise is also a good progression towards a strict single leg activity, such as a single leg squat.
While performing a boring ‘ol split squat, the load is fairly evenly distributed between the front and back legs. However, elevating the rear foot shifts your center of mass forward, dramatically increasing the loading of the front leg. Train this sucker and that leg’s getting more yoked than a Marriott Courtyard omelette bar.
The RFESS is #3 on this list because it trains a little like a cross of exercises #1 and #2.
It’s a vertical movement (like our FFESS), but the forward lean created by the elevation of the rear foot enables some degree of forward/backwards COM displacement (like our deadlift variation). The result is an unholy cross of glute and leg destruction.
Placement of Load
To optimize loading with this drill, we recommend dumbbells in each hand- like THIS. As we mentioned previously, a barbell placed in the traditional “back rack” position tends to compress muscles on the backside of the body, robbing the body of hip flexion availability and trainable range of motion.
The distance between your front and back legs- your “stride length” during a split squat- also matters.
A short stride length (front foot closer to back foot) will bias hip musculature (glutes). If you elongate the stride length you’ll shift the loading to more quads, leading to more yoked legs with which to better fill out those new early-Christmas jeggings.
Bonus Yoked-Worthy Exercise: Walking Toe Touch Lunges
Muscle Recruitment
Walking Lunges with an opposite arm reach facilitate more high hamstring recruitment by biasing a posterior tilt of the pelvis. High hamstrings fix the position of the pelvis, enabling greater loading of the hip extensors (butt), making this drill an excellent choice for a “finisher” after your main exercises. To quote our good friend, the wise and powerful Tony, after performing a set of these, “I FELT it in my soul”!
DISCLAIMER; Michelle and Tim are NOT responsible for any Soul-Delayed-Onset-Muscule-Soreness (SDOMS) experienced after performing this drill.
Technique
Big pointers with the Walking Toe Touch Lunges
Maintain up/down motion by keeping your head stacked over your chest and stacked over your hips… put simply “mostly elevator, a little escalator”
Reach your opposite arm to your front big toe keeping your breastbone pointed straight ahead and letting your shoulder blade reach around your ribcage
“A little” hinge at the hips is necessary to stay moving FORWARDS, but “a little” is all you get
Be nice to your back knee, a soft surface is ideal with this drill
Focus on turning into your abs on the same side as the front leg
Stand up by pushing the ground away with the front foot (that same tripod foot as we discussed previously)
You get no bonus points for lunging LONG- keep your stride length short and controlled
Summary
Choosing single leg exercises that will allow you to achieve the greatest ROM while moving heavy loads are key to targeting more muscle mass. Gettin’ more yoked than a 12th century plow animal is all about moving load over ROM.
Intelligent holding positions, such as DBs at sides and zercher, beget more motion availability.
The positioning or elevation of your feet relative to one another is VITALLY important in ensuring we’re loading the target tissue through as large of an available range as we can muster.
Now go get those legs so HUGE that grandma’s gonna have to buy you new Christmas stockings.
Today’s guest post comes courtesy of Dr. Michael Mash.
I have a legit man-crush on him ever since I’ve started diving into his online resource Barbell Rehab. As the name implies: Its mission is to help barbell athletes (and aficionados) overcome pain and improve performance WITHOUT being forced into “corrective exercise” purgatory.
In a sense, it’s designed to use barbells (and lifting stuff) to help fix shit. What’s more Tony G than that? Okay, maybe Jason Bourne fight scenes.
Or dragons.
Or an endless cheese plate.
Regardless, Barbell Rehab speaks to my strength coach love language, and as it happens Michael is offering his course to all my readers at $50 off the regular price for this week only.
All you have to do is click THIS link and enter the coupon code TONYG50 to receive your $50 credit.
And even if you’re not keen to saving money (weirdo) you should still give his blog post below a read because it’s riddled with common sense and practical applications you can use TODAY to improve your squat screen or assessment.
When it comes to effectively screening the squat, many personal trainers and strength coaches have different approaches. From not utilizing a screen at all, to performing dozens of assessments prior to implementing a bodyweight squat, what is the best way to screen the squat?
Before we answer this question, let’s first talk about the function of a “screen” in general.
What is a Screen and Should We Use it?
According to John Hopkins…
“…a screening test is done to detect potential health disorders or diseases in people who do not have any symptoms of disease.”
If we apply this definition to the squat, one could say that a squat “screen” is a test performed to detect potential joint, muscle, or movement impairments in those who don’t have any pain.
In order for a screen to be effective, a “failed” test must be highly predictive of future injury or pain. If it’s not, this could create a lot of false positives results (a.k.a telling someone they’re doomed for injury if they really aren’t). So on one side, you want to make sure your client is “safe” to squat before loading them up, but you also don’t want to prevent them from squatting if they don’t really need to.
Oh the dilemma!
It’s Tough to Really “Predict” Pain and Injury
As mentioned, in order to analyze the efficacy of a screen, we need to know if it can indeed accurately predict injury. As it turns out, the research isn’t so sure about this.
In fact, it has been shown that one of the most common movement screens, the FMS, is only slightly better than a 50/50 coin flip at predicting injuries. This doesn’t mean, however, that you need to throw the baby out with the bathwater. While both myself and the authors of this paper note that the FMS can be used to see HOW a person moves, it shouldn’t be used as a way to predict injury.
If the FMS can’t reliably predict injury or pain….what can?
Because pain is a multidimensional experience driven by biological, psychological, and sociological factors, it is really a reductionist mindset to blame pain solely on “tight hamstrings” or “poor form” in general.
In fact, factors such as stress, anxiety, depression, lack of social support, job dissatisfaction, and poor sleep and nutrition can ALL affect a person’s pain experience. This is why we need to zone OUT when it comes to “predicting” injury and really take a comprehensive approach. The WAY someone moves is certainly important, but it’s just one tiny piece of a much larger puzzle.
What is an Effective Movement Screen?
So how should you effectively screen the squat? In order for a screen to be effective, it needs to be SPECIFIC, and there’s no better way to be specific than to actually perform the movement itself. Yep, that’s right. The best way to “screen” the squat, is to actually have the client perform a squat.
This process will give you ALL of the information you need in order to make a decision on whether or not they are “safe” to proceed forward with loading the squat.
And guess what?
It doesn’t involve any kind of joint-by-joint assessment, specific muscle flexibility testing, or any other long drawn out processes either.
While the aforementioned approaches can be beneficial to “dig deeper” if someone already has pain, they’re rather unnecessary as part of a screening process in asymptomatic individuals.
For those without pain, here’s a simple process I recommend in order to determine if they are safe to squat.
Step 1: Show Me Your Squat
The first step of our world’s simplest squat screen is to simply ask the client to “show me a squat.” I like to do this for a few reasons. First, it will give you an idea of what they “think” a squat is and how they move in general. Two, it will also give you an idea of how hesitant they are to move.
Some will just drop it low into a perfect squat and others will hesitate to start and move really slowly. You may see the latter example if someone has a history of pain or has fear with movement in general.
This is all useful data to collect on this important first step. If the squat looks good, congratulations!
Your job is easy today, and it’s time to load them up!
If it needs some work, it’s on to the next step.
Step 2: Coach the Squat
After asking the client to show you their squat, it’s time to coach it. While everyone is going to squat with a different stance width, degree of toe out, and torso angle, it helps to at least have a frame of reference to start from.
I recommend cueing them into a heels shoulder-width stance with a moderate 20-30° toe out, and then asking them to squat as far down as they comfortably can. While this foot placement won’t work for everyone, it’ll work for the majority of people. In this initial bodyweight squat coaching phase, some people may have discomfort or won’t be able to quite get to parallel…and that’s ok.
That’s why we have Step 3.
Step 3: Modify Stance and Depth if Needed
If you coach the client into a shoulder-width slightly toed out stance, and they have pain with this, or they can’t squat very deep, all is not lost yet. Two of the most common pains you’ll see with a bodyweight squat are hip and knee pain. And just because they have pain, doesn’t mean they are injured or need to be referred out to a rehab professional. It may simply just be the way they are built.
For example, if you take someone with highly retroverted hips, and have them try to squat with a narrow stance with minimal toe out, they may get a “pinch” in the front of their hips at the bottom. This can usually be remedied by widening the stance a bit and turning the toes out more. This doesn’t mean anything is wrong with them…it’s simply the way they are built!
Tying it all together, if someone has pain when you coach them into a bodyweight squat, see if it’s relieved with a simple stance adjustment. This is 100% within your scope to do as a personal trainer or strength coach, as you’re not diagnosing, assessing, or putting your hands on the client at all.
Step 4: Change the Exercise and/or Refer Out
Sometimes the squat pattern itself is so sensitized, that a stance or form adjustment isn’t enough to eradicate pain. If this is the case, I’d recommend NOT proceeding forward with having the client squat, and instead, finding a similar exercise like a rear foot elevated split squat or a lunge variation that they can tolerate.
If the client’s goal is to squat, it would also be best at this point to refer out to a qualified rehab professional as well. This is why interdisciplinary care is so important in the health and fitness world. At this point, as the personal trainer or strength coach, you can continue to train your client with what they can tolerate (full upper body workouts and modified lower body exercises) while the rehab professional addresses the pain itself.
A Quick Note on Squat Depth
Sometimes no matter how much you modify stance, degree of toe out, or hip position, your client won’t be able to squat to “depth.” Depth is defined as when the greater trochanter of the hip goes below the top of the patella from a side view.
In this case, you need to find out if it’s simply because they feel “tight” or if it’s limited by pain.
If it’s limited by pain (even after stance adjustments) then you may want to refer out. If they just feel “tight,” then you can proceed forward with loading them up to tolerance….even if it’s not quite to depth. That’s right. There is no evidence to suggest that squatting above parallel is inherently dangerous.
Rather than spending six months working solely on mobility to increase squat depth, you can work on BOTH simultaneously. Train the squat to the depth the client is comfortable with and tease in mobility drills at the same time.
This one-two punch of increasing mobility and loading through it, will help your clients squat deeper (if that’s their goal) much quicker than not squatting at all.
Tying it All Together
The squat is one of the most beneficial lower body movement patterns to coach your clients through. While everyone will squat with a different stance, degree of toe out, and variation, there’s no need to take clients through an extensive “screening” process prior to loading them up.
Instead:
1️⃣ Ask them to “show me a squat” to get an idea of how they move to begin with
2️⃣ Coach the squat. Cue them into a moderate stance with slight toe out and ask them to squat as deep as they can
3️⃣ If they have pain, see if you can find a stance width, degree of toe out, and depth that is tolerable for them. If so…it’s time to load them up!
4️⃣ If they still have pain after a stance adjustment, it’s probably best to hold on squatting for now and to refer out to a rehab professional for further assessment.
About the Author
Dr. Michael Mash is the owner and founder of Barbell Rehab, a continuing education company dedicated to helping fitness and rehab professionals improve the management of barbell athletes. Check out his CEU approved online course, The Barbell Rehab Workshop at this link and use coupon code TONYG50 for $50 off.
Whenever someone rounds their back on a deadlift two things happen:
A baby seal dies.
I have to fight off the urge to throw my face into a fire.
Caveats exist, however.
Everyone at some point will round their back.
Elite lifters will do it – sometimes on purpose – to lock out a max effort lift.
Newbie and intermediate lifters will do it – almost always not on purpose – to lock out any lift…🤪
The difference is that elite lifters are strong (and knowledgable) enough to know how to self-correct when teetering with a precarious position (end-range spinal flexion), and mostly everyone else is not an elite lifter.
As I’ve noted repeatedly, if your goal is to become a deadlifting Terminator then the bulk of your accessory work should address either a weakness or technique flaw.
The SLOW START deadlift is a superb choice for those lifters who have trouble with their hips coming up too early and/or have a difficult time with maintaining upper back tension. I’ve been using this with a my clients and it’s been magical to see the progress they’ve made with their technique.
Performing 3-5 sets of 3-5 reps using 50-70% of 1-rep max should do the trick.


 Travis Hansen has been involved in the field of training for over a decade, and he has over 60,000 hours of hands-on training experience.