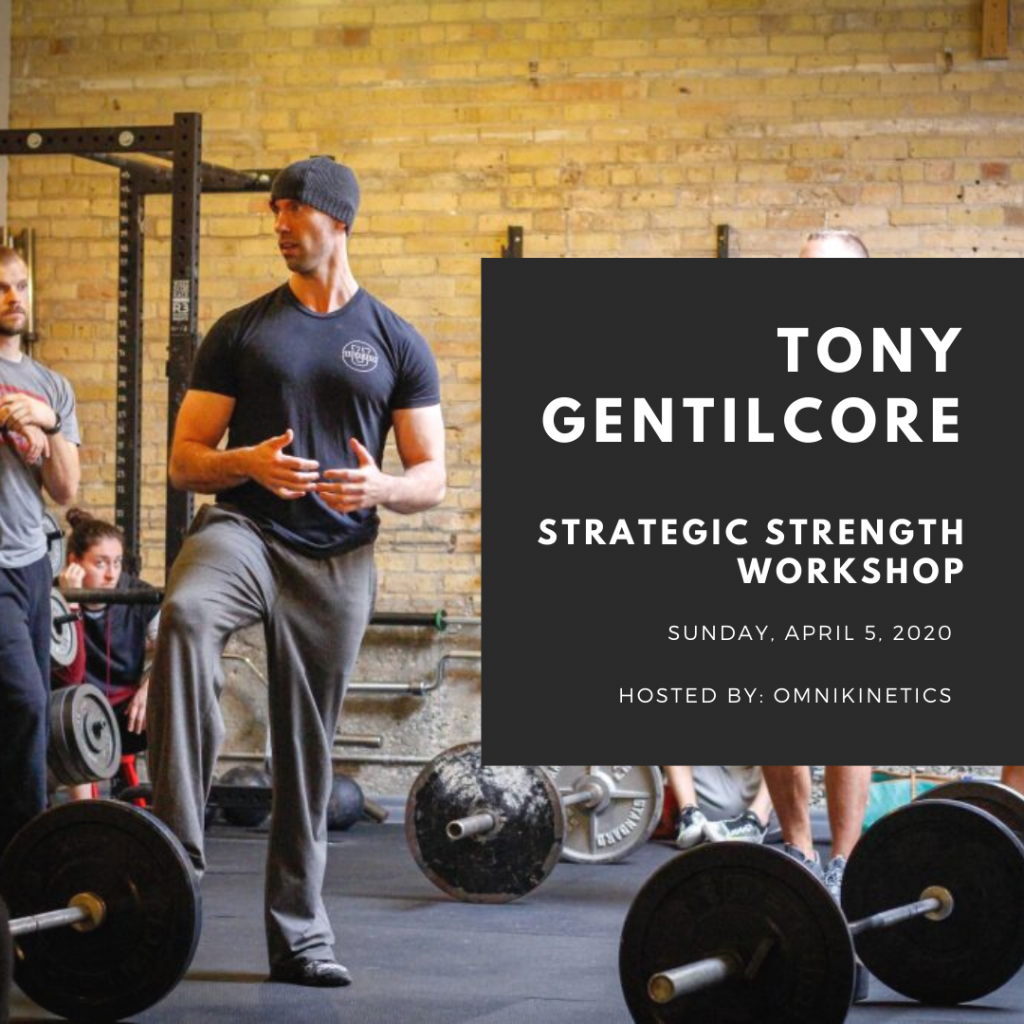
It’s official: This marks the sixth year in a row Dean Somerset and I are presenting together. We’re so excited to be coming to Athens to kickstart 2020.
I’m excited to be presenting alongside some other prominent coaches at this year’s Mid-Atlantic NSCA Conference in Philadelphia, PA this coming December.
Building a successful online training business can be daunting. There’s a lot of noise out there and it can be hard to separate yourself from the masses.
My good friend, Jon Goodman, has produced the most complete and thorough resource on the topic. If you’re looking for help on the what’s and why’s and how’s on the particulars of building a online business, one with integrity and that will help give you some financial freedom, look no further.
This course is only offered twice per year and the early bird opt in (which saves you $200) ends tonight. What’s more, since they’re always adding and updating information, next year the course will be $500 more expensive. So this is your last chance to save a boat load of cash.
When I made the decision to leave Cressey Sports Performance a few years ago it scared the shit out of me. I used that fear to help motivate me not to fail.
It worked. I think.
In this article Jill does a much better job of articulating how to handle tough situations.
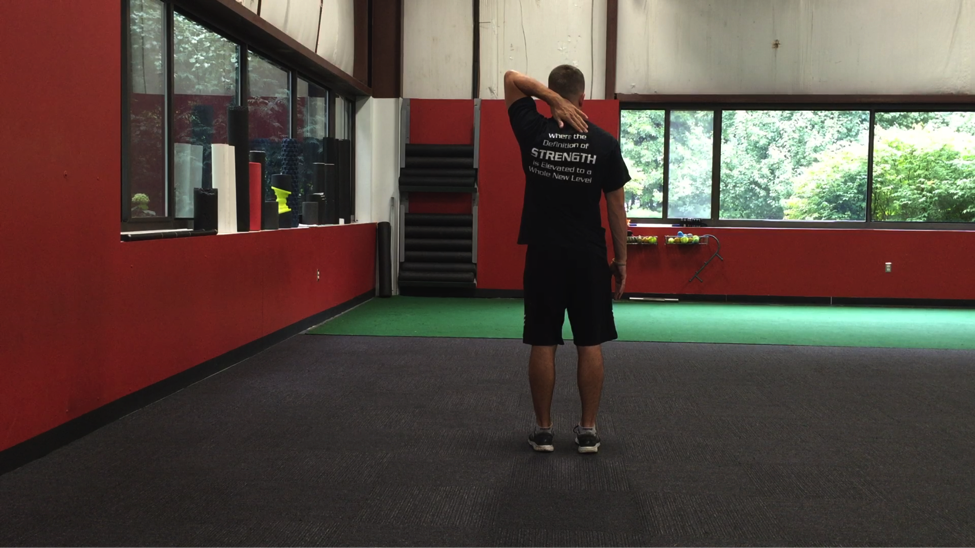
I arrived back to Boston late last night from London and I’d like to say I woke up today well-rested and ready to wow everyone with some witty fitness prose.
I’d like to say that.
Not gonna happen today. I’ve got a ton of emails and programs to catch up on, but that doesn’t mean I don’t have any content prepared for you today. Andrew Millett, good friend and Boston based physical therapist/strength coach was kind enough to send along this baller post today.
I got the idea for this post after recently attending the Advanced Warm-Up and Recovery Workshop put on by Matt Ibrahim and Dr. John Rusin. I didn’t know what new things I may learn at the workshop, but after taking pages of notes and getting new ideas for my clients and patients, it was definitely worth it.
You walk into any gym or fitness facility and you will see people warming-up on the bike, treadmill, elliptical, or maybe even rolling around on the foam roller. It is great to see people putting in the time and effort to consciously warm-up their musculoskeletal, nervous, and circulatory systems prior to engaging in their exercise routine.
The key word in that last statement is:
Consciously
Too many times, people warm-up without any direct goals or agenda in mind. They hop on one of the aforementioned cardio machines and watch TV or read a magazine and aimlessly pedal or step until they think they are ready to exercise. If they are on the foam roller, they probably roll around on it like they are rolling out pizza dough or look like a boy scout trying to start a fire with 2 sticks.
When you are working with a client or are performing a warm-up in your own gym routine, there needs to be a specific goal in mind while warming-up prior to your exercise session.
First off, we need to assess our clients to see what areas they may be lagging in. Here are a few quick and easy tests to see if there are any areas that need to be targeted for some type of self-myofascial release.
Ankle
In the sagittal plane, the ankle needs to be mobile. It needs to be able to plantar-flex and dorsiflex for the demands of life as well as demands in the gym.
In order to perform a squat without compensations, the ankle must be able to dorsiflex and allow the tibia to translate anteriorly as the person descends down in the bottom position. To determine if someone has adequate ankle dorsiflexion, try the Knee to Wall Test.
Knee to Wall Test
You instruct the client to place their foot on the tape strip. On the tape strip, there are 4 lines, each 1-4 inches away from the wall.
Start with the client’s foot on the “4” line. Four inches is required for adequate dorsiflexion in order to perform the squat.
Tell the client to try and touch their knee to the wall without letting their heel come up. Also, make sure they are going into valgus or varus movements at the knee to potentially compensate for lack of dorsiflexion.
If someone cannot reach from the “4” line, then have them move up and determine where they can reach from. Then test the opposite side.
If they cannot reach, ask them where they “feel it.” If they feel they can’t go any farther due to tightness in the back of their ankle, then we know that some of the soft tissue structures on the posterior aspect of their lower leg could be to blame.
For that, some type of self-myofascial release (SMR) to the soleus, posterior tibialis, flexor hallucis longus/flexor digitorum groups could help to improve range of motion at the ankle.
If they feel a pinch on the anterior aspect of the ankle, that could potentially be a joint mobility dysfunction.
Try a Banded Ankle Mobilization.
Start by placing a thick superband around a post or squat rack; something that can’t move. Then place the band at the ankle joint, just inferior to the medial and lateral malleoli. Place a good amount of tension on the band. While maintaining this tension, recreate the same movement as if you were performing the knee to wall test. Go as far as you can comfortably go. Hold for 2-3 seconds when you can’t go any farther. Return to the starting point and repeat for 6-10 reps.
Then retest the Knee to Wall Test.
If it improves, then we know the Banded Ankle Mobilization worked. Whether it improved or not, it might be wise to refer out to a licensed healthcare practitioner to further assess the ankle to determine what may be limiting that motion.
If there has been an improvement in ankle mobility, we want to be able to control that “new found” mobility.
Try the Heel Raises with Single Leg Eccentric. I first saw this from Dr. Ryan DeBell of The Movement Fix.
Key Points:
– Perform the movement slow and controlled.
-When your foot is are parallel to the ground, slightly flex the knee and go slow and controlled towards the ground.
-Imagine like you are slowly pulling your heel to the ground.
Hip
At the hip, we need to determine a few different areas of mobility. Starting in the sagittal plane, we need to determine if the client has adequate hip extension. If the client doesn’t have adequate hip extension mobility, they will have a more difficult type using their gluteal musculature to perform some of the movements we ask them to.
In addition to not being able to effectively activate and use certain muscles, lack of hip extension mobility can place increased stress on the lumbar spine and the knees, as well as some other more distal joints. By ensuring the client has adequate hip extension mobility, then we know some of the other joints of the body will be able to function properly.
To determine if someone has adequate hip extension mobility, we have two different options. First off, you can perform the ½ Kneeling Hip Extension Test.
VID ½ KNEELING HIP EXT TEST
Have the client place one knee down on a padded surface and the other knee up. Instruct them to contract their gluteus maximus on the down leg side, brace their abs, and slowly bring the hips forward.
We ideally would like to see 30 degrees of hip extension on the trail leg. You can use the Inclinometer App on the Iphone to measure the angle.
You can also perform a Thomas Test. This is a test that is typically taught in physical therapy schools to determine hip extension mobility.
*Disclaimer*: First off, you need to ask your client if they are okay with you placing your hands on them to assess their hip mobility.
Thomas Test
Self Thomas Test (and Sick Beats)
You are going to have the client lie supine on the side of a table or bench. Have them hold their knee at 90 degrees of hip flexion, or at hip height. Place your thumb on their Anterior Superior Iliac Spine (ASIS).
Using your other hand, slowly lower the leg the client is not holding with their hands.
If you can lower their leg to the level of the table and their ASIS does not translate anteriorly, then we know they have adequate hip extension mobility.
If you lower the client’s leg and their ASIS DOES translate anteriorly prior to the leg reaching the level of the table, then we know there is some muscle group limiting hip extension.
To determine, which muscle group, then we need to change the position of the lower leg.
If we extend the knee and perform the same test, this will place tension on the Psoas and Iliacus muscle groups. If you lower the leg with the knee extended and the ASIS translates anteriorly, then we can determine Psoas and Iliacus are to blame for decreased hip extension mobility.
If we lower the leg and the ASIS doesn’t translate anteriorly, then the only other muscular group to blame would be Tensor Fascia Latae (TFL).
To test for this, we slightly abduct the hip and perform the same test. If the ASIS translates anteriorly, then we know TFL is to blame.
If we run through all of these tests and each test with the knee extended doesn’t cause anterior translation of the ASIS, but when the knee is flexed it does, then we can determine that Rectus Femoris is to blame.
To improve hip extension mobility, try SMR to whichever area you determine to be problematic.
SMR w/ Lax Ball to Iliacus/Psoas & TFL
SMR to Rectus Femoris
SMR to Vastus Lateralis & TFL
Then re-test to see if any of these SMR variations improved the client’s hip extension mobility.
Once someone’s hip mobility has improved or is normal, we want to make sure they can stabilize in that mobility.
The Cook Hip Lift is a great movement for accessing and stabilizing hip extension mobility.
Key Points:
-Place a ball in your hip crease.
-Use non-stance leg to keep ball in hip crease.
-Lift hips up off ground. Do not let ball fall out
-Perform for 8 repetitions per side.
Thoracic Spine
The thoracic spine is another area of the body that needs adequate mobility. If it doesn’t present with adequate mobility, areas of the lumbar and cervical spines and the shoulder can be affected. It is one of the most influential areas of the body because of the impact it can have on so many different areas.
To determine if your client has adequate thoracic spine mobility, it is best assessed in quadruped using the Quadruped Thoracic Rotation Test.
Normal thoracic rotation in the general population should be 50 degrees. To measure this, use the Inclinometer app and place it ½ way between both shoulders on the thoracic spine.
When you are passively bringing them through the movement, make sure there is no lumbar movement such as sidebending occurring as this will skew your measurements. Also, gently rotate the client. Don’t try to force rotation on someone that may not have it.
If the client does not have 50 degrees of thoracic rotation, there are various thoracic spine mobility drills that can be performed such as:
A-Frame T-Spine Mobilization
Side Lying Thoracic Rotation
Side Lying Rib Roll
If the client has 50 degrees or more of passive rotation, but less than 50 degrees of active rotation, a thoracic spine motor control drill can be performed.
Drills such as:
Quadruped Assisted Thoracic Rotation
Key Points:
-Perform slow and controlled.
-Make sure not to side-bend through your spine. Make sure to rotate through mid-back.
Seated Assisted Thoracic Extension
Key Points:
-Squeeze ball between your knees.
-Slightly turn away from where band is attached.
-Slow and controlled, allow band to rotate body.
Shoulder
The last pertinent area of the body to address in a warm-up is the shoulder. Limited shoulder mobility in shoulder flexion, abduction, or internal/external rotation can affect function at the shoulder, cervical spine, thoracic spine, and even the lumbar spine.
To assess the shoulder, movements such as:
Supine Shoulder Flexion Test
Supine Shoulder ER Test
If there are limitations in mobility, performing self-myofascia release as shown below can help:
Once mobility has been improved, now we want to make sure we can use that mobility. Performing movements such as:
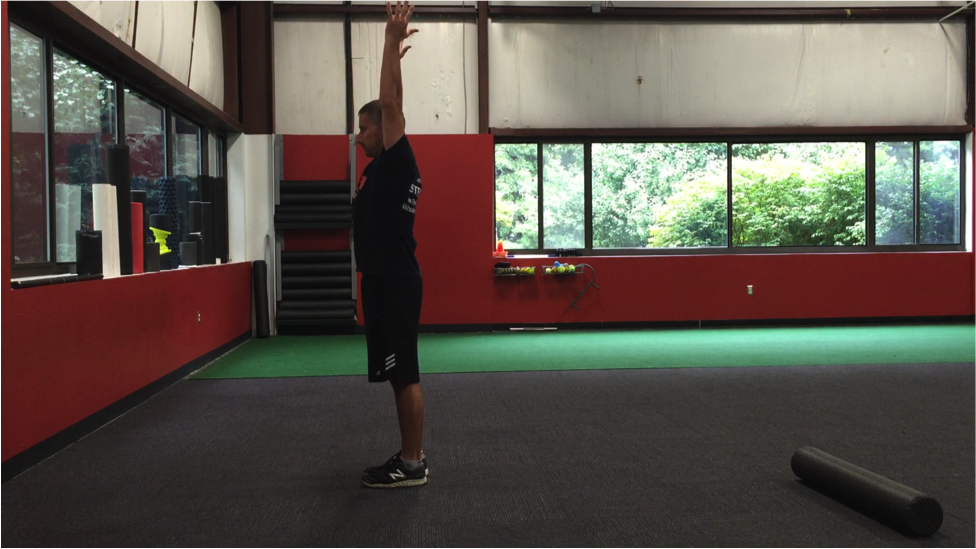
Back to Wall Shoulder Flexion
Key Points:
-Maintain low back flat to the wall.
-Raise arms up and when the reach shoulder height, gently reach 1 inch in front of your finger tips.
-Continue this gentle reaching as you continue to raise your arms overhead.
Forearm Wall Slides
Key Points:
-Slide arms up the wall.
-When your elbows get to shoulder height, gently press into the wall/push your trunk away from the wall.
-Maintain the pressure on the pinkie side of your hand as you slide up the wall.
Quadruped Assisted Reach Roll and Lift
Key Points:
-Perform slow and controlled.
-Slowly reach out. Rotate palm up to the sky. Slowly raise arm up.<
Yoga Push-Ups Sans Pushups
Key Points:
-Think of pushing the ground away from you with your hands.
-Should be felt in your upper back and out and around your rib cage.
If you have no mobility limitations in any of the aforementioned areas, feel free to use the motor control or stability drills to help primer your nervous system to prep you for your lift.
There you have it! Create a plan for your warm-up, do said plan, and then go and get after your training!
About the Author
Andrew Millett is a Metro-West (Boston) based physical therapist
For the past, well, I don’t know how long I’ve posted my “Stuff to Read While You’re Pretending to Work” post every Friday.
This past Friday I did not post it. As a result the internet shut down.1
Okay, it didn’t…but it did feel weird not to post it. And while I’d like to sit here and say it was because of something cool like, say, I had a man-date with The Rock or I was fighting crime, the truth of the matter is, with my schedule being switched around with an infant in tow, it makes it easier to post at the start of the week rather than the end.
You didn’t really care? Oh, okay then….lets get right to it.
Lisa and I are happy to announce we’re bringing back our Strong Body-Strong Mind workshop.
Last year we had the privilege of presenting together in Austin, TX and London, UK, and we’re elated to be heading to Toronto, Ontario to pick up where we left off.
In a nutshell I speak to a little assessment talk, program design, and breaking down technique on a few common lifts such as the squat, deadlift, get-up, and blindfolded chainsaw juggling, and Lisa speaks to more of the mindset side of the equation and how we can help build better rapport and “buy in” with our clients/athletes.
For more information and to sign up, please go HERE.
2) Complete Shoulder & Hip Blueprint – Orlando
Our Vancouver shindig in April sold out, but Dean and I have recently announced a stop in Orlando, FL later this year, October 21-22nd at Spark Fitness.
I’ve never been to Orlando. There’s no way in hell I’m visiting Disney World.
A make zero effort to hide my fandom of Jen Sinkler. I think she’s one of the kindest and most authentic human beings I know.
I also think she one helluva a coach and someone who’s a Jedi master at producing and curating quality fitness content. A few months she and Kourtney Thomas (another fantastic coach) released The Bigness Project.
If the title doesn’t give it away it’s alllllll about getting big or diesel or jacked (or whatever your adjective of choice is), and it’s directed towards women. Namely, it’s to prove a point: that women can and should train to add muscle (and not be afraid or timid to do so).
It’s an amazing 14-week program designed for women, by women and also includes a mindset component and thorough exercise glossary.
You need to act quick, though, because it’s being pulled from the virtual shelves by the end of this week. If you want to participate and get the Bigness, you have to go HERE by Friday.
If you’re a strength athlete, physique competitor, or just someone who likes to look like a brick shit house (or help people look that way) this will be right up your alley.
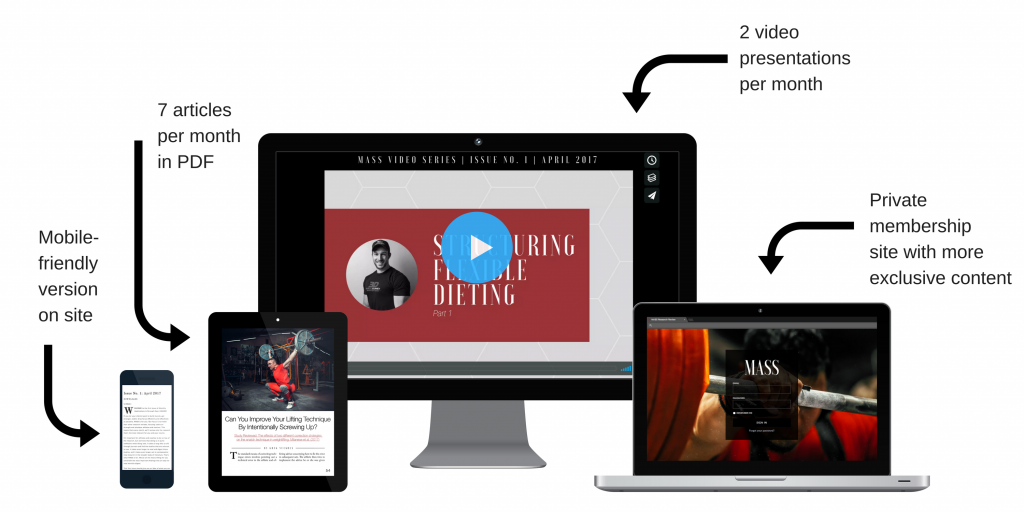
Every month, they sift through 50+ journals and 1,000+ studies to handpick the cutting-edge research that’s most relevant for building muscle, gaining strength, and getting leaner.
Pretty much everyone who reads this site – except my mom – should be down with that.
If you want to stay on top of the research but, like me, hate reading research (nor have 40+ hours per month to dedicate to it) then this is a no-brainer.
Subscriptions can be monthly, yearly, or, for the all-out ballers out there, lifetime. This week only MASS is being offered at 20% OFF the regular price.
Having the ability to regress or progress an exercise based on the needs and ability level of an athlete/client is a skill that any fitness professional should strive to have.
This is never more apparent than when coaching the squat.
The phrase “it’s not so much about contraindicated exercises as it is about contraindicated lifters” never sings to high than in this article.
This is a newly minted website by two (more) coaches I respect a ton…Lori Lindsey and Amanda Wheeler.
It’s a site dedicated to former athletes and women and strives to articulate a message that goes against the status quo directed towards much of female fitness.
I encourage you to check it out.
Social Media Shenanigans
Twitter
“I don’t want to get too bulky,” says the person who will never work hard enough for that to happen in the first place. Relax.
My wife, Dr. Lisa Lewis made an appearance on the Push Pull Legs Podcast recently discussing the psychology behind lifting heavy things, getting women to strength train, and training during pregnancy. She’s a superstar!
I was asked to contribute to THISrecent article on MensHealth.com detailing a beginner 3-week workout plan outlined by stud trainer BJ Gaddour with myself taking the reigns on what to do after the initial three weeks.
3. The Lifting Dead
I also had an article go up recently on BodyBuilding.com outlining the benefits of dead exercises. Namely, how the Dead Squat, Dead Bench, Dead Row, and Dead 1-Legged RDL can help you blast through sticking points.
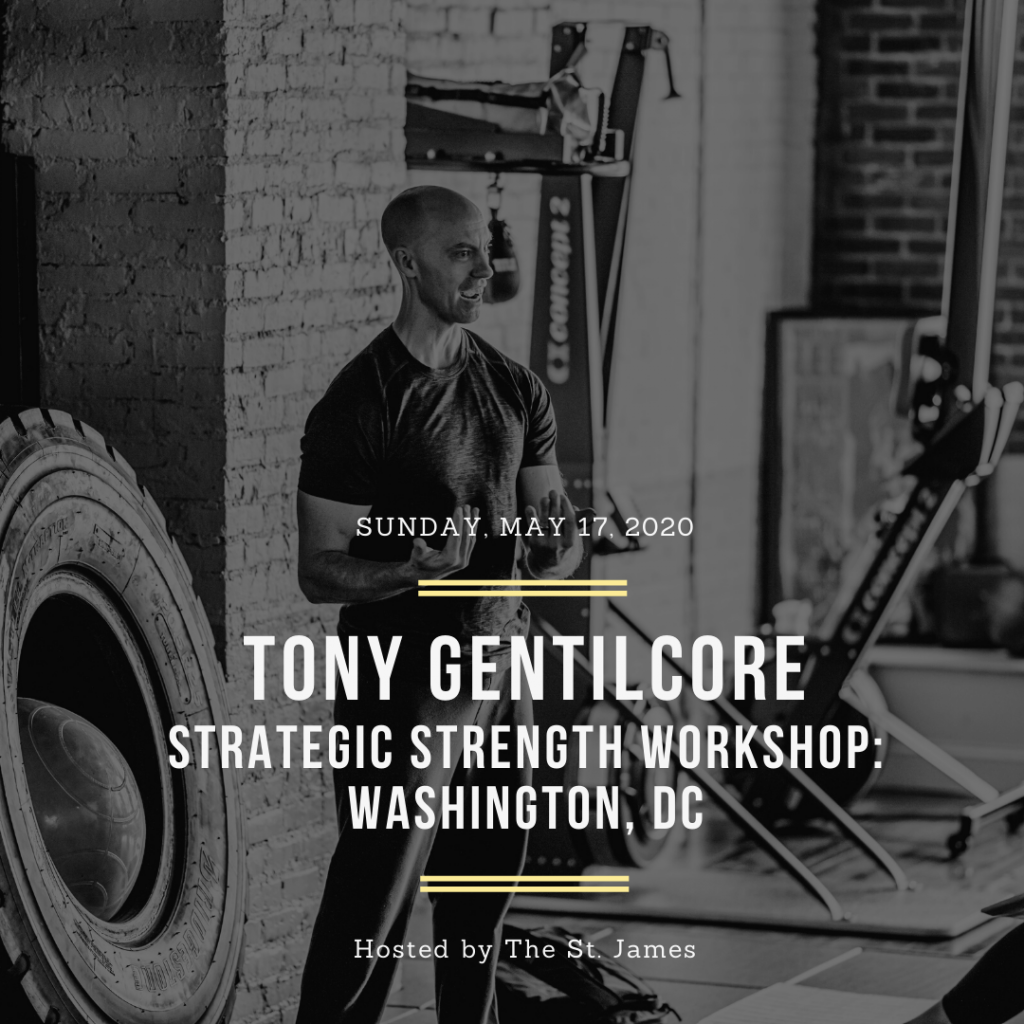
Dean Somerset and I just booked out first speaking gig together for 2017, and it’s in lovely Vancouver the weekend of April 1-2nd. We’ll be putting on our Complete Shoulder & Hip Blueprintworkshop.
And lastly, we’re getting prepped to launch our 6-week beginner course at CORE. Granted I’m biased but I feel this program is going to help a lot of people and help them get over the hump of being intimidated by strength training.
What will differentiate this program from others is that, in addition to the sick techno & house music the stellar coaching on teaching the basics, there will also be a nutrition and mindset component too. The idea is to meet up in 2x per week in a group training format with (optional) nutrition and mindset 60-90 minute breakouts every other weekend.
The course will start in a few weeks and there will only be 10 spots made available.2
For more information please use the Contact function HERE.
And on that note lets get to this week’s list of Stuff to Read…
I’m very fortunate that I have a fair number of coaches and other fitness professionals who see this site as a resource of quality information as well as a resource to help get their information and content in front of more eyes.
I had a bounty of excellent professionals pinch-hitting for me in 2016, and the three articles below were the top ones according to the traffic they received.
NOTE: Once January 27, 2017 arrives I’ll be in dire need for guests posts. That’s the day my little guy is supposed to arrive and my world is going to be turned upside down. In a good way of course…;O) I suspect my writing schedule will be drastically reduced, however I’d still love to continue offering top-notch content on a consistent basis.
If you’re interested please use the Contact function HERE and pitch me some ideas. A few criteria to consider:
1) You should be able to, you know, write well. On a base level you should be able to differentiate between to/too/two, their/there/they’re, your/you’re, then/than, and have read every book Kurt Vonnegut has ever written. Kidding.3
2) Preferably you actually have experience training people in real life. And, I’d prefer minimum two years experience in the field.
3) Have some “feel” for the type of content on this site. If you pitch me an article on fat-loss supplements or “Top Exercises to Tone Your Arms” I will Sparta kick you you in the throat.
This article actually made the PTDC’s list of Top Articles of 2016 on their site (you can check out their list HERE). People have been programmed to think that exercise intensity is all about performing endless repetitions of whateverthefuck and then dropping in a pool of your own sweat or going until you can’t feel your legs.
Sure, it’s hard, and it has it’s time and place. But it’s not, technically, “intense.”
Ohhhhhhhhh snap. Not surprisingly this article received a fair bit of back and forth in the comments section. I get it: I think much of what was argued about was over semantics over the word “elite.” Nevertheless, I felt this was a good article by Travis who brought up some valid points.
You don’t need to be be doing core stability exercises or core strengthening exercises. You NEED to be doing BOTH!
What is Core Stability?
Core stability is the ability of the musculature of the trunk aka the “core” to be able to maintain a certain position. It involves musculature contractions typically 20-25% of MVIC (Maximal Voluntary Isometric Contraction). Another way to think of it is that these exercises require precision and control of movement rather than brute strength.
An example of a “core stability” exercise would be the Bird Dog.
The Bird Dog movement requires the participant to maintain a neutral spine position while moving an arm and leg. This does not require a maximal contraction of the abdominal musculature. It requires a low-level, precise contraction of certain musculature to maintain a neutral spine. There are NOT large amount of forces being exuded to cause the person to have to exhibit brute strength to have to perform.
Other examples of “Core Stability” exercises are:
½ Kneeling Chops
½ Kneeling Lifts
Dead Bug
Segmental Rolling
Prone Superman’s
The exercises mentioned above are all movements that can be made more difficult by adding weight or resistance. The purpose of these “easy” movements are to improve the timing and sequencing of the core musculature. Performance of these exercises are to be performed with precision and control.
What is Core Strength?
Core Strength is the ability of the core musculature to maintain or control a certain position against increased forces of gravity, resistance, or weight. Exercises or movements that would be considered core strength are:
Swiss Ball Rollouts
RKC Plank
Stir the Pot
Sledgehammer Hits
Anti-Rotation (Pallof) Press
All the movement mentioned above are using some form of external force. Whether it be gravity, weight, etc., the core musculature has to exhibit a much greater force to resist moving through the spine.
Why Do WE Need BOTH?
Well, you can have great core stability and be weaker than a baby kitten in a wet paper bag or you can have the strongest core in the world and can have poor core stability.
How is that so?
For example, maybe you can hold a plank with proper form for an inordinate amount of time, ie. 5 minutes. I would say that you have great core strength. But we can’t say that you have great core stability.
Here are a few quick tests to determine how someone’s core stability is functioning:
Segmental Rolling
Key Points:
Attempt to roll from your back to your stomach using one arm and no legs.
You may lift your head and reach with one arm.
Bird Dog
Key Points:
Can you maintain a neutral spine while alternating arms/legs?
Does the pelvis remain level while performing?
If so, then you passed. If not, then barring any type of decreased hip extension, thoracic spine extension, or upper extremity flexion mobility, your core stability may be impaired.
½ Kneeling
Key Points:
Bring front foot so that it is in line with down leg.
You should be able to maintain your balance without shaking or using your arms for balance.
Typically, one side is more difficult than the other. There may be a core stability issue if you cannot maintain an upright posture in tandem ½ Kneeling.
If you can perform the ½ Kneeling Test and both sides feel relatively equal, then you passed. If not, then barring any type of decreased hip extension, ankle, or thoracic spine mobility limitations, this could be indicative of a core stability issue.
I don’t think I need to go into as much detail for core strength, but the importance of maintaining a certain position when deadlifting, squatting, lunging, etc. is hugely important to decrease risk of injury and to improve performance.
We needcore stability because throughout the spine there are tiny stabilizing muscles that go from spine segment to spinal segment.
If you present with an imbalance during the Bird Dog, try performing with a towel roll on your low back and widen your base of support so that the movement is challenging but you can perform it with good form.
If the ½ Kneeling Test has imbalances present, try performing ½ Kneeling Chops with a band around the lower legs to improve core musculature recruitment.
The responsibility of these muscles is to stabilize from one spinal segment to another or stabilize a few spinal segments that they may cross over. If these tiny muscles don’t do their job and stabilize like during a bird dog, ½ Kneeling position, or during segmental rolling, compensation will occur.
Instead of those aforementioned muscles working, the work will be placed upon the larger muscles such as the paraspinals, etc.
Who Cares?
Well, if the small, stabilizer muscles aren’t stabilizing effectively and the larger muscles are working harder than they need to, then this can cause movement compensations over time and in turn place you at risk for injury or decrease performance.
If you present with an imbalance during segmental rolling and either can’t do a certain direction or one direction is harder than the other, perform it with some assistance.
If all else fails, see a licensed medical provider with a background in the Selective Functional Movement Assessment here (http://www.functionalmovement.com/site/aboutsfma)
With that said, we need BOTH. Performing core stability exercises as mentioned above during a dynamic warm-up or super-setted in a workout AND doing core strengthening super-setted during a workout.
Run yourself or your client through some of these tests and see what you can do to help improve their movement quality through core stability and core strengthening.
About the Author
Andrew Millett is a Metro-West (Boston) based physical therapist.
For many people the first choice when their shoulder begins to hurt or if they lack mobility is to start cranking and yanking on it. This is rarely the right approach, and as Andrew Millett (my good friend and Boston based physical therapist) points out in today’s post…there a far better and far more effective approaches.
The shoulders, specifically, the glenohumeral joints, are typically very mobile joints. They need to flex, extend, abduct, adduct, horizontally abduct and adduct and internally and externally rotate in multiple planes and positions in relation to the body. Even though the shoulders are a common area of mobility, many people will present with limitations in at least one aspect of glenohumeral motion.
There are various reasons why someone may have limited shoulder mobility.
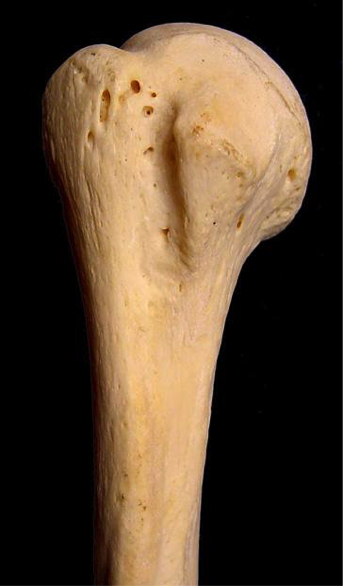
Bony Limitations
photo credit: pediatric-orthopedics.com
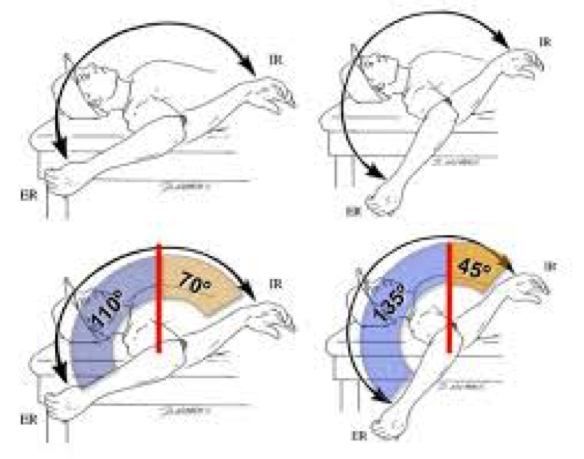
People who engaged in various overhead sports such as baseball, softball, etc. have been shown on multiple studies to have changes to the glenoid and humeral head. In baseball players specifically, they can appear to have a loss of internal rotation range of motion as compared to their non-throwing shoulder and an increase in external rotation range of motion as compared to their non-throwing shoulder.
This change in range of motion is commonly due to humeral retroversion. Humeral retroversion is the alternation of the humerus and humeral head in relation to the glenoid fossa from years of repetitive overhead activity, specifically throwing.
This is typically only seen in overhead athletes. This differentiation in range of motion side to side in external and internal rotation is considered “normal” for this population. As long as External + Internal Rotation aka Total Motion is within 5 degrees of the non-involved shoulder, then that is considered normal.
Note from TG:In other words, loss of IR in a throwing shoulder is an adaptive response and is normal! It doesn’t necessarily have to be fixed.
With that said, we do not want to crank on someone who has “normal” total motion, but may lack internal rotation on one side versus the other. Asking your patient or client if they engaged in overhead sports as a child is a good clue to this. Then measuring their motion will give more information.
We will get into more detail later on how to improve their motion if their is more than a 5 degree difference in total motion.
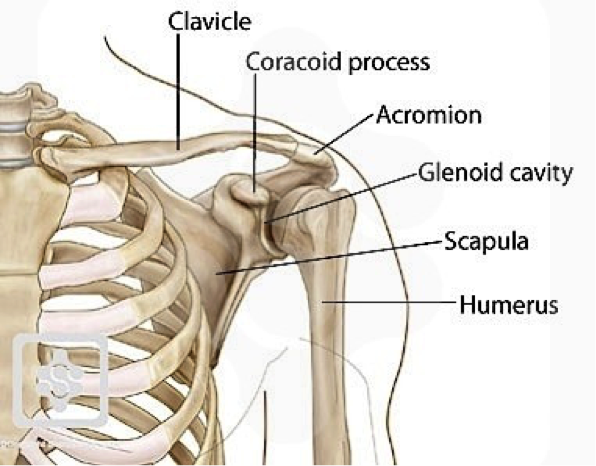
Another bony limitation at the shoulder can be acromion type. The acromion is a bony structure that is present in all people that is part of the scapula.
Photo credit: ipushweight.com
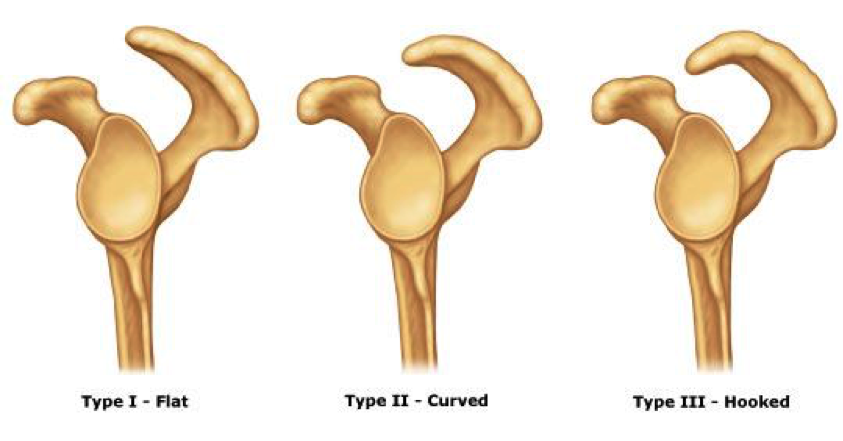
All acromions are not created equal though. There can be 3 varying types of acromions.
As you can see in the picture above, a type I acromion is relatively normal in appearance. In type II and III, there is more of a curved/hooked appearance to it. This alteration in can cause pain and limited motion when reaching overhead.
The only way to definitively know if someone has a type II or III acromion is through radiographic imaging. Programming may need to be altered to more horizontal pulling/pushing variations instead of overhead work if someone doesn’t have full overhead mobility due to a type III acromion.
For most people with a type II acromion, physical therapy can help to improve range of motion and decrease the effect of the acromion on shoulder motion and pain. For most people with a type III acromion, more often than not, surgical intervention is what will help.
Capsular Limitations
In the majority of the joints in the body, there is something called a “capsule” surrounding the joint. A capsule is synonymous to a ziploc bag encompassing the joint.
In this capsule, there are “folds” in certain aspects depending on where the arm is positioned. Due to an old injury, surgery, etc., this capsule can become “tight or stiff.” Now, without getting into too much detail about why it is tight/stiff or why there are capsular limitations, the only way to determine if there is capsular limitations, is by a licensed healthcare practitioner, ie. PT, chiropractor, etc.
Typically, older populations may have more capsular limitations OR if someone has had a long standing injury or prior surgery to the shoulder, they may present with decreased ranges of motion because of the capsule.
The only other area that can be attributed to decreased ranges of motion due to the joint capsule itself that affects the shoulder, would be the thoracic spine. Lack of thoracic spine extension and/or rotation can limit shoulder flexion, external rotation, etc.
To test for limited thoracic spine mobility, try Quadruped Passive Thoracic Rotation:
Normally, passive rotation should be 50 degrees in the general population. If it is less than that, that can significantly limit shoulder range of motion.
Soft Tissue Restrictions
Now, this is the more common of all three of the factors that can limit shoulder mobility. Excluding clients who are hyper-mobile, the majority of clients and patients have some form of increased soft tissue tone in one if not more areas of their body.
At the glenohumeral joint, there are a few “big” than can contribute to limited shoulder mobility.
Muscles that can limit shoulder external rotation are:
Pec Minor
Teres Major
Latissimus Dorsi
Subscapularis
Muscles that can limit shoulder internal rotation are:
Infraspinatus
Teres Minor
Now, you’re probably thinking that I just “copied and pasted” most of those muscles from one section to the other. The latissimus dorsi is a huge contributor to limited overhead shoulder mobility due to its attachment on the trunk into abduction and flexion. It can also limit external rotation as it is a shoulder internal rotator.
Pectoralis minor can limit overhead motion because of its attachment on the coracoid process of the scapula and the rib. Decreased pectoralis minor tissue extensibility can cause an anterior tilt of the scapula limiting humeral motion on the glenoid.
Subscapularis can limit overhead motion due to its attachment on anterior side of the scapula and on the humerus. Teres major attaches on the scapula as well as on the humerus and can limit overhead mobility as well.
Infraspinatus and Teres Minor limit internal rotation of the shoulder due to its attachment points on the humerus and scapula.
Typically, one if not more than one of the aforementioned muscles can limit overhead mobility. Instead of performing intense stretches and forcing the glenohumeral joint into motions it just does not have, we need to ASSESS and then ADDRESS any limitations that are present.
Assessment
Active Motion
To assess someone’s active ranges of motion, ask them to move.
Have them perform:
Shoulder Flexion
Shoulder Abduction
Shoulder Medial Rotation
Shoulder Lateral Rotation
“Normal” ranges of motion for general population clients would be:
Shoulder Flexion: 180 degrees OR humerus in line with the client’s ear.
Shoulder Abduction: 180 degrees OR humerus in line with side of body
MRE: 3rd digit finger tip to contralateral inferior angle of scapula
LRF: 3rd digit finger tip to superomedial border of contralateral scapula.
Now that you have assessed someone’s active motion, we need to assess it passively to fully determine if someone has a true mobility limitation.
Passive Motion
Perform the same motions passively into flexion, abduction, MRE, and LRF. Do not force these motions or push through tightness or pain. If you cannot passively bring the client’s arm to the aforementioned areas mentioned in the Active Motion section, then we know the client has a true mobility limitation.
Addressing the Issue
If someone presents with limitations in passive shoulder flexion, abduction, MRE, or LRF, performing some form of Self-Myofascial Release (SMR) can be beneficial.
Then, re-test passive motion to see if there has been an improvement in mobility. If there has, then you know you have worked on the appropriate areas.
If there has NOT been an improvement in mobility, refer out to a manual therapist (PT, sports chiropractor, massage therapist, etc.)
If the mobility has improved, then we want to use appropriate mobility drills to help groove the patterns that were just improved.
Make sure to keep scapulae retracted by using wall or door jam.
Once scapulae is fixed, gently bring arm across body.
Hold 5-8 seconds pre-training or 30 seconds post-training.
By fixating scapulae, it will provide a more focused stretch to the posterior aspect of the shoulder.
Latissimus Dorsi Stretch
Key Points:
Use opposite side hand to fix scapulae to rib cage.
Once scapulae is fixed, hold onto a stationary object and sit back.
Gentle stretch should be felt in the lat.
By fixating the scapulae to the rib cage using the opposite hand, it provides a truer stretch to the lat vs tractioning the glenohumeral joint.
Motor Control
Once there has been an improvement in mobility, we want to make sure that the brain and the body knows how to access that “new” mobility. We need to make sure to re-pattern the proper movement patterns to avoid falling back into an poor compensations.
For shoulder re-patterning, various movements that help to promote proper movement patterns such as:
Forearm Wall Slides
Back to Wall Shoulder Flexion
Quadruped Assisted Reach, Roll, and Lift
Now that we have improved the mobility by addressing increased soft tissue tone, re-patterned those movement patterns, now we want to incorporate them all together.
Movements such as:
Turkish Get-Up
Kettlebell Bottoms Up Baby Get-Up
There you have it! Instead of mindlessly stretching your shoulder, address any potential limitations and get back to training effectively!
About the Author
Andrew Millett is a Metro-West (Boston) based physical therapist
Today’s guest post comes courtesy of Andrew Millett – a good friend of mine and brilliant physical therapist outside of Boston.
The term “bridging the gap” is always brought up when the discussion of physical therapy and strength and conditioning comes up. There’s no doubt a melding of the two when discussing the most successful outcomes for patients and athletes. However, in a day and age where more and more personal trainers are taking it upon themselves to play the role of “therapist” (and vice versa), it’s important to note that, while it behooves us to dip our toes in both ponds, there IS a distinction between the two.
And we need to respect that.
Enjoy.
Bridging the Gap Between Physical Therapy and Strength and Conditioning
In the fields of strength and conditioning, human performance, physical therapy, etc., we interact with people on a daily basis. We learn about their family, their job, their goals, and what they want to get out of their training or rehab. The majority of the people in this field did not get into their respective field for the money.
I am not saying that any of these fields can’t be lucrative. The majority of us share a common bond: the desire to help people.
Whether you are a physical therapist trying to help someone get rid of their pain and get back to doing what they want to be doing or a personal trainer trying to help someone lose some weight, most of us want to help people.
When we see a client who is in pain or has some type of movement dysfunction, most of us want to help them get out of pain, whether or not we are a healthcare practitioner. Personal trainers, strength and conditioning coaches, etc. are well-qualified to assess and correct movement.
There are many schools of thought such as the Functional Movement Screen (FMS), Selective Functional Movement Assessment (SFMA), and Functional Range Conditioning (FRC) – to name a few – that teach trainers and coaches how to assess movement so that they can make their programming more effective based off of how their client presents on their assessment.
More often than not, a strength coach or trainer will see a movement fault they would like to fix in order to optimize their client’s training in order for their client’s to succeed. There is nothing wrong with wanting more for your client and for your client to achieve their goals. When assessing a client, if some type of movement limitation is present (I.e., decreased joint mobility and range of motion), then by all means, use the tools in your toolbox to attempt to correct it.
Tools such as a foam roller, lacrosse ball, or other self-myofascial release device, can be beneficial in attempting to increase soft tissue flexibility that could be limiting a client’s movement pattern.
Self-myofascial release can be very effective for improving movement quality and at reducing pain. By doing something such as this, you are doing your due diligence in trying to help your client to the best of your abilities.
If you use an implement suggested above and someone moves or feels better, GREAT!
If someone doesn’t move or feel any better after something like that, then as Charlie Weingroff has said,
“4th and 10, you have to punt.”
As he described in his DVD, Training = Rehab, if you have a client who has some type of mobility limitation and they aren’t improving, “punt” them, not literally, to another provider…I.e., physical therapist, sports chiropractor, or a massage therapist.
If someone has pain, punt! Per the Functional Movement Screen (FMS), if someone presents with pain, the test is over and they should be referred to a healthcare practitioner.
Now, if you referred all of your clients who are in pain to another healthcare practitioner, you would probably have a lot of free time on your hands.
Most clients have some type of ache or pain they are dealing with.
By “punting” them, this does not mean you have to get rid of them. You can use a multi-disciplinary approach and continue to train them without worsening their pain or dysfunction while they are treated for whatever ails them.
Don’t try to be a jack of all trades and a master of none. Don’t try to be the strength coach or personal trainer who trains their clients, but also attempts to treat their pain or soft tissue dysfunction by performing some form of manual therapy.
This is where you need to know what you are good at and what someone else may be able to do better. If a patient or client presents to me and I know another practitioner that is better at it than me, they are definitely going to continue their care with that better clinician.
Keep the manual therapy to the physical therapists, sports chiropractors, etc. These clinicians have hours upon hours of training on various manual therapy techniques to assist in improving movement, pain, and dysfunction.
By meeting with local PTs and chiropractors in your area and developing a network of providers you can refer to, you should have no problem sending a client to a colleague who can help improve their current state. Your client will think the world of you for having the humility to refer them out to someone who can help them properly.
Even if the physical therapist helps decrease their pain, that client will always remember that you had their best interests at heart and you were thinking of them first.
Think of your client’s needs first, not your ego!
Now, just because I am a physical therapist, doesn’t mean I am not going to “bash” on personal trainers and strength coaches. I have a background in physical therapy and strength and conditioning. I consider myself a hybrid physical therapist, bridging the gap between rehab and strength training.
I know that I am not the smartest trainer or coach out there. I have the confidence in my skill-set to start the programming process and teach and help clients squat, deadlift, lunge, carry, push/pull, etc.
There eventually comes a time where I can have a personal trainer or strength coach take over and continue the process. My goal for my clients when they leave me is that they have some type of basic foundation of the various movements just mentioned so they can effectively and safely progress towards their health and fitness goals.
If you are a physical therapist, sports chiropractor, etc. and you either do not have the confidence in how to teach basic movements and program them OR you have not educated yourself on how to program and teach basic movements, then leave that to the strength and conditioning or personal training professionals.
The message goes both ways: as much as we encourage personal trainers not to be too “bridge gappy,” the same goes for physical therapists.
The major point of this post is not to bash either side of the health and performance spectrum. The point is that we need to coexist and develop connections with various healthcare and performance disciplines so that we are in the position to help the most important person in this process: the client or patient.
About the Author
Andrew Millett is a Metro-West (Boston) based physical therapist
Note from TG:If there was ever a blog title conceived specifically for this website, this is the one. Jason Bourne, an F-16 fighter jet, and a lumberjack punching a grizzly bear in the face while eating a bag of beef jerky could have steel cage match and it wouldn’t be as manly as this title.
Fair warning: parts are a bit “heavy” with technical terms and verbiage, but there are still plenty of insights and suggestions (and videos!) that are applicable to everyone reading, because……
Everyone NEEDS to Deadlift
There are a few absolutes in this world. Some of those absolutes are:
Gravity
The Earth is round
Humans need oxygen to survive.
The Human Body needs food and water to survive.
Another absolute I could add to that list is that…Everyone NEEDS to Deadlift!
Now, that I’ve got your attention, finish reading this article before you decide to send your hate e-mail or hate mail if you are still living in the dark ages.
Let me clarify my point: Everyone needs to do some form of hip hinging in order to maintain good back and lower extremity health.
The movement of hip hinging is a vital component of everyday life.
Whether you want to lift up your kids without blowing out your back or you are trying to deadlift your car for reps, being able to hip hinge properly is an integral component to reducing injury risk as well as attaining a high level of performance.
What is “Hip Hinging?”
Hip Hinging is the ability of a person to maintain a neutral aligned spine while predominately loading the hips and having the primary movement come from the hips in an anterior to posterior direction.
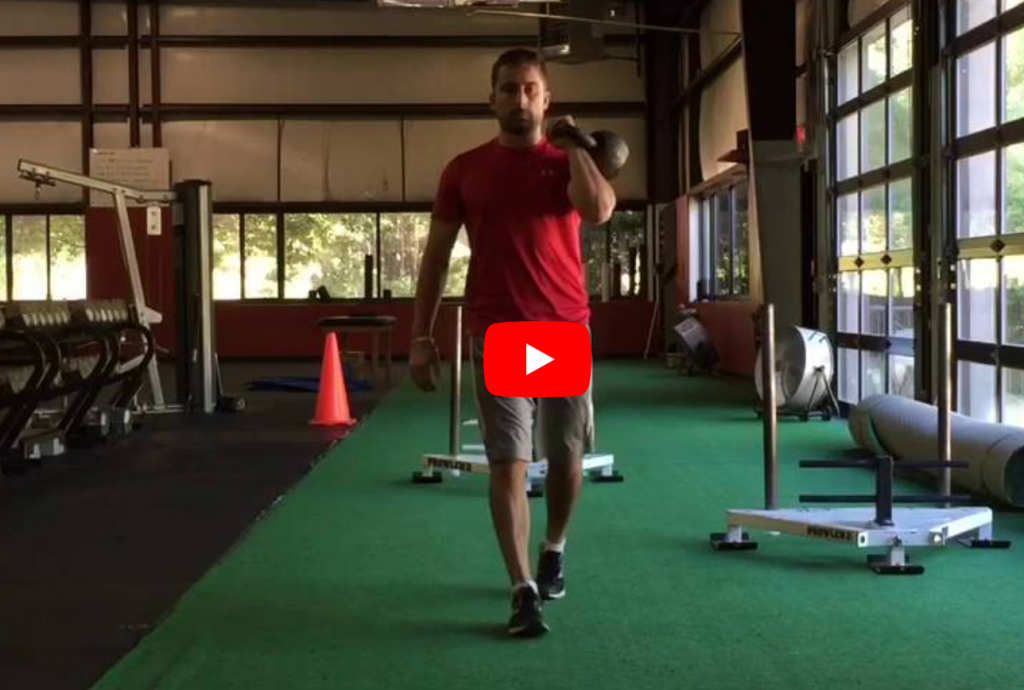
For the visual learners, this is what it looks like:
As you can see from the video, we ideally want a neutral spine position and the majority of the movement comes from the hips moving in an anterior to posterior direction. The knees remain in a soft knee position. This means that the knees are not in a terminally extended (straight) position nor are they overly flexed (bent).
What movements use hip hinging?
The hip hinging move is used for a multitude of movements. It can be used in the:
Deadlift
Good Mornings
Variations of the Glute Ham Raise
Certain Athletic Endeavors
For activities throughout your day, it could include:
Properly picking up your kids.
Lifting a heavy box from the floor to a different location.
Picking a pencil up off the floor.
The list is endless. Being able to properly move through this movement pattern, whether it be for performance or daily life, is a NECESSITY!
How do I know if I can hip hinge?
Well, check out this video below for a quick and easy test to tell if you are hip hinging properly:
Place a broom, golf club, dowel, etc. on your back as shown in the video. Place one hand on the top portion at your head and the other hand at your sacrum (tail bone). Make sure to keep the three contact points between your head, thoracic spine (mid back), and sacrum.
Next, while maintaining “soft knees”, attempt to push your butt back like you are trying to tap the wall with it.
As you are doing this, you are going to need to counteract falling backwards by leaning your upper body/trunk anteriorly (forward). Time and time again, I will see people attempt to do this movement with just pushing their hips backwards and then in turn, fall backwards or lose their balance.
Your hips should always be more superior than your knees. If your hips are in line with your knees in the transverse plane, then you are squatting, not hip hinging.I can equate it going to an upscale club or lounge.
You walk up to the club and there is a line. It is up to the “bouncer” aka the strength coach/physical therapist in this example, to let you past the velvet rope and into Club Hip Hinging.
Once your in the club, there is a VIP section.
In this example, that VIP section is the Deadlifting VIP. If you aren’t on “the list,” then you aren’t making it into the “VIP” section.
For the physical therapists, strength and conditioning coaches, performance coaches, etc. who want to know if someone can perform hip hinging and/or deadlift variations, then screen your clients and patients.
Screening/Assessment
***Disclaimer*** If you are NOT a physical therapist, you need ask your client if you may put your hands on them to screen them. Also, if someone has pain with any of these screens/assessments, structure your programming appropriately and refer out to a PT, sports chiropractor, etc.
Tell them you want to screen them so you can adjust their programming so it is customized for them.
99.9% of people won’t have a problem with this, but you need to look out for yourself and make sure your clients are fine with this.
First piece of information I would like to know is, what does their hip flexion motion look like.
Place your client on the ground and passively/gently move their hip through their available range of motion (ROM).
Then, we want to check and see if they have the passive straight leg raise (PSLR) mobility. Gently raise their leg until you feel some resistance.
Per the Selective Functional Movement Assessment (SFMA), we would like to see 80 degrees of the PSLR. If the client doesn’t have 80 degrees, all is not lost. We have to modify their training regimen. We will get to that later in this post.
Next, if the client has 80 degrees of PSLR, we want to see if they can stabilize in that ROM. Ask them to actively raise their leg, keeping the knee straight up in the air without letting the opposite leg come up off the ground/table. We like to see 70 degrees of active straight leg raise (ASLR).
If they have 70 degrees of ASLR, then we can progress further in our assessment/screening. If they do NOT have 70 degrees, have the client place their hands on the ground. Then press into the ground with their hands and try again.
If their ASLR improves, then they have either a:
Core Stability Issue
Anterior Pelvic Tilt
What the pressing down into the ground/table does is activates the anterior core musculature and in turn, places the trunk in a more neutral position.
Since the hamstrings attach on the pelvis, if the pelvis is in an anterior pelvic tilt, this can cause the SLR to appear limited because it is starting in a stretched position.
If pressing down into the ground/table does NOT improve anything, then try these ASLR correctives:
Active-Straight Leg Correctives (via FunctionalMovement.com)
If there is an improvement in the ASLR, now, have the client stand up and tell them to bend over and touch their toes.
If the client can bend over and touch their toes with ease and without trying to blow a gasket or bouncing up and down, then this is another assessment check point that can tell us that they may potentially be able to deadlift/hip hinge.
The toe touch test comes from the SFMA.
What does the toe touch tells us?
We want to see if the client has the ability to posteriorly shift their hips when performing the toe touch. This tells us that the client can get into their posterior chain to load their hips. When watching someone perform the toe touch, find their greater trochanter (hip bone on the side of their hip region) and watch to see if that area moves backwards during the toe touch
In the first video below, you can see the person can shift their hips backwards.
In this next video, if the person doesn’t perform an adequate posterior weight shift, then they wont be able to touch their toes.
If your patient or client doesn’t have the ability to touch their toes, then try these correctives as recommended by FunctionalMovement.com.
This series of correctives is called the Toe Touch Progression.
First, place a 1/2 foam roller or a 10 lb plate underneath your client or patient’s toes as shown in the picture below.
Then, while maintaining the feet on the plates and the knees straight, instruct the person to bend over and gently try to touch their toes.
Perform 10 repetitions then switch to the heels elevated as shown below and perform 10 more repetitions.
You can also place a foam roller or a small ball between the person’s knees and instruct then to squeeze it during the toe touch. When you instruct the person to squeeze the ball, it up-regulates inner core musculature and places the core/trunk in a better position to perform the toe touch.
Next, have the client perform the toe touch again. If they can know touch their toes or it has improved as compared to before, then we know that this simple corrective has taught their brain/body to learn how to perform a posterior weight shift needed to perform hip hinging and/or deadlifting.
Now, their toe touch may have improved, but in a few hours or when they wake up tomorrow morning, it may be back to the way it was before the toe touch progression corrective.
With the body and the brain when we see a quick improvement such as this one with the toe touch, we are tapping into the Central Nervous System (CNS) and the brain.
It is “teaching” the brain/CNS a new way to move.
As Erson Religioso has mentioned on his website, Modern Manual Therapy, the brain/CNS is easily tricked, but it is difficult to convince. What that means is that with the toe touch, we have opened a window to the CNS that has allowed for a chance or an improvement to the system, we want to do whatever we can to “keep that window open” through various correctives and behavior modification in our daily lives.
If the client’s toe touch hasn’t improved, then there may be something else from a mobility, stability, or motor control standpoint that a licensed healthcare practitioner may need to dig a little deeper to discover why the toe touch hasn’t improved. Refer them to someone in your network, but we will go into more detail now on other ways to train this client even though their toe touch isn’t sufficient enough to deadlift from the floor.
Well, there are many options that you can provide your client to receive a great training effect. The next few examples all work to help load the posterior chain musculature as well as helping to improve core/trunk stability.
Most of these exercises should be felt in the gluteal and hamstring musculature.
Cable Pull-Throughs
Key Points:
Sit back into hips.
Maintain a neutral spine; no rounding or extending of the lumbar spine/TL junction.
Make sure to extend through the hips at the end of the movement, NOT through lumbar hyper-extension.
Hip Thruster/Single Leg Hip Thruster
Key Points:
Start with upper back resting against a bench and hips/knees flexed.
Maintain a “neutral spine” or “ribs down” position.
Extend your hips upwards and squeeze butt at the top.
Finish with your knees, hips, shoulders, and ears in a straight line.
Barbell Supine Bridge
Key Points:
Place an airex pad or exercise mat over hips/under bar to provide some padding.
Maintain a neutral spine, “ribs down” position and drive hips to the sky.
Make sure not to try and lift too high by extending through the lumbar spine.
Elevated Kettlebell Deadlift
Key Points:
Stand directly over the kettlebell (KB).
Push your hips back like you are trying to touch your butt to the wall behind you.
Maintain a neutral spine position.
Grasp the KB, drive your heels through the floor, and lift up through your hips/legs.
Squeeze butt at the top. Make sure to extend your hips and not your low back. Imaginary line should be between your ears, shoulders. hips, knees, and ankles.
Once the client or patient demonstrates proper form with an elevated KB deadlift, eventually lower the elevation height to make the exercise more difficult and eventually perform off the floor as long as proper form is maintained.
Trap Bar Deadlift
https://www.youtube.com/watch?v=p-sA3PG1kGY
Key Points:
Step into the trap bar/hex bar.
Push hips back like you are trying to touch your butt to the wall behind you.
Grasp handles and maintain a ribs down, neutral spine.
Imagine their are oranges in your armpits. Try to squeeze them.
Drive through the heels and extend your hips. Shoulders, hips and knees should be in a line at the top of the movement.
If the client/patient can’t demonstrate proper form with the Trap Bar DL from the floor, then you can place blocks or some other implement underneath the weights to elevate it so they can demonstrate proper form.
Rack Pulls
Key Points:
Step up to bar. Push hips backwards and grasp bar.
Same points as mentioned above.
Can use pronated grip (palms facing you) OR mixed grip (one palm facing you, one facing away from you).
Once someone can demonstrate proper form with these movements, then you can start by progressing towards the floor.
If someone’s goal is to deadlift from the floor and they can do it with proper form and pain-free, then we’re on our way to hitting that goal.
If someone’s goal is to be able to pick-up their kids or move and feel better, then the exercise variations mentioned above are great ways to help with that.


.jpg)