CategoriesExercise Technique personal training Program Design

Breaking Down the Turkish Get-Up

For some people seeing the words “Turkish Get-Up” in the title of an article elicits a gag reflex or makes them want to jump into a live volcano.

Even I’ll be the first to admit it’s not the most exciting exercise to talk about.

However, that doesn’t mean it’s altogether invalid or that it doesn’t deserve our undivided attention. It’s an exercise that has carryover to many facets of fitness whether you’re a beginner or elite athlete.

Call me crazy, but I wholeheartedly believe it has a time and place in everyone’s programming.

In today’s guest post by Calgary based personal trainer, Linden Ellefson, he breaks down the movement into more manageable, bite-sized tidbits that’ll (hopefully) convince you to give it a try.

Enjoy.
Copyright: photominus / 123RF Stock Photo

Breaking Down the Turkish Get-Up

In fitness, there aren’t any magic exercises… any more than there magic fat loss pills or magic devices that will get you jacked injury-free.

You have to put in the work and train intelligently.

That said, every once in awhile the fitness fairy godmother graces us with an exercise that performs beyond expectations.

Case in point: The Turkish Get Up.

The Turkish Get Up:

* Improves hip and shoulder mobility
* Improves core strength
* Can be a great conditioning tool
* Makes your look great

But wait, there’s more (as they say on infomercials.)
This Turkish Get-Up can fix a lot of problems before they even come up.

An example is bulletproofing your shoulder to reduce the risk of injury. Even NFL teams are trading the bench press for the Turkish Get Up

Shoulder, chest, and arm development will skyrocket due to the amount of time you spend keeping the kettlebell above your head.  

It will iron out any left to right imbalances, meaning that your bench press and squat will likely improve because both are being trained equally.

Because your hip moves in multiple planes of movement, you train your hip more than up/down and forward/back like a squat or deadlift. This helps prevent injury.

Another benefit of this exercise is that since there are so many pieces to the exercise, you can work on improving each step to get better at the whole.

If you aren’t drooling with anticipation to master this exercise and be the envy of your entire gym, we can’t be friends.

You’re going to need:

Overhead Mobility: Can you put your arms overhead so that your biceps rub your ears without your lower back compensating?

Hip Hinge: Can you move your hips independently of your lower back? If so, then feel free to give this a shot!


Obligatory “If You’re Hurt, Then Read This” Warning: If you are currently going through an injury, then you need to see a physical therapist or doctor to get out of pain first. Do that, THEN you can learn your turkish get-ups.

Lets Get to the Breaking Down Part

While this exercise may look complicated when we look at the whole, there are actually five different parts you’re going to learn about. Here’s what they are.

  1. Drive to the elbow
  2. Press to the hand
  3. Bridge the hips
  4. Sweep the foot underneath
  5. Half kneeling position
  6. Stand Up

If you watch this video, you’ll know how technical this movement is.


This is best learned by having someone coach you through it. If you have access to a competent coach, be sure to learn this from them.

Note From TG: You can find competent coaches by perusing both the StrongFirst & RKC (Dragondoor.com) websites.

If you like learning by reading, read along!

A Couple Keys to Keep in Mind.

  1. There is a concept known as active and passive shoulder. When you have an active shoulder when someone pulls on your hand, your whole body would come with it. When you have a passive shoulder, it means that your shoulder moves independently of your body. We’re looking to keep your shoulder active the entire time.
  2. You’ll naturally press into the hand that’s holding the kettlebell, but I also want you to press into the ground with your bottom hand like you’re a wide receiver trying to stiff arm the safety as you run to the endzone for a touchdown. This will allow you to keep the shoulder in a safe position, not increasing your risk of shoulder pain.

Ready to learn? Let’s start then.

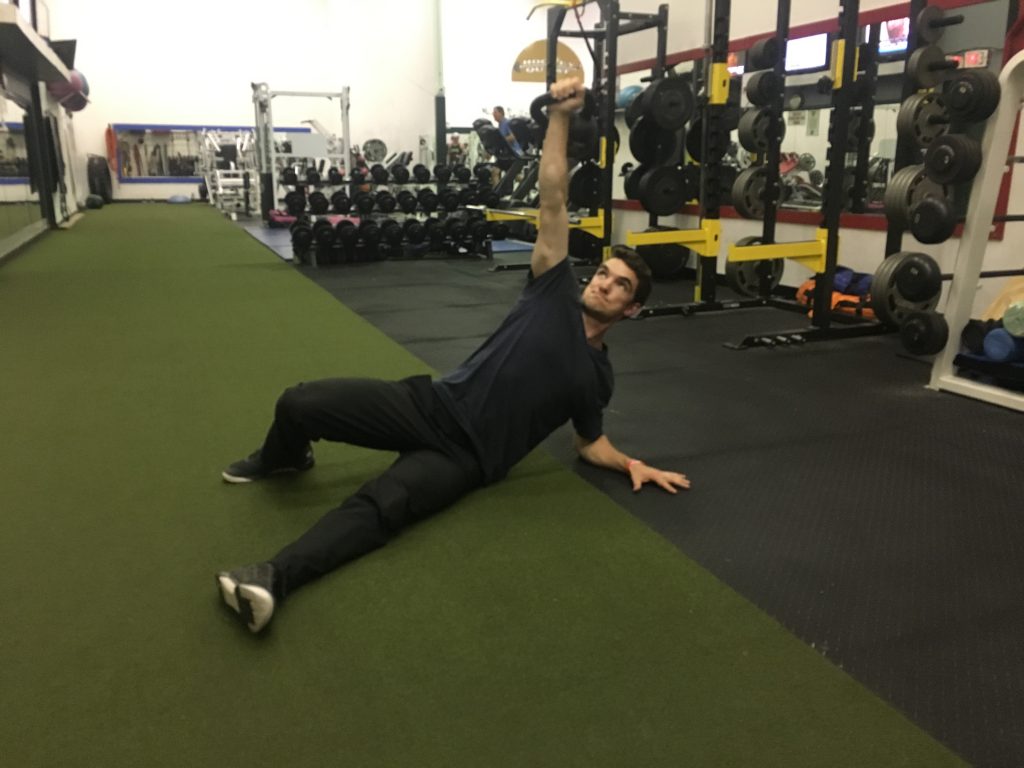
Drive to the Elbow

Assume you’re using your right hand. Start with the kettlebell directly above your elbow at a 90 degree angle. Your right knee is at a 90 degree angle with your foot on the ground. You will look like the following:
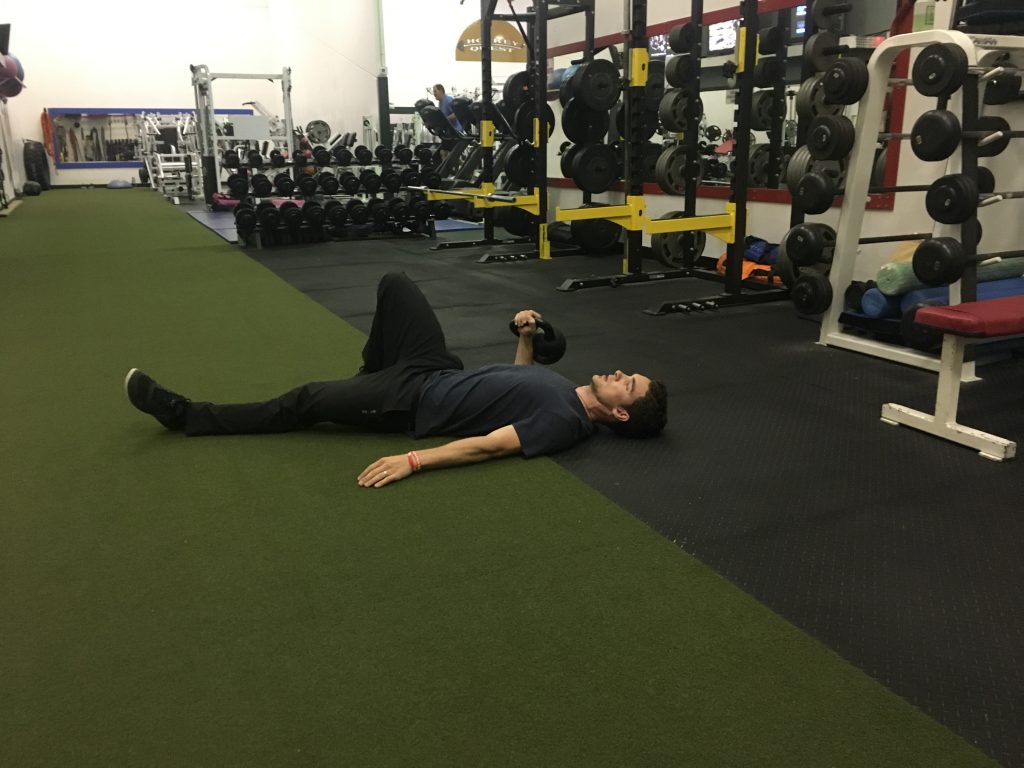
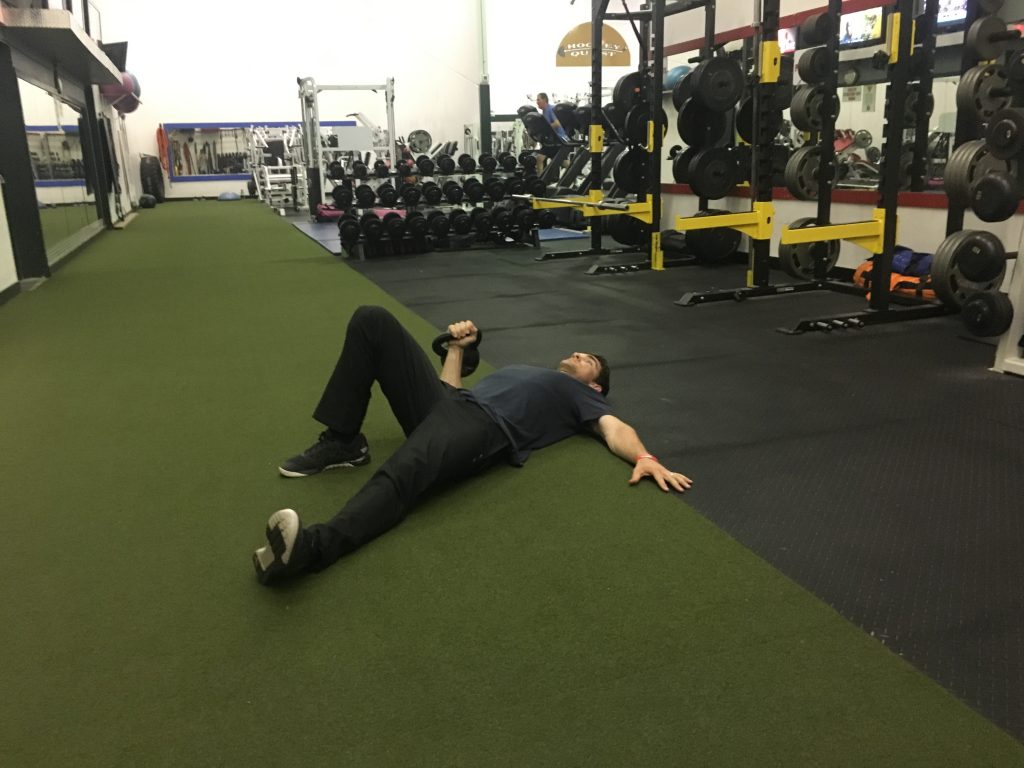
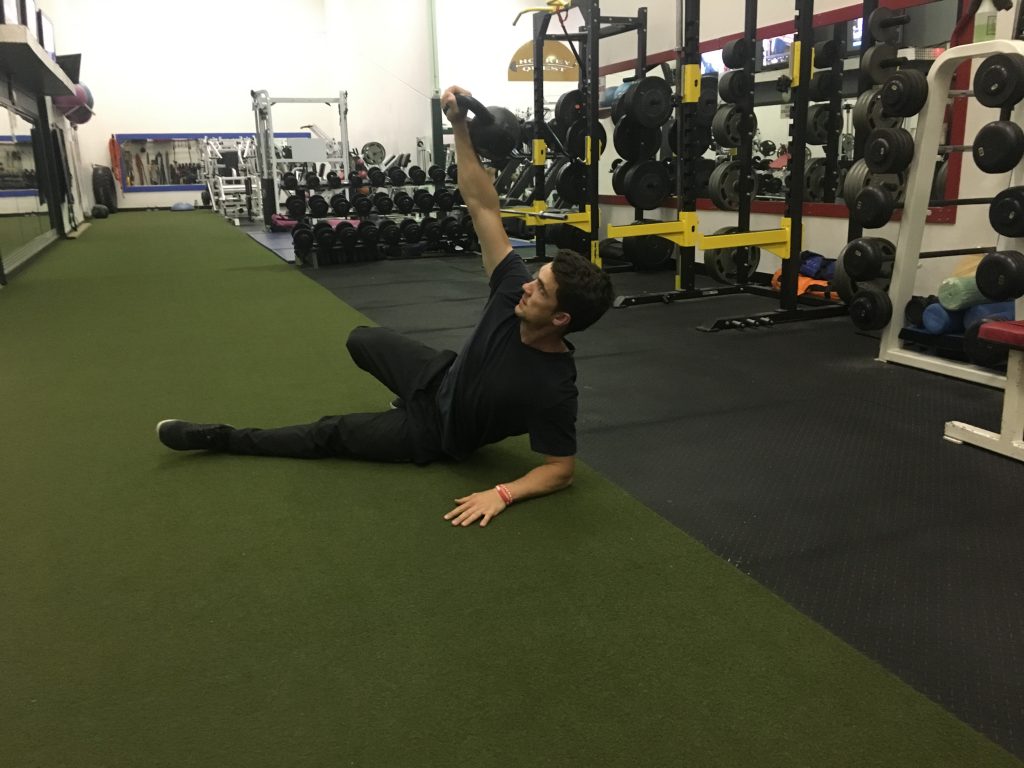
From here, drive the kettlebell across your body as if you’re going to punch someone. Push with your right leg as well.

As you drive the kettlebell in the air across your body make sure you push through your elbow into the ground. When you do this, your shoulder is less likely to get injured.

Part 1 done! At this position, you should feel your back turned on, your shoulders nice and warm, and core turned on too. Finish position below:
Press to Hand

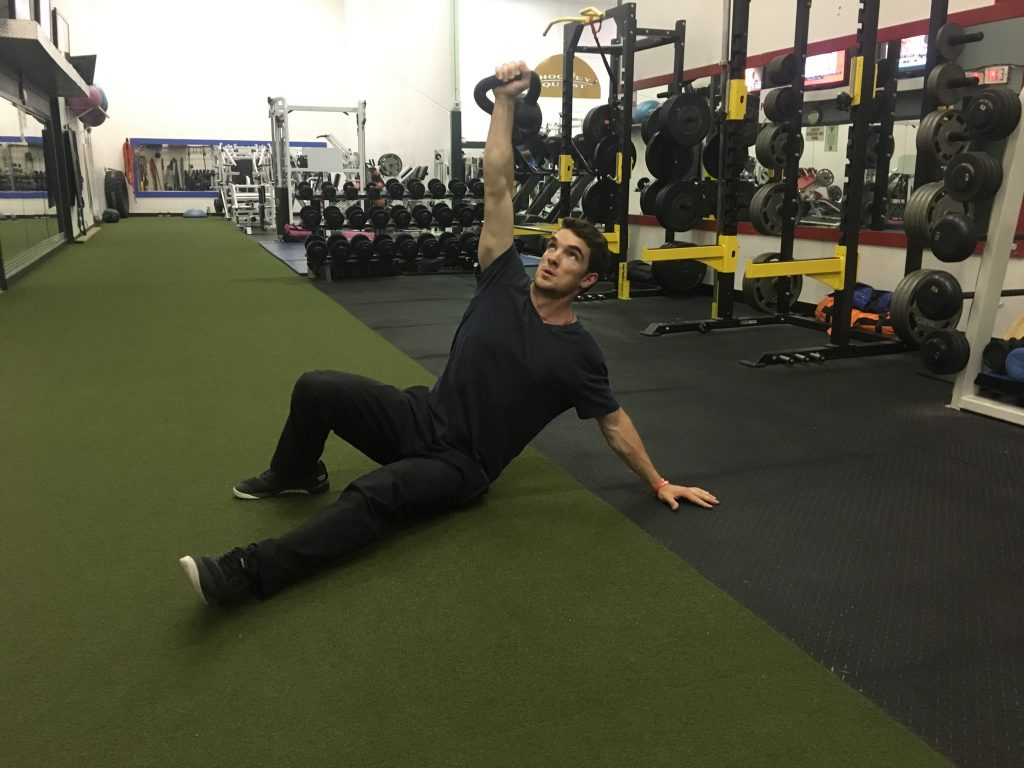
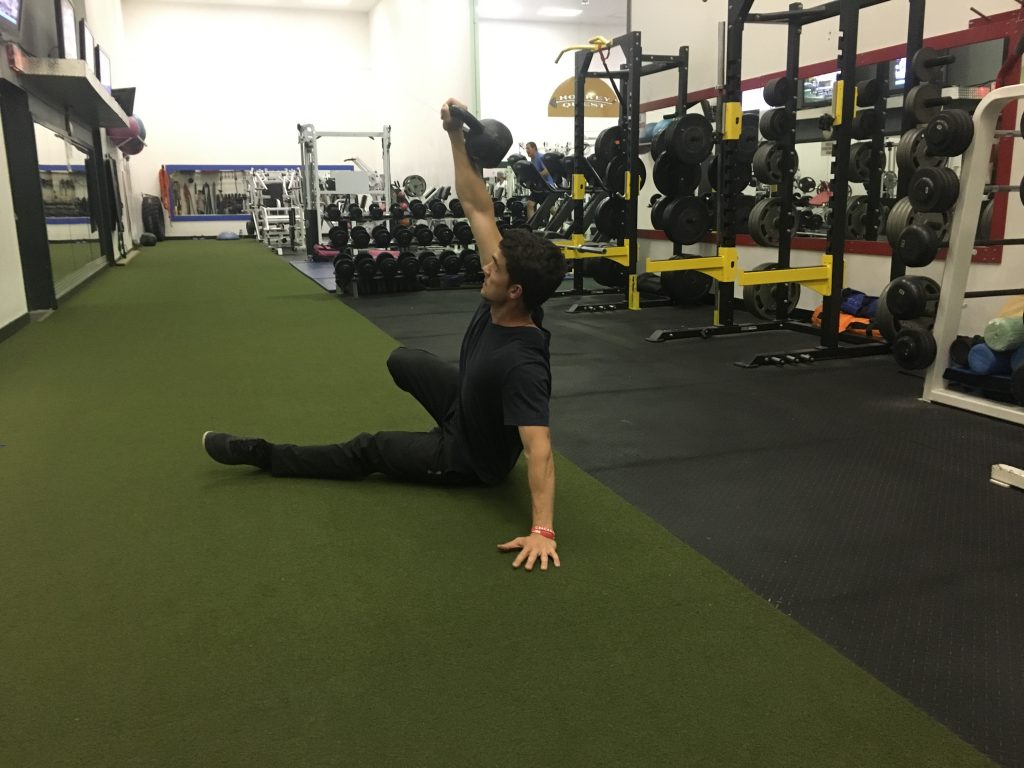
With your right hand in the air, extend your left elbow and squeeze your tricep as you press up onto your hand, just like a tricep extension. When you finish you will look like the following:
Hip Bridge

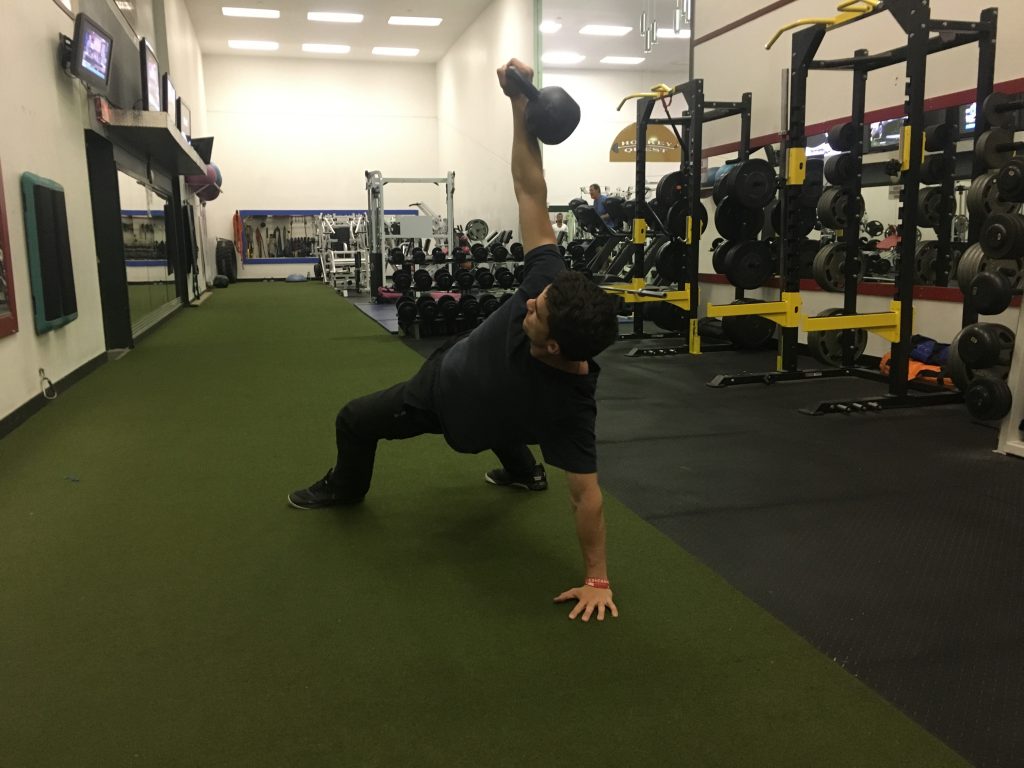
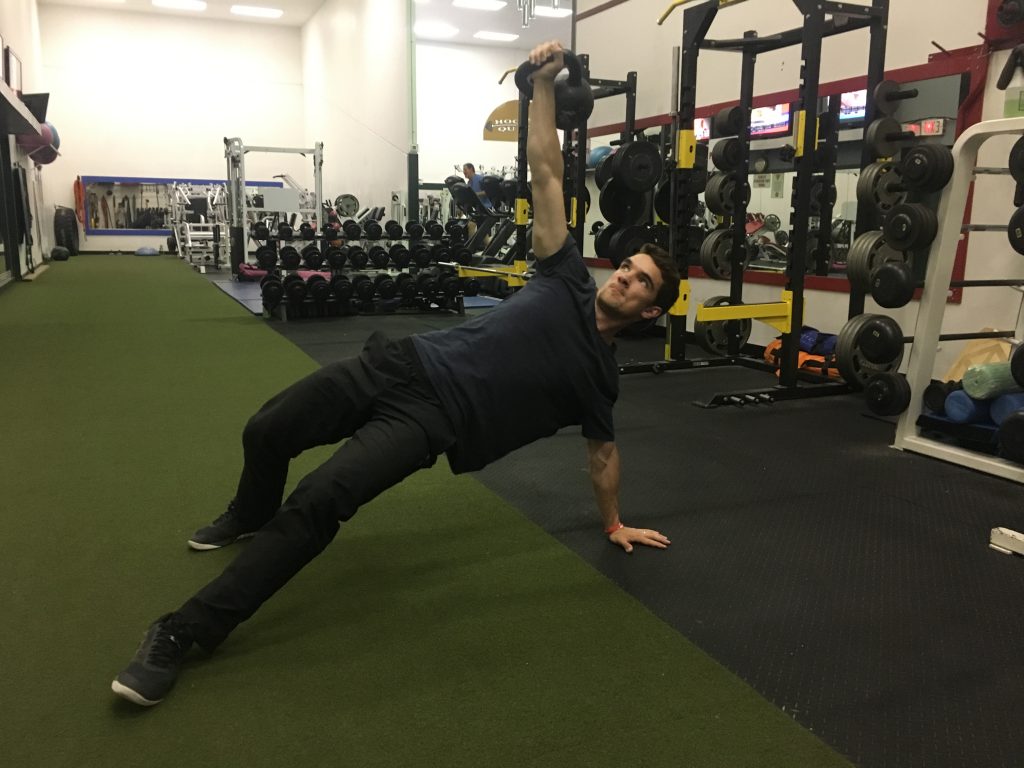
This step can cause the most problems with trainees. Make sure your both the bell hand and the hand on the ground are stable. When here, drive your hips up in the air by aggressively squeezing your glutes.

Like a deadlift.

Or other fun activities 😉

The higher you can get your hips, the easier the next step will be.

This is the finish position:
Note From TG: As an alternative, and I hope Linden doesn’t mind me poking my opinion into the mix, I’m not married to trainees always performing the high bridge option. Both Gray Cook and Dr. Mark Cheng (the latter likely should get more credit) note that this is a “speed bump” or fork in the road to the get-up.

Meaning we have some options.

There’s the high-bridge option which is delectable option for those with optimal hip mobility and hip flexor length.

And then there’s the non high-bridge option where one more or less sweeps the leg – Johnny Lawrence style – and transitions to the half kneeling position from sitting.

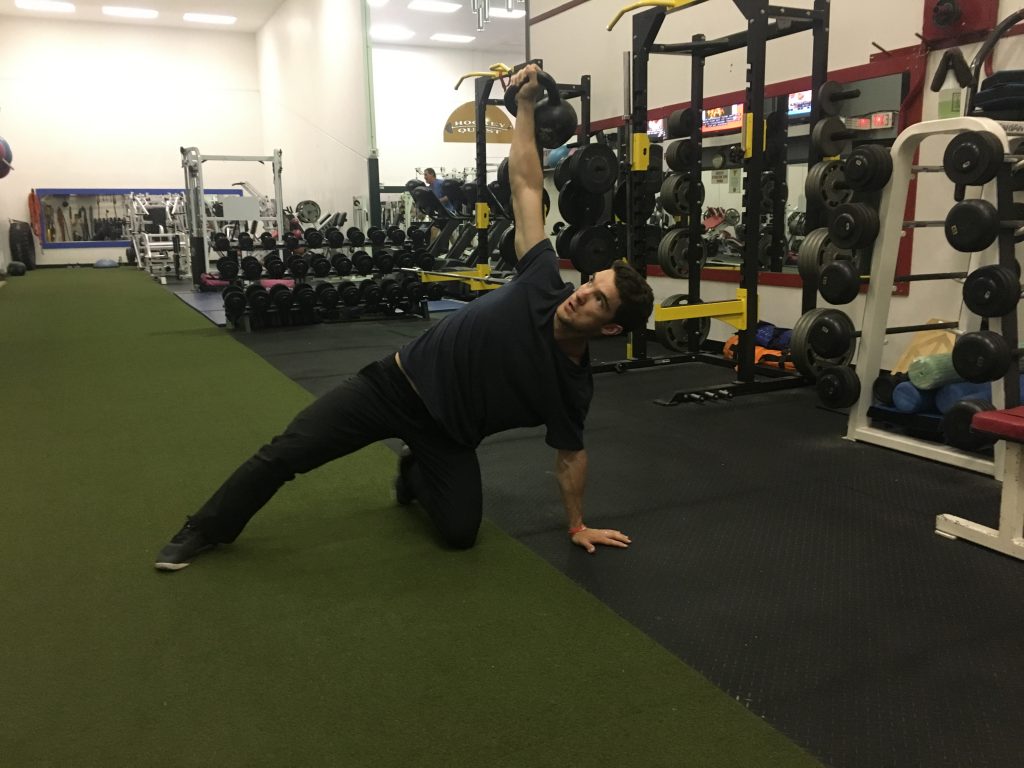
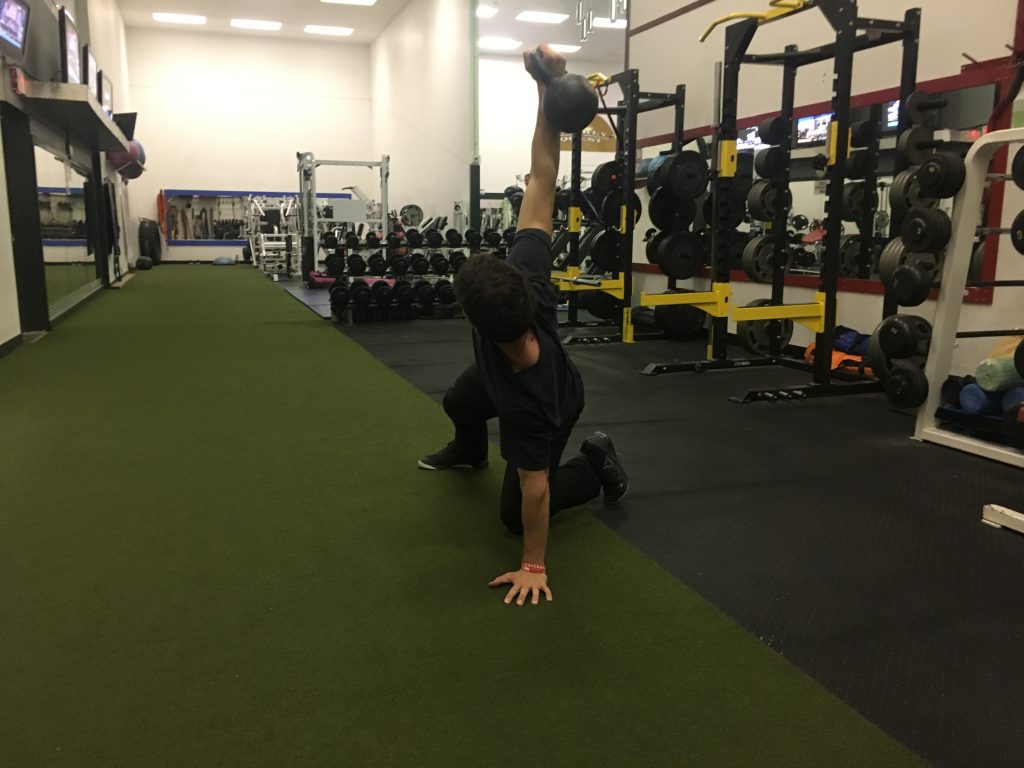
Sweep the Leg

From here, you’re going to take your LEFT leg, and sweep it underneath your right leg and place your left knee directly underneath your hip. Your right arm will still be in the air, and your left hand directly below your right. You will look like the following picture:
Half Kneeling Position

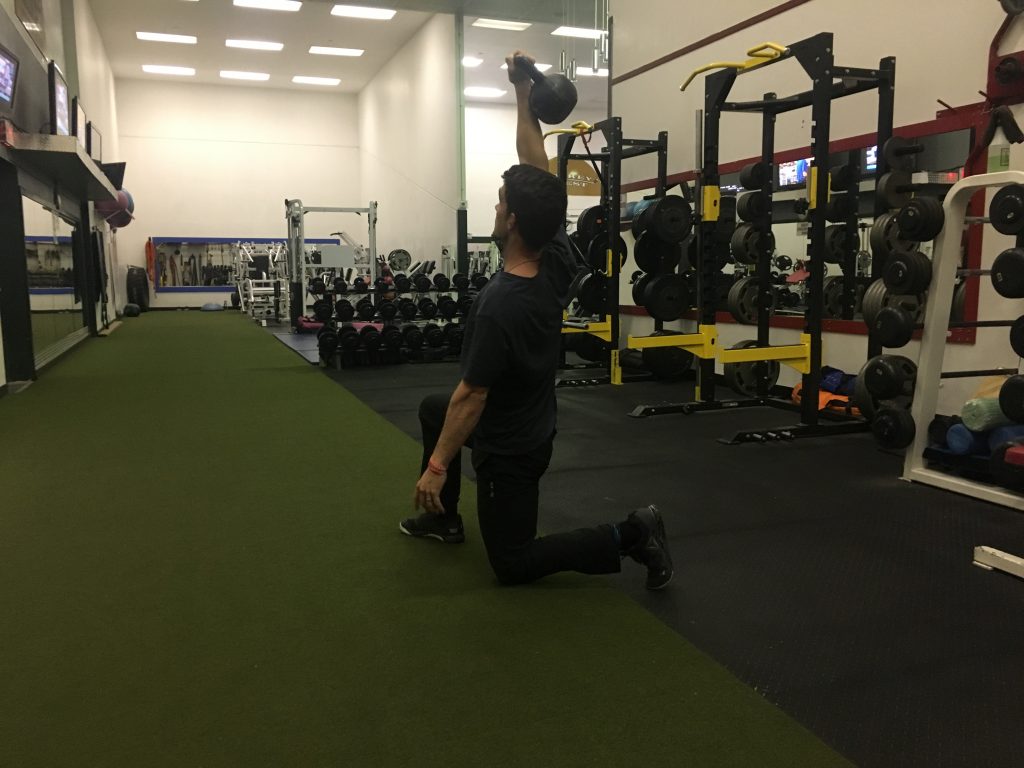
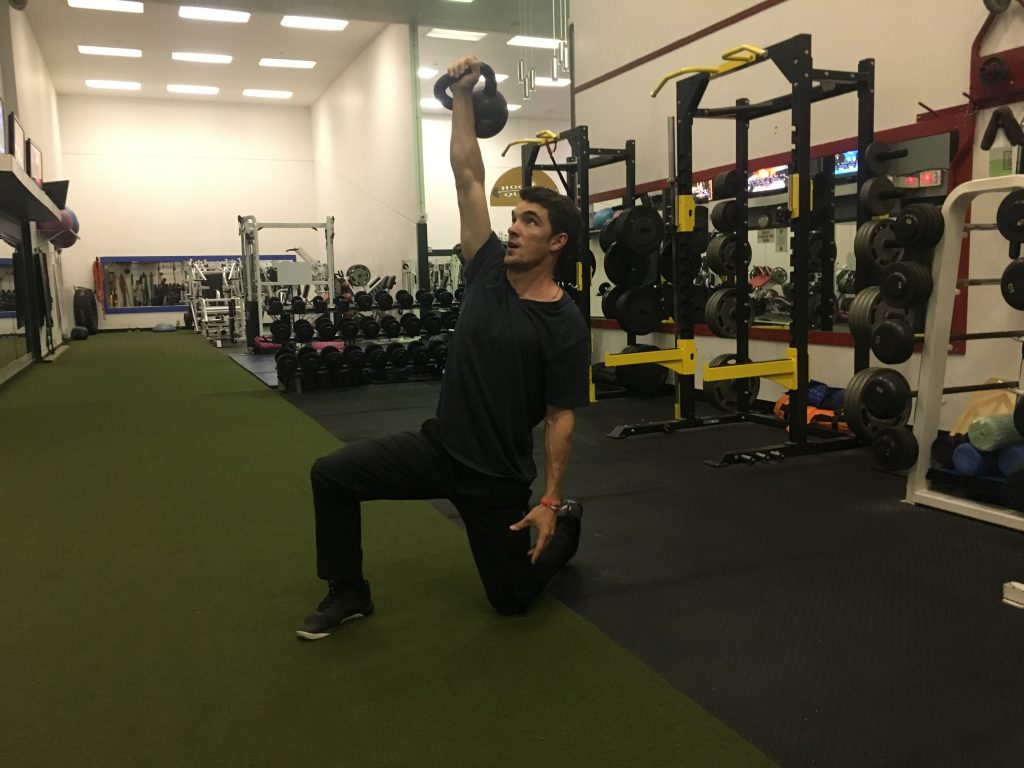
This isn’t a movement, but the position you end in. You DON’T use your back to get to a kneeling position with the bell above your head. Instead, you’re going to brace your core, squeeze your butt and push your hips underneath your upper body as you press the weight up.

Your butt is fully engaged here as you keep the weight up. Keep your core tight as the tendency here will be to use your lower back to keep the shoulder stable.

The picture of the position is below.
Note From TG: Hey, it’s me again. This is yet another speed bump to the Get-Up. The most popular option to transition to the half-kneeling position is the “windshield wiper” the back leg and position into half-kneeling. 

This is fine.

However, it can oftentimes feel wonky to a lot of trainees. 

Another option I like is this:

Stand Up

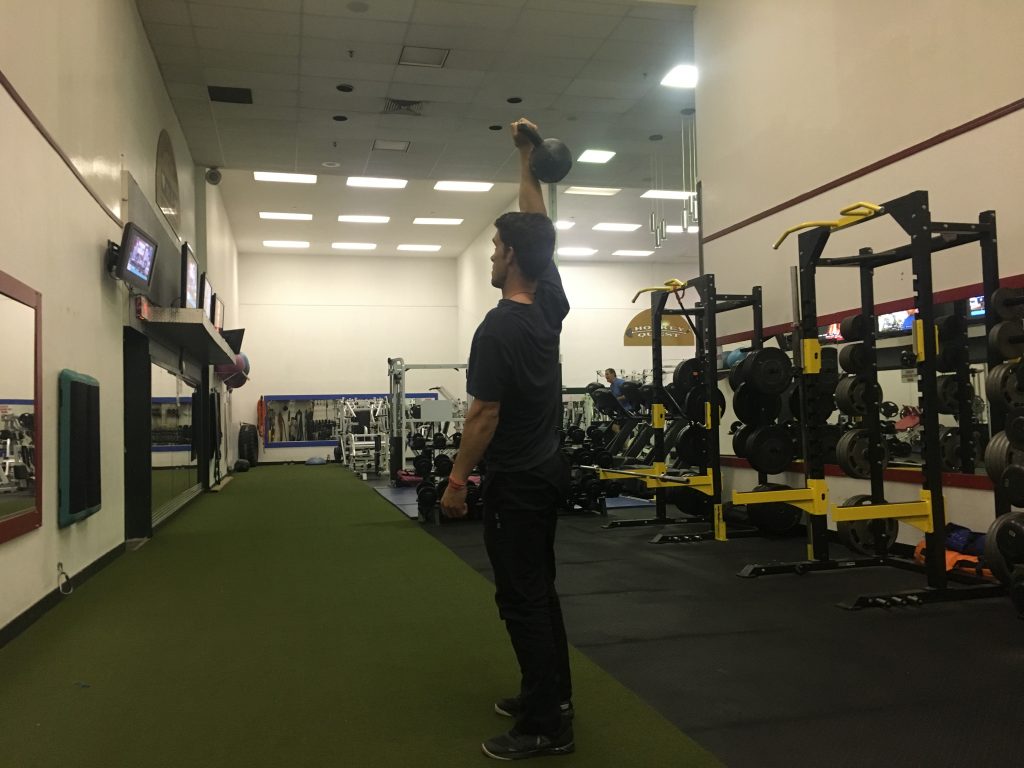
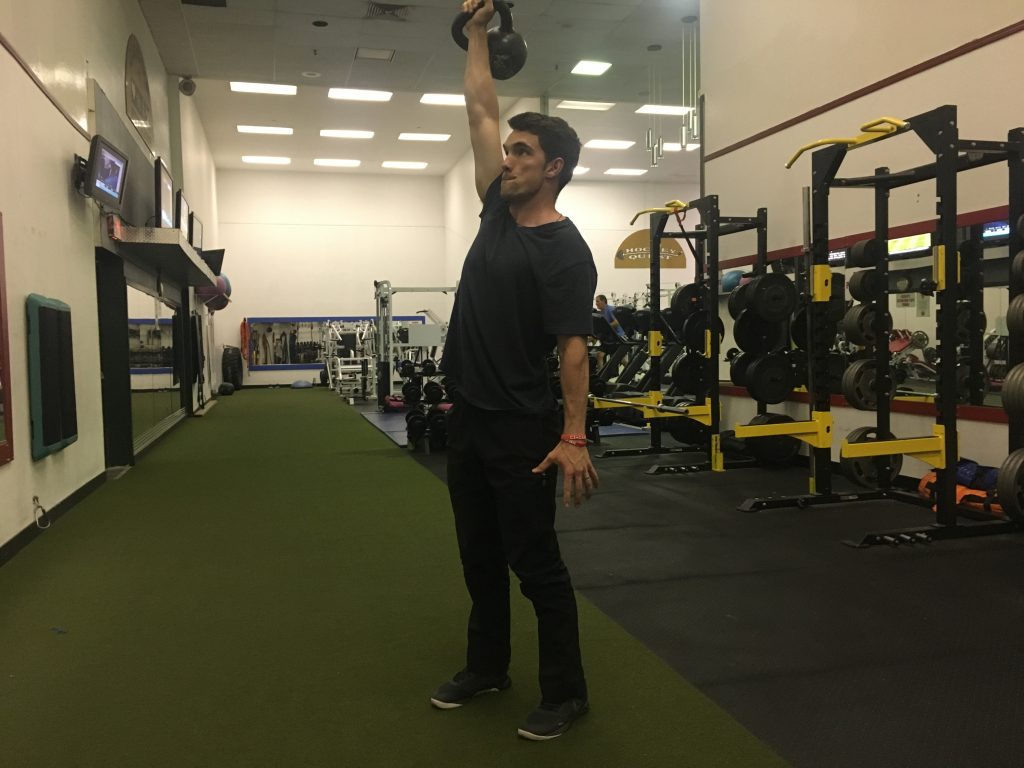
This is essentially where we stand up from a lunge. With the weight over our head, we’ll stand up using the entirety of our legs. Stand up from there.

Finished position below:
With that, we’re going to reverse this whole process to lie back down.

If you understood all that and put it into practice, then you might have successfully completed your first turkish get-up.

OR you might have picked up a couple cues to clean up your relatively hideous one.

Where Should You Put It In Your Workout?

Without understanding how to put it into your workouts, it does you no good. There are three places where I would suggest using them.

  1. As a Warm-Up. Since this uses every muscle, depending on your workout for the day, you can emphasize different steps to get specific muscle groups prepped.
    Doing upper body? Spend 3 Seconds in each position until you Sweep the Leg. Got a killer deadlift workout coming? Spend 3 Seconds in each step from the hip bridge on.
  2. Use it as part of your strength programming. This can work as your second or third exercise in an upper body day or your full body workouts. Due to the length of this exercise, if you’re looking to get stronger, I would suggest sets of 3-5 reps with a heavy bell. Start with 35lb as a man, and 15-25lb as a woman.
  3. Use it for conditioning. With a lighter bell than you would use for your strength work, set a timer for 10-15 minutes and see how many good quality Get-ups you can do in the time frame. Alternate your hands every rep or after every second rep. Challenge yourself to be better next time.

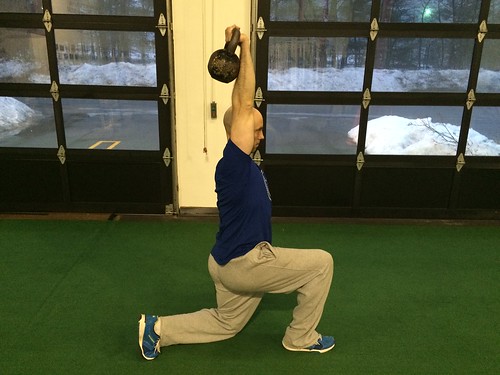
If you want a good challenge, one of my new favourite conditioning combos is to use turkish get-ups and overhead walking lunges together. Check out the video below to see how to perform it.

If you follow this step by step guide, along with download the accompanying video, you’re going to master this exercise in no time. Use this exercise, abuse it, and thank the fitness fairy godmother for this one when you get a chance.

About the Author

Linden Ellefson,

Bkin, CPT

Linden is a Calgary, Alberta personal trainer and online coach. He loves good coffee, his Boston Terrier Taco, and a great workout. Most of all, he loves making his clients the strong, pain free, athletic beasts they were meant to be.

To find out more from Linden connect with him at www.lindenellefson.com Facebook (he’s the only Linden Ellefson), or on Instagram.

Categoriescoaching Exercise Technique

Turkish Get-Up Tip: Vertical Knee

The Turkish Get-Up.

Some people love them.

I mean, really love them.

https://www.youtube.com/watch?v=M_98w0cwqFQ


And others are indifferent maybe even skeptical.

I know some strength coaches who view them as a valued asset to their programs, providing insight on their athlete’s movement quality as well as highlighting any “weak links” that may exist.

And I know some strength coaches who could make a list of other things more valuable or worth their time:

  • Deadlifts
  • Squats
  • Arguing with a vegan
  • Running a 5K
  • A basket of dicks

I, for one, do find value in them.  Of course, whether or not I transplant them into someone’s program depends on several factors; namely, their goal(s).

Sorry, but if someone’s goal is hypertrophy I can think of roughly 412 other exercises more prudent to get the job done than the Turkish get-up.

I’m not saying it’s a waste of time to include them in a program designed to get someone jacked – maybe include them as part of an extended warm-up to get the joints primed for larger, compound movements, or, say, if someone has the movement quality of a pregnant pig (they’re a nice addition to GPP days) – however, I’d raise an eyebrow (or two) to any coach who places heavy precedence on including them in such a program.

That said, I find the get-up to be one of those universal movements I use with my athletes and general fitness clients alike. For athletes it’s a great way to control fatigue and reduce axial loading. Not to mention we’re accomplishing a lot with regards to scapular stability, hip mobility, glute activation, as well as working on primitive patterns such as rolling, half kneeling, to standing.

I pepper them into programs for general fitness clients because, well, it’s good for them (and I like to LOL when they call me an a-hole for making them do it).

There are a lot of moving parts to the get-up. Not surprisingly, this makes the learning curve a bit tricky for some with regards to honing technique

Much like how I prefer to layer the KB Swing, I think it’s wise to also break down the get-up to more bite-size portions.

Today I’d like share a tip I learned from StrongFirst Team Leader, Artemis Scantalides, on a subtle “technique trap” many seem to fall prey to.

Maintaining a vertical knee (which helps to keep the glute engaged during the initial roll to press).

Vertical Knee

CategoriesExercise Technique

Cleaning Up the Turkish Get-Up: Stuff People Gloss Over Because They’re Too Cool

“What does this THING even do anyways?!”

That’s pretty much the standard reaction/question I receive every time I have a client or athlete perform a Turkish get-up.

What’s the big deal anyways, right? You take a cannonball looking thingamajig, hold it in your hand, and stand up with it.

La-dee-freakin-da.


There was a time, not long ago (<– I’m trying really hard to refrain from a Star Wars reference here), where I mirrored some of the same sentiments.

I attended a Perform Better conference where one of the presenters took the attendees through some basic kettlebell exercises – namely the swing and get-up – and I thought to myself, “This is so lame. It’s a fad. Can we please go do something cool like deadlift or play Laser Tag or something?”

Then I started seeing the same exercises pop up on various fitness websites – Men’s Health, Women’s Health, even T-Nation. No! Not T-Nation. Dammit!

Additionally I started listening to guys like Gray Cook, Pavel (no surprise there, since he’s essentially the guy recognized as popularizing kettlebell training in the States), Dan John, and many other reputable coaches start to speak to the benefits of kettlebell training, in particular the get-up.

To be honest, Eric (Cressey) and myself held off for as long as we could before we accepted that kettlebells were here to stay. Guess it wasn’t a fad after-all. And it wasn’t until a few years ago when we started making a concerted effort to implement them into our programming for our clients and athletes.

Lets bring this back to the original question: “what does this thing (meaning get-ups) even do anyways?”

Here’s the answer:

What DOESN’T It Do?


I’ve heard Gray Cook refer to the get-up as loaded yoga. He didn’t stand there or drop the mic or anything, but he should have. That’s an excellent explanation.

Think about it: what other exercise combines the interplay between mobility/stability while simultaneously having people incorporate the lying down, rolling, half-kneeling, and standing positions…..and then reversing those actions?

And this doesn’t speak to its versatility. I’ve used get-ups as part of an extended warm-up, as a corrective exercise, as a strength exercise, as part of a circuit or finisher (shown in the video above), and if I had a kid, I’d use the get-up as punishment for not eating all their vegetables.

In addition, it’s not uncommon to see a correlation between improved get-up performance and improved performance on the sexier lifts like squats and deadlifts.

And it’s here where I wanted to take a few moments to hammer a few bullet points on the get-up. Not so much a “how to” post – there are plenty of those on the internet, and I’d encourage you to seek out all the people mentioned above along with Brett Jones, Steve Cotter, Dr. Mark Cheng, Neghar Fonooni, and Artemis Scantalides – but rather just something to speak to the finer points of the movement that many people tend to gloss over.

1. Grease the Groove

I like Dr. Mark Cheng’s approach to the get-up.

He’s a boss.

There’s a time and place to push the envelop with the get-up, but realistically, it should rarely be a max effort endeavor. I.e., it shouldn’t look as if you’re passing a kidney stone during every transition on every rep.

Dr. Cheng is a guy who could easily use the Beast on his get-ups, but he rarely does. He likes to stick with a weight between 20-24 kg and focus on the QUALITY of the movement rather than making it hard for the sake of making it hard.

I get that sometimes we want to impress our friends or Twitter followers with feat of strength, and I’ve seen many gleaming examples of impressive get-ups. However, I’d encourage most people to err on the side of conservative and use a light(er) KB than they think 95% of the time. It’s only then you’ll learn and (soon) master the movement.

Which serves as a nice segue into my next point.

2. Slow Down, Buttercup

Pigging back off of Dr. Cheng’s sentiments above, the get-up is like a pot roast. Much like we allow the meat, broth, and vegetables to marinate over time; we also need to marinate the get-up.

The objective is NOT to rush1. It’s imperative to OWN every transition and stage of the movement. A common mistake many trainees make is they try to speed up the get-up. Sometimes it’s due to boredom (more on this in a bit) and they just want to get the set over with for….the….love….GOD!!!

Almost always it’s because many lack the stability to do the get-up right. This can be a bodily issue or weakness or, most commonly, they’re flat out going too heavy.

A proper get-up should take a good 45-60s/PER SIDE to complete. This is where those who have exercise ADD may get bored. Sorry, it’s just the way it is.

This is why I tend to program 1-2 reps per side on any given set. Anything more than that and people start to lose focus and/or start getting sloppy with technique.

Slow down. Own every position.

3. Wrist Position

The Turkish get-up is all about stacked joints and locked out joints.

I see it all the time: someone performs their get-up and their supporting shoulder is “shrugging” their bodyweight, the knee on their extended leg isn’t fully locked out, or they’re not getting full hip extension on their high-bridge (more on this below).

All are wrong, and all promote energy leaks which is only going to make the exercise harder to perform,

Another common snafu for a lot people is wrist position. Many will allow their wrist to extend back too far, like this:

1. Ouch

2. That’s a massive energy leak that’s going to make it much harder to control the bell throughout the rest of the repetition.

Instead I like to tell people to point their knuckles to the ceiling at all times. Like this:

1. Way sexier.

2. Less energy leaks.

3. Correct.

4. Don’t argue with me.

Not that I need to say it, but just to cover my bases: this rule applies THROUGHOUT THE ENTIRE MOVEMENT.

4. High Bridge vs. Sweep the Leg

You might have noticed I mentioned the high-bridge above. This is something I believe Dr. Mark Cheng introduced a few years ago, and something that himself and Gray Cook looked to as a way to “clear” someone of hip extension/hip flexor mobility.


We don’t have to be Nazis about it. It’s not right or wrong to include the high-bridge or not as a transition point. It comes down to personal preference. Really, it’s okay.

Although, anytime I can reference The Karate Kid – “sweep the leg!” – I’m all for it.

I will, however, caution fitness professionals to be leery of including this step with anyone who doesn’t have the prerequisite hip mobility to perform it.

5. Transitioning From Half-Kneeling to Standing

Last but not least, in the past I had always coached the “windshield wiper” as the best way to transition from the half-kneeling position to standing.

It works.

A few weeks ago, though, Artemis Scantalides and Eric Gahan of Iron Body Studios (located in Needham, MA), came to Cressey Sports Performance and showed us some cool hacks for the get-up. One of which I really liked and thought was brilliant.


And there you have it. Just a few things to consider to help clean up your get-up technique.

CategoriesCorrective Exercise Exercise Technique

Making Difficult Lifts Easier

The word “easier” is subjective in this context.

I mean, can we really make a squat or deadlift easy?

Maybe a better way to state things is to say “easier to perform so that someone doesn’t shit their spine.”

As a strength coach it’s obviously important for me to help get people stronger – especially with the big lifts. Too, and maybe more importantly, a large portion of my job is to “fine tune” technique so that a particular lift or exercise is more user friendly for my athletes and clients to perform.

Almost always everyone I work with is going to be squatting, deadlifting, and performing any number of compound movements to some degree on a daily basis. This DOES NOT mean, however, everyone is barbell back squatting, squatting deep (or ass-to-grass for the brosefs reading), conventional deadlifting, and/or performing max effort anything on day #1.

Much of that will depend on one’s current (and past) injury history, training experience – not to mention goal(s) – as far as what variation of squats or deadifts (or whatever) I’ll start them on. In short: I need to figure out their “Point A” (starting point) before I can get them to “Point B” (squatting 2x bodyweight, hitting a 500 lb DL, arm wrestling a grizzly bear, etc).

Often I’ll need to break down subsequent movements into specific parts in order to groove technique and/or introduce a new exercise into someone’s training repertoire.

Which is the topic of my latest article on BodyBuilding.com. In it I discuss some simple drills I like to use to break down the deadlift and KB Turkish Get-up.

Continue Reading…..

CategoriesExercise Technique Miscellaneous Miscellany

Miscellaneous Miscellany Monday: Get-ups, Deadlifts, and B-Days

1.  I have a love-hate relationship with Turkish get-ups.

Photo Credit: John Maguire

As a coach I love them in the sense of how much bang-for-my-training-buck they provide. I get asked all the time from my athletes and clients “what the hell do these get-up thingamabobbers do anyways?” To which I respond: what don’t they do?

Dean Somerset wrote an excellent article last week on T-Nation HERE which mirrors many of my own thoughts on the matter.

But to expound a bit more, you can think of get-ups as loaded yoga. Yes, I can use the word “yoga” in a sentence and not throw up a little in my mouth….;o)

Truth be told: 98% of the dynamic warm-up drills that we use on a regular basis at Cressey Sports Performance are derived and have their base in yoga. Likewise, a fair number of basic strength training moves like planks (and all their iterations), yoga push-ups, and certain lunge variations have their ancestry in yoga.

So it’s not like yoga doesn’t deserve some credit!

Taking the thought process a bit further, can you name another exercise which incorporates so many valuable components as the get-up? We have lying, rolling, glute activation, bridging, scapular stability, overhead static hold, core stability/strength, half kneeling, and lunging; and then a reversal of all of that. About the only thing get-ups don’t do is remember to set the DVR to record the latest episode of The Walking Dead, GODDAMMIT!!!!

As a trainee I hate get-ups.

1. No exercise does a better job at highlighting any glaring weaknesses up and down the kinetic chain. Whether it’s limited hip flexor length, having hip mobility that would rival the ROM of a pregnant rhino, poor scapular stability, or weakness in general, get-ups are going to humble you.

2. Using a more personal anecdote, get-ups just take F.O.R.E.V.E.R to perform. Coming from a guy who thinks anything that requires more than five reps is cardio, the fact that it takes upwards of one minute to complete ONE SIDE of a get-up makes me want to punch myself in the neck. It’s so annoying.

The thing is: when performed correctly, that’s how long a get-up should take!

Dr. Mark Cheng was kind enough to make a cameo appearance two weekends ago at mine and Dean’s Excellent Workshop in LA.

He spent a solid 90 minutes taking all the attendees through the kettlebell swing and get-up. I learned more in those 90 minutes than anything I’ve watched or read in the past five years (no offense to those who’s DVDs I watched and books/articles I read!).

Side Note: Mark is the guy James Fell interviewed for THIS article a few years ago that time Jillian Michaels tried to pretend she knew what she was talking about when it came to whatever it is she was trying to demonstrate here.

– For example, why are they called TURKISH get-ups in the first place? Why not Canadian get-ups or Vulcan get-ups? Why do the Turks get all the love?

It seems back in the day, and I assume present day too, the Turks were kind of badass. I forget what term Mark used, but he described the form of grappling they typically trained their warriors in, and how they used to do so all oiled up.

You know how hard it is to grip or grab something that’s all wet or sweaty, right? Well imagine that only 100x more challenging and homoneurotic (depending on what your definition of an ideal Friday night is)2

Anyways, waaaaaaay back in the day, in order to even be considered “man enough” to train and to learn how to fight the Turks made it a prerequisite you had to perform a get-up with close to a 100 lb kettlebell (give or take a few lb’s). While fighting a grizzly with your free hand!

Okay, I made that last part up….but still. WTF!!!!!

Point: Turks. Well played.

– Another tidbit I didn’t realize was that Mark is the guy who implemented the high bridge into the get-up! This isn’t to say he feels this is the correct way to do the get-up, but rather to suggest there’s more than one approach to any given component.

To transition from the seated overhead position to the half kneeling position you can do so in a variety of ways depending on preference and/or limitations. You can use the basic leg sweep, the leg switcharoo (<— where you essentially stay seated the entire time, switch leg positions, then stand up), the two-legged squat approach, or the high bridge.

– According to Mark he was toying around with the high bridge one day (as it emulated a specific move in his favorite form of fighting), and he and Gray Cook had an Ah-HA moment! The high bridge, when you pause to think about it, “clears” people from hip flexor limitations. If they can’t get full hip extension, their hip flexors may be a limitation.

Again, as Mark adamantly noted, the high bridge IS NOT a requirement!!! He’s not married to one way or the other with regards to completing the movement. It just comes down to personal preference.

– The get-up should be a controlled movement!  If you have to speed up in order to complete any one step, you lack stability. Speed = instability!!!!

As I alluded to above, when done correctly, the get-up should take upwards of 60s PER SIDE!!!

– Mark prefers to using anywhere from 20-24kg for his get-ups and “grease the groove.” He can go higher – much higher – but that’s not necessarily the point of the exercise. It’s to do shit right (my words, not his. But I know he wouldn’t disagree).

In short: SLOW DOWN!!!!!!

2. Thanks to everyone who went out of their way to send me B-day wishes yesterday. As you can tell I had a rough day.

Lisa snapped this pic in the middle of the afternoon as I was taking a nap. I fell asleep watching The Hobbit: An Unexpected Journey for the 17th time.

Don’t worry, though. I recovered nicely, took off my lame hat, and Lisa and I went to an amazing dinner last night with our friends Pat and Brianne.

A quick nod to Sarma (located in Somerville, MA) for an unreal menu and dinner.

3. Deadlifts!!!!

Last year my good friend, Dave Dellanave, released what I felt was one of the best deadlift(centric) resources I had ever come across  – Off the Floor.

It just so happens that after receiving feedback and testimonials over the past year, Dave’s fine tuned his program and has added a bunch of new content and add-ons.

As if listening to a guy who has deadlifted 3x bodyweight on three different deadlift variations – not to mention owning a few world records to boot – wasn’t enough, Off the Floor now includes three different programs (beginner, intermediate, and advanced), a slew of new grip challenges, in addition to just under an hour of new video content (including Dave talking about the concept of autoregulation).

It’s off the hook and something I feel would be an excellent addition to anyone interested in improving their deadlift; or just their overall level of badassery in general.

For more info you can go HERE (<—- link to an article, not a sales page).

4. Seriously, how freakin cute is my cat?

CategoriesCorrective Exercise Exercise Technique

Turkish Get-Up: Roll-to-Elbow Conundrum

Damn those Turks!  It’s no secret that I have a love-hate (mostly hate) relationship with the Turkish get-up. I love them because there’s no doubting their validity in terms of providing a lot of bang-for-our-training buck.  We’ve been utilizing them more and more at CP with our athletes and clients to address everything from scapular stability to t-spine mobility to hip mobility to glute activation to, well, lets just say there’s a lot of good stuff happening.

I hate them because, speaking from a personal perspective, TGUs do an excellent job at shining a bright, Bat Signal’esque spotlight on some glaring weaknesses and imbalances I have. And while I think I’m better than the average cat at performing them, I know deep down that I probably suck at them.

But it’s like I always say:  you’re only as strong as your weakest link, and it’s generally those exercises you hate most that are most beneficial for you.

Don’t believe me – read THIS awesome post by Roman on why you should embrace the suck.

Anyhoo, back to Turkish get-ups.

At last count there are like 593 separate steps to perform a proper get-up. Funnily enough, it’s step numero uno that generally gets people the most flummoxed (<—- I love that words).

Many people have a hard time with the roll-to-elbow because they try to do it like an ab crunch.  I know I’ve tried to use cues like “roll and punch the ceiling” which works for some people, but admittedly even this only works half of the time. If that.

One of my former distance coaching clients, Laura McNally, who also happens to be a Strong First (SFG) certified kettlebell instructor, recently invented an ingenious drill that really cleans up the roll-to-elbow conundrum.

Here’s Laura’s description:

This assisted drill helps teach the proper motor pattern, which is a roll with a pulling motion on the down arm.  You’ll automatically feel what’s supposed to be happening, and people can move to unassisted after only a couple reps.

Lay a heavyish kettlebell on its side so that the student’s hand on the down arm is holding onto the handle of the bell.  During the roll-to-elbow move, the student pulls against the handle, using the kettlebell as an anchor. (A variation is for the instructor to hold the student’s hand as the anchor, with the student pulling against the teacher’s hand.)

Bloop – the student pops right up.

NOTE: It’s important to highlight that you need drive the elbow into the floor when doing the roll, as opposed to just trying to drag the KB toward the torso without pushing the elbow down as a pivot point.

It’s definitely one of those drills that you have to try to understand why it works.  The drill helps to teach lat engagement and elbow drive. After a few reps, once the motor pattern feels grooved, try unassisted.

Since I first posted this idea on Facebook, I’ve heard from a number of kettlebell instructors that this drill helped switch on the lightbulb for the start of the TGU.

CategoriesStrength Training

Cressey Performance In-Service: Get-Up/Swing Tutorial

Around two weeks ago I wrote a post titled There’s a Time and Place For Everything. Kettlebells Included, where I essentially explained that everything in the realm of strength and conditioning is a tool, and should be viewed as such.

I don’t care if we’re referring to kettlebells, TRX, sandbags, strongman, chains, bands, or whatever the hell THIS contraption is supposed to be….you could make an argument that there’s a time and place for everything, and that they’re a tool in the toolbox, and need to be used at the right time, with the right person, for the right job.

When I wrote the piece, I wasn’t entirely sure how people were going to react to it. On one hand, I felt I was making a compelling argument and that a statue would be erected in my honor for making so much sense. Conversely, I knew I was “kinda, sorta” throwing one group of individuals to the lions and was fully prepared for the avalanche of hate mail and push back I was going to receive.

Worse case I figured some kettlebell bully was going to show up at the facility, tell me I was some big stupid head, and give me a massive atomic wedgie.

It never happened.  Thank god.

I seems I was able to relay my message successfully and with no major incidents.  Yay me!

Nevertheless, in light of what I wrote I felt compelled to expound on a few things in a recent staff in-service we filmed  to demonstrate to the world that we actually do incorportate kettlebells in our every day programming.  TRUTH!!!!!

A few things to note before we begin:

1.  There are only a handful of things I consider myself to be an expert in:

– Omelete making.

– Watching Star Wars.

– Being awesome.

While I feel I’m fairly competent, get-ups and swings aren’t what I would consider my strong suits.

Speaking frankly, I hate doing get-ups. I do them, obviously. I just hate them with a passion.  There’s no tip toeing around it: they rank pretty high on the Things That Generally Suck Or Really Irritate Me List , juuuuuust above passing a kidney stone and juuuuuust below Justin Beiber.

Having said that, there’s no denying their efficacy towards building total body strength and bringing to the forefront any mobility and/or stability “leaks” in the kinetic chain.

It’s like what I always say:  the exercises that we hate the most are generally the ones that elicit the greatest benefit.

Anyways, admittedly I’m NOT an HKC or an RKC (I do hope to attain an HKC soon) and I’m fully aware that there might be some nitpicky things that I’m doing wrong in the video, as well as a handful of things I missed noting.

I’m all for an open discussion on how I can improve my coaching, and if there’s any glaring mishaps or discrepancies, I’d encourage any experts to chime in.  Please!

If, however, you’re going to bust my chops because I didn’t dorsiflex my left pinky toe enough, then all I have to say is: “come on……..really?”

All in all, I feel this is a pretty decent representation of how to go about coaching both the get-up and swing effectively (and safely) – especially with beginner and intermediate trainees.  Keep it simple.

2.  This was a very, very impromptu presentation.  I was literally sitting in my office when Chris Howard walks in and says, “Tony, you’re up.  Staff in-service in five minutes.”

Crickets chirping……….

I had no idea I was supposed to do the staff in-service, so I put my shirt on, pounded a protein shake, and I was off.

My apologies if it seems little “disorganized.”

3.  I’m REALLY sorry about the length. I realize no one wants to sit there and watch a 30 minute video on anything (unless it’s about Katy Perry’s boobs), and I had every intention of dividing this into two separate tutorials, but for the life of me I couldn’t figure out iMovie.

I sat in front of my computer for at least 45 minutes last night trying to figure out how to import a file, and I just couldn’t do it.  You might as well have asked me to figure out how to solve global warming.

Anyways, just to give you a heads up:  I begin everything with how to coach someone through a “naked” half get up to a “naked” full get-up.  Then, at around the 17:00 minute mark I switch gears and discuss the swing.

Okay, enough with the formalities.  Here you go.  Let me know what you think!