CategoriesCorrective Exercise Program Design

Training With Laxity: Tips and Advice From Someone Who’s Been There, Done That

I’m traveling back to Boston today after spending the weekend up in Edmonton with Dean Somerset teaching our Complete Shoulder & Hip Workshop.
FYI: Future Dates: ST. LOUIS (September 26th-27th), CHICAGO (October 17th-18th), and LOS ANGELES (November 14-15th).

It was an awesome two days and we were ecstatic to have the opportunity to share our new material with a bunch of personal trainers and coaches eager to geek out over everything shoulders and hips (and my lame cat jokes).

The highlight, though, had to be me admitting to the audience (full of Canadiens, mind you) I’ve never been to a hockey game. Like, ever. You could factor that and then imagine any number of other awkward scenarios – farting in an elevator, being on a first date and realizing you forgot your wallet, that part in Star Wars when Luke and Leia kiss (and then, fast forward to Return of the Jedi, and you realize that they realize they’re brother and sister) – and none of that can top the awkward concert of crickets chirping which occurred.

Okay, it wasn’t that awkward. But I did get a few “what chu talkin’ bout Willis” looks.

.

Nevertheless I’m out of the loop today, but have an awesome guest post by DC-based strength coach, Kelsey Reed, on the topic of joint laxity and hypermobility.

Enjoy!

Training With Laxity

Cue a bunch of crickets chirping and then

Want to see a strength coach party trick?


I have a fair amount of joint laxity and amongst coaches and trainers this stunt usually produces a few raised eyebrows and surprised looks. Amongst normal people, they just stare blankly at me and wonder why would anyone bother to do a squat facing the wall.

Joint hypermobility or joint laxity (the terms are used interchangeably) is the ability of a joint to move beyond the usual range of motion. Typically this is because the ligaments are looser than “normal” the due to either genetics or injury.

For the most part, joint laxity isn’t debilitating nor is it usually a worrisome problem, particularly if you’re a gymnast, dancer, baseball pitcher, or a Cirque du Soleil performer.

However, if you are a lax athlete/trainee there are some training considerations to keep in mind. It’s easy to inadvertently injure yourself or cause chronic aches and pains.

Before we dive into some recommendations, are you someone with joint laxity?

The most common test for generalized joint hypermobility is the Beighton Scale.

If you can do at least 2 or 3 (sources differ), then it’s an indicator that you may have general joint hypermobility. Don’t freak out; like I said hypermobility is very common, particularly among children and adolescents (though many grow out of it later), females, Asian, and Afro-Carribbean races. Laxity can manifest in a variety of ways with differing levels of severity. It also isn’t necessarily systemic; it can affect some joints and not others.

If it’s so common, why do we need to worry about it?

According to Dr. Hakim over at Hypermobility.org:

“However some hypermobile people can injure their joints, ligaments, tendons and other ‘soft tissues’ around joints. This is because the joints twist or over extend easily, may partially dislocate (or ‘sublux’), or in a few cases may actually dislocate. These injuries may cause immediate ‘acute’ pain and sometimes also lead to longer-term ‘chronic’ pain.”

I would also add that being hypermobile or lax will also increase the chance that joints will be unstable and therefore exercises that focus on stability will be key to maintaining healthy joints. Additionally, the end-range of motion of joints will be the soft tissue instead of the bones; you could easily stress and irritate the ligaments and tendons during lock-outs. (More on that below)

Since there is a slightly higher risk for injury for us lax people, here are some of my thoughts when it comes to training.

Be Mindful of Joint Position During Exercise

Just because your joints can go through a full range of motion, doesn’t mean that it’s necessary. For example, look at my elbows at the top of a push up:

I catch a lot of my females doing this and I coach them to leave a little slack in the lock-out. Their arms are still straight, just not pushed to the very end of their range.

Here’s another common position lax people can fall into:

In this position, I’m not really “owning” it but instead I’m relying on all my passive restraints (the ligaments) to keep my body stable. Notice the excessive arch in my lower back, my shoulder blade sticking up like Mt. Doom, and my elbow popping forward beyond my wrist.

I would argue that this position offers a false sense of stability and, as the weight increases, it’s going to become harder and harder to stabilize and eventually something will start hurting.

Here’s where they should be:

Here, I’m actively stabilizing by using the surrounding muscles- my core, upper back, and the triceps/biceps of my support arm- it’s safer and more effective in the long run.

Placing the ligaments and tendons under load while pushing through to the end range of their movement is a recipe for achy joints. Be aware of how you/your clients are performing various exercises and own the range of motion- you should be stable and strong, not loose and wobbly.

Balance Distraction and Approximation Exercises

Simply, distraction exercises pull the joints apart, as in a pull-up, and approximation exercises push the joints together, as in a push up. People with hypermobility are going to be more sensitive to the external forces placed on their joints.

For example, I experienced some wicked elbow pain last year.

I was mystified – I wasn’t benching too much or doing hundreds of skull crushers and curls, all the no-nos when it comes to cranky elbows. I took a gander at my weekly training routine at the time, and in an effort to increase my deadlift, I was deadlifting, pull-upping, kettlebell swinging, and rowing nearly every day; I did push ups a few times a week, but aside from that, I didn’t include any pressing.

The former exercises are all fantastic in themselves yet they’re all distraction. I had triple (if not more) the volume of distraction as I did approximation exercises. I subbed out a few of the pull-ups and rows for pressing and, surprise! My elbows felt much better.

When performing exercises that are distraction, pull-ups, row variations, and even deadlifts to an extent, it’s best to avoid the “dead hang” position (when you’re fighting gravity by hanging on your passive restraints instead of actively holding the bar/weight). If the stress is placed on the joints without the accompanying muscle activation, all that tension goes straight into the tendons and ligaments (when I hang from a bar, I can literally feel my forearm bones separating from my upper arm). By creating muscular tension when holding onto the weight or bar, it will prevent excessive stress for your poor ligaments.

Stop, for the Love of Iron, Stretching!

We humans like to do what we’re good at and if you’re hypermobile, you’re good at stretching. Hypermobile people need stretching as much as Darth Vader needs a haircut.

If you feel tight, it’s probably because that muscle(s) is fighting to hold your joints together because your tendons are loose. At best, stretching is only going to feed into the dysfunction (if there is one). We need to stabilize! Which rolls nicely into the last point…

Note From TG: HERE’s an article I wrote on why “stretching” isn’t always the answer.

Stabilize

It’s not cool or sexy but it’s darn useful! If you’re hypermobile, there’s a chance that the ligaments in your spine are too. No good, my friend. Planks, deadbugs, bird dogs, are examples of stabilization exercises that focus on the smaller, lower threshold muscles that are necessary for happy spines and joints.

Seeing as the shoulder is one of the more unstable joints, shoulder stability training  is imperative for hypermobile trainees.


Adding isometric holds to exercises is another way to increase time-under-tension to bolster tendon and ligament strength. Crawl variations are low-threshold core stabilization exercises that teach you how to stabilize dynamically (during movement). They also are approximation exercises to add to your training. If you want to get fancy, you can add a few chains:


Take care of your tendons!

If you have joint laxity and have/want to avoid joint pain, pay attention to your joint position, balance distraction and approximation exercises, stop stretching so much, and work on your overall stabilization. Own the range of motion you have- don’t push to the full ROM if you don’t need to and risk injury due to instability.

Hypermobility isn’t a curse, it’s actually a pretty cool trait; it just takes a little extra thinking when it comes to training.

Thanks again to Tony for allowing my musings to appear on his blog once again!

About the Author

Kelsey Reed is head strength coach at SAPT Strength & Performance located in Fairfax, VA. Bitten by the iron bug at 16, Kelsey has been lifting ever since. Her love for picking up heavy things spurred her to pursue a degree in the Science of Exercise and Nutrition at Virginia Tech.

Now she spends her days teaching and coaching others in the iron game. In her down time, she lives life on the wild side by not following recipes when she cooks, fighting battles through characters fantasy fiction novels, and attempting to make her cats love her.

CategoriesAssessment Corrective Exercise Program Design

Is Corrective Exercise Overrated?

We got a doctor in the house!

Today’s guest post comes courtesy of Dr. Evan Osar, a Chicago based chiropractic physician and coach, and someone I’ve been a huge fan of since reading his first two books Form and Function and Corrective Exercise Approach to Common Hip and Shoulder Dysfunction.

His latest resource (a course, really), The Integrative Corrective Exercise Approach, is available starting today and is something I believe will add a ton of value to any fitness professional looking to take his or her’s assessment and programming skills to a higher, dare I say, Jedi’esque level.1

Is Corrective Exercise Overrated?

These days it’s hard to read an article or view a video about exercise without the mention of corrective exercise. Like many things in our industry, corrective exercise has its fair share of proponents as well as detractors. And there are plenty of facts and fictions about how to define corrective exercise and actually what it is.

FYI: Despite what Google says, this isn’t corrective exercise

In this article I am going to explain our concept of corrective exercise and dispel one of the biggest myths surrounding it.

I will also share with you how to integrate corrective exercise to improve the success you are already having with your general population clients. Because when you understand what corrective exercise is – as well as what it isn’t – you can create dramatic changes in your client results by implementing some very simple principles and key concepts into your programs.

Lets Do This

The first thing we need to discuss prior to covering the most common myth is to define the term corrective exercise. While it may seem like an issue of semantics, similar to other industry terms like ‘functional training’ and ‘core training’, corrective exercise takes on a variety of different meanings depending upon whom you speak with.

It’s important to recognize that our clients have developed their own unique and individual strategy for posture and movement. This strategy has been influenced and driven by many factors including but not limited to:

  • Things they have learned throughout their life such as adopting posture and exercise cues from their parents, therapists, and/or fitness professionals.
  • Compensations they have developed as a result of previous injuries, traumas, and surgeries.
  • Their lifestyle – sitting at a desk, the types of exercises they do and/or have done, how active they are or aren’t.
  • How they have been taught to exercise (for example many individuals have been taught to over-brace or grip as their primary stabilization strategy).
  • Their emotions or how they generally feel about themselves or their situation in life

These factors directly contribute to your client’s habits, which then dictate their current postural and movement strategy.

These habits are how your clients will perform most things in their life.

They will generally use this habitual postural and movement strategy when they sit, stand, walk, do their job, and exercise. It is these habits – actually their non-optimal habits – that lead so many individuals to develop chronic tightness, muscle imbalances that inhibit optimal performance in many of their activities, and which eventually lead to pain syndromes.

Because they become so engrained into their nervous system, most individuals are not even aware of these habits. This is why it is becomes so challenging to alter chronic posture and movement habits – they have been imprinted into their nervous system.

This is where we believe corrective exercise can play a vital role as part of an overall training system.

In our paradigm, we view corrective exercise as a strategy that consists of a thorough assessment so that you can:

  1. Identify the key factors contributing to an individual’s current postural and movement strategy.
  2. Utilize specific release and/or activation techniques to address the individual’s primary issues that are driving their chronic problems or loss of performance.
  3. Incorporate the principles of the Integrative Movement System™ – alignment, breathing, and control – into the fundamental movement patterns of squatting, lunging, bending, rotating, pushing, pulling, and gait so the individual can accomplish their health and fitness goals.

In other words, we view corrective exercise as a strategy – rather than a series of exercises – to help individuals develop and maintain a more optimal postural and movement strategy so that they can accomplish their health and fitness goal whether they be to exercise at a more intense level, develop a strategy for dealing with their chronic muscle tightness, or simply to live life with greater ease and less discomfort.

With an understanding of what corrective exercise is, it is also important to understand what corrective exercise is not.

Corrective Exercise Is Not:

  • A ‘fix’ for your client’s postural dysfunction, muscle imbalances, and/or pain.

  • A method for making individuals do their exercises in a ‘perfect’ way.

  • A group of remedial exercises that a client performs to undo the effects of performing inappropriate exercise (allowing clients to perform exercises in which they can’t maintain their alignment, breathing, and control).

  • A diagnosis or substitute for a thorough evaluation by a qualified health care professional.

  • A substitute for a well-designed integrative strength training program.

Note From TG: I really like that last point.

https://www.youtube.com/watch?v=oTY8bE6C1bs


Now that I have defined what it is and what it is not, here is the most common myth I hear surrounding the concept of corrective exercise:

Corrective Exercise ‘Fixes’ Postural Dysfunction and Muscle Imbalances

This is by far the biggest myth surrounding corrective exercise and the statement that its detractors most often bring up. This myth commonly stems from within the health and fitness industry because we like to make BOLD claims and then promise equally BOLD results.

We often claim things like:

1. ‘Everyone has a tight, short psoas’ from sitting too much so do this stretch and strengthening exercise (insert the novel stretch and strengthening exercise here) and you’ll fix everyone’s back pain.

2. ‘Everyone has forward shoulders from working on the computer so have your clients stretch out their pecs and strengthen their rhomboids and lower trapezius with some Y’s, T’s, and W’s and you’ll solve all your client’s shoulder problems’.

3. ‘Here’s the ‘best’ movement screen so you’ll know exactly what’s causing your client’s problems’ and here’s the corrective exercises to ‘fix’ those problems.

Making BOLD statements and promising BOLD results gets people to open the most recent blog or video post.

Making BOLD statements and promising BOLD results gets people excited that they have discovered ‘the answer’ to their clients issues.

However making BOLD statements and promising BOLD results also makes people lazy about performing their own assessments and determining the best exercises for the individual that they are working with.

Because the Truth Is:

  • Yes, some people have a tight psoas and weak glutes… and many do not. And for those individuals in the latter group, stretching their psoas and strengthening their glutes actually perpetuates the very problem causing their low back pain.
  • And yes, many individuals have forward shoulders and inhibited rhomboids and lower trapezius…and many do not. Doing Y’s, T’s, and W’s for example however do not even address the most common cause of the forward shoulder so again, these exercises will perpetuate and/or create an entirely new issue in your clients.


  • Finally, there is no magic screen or assessment that will tell you all you need to know about your client. You need to perform a series of assessments, combine them with your client’s intake and functional goals, and then determine where you would start with them. Then you must find the exercises that work best for your clients that help them address their biggest issues and how to incorporate these components into a well-designed program.

Conclusion

Corrective exercise is not a series of exercises designed to diagnose or identify the ‘fix’ for your client’s issues.

It is a strategy for implementing a thorough assessment, implementing the appropriate releases and/or activation sequences so that your client can achieve optimal alignment, breathing, and control, and then integrate these principles into the fundamental movement patterns and/or your client’s functional goals.

Used judiciously, corrective exercise is a part of an overall training strategy designed to look at your client as an individual and provide them with a viable option for successfully addressing their issues while working towards their functional goals.

Corrective exercise should enhance and not deter from developing greater strength, mobility, endurance, or other objective outcome. When you understand and integrate a successful corrective exercise strategy, you will help so many clients who have been struggling with chronic issues, safely and effectively accomplish their individual health and fitness goals.

About the Author

Audiences around the world have seen Dr. Evan Osar’s dynamic and original presentations.  His passion for improving human movement and helping fitness professionals think bigger about their role can be witnessed in his writing and experienced in every course he teaches.

His 20-year background in the fitness industry and experience as a chiropractic physician provide a unique perspective on corrective exercise and fundamental training principles for the health and fitness professional that works with the pre and post-rehabilitation, pre and post-natal, baby boomer and senior populations.

Dr. Osar has become known for taking challenging information and putting it into useable information the health and fitness professional can apply immediately with their clientele. He is the creator of over a dozen resources including the highly acclaimed Corrective Exercise Approach to Common Hip and Shoulder Dysfunction and the Integrative Corrective Exercise Approach.

CategoriesCorrective Exercise Program Design

Unconventional Core Training

You keep using that word, I do not think it means what you think it means.

The Princess Bride is one of my all-time favorite movies. It’s a classic, and many fellow movie buffs and connoisseurs will recognize the quote from above.

It’s one of roughly 816 (give or take) memorable lines from the movie, and it’s uttered by Inigo Montoya. Throughout the movie, Sicilian boss Vizzini repeatedly describes the unfolding events as “inconceivable.”

In one scene of the movie, as Vizzini tries to cut a rope that the Dread Pirate Roberts is climbing up, he blurts out in an exasperated tone it was inconceivable that he did not fall.

At this point, Inigo responds with the now famous quote:


So what does this have to do with anything fitness related?

Well, replace the character Inigo with myself, replace the word inconceivable with the word “core,” and you’ll have the exact same scene playing before your eyes. Except, you know, I’d have less chest hair, be a tad more beefy, and in lieu of the swordplay…I’d be rockin some killer nunchuck skills.

What Do You Mean “Core?”

Ask five different people what the core is and how you train it, and you’ll inevitably get five different answers.

Most abundant, though, would be any number of iterations referring to a Men’s Health Magazine cover:

Or maybe Dr. Spencer Nadolsky (that’s right: a doctor who lifts!) because he’s hunky as balls:

Trust me: there’s a six-pack underneath there.

Make no mistake: when most people think core, they think six-pack abs – or, rectus abdominis, if we wanted to be uppity anatomy nerds – that you can cut diamonds on. Too, they think about all the various exercises in the infinite training toolbox which can be used to carve our said six-pack abs.

Crunches, sit-ups, planks, RKC planks, side planks, planks on one-leg, planks with one arm behind your back, planks with alternate reach, planks on a stability ball, planks blindfolded, planks while fighting zombies, and more planks. Because people like planks.

And they wouldn’t be wrong. The “abs” are certainly part of the core and all the exercises listed above have their time and place. Relax, no need to shit a copy of Ultimate Back Health and Performance because I mentioned crunches and sit-ups. I too am a huge fan of Dr. McGill’s work and understand the pitfalls of repeated spinal flexion.

Occasional unloaded (spinal) flexion, for the right population, also has a time and place. But that’s a conversation for another time.

All of it, however, is a teeny tiny fraction of the entire picture. It’s akin to only being able to see the top right-hand corner of Van Gogh’s Starry Night. And that’s it.

How lame is that?

The core is so much more than what we can see on a magazine cover. There’s the pelvic floor on the bottom, the diaphragm at the top, the rectus abdominis in the front, the obliques (internal & external) on the sides, and the erectors as well as all the “ancillary” support musculature: paraspinals, multifidi, longissimus, iliocostalis (lumborum & thoracis), etc, in the back.

It’s more or less a canister.

In fact, the “core” consists of everything from the neck line down to the hips: pecs, lats, glutes, the sexy”v-taper” leading down to you know where, everything. Or, to be overly simplistic: everything not including the legs, arms, and head.

And its main job, contrary to popular belief, is not to crunch or perform countless sit-ups. Rather, the core’s main function is to counteract rotary movement so that force can be more easily (and efficiently) transferred from the lower body to the upper body, and vice versa.

I mean, if you really look at the way the muscles are oriented (especially in the front) you can see they take on a more inter-connected, inter-laced, weblike presentation…designed to resist hoop stress.

This is why I prefer exercises like various chops and lifts, Pallof presses, rollouts, and Farmer carries…as they all train the core in a more “functional” manner.

Chops and lifts help train rotary stability; rollouts tend to train anti-extension; and Farmer carries are superb in resisting lateral flexion.

Pallof presses, depending on how they’re set up, can train every plane of motion and resist flexion, rotation, and extension. And they’re gluten free!


However, we can’t neglect the fact the core is a much more intricate chain of events.

Coming full circle back to the rectus abdominis (RA):

1. Yes, one of its main functions is spinal flexion. But I generally don’t go out of my way to program more spinal flexion, via sit-ups and crunches with most of my clients (especially “computer guy” who sits in front of a computer all day in flexion).

The catch-22 is that many of these same clients are rocking significant anterior pelvic tilt in addition to a flared rib cage (via lower ribs sticking out) which doesn’t bode well for ideal alignment and leads to a cascade effect of faulty diaphragm mechanics, breathing patterns, as well as a metric shit-storm of PRI (Postural Restoration Institute) stink eyes.

In this context training the RA to control rib position (ribs down) is very important. We need to train them (along with the external obliques) to contract isometrically to resist extension of the thoraco-lumbar region.

In other words, as Mike Robertson notes: “We need to teach our upper abs to control our rib position so that we can maintain optimal alignment of the rib cage during exercise and daily life.”

Walking around in a “flared” rib position in concert with an excessive anterior pelvic tilt is a one-way ticket to Mybackhatesmeville, USA.

Case in point, here’s an example of what I mean:

In the first picture my ribcage is flared out and the (imaginary) line between my nipples and belly button is long (excessive lumbar hyperextension). Conversely, in the bottom picture my abs are braced – essentially creating a flexion moment (not movement) –  and the line between my nipples and belly button is shorter (less extension). This is the position I’d ideally like to stay in for most of the day, especially while exercising.

Now, I’m am NOT insinuating you need to walk around all day “checking” yourself, making sure your abs and glutes are engaged, but I am saying it’s something that should enter the equation. And we can help address it by training the RA.

Read: Deadbugs, motherfucker.


2. An often forgotten “role” of the rectus abdominis is posterior pelvic tilt. Making the RA stronger/stiffer is another fantastic way to help “offset” excessive anterior pelvic tilt.

Remember: flexion from extension to neutral is different than flexion to more flexion from neutral.

Two exercises or drills that fit the bill are:

Reverse Crunches


Cuing Posterior Pelvic Tilt With Squats and Deadlifts


See what I mean?

We can’t be so “concrete” in our thought processes when it comes to core training. I could sit here and wax poetic on how I feel the lats are an often under-appreciated core muscle (learning to engage them to a higher degree while lifting heavy things works wonders with regards to spinal stability and performance).

Or that building bigger, stronger glutes would make for a better use of training time than any of those silly 30-minute ab blaster classes people take…but I’ve talked long enough.

If I may, let me introduce you to something….

Advanced Core Training

My good friend, Dean Somerset, just released is latest resource, Advanced Core Training, and it’s something that covers traditional core training as well as a bunch of voodoo theory stuff that will make your face melt.

In it you’ll find:

  • Detailed outline of core and hip function plus what the results of the assessment mean
  • Simplified walkthrough of the approach to core training that can be used for everyone. from rehab to elite performance.
  • Simple changes to variables like breathing and speed that can help change an exercise from a mobility drill to a speed and reaction drill and even to a max strength drill.
  • Tons of practical takeaways and coaching cues to help viewers implement the exercises and techniques immediately.

Those of you who were fans of his Ruthless Mobility series will find the material here a nice adjunct/sequel.

And if that’s not enticing enough: it’s on SALE at 40% off regular price this week, and you can earn continuing education credits too.

Baller.

Check it out HERE. You won’t be disappointed. Dean’s wicked smaht.

CategoriesAssessment Corrective Exercise

Feed the Dysfunction: A Simple Squat Fix

A few months ago I wrote about my experience participating in the Functional Movement Screen. I spent an entire weekend (something like 20 contact hours) completing both module I and II.

I didn’t get a t-shirt2, but it was an awesome learning experience nonetheless.

You can read all about it HERE.

One of the chief messages that stood out to me was the notion of “feeding dysfunction.” It’s a concept I’ve used intermittently throughout the years to help clean up movement, but hearing it described and used in the confines of four walls amongst so many other smart people…it really resonated more with me.

I’m sure it’s a concept that many of you reading have used as well.

One of the more common iterations is when someone’s knees cave in during a squat.

Unfortunately, there are some trainers and coaches out there who would deem this an acceptable squat pattern, and do nothing to correct it. They should be drop kicked in the neck.

The less lazy trainer may fix it by screaming, “knees out, knees out, PUSH YOUR KNEES OUT!”

It’s a step in the right direction, but sometimes it takes more than a verbal cue. For some trainees their nervous system needs a little more “feedback.”

So the more savvy trainer will wrap a band around one’s knees.

The idea is that the band will push the knees in, giving the trainee some proprioceptive feedback to prevent or resist this action. More often that not it works like a charm.

Squat pattern is fixed, all is right in the world, parades are held in your honor.

What About a Weight Shift?

Ever watch someone squat and he or she tends to sway/weight shift to one side or the other?

There can be any number of reasons this happens.

1. Bony Block. Those with Femoral Acetabular Impingement on any given side will block/impinge quicker on that side, often resulting in a weight shift to that very side.

I don’t want to get into a heavy FAI discussion now, but suffice it to say it’s often in this person’s best interest to 1) stop squatting altogether (in lieu of exercises that require less hip flexion, like deadlift variations) or 2) tweak squat height so they don’t enter the “danger zone” (90 degrees or below).

2. If we were to jump down the PRI (Postural Restoration Institute) rabbit hole we could explain things by stating how much of the population tends to weight shift into their right hip.

CSP coach, Greg Robins, PRI Blue Steel pose

In this scenario – which is very common – people are more internally rotated and adducted on the right side (externally rotate, abducted on the left), which then parlays into their squatting pattern. I.e., you’ll see a weight shift to the right.

As I’ve noted in the past: I like PRI, I use PRI, I think there’s a lot of validity to PRI. And, in this scenario I do feel some dedicated positional breathing drills hold weight with helping to “correct” the issue at hand.

If we can encourage more neutral (we’ll never, ever, like, ever be 100% neutral) and help to shift the hips and own our rib position (reduce Zone of Apposition) the likelihood we can fix the faulty pattern is fairly high.


All that said, the PRI rabbit hole is a deeeeeeeeeeeep one, and I do find many fitness professionals tend to overstep their scope of practice and forget that, you know, barbells still work and that our jobs are to still give people a training effect. 

I’m sorry but people aren’t going to get fired up spending 30 minutes of their training session practicing their diaphragmatic breathing. In fact I think a recent research study found that incidences of people wanting to stab themselves in the eye with a pen increase by 130% when this is the case.

Don’t get me wrong: PRI drills could very well be a part of the equation and I have used them to fix this very dysfunction, but I try not to get too carried away with it.

3. Lack of kinesthetic awareness. Much like the notion above with placing bands around someone’s knees to prevent them from caving in, we can use the same concept here.

Band Reactive Neuromuscular Training (RNT)

If you find someone exhibits a weight shift during their squat you can use a band to pull them into the weight shift (“feed the dysfunction”), and attempt to fix the faulty pattern. Essentially you use the RNT factor to help turn other stuff on that otherwise would be under-active or not firing efficiently and contributing to wonky movement.

How’s that for science?

Give the video a quick watch.

CategoriesCorrective Exercise Exercise Technique

The Difference Between External and Internal Impingement of the Shoulder

Shoulder impingement.

Not to play the hoity toity Jonny Raincloud card, but the words themselves – shoulder impingement – is a garbage term.

It doesn’t really mean anything.

To one degree or another your shoulder is always being “impinged.” So when you or your trainer or someone with more letters next to their name (or the Easter Bunny) says “you have shoulder impingement” when your shoulder hurts, they’re not really saying anything significant and just playing the Captain Obvious card.

Thank you, that will be $149.99. Cash or credit?

Facetiousness aside, I should backtrack a bit and note that shoulder impingement isn’t a completely useless term – I mean, plenty of people still say anterior knee pain to diagnose, well, anterior knee pain – it’s just, you know, mis-managed.

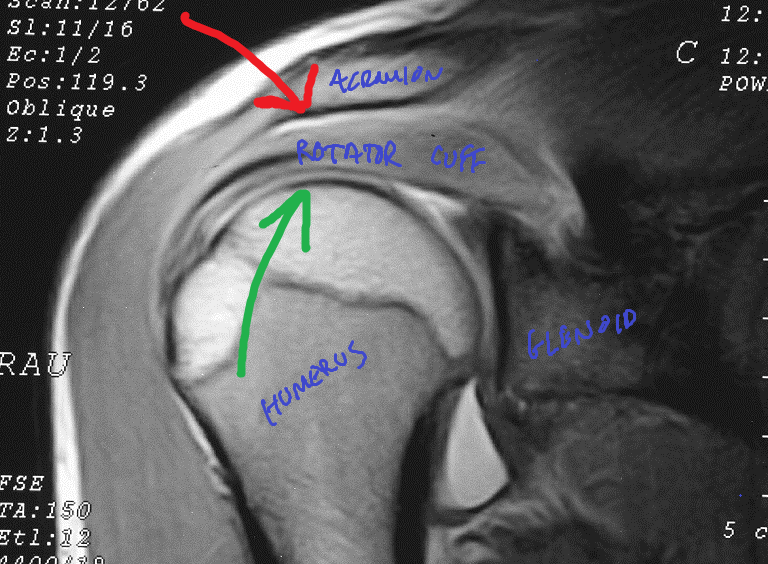
The thing about shoulder impingement is that it’s very much a real thing. Like I said, everyone lives with it. While it’s a watered down description, when people refer to impingement they’re typically referring to compression of the rotator cuff – usually the supraspinatus, and over time, the infraspinatus and biceps tendon – by the undersurface of the acromion.

[Except for when it’s not and we’re talking about INTERNAL impingement. More on this below.]

This happens all the time – even in quote-on-quote healthy shoulders. It’s inevitable. It’s anatomy.

But the degree of impingement is what we’re really alluding to here.

In other words: the rotator cuff (RC) gets “impinged” by the acromion due to a narrowing of the space between the two.

In (other) other words: you have an ouchie. Or, for the non-PG people in the crowd “your motherfuckin shoulder hurts!”

98% of the time this type of impingement results in bursal-sided rotator cuff tears, and as Eric (Cressey) has noted on numerous occasions “happens more with ordinary weekend warriors and very common in lifters (not to mention much more prevalent in older populations).”

The thing that irritates me is that telling someone they have a shoulder impingement – assuming there’s pain present – doesn’t speak to the root cause of why their shoulder is flaring up in the first place.

Is it structural?

Tissue quality?

Lack of mobility somewhere? Relative stiffness elsewhere?

A programming flaw?

They wore green on a Thursday?

Moreover there are different kinds of impingement (external and internal; and the former has different categories: primary and secondary) which manifest in different ways, in different populations, and will require different approaches.

It’s beyond the scope of a blog post to peel back the onion on everything related to shoulder impingement – for that you may want to check out Eric Cressey and Mike Reinold’s Functional Stability Training series. But I did want to take some time to provide some information and help any trainers or coaches or anyone in the general population reading be able to differentiate between the different types of impingement and the mechanisms behind them.

External Impingement (AKA: Meatheaditis)

This is the one that’s relevant to most people reading, and the one we’re discussing when referring to anything related to the rotator cuff being impinged by the acromion via bursal-sided impingement.

Here someone can usually point to pain on the front of the shoulder and things like overhead pressing, bench pressing, and approximation hurt.

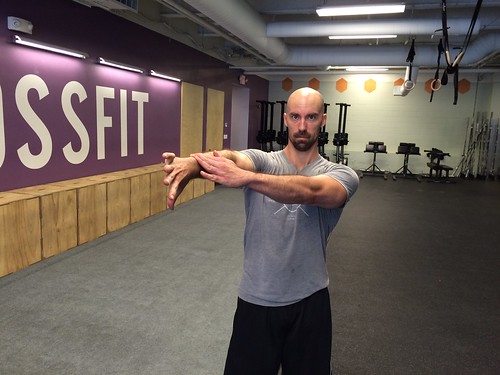
In addition to pain during those activities, another way we can distinguish if it’s (most likely) external impingement – is by implementing two simple screens.

FMS Impingement Clearing Screen

This is the exact screen the FMS uses to “clear” someone for impingement. Place palm of one hand on opposite shoulder and, without allowing your palm to come off the shoulder, lift your elbow.

Empty Can Provocative Screen

Place one arm in scapular plane thumb facing down and gently press down with other hand.

Pain with either of the two?

I’d seek out a reputable health professional to do a little more digging.

Read (NOTE TO PERSONAL TRAINERS AND STRENGTH COACHES): you’re not diagnosing anything. These are screens. Nothing more, nothing less. It’s information.

Also, on more of a side note: the empty can screen should NOT be used as an actual exercise. It’s a provocative test (placing people into impingement), used to ascertain if pain is present. Why anyone would use this as an actual exercise is beyond me.

That’s like saying, “Oh, banging your head against a wall hurts? Lets do more of it!” 

Anyhoo, like I said those are two very easy screens you can add into your arsenal to help gather information.

But this still doesn’t speak to WHY someone may have external impingement. And here’s where things get even more interesting.

Primary External Impingement

This can be considered more of a morphological/structural issue (and as it happens, what we have less control over).

Ever watch some old-timers train and they’re able to perform endless sets of overhead presses, upright rows, and bench pressing without their shoulder(s) ever hurting?

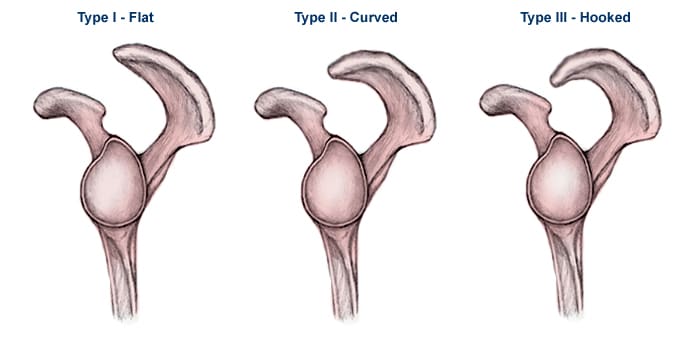
Most likely it’s because they have a Type I acromion.

Then there’s you, who just thinks about upright rows, and your shoulder flips you the middle finger. You may have a Type II acromion (more narrow space).

Outside of an x-ray (and surgery) this is something you’re never really going diagnose and solve. But it can speak to how you’d alter your programming to better fit your anatomy.

Secondary External Impingement

This is where the rest of us live and plays into more lifestyle factors. This is more or less things we have control over.

Things like poor scapular positioning (too depressed, too elevated, too abducted, too adducted, all of which affect upward/downward rotation), poor T-spine mobility, poor tissue quality, poor exercise technique, rotator cuff weakness, unbalanced programming, lack of lumbo-pelvic hip control, stiff/shorts lats, inefficient breathing patterns, and host of other factors can come into play here.

Here’s where it’s the trainer’s or coach’s job to figure out which of these is the culprit (often it’s a number of them).

Internal Impingement

Unless you’re involved in overhead athletics, chances are you don’t have this.

With internal impingement someone with describe it as “inside” the joint and will generally point towards the back of the shoulder. Too, it will typically only hurt when they’re in excessive external rotation (think: cocked back/lay-back position for a pitcher).

As Mike Reinold notes: “as you move into humeral external rotation, the more aggressive it is, the more likelihood one will feel a pinching sensation towards the posterior-superior aspect of the glenoid.”

This basically alludes to the “inside” feeling described above.

Internal impingement deals with more of the ARTICULAR side of the rotator cuff, and specifically refers to the contact between the articular side of the supra/infraspinatus and the posterosuperior rim of the glenoid.

The more external rotation (lay back) one goes into, the more internal impingement will arise

And, as Reinold notes, “we don’t get internal impingement from sitting at our desks. It happens when people use their arms in an extreme abducted & externally rotated position.”

So, in short: unless you’re throwing a baseball during your lunch hour (or fighting centaurs3, you don’t have internal impingement.

Regardless in this scenario we’d want to place a premium on addressing scapular position (improve upward rotation), as well as address any shoulder instability. Overhead athletes are notorious for having super lax shoulders, so anything we can do to improve that – rhythmic stabilizations – would be ideal. That, and make sure they perform exercises like push-ups and row variations correctly.


And That’s That

Whew, I hope that all made sense. Like I said this wasn’t meant to be an all-encompassing diatribe on everything shoulder impingement, but I hope I was able to get you out of the weeds a bit on the topic.

Oh, And There’s This

This post is just the tip of the iceberg in terms of all the things I cover as part of mine and Dean Somerset’s Complete Shoulder and Hip Blueprint:


We discuss and breakdown anything and everything as it relates to shoulders and hips, obviously. Including but not limited to anatomy, assessment, corrective exercise, performance training, programming, etc, in addition to analyzing World of Warcraft strategies. Because, nerds rule.


Complete Shoulder & Hip Blueprint HERE.

CategoriesCorrective Exercise Motivational

Injuries Happen. Here’s How To Deal With It

Today’s guest post comes courtesy of Dallas based personal trainer, Shane McLean. Shane’s an avid commenter on this website and passionate coach. Today he discusses injuries and how to best deal with them.

Enjoy!

Shit Injuries Happen. Here’s How To Deal With It

Ever played Whack-A-Mole?

Those smiling, annoying critters pop up faster than you can smack them down. How I love to thump them into the middle of next week.

Sometimes, don’t you feel the same way about those niggling injuries that hinder your progress in the gym? After one heals, another one rears its ugly head. Then it’s the never-ending story of rest, rehab and training around your current niggle.

Since I started taking this exercise thing seriously, I’ve trained around and rehabbed through several injuries (some have been my own fault) including:

  • Torn quadriceps X 3
  • Strained hamstrings
  • Knee and ankle tendonitis
  • Sprained triceps tendon
  • Tennis and golfer’s elbow
  • Right A/C joint inflammation
  • 3 herniated disks and several back spasms

Before you start rubbing your two fingers together to make the world’s smallest violin and tell me to “suck it up, wuss bag,” there’s a point to all this.

I’ve learned along this exercise journey that yes, shit happens, but it’s how you deal with it that counts. Trust me, I’ve found this out the hard way.

So next time you suffer a setback whether it’s your fault or not (I’m not here to judge) use one or all of the following strategies to get back on your feet sooner after the injury bug knocks you down.

Some may seem obvious, but it’s always good to be reminded. Well, that’s what my mother always said, anyway.

1. Lean On Your Network

With the advent of social media, it’s super easy to make nice with health and fitness professionals around the world, and personal trainers/strength coaches are just friendly guys all round, right Tony?

[Note From TG: Unless you attack one with a kettlebell.]

With direct messaging function on sites like Facebook, Twitter and LinkedIn, it’s easy to reach out and ask questions about your current predicament.

When you’re asking, make sure your questions are as concise as possible to avoid possible confusion and wasting their time.

[Note From TG: Best piece of advice I can give anyone reaching out to a fitness professional for advice?: don’t write a dissertation. Nothing irritates me more then when I open an email and it looks like a Dickens novel.

I’ll take one glance and often archive those emails for a later time (which could be multiple weeks). It just reeks of the sentiment that “my time is more valuable than yours,” and comes across as woefully inconsiderate.]

While it’s almost impossible to diagnose over the internet, they can offer suggestions on what to do because they may have encountered a client with a similar injury.

At worst, they will completely ignore your question or offer a suggestion on who else to contact.

Either way nothing ventured, nothing gained. It never hurts to ask.

2. Learn Perspective

On my way to yet another physical therapy appointment, I was having a “woe is me moment.” My back was killing me, and I didn’t see any light at the end of the tunnel.

Okay, you can cue those violins again?

At that very moment I walked past two guys on their way to PT. One was in a wheelchair with no legs, the other had an amputated leg below the knee, walking with the aid of a walker.

I felt like complete idiot.

When my therapist Regan Wong asked me how I was feeling, I had a response all cued and ready to go.

“Regan I was going to tell you I felt like shit. But then I walked past two guys in the car park without the use of their legs. I’m good, Mate, so let’s get to work.”

No matter how bad you’re feeling, someone has it much worse than you.

So stop complaining. Stop telling everyone within ear shot at the gym that you’re hurt. That guy in the wheelchair doesn’t give a crap. Get back to rehab. Do the work.

“I don’t wanna go to rehab, no, no, no, no” 

3. Keep Your Eyes On the Prize

While others are hoisting weights around, you’re in the corner with your light dumbbells, stability ball and bands doing an exercise to activate your serratus anterior.

Boring.

Rehab is long, tedious and time consuming. I get that. After you’ve finished, there’s barely enough time to do your mindless cardio and bicep curls. Then it’s time to hit the showers and punch the clock.

There’s always a temptation to leave a few exercises out to get to the fun stuff sooner, or to totally skip the exercises your Trainer/Physical Therapist/ Chiropractor gave you so you can join your friends under the bar.

That’s a big mistake.

In my experience, that only leads to more heartache and pain. You end up on a merry-go-round, and not the fun kind with fairy floss and unicorns.

Keep the eye on the prize, which is your health and lifting heavy. Keep repeating the mantra “every little bit helps.”

Every rep, every set of rehab exercises will get you closer to getting healthy

Take yourself away from the iron, just for a little while, it isn’t going anywhere. Your body will end up thanking you in the long run.

4. Stay Positive, It Doesn’t Last Forever

When you’re hurt and you’re limited in what you can do, it’s very easy to get down on yourself. You may think you’re getting weaker and smaller by the second when lifting those pink dumbbells.

Breaking news flash……….you’re not.

While addressing muscle imbalances that you never knew you had (besides traumatic/chronic injuries) that may have led to getting hurt in the first place, you’re actually getting stronger.

Think about it.

Strengthening your weakness while maintaining a training effect for the rest of your body will help you come back stronger when you eventually hit the weights/playing field again.

[Note From TG: As a quick aside, no, you won’t develop an imbalance because you happen to train one side of the body or limb over the other. In fact, there’s a lot of research to indicate that training the NON-injured area or limb will result in a “feed-forward” or neural effect to the INJURED area/side which will make healing faster!

Besides, as noted earlier, it’s only temporary. What’s the alternative, don’t train at all because you’re scared one bicep or pec muscle will look bigger than the other? Come on.

Another quick aside: bacon is delicious.]

All those professional athletes that come back from serious injuries cannot be wrong. How often have you heard injured athletes say they will come back bigger and stronger than ever?

They’re usually right.

Maintaining this positive attitude throughout your injury rehab will benefit you because nothing is forever, including being hurt.

Wrapping Up

No one likes being hurt, but unfortunately it’s a part of our gym lives. However, there’s always light at the end of the tunnel. Keep your head up, stay positive and stay on the rehab path.

You’ll be back crushing weights in no time.

About the Author

Shane “The Balance Guy” McLean is a Certified Personal Trainer who works deep in the heart of Dallas, Texas. No, Shane doesn’t wear a cowboy hat to work. After being told his posture blows by Eric Cressey, he has made it his mission to rid the world of desk jockeys one person at a time.  

Shane loves coffee and deadlifts and always has a huge coffee mug by his side.
 
CategoriesCorrective Exercise Exercise Technique

Rotation Helps Improve SI Joint Pain: A Doctor Even Says So!

Today’s guest post comes courtesy of Dr. Erika Mundinger4, who’s presentation on how to deal with SI joint pain (specifically how ROTATION can help!) at The Fitness Summit a few weeks ago really impressed me.

I asked if she’d be willing to help me out while I was away, and she was more than happy to oblige. 

Enjoy!

A couple of years ago, a fellow physical therapist at the clinic where I work asked with a quizzical and concerned look, “What do you think of that Jefferson deadlift everyone is doing at your gym? Lifting and twisting?” My response evoked an even more quizzical look — that in my four years coaching the Jefferson deadlift, I had yet to see someone get hurt.

Now I know that a PT saying it’s OK to lift and twist is bold and brazen. But lets be clear, I’m NOT saying this:


What I am saying is that I’ve seen rotational movements, when trained properly, actually help clients and spine patients get out of pain.

When I see clients and patients with a back injury that results from twisting it’s not necessarily because they were twisting in the first place. Often it’s because they were trying to twist, bend, or reach into a range of motion not available to them.

In layman’s terms, they were trying to move beyond their limits. So, my contention is that instead of avoiding rotation in training, we can find safe ways to use rotation to help get people out of back pain — and potentially prevent back pain at all.

So since we naturally move in to rotation why would we not want to train rotation?

One clear answer is because if we lack mobility we could get hurt lifting in to rotation. But does that mean we should NEVER place a client or ourselves in to these positions? Or should we start training rotation so that when they find themselves in this position again the chance of getting hurt is minimized?

I vote for the latter.

Lets back up for a moment and take a look at how the spine and pelvis move together. When you move for day-to-day functional activities, are you moving in singular, robotic motions? When you squat down to pick up something off the floor are you assuming the same back squat position you do at the gym? Typically one foot is slightly forward, one foot back, the front foot may be more flat on the floor with the other foot raised on to a toe, and there’s a slight twist in the spine and pelvis. In fact our pelvis twists with every single motion we do.

Take a look at walking, for example, as one foot is forward and one foot backward the pelvis sits forward and down on one side and up and back on the other.

The hips, pelvis, and spine move together in a three-dimensional pattern. And as a result we have a three-dimensional system that stabilizes our pelvis as our joints bend and rotate.

Posterior Sling

The posterior sling involves the erector spinae, multifidi, and thoraco lumbar fascia. As they contract, they tilts the sacrum forward and pull upward, locking the SI joints in to place with a vertical force vector.

Posterior Oblique Sling

The posterior oblique sling involves the glute max, glute med, biceps femoris combined with the opposite lat create a diagonal force compressing the SI joint together.

Anterior Oblique Sling

The anterior oblique sling involves the external oblique, internal oblique and transverse abdominis with the oppsite adductors compress the pubic symphysis and stabilize the anterior pelvis.

If we lack mobility, or if we have a muscle imbalance in one or more of these slings, the stabilizing force of our pelvis can neither allow for mobility when we need it, nor stabilize where we need it. This causes more load to be placed on the spine and SI joints, possibly leading to injury.

Now let’s be clear about one thing: If there is a lack of mobility at the pelvis and spine, there is also most likely a lack of mobility at the hips. It would certainly be irresponsible of us to address one area without addressing the other.

However, the beauty of training rotation is that we get to address many of the sticky spots because in a 3-D system, we can’t move one without the other.

As always, if the exercise is uncomfortable, don’t do it. Furthermore, if the exercise feels great on one side but not so great on the other — don’t be afraid to train only one side. Forcing a motion on a side that feels uncomfortable will also cause injury.

Typical question: “But won’t I be uneven?” My typical response, “You’re already uneven, which is why we are now having this little chat.”

Here is an example of someone who trained Jeffersons with the intent of improving motion. Upon first attempting Jeffersons, one side felt great while the other side, well, not so much.

When looking at spine, pelvic, and hip motion we could see that an underlying scoliosis was one contributor to the problem. So he trained Jeffersons on just the side that felt comfortable. With time, as motion started to improve on that side, so did motion on the other and gradually he was able to perform the movement on both sides. The results were very impressive.

Not only did his general strength in rotational patterns improved, but so did the position of his spine. (photo reprinted curtesy https://www.dellanave.com/follow-your-body-to-better/)

So how do we do this?

Obviously if there is an imbalance, and certainly if there is a pre-existing injury, the last thing we are going to do is perform a loaded rotational movement. It is no secret that rotation places more load on the facet joints and requires more work from muscles increasing torque. But if we start with the motion itself, unloaded, or lightly loaded, with modifications were necessary, we build a solid platform on which progression can occur.

More Rotational Deadlifting


As Tony mentioned in a previous post, rotational deadlifts challenge the transverse plane of mobility, not to mention help fire up those oblique slings we use for diagonal stability. But what if it hurts to this, or you don’t have mobility to do this?

The above video is a great modification for beginners of this motion or those who have some trepidation in approaching this movement.

Valslide Curtsy Lunges


Don’t feel limited to rotational picking-up of things. Rotational lunges also provide a great opportunity to gain motion, not to mention they are a good butt burner.

After I taught this exercise at the Fitness Summit, a comment I received a lot via email/text/twitter from the attending trainers was “My clients love to hate this motion.” They love it because it feels so good, but hate it because the glutes are on fire, but then love it again because the glutes are on fire.

I have seen those with SI dysfunction quickly relieve symptoms performing this movement, even unloaded.

And Of Course the Jefferson

This is such a great exercise because it really caters to where our asymmetries in the pelvis may be.

You can stagger your stance if deadlifting with an even stance is hard. You can reduce shearing forces on the SI joint that can occur with single plane deadlifts because ALL three slings are engaging. And it reduces torque on the spine that a conventional deadlift can create because the load is directly under your center of mass, not in front of it.

David Dellanave of the Movement Minneapolis has great coaching and training tips HERE.

Summary

Ready to start twisting?

The first step is: Don’t be afraid to play around with rotational movements. Pick some exercises you already know and like, then start by staggering the stance a bit, or add even a few degrees of rotation. Follow what feels good.

Disclaimer: These are not exercises to push through, and this is not the time to pick the heaviest weight so you can look strong or boost your ego. That will lead to trouble — trust me. There are very safe ways to do this. If done mindfully, clients can gain not only improved mobility, but overall strength within that mobility. As always, listen to pain, don’t push past your current range of motion, and start where you are, and not where you want to be.

About the Author

Erika Mundinger is a licensed Physical Therapist and a board-certified orthopedic specialist working in the Twin Cities area. She practices orthopedics and sports medicine with advanced training and practice in manual therapies, corrective and functional exercises, and treatment of spinal disorders. She works at TRIA Orthopedic Center, the Twin Cities’ premier ortho clinic, treating athletes from professional to “weekend warrior” levels as well as general orthopedics and is a member of the clinic’s Spine Team, helping to better advance patient access to professionals specialized to manage care of spinal disorders and injury.

In 2002 she received her B.S. in Exercise Science from Montana State where she was involved in exercise physiology research and outdoor sports. In 2007 she received her Clinical Doctorate in Physical Therapy at the Mayo Clinic. She will receive a board certification as an Orthopedic Specialist in March 2015.

Mundinger is also an active member, coach, and physical therapist at the Movement Minneapolis and is trained in the Gym Movement Protocol. She actively applies this biofeedback training with clients and her own patients. She also works with several trainers outside of the Movement to help bridge the gap between physical rehabilitation and returning to fitness and recreation.

CategoriesAssessment Corrective Exercise

Defending Spinal Flexion: It’s Not Always the Evil Step-Child We Make It Out to Be

No offense to my future wife (t-minus 37 days until the big day), one of the greatest days of my life was the day I got my first Atari 26005 My game of choice: Defender.

The premise was/is simple: your planet is under invasion by waves of aliens and it’s your mission to “defend” it, as well as other astronauts.

Pew pew pew

Man, I spent hours playing that game.

I really have no other reason for leading with this story other than to say 1) it was an awesome game 2) the chick on the cover was hot and 3) the theme – defender – served as a nice segue to today’s topic……

Spinal Flexion

https://www.youtube.com/watch?v=a1Y73sPHKxw


Like many other fitness professionals a few years back, I jumped onto the anti-flexion bandwagon.

I mean could you blame me?

Gulfs of research – in addition to anecdotal evidence – suggest that spinal flexion has its downfalls. To be more precise, however, I should state it’s repeated spinal flexion (and extension) taken into end range that’s the real culprit. Do that on a consistent basis, let it marinate with little to no strength training, and you have the perfect recipe to herniate a disc.

And as my boy, Eric Cressey, notes:

“If you want to see a population of folks with disc herniations, just look at people who sit in flexion all day; it’s a slam dunk.”

Of course, this doesn’t automatically equate to someone being in pain or complaining of back issues. There are plenty of people walking around with not one, but maybe even two, levels of herniations or disc bulges in their spine. And they’re fine.

In fact, in a landmark study published in 1994 in the New England Journal of Medicine, researchers sent MRI’s of 98 “healthy” backs to various doctors, and asked them to diagnose them.

– 80% of the MRI interpretations came back with disc herniations and bulges. in 38% of the patients, there was involvement of more than one disc.

And these were considered “healthy” backs, and those of people walking around with no symptoms what-so-ever.

Which goes to show: I’d trust an MRI about as much as I’d trust a barber with a mullet.

NOTE: this isn’t to insinuate that MRIs are a waste of time or aren’t valuable. That’s 100% false. But I’d be remiss not to state that we, sometimes, place far too much precedence in them.

Oftentimes leading to unnecessary surgery (which should be an absolute LAST resort).

Long story short: just because someone flexes their spine – and may or may not have a disc herniation – doesn’t mean their spine is going to explode.

And least we forget the Godfather of spinal mechanics and research Dr. Stuart McGill. The man has forgotten more about the spine than any of us could ever hope to remember. I’d be lying if I said his two books – Low Back Disorders and Ultimate Back Fitness and Performance – haven’t shaped most of my thinking and approach when working with clients and athletes with low back pain.

Who the hell am I to disagree with him?!?!

That would be like me starring Yoda in the face and saying something like, “Pffft, whatever dude. Force schmorce. What do you know??”

With that commentary in mind, as a fitness professional, most of the time (but not always), I’m not going to go out of my way to include more exercises or drills that place people into spinal flexion.

Particularly with the aforementioned “people who already sit a lot and live in flexion” scenario from above.

Taking it a step further (and to help appease those people who are probably hyperventilating into a brown paper bag reading this, assuming I’m saying spinal flexion is okay):

I typically avoid the following:

1. End-range lumbar flexion

2. Lumbar flexion exercises for those who are “stuck” in flexion.

3. LOADED spinal flexion

But Just to Play Devil’s Advocate For a Second

With point #3 – loaded flexion – there are some people out there who purposely train with a rounded spine and do very well.

Lets use the deadlift as a quick example.

We could make the argument – from a bio-mechanical standpoint – that a rounded back deadlift is efficacious because it’ll allow you lift more weight.

As Greg Nuckols explains in THIS amazing article:

“Rounding your back a bit shortens the length of the torso in the sagittal plane.  In non-nerd speak, it lets you keep your hips closer to the bar front-to-back so they don’t have to work as hard to lift the same amount of weight.”

Fancy chart making skills courtesy of Greg Nuckols

The picture on the right depicts a “neutral spine.” Taking natural kyphotic/lordotic curves into account, on the right, “neutral” equates to a spine that’s 15.3 inches “long” front to back.

On the left, with some significant rounding – albeit in the THORACIC spine (more on this point in a bit) – the the length of the spine is reduced to 11.7 inches. I.e., the hips are closer to the bar.

This in mind, if you watch elite level powerlifters you’ll notice that many of them do seem to “round” their back on max effort pulls.

But lets put things into context

A). It’s important to understand that for most, the rounding is happening in the t-spine and NOT the lumbar spine. The T-spine has more “wiggle room” in terms of end-range flexion compared to the lumbar spine.

B) They’re NOT rounding their lumbar spine.

C) Pulling 600+ lbs is heavy as f***. You try pulling that much without some rounding.

D) Guys (and girls) who are strong enough to be pulling 3-4x bodyweight have assuredly trained themselves to stay out of those last 2-3 degrees of end-range flexion. Moreover, they’ve also been in compromising positions enough that they’re able to stay out of the danger zone.

E) More importantly, you’re (probably) not an elite lifter, so I wouldn’t suggest you start training with a rounded back.

In the end, we could make the case for loaded spinal flexion. Just like we could make the case for Lisa and I being introduced as husband and wife for the first time with Juvenile’s Back That Ass Up playing in the background:


Neither are a good idea. Except for the second one.

When Is Spinal Flexion Okay?

Let me repeat, I generally avoid:

1. End-range lumbar flexion

2. Lumbar flexion exercises for those who are “stuck” in flexion.

3. Loaded spinal flexion

I BOLDED #2 because, well, I work with a lot of athletes and people who are the opposite. They live in extension and excessive anterior pelvic tilt, which can be just as deleterious for the spine as flexion.

I BOLDED “excessive” because I want to make it clear that anterior pelvic tilt is not a bad thing (it’s normal). And because some people are morons, will miss the bolded EXCESSIVE, and will still send me a note via email or social media saying how dumb I am for saying APT is bad for the spine.

People on this side of the fence face a whole host of other scenarios like Spondylolysis (referred to as an end plate fracture, most often on the pars interarticularis), Spondylolisthesis (forward disc slippage), femoral acetabular impingement, and what I like to call fake badonkadonk-itis.

In other words: some people don’t have a big butt, they’re just rockin some serious APT.

Cough, cough Jen Selter cough, cough

Kidding aside, extension-based back pain or extension-based issues are no laughing matter, and it’s in scenarios like these where spinal flexion is warranted (and encouraged).

This is where were start to dive into the PRI (Postural Restoration Institute) philosophy and discuss breathing and how it affects pretty much everything.

Many of the (breathing) drills we use at Cressey Sports Performance place people (people who are overly extended) into spinal flexion, which is a good thing.

Watch this video below and you’ll get a sense of what I’m referring to.

Lets take the regular ol’ boring prone plank/bridge.

Learning to perform this exercise correctly (getting to and maintaining neutral spine) is a game changer for anyone experiencing low-back pain regardless of whether it’s a flexion issue or extension.

However, I rarely ever see anyone perform this exercise right. Most people start in a okay position for about five seconds, but then quickly “fall into” an excessively extended posture where their head protracts towards the floor and/or their entire spine sags, essentially doing nothing but hanging onto their passive restraints and hip flexors.

The “core” isn’t doing anything.

It kind of looks like this.

Not coincidentally these are the same people who brag about being able to perform a plank for [insert pointless amount of time here].

When done correctly – I prefer an RKC style plank: feet together, palms flat, elbows being pulled towards toes (to increase tension), and fire everything (glutes, abs, quads, nostrils, everything) – the amount of time someone can perform it is drastically different.

20 seconds and you should be hating life.

You may also notice that I’m rounding my (upper) back above. This is on purpose and goes against conventional wisdom.

Here’s the deal.

I like to start people in a bit of flexion – especially those who are overly extended – because as fatigue kicks in they’ll end up in neutral (rather than past it).

And I’m done.

CategoriesCorrective Exercise Rehab/Prehab

Prioritize Your Mobility

Today I have an excellent guest post by Boston based strength coach, Matthew Ibrahim. I love pointing people in the direction of coaches in the industry who are on the up and up, and Matthew definitely falls into that camp.

He’s someone who I feel provides a ton of great content and has a lot of great things to say. Today he discusses mobility, what it is (what it isn’t), and some new drills I think you’ll enjoy.

Craig: “Hey bro, I can’t wrap my right hand all the way around my back and grab my left arm.”

David: “Really? Everyone can do that. You definitely need some shoulder mobility to fix that.”

The word ‘need’ is quite subjective here.

Does Craig really need mobility in his right shoulder? Is that particular range of motion and pattern important enough to warrant this need? How much mobility is truly enough?

Think about these few questions. Let them marinade for a bit. We’ll jump back to them soon, but first let’s talk about the why, the where and the when.

WHY MOBILITY IS IMPORTANT

Everyone needs mobility, to a certain extent and in certain areas more than others.

It’s just a common thing to see in clients/athletes/patients: a lack of mobility in a joint.

Regardless of the reason, more often than not, that particular individual will benefit a great deal by incorporating more mobility drills in order to increase the overall range of motion for that joint to have access to. We see this both in the strength and conditioning world and in the physical therapy world.

Perfect example: if you can’t perform lunges properly due to hips that just don’t seem to function correctly, then a quick fix may be to perform a few hip mobility drills to open these areas up.

Most recently, I’ve had the opportunity to work with a big group of NFL Combine Prep college football players from Division I programs at Athletic Evolution in Woburn, MA.

One incredibly glaring thing I noticed right from the start: all of their hips were jacked up, so much so that each of their gait patterns were altered due to this imbalance, which was ultimately affecting their performance.

I knew this problem needed to be fixed, especially if they had high hopes of making some noise in the next couple months during their Pro Day.

Luckily, I was given the task of creating and implementing a mobility program, specifically designed with their needs in mind.

In this case, mobility in their hips has been most important since it has helped a great deal in restoring their gait pattern, improving their posture, and most notably, optimizing their overall performance in the weight room and on the field.

Mobility is crucial to certain joints in your body that are either limited or don’t have full access to certain ranges. It’s important for you to find the areas of most need and to constantly address them through daily maintenance.

Note From TG: it IS important to note (and I know Matthew would agree) that sometimes lack of mobility at a certain joint is due to a stability/alignment issue.  We shouldn’t set our default to always thinking it’s a mobility issue.

WHERE AND WHEN TO APPLY MOBILITY

I see too many individuals performing mobility drills without actually having a legitimate reason. They just feel that they need to do it. It’s almost as if they truly believe that their entire body “needs” mobility.

Stop. Please, STOP!

Before you go any further, put the foam roller, the lacrosse ball and the stretching strap down for two minutes.

I’ll use the shoulders as an example. Here’s what you need to know:

  • Should you perform an excessive amount of mobility drills if your shoulders already have plenty of range without any limitations? No.
  • Should you perform a couple short mobility drills for your shoulders if they’re especially tight/naggy due to a recent workout, but typically have very few limitations? Yes, go for it, but keep it light.
  • Should you perform a handful of mobility drills for your shoulders if they’re especially tight/naggy due to a recent workout, but are usually limited in several areas? Yes, definitely: address what needs to be addressed.

My point: have a legitimate reason for performing mobility drills with a thoughtful goal in mind. Don’t just do it to do it; have a purpose.

Case in point: apply mobility where it is needed most at the time of most need.

Simple enough? Yes, but that’s the point!

For example: it wouldn’t make much sense for me to focus the mobility program solely on shoulder/thoracic spine drills for the aforementioned college football players. They wouldn’t benefit much since they aren’t really lacking in those areas.

Always make sure there is a reason as to why you are doing what you are doing when it comes to mobility.

Referring back to the introduction

Is it truly that important for Craig to wrap his right hand all the way around his back and grab his left arm?

Think about what we just went over.

With those items in mind, I’m not so sure it is that important. Plus, we haven’t even discussed anything about his overhead shoulder range of motion or shoulder external rotation range of motion.

These are the angles you need to start viewing mobility from. Be conscious of how much is enough, and also how much is needed in order to perform the exercise task (i.e., overhead shoulder press) and the daily task (i.e., grabbing a snack from the top cabinet).

CHOOSE AREAS OF PRIORITY

You’re not always going to need mobility everywhere in your body.

Note From TG: Read THIS (<— it will melt your face)

It’s important to be able pinpoint what areas may need the most attention.

I’ve created three short mobility sequences below, where the body has been divided up into three separate compartments: lower, middle and upper. Select the compartment that you need to focus on the most.

MY GO-TO MOBILITY SEQUENCES

1.) Lower Compartment

If you’re someone who has a tough time loosening up the areas of the calves, ankle and feet, then give this mobility drill series a try for 2-3 rounds:


  • Lacrosse Ball Rolling
  • Lacrosse Ball Pin and Extend/Flex
  • Tibial External/Internal Rotation Shifting
  • 1-Leg Ankle Rocking

2.) Middle Compartment

Do you find it challenging to get limber in the hips, glutes and posterior chain areas? Try out this sequence for 2-3 rounds:


  • Quadruped Rocking
  • Inchworm
  • Hip Series: Spiderman, External Hip Rotators, Lateral Lunge w/Toes Up

3.) Upper Compartment

Tight shoulders? Naggy thoracic spine? Give this series of mobility drills a shot for 2-3 rounds:


  • Overhead Floor Slides
  • Scap Push-Up
  • Lateral Crawl
  • Linear Crawl
  • Quadruped Thoracic Spine: 4-Way Reach w/1-Leg Abducted

Always remember: address what needs to be addressed, and always keep it simple.

Now, go get limber!

About the Author

Matthew Ibrahim is a Strength and Conditioning Coach and Physical Therapy Rehabilitation Aide with an evidence-based approach to human movement, biomechanics and injury-prevention, and is knowledgeable on how each area impacts performance in sports and life. He delivers training methods that are aimed at bridging the gap between rehabilitation and performance through proper movement education and basic human maintenance. Feel free to read more at www.mobility101blog.com and follow ‘Mobility 101’ on Facebook and Twitter.

CategoriesCorrective Exercise Exercise Technique

Making Difficult Lifts Easier

The word “easier” is subjective in this context.

I mean, can we really make a squat or deadlift easy?

Maybe a better way to state things is to say “easier to perform so that someone doesn’t shit their spine.”

As a strength coach it’s obviously important for me to help get people stronger – especially with the big lifts. Too, and maybe more importantly, a large portion of my job is to “fine tune” technique so that a particular lift or exercise is more user friendly for my athletes and clients to perform.

Almost always everyone I work with is going to be squatting, deadlifting, and performing any number of compound movements to some degree on a daily basis. This DOES NOT mean, however, everyone is barbell back squatting, squatting deep (or ass-to-grass for the brosefs reading), conventional deadlifting, and/or performing max effort anything on day #1.

Much of that will depend on one’s current (and past) injury history, training experience – not to mention goal(s) – as far as what variation of squats or deadifts (or whatever) I’ll start them on. In short: I need to figure out their “Point A” (starting point) before I can get them to “Point B” (squatting 2x bodyweight, hitting a 500 lb DL, arm wrestling a grizzly bear, etc).

Often I’ll need to break down subsequent movements into specific parts in order to groove technique and/or introduce a new exercise into someone’s training repertoire.

Which is the topic of my latest article on BodyBuilding.com. In it I discuss some simple drills I like to use to break down the deadlift and KB Turkish Get-up.

Continue Reading…..