
CategoriesExercises You Should Be Doing Program Design Strength Training

One of My Favorite Core Exercises: The Lying Overhead Pullover

It’s a shit-show of a week on my end this week.

For starters I’m involved with a pretty cool product – The Trainers Toolbox – that’s set to be released next week that’s going to set the fitness industry on fire. I won’t give away too much here, but suffice it to say it’s going to help a lot of fitness professionals.1

Second, we’ve had a cranky toddler on our hands all week this week (wake-up call of 4:30 this morning as a matter of fact), so, basically, FML.

Hence I haven’t had much time to write for my own site this week. Thankfully I have some awesome contributors – like Dr. Nicholas Licameli – who are more than willing to send me articles out of the blue and make me want to buy them a steak dinner.

Enjoy.

Copyright: valeriylebedev / 123RF Stock Photo


There are some things that you just don’t hear everyday”

-“Who keeps eating all of the kale!?!?”

-“Of course I understand why my cable bill is $37.97 more this month than it has been in the past 15 months.”

-“I hope I get placed in Ravenclaw or Hufflepuff…please, Ravenclaw or Hufflepuff…”

-“Let’s talk about Fight Club.”

-“A strong core? No thanks, not interested.”

There seems to be a slight stigma surrounding training the abs and core while lying down because, as some say, there are “better” and more “functional” ways to train.

While this may have some truth to it, I don’t mind training the abs and core on the ground. Whether or not something is “functional” really depends on the individual and his/her goals (is a standard plank really “functional?”).

In order to have functional carryover to the task at hand, the training must be specific to the activity (more on this below).

This means that “functional” will be different for everyone.

If you’re a weight lifter or powerlifter, “functional” core strengthening may include tempo reps, pause reps with postural bracing, breathing drills under sub-maximal loads, etc.

If you’re a baseball player (check out Mike Reinold and Eric Cressey, if you haven’t done so already), “functional” core strengthening may include plyometric twists, anti-rotation movements, quick accelerations and directional changes, etc. The point here is that “functional” is different for everyone and if the goal is simply to progressively load and train the abdominals, don’t fear the floor.

Today I’d like to share with you an exercise that I call the lying overhead pullover (LOP) (see the video link at the end of this article). I think I invented this exercise, however Chuck Norris and Total Gym do have a variation of it in their manual and let’s be honest, I do not want to get on the bad side of a man who once challenged Lance Armstrong to a “Who has more testicles” contest and won by five.

Other than the Total Gym variation, I have not seen it anywhere else.

How To Do It

Before we dive into how to perform the LOP, let’s have a quick review on what it means to “brace the core:”

“From the top down, we have the diaphragm, from the bottom up we have the pelvic floor, and around the sides we have the deep abdominals that surround the midsection like a corset. To engage the diaphragm, take a breath in through the nose and brace. To engage the pelvic floor, pull up as if holding in gas or urine. To engage the deep abdominals, tighten up the midsection as if putting on a tight belt after Thanksgiving dinner or walking into a cold pool as the water drifts up to your navel.”

It is imperative that you understand how to perform a pelvic tilt and properly brace the core…the entire exercise depends on it.

For more on this, check out my videos right here and here (these are from the archives, so bear with me…but the content is still relevant!).

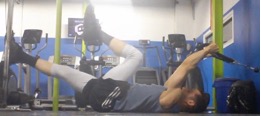
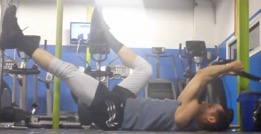
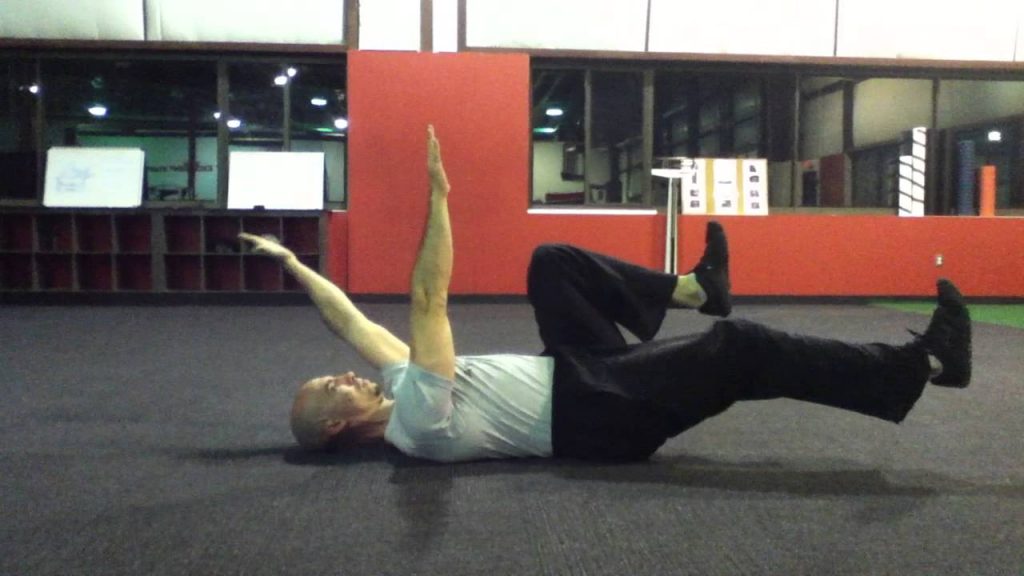
To perform the LOP, lie on your back in front of a low cable station or a low anchored resistance band. Bend the knees and perform a posterior pelvic tilt by pressing the small of your back down into the floor. Reach overhead and grab the rope or band. Maintaining the pelvic tilt, bracing the core, and keeping the arms straight, pull the rope down toward your knees.

Squeeze the abs for a count, and slowly return to the start position.
Progressions and Regressions

As with any exercise worth writing about, it must have the ability to be modified to better meet individual needs such as level of experience, pain, personal preference, etc. It may seem intuitive that decreasing or increasing the resistance would make this exercise easier or harder to perform, however how changing the range of motion affects the difficulty of the exercise may be less intuitive.

The LOP is an anti-extension exercise, which means it challenges primarily the anterior abdominals to resist spinal extension.

During this exercise, the spine and pelvis collectively become a fulcrum and our arms and legs become levers. The lever arm and extension moment increase simply by stretching out a leg or stretching the arms overhead. As the lever arm increases, it becomes more challenging to prevent the spine from arching off the ground into extension.

By maintaining that pelvic tilt, we are resisting extension.
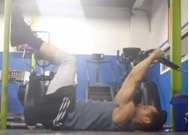
Looking for a nasty little extended set to take past failure?

Start with the most difficult position and regress in a stepwise fashion to easier versions as muscle failure is reached, again and again.

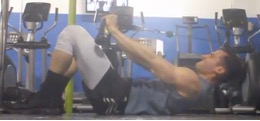
Another simple way to alter the range of motion would be to add a small crunch to the mix.

This would allow us to not only resist extension, but also overcome it with slight flexion. Be sure to crunch up almost into a 45-degree diagonal as opposed to down toward the feet or straight up toward the ceiling. This will ensure proper tension and alignment with the line of pull and resistance curve of the exercise.

Why I Like the LOP

There is one very important function of the abs that is often overlooked, and that is resisting movement. Sure, everyone knows that the abs flex, side bend, and rotate/twist the spine, but besides causing movement, the abs collectively function to resist movement and stabilize the spinal column.

The LOP challenges that function nicely.

Another reason why I like it is that the LOP trains lumbo-pelvic stability during upper and lower extremity movement.

Why is that important?

In order to perform pretty much any sport, exercise, or functional task, the spine has to provide a stable base for the extremities to move about, otherwise it would be like vertical jumping on sand or firing a bazooka off of a kayak (why you’d have a bazooka on a kayak is beyond me…).

I am not saying that performing the LOP will directly increase power output and safety during running, cutting, kicking, punching, squatting, overhead pressing, etc.

Nope. Sorry, but the principle of specificity still reigns supreme.

If you want to improve your 40 time, better get sprinting! If you want to improve power output when kicking a soccer ball, better get out on that field and kick! If you want to improve your squat, better read this article and of course…squat!

What I am saying is that the LOP is a great way to feel, get accustomed to, and train spinal stability with extremity movement, which is foundational to all of those previously mentioned tasks.

And That’s That (LOP in Action)

So be sure to give the lying overhead pullover a shot. Depending on how it is done, the LOP can be used as a top down ab movement, a bottom up ab movement, or a core stability movement. Feel free to experiment and find what works best for you and your goals.

Enjoy!


About the Author

Nicholas M. Licameli, PT, DPT

Doctor of Physical Therapy / Pro Natural Bodybuilder

Nick believes in giving himself to others in an attempt to make the world a happier, healthier, and more loving place. He wants to give people the power to change their lives in hopes to leave this place better because he was here. Bodybuilding and physical therapy just act as mediums for carrying out that cause. Love. Passion. Respect. Humility.   Never an expert. Always a student. Love your journey.

Youtube: HERE

Instagram: HERE

Facebook: HERE
 

CategoriesExercises You Should Be Doing

Exercises You Should Be Doing: Anti-Flexion Squats

“It’s official,” I thought to myself.

“I’m a moron. Why have I never thought of that?”

On an almost daily basis I read or watch something one of my colleagues posts on the internet and I am not-so-subtlety reminded of how inadequate I am.

I mean, granted, I have a deadlift most guys covet, and pecs that can cut diamonds, but even still…it’s not enough.

My brain just doesn’t work in the say fashion as some of my fitness brethren.2

Today’s installment of Exercises You Should Be Doing is a gleaming example of this fact.

Copyright: gekaskr / 123RF Stock Photo

Exercises You Should Be Doing: Anti-Flexion Squat


Who Did I Steal It From? – Friend, colleague, and coach, Robert Linkul, owner of Be STRONGER Fitness in Sacramento, CA.

** No fluff here, Robert is an outstanding coach and someone you should be following (especially if you work with older clients).

What Does It Do? – When I first saw this exercise being performed on Robert’s Instagram feed I instantly thought of my IN-SEASON high-school basketball players. They were coming in to train at CORE the following day and I knew they were going to be a bit beat up from a hectic week of games and practices.

I wanted them to come in and get a good training session in, but I also wanted stay cognizant of the fact they would have likely given me the look of death if they walked into the studio and saw “squats” on the docket.

With this iteration I was able to still have them squat, albeit with minimal axial loading on their spine. Too, as I found out myself after performing a few sets, it torches the anterior core.

I receive a high training effect with minimal joint stress with this exercise, and like I said, for in-season athletes this is money.

In reality, though, this is a great exercise for anyone: athlete, non-athlete, in-season, off-season, centaur, whatever.

Other things to note:

– The added “pull” of the band during the eccentric phase of the exercise provides a unique training stress in that the trainee must now learn to CONTROL the lowering portion and not just let the band take over.

– Moreover, I see some value in using this variation with beginners. Getting a beginner to appreciate TENSION and body position during a squat (abs on, ribs down, hips tucked under) is paramount. Far too often they’re “loosey-goosey” and have a hard time comprehending the concept. Here, the band gives them all the feedback they need to FEEL what it is I’m after.

– Lets quit it with the formalities shall we? You know and I know that there’s one thing, and one thing only, we’re both thinking of when it comes to this exercise.

We’ve finally figured out a way to combine squats and bicep curls, baby!

via GIPHY

Key Coaching Cues: I’m using  an EZ Curl bar in the video, but if you wanted to up the bad-ass factor you could use a straight bar or, I don’t know, an ax.

I’d err on the side of conservative here.

A 1/4″ band will be more than enough resistance for most people, but I can see a case being made for 1/2″ band for stronger individuals.3

Programming wise this exercise fits well with high(er) rep schemes (8-15) so don’t be bashful.

SIDE NOTE: Grip will be the limiting factor for the bulk of trainees with this exercise, so please take that into consideration. The last thing you want is someone letting go of the barbell from the top position due to fatigue and then they break their foot.

Jerk.

CategoriesExercises You Should Be Doing

Exercises You Should Be Doing: Band Resisted Kettlebell Deadlift

One of my biggest pet peeves about the fitness industry are those people who tend to be absolutists about stuff.

They feel that just because something worked for them that it must mean it’ll apply to everyone, and you’re an idiot or inept if you feel otherwise:

  • You have to back squat if you want to get strong.
  • You have to follow a Paleo diet if you want to get ripped.
  • You have to wear pants when you’re training clients.

It’s all a bunch of hooey if you ask me. Nothing is set in stone, and nothing is going to apply across the board towards a diverse population with varying injury histories, goals, and ability levels.

This train of thought applies towards the deadlift as well.

Copyright: bezikus / 123RF Stock Photo


There aren’t many exercises as maligned or misrepresented as the deadlift.

On an almost weekly basis I’m having a conversation with someone who offhandedly says “so and so mentioned to me how deadlifts are dangerous,” or “such and such said deadlifts are the worst thing ever for your back,” or “I heard deadlifts give you gonorrhea, is that true?

Listen, deadlifts are no more “dangerous” than any other exercise that’s performed incorrectly (or with too much load/volume that surpasses any one individual’s threshold to recover from).

When performed well, and with the appropriate progressions in place, the deadlift is one of the best bang-for-your-training-buck exercises out there.

It’s also pretty freakin versatile.

Another popular fallacy of the deadlift is that it has to be performed with a straight bar, and that it has to be heavy.

Nothing could be further from the truth.

Picking anything up off the ground – whether it’s a barbell, dumbbell, a bag of groceries, a baby, or Mjolnir – with the knees slightly bent, hips flexed, and with an upright torso, can be considered a deadlift.

Not so dangerous now, huh?

To prove my point check out this gem of a variation.

Band Resisted KB Deadlift


Who Did I Steal It From? – Strength & Conditioning legend, Vince McConnell.

What Does It Do? – I had my client, Jessica (who’s in the video above), perform this last night because we’ve been working on troubleshooting through some hip shenanigans.

To put it bluntly, Jessica is strong AF.

Her best deadlift is 350 lbs with a straight bar, and I’m pretty sure she’s undefeated in Fight Club. Thing is, though, she’s always had trouble feeling her glutes during a deadlift.

As with most people, she’s gotten really good at compensating, and every now and again she’ll get a bit of a back niggle.

Not necessarily an injury; but, you know, just an annoying “something.”

This exercise serves a few purposes:

  • Using a KB – so her center of mass is OVER the load – makes this exercise infinitely more “back friendly.”
  • Adding the band takes advantage of accommodating resistance where the load gets more challenging at a position where she’s strongest (terminal hip extension).
  • Too, adding the band, really helps with engaging the glutes to a higher degree at the top of the movement. I don’t know how better else to explain it other than “IT JUST DOES ALRIGHT. WHY DO YOU ALWAYS HAVE TO QUESTION ME?”

Key Coaching Cues – All I did was wrap a Jump Stretch band across two pegs at the bottom of my power rack and then loop the same band underneath the handle of a kettlebell.

Then Jessica lifted it.

And then it was Glute O’clock.

Normally I’m not a fan of high(er) rep deadlifts, but this variation lends itself to me breaking that rule.

Try 3-4 sets of 8-12 repetitions.

CategoriesExercises You Should Be Doing

Exercises You Should Be Doing: Hip Flexed Landmine RDL to Reach

Sometimes I think my brain sucks.

I’ll be the first to admit I don’t consider myself an innovator in the fitness industry. My talents lie in taking other people’s information4, letting things ruminate for a bit, figuring out how it may apply to my clients, then adding my own spin or take, in addition to a few Star Wars or Jason Bourne references (maybe an f-bomb or two…or three), and then disseminating it to my tribe.

I.e., you.

Much like many of you I peruse Twitter, Instagram, and LOLcats for a little inspiration and to see what other people in the industry are doing to make their clients/athletes better. And, much like many of you, I read an article or watch a video that piques my interest and think to myself…

…”well, FML, why didn’t I ever think of that?

Today’s edition of Exercises You Should Be Doing is a clear example of this.

Copyright: wavebreakmediamicro / 123RF Stock Photo


I’ve always had an infatuation with the landmine.

The piece of exercise equipment, not the nefarious tool of war.5

It’s one of the more versatile tools in the weight room and I’ve used it to perform everything from deadlifts and squats, to hollow presses and rows, to single leg work and a plethora of core exercises.

I thought I had seen it all. Between stalking Ben Bruno, Joel Seedman, and Meghan Callways’s YouTube pages, I thought I had seen every application of the landmine possible.

I then I saw this.

Hip Flexed Landmine RDL to Reach


Who Did I Steal It From? – Virginia Beach based strength & conditioning coach, Vernon Griffith.

What Does It Do? – I know, I know. Some of you may be watching the video and are like “da fuck?”

But hear me out.

Well, hear Vernon out:

“This is a ground based movement that I have found to be successful in challenging hip mobility, strength and stability. Mobility is A LOT more than just stretching.”

The addition of the landmine is brilliant because it provides a base of “irradiation” (body tension) which helps prevent unwanted movement – namely in the lumbo-pelvic area – and locks the trainee in so (s)he can challenge the hip(s) and core.

Key Coaching Cues – Start in a half-kneeling position (inside leg UP) and be sure to use your top hand to push into the barbell for added stability.

– Lift foot off ground, pushing into barbell to maintain TENSION, and begin to hinge on the flexed side.

GO SLOW. The whole point of this exercise is to “own” your position(s). Hinge back until the inside leg is fully extended and then squeeze glute for 2-3s count (again, owning the position).

– Reverse the action and return back to starting position, but this time when you’re back to the half-kneeling position, add a reach by pressing the barbell overhead and then contract the opposite (flexed side) glute. Pause for another 2-3s count.

– Repeat for 3-5 reps/side.

– You don’t need to load this exercise very aggressively. I’m only using a 10 lb plate in the video and that was more than enough. An empty bar will work too.

This drill can be used as part of a general warm-up for the hips prior to squatting or deadlifting. Or, even better, as an additional exercise as part of a mobility or GPP day.

Give it a try. It’s harder than it looks.

And it feels awesome.

CategoriesExercises You Should Be Doing

Exercises You Should Be Doing: Band Resisted Hinge Row

Copyright: realstock / 123RF Stock Photo


This edition of Exercises You Should Be Doing puts a little spin on a similar iteration I stole from Joel Seedman a few years back.

Or maybe it was John Rusin?

Either way, my brain doesn’t work the same way their’s does and I gladly borrowed the idea.

It involved adding resistance bands to KB/DB Rows while in the hinge position. The pull of the bands really (and I mean REALLY) added another element to the exercise I wasn’t expecting.

Because I had to resist the anterior pull of the bands, the exercise hammered my lats, and I loved it.

Well, here’s the same exercise, albeit with a little bit of a twist.

Band Resisted Hinge Row


Who Did I Steal it From? – Doug Balzarini of Iron Village Strength and Conditioning in Beverly, MA.

What Does It Do? – A lot.

As Doug noted in a recent post of his:

“This one checks off a lot of positive boxes. The accommodating resistance of the super-band, the constant tension from the active hinged position, the big range of motion from the scapula, the muscle squeeze at the top…goodness.

And the wall support allows you to “sit back” a bit and really focus on the squeeze of the mid/upper back.”

Key Coaching Cues – It may take a little trial and error to get the setup juuust right, but when you do:

  • Make sure to push your hips back INTO the wall. It’s still important to feel a fair amount of hamstring tension, though.6
  • With pretty much any row variation I like to tell people to think about allowing their shoulders blades to move AROUND the ribcage; you should feel a reach/slight stretch when your arms are extended out in front.
  • In playing around with this exercise myself, I think it bodes best to do it for high(er) reps, in the range of 12-15 reps.
CategoriesExercises You Should Be Doing

Exercises You Should Be Doing: T-Spine Wall Rotation With Lift-Off

Copyright: gekaskr / 123RF Stock Photo


The ability to “access” thoracic extension (and rotation) can be a game changer for a lot of people; especially for those who spend an inordinate amount of time sitting at a desk job.

In no particular order, t-spine extension & rotation:

  • Allows the shoulder blades to move, particularly with regards to scapular retraction and upward rotation.
  • Takes much of the burden off the lumbar spine. We WANT the bulk of our rotation to come from this area (7-9 degrees per segment).
  • Likewise, it helps keeps our shoulders healthy, allowing for a bit more external rotation in the glenohumeral joint. I.e., “opens” us up.
  • Provides a window to be in better position(s) to lift heavier loads, and with less compressive loading on the spine.
  • Makes you look 43% more attractive.
  • Both have immense carryover to everyday (as well as athletic activities) which require a litany of movement variability such as reaching behind us, overhead, in addition to lifting and throwing things.7

Today I wanted to share a drill I think you’ll get a lot of use out of that you’ll be able to incorporate with your clients/athletes right away.

T-Spine Wall Rotation with Lift-Off


Who Did I Steal It From? – Dean Somerset, yo.

What Does It Do? – Proper execution of this drill takes the lower back out of the equation (where we DON’T want any movement) and instead targets the mid-back (where we DO want movement).

It also provides a killer bicep pump.

Just kidding. It doesn’t.

But it does help improve thoracic rotation & extension, which will keep people healthy, which will allow them to train more often, which will then allow them to curl to their hearts content.

Key Coaching Cues: Place a foam roller or yoga block between the wall and the knee (or the hip for that matter) that’s closest to it. From there, with your palm facing out, try to trace a circle on the wall rotating/extending as far as your mobility allows.

When you reach end-range, perform an exhale (out of the mouth) and lift your hand off the wall a few inches.

Don’t allow the foam roller/yoga block fall to the ground.

Return back to starting position, inhale (via the nose), and repeat the same process for 3-5 reps/side. Don’t be surprised if you get a little bit more off the wall with every subsequent rep.

It’s magic.

CategoriesExercises You Should Be Doing

Exercises You Should Be Doing: Bench Assisted ValSlide RDL With Reach

I know the name of today’s Exercise You Should Be Doing seems like a mouthful, but I promise it’s easier done than said.

More cogent to the point is that it’s one of my new favorite drills to help trainees groove the Single Leg RDL.

Copyright: gekaskr / 123RF Stock Photo

I’ve Written About This Shit Before

I view the Single-Leg RDL as a valuable movement to master. I think it behooves8 most people to be able to do it, and do it well.

And while I’d like to sit here and say that mastering the 1-Legged RDL will help you jump seven inches higher, run a sub-10s 100m dash, shed 25 lbs of fat, add 50 lbs to your squat, and help cure male pattern baldness…it won’t.

But it’s still a pretty fuckin important movement pattern to add to your training menu for a variety of reasons.

Off the top of my head:

    • Helps improve posterior chain strength (glutes, hamstrings, erectors).
    • Helps correct left-right strength and size asymmetries.
    • Can be used in both a rehabilitation AND strength training setting.
    • Phenomenal for hip stability and strength.
    • Challenges the body in a multi-faceted way – namely proprioception and balance.
    • Trains the feet (you learn how to “root”” your foot into the ground).
    • Also, and maybe most important of all, improves your Fortnite Dance-off prowess.

All that said, even for people with a fair amount of experience in the weight room, Single-Leg RDLs are about as advanced as they get as far as single leg movements go.

Here, a lot of things have to harmoniously come together (core stability, hip stability, upper back strength, balance, hip hinge, etc) in order to perform the movement effectively, and in a fashion that doesn’t make me want to throw my face into a brick wall.

The LAST thing I’m going to do with the bulk of people I start working with – especially in the beginning stages – is to put weights in their hands and have them RDL to their hearts content.

A lot of things need to happen first.

As with any exercise, there’s a right of passage and a natural progression that needs to take place.

Oh, and it just so happens I wrote an article a few months ago detailing many of the Single-Leg RDL progressions I use with my clients/athletes HERE.

It’s pretty good. I believe it’s up for the Pulitzer.9

To that end I wanted to share with you another viable RDL progression I learned recently that you can add to the mix.

Bench Assisted ValSlide RDL w/ Reach


Who Did I Steal It From? – My friends over a Warhorse Barbell Club in Philadelphia, PA.10

What Does It Do? – Using a bench as a support helps to keep the backside “stable” as one extends their moving leg back. In addition it helps to prevent the pelvis from rotating to one side or the other.

Also, the reach forward is important here because it inspires a posterior weight shift which many trainees have a hard time with out of the gate.

Key Coaching Cues – The beauty of this drill is that it’s proper execution keeps people honest. If the hips rotate, the ValSlide falls off the side of the bench, the “sliding component” helps to groove a long (and stable) backside, and the reach helps prevent excessive rounding of the upper back.

I like to stick with a med ball for a few weeks, and once someone feels competent with that I can then add a pair of dumbbells or kettlebells as a progression.

CategoriesExercises You Should Be Doing

Exercises You Should Be Doing: Offset Glute Bridge DB Press

It’s been a while since I’ve offered a glimpse into my exercise library and shared an example of something I’ve been playing around with of late.

Today’s exercise is nothing revolutionary, but it’s simplicity is one of the reasons I feel it’s so effective.

Whether you workout at home or in a commercial gym it can be performed rather easily, and the set-up is minimal.

Copyright: gekaskr / 123RF Stock Photo

Offset Glute Bridge DB Press


Who Did I Steal It From? – Your mom.11

Just kidding.

I know Ben Bruno has done similar variations from the floor, so I guess he serves as my muse in this instance.

What Does It Do? – This is a great example of an exercise that provides a high-training effect with a low dose. Here we’re targeting the pecs (obviously), but we’re also getting a high degree of glute activation and an even higher degree of core recruitment.

I’m a BIG fan of “offset” training.

This is where you hold a weight (dumbbell, barbell, KB, Mjolnir) on ONE-side of the body and perform all your repetitions before switching to the other side.

In this case the benefit is you have to do all you can to “steady” yourself and not fall off the bench as the set progresses.

It’s core training 101.

Resisting/stabilizing external forces & vectors.

Moreover, the exercise is made exponentially more difficult when performed in the “off-bench” position (glute bridge) because 1) there’s less of the bench to keep you stable and 2) you have to work to maintain appropriate lumbo-pelvic alignment as a result.

Key Coaching Cues – This is admittedly a bit of a wonky exercise at first, especially with regards to getting into position. The best piece of advice I can offer is to place the DB on your lap first and then use that (and the bench) as leverage as you finagle yourself into the bridge position.

Rest your head on the bench.

When you’re set make a fist with your free hand to help ramp up and maintain full-body tension. Be prepared to get diesel.

CategoriesExercises You Should Be Doing

Exercises You Should Be Doing: Deadbug Floor Press

I don’t say this lightly.

I am IronmanDeadbugs are underrated and you need to be doing more of them.

I believe they’re as important and integral of an exercise to your success in the weight-room as squats, deadlifts, or just about any barbell lift you can think of.

In fact, I’d go so far as to say “the more deadbugs you include in your training (and the more proficient you get at them), the higher the likelihood you’ll see improvements in all your lifts.12

Copyright: tankist276 / 123RF Stock Photo

Deadbugs Are About as Exciting as Listening to Bobcat Goldthwait Narrate 50 Shades of Grey

As much as I’m a fan of deadbugs I get why most people tend to roll their eyes when they come up in conversation.

Client: “I’m so excited to get started on my new program. What are we doing today?

Me: “We’re starting off with some deadbugs and then…..”

Client (cue tossing of shade):

via GIPHY

I’ll admit deadbugs aren’t super exciting to perform and there are many, many things clients/athletes would likely rather perform:

  • High rep squats.
  • Fran
  • A colonoscopy

But since when does exercising have to be exciting or sexy? While I can appreciate there should be some form of “give and take” with regards to what I feel clients need to do and what they want to do, I have yet to come across anyone – regular Joes and Janes alike to professional athletes – who haven’t benefited from more deadbugs being peppered into their program.

The ability to stabilize and maintain a “neutral” pelvis/spine while simultaneously moving the extremities has a profound effect on one’s ability not only reduce the incidence of injury, but to also improve performance.

NOTE: For more of the what, why, and how’s on the topic I’d encourage you to read THIS quickie article I wrote a few years ago, in addition to THIS one which shows off a few solid progressions.

Learning to perform a deadbug correctly is step #1 (check out the links above), and not coincidentally provides a profound degree of respect people tend to lack towards the exercise.

Actually, screw it, lets press the pause button.

Watch this short video which details mistake #1 when it comes to deadbug execution:


It’s a lot harder than many think.

Another aspect not fully appreciated is the adaptability and “scaling” of the exercise which exists. The deadbug can seamlessly be regressed or progressed to fit the needs, goals, and ability level of the individual.

To that end here’s a nice progression I went over this past weekend while in Vancouver/Victoria teaching my Coaching Competency Workshop.

Deadbug Floor Press


Who Did I Steal It From?: I actually learned this variation a few years ago when I was speaking in London during one of my hands-on breakouts. I had all the trainers in attendance try a few of my variations, and as we had a little more of a back and forth dialogue this badboy made an appearance.

What Does It Do?: All of the benefits of a regular, vanilla deadbug (improved core stability, lumbo-pelvic control, anterior core activation, cueing “canister” position), but less instance of someone wanting to throw their face into a cement floor from boredom.

It’s a deadbug, but a little more “meatheady” and athletic.

Key Coaching Cues: Do NOT lowball the exhale. If you didn’t already, please watch the first video above which breaks down what a full exhale should look like.

Some other minor stuff I didn’t go over in the video:

  • When pressing (especially with a KB) make sure your knuckles point towards the ceiling. This will help reduce excessive wrist extension.
  • If need be, you can also decrease the lever of the move by bending the knee of the moving leg, and perform more of heel tap.
  • When the full exhale is complete and the leg is fully extended, try to let the leg “hover” for a 2-3s count before you return back to the starting position with an inhale.
  • I shot this video on June 5th. It was 55 degrees outside. WTF mother nature.


CategoriesExercises You Should Be Doing

Exercises You Should Be Doing: Renegade Push-Up

Push-ups are an underrated exercise.

Meatheads scoff at the notion of adding them to their programs. “Too easy,” most will say. “Not not going to make me pecy enough.

Athletes roll their eyes at them. “Not going to get me to the show, bro,” they’ll retort.

Au contraire I say.

Copyright: davidoff205020 / 123RF Stock Photo

Do Your Fucking Push-Ups

Yeah, that’s right.

For starters, I can tell you without hesitation that in my 15+ years working with athletes, general population, and the occasional wizard, it’s a rare find when someone shows up on Day #1 and can impress me with their push-up prowess.

Most of the time I end up watching something like this:

Which makes me do stuff like this:

SIDE NOTE: This is also how I react when my wife tells me to make the bed in the morning.

Suffice it to say, the push-up – or rather, someone’s ability to do one without making me go batshit crazy – provides me with a lot of information.

Sure, it gives insight on their upper body strength. But that’s just the tip of the iceberg and not really what I’m after. More importantly it provides valuable data with regards to someone’s lumbo-pelvic-hip control/stability and their ability to 1) maintain a good position and 2) to do so once motion comes into play and fatigue sets in.

Secondly, I’m a firm believer that push-ups are one of the keys to healthy shoulders. On one end of the spectrum it’s standard procedure to cue trainees to lock the shoulder blades in place – retract and depress – during basic strength movements like the bench press, squat, and deadlift.13

In short: In order to “protect” the shoulder and to move appreciable weight you have to be dialed in with scapulae positioning.


And on the other end of the spectrum we take everything I just said and toss it out the window.

Unlike the bench press, push-ups are a closed-chain movement (hands don’t move).

As much time as we spend cuing people to “glue” the shoulder blades in place – especially during bench pressing variations – it’s equally as vital to allow them to experience moving around the ribcage (protraction) and gaining access to their full range of motion.

That’s what the shoulder blades are designed to do….

…to move.

I have a simple approach with most of my lifters:

1. Lock those fuckers down when lifting heavy things.

2. However, do your push-ups. Those shoulder blades need to move.

To that end, one of the other advantages of push-ups is that they can be done anywhere and there’s no shortage of iterations to regress or progress them according to someone’s ability level.

Here’s a variation I think will pique some interest.

Renegade Push-Up


Who Did I Steal It From? – The one and only Jim “Smitty” Smith of Diesel Strength & Conditioning.

What Does It Do? – Here I take away a base of support (an arm) and try to hold a 3-point position without allowing my torso or hips to rotate.

This is a killer core/rotary challenge.

Key Coaching Cues – I’m gonna throw myself under the bus a little and say I should have held my elbow tap a tad longer in the video above. I rush things in an effort to get in a more stable position and not make out with the floor.

The idea here is to keep a controlled tempo.

No rushing.

Slowing things down is paramount to the effectiveness of this exercise.

Any sort of mild elevation will work here: an aerobics stepper, the bar set at the lowest position on a Smith Machine, a medicine ball (if you really want to up the ante), or anything similar.

Feel free to alternate which hand comes off the ground.

Aim for 5-8 repetitions per side.