Categoriespersonal training Program Design Strength Training

My Top Shoulder Training Tips Part I

The shoulders (delts) are an area that many trainees wish were bigger. They’re also an area that’s often injured. In today’s guest post by Dr. Nicholas Licameli he discusses and breaks down some of his top training tips for shoulder health and hypertrophy.

Enjoy.

Copyright: xmee / 123RF Stock Photo


In order to build a quality and symmetrical physique, all muscle groups must be trained and developed equally. An overdeveloped muscle group can never compensate for an underdeveloped one. That being said, a well-developed set of shoulders, along with a narrow waist, can really enhance a physique and create a nice V-taper.

While the shoulders are one of the most sought after muscles to develop, they also tend to be one of the most stubborn and most commonly injured. Here are my top shoulder training tips to help you on the journey to strong, healthy shoulders.

1) Listen To Your Body

Early in my training career, I remember feeling as if there were some aspects of my training that could not be changed. Compound lifts had to be performed using a barbell only and with heavy, lower rep sets. Dumbbells and lighter/higher rep training were for isolation movements.

For years, I trained in the 6-10 rep range for barbell overhead presses and in the 12-20 rep range for lateral raises, rear deltoid work, and other isolation movements. I never really felt “satisfied” or that “good” fatigue after completing heavy sets of overhead presses.

I eventually took the leap out of my comfort zone and started using dumbbells and a landmine set up for overhead pressing.

What a difference!


I felt a connection to my deltoids like never before. The overhead press soon went from one of my least favorite movements to one of my favorites.

I also started to realize that my lighter warm up sets seemed to feel better (even when not taken anywhere near failure) than my heavier working sets. I took another leap and started training the overhead press in the 12-20 rep range and again, I was blown away at how my body responded. Does this mean I completely removed heavy overhead pressing from my training?

Of course not, but I am definitely not afraid of lighter training.

The take home message here is listen to your body.

If heavy barbell training doesn’t quite “click” for your shoulders, don’t be afraid to change it up.

We now know that if hypertrophy is your goal, overall volume (volume = weight lifted x sets x reps) and progressive overload at an appropriate intensity is what matters.

Note From TG: Technically speaking, for muscular hypertrophy three factors take precedence: Mechanical Tension, Metabolic Stress, and Muscle Damage.

For more insights you can’t ask for a better resource than Brad Schoenfeld’s Science and Development of Muscle Hypertrophy.

Hypertrophy can be seen by training with heavy weight and low reps as well as light weight and higher reps. Keep in mind that if your goal is strictly to increase strength on the barbell overhead press, you’re going to have to train the barbell overhead press with heavy loads, as specificity is much more important when it comes to strength.

2) Obey Your Anatomy: The Upright Row and Lateral Raise

The upright row seems to have more controversy surrounding it than Donald Trump administering a flu vaccine to a gluten-free, ketogenic, vegan, transgender circus elephant in captivity while drinking creatine sweetened with aspartame.

Is the traditional “muscle magazine” upright row the safest or most effective exercise to build big, strong, and healthy shoulders?

Probably not.

Can it be modified?

Absolutely.

By nature of the movement, the barbell upright row places the shoulder in resisted internal rotation with elevation. This is a less than optimal and, dare I say, vulnerable position because it narrows the subacromial space, which can increase risk of injury.

Does that mean our shoulders will break on the first rep?

No.

Our bodies are resilient and can handle less than optimal positions, but why risk it if we can find a better way? Need a refresher on what the sub-acromial space is and how narrowing it can lead to injury? Check out Tony’s awesome article right here.

Great alternatives to the barbell upright row are the dumbbell upright row and the face pull.

Face Pull

As mentioned above, the barbell upright row puts us into internal rotation, which narrows the sub-acromial space.

External rotation, however, can be a shoulder’s best friend.

The dumbbell upright row frees up our joints and allows us to externally rotate throughout the movement. The face pull reduces the amount of internal rotation at the bottom of the movement and increases the amount of external rotation at the end of the movement.

Many training routines tend to be abundant in internal rotator strengthening (pecs, lats, etc.) while lacking strengthening for the external rotators (posterior rotator cuff, rear deltoids, etc). Both the dumbbell upright row and face pull involve resisted external rotation, which means they can help balance out a traditional training routine (more on this to come).

Note From TG: Speaking of Face Pulls I am reminded of THIS classic T-Nation.com article by Mike Robertson and Bill Hartman on the topic.

The lateral raise is a staple in most shoulder training routines, however if done incorrectly, can be very similar to the barbell upright row.

By internally rotating at the top of a lateral raise, as if pouring a pitcher of water, the shoulder gets placed into resisted internal rotation with elevation, which we now know is not that great of a position.

Why is that a common cue (even Arnold recommends it!)? Because in order to maximally target the middle deltoid, it needs to be directly in line with the force of gravity and the “pouring-the-pitcher” position accomplishes this.

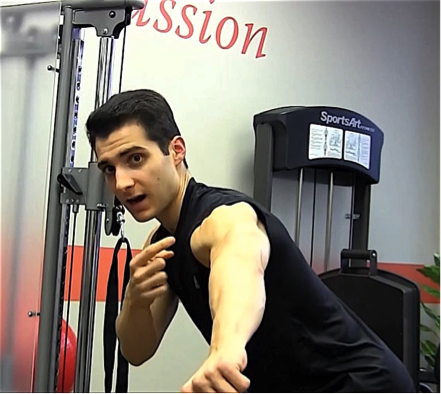
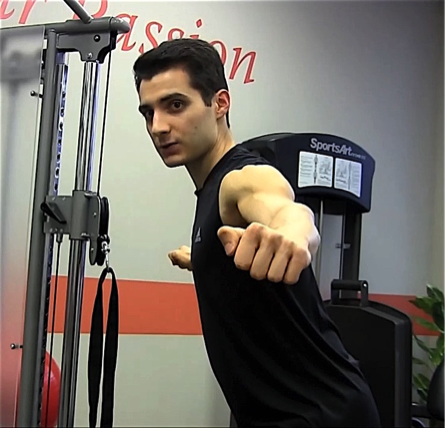
Middle deltoid is directly in line with the force of gravity (good!), however the shoulder is in internal rotation and elevation (bad!)

Anterior deltoid is directly in line with the force of gravity

Bending forward or lying face down in a bench targets the posterior deltoid because it is directly in line with the force of gravity.

Posterior deltoid is directly in line with the force of gravity

So how do we reduce our risk of injury while still maximizing the force through the middle deltoid?

Simple.

Hinge at our hips and lean forward, just a bit.

The line of gravity has now changed. We’re now able to externally rotate (reversing the pitcher pouring motion) while still placing the middle deltoid in perfect alignment with gravity.

Middle deltoid is directly in line with the force of gravity (good!) AND the shoulder is in external rotation (good!)

For a video demonstration and explanation of this, go HERE.

3) Don’t Overdo It…Pay Attention to Volume

When looking at weekly shoulder volume, don’t forget to account for all of the exercises that involve the shoulders as secondary movers.

Shoulder presses, lateral raises, and reverse flyes are not the only exercises that add to weekly shoulder volume.

The shoulders get worked during exercises like bench presses, rows, dips, and even pull-ups and pull-downs. If you have a volume goal you are trying to hit, be sure to keep this in mind to avoid overtraining and overuse injuries. Remember, more is not better…better is better.

4) Don’t Try To Get Too Creative Just For The Sake Of Novelty

Bruce Lee said,

“I fear not the man who practiced 10,000 kicks once, but I fear the man who has practiced one kick 10,000 times.”

Too much variety for the sake of novelty can limit your ability to progress, especially when it comes to shoulder training.

In general, the basic variations of shoulder movements are presses, lateral raises, extension-based movements (face pulls, reverse flyes, etc.), and global stability movements (farmer carries, planks, bird dogs, etc.).

My suggestion would be to find your preferred variations of those movements and perfect, fine tune, overload, and progress them. Yes, change it up every once in a while, but don’t swap out a solid landmine press for a banded, blood flow restricted, single-arm kettlebell press while standing on a BOSU over a pool of sharks with laser beams attached to their heads.

Stay tuned for Part II tomorrow where I offer four more of my top shoulder training tips.

About the Author

Nicholas M. Licameli

Doctor of Physical Therapy / Pro Natural Bodybuilder

Youtube: HERE

Instagram: HERE

Facebook: HERE

Every single thing he does, Nick believes in giving himself to others in an attempt to make the world a happier, healthier, and more loving place. He wants to give people the power to change their lives. Bodybuilding and physical therapy serve as ways to carry out that cause. Nick graduated summa cum laude from Ramapo College of New Jersey with his bachelor’s degree in biology, furthered his education by completing his doctoral degree in physical therapy from Rutgers School of Biomedical and Health Sciences (previously the University of Medicine and Dentistry of New Jersey) at the age of 24, and has earned professional status in natural bodybuilding. His knowledge of sport and exercise biomechanics, movement quality, and the practical application of research combined with personal experience in bodybuilding and nutrition allows him to help people in truly unique ways. Love. Passion. Respect. Humility.   Never an expert. Always a student. Love your journey.

CategoriesProgram Design

Training Over 40 Doesn’t Mean Your Life Is Over

My name is Tony Gentilcore and I am over 40 years old.

41 to be exact.

Old enough to remember when He-Man ruled Saturday morning cartoons, Back to the Future was released in theaters, and when shows like Knight Rider and Air Wolf were network tv staples.1

Too, I’m also the same age now that, in some demented version of paying it forward, I feel I’m obligated to tell every 25 year old I pass at the squat the following words of wisdom I used to receive ad nauseam when I was their age….

“You wait till you’re my age, kid.  You won’t be training like that.”

Copyright: bezikus / 123RF Stock Photo


Needless to say, I think that statement is peppered with a degree of malarkey 2

I know when I used to hear it my eyes would roll so hard to the back of my head I’d look like Bran Stark/the Three-Eyed Crow.

Pfffffft, whatever grandpa,” I’d think to myself. “I’m still going to be getting after it well past the age of 40. I’m not going to use age as an excuse to take it easy.

Well, now that I am “of age”…I can say two things with confidence:

  1. I’ve never uttered the “wait till your my age” line to anyone, ever.
  2. There is a bit of truth to it. Training, for most guys, most of time, will require a degree of tinkering once the big FOUR-O hits.
  3. Given all the 80’s-90’s remakes in Hollywood of late, when the hell is Air Wolf going to get some love?

You’re 40, Not Dead

My friend and colleague, Bryan Krahn, sums it up nicely:

“Few things are as divorced from reality as your typical “over 40” fitness article.

It shouldn’t come as a surprise, as their respective authors are typically 25 year-olds with social media profiles filled with self-serving selfies yet very few actual mid-life clients.

What really irks me though is the whole “one size fits all” approach.

Certainly there are a few universal truths that apply to most every 40-something fit person (or wanna-be fit person).

Age requires more attention be paid to cardiovascular health, lipids, and joint mobility, all while keeping both day-to-day and overall recovery in check.”

While there are exceptions to the rule, in my experience, most articles or training programs geared to the 40+ lifter can be summarized as follows:

Knee pain? No squatting, lunging, running, walking, or breathing for 4 to 317 weeks.

Low back pain?  No deadlifting whatsoever. And obviously…creatine, BCAA’s, Jack3D, and a Starbucks Grande mixed in apple cider vinegar.

Shoulder pain?  Surgery…there’s no other way.

In a nutshell, you’re relegated to a program filled with nothing but cable pull-throughs, hip flexor stretches, and shoulder external rotation drills.

Basically, it’s corrective exercise hell.

To which I say:

via GIPHY

Make no mistake: the various nuances that come into play when discussing the over 40 lifter – career, kids, prostate exams – do require our consideration and attention when designing a competent, well-thought out training program.

However, lets not toss in the towel and start the countdown to Hospice Care just yet.

Frequency of Workouts May Trump Length

In my twenties and early 30’s I used to pride myself on the length of my workouts.

2-2.5 hour training sessions were not outside the norm.

Then again, back then, my life revolved around reading Vonnegut novels and watching Alias re-runs. I had nothing but time to workout.

And, as you can probably surmise, I was a major hit with the ladies.

Today the idea of workouts running that long make me cringe. In fact whenever I hear about anyone bragging about a workout that rivals the running time of Titanic my inner “Sweet Brown” can’t help but take over:

Ain’t nobody got time for that!

Once family, work, and never-ending extra-curricular activities for the kiddos start to enter the equation, having 60-90 minutes available to squeeze in a training session is a rare commodity.

Vegas has better odds of you spotting a unicorn

To that end, I’ve found it behooves many trainees (with a life) to make the switch to shorter, more frequent training sessions – 30-45 minutes – throughout the week in lieu of marathon sessions.

While not always the case, it tends to be more palatable to tell someone to squeeze in a “quickie” – maybe a “meathead” session where they get an arm pump – than it is to force-feed a workout that takes 90 minutes to complete.

What’s more, and from what has been my experience, those quickie 30 or so minute sessions tend to be money workouts.

Meaning, people will work hard. And, I’d rather someone work hard for 30 minutes, 4-5 times per week than to half-ass 2-3 90 minute sessions.

Flirt With Performance, Don’t Have a Relationship With It

Forgive the potty mouth, but this is probably the one thing that will mind-fuck a lot of people.

I’ve always championed the notion that having a performance-based goal is a game changer for most trainees, as it provides purpose and intent with training.

It prevents incessant meandering around the weight-room, which is always a progress killer.

That being said, I came across this Tweet from strength coach Jim Laird the other day that really hammers home a key point:

You should train for performance. Just not year round.

Case in point, I finally hit a 600 lb deadlift just before my 41st Birthday last month.

NOTE: This may or not be the 512th time I’ve posted this video.


While this had been a long-time goal of mine I’d be remiss not to note that it came with its parade of setbacks.

I’d go very long stretches hitting my deadlift pretty hard. And, inevitably, my back would be like “Um, fuck you, Tony.”

It wasn’t until I took a step back and realized it would help to intermittently pump the brakes, not to mention take breaks, specifically, from training for this one goal that I really started to make headway.

(In no small part this revolutionary breakthrough came as a result of hiring another coach to write my programs.)3

You Don’t Want To Hear It, But Mobility Matters

Nobody wants to do their mobility work.

I’d soon rather wash my face with broken glass than do it myself.

But I do it anyways.

The key, I found, is to attack it in one of two ways:

1. Understand that the quickest way to guarantee your clients (probably) won’t do it is to include a warm-up at the start of a training session that A) includes a list of 20 exercises and B) takes far too long to complete.

2. Instead, either include more “hybrid” based mobility drills that combine several exercises into one which will help expedite the process:

Pigeon to Half-Kneeling


Seated 90/90 Flow Drill


Yoga Push-Up Complex


OR

Include more “fillers” – low grade mobility/activation drills – INTO the program itself.

As an example:

A1. Trap Bar Deadlift 3×5
A2. Rocked Back Adductor Stretch w/ Extension-Rotation 3×6/side


Or maybe:

A1. Pecification of Pecs (Bench Press) 3×5
A2. Bench T-Spine Mobilization 3×8


The “filler” approach is great because it still sprinkles in exercises that target problematic areas – glute activation, T-spine mobility, hip flexors that need a crowbar to release – yet it doesn’t feel too “correctivey.”

It’s the perfect way to trick people into doing the stuff they need to be doing, but otherwise wouldn’t.

Now if only there were a program that was designed for the 40+ lifter in mind…..

Strong MOFo Program

Bryan Krahn and I are looking for highly committed, experiences lifters to beta-test our Strong MOFo program for four months.


The Deets

The program will be hosted on my CORE Online app, which in an online service via my website. This offers a few benefits:

  • This will allow you to follow the program on your phone (but relax, you’ll also have the option to print it out too, you geezer).
  • You’ll have immediate access to video tutorials and explanations of all exercises.
  • You’ll also have access to a community forum to converse with other beta testers as well as to ask questions to Bryan and myself.
  • Selfishly, it’s more convenient for us to go this route rather than deal with a plethora of Excel spreadsheets and emails. This way, there’s a “home-base” for everything.

Cost: We’re offering this beta program at a price of $249. This will cover four months of programming (and is less than what Bryan and I charge for one month of distance coaching).

Start Date: The start date is Monday, December 18th.

Requirements

  • You have to be a minimum of 35 years old.
  • You have to have experience lifting weights. If you’re unable to deadlift, then, um, this may not be the program for you.
  • You have to have access to a well-equipped commercial or home gym. The last thing we want to be doing is tweaking someone’s program who only has access to dumbbells up to 40 lbs, a treadmill, and a rubber ducky.
  • You have to be relatively injury-free. Aches and pains are one thing. A frozen shoulder or six-months post back surgery is another

—> SIGN UP FOR STRONG MOFO <—

Categoriespersonal training Program Design Strength Training Uncategorized

10 Steps To Dominate Your Deadlift Technique

The better title of this post should be: “10 Steps To Ensure You Won’t Destroy the Back Of Your Pants (With Your Spine) When You Deadlift.”

The deadlift, as with any compound movement, requires precision and attention to detail in order to 1) Perform it well 2) Not get hurt and 3) To have any shot at lifting appreciable weight. There are many moving parts to the lift, however, to speak candidly, of the “Big 3,” the case could be made it’s the least technical.4

This is not to insinuate it’s altogether easy or simple. Simple in concept? Yes. I mean, picking a barbell up off the ground and locking it out isn’t rocket science. Simple in execution? Well, that’s where things get a bit more complicated.

Below are some overarching (<—Ha, pun intended) “themes” with regards to setup and execution of the deadlift I feel are important across the board.

Copyright: spotpoint74 / 123RF Stock Photo


1) First, Lets Clear the Air

The internet likes to argue. It’ll argue whether or not the dress was gold or blue (remember that stupid debacle from a few years ago?), DC vs. Marvel, high-bar vs. low bar squats, and/or who’s the most bad-ass He-Man character not named He-Man.

Cyclone anyone?

More cogent to the topic at hand, people will also argue on the internet that anyone who SUMO deadlifts is cheating.

The prevailing, uppity, train of thought is that, because one is closer to the ground when performing a SUMO deadlift (compared to a conventional stance) it’s easier and thus it’s cheating…and somehow less relevant of a lift.

To which I say: bull to the shit.

Unless your name is Professor Dumbledore and can somehow make someone’s femur change length when they switch from a conventional stance to SUMO stance…the whole “it’s less ROM, it’s easier” argument is a moot one.

The moment arm (femur) doesn’t miraculously change from conventional to SUMO stance.

It’s just…..different.

What you lose in the sagittal plane during conventional, you gain in frontal plane when performing SUMO style deadlifts.

Generally speaking (due to the moment arms and levers at play):

Conventional Pulls: easier/faster off the ground, harder at lockout.

SUMO Pulls: harder/slower off the ground, all out sexification at lockout.

Stephanie Cohen hit a 525 lbs deadlift at a bodyweight of 123 lbs recently. It was done SUMO.


True to form, (some of) the internet projectile vomited all over itself calling her out, saying it didn’t count, and that it’s not real powerlifting (I guess because she was using straps?).

1. Hahahahaha. I have to assume most commenters calling her out couldn’t sniff her warm-up weight.

2. Um, the lift didn’t take place at a powerlifting meet. So thanks for making the stupidest argument you could possibly make.

[For the record: most powerlifters I know are some of the most respectful, courteous, and supportive people I know. They would never turn their nose to such an impressive lift.]

Step one to successful deadlift technique is to figure out what style feels best FOR YOU.

What feels better? What feels more powerful and stable? Which one places you in the best position possible?

Some people will do well with conventional style, while others may prefer SUMO. Both are fine.

Relax internet.

2) Get Your Air, Set Your Ribcage

Gone are the days of cuing people to excessively arch their backs. Gross, repetitive extension can have just as many negative ramifications on spine health as gross, repetitive flexion.

Ideally we want to shoot for more of a canister (or pillar) position where the pelvis and ribcage are “stacked” on top of one another. Most specifically, the pelvic floor and diaphragm are stacked on top of each other.

I like to cue people to get a big gulp of air and aim for 3D expansion (breathing into their stomach, sides, and back) before bending over to grab the bar.

Admittedly it takes a bit of practice but makes a profound difference in how the lift feels.

3) Chest Up, Show Me Your Logo

This is a cue I stole from Eric Cressey and a staple at Cressey Sports Performance. Generally speaking I like to see the following on the deadlift setup:

  • Shoulders above chest
  • Chest above hips
  • Hips above knees.

This isn’t the case for everyone, mind you, but a good rule of thumb to follow. This will ensure most people stay in a “neutral” position and offset the bulk of shear forces on the spine.

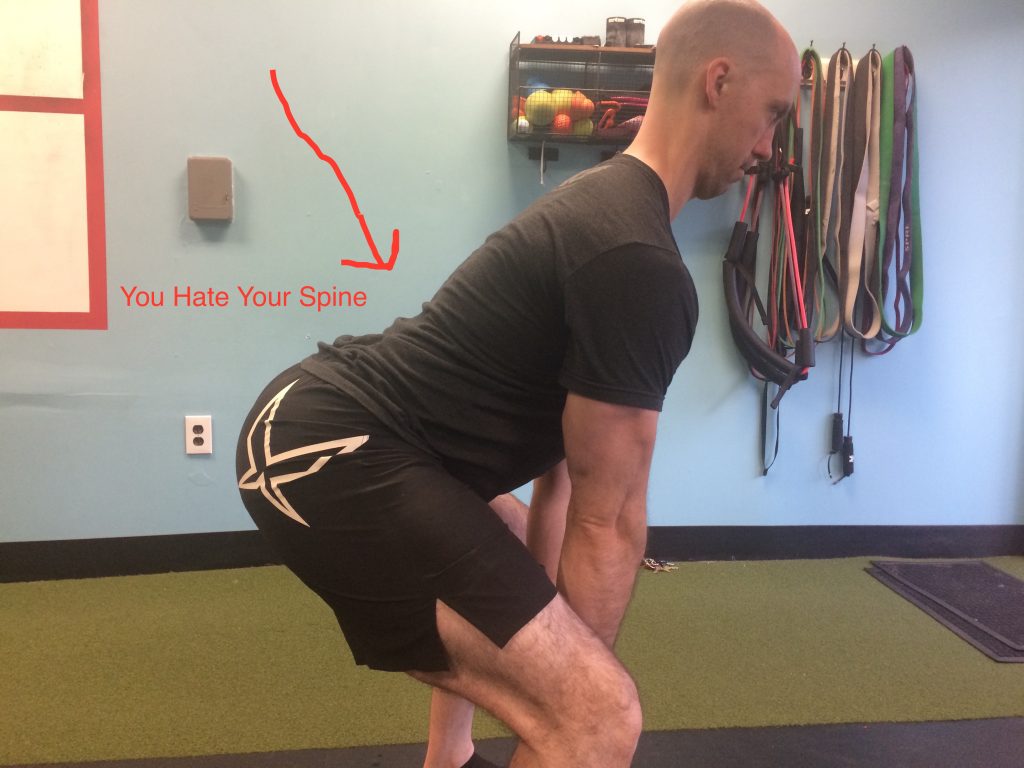
I’ll often stand in front of an individual and just say “show me your logo the entire time” as he or she descends down to the bar.

The end result should look like the picture above.

If not, this happens:

4) Armpits Over Barbell, Max Hamstring Tension

Regardless of style of pull, the goal with one’s set up should be armpits over the bar with maximal hamstring tension.

This will help ensure 1) hips are as close to the bar as possible (without making it too squatting. In that case the hips are actually further away….laterally) and 2) people will be less likely to pull via the lower back.


5) Turn Lats On

The lats are a big player with regards to deadlift technique. You want to make sure they’re “set” to help with upper back stiffness during the lift itself.

The best cue I’ve used to help with this is to tell someone to “squeeze the oranges in your armpits.”

Works like charm.

6) Pull Slack Out of the Bar or Bend the Bar

7) Push Away

The deadlift is just as much of a PUSHING exercise as it is pulling. You want to generate force into the ground and drive AWAY, thrusting your hips forward as you stand up.

People who solely focus on pulling the weight up – via their back – are often the ones that complain about it low back pain the most.

8) Finish at Top or Stand Tall

A common mistake I see some trainees make is either not getting their hip through at the top (AKA: the sexy stripper butt) or going too far.

“Hump the bar” at the top. Finish. Stand tall. All are cues I’ve used that work and get people to finish with their glutes.

9) Don’t Let Go

On the descent, don’t let go.

Stay engaged.

It’s here where I’ll often see people round their shoulders or lose their upper back position. And it makes me sad.

Keep your abdominals engaged (and keep squeezing that orange), even on the way down.

NOTE: Disregard for max effort pulls….;o)

10) Reset or Peel the Shoulders

There’s a time and place for tap-n-go deadlifts, but I have to admit I rarely use them. Instead I’ll tell people to “reset” between each rep – albeit it’s brief – to gulp their air, “peel their shoulders back,” and to make sure they’re in a good position for the next rep.

The video below is of me demonstrating this with a dumbbell, but you should still get the gist:


These Aren’t Set in Stone

None of what I said above is concrete.5 There will always be some slight deviations based off someone’s anatomy, ability level, and goal(s).

However, I have found that for most people, most of the time, they all work really well to get people’s technique in check.

Happy Thanksgiving everyone!

CategoriesProgram Design Strength Training

3 Unique Drills to Help You Conquer Your First Pull-up and Then Some

When you see the name Elon Musk it’s a safe bet adjectives like “smart,” “intelligent,” and “revolutionary” come to mind. Jason Bourne? “Badass,” or maybe “guy I wouldn’t want to pick a fight with.”

Meghan Callaway?

Well, if you ask me, when I see the name Meghan Callaway I think “amazing coach and the World’s #1 ranked pull-up connoisseur.”

Copyright: korarkar / 123RF Stock Photo


To put it lightly: Meghan likes pull-ups.

She likes them a lot.

via GIPHY


And, to speak truthfully, there aren’t many coaches I’d tip the hat to when it comes to pull-up mastery and programming than Meghan. She consistently impresses me with her content and knowledge on the topic, and as it happens she just released her latest resource, The Ultimate Pull-Up Program, today.

If you struggle with the pull-up and/or are looking for a little direction on how to become more proficient with them (not to mention learning a TON of awesome variations) than I can’t recommend this resource enough. It’s on sale this week at $50 off the regular price for this week only.

3 Unique Drills to Help You Conquer Your First Pullup

Performing your first pull-up is a unique experience.

In fact, when many people conquer their first pull-up and get their chin over the bar (of course without straining their neck to do so), they often experience far greater feelings of empowerment, accomplishment, and downright badassery than when they hit PR’s on max deadlifts, squats, and other heavy meat and potatoes exercises.

Meghan showing off.

Maybe I’m a little biased, but with pull-ups it is just different.

When it comes to tackling pull-ups, many people quit long before they’ve achieved their first rep. Others hit their first rep but are never able to string together multiple reps and become frustrated.

Let me tell you, it does not have to be this way.

In most cases, people fail to reach their pull-up goals not because they are weak, but because they are not training for the exercise the right way.

Many people possess enough upper body strength that they should be able to do pull-ups, but they often suffer from technical deficiencies. Other people know what to do but they do not possess the requisite levels of lumbo-pelvic stability or the ability to control the movement of their shoulder blades.

So essentially, instead of moving a stable object to and from the bar in a shorter and more efficient straight line, they are forced to move a heavy, floppy and limp body to and from the bar and in a longer and inefficient arc. Kind of like Erick here. Tony likes cats so I know he understands.

In this article I will provide some of my favorite exercises that address various areas that are holding many people back from performing their first pull-up ever, or from performing multiple reps and feeling like a total badass, or perhaps Wonder Woman.

Without further ado, here are some of my go-to exercises for conquering the pull-up.

1) Scapula Pull-Ups

If you cannot hang from the bar or control the movement of your shoulder blades, you will not be able to perform a pull-up.

This exercise will help lead you to your first pull-up as it develops grip strength, scapular and shoulder controlled mobility, and lumbo-pelvic stability.

While this is a pull-up regression, it is a definite stepping stone towards doing your first pull-up. If you are performing this exercise correctly, the muscles in your mid and upper back, not your arms, should be doing the majority of the work.


Key Coaching Cues:

  • Grab onto the bar so your palms are facing away from you and are slightly greater than shoulder width apart.


  • Before you perform your first rep, make your body as stable as possible by bracing your core, tucking your ribs towards your hips (closing the space in your midsection), squeezing your glutes, straightening your knees/flexing your quads and hamstrings, and dorsiflexing your feet. This will stabilize your pelvis, spine, and legs, and will prevent your body from swinging.


  • In terms of the pull-up, without bending your elbows or initiating the movement with your arms, use the muscles in your shoulder blade area and draw your shoulder blades together and down (bring each shoulder blade in towards your spine and down towards your opposite hip), and lift your body a few inches. Pause in the top position, really contract these muscles, and lower yourself to the starting position in a controlled manner. Fully extend, but do not hyperextend your elbows.


  • On the lowering portion of this movement, your shoulder blades will perform the reverse movements as they did on the way up.


  • Do not allow your lower back to hyperextend or ribcage to flare. Keep your chin tucked and neck in a neutral position.


  • As for your breathing, exhale just after you have initiated the scapular movement and have drawn your shoulder blades together and down; inhale and “reset” as you are descending, or do a full reset when you are in the bottom position.

2) Pull-Up Regression: Eccentric Pull-Ups (from a bench)

Many people falsely assume that when they have accomplished the awesome task of “pulling” their body to the bar their job is done, and they allow their body to free-fall to the bottom position with reckless abandon.

This exercise will help you improve your pull-up technique (lowering component), and develops upper body strength, grip strength, scapular and shoulder controlled mobility, and lumbo-pelvic stability.

Owning the ability to lower your body with control and ease will make your transition into the next rep much more seamless, and will thus improve your ability to perform multiple reps.


Key Coaching Cues:

  • Grab onto the bar so your palms are facing away from you and are slightly greater than shoulder width apart.


  • Stand on a bench or box so your chin is already at (or close to) the height of the bar. Or if you are already able to, jump from the floor and pull yourself up the rest of the way by using the muscles in your mid and upper back and drawing your shoulder blades together and down (bring each shoulder blade in towards your spine and down towards your opposite hip). Do not initiate the movement with your arms.


  • When your reach the top position, it is important that you stabilize your body as quickly as possible as this will prevent your body from swinging back and forth and will allow you to focus on the lowering portion of the exercise. You will achieve this full body stability by taking a deep breath in through your nose (360 degrees of air around your spine), bracing your core, tucking your ribs towards your hips, squeezing your glutes, straightening your knees/flexing your quads and hamstrings, and dorsiflexing your feet.


  • Repeat the breathing, bracing, and rib tuck that I described above; now perform the eccentric movement and slowly lower yourself down to the bottom position in 3-5 seconds. Use the muscles in your mid and upper back, anterior core, glutes, and legs to control the movement. Your shoulder blades should move in a controlled manner. Do not allow your lower back to hyperextend or ribcage to flare. Keep your chin tucked and neck in a neutral position.


  • Let me reiterate that this exercise is not for the arms. The muscles in your mid and upper back should be performing the vast majority of the work, and the muscles of your anterior core, glutes and legs will help keep your body in a stable position.

3) Dead Bugs With Double Kettlebell Resistance

A huge number of people fail to excel at the pull-up because they treat it like an upper body exercise when in fact it is a full body exercise that demands a lot of lumbo-pelvic stability.

This bang for your buck dead bug variation accomplishes just that, and helps you develop the necessary level of tension that is requisite to optimal pull-up performance. This exercise also develops scapular and shoulder controlled mobility.


Key Coaching Tips: 

  • Lie on the floor. Grab onto two kettlebells or dumbbells, and extend your arms so they are in a vertical position, and so your hands are above your chest.


  • Lift up your legs so they are in a vertical position, straighten your knees, and point your feet toward you (dorsiflex). Keep your chin tucked and neck in a neutral position.


  • Before you go, take a deep breath in through your nose (360 degrees of air around your spine), and tuck your ribs towards your hips. Now forcefully exhale through your teeth, contract your anterior core muscles as hard as you can (10), and slowly lower the kettlebells and one leg towards the floor and to a range where you can maintain proper form. Return to the starting position. Reset and repeat with the opposite leg.


  • Make sure you don’t allow your ribcage to flare or lower back to hyperextend.


  • Keep your legs relaxed so they do not dominate.


  • Make sure that your knee remains in a fixed position and that the movement occurs from your hip.


  • One key I like to look for is that if your shirt is wrinkled it likely means your ribs are in the right position. If your shirt suddenly becomes smooth, you have likely disengaged the muscles in your anterior core and have flared your ribcage. This defeats the purpose of the exercise.

Now that I have given you some extremely useful exercises that will help you accomplish your first pull-up ever, or several consecutive reps, it’s time to let the cat out of the bag and get started on achieving this amazing goal. Apologies for the cat references, but my cat is snoring while I’m trying to write this.

The Ultimate Pull-Up Program

Whether you’re male, female, Klingon, whatever….getter better at pull-ups is never a bad option and will almost always carryover to other endeavors you pursue inside the weight room (and out).

  • Improved ability to squat and deadlift a metric shit-ton of weight? Check.
  • Improved body composition? Check.
  • Harder to kill as a whole, especially during the impending zombie apocalypse? Check.

This is undoubtedly one of the best resources on the topic I have ever come across. If you’re looking to up your pull-up game you’d be hard pressed to find a more thorough resource.

—> Save Yourself $50 and Get to Work <—-

CategoriesAssessment coaching Program Design speed training

Bottoms-Up Squat Patterning Is the Jam

I was livid.

Not long ago I had a female client come in for an initial assessment and she divulged to me the previous coach she had worked with, in not so many words, inferred she was “dysfunctional” and that she’d likely never be able to perform a decent squat.6

What kind of BS is that? Within ten minutes of the first session you tell someone how much of a walking ball of fail they are? Awesome business model, dude.

I took it as my mission to use that initial session with her and demonstrate to her success; to prove to her she could squat. Maybe not with a barbell on her back, ass to grass, but I wanted to show her that 1) not many people are able to do that in the first place and 2) there are many different iterations of the squat and it was my job to showcase what her best options were given her ability level, injury history, and goal(s).

Screw that coach.7

Copyright: fxquadro / 123RF Stock Photo


The interaction above took place several months ago.

And, not to be too braggadocious, I was able to successfully get her to “squat” within that first session after taking her through a thorough screen and using more of a bottoms-up approach to pattern her squat.8

It all came down to getting her nervous system comfortable in the bottom position and to own it.

Cliff Notes Version:

  • Perform a hip scour to ascertain general anatomy limitations
  • Assess both passive AND active squat pattern(s).
  • See if active “matches” passive ROM (Range of Motion).
    • If so, do they demonstrate enough motor control to, well, control that ROM?
    • If not, is it a mobility or stability issue? I find it’s rarely the former. However mobility tends to be everyone’s “go to” scapegoat.
  • Implement appropriate patterning drills that match the trainee’s ability level and don’t bore them to tears with too many corrective drills that don’t accomplish much of anything.

Non-Cliff Notes Version:

Read THIS —-> Building the Squat From the Bottom

Bottoms-Up Is the Jam

Using the BOTTOMS-UP approach to introduce specific movements – in this case, the squat – is a foolproof way help build your client’s confidence in the movement and to start to nudge a training effect.

NOTE: a baby dolphin dies every time you default to 30 minutes of “ankle mobilization” drills.

This past weekend I was fortunate enough to attend the Clinical Athlete Workshop in Springfield, MA with Dr. Quinn Henoch, Dr. Zak Gabor, and Matthew Ibrahim.

Quinn brought to light two more drills I’m immediately going to add to my arsenal and I wanted to share them with you here.

Check these bad boys out.

Quadruped Rockback Squat Patterning


Tall Kneeling Squat Patterning


Pretty cool, right?

Play around with them yourself. Use them with your clients. Demonstrate to your clients that they can do stuff, and that oftentimes it’s just a matter of breaking down movements into more digestible parts to show them success.

Go to work my Padwans.

CategoriesProgram Design Strength Training

The Deload Week: Yes, No, Maybe So?

Outside of several other health/fitness arguments – steady state cardio vs. HIIT, low bar vs. high bar squats, weight belt vs. not wearing weight belt, Paleo vs. eating like a normal human being with a life, blue yoga pants vs. black – there aren’t many topics which rev people up or bunch panties more so than the deload week.

Some people believe they’re crucial for long-term progress, while others feel they’re a complete waste of time?

Who’s right?9

Copyright: jtrillol / 123RF Stock Photo

What Is This “Deload” You Speak Of?

For the uninitiated, in simplest terms, the deload week or “deload” is a purposeful, structured, and oftentimes planned reduction in training volume or intensity (or both) with the intention of improving performance, recovery, and/or injury prevention.

The concept has its roots via the Fitness-Fatigue Model (or, Two-Factor Theory Model) popularized by I have no idea (probably some Russian dude, they’re smart) and is a tool used to help optimize an athlete’s preparedness for training, and subsequently effect their ability to “peak” or perform at a high-level in his or her’s respective sport.

Photo Credit: BarbellShrugged.com

Feel free to peruse Wikipedia – or any number of my friend’s and colleague’s websites – for a more thorough, eloquent, and potty-mouth free explanation.

However, in even more simpler terms the Fitness-Fatigue Model can be explained as follows: you lift heavy shit in the weight room and you either build “fitness” or accumulate “fatigue.”10

Broadly speaking deload weeks are widely accepted as most “relevant” for a few demographics:

  • Professional or elite-level athletes (<— probably not you).
  • Advanced or “strong as shit” lifters (<— probably not you).
  • Jason Bourne (<— probably not you. But if so, can we hang out?).
  • Those who are often injured (<— might be you).

If you’re a competitive athlete with an in and off-season and your livelihood relies on your ability to perform at a high level or you’re someone who’s strong AF, it’s likely you’ll benefit from a healthy diet of deload weeks.

On the other hand, if you’re Dale from accounting and you spent two weeks on 5/3/1 or, I don’t know, took a CrossFit class two days in a row, relax, you don’t need a deload week.

I tend to agree with strength coach Mike Ranfone:

“Deloads are like cheat meals everyone wants one but not many have earned one.”

In reality, though, the real best answer as to whether or not a deload is warranted is: it depends.

I mean, if you want to keep things as succinct as possible look no further than a brilliant quote I stole from Molly Galbraith (courtesy of Greg Nuckols):

If you feel good and are making progress, do more. If you feel bad and aren’t making progress, do less.”

via GIPHY

For Shits and Gigs Lets Dig a Little Deeper

Jordan Syatt has written in the past regarding the idea of the traditional deload and why he feels it’s a bit misguided to assume everyone needs to follow it.

In short, a traditional deload encompasses a full-week of pre-planned reduction in training preceded by three weeks of intense training. The deload week usually involves using submaximal loads (40-60%) and can also include nothing more than dedicated mobility/activation work, bodyweight drills, or, for those inclined to do so, Netflix and Chilling.11

An important distinction Jordan makes is that the traditional deload (three weeks “on,” one week “off”) doesn’t always fly or serve people’s best interests:

“Not only does it neglect individual needs and preferences, it fails to account for inevitable variances in how you feel on a day-to-day basis.

Cybernetic periodization, a term coined by the late Mel Siff, essentially refers to accounting for and modifying your program based on your subjective perception of how the weights feel on that specific day.

This skill, learning how to listen to your body and understand what it needs based on how you feel, is arguably the single most important skill to master for both coaches and lifters a like.

Unfortunately, the traditional deload completely neglects cybernetic periodization.”

Often times this approach can derail one’s training mojo. Just when someone is starting to make decent progress in the gym and starting to move some appreciable weight, and despite feeling great on any particular day and ready to get after it, they tap the brakes too soon and toss in a deload week.

You know, because that’s what’s supposed to be done.

NOTE: Admittedly, from a programming perspective, regardless of most variables, it’s not uncommon for me to toss in a “fake” deload week every fourth week. Part of it is because of how I prefer to write the bulk of my programs.

Each one is written in four-week blocks (in terms of overall training volume):

  • Week 1 = High
  • Week 2 = Medium
  • Week 3 = Hahaha, You’re Going To Hate Life
  • Week 4 = Low

And then the following week after that a “new” program starts and the intention is the client/athlete feels “fresh” to handle the additional volume and/or handle the novelty of any new exercises that may be thrown their way.12

Of course, this is not set in stone. Someone who’s training 2-3x per week as it is probably doesn’t need a dedicated deload week every fourth week. In this case it may be extended to every six to eight weeks, if not more. It depends….;o)

In addition, from a business and gym owner standpoint, the Week 4 “fake deload” subconsciously primes people into preparing for the next program.

I.e., they pay.

All That Said

If we’re honest: most people don’t work hard enough to warrant a deload.

Some people will use any excuse – they had one hard workout, they strained a little bit and their neck vein appeared, it’s Wednesday, anything – to not work hard.

Most general population clients don’t require structured deloads because the clusterfuckedness of “life” (work, school, family obligations, vacation) feeds them more than enough.

Strength coach and resident industry savage, Pat Davidson, says it best:

“Life will sprinkle in more than enough deloads. I’ve always found too many people take a deload right when they start making progress. They get the slightest bit uncomfortable, or they think they need to be on some three week on, one week off deal…and in pops a deload that’s more a derail of progress.”

As an industry we jest that “cardio will steal your gainz.” I’d posit that “you’re lack of making gainz (via incessant training deloads) is stealing your gainz.”

When To Deload

There’s no one-size-fits-all answer here.

However my sentiments tend to mirror that of many other coaches:

Even with my most consistent and dedicated clients they’ll still miss some time every month due to work or vacation or any other legitimate reason (Laser Tag Tournament?).

If it’s been 6-8 weeks of heavy training, I’ll incorporate a low(er) volume/intensity week and we’ll turn the page and get back after it the following week.

Heck, sometimes a client will walk in on a random day and I know he or she is not feeling it. When that happens I’ll gauge biofeedback and ask questions about sleep, how they feel, etc and adjust accordingly.

I’ll often give them what I like to call a Bloop, Bloop, Bloop workout.

https://www.youtube.com/watch?v=G4_nBSQ68A8


Types of Deloads

Again there’s no one-size-fits-all approach here, but below are some of my favorite options:

I find the term overtraining is drastically overused. Most trainees don’t come close to overtraining, but if they do volume is usually the culprit. To that end my “go to” deload strategy is a simple one.

1. Keep intensity high (as a % of 1RM) and cut training volume by 50%, sometimes as high as 2/3rds.

2. Another approach comes via strength coach Chris Butler: Deload the main lifts to 40-60% of training max (5/3/1).

3. Perform bodyweight only circuits for a week. Use the week as an opportunity to re-charge and prioritize mobility/activations drills like this:


4. Toss in a training curveball. Change up your training entirely. Instead of focusing on the “Big 3,” maybe do a body-part split for a week. Mentally this is huge.

5. Along the same lines maybe a deload week is nothing more than omitting all axial loading exercises.

Give your joints (particularly your spine) a break.

6. Some coaches use the deload week as a “Test Week.”

Meaning, choose one lift per session and go to town. Hit a top set (or maybe a PR?), drop the mic, and peace out.

7. Movement Variability – incorporate movements you rarely perform.

Experiment.

Go outside and do some agility work (skipping, sprinting, etc).

Play around with some sled work KB swings.

Never done frog pumps and try to make people feel really uncomfortable watching you?

Do that. DO IT.

Like I said, there’s no right or wrong here. Have your own strategies to share? I’d love to hear about them.

Categoriescoaching Program Design Strength Training

3 Ways to Improve Your Deadlift Without Deadlifting

For the sake of brevity, this post assumes you can perform a deadlift – trap bar, straight bar, bag of groceries of the ground, person, whatever – without shitting your spine.

If you can’t, go seek out a reputable fitness professional – or Google it13 – to show you how.

Copyright: langstrup / 123RF Stock Photo

Much like if someone wants to get better at writing they should, you know, write, or if they want to get better at not getting laid, they should attend Star Trek conventions…if you want to get better at deadlifitng, you should deadlift.

The more you (purposely) practice something the better you’ll get at it. I understand it’s stating the obvious, but it can’t be repeated enough.

There are many moving parts to executing a pristine deadlift, however, and oftentimes it bodes in our favor to include exercises, drills, and/or movements that compliment the lift or, more germane to the conversation, address a technique flaw or general weakness.

Below are a handful of quick-n-dirty suggestions that may (or may not) apply to you and help increase your deadlift badassery.

1) Deadstart Squats


This is one of my favorite deadlift accessory movements for a few reasons:

  • When set up to match your hip position for the deadlift it offers a ton of carryover in terms of both mechanics and musculature targeted.
  • The deadlift is (mostly) a concentric movement. The Deadstart Squat, too, is (mostly) a concentric movement.
  • For people who struggle with keeping their chest up (preventing their upper back from rounding) during the deadlift, this will be a challenge. NOTE: I’d likely revert to a FRONT squat hold for those who really struggle with back position here. Front squat position is also a better option for those who lack the requisite shoulder mobility (external rotation) to perform well. Another great option is using the Safety-squat or Yoke bar.
  • Great option for training power/explosiveness.
  • Because I said so.

As far as sets/reps there are two approaches I like, both of which gravitate more towards the low(er) end of the spectrum.

One (3-5)

Here, reps will stay in the 3-5 (25ish total reps) range using 60-75% of 1RM. A 4-week macro-cycle may look something like this:

Week 1: 5×5 @ 65% 1RM, 90s rest

Week 2: 6×4 @ 70% 1RM, 90s rest

Week 3: 8×3 @ 75% 1RM, 90s rest

Week 4: 3×5 @ 60% 1RM, 90s rest

Idea is to stay tight throughout duration of set. You should always come to a complete stop on the pins, however you shouldn’t relax

Two (Singles)

I love this option as I feel it offers the most carryover to my deadlift.

Because I’m only performing one-rep, I can place a premium on getting as tight as humanly possible and being as explosive AF. In addition I can go a little heavier in weight here (70-85% of 1RM)

A 4-week macrocycle may look something like this:

Week 1: 12×1 @ 70% 1RM, 30s rest

Week 2: 10×1 @ 75% 1RM, 30s rest

Week 3: 8×1 @ 80% 1RM, 60s rest

Week 4: 6×1 @ 85% 1RM, 60s rest

2) RKC Plank

I don’t know about you, but this is what I look like whenever someone brags to me about how (s)he can hold a two-minute plank:

via GIPHY

You might as well be bragging to me about how you can point out the color red or, I don’t know, walk in a straight line.

That’s how many fucks I give about your fucking plank.

Besides, you know and I know if you’re holding a plank that long it (probably) looks like garbage.

NOTE: This is not to insinuate I’m against the plank or find zero value in it.

Au contraire.

Without going too far down the rabbit hole of spinal mechanics, prone (and side) planks (and how long someone can perform them) are a legitimate assessment tool and are staples in terms of low back rehab and performance.

Teaching the RKC Plank offers a quick primer on how to 1) perform the plank right and 2) allow people a window to appreciate what it really feels like to get and maintain full-body tension.


The RKC Plank is all about building context.

More specifically it’s about appreciating full-body tension. If someone can’t understand (or feel) what this means while lying on the floor…how in the hell are they going to understand it standing up while attempting to pick up a heavy object off the floor?

Trust me, when done right, 10s will feel like torture.

3) Straight-Arm Band Pulldowns


I stole this tip from Dr. John Rusin when I was giving his Functional Hypertrophy Training program a test-drive last year.

For the Record: it’s an awesome program.

The idea is pretty simple (and effective).

Prior to each set of deadlifts you perform a set of 5-10 repetitions of band pulldowns (holding each rep for a 3-5s count).14

This serves a few functions:

  • It allows the trainee to prime or feel his or her’s lats firing. Setting your lats (and subsequently posteriorly tilting your scapulae) as part of your DL set-up will help with leverages and moment arms getting you closer to the barbell. Greg Nuckols does a fantastic job at explaining things more thoroughly and nerdely HERE.
  • Offhandedly, it also helps with anterior core engagement, which in turn aids with rib position. Less rib flare = less lumbar extension = more stable position to lift a metric shit-ton of weight.

Closing Thoughts

None of the above are revolutionary ideas or are going to win be any fitness writing Pulitzers. However, they are exercises/drills I use myself (and with my own clients/athletes) and have found they provide a lot of benefit.

Give them a try yourself and let me know your thoughts/experiences.

CategoriesProgram Design Strength Training

How To Get Strong in 2-3 Days a Week

I have a 7-month old here at home and to say that my day-to-day routine – wake up, casual breakfast, peruse the internet, take a pic of my cat, do a little writing, go lift heavy things, go coach, come home, eat dinner, watch Forensic Files15, repeat – that I like(d) very much and grew accustomed to over the years has been interrupted would be an understatement.

Now my world revolves around diaper changes, eating & sleep schedules, and subconsciously rocking back and forth while standing in place (oddly, many times despite not holding a baby).

I’ve still made my training a priority, though.

xCopyright: improvisor / 123RF Stock Photo

Sure I may bitch and whine about having to be more on-point and expeditious with my training – gone are the two hour bro-sessions – and also be more steadfastly aware that my ability to recover has been compromised (again, gone are the two hour bro-sessions), but it’s all good.

In the grand scheme of things I have little to complain about.

Julian is growing, happy, healthy, and already has his sights on the 2040 Olympics.16

My kid’s cute and stuff and I’d love to talk about him more, but lets get back to topic of training.

The peeps over at BodyBuilding.com knew I had become a Dad recently and asked if I’d be willing to drum up a quick-n-dirty program not necessarily directed towards new parents per se, but more so for people who are busy and don’t have copious amounts of time to get their diesel on.

I was happy to oblige and this is what I came up with.

—> How To Get Strong In 2-3 Days a Week <—

CategoriesExercise Technique personal training Program Design

Breaking Down the Turkish Get-Up

For some people seeing the words “Turkish Get-Up” in the title of an article elicits a gag reflex or makes them want to jump into a live volcano.

Even I’ll be the first to admit it’s not the most exciting exercise to talk about.

However, that doesn’t mean it’s altogether invalid or that it doesn’t deserve our undivided attention. It’s an exercise that has carryover to many facets of fitness whether you’re a beginner or elite athlete.

Call me crazy, but I wholeheartedly believe it has a time and place in everyone’s programming.

In today’s guest post by Calgary based personal trainer, Linden Ellefson, he breaks down the movement into more manageable, bite-sized tidbits that’ll (hopefully) convince you to give it a try.

Enjoy.

Copyright: photominus / 123RF Stock Photo

Breaking Down the Turkish Get-Up

In fitness, there aren’t any magic exercises… any more than there magic fat loss pills or magic devices that will get you jacked injury-free.

You have to put in the work and train intelligently.

That said, every once in awhile the fitness fairy godmother graces us with an exercise that performs beyond expectations.

Case in point: The Turkish Get Up.

The Turkish Get Up:

* Improves hip and shoulder mobility
* Improves core strength
* Can be a great conditioning tool
* Makes your look great

But wait, there’s more (as they say on infomercials.)
This Turkish Get-Up can fix a lot of problems before they even come up.

An example is bulletproofing your shoulder to reduce the risk of injury. Even NFL teams are trading the bench press for the Turkish Get Up

Shoulder, chest, and arm development will skyrocket due to the amount of time you spend keeping the kettlebell above your head.  

It will iron out any left to right imbalances, meaning that your bench press and squat will likely improve because both are being trained equally.

Because your hip moves in multiple planes of movement, you train your hip more than up/down and forward/back like a squat or deadlift. This helps prevent injury.

Another benefit of this exercise is that since there are so many pieces to the exercise, you can work on improving each step to get better at the whole.

If you aren’t drooling with anticipation to master this exercise and be the envy of your entire gym, we can’t be friends.

You’re going to need:

Overhead Mobility: Can you put your arms overhead so that your biceps rub your ears without your lower back compensating?

Hip Hinge: Can you move your hips independently of your lower back? If so, then feel free to give this a shot!


Obligatory “If You’re Hurt, Then Read This” Warning: If you are currently going through an injury, then you need to see a physical therapist or doctor to get out of pain first. Do that, THEN you can learn your turkish get-ups.

Lets Get to the Breaking Down Part

While this exercise may look complicated when we look at the whole, there are actually five different parts you’re going to learn about. Here’s what they are.

  1. Drive to the elbow
  2. Press to the hand
  3. Bridge the hips
  4. Sweep the foot underneath
  5. Half kneeling position
  6. Stand Up

If you watch this video, you’ll know how technical this movement is.


This is best learned by having someone coach you through it. If you have access to a competent coach, be sure to learn this from them.

Note From TG: You can find competent coaches by perusing both the StrongFirst & RKC (Dragondoor.com) websites.

If you like learning by reading, read along!

A Couple Keys to Keep in Mind.

  1. There is a concept known as active and passive shoulder. When you have an active shoulder when someone pulls on your hand, your whole body would come with it. When you have a passive shoulder, it means that your shoulder moves independently of your body. We’re looking to keep your shoulder active the entire time.
  2. You’ll naturally press into the hand that’s holding the kettlebell, but I also want you to press into the ground with your bottom hand like you’re a wide receiver trying to stiff arm the safety as you run to the endzone for a touchdown. This will allow you to keep the shoulder in a safe position, not increasing your risk of shoulder pain.

Ready to learn? Let’s start then.

Drive to the Elbow

Assume you’re using your right hand. Start with the kettlebell directly above your elbow at a 90 degree angle. Your right knee is at a 90 degree angle with your foot on the ground. You will look like the following:


From here, drive the kettlebell across your body as if you’re going to punch someone. Push with your right leg as well.

As you drive the kettlebell in the air across your body make sure you push through your elbow into the ground. When you do this, your shoulder is less likely to get injured.

Part 1 done! At this position, you should feel your back turned on, your shoulders nice and warm, and core turned on too. Finish position below:

Press to Hand

With your right hand in the air, extend your left elbow and squeeze your tricep as you press up onto your hand, just like a tricep extension. When you finish you will look like the following:

Hip Bridge

This step can cause the most problems with trainees. Make sure your both the bell hand and the hand on the ground are stable. When here, drive your hips up in the air by aggressively squeezing your glutes.

Like a deadlift.

Or other fun activities 😉

The higher you can get your hips, the easier the next step will be.

This is the finish position:

Note From TG: As an alternative, and I hope Linden doesn’t mind me poking my opinion into the mix, I’m not married to trainees always performing the high bridge option. Both Gray Cook and Dr. Mark Cheng (the latter likely should get more credit) note that this is a “speed bump” or fork in the road to the get-up.

Meaning we have some options.

There’s the high-bridge option which is delectable option for those with optimal hip mobility and hip flexor length.

And then there’s the non high-bridge option where one more or less sweeps the leg – Johnny Lawrence style – and transitions to the half kneeling position from sitting.

Sweep the Leg

From here, you’re going to take your LEFT leg, and sweep it underneath your right leg and place your left knee directly underneath your hip. Your right arm will still be in the air, and your left hand directly below your right. You will look like the following picture:

Half Kneeling Position

This isn’t a movement, but the position you end in. You DON’T use your back to get to a kneeling position with the bell above your head. Instead, you’re going to brace your core, squeeze your butt and push your hips underneath your upper body as you press the weight up.

Your butt is fully engaged here as you keep the weight up. Keep your core tight as the tendency here will be to use your lower back to keep the shoulder stable.

The picture of the position is below.

Note From TG: Hey, it’s me again. This is yet another speed bump to the Get-Up. The most popular option to transition to the half-kneeling position is the “windshield wiper” the back leg and position into half-kneeling. 

This is fine.

However, it can oftentimes feel wonky to a lot of trainees. 

Another option I like is this:

Stand Up

This is essentially where we stand up from a lunge. With the weight over our head, we’ll stand up using the entirety of our legs. Stand up from there.

Finished position below:

With that, we’re going to reverse this whole process to lie back down.

If you understood all that and put it into practice, then you might have successfully completed your first turkish get-up.

OR you might have picked up a couple cues to clean up your relatively hideous one.

Where Should You Put It In Your Workout?

Without understanding how to put it into your workouts, it does you no good. There are three places where I would suggest using them.

  1. As a Warm-Up. Since this uses every muscle, depending on your workout for the day, you can emphasize different steps to get specific muscle groups prepped.
    Doing upper body? Spend 3 Seconds in each position until you Sweep the Leg. Got a killer deadlift workout coming? Spend 3 Seconds in each step from the hip bridge on.
  2. Use it as part of your strength programming. This can work as your second or third exercise in an upper body day or your full body workouts. Due to the length of this exercise, if you’re looking to get stronger, I would suggest sets of 3-5 reps with a heavy bell. Start with 35lb as a man, and 15-25lb as a woman.
  3. Use it for conditioning. With a lighter bell than you would use for your strength work, set a timer for 10-15 minutes and see how many good quality Get-ups you can do in the time frame. Alternate your hands every rep or after every second rep. Challenge yourself to be better next time.

If you want a good challenge, one of my new favourite conditioning combos is to use turkish get-ups and overhead walking lunges together. Check out the video below to see how to perform it.

If you follow this step by step guide, along with download the accompanying video, you’re going to master this exercise in no time. Use this exercise, abuse it, and thank the fitness fairy godmother for this one when you get a chance.

About the Author

Linden Ellefson,

Bkin, CPT

Linden is a Calgary, Alberta personal trainer and online coach. He loves good coffee, his Boston Terrier Taco, and a great workout. Most of all, he loves making his clients the strong, pain free, athletic beasts they were meant to be.

To find out more from Linden connect with him at www.lindenellefson.com Facebook (he’s the only Linden Ellefson), or on Instagram.

CategoriesExercise Technique Program Design Strength Training

9 Ways to Progress the Landmine Press

At the expense of coming across as the cantankerous, meanie-head strength coach for saying it, I’m going to go a head and say it anyways:

Exercise, for most people, most of the time, should be mind-numbingly monotonous.

Boring.

It should be boring.

Copyright: AlienCat / 123RF Stock Photo


I get it: boring isn’t sexy. And it sure as shit doesn’t help sell DVDs or keep people’s attention at 3 o’clock in the morning watching the latest infomercial on how performing 47 different bodyweight calisthenics while juggling two machetes – you know, to keep the body guessing – is the key to your ultimate body.

BONUS: If you order within 30 minutes you’ll also receive a month’s supply of grass-fed acai berries soaked in the belly-button sweat of a Centaur.

Because, why the fuck not? And, science.

People have been sold on the idea of incessant novelty and variety being the determining factor in getting results at the gym.

I disagree.

“The greatest gap in most people’s training isn’t lack of novelty, but rather lack of mastery.”

It’s telling, then, that many of the most popular training programs around and top coaches in the industry often predicate their roots and training around these basic movements: squat, hinge, push, pull, lunge, carry.17 That’s it.

That’s about as un-sexy as it gets.

However, what’s often lost in the age of exercise ADD is that those six categories alone can be broken down into hundreds of iterations when you factor in variances in grip used, stance used, sets/reps, load, tempo, speed of movement, not to mention barbell vs. dumbbell vs. kettlebell vs. bulldozer (depending on how ginormous of a human you are).

There’s more than enough variety to keep even the most strident exercise enthusiast satiated for a fitness lifetime.

To that end, I can see why some people aren’t as enamored with the Landmine Press as others.

Upon first glance it’s the vanilla ice-cream or NASCAR of the strength and conditioning world.

“Oh, you mean, like, you just press the barbell up and down like that? At an angle? Repeatedly?

Cool.”

via GIPHY

It’s nerds like me who can see the bigger picture and can appreciate how valuable of an exercise/drill the Landmine Press is.

I’ve waxed poetic enough in the past on the importance of overhead mobility and people’s lack of ability to do so in a safe and efficient manner.

You can check THIS article out; or THIS one; or THIS one; or not.

I’m cool either way.

In the end, it’s a fantastic, joint-friendly way to perform “fake” overhead pressing for those who lack the requisite range of motion to do so.

Pressing up and down, at an angle, indeed, while seemingly boring, helps keep people out of their “danger zone”…yet still glean an effective training effect that helps build strong shoulders, core, and general levels of badassery.

And as much of a champion of monotony as I am, I can appreciate that, after a certain amount of time, it’s often prudent to up the ante and provide more excitement and, GASP, variety to the movement.

Here Are Some of My Favorite Progressions/Regressions/Lateralizations (Whatever Word Piques Your Interest Most) of the Landmine Press

1) A Quick Primer on Set-Up and Execution


In general, much how I program my warm-ups, I prefer to progress my landmine variations from the ground to standing. When you adopt a tall kneeling or half-kneeling stance you take joints out of the equation (ankles, knees, hips, lumbar spine) and provide less of a window for people to default to aberrant movement patterns that can cause injury or exacerbate any painful symptoms they may have.

2) Tall Kneeling 1-Arm Landmine Press


I should note there are a handful of tenets with regards to technique across the board:

  1. Abs and glutes engaged. Both will nudge people into a little more posterior pelvic tilt and less likely to crank through their lumbar spine.
  2. If you are performing these 1-arm at a time I like to cue people to make a fist with their free hand to encourage more full-body tension.
  3. The shoulder of the working arm should not “dip” or round forward on the lowering phase.
  4. Keep the chin tucked.
  5. When appropriate, there should be a slight “reach” (or shrug) at the top to more fully engage the upper traps (which play a role in scapular upward rotation).
  6. Also when appropriate, play some Wu-Tang.

3) Half Kneeling 1-Arm Landmine Press


This is probably my favorite variation regardless. I like this one because we’re hitting a lot of problematic areas at once: shoulder health (upward rotation), rotary stability, hip flexor length, and glute activation (on kneeling side).

I prefer to coach people to dorsiflex the toes of the back foot (dig them into the ground), but in the end it comes down to whatever feels better for the person.

4) Half Kneeling Sideways Landmine Press


This is one I stole from my buddy Dean Somerset.

Here we’re training more in the frontal plane, which is important…cause we should get people out of the sagittal plane once they master it.

NOTE: you could also combine this one into a 1-arm clean-to-press hybrid movement if you wanted.

Honeybadger don’t give a shit.

5) Plain Ol’ Boring Standing 1-Arm Landmine Press


You can toss in a few curveballs here. You can adopt a staggered stance (one foot in front of the other), which makes things more challenging due to a narrower base of support.

You can also add bands into the mix.

6) Band Resisted Landmine Press


I like adding bands because it provides an added challenge to the anterior core musculature, in addition to forcing the lifter to control the eccentric portion of the lift more.

We can also make the case it “saves” the shoulders even more in that the band automatically decelerates the movement at the top.

Also, on a side note: When the hell are Jon Snow and Daenerys going to hook up on Game of Thrones?

7) Side to Side Landmine Press


This is a great option for when you want to be a little more aggressive with loading.

8) 2/1 Technique Landmine Press


The 2/1 technique is a concept I picked up from Christian Thibaudeau years ago, and something I’ve used in my own programming and that of my clients ever since.

We all know that we can handle more weight on the yielding (eccentric) portion of any lift compared to the overcoming (concentric).

The 2/1 technique takes this into account.

The idea is simple: Press up with both arms (preferably, in an explosive manner) and lower with one under control.

9) Deep Squat 1-Arm Landmine Press (<– Only For Those Who Want to Hate Life)


I hate this one so much. And by hate, I mean love.18

Assume a “deep” squat position and press away.

This can also be performed 1-arm at a time.19.

10) Z Landmine Press


I wasn’t sure where to place this one, so I guess I broke my “from the ground up” rule here.

Whatever, it’s my blog, I can do whatever I want.

Like, yell out “I’m Batman!” or post a picture of a unicorn shitting rainbows and cupcakes.

This one is a doozy and requires someone exhibits sufficient t-spine extension to perform well. Even though it’s a ground-based variation I’d be reticent to place have beginners perform this one.

That’s It, Folks

I hope you learned a few new variations in today’s post. If you have some of your own you’d like to share please feel free to post them in the comments section here or on Facebook.

BONUS Option

Because nine sucks, here’s a 10th variation.

Viking Landmine Press


If you have the Viking attachment (which you can purchase HERE) you can add another nice variation, which includes a neutral grip option.

Helmets sold separately.