Maybe I should do a 30-day series on Instagram and cover something cool?
30 Favorite Pictures of My Cat?
30 Days of Omelets?
No, no, no…30 Days of Jason Bourne Fight Scene Reenactments?1
As you can tell, I didn’t go with any of those choices. But if you want me to let me know.
I went with deadlifts.
And I took 30 – admittedly not in a row – days to cover everything from technique tips and troubleshooting ideas to program design and different deadlift variations I like.
It was a huge hit and people seemed to get a lot out of it. And it just so happens T-Nation reached out and asked if they could publish the series on their site.
Days 1-10 were posted today and they include all the videos I filmed in addition to some added (written) commentary.
The better title of this post should be: “10 Steps To Ensure You Won’t Destroy the Back Of Your Pants (With Your Spine) When You Deadlift.”
The deadlift, as with any compound movement, requires precision and attention to detail in order to 1) Perform it well 2) Not get hurt and 3) To have any shot at lifting appreciable weight. There are many moving parts to the lift, however, to speak candidly, of the “Big 3,” the case could be made it’s the least technical.2
This is not to insinuate it’s altogether easy or simple. Simple in concept? Yes. I mean, picking a barbell up off the ground and locking it out isn’t rocket science. Simple in execution? Well, that’s where things get a bit more complicated.
Below are some overarching (<—Ha, pun intended) “themes” with regards to setup and execution of the deadlift I feel are important across the board.
The internet likes to argue. It’ll argue whether or not the dress was gold or blue (remember that stupid debacle from a few years ago?), DC vs. Marvel, high-bar vs. low bar squats, and/or who’s the most bad-ass He-Man character not named He-Man.
Cyclone anyone?
More cogent to the topic at hand, people will also argue on the internet that anyone who SUMO deadlifts is cheating.
The prevailing, uppity, train of thought is that, because one is closer to the ground when performing a SUMO deadlift (compared to a conventional stance) it’s easier and thus it’s cheating…and somehow less relevant of a lift.
To which I say: bull to the shit.
Unless your name is Professor Dumbledore and can somehow make someone’s femur change length when they switch from a conventional stance to SUMO stance…the whole “it’s less ROM, it’s easier” argument is a moot one.
The moment arm (femur) doesn’t miraculously change from conventional to SUMO stance.
It’s just…..different.
What you lose in the sagittal plane during conventional, you gain in frontal plane when performing SUMO style deadlifts.
Generally speaking (due to the moment arms and levers at play):
Conventional Pulls: easier/faster off the ground, harder at lockout.
SUMO Pulls: harder/slower off the ground, all out sexification at lockout.
Stephanie Cohen hit a 525 lbs deadlift at a bodyweight of 123 lbs recently. It was done SUMO.
True to form, (some of) the internet projectile vomited all over itself calling her out, saying it didn’t count, and that it’s not real powerlifting (I guess because she was using straps?).
1. Hahahahaha. I have to assume most commenters calling her out couldn’t sniff her warm-up weight.
2. Um, the lift didn’t take place at a powerlifting meet. So thanks for making the stupidest argument you could possibly make.
[For the record: most powerlifters I know are some of the most respectful, courteous, and supportive people I know. They would never turn their nose to such an impressive lift.]
Step one to successful deadlift technique is to figure out what style feels best FOR YOU.
What feels better? What feels more powerful and stable? Which one places you in the best position possible?
Some people will do well with conventional style, while others may prefer SUMO. Both are fine.
Relax internet.
2) Get Your Air, Set Your Ribcage
Gone are the days of cuing people to excessively arch their backs. Gross, repetitive extension can have just as many negative ramifications on spine health as gross, repetitive flexion.
Ideally we want to shoot for more of a canister (or pillar) position where the pelvis and ribcage are “stacked” on top of one another. Most specifically, the pelvic floor and diaphragm are stacked on top of each other.
I like to cue people to get a big gulp of air and aim for 3D expansion (breathing into their stomach, sides, and back) before bending over to grab the bar.
Admittedly it takes a bit of practice but makes a profound difference in how the lift feels.
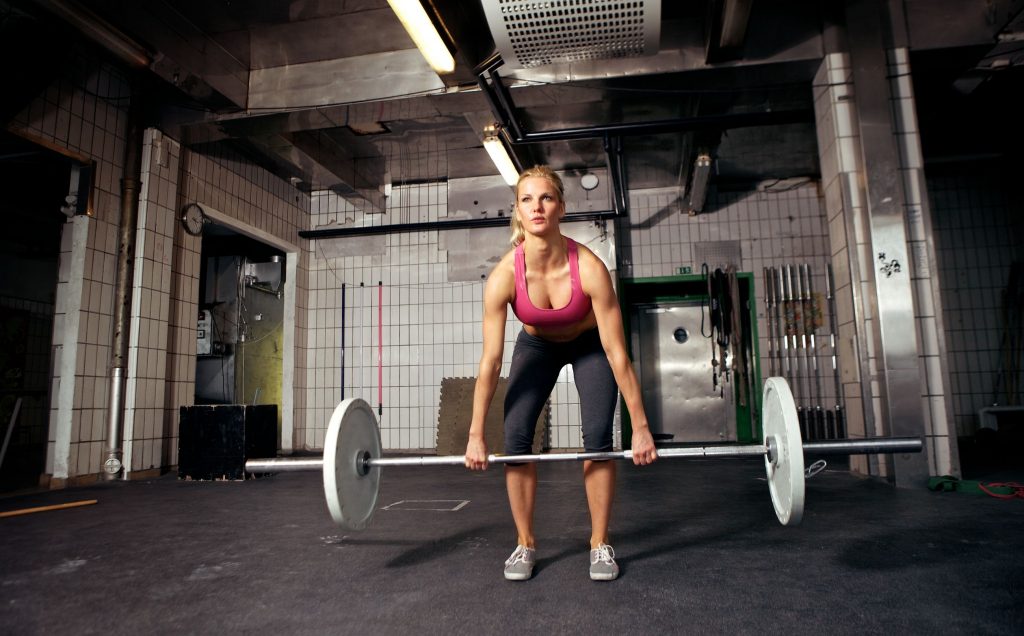
3) Chest Up, Show Me Your Logo
This is a cue I stole from Eric Cressey and a staple at Cressey Sports Performance. Generally speaking I like to see the following on the deadlift setup:
Shoulders above chest
Chest above hips
Hips above knees.
This isn’t the case for everyone, mind you, but a good rule of thumb to follow. This will ensure most people stay in a “neutral” position and offset the bulk of shear forces on the spine.
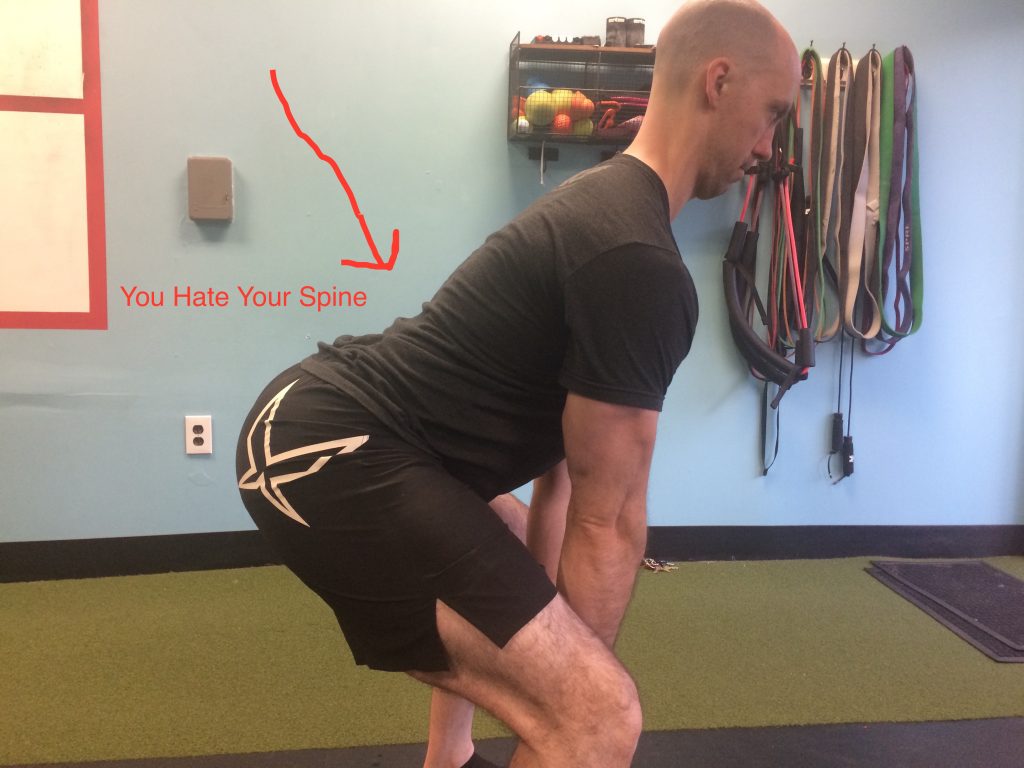
I’ll often stand in front of an individual and just say “show me your logo the entire time” as he or she descends down to the bar.
The end result should look like the picture above.
If not, this happens:
4) Armpits Over Barbell, Max Hamstring Tension
Regardless of style of pull, the goal with one’s set up should be armpits over the bar with maximal hamstring tension.
This will help ensure 1) hips are as close to the bar as possible (without making it too squatting. In that case the hips are actually further away….laterally) and 2) people will be less likely to pull via the lower back.
5) Turn Lats On
The lats are a big player with regards to deadlift technique. You want to make sure they’re “set” to help with upper back stiffness during the lift itself.
The best cue I’ve used to help with this is to tell someone to “squeeze the oranges in your armpits.”
Works like charm.
6) Pull Slack Out of the Bar or Bend the Bar
7) Push Away
The deadlift is just as much of a PUSHING exercise as it is pulling. You want to generate force into the ground and drive AWAY, thrusting your hips forward as you stand up.
People who solely focus on pulling the weight up – via their back – are often the ones that complain about it low back pain the most.
8) Finish at Top or Stand Tall
A common mistake I see some trainees make is either not getting their hip through at the top (AKA: the sexy stripper butt) or going too far.
“Hump the bar” at the top. Finish. Stand tall. All are cues I’ve used that work and get people to finish with their glutes.
9) Don’t Let Go
On the descent, don’t let go.
Stay engaged.
It’s here where I’ll often see people round their shoulders or lose their upper back position. And it makes me sad.
Keep your abdominals engaged (and keep squeezing that orange), even on the way down.
NOTE: Disregard for max effort pulls….;o)
10) Reset or Peel the Shoulders
There’s a time and place for tap-n-go deadlifts, but I have to admit I rarely use them. Instead I’ll tell people to “reset” between each rep – albeit it’s brief – to gulp their air, “peel their shoulders back,” and to make sure they’re in a good position for the next rep.
The video below is of me demonstrating this with a dumbbell, but you should still get the gist:
These Aren’t Set in Stone
None of what I said above is concrete.3 There will always be some slight deviations based off someone’s anatomy, ability level, and goal(s).
However, I have found that for most people, most of the time, they all work really well to get people’s technique in check.
When friend and fellow Boston-based coach, Lana Sova, pitched an article shedding light on some common mistakes she see’s other women make with regards to deadlifting, it goes without saying she had me at deadlift.
Lana’s a great coach and strong herself, boosting a 300+ lb deadlift. She knows a thing or two when it comes to picking things up and putting them down.
Four years ago, I could spot one or two women in the strength area of my gym doing deadlifts, and one of them was a trainer. Now, the love for deadlifts has increased among women.
As a powerlifter and a coach, I love to see the change 99% of the time, but there is still that one percent that makes me want to throw myself into the wall every time I see someone deadlifting.
These days, it seems like deadlift technique is being preached from every corner of social media. And if you are not a fitness professional, you have no idea whether it’s good or bad advice.
Therefore, in true Wonder Woman fashion, I’m attempting to save the world, or at the very least to save you from getting injured while deadlifting, and potentially help you put 20 to 30 pounds — even 50 —on your deadlift instantly.
Here are four deadlift set-up mistakes I see women make.
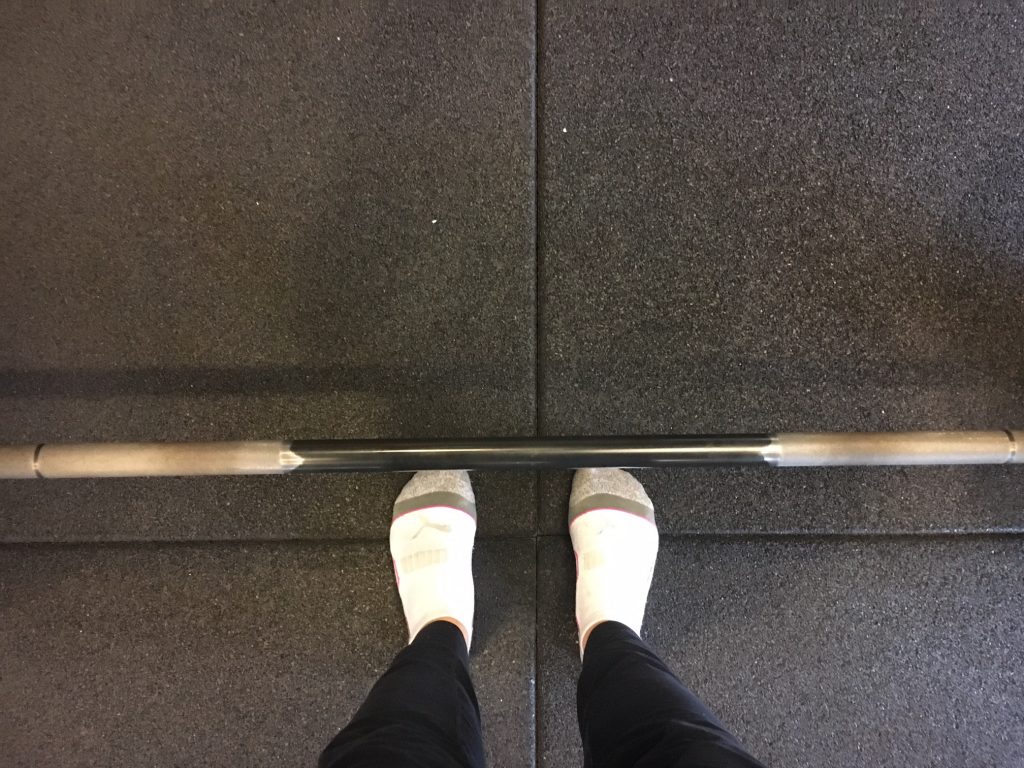
Mistake #1. Bar and Shin Distance
There are two ways I see women approach the barbell. They either stand too far away from the bar, like it’s gonna bite them, or they step so close it tickles.
The thing is, in both cases, you end up pulling the bar with your lower back. Why? Because the bar is either set up too far forward or ends up being shifted there.
Feet too close.
Lets see what it looks like in action:
As you can see from the video above the initial set-up is awkward – namely, not allowing for any forward translation of the tibia – which then pushes the bar away, which then makes the DL more “squatty” and pushing the axis of rotation (hips) further away, which then places much more stress on the lower back.
Not cool.
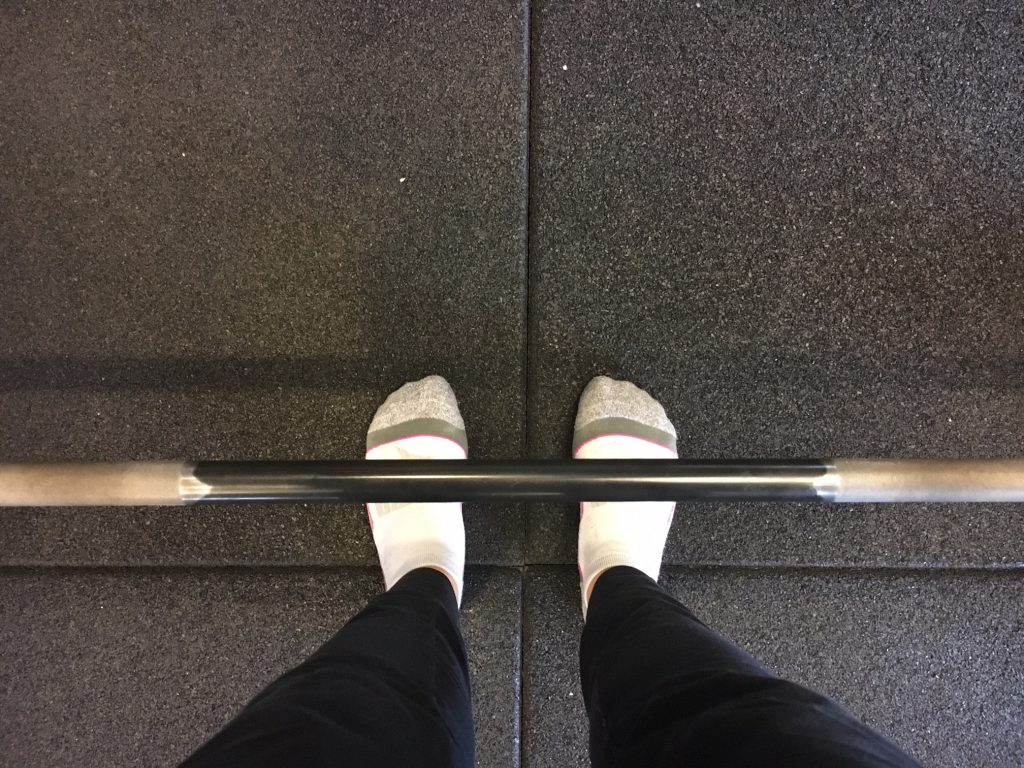
Conversely, here’s what it looks like when the feet are set up too far away.
Feet too far (away)
And here’s what that looks like in action:
Again, not an optimal set-up. And a lower back that will end up pissed off.
So we gotta find the middle ground.
To avoid pulling the barbell with your back, set up so that your middle foot is right underneath the barbell.
Feet juuuuuuust right.
The end result is something that looks like this:
Mistake #2. Slacking to Pull the Slack
Did you know there are such things as Meggings? I might be late to the party, but damn those things are tight.
When you deadlift, you want your whole body to almost explode from the tension you created in your set-up.
Pulling the slack out of the bar means exactly that. Make that shit tight. Just like the meggings.
You want to create tension in your hamstrings, gluteus muscles, and lats.
Here’s how I like to teach my clients to pull the slack out:
We first make sure their heels are screwed into the floor – check.
Gluteus muscles engaged — check.
Then we squeeze the purses in their pits. Lats are tight — check.
And lastly, as they reach the bar, they “bend” it and shift their weight onto their heels. Bend the bar — check.
Impromptu dance-parry prior to set is optional – check.
Mistake #3. Head Position
Your body is like a chain that consists of segments. Your head is the last piece of this chain. If your head is tilted, turned, extended, or, I don’t know, rotated 180 degrees, it will change the position of the next piece of the chain — your upper back.
An excessively rounded upper back is a big no-no when deadlifting. If you’re one of the people who always has to watch herself in the mirror while deadlifting, you might want to stop.
I get you want to make sure your form is right, but you’re making it even worse.
Instead of looking in the mirror, look at the bottom of the mirror. This will help you to put your head in a position that doesn’t force your upper back into flexion, or excessive rounding.
Mistake #4. Mindset
For some reason, when it comes to deadlifting, every client turns on her lady-like operations, and treats the barbell like it’s a kitten.
But if your goal is to deadlift your significant other’s weight (or triple that), you might want to be a little more aggressive.
You want to attack the bar.
So leave all your love for kittens behind the gym doors, and rip that shit off the floor, like you’re family’s life depends on it.
About the Author
Lana Sova is a coach at Shameless Strength Academy and a personal trainer atHealthworks Fitness Center in Brookline, MA. She empowers women to build and own their strength via powerlifting and strength training.
In case you missed it, last week I shared a few thoughts on deadlifting. You can check out part one HERE.
In it, rather than regurgitate the same ol’ obvious things most people who write about deadlifts regurgitate (don’t round your back!, good deadlifters don’t “jerk” the bar off the ground, 2+2 = 4, water is wet, Kate Upton is hot, my cat is the cutest cat in the world) I opted to highlight a few things I feel most lifters overlook or aren’t aware of in the first place.
Things like:
– how the lats play a key role in pulling big weight off the floor.
– how to engage the lats more optimally.
– how paying closer attention to your setup may result in better performance.
– and what it really means to pull the slack out of the bar. I promise, despite the nefarious connotation, the explanation is completely PG rated.
A photo posted by Tony Gentilcore (@tonygentilcore) on
As promised I wanted to continue my stream of thought and hit on a few more “habits” of highly effective deadlifters.
4. Think of 315 as 135.
Chad Wesley Smith of Juggernaut Strength hammered this point home a few weekends ago during a workshop he put on here in Boston at CrossFit Southie.
To paraphrase: You can’t be intimidated by the weight. You need to approach the bar on every set and show it who’s boss. Every time.
Like this monster.
https://www.youtube.com/watch?v=q4jO21-a2W0
Setting a little expectation management, though, if you’re training in a commercial gym and acting like this before a set of 225, you’re an a-hole. Lets calm down a little bit and put down the ammonia packets mmmm kay?
Many trainees will attack a lighter load and then turn into Bambi once the barbell hits a certain weight or threshold. Lighter loads will generally go up faster than heavier loads…..duh, I get it. However, this point does speak to something larger, and something that’s a bit more psychological in nature.
If you approach the barbell with a defeatist attitude – oh shit, oh shit, oh shit – before you even attempt the lift, how will you ever expect to improve, much less lift appreciable loads?
If you watch good (effective) deadlifters you’ll notice that every set looks the same. Regardless of whether there’s 135 lbs on the bar, 315, or 600 lbs, everything from the set up to the execution of the lift is exactly the same.
Which is why, flipping the coin, we could also make the argument that 135 lbs should be treated like 315. Getting good at deadlifting requires attention to detail and treating every set the same. Even the lights ones.
5. Don’t Just Think “Up.” Think “Back.”
The deadlift is nothing more than bending over and picking up a barbell off the ground, right?
Well, yes….but it’s a bit more complicated than that.
Many will view the deadlift as a pure up and down movement. Meaning, the barbell itself will move in a path that’s literally straight up and down.
Ehhhhhhhhhhhh, wrong.
23.7% wrong, at any rate (<—- trust me it’s science).
The deadlift is actually much more of a horizontal movement than people give it credit for. To quote my good friend, Dean Somerset:
“Deadlift drive comes from the hips when you start in flexion and move into extension. In other words, deadlift drive comes through hip drive. Driving your hips forward, coupled with vertical shins and a stable core, causes the torso to stand up vertically, pulling the weight with it.”
When people get into the mindset that deadlifitng is more of vertical movement they’ll often resort to initiating and finishing the movement with their lower back rather than their hips. Which, as you can guess, leads to some wonky habits of the rounded back nature (which we’d like to avoid as much as possible).
A cue I like to use to help initiate more of a horizontal vector is to tell people to think about “driving their sternum to the back wall.”
When they initiate the pull, they shouldn’t think up but rather……..BACK!
It sounds weird, but I like to describe this phenomenon by telling people that if they do it right – and think about pulling their sternum back – that they’d fall backwards if they decided to let go of the bar.
6. Deadlifts Don’t ALWAYS Need to be Max Effort, I’m Going to Shit My Spleen, Heavy.
Yes, you’ll need to train with max effort loads in order to improve your deadlift. To quote Ronnie Coleman, you’ll need to “lift some heavy ass weight.”
That’s pretty much a given.
But you DO NOT need to do it all the freakin time.
This is another point that Chad Wesley Smith touched on a few weeks ago. To paraphrase him (again): “I could care less about gym PRs. I want to PR when it counts.”
Understandably, most of the people reading this post aren’t competitive powerlifters like Chad, so how he trains and prepares (and peaks for a meet) is going to be drastically different from most of us.
But the message still resonates and reigns true for most trainees. You don’t need to train balls to the wall 100% of the time.
This is a tough pill to swallow for many people, especially in the shadow of CrossFit where training all out, to the point of exhaustion is not only encouraged but accepted as normal.
Don’t get me wrong: I LOVE when people train hard, and I think CrossFit has done some good in terms of getting more people excited to not run a treadmill.
However it’s also set a dangerous precedent in brainwashing people into thinking that a workout or training session is pointless if you don’t set a PR or come close to passing out.
NOTE: this doesn’t apply to every box or every Crossfit coach. So relax guy who’s inevitably going to shoot me an email saying I’m nothing but a CrossFit hater.
1. I actually have written a fair amount praising CrossFit. Like HERE.
2. I also workout at a CrossFit 1-2x per week – albeit during “off” hours when I have the place to myself along with the other coaches.
3. Shut up.
More often than you think, training with SUB-maximal weight (60-85%) is going to be the best approach for most people, most of the time. Not only does it allow for ample opportunity to focus on and work on technique, but it also allows people to train the deadlift more often.
The best way to get better at deadlifitng is to deadlift. A lot.
If you’re someone who constantly trains with max-effort loads this is going to be hard to do because 1) you’re going to beat up your joints 2) you’ll fry your CNS and 3) this requires more recovery time.
Not every training session requires you to hate life. This is especially true when it comes to improving your deadlift. QUALITY reps are the key. Oh, this is weird…..it just so happens I have a deadlift specialization program that follows this mantra to a “t.”
The deadlift is a pulling dominant movement. But it also involves a fair amount of pushing.
Yep you heard me right, pushing.
Think of it like this: in order to pull an ungodly amount of weight off the floor (or for those less interested in ungodly amounts, a boatload or shit-ton) you need to generate a lot of force into the ground and push yourself away.
I’ve heard this best described as “trying to leave your heel print into the ground.”
It’s a subtle cue, but it works wonders and it’s something that effective deadlifters keep in the back of their mind all the time.
And there you have it. While not an exhaustive list of habits, I do feel the one’s highlighted in both parts of this article will help many of you reading dominate your deadlifts moving forward.
Got any of your own habits to share? Chime in below.
When I was a junior in college one of my professors had us read The 7 Habits of Highly Effective People by Stephen Covey.
Yeah, I didn’t read it.
But who actually reads in college anyways? I was too busy playing baseball, lifting weights, watching Party of Five, and not hanging out with girls because, well, I was watching Party of Five.
I mean, all I had to do was look at the title and I knew it was going to put me to sleep within five minutes of turning the cover. And besides, was this book going to add 5MPH to my fastball and get me drafted? Pffffft, I think not!
Fast forward five years.
Surprise! Nothing I read added 5MPH to my fastball. Professional baseball didn’t pan out and I was a year or two into my career as a personal trainer. I finally listened to my professor and read the book. And it was game changer.
I won’t bore you with the details – it’s a quick read – but The 7 Habits of Highly Effective People speaks to things like how to be more proactive, why it’s important to think about the future so that you can more concretely figure out what to make a reality, the value of the “win-win” mentality, seeking to understand shit before you open your mouth (<— that’s my own interpretation), and what it means to “sharpen the saw” (I.e., seek out activities like exercise, yoga, meditation, etc. to expedite mental focus), among a handful of others.
Needless to say it’s a book I recommend to a lot of people, and something who’s theme I’m going to rip off today.
The 7 Habits of Highly Effective Deadlifters
Being a massive human being helps (^^^^^^^^^), so I’ll just skip that one and try to focus on some less obvious points.
NOTE: What follows is more of a commentary on deadlift technique with the goal to lift a lot of weight. It’s not going to cater to CrossFit and more of the tap-n-go, bounce off the floor, (high) hinge deadlift.
NOTE II: Please don’t take this as a knock against CrossFit. It isn’t. I get that the tap-n-go approach is more relevant to the demands of a CrossFit class or competition, where high(er) reps are performed. I also recognize that there are some strong people who do CrossFit.
But if you’re a CrossFitter and you’re that easily butt-hurt over me poo-pooing a tap-n-go deadlift, I’ll ask you this: why is the exercise called a DEADlift?
NOTE III: Nothing I mention below is concrete and will apply to every lifter in every situation. While I feel much of what I have to say with resonate with a lot of people, I’m not that much of an egotistical asshat to think that it will apply to 100% of the lifting population. So take that for what it’s worth.
Anyways……..
1. Your Lats Are the Key (Point #1)
In order to move big weights (safely, and long-term) you need two things to happen: you need to place a premium on tension and alignment.
If either of the above are lacking you’re not going to be able to develop as much force.
To the former point (tension), the lats are kind of a big deal.
The latissismus dorsi (or “lats” in bro-talk) are a massive muscle, which, on top of playing a role in humeral extension, internal rotation, and adduction (blah, blah, blah), also has significant play in breathing patterns and more germane to this conversation spinal stability.
In short: get the lats to engage and garner TENSION during the setup of a deadlift, the more stable you’re going to be, and the less likely you’ll look like this:
To do this I like to use any one of the following cues:
1. Squeeze an orange in your armpits
2. Protect your armpits.
3. Phew…your armpits stink.
4. Put your shoulder blades in your back pocket.
All are fantastic external cues to help people get the lats to fire to provide more tension and thus, stability. Despite this, some people may still look at you as if you’re speaking Elvish when you tell then to “turn on” their lats.
Sometimes it’s beneficial to give them more tactile feedback or cues.
Band Lat Activation with Hip Hinge
Or what I like to call “TRICEPS”
Lat Activation (via Mike Robertson)
2. Your Lats Are the Key (Point #2)
Pigging back on the point above, your lats are what “connects” you to the bar. Yes, your hands are grabbing the bar, but it’s where your armpits (where the lats insert) are located – in relation to bar placement – that plays a huge role in deadlifting badassery.
I’m a fairly decent deadlifter. I’ve pulled 3x bodyweight….570 lbs at a bodyweight of 190. I’m no Andy Bolton, but not many people are.
For years I’ve set up with my shins as close to the bar as possible, and while it led to some success it also led to some pesky back issues.
Why?
When setting up as close as possible to the bar, think about what’s happening.
1. My shins are more vertical.
2. And because my shins are more vertical, my armpits are in front of the bar, creating an awkward line of pull I have to overcome.
This not only puts me in a mechanical disadvantage, but over time is going to make my lower back flip me the middle finger. And it has, many times.
In the past few months I’ve had to overhaul my setup so I’m a little further away from the bar in that my shins can translate forward a bit, which then allows me to get my armpits directly over the bar, which in turn puts me in a more mechanical ADvantage (which helps me garner more tension), which in turn makes my lower back happy.
FYI: the picture below doesn’t show that right before I pull, I’ll push my hips back a smidge
Running with the tension theme, another habit of highly effective deadlifters is learning how to take the slack out of the bar.
It’s important to leverage yourself against the weight when you’re setting up. Another way to think about it is to act as if you’re “pulling” yourself (against the bar) into proper position.
This is what it means to get the slack out of the bar or what I like to say instead “bending the bar before you pull it.”
NOTE: I was in the middle of filming a video of this last night when my camera puttered out. Damn you Droid!
Luckily CSP coach, Greg Robins, filmed a video not too long ago on this very concept:
That’s it for today. I’ll be posting part II of this article sometime soon. But in the meantime I want you to recognize the key theme of all the points listed above:
That the setup is very, very, VERY important.
Like almost as important as Bilbo giving Frodo Baggins the blade Sting when leaving Rivendell on his way to Mordor.
95% of the time any mistake or snafu in technique with the deadlift can be attributed to how someone sets up in the first place. Far too often trainees fail to put much thought into it and just haphazardly bend over and pick up the bar. And far too often people end up getting hurt and/or never making any progress.
Place more precedence on getting tension and watch your deadlift take off.
Sure I can regurgitate all the muscles that attach to the scapulae, list all the muscles involved with posterior pelvic tilt, name all the members of the starting line-up for the 1990 Oakland Athletics, recite line-for-line the “I will find, and I will kill you” monologue Liam Neeson uses in the movie Taken, and, on a good day I can crush my multiplication table.
I know stuff, but I don’t know everything.
One of the exceptions, however, is the deadlift. I know the deadlift. As a strength coach it makes sense. I mean, it’s my job to help get people freaky strong, and it’s kinda hard to do so without at least a casual relationship with the deadlift. Don’t worry I always buy it dinner first….;o)
Moreover, most serious weightlifters recognize that the deadlift is what often separates the men from the boys.
As an example here’s Cressey Sports Performance athlete, Dave Stanton, deadlifting 600 lbs for an easy set of three. With no belt (at a bodyweight of 192 lbs).
Yes, we recognize he’s bouncing the weight off the floor a little bit. Relax, internet.
David is a bit of an outlier. A freak if you will. We often joke at the facility that he’s a deadlifting savant because he’s always been good at it. It’s as if he was built to deadlift – look at those leverages!
But that doesn’t mean he hasn’t had to work his ass off in order to get to this point.
He’s been training with us for over four years, and has spent a lot of time working with us under our supervision.
Using David as our inspiration and model, I wanted to discuss what I feel are some things that a lot of trainees overlook when it comes to their approach to the deadlift.
1. Not Placing a Premium on Technique, Technique, Technique
Playing the Captain Obvious card, it goes without saying that in order to get better at the deadlift, you need to deadlift. It’s the Law of Specificity played to it’s most specific tune.
Quarterbacks don’t get better at throwing a football by playing Madden.
Chefs don’t get better at food preparation by watching Top Chef.
And you don’t get better at deadlifting by watching Youtube videos or by just “showing up” at the gym and doing leg curls. YOU NEED TO DEADLIFT!!!!
More to the point, you need to hone technique. Technique trumps everything.
Not all deadlift variations are created equal. When most people think of a deadlift they automatically leap to the conventional deadlift, which, by all accounts, can be argued as the most advanced variation.
Not everyone can show up on day #1, walk up to a bar, pick it up off the ground, and make it look passable. I.e., not make me want to pour battery acid into my eyes.
Which is why it’s important to regress the movement to fit the current ability level and needs of the lifter. Learning the hip hinge pattern is vital and serves as a precursor more advanced exercises down the road.
There are a million and one different ways to regress the deadlift to help someone learn to hip hinge, which is why I feel it’s such an invaluable exercise.
At the lowest level we have drills which help engrain the motor pattern we’re looking for and to teach “neutral” spine:
Wall Tap Hip Hinge
KB Behind the Head Hip Hinge
Band Lat Activation w/ Hip Hinge
Once we’re confident they’re able to groove the hip hinge and control their spine, we can then start adding load with more rudimentary deadlift exercises like kettlebell deadlifts, suitcase deadlifts, and “potato sack” or DB deadlifts.
From there, when we want to start adding more appreciable load the order we typically use at Cressey Sports Performance is Trap Bar Deadlift —> Sumo Deadlift —> Conventional Deadlift —> Dude, you’re like Han Solo now.
And, to be honest, it’s not until someone has a good 1-2 years of solid, legit training that we start implementing more superfluous things like chains, bands, and the like.
There’s plenty we can do with JUST a barbell.
Below is a video I originally shot for the release of Mike Robertson’s Bulletproof Athlete, which goes into more detail on some of the ways I progress (and cue) the main deadlift variations.
So to reiterate – TECHNIQUE is kind of important. Learn it. Also, take into account the importance of properly placed progressions. Not everyone is Gandalf and can walk into a gym on day one and crush a perfect deadlift.
Also, if you want to read something that will give you a deadlifting boner I’d suggest reading THIS magnum opus by Mike Robertson, or check out any of THESE 22 articles listed by T-Nation as the best deadlifting articles on their site.
Listen, most people who train don’t need to worry about “speed work.” Yes, getting faster and honing bar speed is a factor in improving strength, but for most people, most of the time, it’s a complete waste of time.
Let me explain.
First off, unless you’re pulling (at least) 2x bodyweight I don’t feel adding in speed work or a dynamic speed day – or any other connotation you use to pretend like you train at Westside Barbell – into your training repertoire is going to serve as the x-factor.
Lets just call it what it is. TECHNIQUE WORK!!!!
Using sub-maximal loads forces people to dial in their technique, and THAT’S where I feel the true value of “speed work” lies.
Instead of calling it a speed work, I just call it a technique work and I try to implement it into most people’s programs at least once per week (especially if they’re trying to work on a specific movement, like the deadlift).
It may look something like this:
Week 1: 12×1 @ 55% 1RM
Week 2: 10×1 @ 60% 1RM
Week 3: 8×1 @ 65% 1RM
Week 4: 6×1 @ 70% 1RM
I’ll typically allot 30-45s rest between each rep.
Another approach I use (with more intermediate and advance lifters) is to have someone use 70% of the 1RM and to then set a timer for 10-15 minutes and they perform ONE rep every minute, on the minute for the allotted minutes.
Week 1: 65% at 10 Min
Week 2: 65% at 12 Min
Week 3: 70% at 12 Min
Week 4: 70% at 14 Min
Either way the idea is to use lower loads to HAMMER technique (which in turn is going to help with bar speed and overall performance in general).
3. Lack of Upper Back Strength
Like it or not, most people have weak upper backs and they don’t train it enough. I’m a HUGE proponent of adding in some form of dedicated upper back work in every training session.
I think this serves several benefits:
1. It will undoubtedly help with deadlift technique in the long run.
2. From a posture standpoint, it will help to offset the endless hours we all spend in front of our computers watching LOLCats working.
3. A thick, wide, upper back just looks badass.
To that end, I feel most trainees should go out of their way to add in some upper back work – both horizontal AND vertical – into their programs.
Now, this doesn’t mean you have to go balls to the wall and load yourself heavy every session, but it stands to reason most people won’t be doing themselves a disservice by incorporating this mindset.
I like to add in some high(er) rep TRX Rows or face pulls on my lower body days, and I’ll sometimes perform heavy chin-up variations too.
On upper body days, I’ll almost always be including some form of heavy barbell row or DB row.
Make no mistake: a strong upper back will help you deadlift more weight.
Pick Things Up and Put Them Down
And it’s on that note I want to remind everyone that my new Deadlift Specialization Program hits on all the above points (and then some).
It’s a FOUR-month program that will not only turn you into a deadlifting Jedi, but you’ll get hella strong to boot.
What’s more, not only do you get a program written by me, but you also get the advantage of using WeightTraining.com’s user friendly platform to receive workout reminders, track and log your workouts, and watch videos, all by using your smart phone.
I also included a 30% discount that will last for the next 24 hours (through Wednesday, September 10th), because I’m cool like that All you have to do is type in IncreaseDeadlift30 within the Coupon Code area at checkout.
For more information and to get your deadlifting on go HERE.
So said George “Iceman” Gervin in the classic mid-90s Nike commercial featuring Tim Hardaway, David Robinson, and pretty much the coolest barbershop known to man.
For a little taste of nostalgia you can watch the video HERE.
Now, I’m not an ex-NBA legend. I might be able to dunk a tennis ball. Maybe. But only if you gave me a running start (and a trampoline). Or a JetPack.
Julia Child was pretty much a boss in the kitchen.
You can’t discuss the history of film and not mention the name Steven Spielberg.
Sandy Koufax had arguably the most devastating curveball in baseball history.
Is there a bigger douche to the douchiest power nowadays than Justin Bieber?
All of this to say: Everyone has their own speciality or a skill that they’re known for.
Me? While I’d like to sit here and say it’s hanging out with Jason Bourne, in reality it’s nothing nearly as badass.
While they’re badass in their own right, I think anyone who’s read my stuff for any length of time knows that I have a particular affinity for deadlifts, and that that’s what I’m known for.
Which is weird because I don’t own any records. Not even close. Heck, I’ve never even competed! Giving a little credit to myself, though, my best pull is 570 lbs (which at the time was 3x bodyweight).
On top of that, if someone triple dogged dared me, or, I don’t know, if Kate Beckinsale walked into a room and said, “Tony I’ll make out with you right now if you lift 500 lbs this very minute,” I’m fairly confident I could do it.
For reps.
On one leg.
Blindfolded.
Standing on a BOSU ball.
More to the point (and a bit less facetious in tone): I know how to coach the deadlift very well. So to steal the quote from the Iceman above.
One thing I can do…..is coach the deadlift!
And it’s with that quote in mind that I wanted to take today and do a pseudo “brain dump” on a few insights and common (or not so common, depending on who you are) mistakes I notice with regards to deadlift technique.
1. Not Choosing the Correct Deadlift Variation
I’ve said it before, and I’ll say it again: everyoneshould be deadlifting in some form or another. What other exercise accomplishes so much?
I’m biased. You’d be hard pressed to convince me otherwise that the deadlift isn’t one of the best overall exercises for hypertrophy, not to mention the best functional exercise you can do with respects to posterior chain strength, core stability, glute activation (terminal hip extension), power development, and transference of force throughout the entire body.
Likewise, when done correctly, deadlifts help to prevent shear loading on the spine, help engrain a hip hinge pattern (which spares the spine), and you could make a case plays a role in “preparing” people for life.
Ask your grandmother to pick up a bag of groceries. That’s a deadlift!
My friend, Nick Tumminello, wrote a fantastic post awhile back on assessments and brought up an interesting question:
“What’s the point of doing whatever assessment you’re doing, when you have all your clients squat, deadlift, perform X, Y, and Z anyways?”
I respect Nick a ton. It’s hard not to look up to someone with as much experience as him, and I’ve learned a lot from him.
And while I “get” what he was trying to say, even when I originally read his post (and forgive me if Nick’s perspective has changed since he wrote it) I couldn’t help but cock my head like a curious puppy being asked to fetch.
From my point of view, YES, the goal is to have all my clients squat, deadlift, perform single leg work, crush push-ups, row, bench press, sprint, push the Prowler, arm wrestle a tank, and many other fitness and performance based methodologies.
The point of the assessment – outside of the obvious – is for the client/athlete to prove to me that they can perform said movements correctly and without causing further harm.
With regards to the deadlift, the results of their assessment – outside of providing information on any imbalances or any glaring deficits that may exist – is going to tell me which variation of the deadlift I’m going to start them on.
Not everyone is meant to (or should) walk into the gym on day one and conventional deadlift. Truth be told: the conventional deadlift is the most advanced variation of the deadlift, and I rarely start an athlete or client there.
If someone has a cranky lower back or anterior knee pain (or both), it may be wise to start them on a trap (or hex) bar deadlift. Because the body is placed inside the bar, there’s less shear on the spine. Likewise, the trap bar (like most DL variations) require a more vertical tibia which will feel significantly better on the knees.
Looking a bit deeper, if someone has a deficit in ankle dorsiflexion or needs a crowbar to loosen up their hips, having them attempt to get all the way down to the bar for a conventional deadlift is going to be compromising.
Instead it may be more advantageous to have them perform a Sumo style deadlift – maybe even elevated slightly depending on the severity of their limitation.
The point is: not all deadlift variations are created equal, and it’s important to consider what will be the right fit based off of one’s body-type, experience, limitations, and injury history.
2. Tension, Tension, Tension!
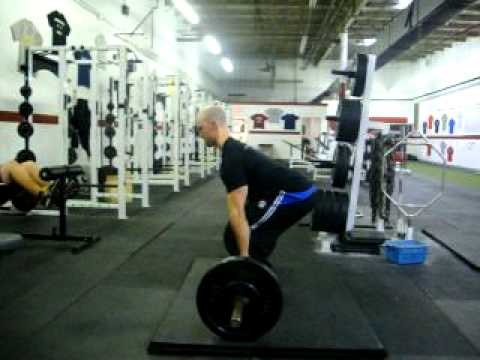
One instantaneous red-flag I’ll notice with many people deadlifting is when I see their hips rise too quickly when initiating the pull. Like this:
Kelly Starrett mentioned this same concept in his book Becoming a Supple Leopard, but when this happens it’s generally a failure to get (and maintain) TENSION!!! You could also make the same argument whenever you see someone initiate their pull and they turn into a “scared cat” with their back rounding like crazy.
The deadlift is a bit more than just “bending over and picking up a bar.” I like to tell trainees that the hips and shoulders should “break” synchronously. Meaning there should be a synergistic dance or interplay between the hips and shoulders. If the hips break first or come up too fast in relation to the upper body, we just need to slow things down a tad and get more tension.
Lack of tension = an energy leak, and that’s the last thing you want when trying to pull heavy things off the ground.
Here’s a checklist I like to follow:
1. Hinge back – pushing your butt back towards the wall – as if you’re performing an RDL – until your hands reach the bar.
2. Once there, you’ll grab the bar with one hand and pull the “slack out.” Basically, you’re going to activate or engage your lat and posteriorly tilt the scapulae, which will provide a ton more stability/tension.
3. You’ll then repeat the same process with the other hand.
Note: a more simplified and less geeky way of explaining things is to pretend you have an orange in your armpit and that you’re trying to squeeze out some orange juice.
This cue will ensure all of the above: lats will be engaged, scapulae will posteriorly tilt, and the chest will be up.
4. In order to maintain tension in the hamstrings (kind of important for deadlifting big weight) the hips should stay somewhat high (this will vary for numerous people, but they should never be above the shoulders), and you should think about “pressing” or “pushing” yourself way from the floor – generating force INTO THE FLOOR. Like this:
Notice how, compared to the first video, the hips and shoulders have more of a timed interplay?
This is what’s “ideal” and will result in better deadlifting performance for most people.
In any given week I receive a fair amount of emails ranging from readers who just want to say thanks for writing such a kick-ass blog (you’re welcome!) to momma Gentilcore reminding me that 1) I forgot [insert relative’s name here] birthday and that I better get on my high-horse and send a card stat and 2) it’s getting cold outside. Bundle up! Love you!
And, of course, I get a fair number of emails from people asking me anything from programming questions to why does their shoulder hurt? to why it is I am so uncannily interesting, witty, and awesome. And everything else in between.
In every sense, the emails I receive span the entire fitness spectrum – and I try my best to answer every……single…….one. Speaking of which, if you could just hold on one quick second as I answer this one I just got in my inbox :
Dear Victoria Secret Models,
Yes!
It’s silly really, but a group of them reached out and asked if I’d please stay at least 500 yards away from them at all times be their personal oil boy at their next photo shoot.
Anyways, oftentimes I’ll have someone reach out and ask if I’d be willing to take a gander at their technique on certain lifts and to see whether or not I’d offer any insight or cues to help them clean things up.
8 times out of 10, it’s usually the deadlift.
Sometimes it’s easy. I’ll watch a video, things won’t look pretty, and I’ll forward along some simple cues that will help, and then point them in the direction of posts like THIS, THIS, and THIS.
Other times it’s a bit tricker because someone’s technique may need a little more TLC and attention to detail. A great example would be the video below, which was sent to me last week from someone who will remain nameless.
**When I asked his permission to use his video for a blog post he asked if it would be okay if I’d omit his name altogether. I think he was thinking I was going to throw him under the bus and include him on some rolling playlist of epic deadlift fails.
I reassured him that that wasn’t going to be the case, and all I wanted to do was to make this into blog post so that my advice could be read by others who may be making the same mistake(s).
We internet high-fived and well, here we are.
Speaking of which, here’s the video
My Thoughts/Words of Wisdom
1. First and foremost: props for walking onto screen wearing that hat like a boss. I’d almost liken it to a Walter White’esq/Heisenberg fashion prop, but I know all you’re doing is deadlifting and not cooking a vat of meth.
**Bonus points for a Breaking Bad reference!
2. One of the glaring “mistakes” I see right off the bat is setting up too far away from the bar. I like to tell people to make sure their shins are right up against the bar, or at the very least to be an inch or two away (to allow for a little dorsiflexion).
By setting up too too far you’re just going to make more work for yourself and increase the distance the bar has to travel – not to mention we could make a case that you’re going to place a bit more shear load on the spine.
So, for starters: get closer to the bar upon the initial set-up.
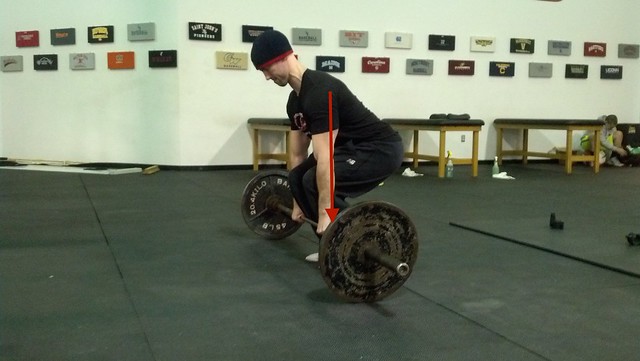
3. Another major point to consider is the initial movement upon descent towards the bar. If you pause the video at the 9-second mark, you’ll notice that “Heisenberg” initially breaks with his knees translating forward, essentially squatting down towards the bar.
Instead, what I’d prefer to see is more of a hip hinge/pseudo RDL pattern to start. I like to cue people to push their hips back. But usually a more pertinent EXTERNAL cue is to tell them to try to push their hips back so that their butt taps an imaginary wall behind them.
So, in a lot of ways, what’s going to happen is we’re trying to set up from a “TOP-DOWN” position, which is something Dr. Kelly Starrett discusses at length in his book Becoming a Supple Leopard.
The goal, then, would be to initiate by pushing the hips back and to continue hinging back, performing to what mounts as an unloaded RDL, accumulating massive tension in the hamstrings, and when there’s only a few inches left, THEN you’ll bend over to grab the bar.
Which brings us to the next point.
4. Setting the hips too low
This coincides with the whole squatting vs. hip hinging discussion from above. I think the bulk of this issue will clean up itself once you learn to hip hinge into proper position, so I won’t belabor this point too much. But it stands to reason that a nice “check point” would be to take notice where you feel tension. In the video above, I can guarantee to you feel the bulk of it in your quadriceps. If so, you know you’re setting up with your hips too low.
5. Another key point to consider is getting tension in the lats and upper back.
If I were standing there coaching Heisenberg, 1) I’d tell him to put on some loud, belligerent “my mother never loved me music” to fire the place up a bit more and 2) I’d stand in front of him and have him set up a bit more vertical or upright. I’d want him to make sure that whatever lettering is on the front of his shirt is facing me the entire time.
You can think to yourself “chest up,” “chest tall,” “proud chest,” “arch like a mofo,” whatever works.
From there, I’d tell him to use the bar to “pull” his chest up and to engage his lats. You’ll notice in the video that when he starts his first pull to break inertia his shoulders are still fairly rounded (24-second mark).
Speaking in geek speak for a second: I want him to use the bar to “set” his lats and to get more posterior tilt of the scapulae.
This will work wonders in terms of garnering more tension and to provide more stability to the spine as a whole (as well as placing him in a more ideal position to pull).
6. More tangentially, while I understand that it’s called the “deadlift,” and you’re lifting the barbell off the floor, there’s a bit more to it than that.
I think one major mistake that a lot of people make is that they feel as if the deadlift is nothing more than casually lifting the bar off the floor.
Instead, what needs to happen is that you need to get more tension in your hamstrings and glutes and generate force into the floor, “pressing” or “pushing” yourself away (through the heels), and then focus on driving your hips forward until you lock the weight out.
Again, freeze framing the video at the 26-second mark, you can see that Heisenberg’s shoulders and upper back aren’t “stiff” (shoulders are rounded) and that his knees aren’t locked out. Not to call him out or anything, but he’s just kinda haphazardly lifting the bar as if it were an egg he didn’t want to break or as if he were at some swanky tea-party and didn’t want to offend anyone.
Now, I understand it’s an un-loaded bar. But what the fuck? Lift it!!!!!!
More privy to the point is that he’s seemingly just trying to hoist the bar off the floor without generating any tension or force into the ground.
Finish the lift. Get those hips through! Lock it out!
7. And lastly, to reiterate the point above, he just needs to make sure that on his descent towards the ground he initiates the process by breaking with the hips going back, and not the knees forward.
It’s going to take a little practice, and some attention to detail, but I think all told he’s not too far off from where he needs to be.
Moving forward I’d recommend the following:
1. A drill that I love to use with newbies to help groove the hip hinge is one that Dean Somerset uses quite a bit as well – the KB Behind the Head Hip Hinge
Here the objective is to brace the abs hard and to hinge through the hipsand NOT the lower back. Incorporating this as part of a warm-up or as a filler exercise several times throughout the week would be money.
2. Don’t be scared to load the deadlift. It’s actually going to feel a bit MORE awkward to try to hone in on technique with just the bar. So, don’t feel as if you have to limit yourself to the bar to get better. Sometimes it’s advantageous to load an exercise to get a better “feel” for it.
3. Also, don’t be afraid to deadlift more the once per week. I know it’s in vogue to tell newbies to just perform the major lifts once per week to lessen the risk of injury – and that’s fine – but conversely it’s kind of hard to get better at anything only performing it once every seven days.
I’m actually not opposed to including some form of deadlift technique work every training session assuming someone isn’t going to be an asshat and perform heavy singles every chance he or she gets.
4. Don’t go use a high(er) rep protocol. I think anytime a newbie starts performing high-rep deadlifts, things are going to get dicey real quick from a technique standpoint. To that end, I’d much prefer to keep the reps in the 3-5 rep range (but keep the intensity low).
And that’s about it. A lot to digest, I know – but hopefully this discussion helped to shed some light on how I generally go about cleaning up one’s deadlift technique.
If anyone else has some food for thought, I’d love to hear it.
A few weeks ago I received an email from a DPT student in central Florida detailing a research project that he’s doing alongside a fellow student (as well as with one of the faculty at his school) looking at ways to use the deadlift pattern to treat patients with low back pain in a therapy setting.
He asked if I’d be willing to provide some common cues I use given certain “issues” people have when trying to deadlift which would aid in correcting their technique.
[Places finger over said student’s mouth]
Shhhhhhhh, you had me at deadlift.
What follows below is a candid/informal list I sent back highlighting my thoughts on more of the cueing side of things rather than the actual “correctives” (Ie: mobility drills, soft tissue restriction, chewing with your mouth closed, etc).
At the very least I figured it was something that could potentially help out others who may be looking to clean up their own technique.
And if it doesn’t, my bad. I tried.
Lumbar Kyphosis
Depending on one’s kinesthetic awareness, this one can be tricky. For those completely unaware of what their body is doing in space I’ll most likely take a more “hands-on,” non-Creepy McCreepypants approach – akin to what I call Play-Doh coaching.
Lets just say I’ve seen some trainers and coaches get a little too hands-on, if you’re catching my drift.
More often than one would think, you’re going to tell someone to “arch their back,” and then they’re going to look back at
you as if you’re speaking Klingon or have an extra nipple or something. Not that you’d be showing off your nipples or anything, hence the whole creepy comment above, but I’m just trying to make a point.
They’ll literally have no idea or differentiation between lumbar flexion and what it means to arch their back.
One trick I like to use is to place them on the floor in the quadruped position and have them perform the cat-camel. I’ll have them round their back as much as possible and tell them that’s what I DO NOT want.
Sometimes, depending on the severity, I’ll place my hands on my head, scream as loud as I can “no no no no no no NO!” and then jump through a pane glass window.
You know, for a little more effect. That’ll get their attention…..;o)
Back in reality, though, I’ll then have them bring their spine back to neutral and tell them that’s what I’m looking for. I’ll have them perform a few rounds of this just so that they’ll get a feel for what I want and who I’ll want them to set up to deadlift.
It’s pretty effective, and will work for most trainees.
Another one I’ll use is to tell them to emulate what a basketball player does on the court when he’s tired (bends over and places his hands on his knees). Almost always, they’ll drop right into a neutral spine position and then I’ll be like, “there!” Now, keep that same spinal position and grab the bar.
Another thing to consider is just using a deadlift variation which allows them to be successful. I’ve long championed that what makes the deadlift so awesome is that it can be so easily catered to the lifter, and not vice versa.
This is a huge reason why I love the trap (hex) bar so much, as it lends itself to be a bit more user friendly compared to other deadlift variations. This is especially true for those who lack ample ankle, hip, and t-spine mobility to get into proper position in the first place.
With the elevated handles (and the fact that their center of gravity is inside the bar), the trap lends itself very appropriately to beginners or those with postural limitations.
Anterior Weight Shift
The main culprit here is people wearing those cement blocks that they call shoes. Many have a significant heel lift which shifts the body anteriorly and makes it much harder to engage the posterior chain (glutes and hamstrings).
In addition, wearing shoes also increases the distance the bar has to travel, so it bodes in one’s favor to just ditch them altogether.
If for some reason they train at a gym that sucks and won’t let them deadift barefoot, I’d highly recommend things like Chuck Taylor’s or the New Balance Minimus (which, as the name implies, is more of a “minimalist shoe).
Outside of that, much of the resolution here is engaging a proper hip hinge pattern.
Having the ability to break with the hips and engage a hip hinge pattern – without losing spinal position – is HUGE in this context.
My go-to drill is hinging with the dowel rod. We’re looking for three points of contact – back of the head, in between the shoulder blades, and the sacrum.
If at any point the dowel rod loses contact with the body, you’re doing it wrong.
I may have them perform a set of 8-10 reps with the dowel rod, and then immediately have them walk over to the bar and try to emulate that same motion. We need to CEMENT the pattern with strength training.
Along those same lines, another drill I use sporadically is where I tell them to pretend I have a rope tied around their waist and that I’m standing behind them and when they start their descent to imagine that I’m pulling their hips back with the rope.
It sounds weird and far too simple – but it works.
Limited Dorsifexion
This is an often overlooked limitation, as you need roughly 15-20 degrees of ankle dorsiflexion in order to perform a squat, lunge, and deadlift pattern without any major compensation up the kinetic chain.
Your garden variety ankle mobility drills are going to work wonders here.
Knee Break Ankle Mobs:
Wall Ankle Mobs:
Band Hip IR/ER with Ankle Mob (kill two birds with one stone here):
Some other things to consider, however:
1. We live in PLANTAR flexion. Think about all the women who wear high-heels day in and day out, not to mention the aforementioned “cement shoes” that a lot guys opt to wear. I love high-heels as much as the next guy (looking at them, not wearing them. Just wanted to clarify).
Oh……my……..god…..I love them so much…
…..but I can’t even begin to describe how much of a train wreck they are in terms of the compensation patterns they elicit. Everything from chronic low back pain to plantar fasciitis to bone spurs.
It’s pretty telling how much they mess women up, and I’m often advocating for most, when they can, to ditch the high heels in light of wearing a flatter shoe.
Likewise, for dudes, purchasing a more minimalist shoe will work wonders in the long run.
2. Dedicated stretches for the gastrocs and soleus muscles are going to be imperative here as well. Standing around in plantar flexion all day is going to light these muscles up, so taking some time to do some simple stretches would be advantageous.
3. On that same note, I’m willing to bet that most even sleep in plantar flexion! It sounds excessive, but even something like utilizing a Strassburg Sock – which encourages more DORSIflexion while you sleep – pays huge dividends in the grand scheme of things.
As an aside, I’d also gravitate more towards trap bar and sumo variations for those with limited ankle dorsiflexion and those will be less problematic postions to get into.
Limited Glute Activation/Weakness
This one is pretty easy. I’ll often defer to my good friend, the glute-master himself, Bret Contreras and place a premium on glute activation drills prior to training whether it’s supine bridge variations, single-leg variations, etc.
In my mind, glute activation drills is something that most people can’t get enough of so I have no qualms telling people to do them every day, several times throughout the day.
The key, of course, is to ensure that they’re doing them correctly. Again, proper coaching comes into play here.
Moreover, in the context of deadlift technique, you have to be cognizant of a few things as you’ll inevitably come across two common errors.
1. Incomplete or no hip extension what-so-ever.
Note: for some reason I didn’t have a video available for the DL, but Eric does a good job of showing incomplete hip extension with this squat variation.
2. Excessive HYPERextension (essentially using lumbar hyperextension for hip extension)
In both cases proper cueing is going to be paramount.
For the former I’ll typically tell them to “finish with glutes” or “hump the bar,” which usually gets the job done. Also, depending my rapport with the client, I’ll literally place my hands around their pelvis and try to encourage more posterior pelvic tilt. Too, I may gently tap their glutes to help them fire.
In the case of the latter it’s a bit trickier, but I like to tell them to “finish tall,” and again, depending on the rapport, I’ll place my hands around their pelvis to help them but on the brakes (and prevent them from going into too much hyperextension).
Thoracic Kyphosis (keep in mind we’re just using the movement to influence lumbosacral movement, not trying to lift maximal weight)
Honestly, the dowel rod drill from above is going to be great here. As well, I’ll cue guys to make sure they stick their chest out upon the initial set-up which will encourage a bit more t-spine extension
I pretty much shot from the hip on all of these, but hopefully they all made some sense and help a few people out.