CategoriesCorrective Exercise Program Design

Never Question Your Exercise Selection Again

I’ve been a fan of “offset” loading for a number of years now. Without getting too deep in the weeds on what offset loading is and what the benefits are…

…it’s when you either stagger your foot or hand position on certain exercises OR you load an exercise a certain way (how you hold a DB or KB) to target or overload a specific limb or joint.

It has implications for both rehab (helping people to move better) AND for getting them jacked (self-explanatory). My good friend and Boston-based colleague, Dr. Michelle Boland, elaborates more on offset loading and how you can use it to your clients’ advantage below.

Enjoy.

Copyright: lightfieldstudios

Never Question Your Exercise Selection Again

I speak from personal experience, as a personal trainer, when I say it can be challenging to navigate through all of your client’s aches, pains, and movement hiccups.

It has caused me some serious headaches in the past. 

In a social media guru filled world, there is so much information about magic tricks to FIX your clients movement struggles. These magic tricks are typically called corrective exercises. 

We then think we are Harry Potter and build our client’s sessions and training programs around corrective exercises, making the perfect potion to have our clients move perfectly. 

Harry Potter cosplay concept. Moment of magic wand action

BUT, what ends up happening is that our FITNESS TRAINING sessions start feeling like a bad physical therapy experience. 

  • Our clients are not TRULY becoming better movers. 
  • Our clients are not TRULY gaining muscle or looking better in a bathing suit.  

They are in no man’s land, not getting results, and being held back from their physical potential.

Not to worry though!

(Check out THIS blog post to learn more about the mental barriers that may be holding your clients back.)

I am here to help!! Because I made these same mistakes and learned from them!

I am going to provide you with four simple rules to make sure your clients are still achieving their fitness goals while ALSO becoming better movers.  

These rules will provide you the ability to build a training program and select exercises without having to choose between a simple corrective exercise that is targeted to help someone move better and a complex lift that is targeted to get them jacked. 

Most coaches’ have go-to exercises for getting jacked and strong which is great but these same exercises can also create some movement restrictions due to the high levels of tension they require, such as a barbell back squat or bench press.

Sports young woman doing exercises with barbell on bench in the gym. Bar Bench Press

However, simple considerations to where the weight is placed, the type of grip, and feet position (stance) can be changed during these typical go-to exercises to prevent some of the possible movement restrictions. 

Below, I am going to provide you with simple, practical programming strategies that will allow you to both load AND improve movement quality for all ages and training levels.

The four simple rules allow you to make small tweaks to exercises in order to help people move better, WHILE still getting 80-90% of a training effect from the loading. In other words, we can still get our clients strong and powerful without turning them into walking refrigerators. 

(If you prefer to watch instead of read, Check out my video presentation of these Rules HERE.)

Rule 1. Choose Offset Positions

Offset positions include separating hands and feet from front to back. These positions will allow your clients to feel stable, so they can still try hard, without robbing them of their rotational abilities along the way.

Offset positions benefits include:

  • Improving rotational abilities from separating hands and feet front to back which helps to turn people’s hips and chests
  • Initiates alternating positions of the hips with one hip more extended and the opposite hip more flexed
  • Provides greater variation in your exercise selection especially for unilateral loading
  • Provides more options to add different weight shifting which helps to create unilateral loading challenges 

Offset positions include:

1. The Staggered Stance position is standing with both feet flat on the ground and split front to back. Feet are typically hip-width apart from side to side and a half foot distance apart front to back, but the distance can be altered in relation to base of support needs. So, if your client has a difficult time balancing in this position, move their feet wider side to side. The position initiates alternating positions of the pelvis with one hip more extended and the opposite hip more flexed and can also create rotation towards the back side leg.
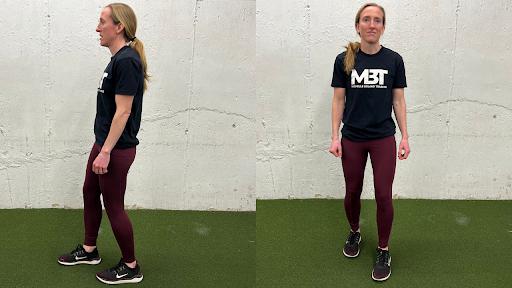
The Staggered Stance position can also be challenged with a variation called the ‘Loaded Step’. The Loaded Step variation is a weight distribution backwards onto the back leg. The center of mass should be about 80% on the back leg and 20% on the front leg. 

Loaded Step benefits:

  • This position variation encourages rotation through the hips and chest
  • You can coach it to be a knee or hip dominant exercise (see examples below)
  • You will feel LOTS of inner thigh (adductor), glute, and hamstring on the back leg
  • It supports hip mobility and eases tight posterior hips by allowing someone to feel a stretch in the back leg posterior hip, but try to avoid squeezing glutes…I know how tempting this can be 😉 
  • It encourages more single leg loading or shared loading
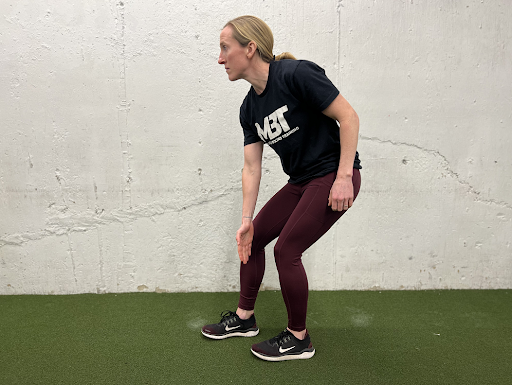
2. The Split Stance position is standing with a front to back separation of the legs and includes a reduction of foot contact on the back side foot. The leg separation is wider front to back than the Staggered Stance position and there is removal of full foot contact on the back side foot, such that the back heel is off the ground and the weight is rolled onto the ball of the foot. The position mimics (not equivalent to) a top of a split squat exercise.
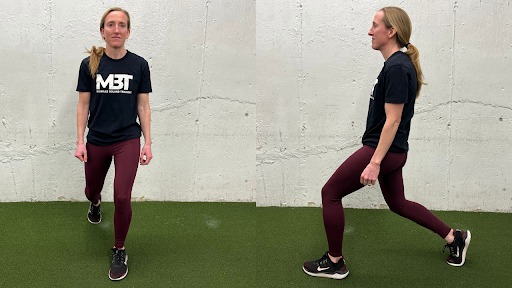
The Staggered Stance position can be challenged with a variation called the ‘Kickstand  Step’. The Kickstand Step Split Stance variation position is a body weight distribution forwards on the front leg with supportive, light weight on the back toe. Body weight distribution should be about 80% on the front leg and 20% on the back leg. 

Kickstand Step Consideration and Benefits:

  • This position variation encourages more single leg loading 
  • This position variation encourages rotation through the hips and chest
  • You will feel LOTS of inner thigh (adductor), glute, and hamstring on the front leg

You can challenge the position with where you hold the weight:

Holding Weight With Two Hands Will Limit Rotation


Holding Weight In Opposite Hand As Front Leg Will Encourage More Rotation


3. The Staggered Hand position is a front to back separation of the hands on the ground. Staggering the hands can help with creating alternating movement in the ribcage. The side of the ribs of the back hand will be lower and the upper body will be more likely to be rotated in that direction. You can also help target more side abdominal wall muscles by staggering the hands. 
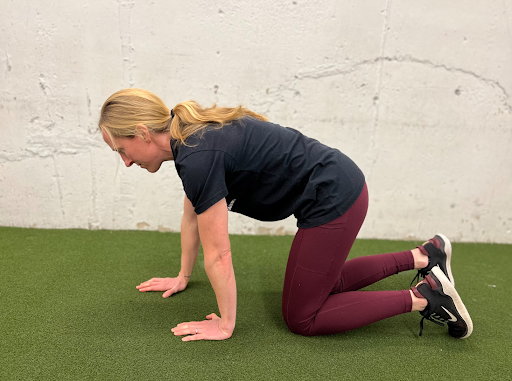
Check out some exercises you can start incorporating today with offset positions:  

Contralateral Loaded Step Hip Hinge


Loaded Step Ski Erg


1-Arm Kickstand KB Swing


Staggered KB Hang Clean


Offset Pushup


Salamander Pushups For Staggered Hands


Rule 2. Choose Offset Loading

Offset loading involves having your clients hold weight in less than obvious places that will challenge them in different ways. For example, instead of putting a barbell on your back, hold the barbell between your elbows (see Zercher hold below).

Holding a weight in the front will help target more abdominal wall muscles with less low back issues (see Goblet hold below). Instead of holding a kettlebell with two hands, you can also hold it with one hand to create some unilateral loading challenges.  

Check out some exercises you can start incorporating today with offset loading:  

KB Goblet Split Squat


Contralateral 1-Arm KB Split Squat w/ Opposite Arm Reach


DB Zercher Split Squat


Alternating 1-Arm KB Deadlift


Rule 3. Alternate Grips

Alternating your grip on the weights can improve your client’s ability to rotate, making them super athletes while ALSO being able to pick up heavy things and put them down. Turning one hand into supination and the other hand into pronation causes the upper body to turn towards one side. 

Check out some exercises you can start incorporating today with alternating grips: 

Jefferson Split Squat


Alternating Grip Pull-Up


Rule 4. Reduce Tension When It Is Not Necessary

Have you ever had a client who picks up five pound dumbbells to do a bicep curl and acts like they are 60 pound dumbbells?

I sure have. 

Encourage clients to create tension and substantial effort WHEN THEY HAVE TO.

Other times, encourage them to back off a bit. Exercises that are not too demanding can encourage improvements to joint range of motion and movement quality IF they are performed with low tension, no squeezing, no death grips, or no breath holding. 

Your clients do not need to be squeezing all of their muscles, all of the time, to get a good workout. Low tension exercises can stretch tight areas and improve mobility. For example, the Loaded Step RDL can improve hip mobility and stretch the back side of the hip when it is performed with low weight and low levels of tension. 

Loaded Step RDL


A great start would be to select warm-up or cool-down exercises that can be performed with low tension!

QUICK Programming Tips To Incorporate These RULES:

  1. Combine: Every exercise within your training session include the above four rules
  2. Pair: Pair a heavy, bilateral lift with an exercise that incorporates the rules 
  3. Consider positions in your exercise selection process, to learn more click HERE

Summary

Incorporating offset positions, offset loading, and alternating grips into your exercise selection will help your clients gain some rotational abilities, gain hip and rib cage mobility, and add some excitement into their training while STILL allowing them to get strong.

To learn more, check out my EXERCISE SELECTION PROCESS which layers positions, fitness qualities, then individualized variations. Position selection is the foundation of my exercise selection and all the information included in this article about offset positions comes from my quick and concise Position Principles course. 

The Position Principles course will help you to avoid leaving behind the greatest factor in getting your clients and athletes to move better. The course provides clarity on positional biomechanics, clarity on terminology within the fitness industry for exercises, a downloadable programming template, and easy steps to organize your program design. After this course, you will never question your exercise selection again.

If you have any comments or questions please feel free to email me at [email protected]

If you enjoyed the exercise videos in this article, check out the MBT Exercise Database for 1,200 more videos to use, embed within your programming, and level up your exercise selection game. 

Author: Dr. Michelle Boland


Categoriespersonal training Program Design

Building Your Sessions Around Effort

One of the more challenging concepts for new(er) clients to grasp is the idea of training effort. Sure, there are a select few who are psychopaths and think a training session only counts if you come close to shitting your spleen.

The vast majority, however, tend to UNDER-estimate what it takes to put forth appreciable effort during a training session.

Effort that will lead to consistent results.

I don’t know about you, but I find the missing link for most trainees (and why they never seem to make progress) is they lack a thorough understanding of what effort is and the types of effort that can be utilized.

Today’s guest post via Boston based strength & conditioning coach, Dr. Michelle Boland, helps to shed light on this topic.

Making effort.

Building Your Sessions Around Effort

Are you constantly having to hold your clients back from giving TOO MUCH effort?

…yeah didn’t think so!

Effort is one of the most important variables for client and athlete success, while also being one of the hardest things to extract from the people that you coach. 

So, how often are you accounting for it, teaching it, and programming for it? 

As coaches, we want to make sure our clients are matching their effort with our goals for them. 

If we want Karen to improve strength, there needs to be a difference between the weights she grabs for a 5 rep set and a 15 rep set. Those two repetition schemes require two different efforts. 

We need to teach Karen how to choose the appropriate amount of weight, what different types of effort feel like, AND why they matter. Progress in the weight room can be dictated by four specific types of EFFORT

  1. Substantial Effort
  2. Sustainable Effort
  3. Sprint Effort
  4. Reset Effort 

When working with general population clients, prescribing a set amount of repetitions ISN’T always the best STRATEGY to get results. INSTEAD, cue different efforts and select exercise variations that will allow them to adequately express that effort. 

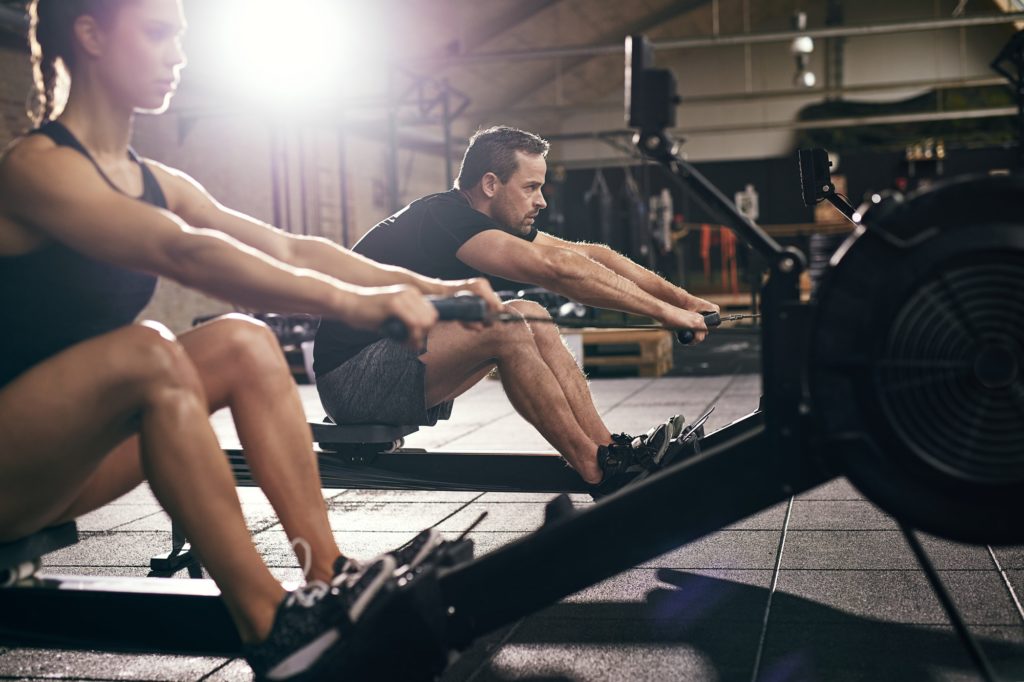
For example, if you want Karen to row for 10 minutes at a steady rate, Karen can’t start sprinting and crying 30 seconds into the row. 

Sportsmen doing exercises with rowing machine together

She needs to learn how to maintain her pace for the duration of the time and not be too gassed at the end. Hard work and effort have variations and aren’t always just maximum exertion. 

The more Karen understands this, the better she can perform the exercises you select with the appropriate amount of weights and with the appropriate amount of exertion. Thus, she will be able to express the appropriate outputs and get the BEST RESULTS

Now, let’s dive into the four different types of effort and how you can cue exercises and choose variations based on them… 

1. Substantial Effort

Think about the effort you would put into lifting a car off your child. 

Seems morbid, but I bet you wouldn’t hold back or look at your WHOOP band for advice.

A substantial effort should be challenging and be deliberate. You may have to tell your client to prepare and be ready to put in work. 

A strategy for teaching a substantial effort is to program separate repetitions. This DOESN’T mean max weight. It means allowing your clients to prepare for a considerable exertion without the momentum of bouncing the weight on the ground using a rebound effect. 

For a deadlift exercise example, cue your client to keep their hands on the barbell while letting the barbell rest on the ground after each repetition. Separate repetitions will teach the first pull from a dead stop, which requires the most substantial effort. 


For an exercise that is performed on one side of the body then repeated on the other, make sure you take a break between sides. For example, perform a heavy split squat for 5 repetitions with the right leg forward, then set the weights down to regroup mentally, then complete the split squat with the left leg forward. 


Keep the repetitions low (2-5ish), the speed will most likely be slow, and the weight should be RELATIVELY high. This again, doesn’t mean maximum. Submax loading is advised by TONY and works. Substantial efforts will be associated with the adaptive fitness quality of Max Strength.

2. Sustainable Effort

Think about speed walking.

It’s harder than regular walking but you can probably do it for a long duration of time. 

Nordic walking race, motion blur

Sustainable efforts should feel like they can be maintained over a long duration and continuous in their repetition. A coaching strategy for sustained efforts can be cueing the client to tap-and-go without resting the barbell on the ground. 


For an exercise that is performed on one side of the body then repeated on the other, DON”T take a break between sides. For example, perform the split squat for 8 repetitions with the right leg forward, switch legs, then perform 8 repetitions with the left leg forward, making the effort continuous between sides. 


Keep the repetitions moderate to high in the 6-30ish range.

This range may seem large, but most general population clients need a wide range to build an aerobic foundation, volume tolerance, and to learn associated weight ranges. Sustainable efforts will be associated with the adaptive fitness qualities of Strength Endurance and Hypertrophy.

The speed of the repetitions will be moderate: too slow and you may fall asleep, too fast and you won’t last…dang that rhymed! …Hence the word SUSTAINABLE.

3. Sprint Effort

Think about running for your life Karen. 

via GIPHY

Sprint efforts should feel powerful and quick. To program sprint efforts, find ways to help your clients be quick, such as…

  • Create some race challenges such as the Cone Stack Drill


  • If you have fancy velocity tracking equipment, use it
  • Find ways to unload them using bands


A coaching strategy to teach sprint efforts can be cueing the client to push the ground away and get tall to the ceiling during a deadlift. During the deadlift, the full rep doesn’t need to fast, focus on the pull from the floor (typically applied to the concentric portion of lifts) and they can lower the barbell down at a self-selected pace. 


For an exercise that is performed on one side of the body then repeated on the other, make sure you take a break between sides.


Keep the repetitions low to moderate (2-8ish) and low weight (better to have lower weight than to be slow). Cue your clients to move fast, “push the ground away”, and to get off the ground quicker by YELLING “the ground is LAVA, KAREN”.  Sprint efforts will be associated with the adaptive fitness qualities of Speed and Power.

Get YOUR CLIENTS to MOVE FAST.

4. Reset Effort

Think about being a light switch, have ‘on’ and ‘off’ modes. 

Closeup of switch on brick wall

A reset effort is being able to duplicate substantial efforts.

Why is this separate from substantial efforts? 

Substantial efforts are focused on a single attempt. Reset efforts are focused on your client’s ability to repeat high level effort.

Can they use the rest period to regroup and recover?

A coaching strategy to teach reset efforts is to program cluster sets. A cluster set can look like this: perform 3 substantial effort repetitions, then let go of the barbell, rest for 20-30 seconds, then perform 3 substantial effort repetitions, then let go of the barbell, rest for 20-30 seconds, then perform 3 substantial effort repetitions.

Rest should NOT include another exercise, it is a full rest period. 


For an exercise that is performed on one side of the body then repeated on the other, make sure you perform ALL repetitions within the cluster set on one side of the body before moving to the other side of the body. AND definitely take a break between sides. 


For a Split Squat example, perform 3 substantial effort repetitions with the right leg forward, then let go of the dumbbells, rest for 20-30 seconds, then perform 3 substantial effort repetitions with the right leg forward, then let go of the dumbbells, rest for 20-30 seconds, then perform 3 substantial effort repetitions with the right leg forward.

Put the dumbbells down, take a longer rest, then repeat that with your left foot forward. 

Summary

Teaching and cueing effort will allow you to get the best from your clients. You will be better able to match your exercise selection with their output and goals. Make different types of effort known to your clients and when you want them to express them. 

If you have any comments or questions please feel free to email me at [email protected]

If you enjoyed the exercise videos in this article, check out the MBT Exercise Database for 1,200 more videos to use, embed within your programming, and up your exercise selection game. 

About the Author

Dr. Michelle Boland

Categoriespodcast

Appearance on the More Train Less Pain Podcast

I’m often asked if I’d ever think about starting my own podcast.

My answer generally ranges from “I’d rather jump into a live volcano” to “no.”

Why?

1. Time. Between a brick and mortar business, workshops, travel, writing responsibilities, and a wife & kid I’d like to hang out with on occasion I simply don’t have the time to pull it off with all the logistics involved.

2. In terms of sharing content my strengths are tapping away on my keyboard while my cat nestles next to me and being in introvert heaven. Being the host of my own podcast, while I think I “may” be good at it, just isn’t my bag.

3. Besides, I’m fortunate enough to be popular enough to be invited onto 1-2 podcasts per month anyway.  So, I kinda already do do a podcast…😂

To that end, my latest podcast appearance is one of my favorites of all-time.

Copyright: forestrun / 123RF Stock Photo

More Train Less Pain Podcast

Dr. Michelle Boland & Dr. Tim Richardt invited me onto their show recently, and what I really dug about the experience was that there as a theme rather than them asking me about my “fitness journey” or “my top 5 reasons to deadlift on a Thursday.”

In this episode we count down “The Top 3 Things We’ve Changed Our Minds About in the Past 5 Years”. 🤔

Whether you’re a fan of rehabilitation semantics, sub-maximal training, or obscure 1980s Superman movie references, this show’s got something for you.

💥BONUS CONTENT; stick around for the back half, where Michelle and I solve all personal trainer’s financial problems in 30 minutes. 💸

HERE‘s the direct link to listen on the More Train Less Pain website.

HERE‘s the link via iTunes (Episode #3)

CategoriesExercise Technique Program Design Strength Training

Top 3 Single Leg Exercises For Yoked Ass Legs

Coincidentally enough I choose the picture for today’s guest post before actually reading it. 

Oops, a minor editorial mistake.

You see, as you’ll learn below, placing a barbell on your back during single leg exercises – while not a wrong strategy to partake – does have a distinct disadvantage.

HINT: More load isn’t always the “x-factor” with regards to making exercises more challenging.

Suffice to say, lesson learned (but I’m too lazy to go back and find a different picture).

I hope you enjoy this excellent piece by two colleagues of mine – Dr. Michelle Boland (a phenomenal local coach here in Boston) and Tim Richardt (a former coach at CORE who’s now located in the Denver area) – that gave me a few Ah-HA moments.

Copyright: serhiibobyk / 123RF Stock Photo

Top 3 Single Leg Exercises For Yoked A$$ Legs

Quarantine have your legs and butt looking skinnier than Gollum’s?

An excellent example of commitment to a singular goal, but not of muscular development. 

Get your quads, glutes, and hamstrings looking more bountiful than a post-Mordor-crumbling Shire feast with these single leg exercises!

We’re done with the Lord of the Rings references now, we promise.

We’ll explore loading options, body positioning, front versus rear foot elevation, and direction of center-of-mass (COM) movement to help you taste those sweet, sweet single-leg gains.

Let’s get right to it…

#1 Front Foot Elevated Zercher Split Squat

Load Position Advantage 

Holding the weight in the crook of your elbows allows for more relaxation of muscles on the backside of your trunk, enabling increased depth WHILE circumventing grip strength as a potential rate-limiter for loading.

A barbell placed in the traditional “back rack” may rob you of comfortable hip range-of-motion (ROM) due to compression of muscles on the backside of your trunk.

Loading in the Zercher position lets you maintain more VERTICAL displacement throughout the movement, and more pure-up-and-down displacement means more stimulation of muscles that DO vertical displacement (i.e. glutes and quads), leading to more gains and more eventual jealousy from your high school ex after they see your jacked wheels on Facebook.

No barbell? We can accomplish a similar effect with 2 DBs

https://www.youtube.com/watch?v=WlVELvq-ijg&list=PL2C3q7iaQQIVqmCkqxRFaIpiHffq-YcrQ&index=1


Vertical displacement whilst keeping a STACKED position during a split squat, vital to loading muscle tissue (yay!) and minimizing joint strain (boo!), is reviewed,
HERE

Why Front Foot Elevation?

Elevating the front foot shifts your COM backwards, meaning the muscles of the front leg can relax to a greater degree to allow for more depth during the lowering (eccentric) portion of the movement. Additionally, raising the front foot shifts the trained range of motion into deeper degrees of hip flexion, leading to greater mechanical stress placed on the musculature that extends the hip (dat booty). 

Bonus; Heel Up?


Try
elevating your front heel to enable increased loading of the knee and hip whilst maintaining the “vertical stack” during this drill.

Be sure to maintain heel contact and allow your knee to drift forward over the mid-foot to allow for more hip and knee flexion.

#2 Staggered Stance Retro RDL

Why Backwards is Better…

The Staggered Stance Retro RDL allows you to use the front leg to push your COM backwards towards the leg that’ll be doing all the work. This exercise HAMMERS glutes and hammies, and is a great stepping stone towards an eventual unassisted SLRDL.

The KEY distinction between the conventional RDL (or Heels on Wall Variation) and the staggered stance retro RDL is the direction of your COM travels. In the rear foot single leg deadlift, your COM translates forward, whereas in the staggered stance retro RDL, your COM migrates backwards. 

Going front foot supported allows for more of a sit “back” scenario encouraging a more advantageous orienting of the hips to access ROM (remember: more ROM, more loading, more gainz) as well as reducing the challenge of NOT falling forward onto your (pretty) face.

Why Single Arm Loading?

We love a single KB held in the opposite hand (in reference to the back leg), as this encourages rotation of the ribcage TOWARDS that rear leg. Rotation towards the side we’re loading means we’re able to load muscles of that hip to a greater degree, and the combination of an opposite hand reach AND a front foot support ensure we’re loading the back leg’s hamstrings and glutes as much as we possibly can.

Technique 

Some pointers with the Front Foot Supported Single Leg Deadlift:

  1. Position the non-working leg in front of the working leg and use the front (non-working) leg to push the back (working) leg backwards. This results in a hip “shift” TOWARDS that back leg.
  2. The arm opposite the working leg holds the KB and maintains a path over the big toe of the back foot. That reach further supports the shift you obtained in step 1.
  3. Sit your hips back in space, feeling loading on the heel, base of the big toe, and base of the little toe. Reverse this motion by pushing through this “tripod foot” back to the starting position.

#3 Rear Foot Elevated Split Squat

Jack Up That Back Foot

The Rear Foot Elevated (RFE) Split Squat is a variation that places greater emphasis on the front leg. This exercise is also a good progression towards a strict single leg activity, such as a single leg squat

While performing a boring ‘ol split squat, the load is fairly evenly distributed between the front and back legs. However, elevating the rear foot shifts your center of mass forward, dramatically increasing the loading of the front leg. Train this sucker and that leg’s getting more yoked than a Marriott Courtyard omelette bar. 

The RFESS is #3 on this list because it trains a little like a cross of exercises #1 and #2.

It’s a vertical movement (like our FFESS), but the forward lean created by the elevation of the rear foot enables some degree of forward/backwards COM displacement (like our deadlift variation). The result is an unholy cross of glute and leg destruction.

Placement of Load

To optimize loading with this drill, we recommend dumbbells in each hand- like THIS. As we mentioned previously, a barbell placed in the traditional “back rack” position tends to compress muscles on the backside of the body, robbing the body of hip flexion availability and trainable range of motion. 

The distance between your front and back legs- your “stride length” during a split squat- also matters.

A short stride length (front foot closer to back foot) will bias hip musculature (glutes). If you elongate the stride length you’ll shift the loading to more quads, leading to more yoked legs with which to better fill out those new early-Christmas jeggings. 

And Now, This…

You can check out these three extra loading variations that target different planes of motion in the RFE split squat: RFE Split Squat Planes of Motion Variations

Bonus Yoked-Worthy Exercise: Walking Toe Touch Lunges

Muscle Recruitment 

Walking Lunges with an opposite arm reach facilitate more high hamstring recruitment by biasing a posterior tilt of the pelvis. High hamstrings fix the position of the pelvis, enabling greater loading of the hip extensors (butt), making this drill an excellent choice for a “finisher” after your main exercises. To quote our good friend, the wise and powerful Tony, after performing a set of these, “I FELT it in my soul”!

DISCLAIMER; Michelle and Tim are NOT responsible for any Soul-Delayed-Onset-Muscule-Soreness (SDOMS) experienced after performing this drill.

Technique

Big pointers with the Walking Toe Touch Lunges

  1. Maintain up/down motion by keeping your head stacked over your chest and stacked over your hips… put simply “mostly elevator, a little escalator”
  2. Reach your opposite arm to your front big toe keeping your breastbone pointed straight ahead and letting your shoulder blade reach around your ribcage
  3. “A little” hinge at the hips is necessary to stay moving FORWARDS, but “a little” is all you get
  4. Be nice to your back knee, a soft surface is ideal with this drill
  5. Focus on turning into your abs on the same side as the front leg 
  6. Stand up by pushing the ground away with the front foot (that same tripod foot as we discussed previously)
  7. You get no bonus points for lunging LONG- keep your stride length short and controlled

Summary

  • Choosing single leg exercises that will allow you to achieve the greatest ROM while moving heavy loads are key to targeting more muscle mass. Gettin’ more yoked than a 12th century plow animal is all about moving load over ROM. 
  • Intelligent holding positions, such as DBs at sides and zercher, beget more motion availability. 
  • The positioning or elevation of your feet relative to one another is VITALLY important in ensuring we’re loading the target tissue through as large of an available range as we can muster.

Now go get those legs so HUGE that grandma’s gonna have to buy you new Christmas stockings.

About the Authors

Michelle Boland

Tim Richardt

CategoriesStuff to Read While You're Pretending to Work

Stuff to Read While You’re Pretending to Work: 1/10/20

Copyright: olegdudko / 123RF Stock Photo

BUT FIRST…I’M LIKE, REALLY, REALLY IMPORTANT

(Things I’ve appeared in, places I’m going, you know, important stuff)

1. (De)-Constructing the Deadlift & Squat – Stoneham, MA: Sunday, January 26, 2020

I’m teaming up with Brad Cox of ACUMobility for this 6-hour workshop where we’ll discuss hip assessment and, you guessed it…

keto recipes deadlifts and squats.

What will be unique about this workshop is the two perspectives we’ll bring to the table; myself as a strength coach in addition to Brad’s background in sports medicine and orthopedics.

EARLY BIRD rate ends in two weeks.

2. (Even More) Complete Shoulder & Hip Blueprint – Athens, Greece: Saturday, Feb 29th & Sunday, March 1st, 2020

It’s official: This marks the sixth year in a row Dean Somerset and I are presenting together. We’re so excited to be coming to Athens to kickstart 2020.

3. Coaching Competency Workshop – London, UK: Sunday, March 8, 2020

4. Strategic Strength Workshop – Detroit, MI: April 5, 2020

This will be my first ever workshop in the region!

I’m expecting ticker tape parades.

SOCIAL MEDIA SHENANIGANS

Twitter

Instagram


View this post on Instagram


Barking Up the Wrong Tree. . We coaches do it a lot. Take for example new clients who come in and swear up and down they’ve got “tight” hamstrings. . I swear a week doesn’t go by where I don’t hear it. What’s with the pandemic of tight hamstrings everywhere you go? . Well, tight hamstrings is rarely a thing I’ve come to find. This, of course, doesn’t imply people never have tight hamstrings – they do! . It’s just, you know, I’d believe Tupac is alive living on some deserted island more than I believe someone has chronically tight hamstrings. . Look at the before/after pictures above. . This was a new client who came in to see me last weekend who, as you can surmise, told me he had tight hamstrings. . I was skeptical (I.e., cue me going all Beyoncé, Lemonade, baseball bat to a windshield……nooooooooo). . 📸 TOP PIC = Initial Active Straight Leg Raise. Not too shabby, but not great. . 📸 BOTTOM PIC = One minute later after NOT stretching his hamstrings (which he had been doing for years). . I concede he’s bending his knee ever so slightly, but you can clearly see an improvement in his ROM. . What did I do? . I worked on his end range ACTIVE HIP FLEXION. I mean, that’s really what the screen looks at: simultaneous hip Flexion/hip extension; not necessarily hamstring length. . In non-geek speak: I had him actively (meaning HE did the work) bring his bent knee towards his chest (hip flexion) and work on ramping up intensity to “own” the position. . Moving forward, we’re going to do more of that rather than endless stretching. . 🥱 Zzzzzzzzzzzzzz . Swipe LEFT to watch a quick video of how you can test and work on this yourself. . Even though we have to work on stuff, the more you make “rehab” look and feel like TRAINING, the more I find clients buy into it.

A post shared by Tony Gentilcore (@tonygentilcore) on

Stuff to Read While You’re Pretending to Work

Diastasis Recti After Pregnancy – Zach Long

If you’re a trainer 50% (actually, maybe it’s 51%) of the population you train are women. A vast number of them will give birth and have “complications” postpartum.

And even if they haven’t recently given birth, once a woman is postpartum she’s ALWAYS postpartum and knowing how to detect and address Distastis Recti is integral.

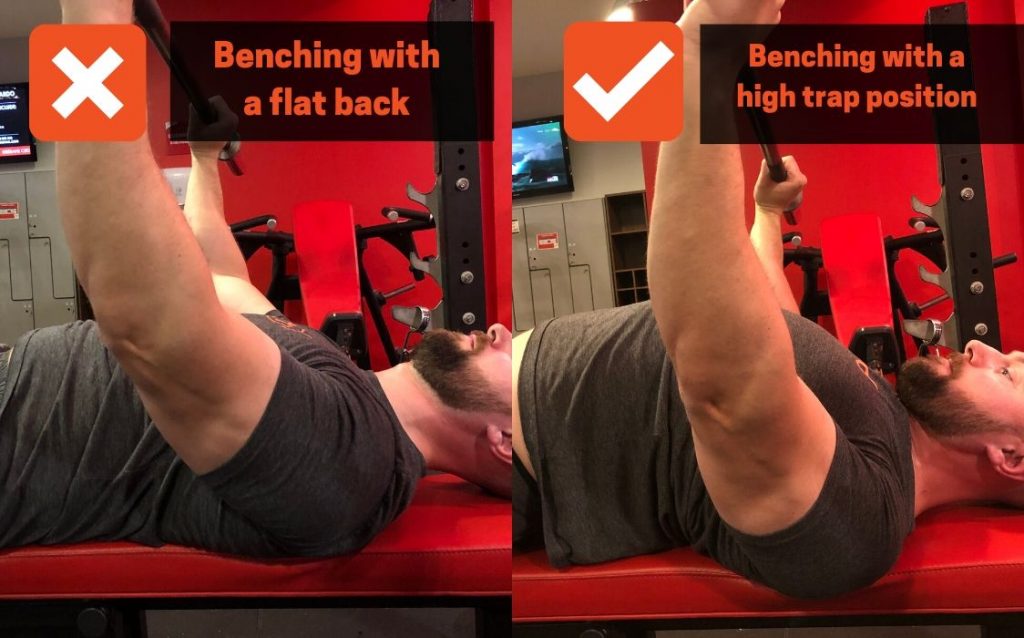
Increase Your Bench Press By Avoiding These Mistakes – Avi Silverberg

I am admittedly the world’s worst bench presser (countered by the mere fact I am one of the world’s best cuddlers), so I was flummoxed with I was asked to contribute a snidbit to this article.

Just a snidbit, though.

Let’s not get carried away.

This is an excellent article nonetheless and if you’re someone who struggles with their bench press this may help.

Scare Tactics – Michelle Boland

The words we use as coaches/trainers matters.

When someone says something like “deadlifts are dangerous,” most of the time it means the person saying it hasn’t done it enough (or with appropriate technique) to perform it safely in the first place.

Just sayin…