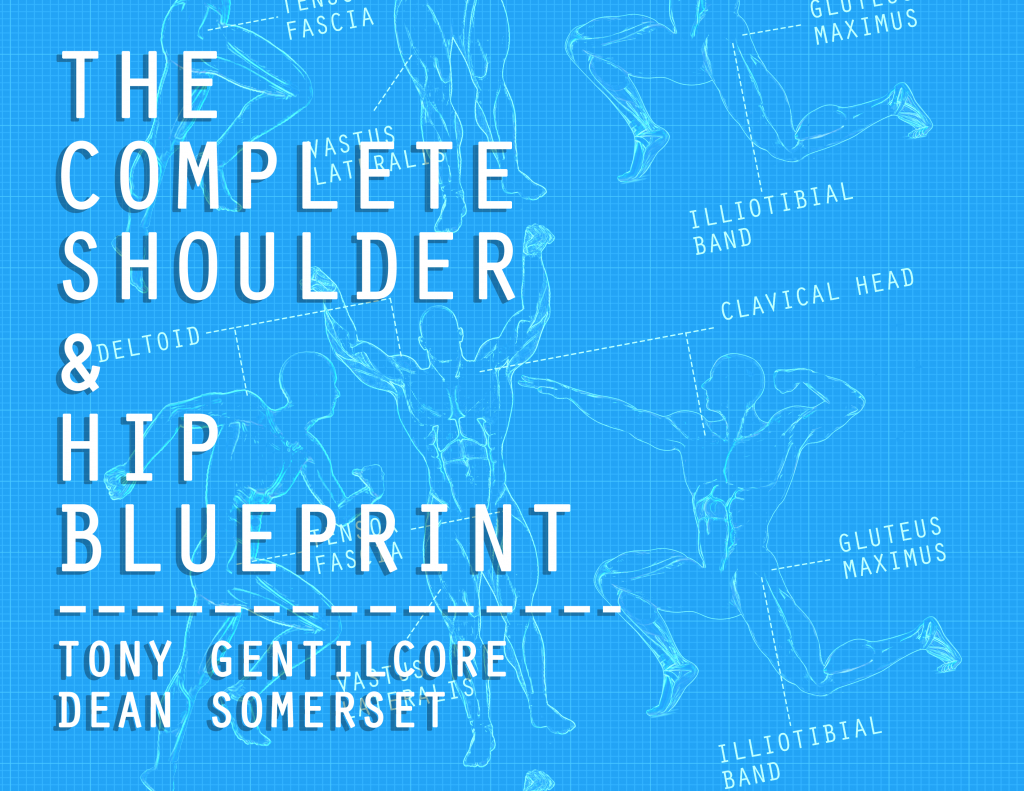
My flagship resource, Complete Shoulder and Hip Blueprint is on sale, like right now, for the first time ever, at 50% off the original price.
Why?
1. My (business) partner-in-crime[footnote]And non-sexual life partner[/footnote], Dean Somerset, is Canadian and we figured it would be a nice way to celebrate our respective country’s Independence Day.
Unity is swell.
2. My 5-month old, Julian, goes through a ton of diapers. That shit’s expensive.[footnote]HA – pun intended.[/footnote]
3. Why not?
It’s gotten amazing reviews and feedback from trainers/coaches from around the world, and I’m not at all biased when I say it’s pretty much the greatest fitness resource ever produced in the history of ever.
Don’t worry: I’ll be writing some actual new content in the upcoming days to coincide with the sale. Content that will educate and make you a better coach.[footnote]And if it just so happens you want to say “thank you” by making a purchase, well, you kind sir (or gal) are going to be the recipient of a hug if or when you and I cross paths.[/footnote]
In the interim I wanted to rehash some older(ish) posts that touch on some of the topics Dean and I cover in the course. Even if you don’t want to buy anything – did I mention it’s HALF OFF? – the info is fantastic, and you’ll be smarter. And more attractive.
Shoulder impingement is a garbage term. A lazy term. But that doesn’t mean you shouldn’t know the difference between the two, the mechanisms involved, and how to train around each issue.
Taking the approach that everyone should squat or deadlift (or whatever) the same way, with the same stance and setup, like we’re all molded to fit into the same textbook algorithm of perfection is unfortunate.
Surviving in the fitness industry is tough. Now, granted, this isn’t The Revenant…we don’t need to worry about wrestling grizzly bears or anything. But it is pretty cut-throat out there and the one’s who “survive,” and do well, are the ones who can separate themselves from the masses.
Today’s guest post by strength coach Travis Hansen showcases some ways you can do just that.
Trying to be successful in the fitness industry is a lot harder than most people tend to think.
The temptation for instant gratification and fly by night credibility is a very strong one, and provides with it a common misconception that you won’t have to grind on a regular basis, learn, and actually train people, not to mention generate legitimate results to remain alive in the business.
I’ve heard from a few credible sources that far less than 10 percent of individuals who start in the fitness business remain alive after a decade, and based on my experience that definitely seems to be pretty true.[footnote]Note from TG: (cue jazz hands) I’m still here. Nah nah nah naaaaah.[/footnote]
In this article I am going to share with you some arguable principles that I’ve utilized over the course of the past 12 years to stay alive and grow both my online and personal/athletic training business. I am by no means the most successful individual and I’m sure that many others could add to the list, but I honestly think the issues I am going to share with you are essential to your survival if you love this business and ultimately want to help people. I think everything stems off of the two factors I just mentioned and they serve as the groundwork for everything else to help lead you on your way.
So here we go….
#1- What Room Are You In?
Something that is very common I noticed from other trainers or even just the general public, is that there seems to be a constant battle in determining who knows more than the other person, or someone immediately jumps out and gets defensive if their current thought process is challenged by someone who may in fact be right.
I would be willing to wager a bet that our industry is far more guilty of this problem compared to any other profession with all of the hyped up trends that are out there still, hands down!!!
If you watch closely you will notice that the best in the business often times have their note pads out, eyes locked in on the person they are interacting with, ears open wide when they are trying to learn anything they can take away from the present conversation, and more times than not, don’t engage in these petty intellectual ego driven arguments that accomplish zero in the long run, unless the individual is just that damn stupid and asking for it.
As Mike Boyle once said:
“ There is a reason we have two ears and one mouth.”
The harsh truth is that you should probably spend the first 10 years of your career searching out the people who make you uncomfortable and dumb for the moment and eventually it will all start to make sense, and I guarantee you will be surprised just how much better you get.
The last thing I want to discuss in this regard is that something world renown coach and gym owner Zach-Even Esh once said that really resonated, and that is that people are often times uncomfortable and unsupportive of successful people as it makes them introspect and assess where they are at relative to their goals.
I honestly feel if that you start admiring successful people and try to emulate and even beat them then good things start to happen.
Don’t hate congratulate!
#2- Sacrifice
What a lot of surviving comes down to is how much you’re willing to do and sacrifice in order to achieve your goals.
Once you have mentally committed to doing whatever the hell it takes in order to achieve your goals without being illegal or walking over someone in the process then eventually you can start to grow.
I remember when I first got into this business I would buy and immerse myself into any fitness related material I could get my hands on to help build a solid learning filter. I was working 6-7 days per week for 8-12 hours per day. I would contact and pester any expert that would respond back to me with questions I had.
Luckily I stumbled across some great people that I still consult with today. You need very strong mentors and a network to better yourself and help your people.
#3-ASK FOR HELP
Never be afraid to ask for help or admit to your clients that you do not know something.
This only improves your credibility and earns more trust from your people in the long run.
Conan O’Brian once said in his late night talk show that saying you don’t know is often a sign of intelligence.
If you elect to retain your massive ego and state of ignorance, then you are only setting your education and growth back, and eventually your people are going to catch onto your bullshit and you will join the massive crowd of fly by night trainers that exist in our society today.
And remember you are only as strong as your network or alliance.
#4- Re-Invest
If you pay attention on social media, many times the high level practitioners and coaches in the field will send you subtle hints on how to be successful by showing you pictures of their personal training library and such.
There is also generally a very robust “Resource” section on every one of their websites where they show you where they learned from and how to improve your potential knowledge gaps.[footnote]Note from TG: Ahem, HERE’s my Resources Page.[/footnote]
Your success will be ultimately determined by how smart you are, how hard you work, and how much you invest in your education and business. I never personally took out a business loan, but every paycheck and sometimes my whole paycheck was dedicated to learning material or small equipment purchases that accumulated into a bigger and bigger training setting or environment.
And then eventually once people see that you know what you are doing, you’re legitimate, and you get results, then they will more than likely invest in you and the ball just keeps growing bigger and bigger!
About the Author
Travis Hansen has been involved in the field of Human Performance Enhancement for nearly a decade. He graduated with a Bachelor’s degree in Fitness and Wellness, and holds 3 different training certifications from the ISSA, NASM, and NCSF.
He was the Head Strength and Conditioning Coach for the Reno Bighorns of the NBADL for their 2010 season, and he is currently the Director of The Reno Speed School inside the South Reno Athletic Club.
He has worked with hundreds of athletes from almost all sports, ranging from the youth to professional ranks. He is the author of the hot selling “Speed Encyclopedia,” and he is also the leading authority on speed development for the International Sports Sciences Association.
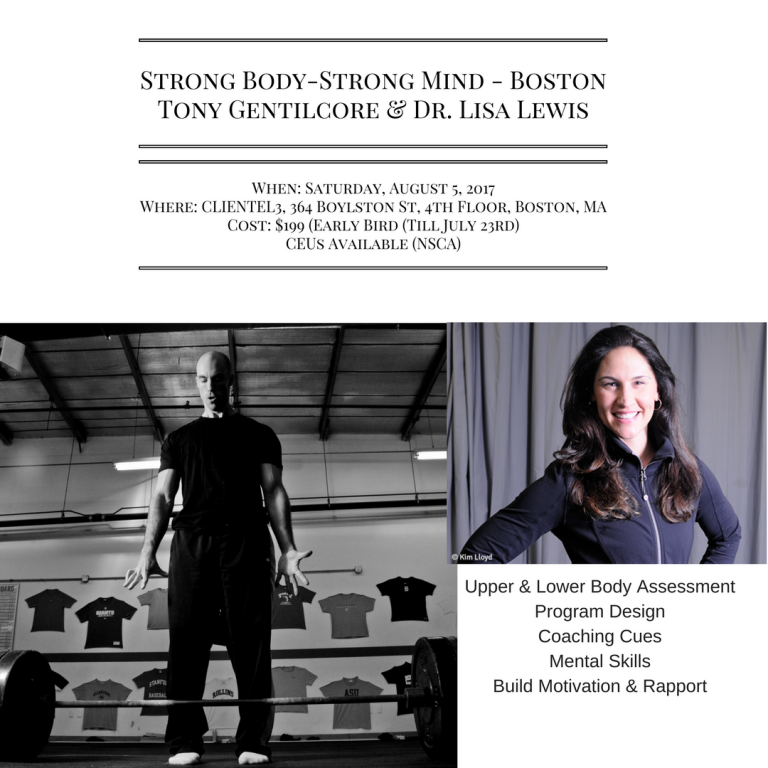
I’m really excited to announce the Strong Body-Strong Mind Workshop, coming to Boston (finally!) later this summer.
The idea is simple: there’s a corner in the industry that’s underserved….mental skills.
There are a lot of people out there who write about “mindset” and describe themselves as mindset coaches (whatever the heck that means) who, by and large, have zero academic background in that department.
Lisa, SPOILER ALERT: she’s my wife, went to school for this shit.
I went to school to help turn people into badasses.
Lisa can speak to building competency and discussing how to build the skills to develop rapport with clients. I can speak to getting people bigger, stronger, and faster.
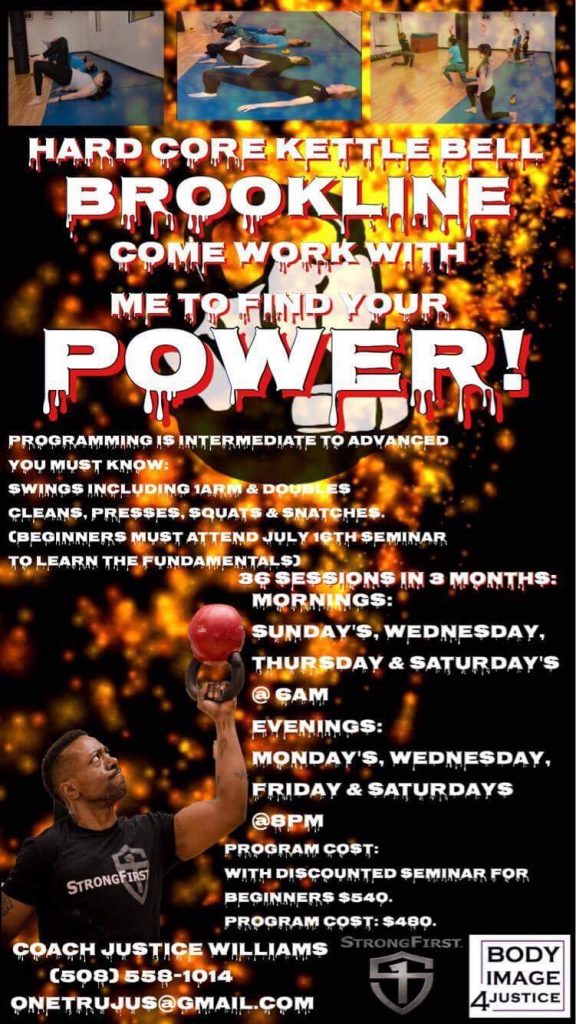
I’m pleased to announce that StrongFirst certified instructor, Justice Williams, will now be running kettlebell specific classes out of CORE starting next month.
You know, kettlebells, those cannonball looking thingamajiggies.
If you’re a beginner you’ll need to first attend the Fundamentals class on Sunday, July 16th where Justice will go over all the foundational moves like the deadlift, Goblet squat, swings, and Get-up.
If you’re already a KB enthusiast you can jump right into the program which will run for three months (meeting 3x per week) at CORE.
This will be an excellent opportunity get accountable, get fit, and learn kettlebell-specific movements all under the tutelage of an amazing coach. Check the flyer above for contact information.
3. Lift and Learn Workshop – CORE
If you’re a beginner, another great opportunity will be the Lift & Learn Workshop hosted by strength and conditioning coach, Jarrod Dyke.
Lifting weights can be intimidating:
Where do I start?
How do I warm-up?
How much weight should I use?
How often should I train?
Crap, did I leave the stove on?
Jarrod will spend an afternoon answering these questions (and more) in this FREE workshop on Sunday, July 23rd. For more information go HERE.
The Summit’s organizer, Ryan Ketchum, and I caught up yesterday and chatted a little on what I’ll be speaking about.
It’s a quick listen, about 15-20 minutes, but I discuss some things I feel are often neglected when it comes to program design. Things not many fitness professionals hit on; and it has nothing to do with the x’s and o’s of program design.
Groin strains can be a stubborn son-of-a-bitch. Once you have one, it’s one of those pesky injuries that never really seems to go away. In today’s guest post by strength coach and physical therapist, Sam Spinelli, he breaks down some common ways to resolve the issue.
Groin strains are often a hard problem for people to manage. We see them present in many different populations and occur with a wide range of activities. Strains are common in sports such as baseball, hockey and soccer where this is a huge demand on the groin.
With the groin musculature being a collection of numerous muscles, it is involved in so many different movements – flexing the hip, extending the hip, bring the knee towards midline, internally rotate the hip, and externally rotate the hip.
Due to the involvement in these movements, the “groin” can get stressed while performing them, but also get strained when the opposing movements are done as well.
For example, the adductor brevis (one of the higher up groin muscles) acts to adduct, internally rotate, and flex the hip.
If strained, during those three movements the muscle will be challenged to contract.
In contrast, during hip abduction, external rotation, and extension the adductor brevis will get lengthened. When the adductor brevis is strained, excessive lengthening can increase the damage to the vulnerable tissue.
The first step to managing these strains is to get things to calm down. Check out THIS article for more on that in regards to strains.
Get Long
When we say get long, we are talking about having someone comfortable with allowing the involved musculature to elongate.
This isn’t trying to lengthen the actual tissue – which is a topic we will discuss in a separate article/video series – but have the tissue be able to express the range it actually has with ease.
Below is a series of options – foam rolling, less dynamic movements, and more dynamic movements.
We start off with foam rolling as a means of helping in the short term, which we can use to help reduce the perception of tone in the tissue. Ideally this is used only briefly and removed as soon as possible so we are not relying upon it.
The less dynamic movements are one which have less involved movement, fewer joints involved, and more support. These are a great starting point for moving and reducing fear in individuals coming off a groin strain.
The more dynamic movements are things that will have more transfer to daily life and sporting activities.
Once we are in the phase of building things up, we will shift our focus to exercises to help make the tissue more resilient. In particular, we are going to start off with an approach to get long and get strong.
Soft Tissue – Adductors
Split Stance Adductor Mobilization
Frog
Frog 2.0
Lateral Lunge
Cossack Lunge
Cossack Squat
Get Strong
A muscle that is stronger can handle more stress placed upon it. This is why developing the musculature related to this injury can help in the future. In particular, we will look to increase the strength of the groin muscles, but also that of the abdominals.
When we look at where most of the groin muscles originate, we can see they share a common insertion with some of the abdominal muscles. This can be like a tug of war between the muscles. If we have one side not holding up its part, then we can be left with imbalanced force production and a not optimal tension-length relationship. This is often overlooked and can lead to reoccurring issues – which is why we address it here.
We use a similar approach here of utilizing less dynamic movements initially to help target the groin muscles, then build in more dynamic movement and load over time.
For the abdominals we use an approach of challenging the abdominals in both a isometric and isotonic format. This helps to integrate static strength to hold position, but also strength in being able to manipulate the pelvic positioning.
Adductor Strengthening
Side Lying Adduction
Feet Elevated Side Plank – Top Leg Only
Feet Elevated Side Lying Adduction
Lateral Lunge – DBs
Lateral Lunge – 1 Rack
Band Resisted Lateral Lunge
Abdominal Strengthening
Reverse Crunch
Hanging Knee Raise
Hard Style Plank
An Example Introductory Session
Upper Body Lift +
A1. Split stance adductor mob x10 x3sets
A2. Side lying adduction x10 x3 sets
B1. Frog x10 x3 sets
B2. Reverse Crunch x10 x3sets
As you start to build strength and comfort, we can progress to:
Modified Lower Body Lift (RFESS, deadlifts, etc.) +
A1. Lateral Lunge – DBs x6 x3sets
A2. Hard style plank – 3(10s) x3sets
B1. Feet elevated side plank – top leg only x3(10s) x3 sets
B2. Hanging knee raise
Wrap Up
Over time you would want to keep progressing the variations while also building to more advanced movements involving power, agility, and requiring greater motor control of positioning.
Move well, lift heavy, stay healthy,
Author’s Bio
Sam Spinelli is cofounder of The Strength Therapist, a company devoted to educating people about strength training for rehab and performance.
Coming from the great white north of Canada, Sam spent 5 years working with high level hockey as a strength and conditioning coach. Currently he has taken up a nomad status in the United States to pursue his doctorate of physical therapy and hang out with really smart people (Like Tony G).
Outside of spending his time reading research papers and drinking coffee, he is a competitive strength athlete in sports such as powerlifting, weightlifting, and strongman.
On the “Like It” side of the fence are powerlifters, people who like to lift heavy things, Gandalf, and otherwise those who view it as a basic movement pattern (hip hinge) which helps people get bigger, faster, stronger, more resilient, less likely to breakdown, and less likely to die during the impending zombie Apocalypse.
Gracing team “Hate It” is an eclectic group as well. While there are exceptions in each example given below, in my experience, those who have beef with the deadlift tend to be primary care practitioners, some physical therapists, some chiropractors, some fitness professionals, 90% of yoga instructors, every person with a vested interest in selling a product preying on women’s irrational fears of getting bulky, and rabbits.
I can’t explain it. Rabbits are weird.
Believe me when I say this: The list above is not concrete. I have many friends and colleagues who are physical therapists, chiropractors, yoga instructors, and the like who are fans of the deadlift and use it routinely with their clients/athletes/patients.
It’s just that, more often than not, whenever I do hear someone speak ill of it, it’s almost always someone with a lot of letters next to his or her’s name (or with limited experience in the weight room).
Take this recent email I received from a chiropractor friend of mine:
“If you could be of assistance I would love to share your opinion on deadlifting with some of my colleagues who feel it is detrimental to the low back. One doc feels it could be responsible for pars fractures in the lumbar spine, I agree with you not likely if done correctly.”
To answer your question:
1. Seriously, I can’t explain the rabbit thing.
2. A Pars Fracture is one of the most common causes of low back pain in general population clients, but also adolescent athletes. It involves a small connecting bone in the lumbar spine called the pars interarticularis, and it’s an area that’s (generally) compromised when excessive extension and rotation of the spine enter the mix.
As far as youth athletics is concerned, I saw this a lot in my time at Cressey Sports Performance as a result of one of two scenarios:
A sedentary kid jumps right into playing a rotational sport (baseball) without any window of preparation. These were the kids who would wait until a week or two before the season started before participating in any strength & conditioning work.
An overzealous kid (or, rather, parent) plays a sport, one sport, year round, and develops a pattern overload injury.
In both cases there can be deleterious effects, at worse, a condition called Spondylolisthesis or “spondy” or end-plate/pars fracture.
With regards to general population, many of the above still applies. But usually it’s a sedentary lifestyle resulting in poor hip mobility, t-spine mobility, which then compromises spine integrity resulting in faulty movement mechanics.
I.e., being “stuck” in extension.
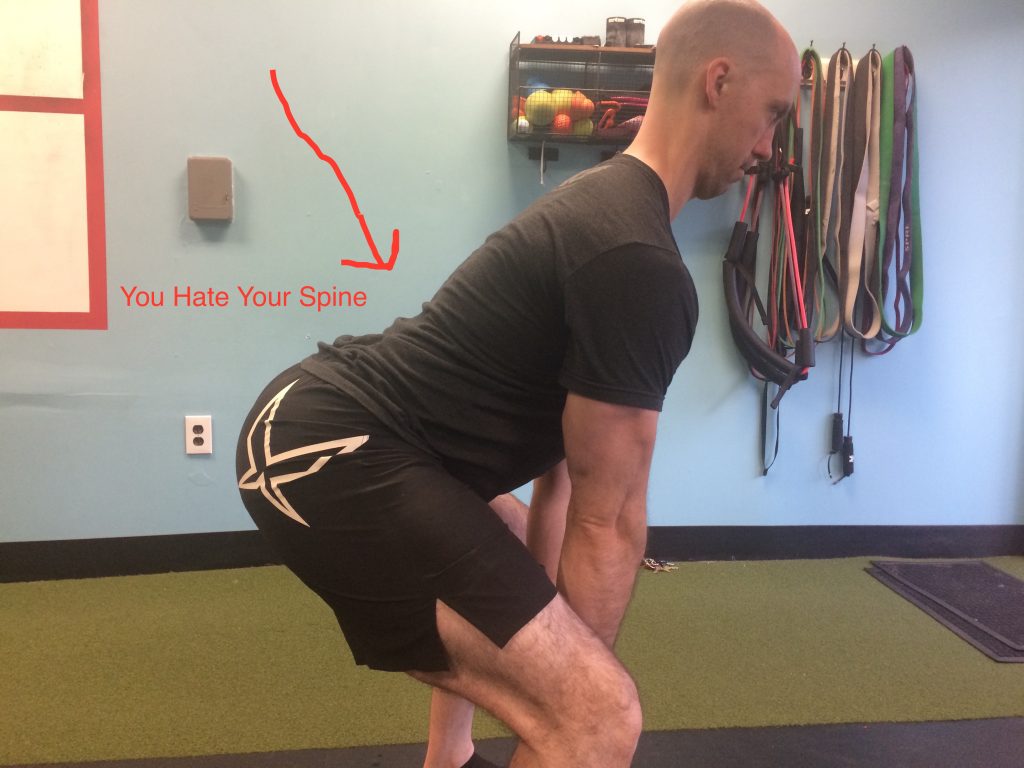
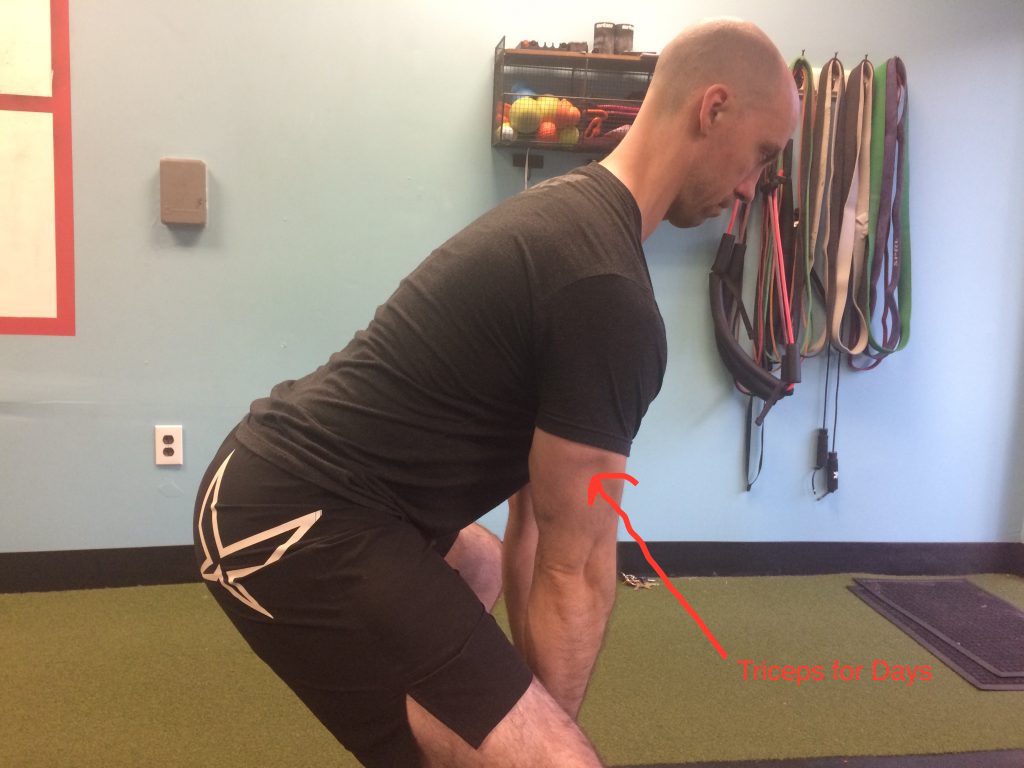
As an example:
Deadlift Setup: Overarch/Gross Extension/Gross in General
Deadlift Setup: Doesn’t Make My Corneas Want to Jump Out of Their Sockets
In the first picture there’s an exaggerated extension pattern, which, over time, could (not always) have negative ramifications on spine health.
If so, fix it!
Clean up/regress the pattern to where someone is successful, limits compensation patterns, and can “own” the movement. Remember: A deadlift isn’t just a loaded straight bar on the ground.
Don’t demonize an entire exercise and label it the root cause of a specific type of back pain because you’re unable to coach it well or understand how to scale it correctly to fit the needs, injury history, and ability level of an individual.
What’s to say any ONE thing is the culprit in the first place? We don’t really know what cause back pain:
Lack of hip internal rotation.
Repetitive flexion, repetitive extension.
Weak anterior core.
Weak glutes.
Kitten cuddles.
It could be anything.
I think any health/fitness professional who frames any one exercise or modality as all-encompassing “dangerous,” at all times, for every individual, and is the root-cause of any one specific injury, is doing the industry a disservice.
The words we use and how we frame things can set a toxic precedent.
Messages That Can Harm People With Back Pain
Note: I found this list somewhere on the internet and saved if for a time I’d need it, like this. I have zero recollection where I found it, and I don’t even remember there being a source.
Regardless, thank you to the person(s) who made it. Please don’t sue me for plagiarism.
Promote Beliefs About Structural Damage/Dysfunction
“You have degeneration/arthritis/disc bulge/disc disease/a slipped disc”
“Your back is damaged.”
“You have the back of a 70 year old.
“It’s wear and tear.”
Promote Fear Beyond Acute Phase
“You have to be careful/take it easy from now on.”
“Deadlifts are dangerous/you should avoid deadlifts from now on.”
“Your back is weak.”
“You should avoid bending/lifting.”
Promote Negative Future Outlook
“Your back wears as you get older.”
“This will be here for the rest of your life.”
“I wouldn’t be surprised if you will always be in pain.”
“Back pain doesn’t mean your back is damaged. It means it’s sensitized.”
“Your Back pain can be sensitized by awkward movements, postures, muscle tension, inactivity, lack of sleep, stress, etc.”
Promote Resilience
“It’s very rare to do permanent damage to your back.”
“Your back is one of the strongest structures of your body.”
Encourage Normal Activity and Movement
“Your back gets stronger with movement.”
“Motion is lotion.”
“Protecting your back and avoiding movement can make things worse.”
Because It’ll Make You Feel Better To Say It
“The next time you tell me deadlifts are bad or dangerous, I’m going to tell you to eat a bag of dicks.”
Or, Maybe Don’t Do That and Take This Sage Train of Thought From Dean Somerset
“Anything “could” be bad if done improperly, or for the wrong reasons, wrong volume/load, or in people who don’t qualify to do the exercise. I would say it’s best to not blame the exercise as a cause, but to understand the mechanism of the injury and see if the exercise could contribute to it or not. There’s a lot of injuries that can come from deadlifts, not limited to only pars fractures.
I wouldn’t avoid programming them for people due to this alone, but would progressively build people up to doing them well and under control with a load that is within their abilities to perform and recover from appropriately.”
We owe it to ourselves (and the industry) to be a little more open-minded, responsible, and less magnanimous at making such boisterous claims.[WU-TANG’s FOR THE CHILDREN.[/footnote]
If you’re like me, you hate listening to the sound of your own voice. For me it ranks somewhere between nails scratching a chalkboard and a whale passing a kidney stone.
Not pleasant.
Which is to say: I get invited onto a number of podcasts each month to talk about training, deadlifts, and LOLcats, and I rarely (if ever), re-listen to any episode I appear on.
This isn’t to say I don’t believe I had anything good or insightful to say, or that I wasn’t entirely witty or downright charming.
Of course I was….;o)
However, it’s just, you know, listening to the sound of my own voice is equivalent to this:
I had a recent appearance on the StrongCast Podcast with Vidura Rajapaksa. He sent me a heads up the other day that my episode went live and out of curiosity I pressed “play.”
I don’t know what it was: the fact it was the first podcast I recorded without my braces, it was a Thursday, I don’t know…..but I sounded amazing.
It was as if Adele took over my vocal chords once I started breaking down individual anatomy variances and squat depth.
“Hello…..”
Okay, in all seriousness, I had a blast recording this episode and if you’re sitting there stuck at your desk or maybe in transit to work or home and want some time to kill give it a listen.
NOTE: Actual exercise not pictured. More power to you if you want to pull it off though. I mean, it does work the serratus…;O)
But First – A Rookie Parenting Mistake
It was a consortium of errors this past weekend. Lisa and I were supposed to head to Toronto for our Strong Body-Strong Mind workshop.
We were pumped to go, but what made the trip an even bigger of a deal was the fact it was going to be our first attempt at bringing our almost 5-month old, Julian, with us. On a plane. Did I mention on a plane?
On a plane.
With no where to go if he acted up.
You could say we were both a little nervous. But we took solace in that the plane ride from Boston to Toronto is a pretty short one and we had a kick-ass weekend a head of us hanging out with 25+ fitness professionals.
That is until we got to the airport, through security waiting at our gate, and were then informed Julian needed a passport.
Whaaaaaaaaaaaaaaaat?[footnote]All we brought with us was his Birth Certificate, which, in fairness, is what Lisa researched we had to bring with us, and the person at Air Canada told us to bring (I.e., some form of proof of identity). Unfortunately, we were wrong.[/footnote]
In the end we had to postpone our workshop, and head back home with our tail between our legs.
Sorry Toronto. We’ll see you later this year, I promise. The man can’t keep us down.
We have a tentative date planned in September, but will confirm shortly.
Lets get to the exercise….
Serratus Punch
Who Did I Steal It From: This is an exercise I’ve done for several years with clients off the floor. The addition of the stability ball, though, is something I snaked from Dr. Joel Seedman.
What Does It Do: The serratus anterior is the muscle located alongside the ribcage and plays a crucial role in shoulder health and performance. Specifically, it’s main role is to aid in upward rotation of the scapulae via protraction.[footnote]The serratus also helps keep the shoulder blade more congruent or “snug” up against the ribcage/thorax. Maybe even more important is that it also helps increase hugging capability by 117%. Science.[/footnote]
It’s a relatively innocuous muscle, but I’d venture a guess the bulk of shoulder “issues” you come across as a personal trainer or strength coach can be remedied with a little more TLC given to it.
It’s a BIG deal.
It’s a big deal especially when we start discussing one’s ability to raise his or her’s arms overhead. In order to do so, safely, three actions need to happen with the shoulder blades:
Upward rotation
Posterior tilt
Protraction
I feel protraction is a lost movement. More and more we’re finding people “stuck” in an extension pattern which has a domino effect up and down the kinetic chain. With regards to upper extremity movement and mechanics we find people with a more depressed (low, not sad) shoulder girdle, excessive rib flair, and shoulder blades that tend to be more adducted/retracted and downwardly rotated.
In no small part the culprit can often be pointed to execution of common strength training movements. True, in order to lift BIG weight with the “big 3” it behooves anyone to “pack” the shoulder blades together and down when setting up to bench press, deadlift, or squat.
Getting and maintaining full-body tension requires “stuff” to be locked down tight.
That being said, it’s still important to be able to access movement. While we may coach people to clamp their shoulder blades down when bench pressing, as an example, to provide more stability to the joint, that doesn’t mean this should be the case 100% of the time.
Protraction or reaching is a vital component for shoulder health and performance.
And the serratus anterior is an often neglected muscle that can have profound effects on how one’s shoulder feels.
Also, not for nothing, this is also a solid core stability exercise.
Key Coaching Cues: Since the successful execution of this exercise is predicated on one’s ability to perform a plank position that doesn’t make me want to throw up a little, lets discuss that first:
TENSION! – everything should be firing. Your abs, your glutes, your quadricep muscle, your eyeballs, everything.
You should not be “hanging out” on your lower back.
Once you’ve got that down, from there the idea is to “punch” or push away from the stability ball making sure to stay fully engaged throughout.
NOTE: I’d start with performing these off a more solid surface – like the floor – if you’re new to this.
I like to add a full exhale as I push away which will help with keeping the ribs down (and serve as a kick-ass ab workout).
Under control, lower yourself back down by retracting the shoulder blades making sure not to poke your head forward. You should still be engaged here.
I know, I know: I’ve been slacking on the writing front the past few weeks. I do hope you’ve been enjoying the influx of informative guest posts of late. It’s important to me that this site remains a repository of good information and ass-kickery (and cute kitty pictures), even in my absence.
The past two weeks have been a whirlwind of international travel and crime fighting.[footnote]Without any crime fighting.[/footnote] I promise I’ll be back on task starting Monday.
Lets get to this week’s list of stuff to check out.
I’m really excited to announce the Strong Body-Strong Mind Workshop, coming to Boston (finally!) later this summer.
The idea is simple: there’s a corner in the industry that’s underserved….mental skills.
There are a lot of people out there who write about “mindset” and describe themselves as mindset coaches (whatever the heck that means) who, by and large, have zero academic background in that department.
Lisa, SPOILER ALERT: she’s my wife, went to school for this shit.
I went to school to help turn people into badasses.
Lisa can speak to building competency and discussing how to build the skills to develop rapport with clients. I can speak to getting people bigger, stronger, and faster.
Our Vancouver shindig in April sold out, but Dean and I have recently announced a stop in Orlando, FL later this year, October 21-22nd at Spark Fitness.
I’ve never been to Orlando. There’s no way in hell I’m visiting Disney World.
3. Elite Fitness & Performance Summit – Chicago, IL
And speaking of being pumped, I am really – and I mean really – pumped for this event.
First off: Take a look at the roster of speakers (HERE).
Second: Holy shit, I am one of them.
Third: Cue trying not to destroy the back of my pants.
This is one of the premier events of the year for fitness professionals and entrepreneurs alike. And it’s taking place in an awesome city. What’s not to be excited about?[footnote]The only way I’d be more excited is if early 90’s Mariah Carey was performing.[/footnote]
The early bird special only lasts through June (and it’s an amazing price).
However, if you go HERE you’ll get an additional $100 OFF the early-price. BOM CHICKA BOM BOM.
In light of a blog post a wrote last week with a similar vibe – Easy Training is Good Training – I felt this literary masterpiece by Nia was a nice compliment.
Social Media Shenanigans
**Admittedly, I was lame last week and wasn’t on social media much. I mean, I was in London for fuck’s sake.
Twitter
Attempted a fake British accent in a room full of Brits today. Note to self: don’t do that again.
I arrived back to Boston late last night from London and I’d like to say I woke up today well-rested and ready to wow everyone with some witty fitness prose.
I’d like to say that.
Not gonna happen today. I’ve got a ton of emails and programs to catch up on, but that doesn’t mean I don’t have any content prepared for you today. Andrew Millett, good friend and Boston based physical therapist/strength coach was kind enough to send along this baller post today.
I got the idea for this post after recently attending the Advanced Warm-Up and Recovery Workshop put on by Matt Ibrahim and Dr. John Rusin. I didn’t know what new things I may learn at the workshop, but after taking pages of notes and getting new ideas for my clients and patients, it was definitely worth it.
You walk into any gym or fitness facility and you will see people warming-up on the bike, treadmill, elliptical, or maybe even rolling around on the foam roller. It is great to see people putting in the time and effort to consciously warm-up their musculoskeletal, nervous, and circulatory systems prior to engaging in their exercise routine.
The key word in that last statement is:
Consciously
Too many times, people warm-up without any direct goals or agenda in mind. They hop on one of the aforementioned cardio machines and watch TV or read a magazine and aimlessly pedal or step until they think they are ready to exercise. If they are on the foam roller, they probably roll around on it like they are rolling out pizza dough or look like a boy scout trying to start a fire with 2 sticks.
When you are working with a client or are performing a warm-up in your own gym routine, there needs to be a specific goal in mind while warming-up prior to your exercise session.
First off, we need to assess our clients to see what areas they may be lagging in. Here are a few quick and easy tests to see if there are any areas that need to be targeted for some type of self-myofascial release.
Ankle
In the sagittal plane, the ankle needs to be mobile. It needs to be able to plantar-flex and dorsiflex for the demands of life as well as demands in the gym.
In order to perform a squat without compensations, the ankle must be able to dorsiflex and allow the tibia to translate anteriorly as the person descends down in the bottom position. To determine if someone has adequate ankle dorsiflexion, try the Knee to Wall Test.
Knee to Wall Test
You instruct the client to place their foot on the tape strip. On the tape strip, there are 4 lines, each 1-4 inches away from the wall.
Start with the client’s foot on the “4” line. Four inches is required for adequate dorsiflexion in order to perform the squat.
Tell the client to try and touch their knee to the wall without letting their heel come up. Also, make sure they are going into valgus or varus movements at the knee to potentially compensate for lack of dorsiflexion.
If someone cannot reach from the “4” line, then have them move up and determine where they can reach from. Then test the opposite side.
If they cannot reach, ask them where they “feel it.” If they feel they can’t go any farther due to tightness in the back of their ankle, then we know that some of the soft tissue structures on the posterior aspect of their lower leg could be to blame.
For that, some type of self-myofascial release (SMR) to the soleus, posterior tibialis, flexor hallucis longus/flexor digitorum groups could help to improve range of motion at the ankle.
If they feel a pinch on the anterior aspect of the ankle, that could potentially be a joint mobility dysfunction.
Try a Banded Ankle Mobilization.
Start by placing a thick superband around a post or squat rack; something that can’t move. Then place the band at the ankle joint, just inferior to the medial and lateral malleoli. Place a good amount of tension on the band. While maintaining this tension, recreate the same movement as if you were performing the knee to wall test. Go as far as you can comfortably go. Hold for 2-3 seconds when you can’t go any farther. Return to the starting point and repeat for 6-10 reps.
Then retest the Knee to Wall Test.
If it improves, then we know the Banded Ankle Mobilization worked. Whether it improved or not, it might be wise to refer out to a licensed healthcare practitioner to further assess the ankle to determine what may be limiting that motion.
If there has been an improvement in ankle mobility, we want to be able to control that “new found” mobility.
Try the Heel Raises with Single Leg Eccentric. I first saw this from Dr. Ryan DeBell of The Movement Fix.
Key Points:
– Perform the movement slow and controlled.
-When your foot is are parallel to the ground, slightly flex the knee and go slow and controlled towards the ground.
-Imagine like you are slowly pulling your heel to the ground.
Hip
At the hip, we need to determine a few different areas of mobility. Starting in the sagittal plane, we need to determine if the client has adequate hip extension. If the client doesn’t have adequate hip extension mobility, they will have a more difficult type using their gluteal musculature to perform some of the movements we ask them to.
In addition to not being able to effectively activate and use certain muscles, lack of hip extension mobility can place increased stress on the lumbar spine and the knees, as well as some other more distal joints. By ensuring the client has adequate hip extension mobility, then we know some of the other joints of the body will be able to function properly.
To determine if someone has adequate hip extension mobility, we have two different options. First off, you can perform the ½ Kneeling Hip Extension Test.
VID ½ KNEELING HIP EXT TEST
Have the client place one knee down on a padded surface and the other knee up. Instruct them to contract their gluteus maximus on the down leg side, brace their abs, and slowly bring the hips forward.
We ideally would like to see 30 degrees of hip extension on the trail leg. You can use the Inclinometer App on the Iphone to measure the angle.
You can also perform a Thomas Test. This is a test that is typically taught in physical therapy schools to determine hip extension mobility.
*Disclaimer*: First off, you need to ask your client if they are okay with you placing your hands on them to assess their hip mobility.
Thomas Test
Self Thomas Test (and Sick Beats)
You are going to have the client lie supine on the side of a table or bench. Have them hold their knee at 90 degrees of hip flexion, or at hip height. Place your thumb on their Anterior Superior Iliac Spine (ASIS).
Using your other hand, slowly lower the leg the client is not holding with their hands.
If you can lower their leg to the level of the table and their ASIS does not translate anteriorly, then we know they have adequate hip extension mobility.
If you lower the client’s leg and their ASIS DOES translate anteriorly prior to the leg reaching the level of the table, then we know there is some muscle group limiting hip extension.
To determine, which muscle group, then we need to change the position of the lower leg.
If we extend the knee and perform the same test, this will place tension on the Psoas and Iliacus muscle groups. If you lower the leg with the knee extended and the ASIS translates anteriorly, then we can determine Psoas and Iliacus are to blame for decreased hip extension mobility.
If we lower the leg and the ASIS doesn’t translate anteriorly, then the only other muscular group to blame would be Tensor Fascia Latae (TFL).
To test for this, we slightly abduct the hip and perform the same test. If the ASIS translates anteriorly, then we know TFL is to blame.
If we run through all of these tests and each test with the knee extended doesn’t cause anterior translation of the ASIS, but when the knee is flexed it does, then we can determine that Rectus Femoris is to blame.
To improve hip extension mobility, try SMR to whichever area you determine to be problematic.
SMR w/ Lax Ball to Iliacus/Psoas & TFL
SMR to Rectus Femoris
SMR to Vastus Lateralis & TFL
Then re-test to see if any of these SMR variations improved the client’s hip extension mobility.
Once someone’s hip mobility has improved or is normal, we want to make sure they can stabilize in that mobility.
The Cook Hip Lift is a great movement for accessing and stabilizing hip extension mobility.
Key Points:
-Place a ball in your hip crease.
-Use non-stance leg to keep ball in hip crease.
-Lift hips up off ground. Do not let ball fall out
-Perform for 8 repetitions per side.
Thoracic Spine
The thoracic spine is another area of the body that needs adequate mobility. If it doesn’t present with adequate mobility, areas of the lumbar and cervical spines and the shoulder can be affected. It is one of the most influential areas of the body because of the impact it can have on so many different areas.
To determine if your client has adequate thoracic spine mobility, it is best assessed in quadruped using the Quadruped Thoracic Rotation Test.
Normal thoracic rotation in the general population should be 50 degrees. To measure this, use the Inclinometer app and place it ½ way between both shoulders on the thoracic spine.
When you are passively bringing them through the movement, make sure there is no lumbar movement such as sidebending occurring as this will skew your measurements. Also, gently rotate the client. Don’t try to force rotation on someone that may not have it.
If the client does not have 50 degrees of thoracic rotation, there are various thoracic spine mobility drills that can be performed such as:
A-Frame T-Spine Mobilization
Side Lying Thoracic Rotation
Side Lying Rib Roll
If the client has 50 degrees or more of passive rotation, but less than 50 degrees of active rotation, a thoracic spine motor control drill can be performed.
Drills such as:
Quadruped Assisted Thoracic Rotation
Key Points:
-Perform slow and controlled.
-Make sure not to side-bend through your spine. Make sure to rotate through mid-back.
Seated Assisted Thoracic Extension
Key Points:
-Squeeze ball between your knees.
-Slightly turn away from where band is attached.
-Slow and controlled, allow band to rotate body.
Shoulder
The last pertinent area of the body to address in a warm-up is the shoulder. Limited shoulder mobility in shoulder flexion, abduction, or internal/external rotation can affect function at the shoulder, cervical spine, thoracic spine, and even the lumbar spine.
To assess the shoulder, movements such as:
Supine Shoulder Flexion Test
Supine Shoulder ER Test
If there are limitations in mobility, performing self-myofascia release as shown below can help:
Once mobility has been improved, now we want to make sure we can use that mobility. Performing movements such as:
Back to Wall Shoulder Flexion
Key Points:
-Maintain low back flat to the wall.
-Raise arms up and when the reach shoulder height, gently reach 1 inch in front of your finger tips.
-Continue this gentle reaching as you continue to raise your arms overhead.
Forearm Wall Slides
Key Points:
-Slide arms up the wall.
-When your elbows get to shoulder height, gently press into the wall/push your trunk away from the wall.
-Maintain the pressure on the pinkie side of your hand as you slide up the wall.
Quadruped Assisted Reach Roll and Lift
Key Points:
-Perform slow and controlled.
-Slowly reach out. Rotate palm up to the sky. Slowly raise arm up.<
Yoga Push-Ups Sans Pushups
Key Points:
-Think of pushing the ground away from you with your hands.
-Should be felt in your upper back and out and around your rib cage.
If you have no mobility limitations in any of the aforementioned areas, feel free to use the motor control or stability drills to help primer your nervous system to prep you for your lift.
There you have it! Create a plan for your warm-up, do said plan, and then go and get after your training!
About the Author
Andrew Millett is a Metro-West (Boston) based physical therapist
I’m still across the pond in London with Dean Somerset presenting our Complete Shoulder & Hip Blueprint workshop.[footnote]I attempted a British accent in a room full of Brits. Note to Self: Don’t do that again.[/footnote] I have zero plans to do work today, but a good friend (and colleague) of mine, George Kalantzis, was kind enough to pinch hit write for me.
He’s written several articles for this site and he’s a master at writing effective fat-loss programs.
In fact, the cards are stacked against you and mainstream media keeps flooding you everyday promising you with six pack abs shortcuts and seven day cleanses to only leave you frustrated and tired of results.
But Not Today
Over the past 15 years of my life, I have had the chance to train with some of America’s finest men as a Marine, and coach alongside some of the best in the fitness realm. I’ve learned some pretty cool training methods and have helped people lose anywhere from 5-40 pounds in a matter of a few months.
Because you are here to pick heavy things up and see results, you want a training method that will optimize time and accelerate fat loss.
And to be lean and athletic, you need to utilize combination exercises in your training to build more muscle and boost the metabolism so that your body continues to burn off calories well after exercise.
Combination Exercises and How The Accelerate Fat Loss
The common mindset or misconception seems to be that you can shred fat faster by doing two things- lower exercise at a longer steady duration or crush yourself into oblivion with high-intensity training.
While both play a vital role in fat loss and a well-rounded program, no one has time to train multiple hours throughout the week, ( if you do, I applaud you) and if you want to accelerate fat loss and keep burning calories well after your workout, you have to work hard and smart.
That means you have to find a training method that will burn a ton of calories, promote muscle mass, and elevate the metabolism.
One of the best ways to accelerate fat loss is to utilize combination movements in your training program. Combination movements play a huge role in fat loss because they allow for the greatest muscle fiber recruitment and an increase in the resting metabolic rate.
By stimulating a greater amount of muscle fibers during a workout your body will see huge increases in metabolic demand, which in turn will increase EPOC (Exercise Post Oxygen Consumption). EPOC is the amount of oxygen consumed during recovery in excess than what would have been consumed at rest.
Essentially your body becomes a fat burning machine well after the workout.
Ok, so now that we’ve covered the why combination exercises work, let’s cover how to shred some serious fat!
How To Use Combination Exercises For Fat Loss
Just training hard and fast isn’t usually the answer to a good fat loss program. Or is running for hours on end on the treadmill and Stairmaster going to do the trick.
You need to stimulate the most muscle in the shortest amount of time while finding a sweet spot between failure and easy in order to boost your caloric deficit, a key component to getting shredded.
Combination exercises are great for fat loss because they use compound movement patterns with short rest periods and higher intensity. A must have for shredding that stubborn fat.
But before we get into the circuits, I want to walk about the method behind the madness of combination circuits.
I’m a huge fan of taking what has been known to work and finding out ways to make it better. Density training has been known as one of the best things you can to shred fat fast. The greater the density, the more fat you will burn. You can increase density by cutting rest times and set up circuits like the ones below.
Day # 1
1a) Upper/Lower Compound x12-15 Reps
1b) Push-up Progression 8-10 Reps
1C) Split Stance Progression/Core x6 reps
2) Quad Dominant x 5
2b) Vertical Pull x 5
2c) Core
Day # 2
1a) Upper/Lower Compound x12-15 Reps
1B) Inverted Row x 5
1C) Single Leg RDL Combo x 6/leg
2a) Hip Dominant x 15
2B) Horizontal Press x 5
2C) Core
These circuits are a bit more advanced, so use them as a starting point and make modifications where you can
Pre-Exhaust Method Combination – Then Heavy Equals Accelerated Fat Loss
Not all circuits are created equal. To stimulate the most muscle during a workout and keep burning fat well after the workout, you need to shock the system.
Traditional fat loss programs include lighter weight and higher reps to produce results. And while there is nothing wrong with those programs, I like my clients to maintain muscle while shredding fat.
This is where I like to combine pre-exhaust training with heavier training to accelerate fat loss. Pre-exhaustion is a way to fatigue the muscles before hitting them with compound multi-joint exercises. This method is old school but is a great way to wake up the muscles prior to the larger lifts and stimulate muscle growth. Which means you get to build some more muscle and keep shredding pounds.
Fair warning, just because the reps are higher and the load is lighter, does not mean it will be easy. You will soon begin to feel what pre-exhaustion meals into your second and third set.
Pre- Exhaustion Set For Fat Loss Looks Like This
A1) DB RDL/Bentover Row Combo x 12
A2) Tempo Pushup x 3-0-3 x 8
A3) Walking Lunge Into Renegade Row 6/side
Then You Would Rest No More Than 90 seconds and Get Right Into Heaver Weights
B1) Double Kettlebell Front Squat x 5
B2) Pull-up x 5
B3) Side Plank With Knee Drive 5/side
A second day would look like this
A1) Kettlebell Squat To Press x 12
A2) TRX Inverted Row x 10-12
A3) Single Leg RDL To Reverse Lunge Combo x 6/leg
B1) Kettlebell Swing x 5
B2) BB Bench Press x 5
B3) Push-up To Mountain Climber 5/side
Accelerated Fat Loss Summary
For most people, when it comes to shredding fat, being consistent with eating healthy and working hard produces results. Sometimes, you will need to think outside of the fat loss box and mix it up with different styles of training.
Harder, shorter training sessions work better than high reps and lower weights because they force you to recruit more muscles than a typical training session. Attack fat loss training with a specific goal and stick to it for at least 4-6 weeks. Use the training methods above at least two days a week and you will begin to see a transformation in your body composition.
Author’s Bio
George is a Marine Corps Veteran of 9 years and was awarded an honorable discharge after deployments to Iraq and Afghanistan. He is currently a Master Instructor and Personal Trainer at Equinox in Boston and a licensed massage therapist.
Outside of Equinox, George maintains a fitness related blog that can be found at www.sgtkfitness.com.
He and his wife Shawna reside in Manchester, NH with their daughter Melina and fur baby Lola the dog.