Categoriescoaching Exercise Technique Program Design Strength Training

Why Train the Posterior Chain?

Today’s guest post comes courtesy of Zak Gabor, a MA-based physical therapist and strength coach. His alma mater – Ithaca College – also happens to be my alma mater’s – SUNY Cortland – sworn enemy.

But he’s cool…;o)

Enjoy!

Not only can tapping into your posterior chain get you extremely strong, help improve athleticism and give you the butt of your dreams, it can leave you significantly less injury-prone, especially with low back and knee injuries.

Photo Credit: Dr. John Rusin

I am here to discuss how and why posterior chain strength needs to be a priority in training (that is, of course, if you want to decrease your chance of getting injured.)  Training your posterior chain doesn’t guarantee injury prevention but it sets you on the right track for building a strong foundation.

What is the Posterior Chain?

In the strength and conditioning world, the posterior chain consists of the erector spinae, gluteal muscles, hamstrings, and gastroc/soleus complex.

Note from TG: “Posterior Chain” was also the original name of Thor’s hammer.

But it actually wasn’t.

Why is the Posterior Chain So Damn Important?

This is an area that I am extremely passionate about. What can I say, I’m a butt guy, but for good reason.

I truly believe that incorporating posterior chain strengthening into training can save tons of money on healthcare costs for low back and knee injuries, but more importantly, keep you healthy! 

As the PT profession is constantly evolving, my goal is to get clients in the door and teach them ways stay healthier, versus having patients in for rehabilitative purposes.

Lets dive into two of the major joints that are especially vulnerable to injury in the lack of adequate posterior chain strength:

Low Back:

Oh yeah, baby.

Over $80 billion spent each year on low back in healthcare… simply unacceptable. 

To me, if you know how to strengthen your posterior chain, that means you know how to hip hinge (i.e. load the glutes and hamstrings effectively while keeping lumbar spine neutral).  For anyone who knows what a freak I am about preaching this movement pattern, this right here is the primary reason why! 

Am I saying that if you can hip hinge you will never get back pain? No.  I am saying that understanding the hip hinge pattern will give you a much better chance at preventing low back pain.  The simplified reason is two fold:

1) Lifting loads from the ground with a neutral spine= less likely to hurt low back

-Now, now, not trying to be dogmatic, but research don’t lie.

Spines ARE resilient, we need to be able to tolerate both flexion and extension. 

Yet, if you are like me, and respect the work of one of the most influential low back researchers (Dr. Stu McGill) then you know that repeated flexion especially under loads; leave the lumbar spine vulnerable to injury.

Therefore, learning how to properly hip hinge and maintain a neutral, stiff, spine throughout the movement can not only prevent injury, but can also get you the butt of your dreams.  Enter strengthening the posterior chain.

2) Strengthening posterior chain = less likely to hurt low back

Simply put, a strong butt (Gluteals) will decrease your risk of low back injuries. 

There is a ton of research out that indicates how important gluteal strengthening is for low back rehab.  Lets simplify this in the pre-hab lens. 

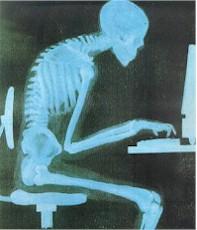
Glute Max is one of, if not the most, powerful muscles in the human body.  Unfortunately, most individual’s glutes are offline thanks to endless hours of sitting.  If we can strengthen the most powerful muscle in the body (which just so happens to neighbor and play intimately with the lumbar spine), wouldn’t it make sense that it would be good protection for the lumbar spine?  Just sayin’

Knee:

The knee gets a little bit more technical, but I will try to keep it simple.

The knee as a joint is extremely vulnerable, to say the least. 

It is literally two bones sitting on top of each other with little to no bony stability…meaning it gains its stability primarily from soft tissue structures both inert (meniscus, ligaments) and contractile (quads, hammies, and a whole lot more). 

Believe it or not, the knee actually has more evidence online than low back for its correlation of posterior chain strength preventing injuries.

A lot of the research is specific to ACL injury prevention, but honestly, mechanics resulting in various knee injuries are often similar to ACL mechanics.

One of the predisposing factors to knee injury is what is known as dynamic valgus (knee collapsing inward) mostly brought on by quad dominance. 

The other major way it can be brought on is by lack of posterior-lateral hip control. 

Most individuals are quad dominant because of sitting all day, turning off the glutes and hammies, and leaving the quads as primary movers.  Here is a photo of one of my favorite examples of a dynamic valgus brought on by quad dominance (i.e. the quads winning the tug of war on the femur and pulling into dynamic valgus:
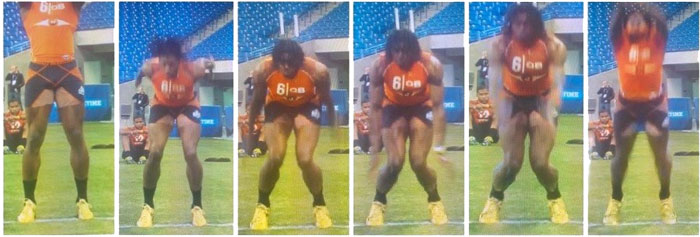
This is called “RG 3’ing.” Named after NFL Quarterback, Robert Griffin III.

Notice how his knees cave in as he develops power, this is a great example of when even “healthy” people can be predisposed to injury. Don’t RG 3….

How do we combat this? Well, this answer is multi-faceted, but Ill give you a hint… one of the best ways it to strengthen the posterior chain. 

It’s really that simple.

There are TONS of ways to strengthen and target the posterior chain.  As a matter of fact, just peruse Tony’s awesome website, and you will find tons of exercises… as I did when I was just a newbie in the S&C world.

Here are a few of my favorites:

1) Glute-centric: Bridging, every bridge variation….

2) Hamstring-centric: Nordic Hamstring curls (also AWESOME evidence for preventing hamstring strains)


Note From TG: This is an older video. So, relax internet trainer who doesn’t even perform this exercise in the first place, but is quick to point out how it’s not perfect technique. Am I bending a little too much from the waist? Yes. Is the music on point? Yes.

Here’s a nice regression:

3) Compound post chain: DEADLIFT, RDL, KB swings

Conclusion

You still need to train your anterior chain too! However, in a world where we’re stuck sitting for hours on end and prone to training our “mirror muscles,” placing more of a premium on the posterior chain is never a bad idea. For many reasons.

Anyone who might be interested in learning more and truly mastering the hip hinge, we will be hosting workshop July 24th at RX strength training in Medford, MA.

Either way, feel free to email me should you have any questions or anything about this you would like to discuss!

Peace, love, and glutes

About the Author

Zak GaborDr. Zachary Gabor, PT, DPT, CSCS, USAW, is a 2015 graduate from Ithaca College where he earned his Doctorate of Physical Therapy.
Prior to that, he earned his Bachelor of Clinical Health Science degree from Ithaca College in 2013. Zak is also a Certified Strength and Conditioning Specialist (CSCS) through the National Strength & Conditioning Association (NSCA), and a Sports Performance Coach through USA Weightlifting (USAW).
Throughout his doctorate program, Zak served as a Teaching Assistant for several physical therapy courses including gross anatomy and musculoskeletal examination and evaluation. He also spent over three years providing personal strength training to clients and athletes.
Zak is passionate about teaching and educating, both of which are very important cornerstones to any patient’s plan of care. In addition, Zak’s clinical experience is rooted in sports-based orthopedic rehabilitation and physical therapy, with an emphasis on strength training and sports performance.
A firm believer in continuing education to better serve the patients, clients and athletes he works with, Zak is dedicated to constantly learning. His future post-gradation coursework will include: manual therapy courses, dry needling certifications, and sports certification specialist designation.
CategoriesAssessment coaching Corrective Exercise Program Design

A Thoughtful Discussion on Low Back Sparing Strategies. Actually, Less “Thoughtful” More “Meandering”

I often joke that “lifting weights isn’t supposed to tickle.”

When you’re pushing, pulling, carrying, thrusting, and otherwise hoisting things around for the heck of it…you’re bound to end up with a few bumps and bruises along the way.1

Honestly, I can’t think of the last time my body was 100% devoid of any type of soreness or semi-nefarious “huh, well that doesn’t feel fantastic” sort of vibe.

I’m not referring to pain. Nothing that diminishes my ability to live my day-to-day life. Just, you know, sometimes my first step out of bed or sitting down to drop it like it’s hot isn’t the most enjoyable experience in the world.2

(Anyone who’s performed heavy squats the day prior can commiserate).

A lifetime of playing sports and training will do that to a body.

But that’s the point.

Lifting weights and pushing the body outside it’s comfort zone is what allows us to adapt and come back stronger and more resilient; to take on the world (or the squat rack) and tell it to GFY.

All that said: it still sucks donkey balls when the inevitable happens. We take things too far, go too heavy, or move juuuuust the right way for something wrong to happen.

Arguably, nothing stagnates or deflates progress more in the gym than a jacked up lower back.

Statistics will say that we’ve all been there. Or, alternatively, as fitness professionals, have worked with someone who’s been there.

So I figured today I’d shoot from the hip and fire back some quick-hitting suggestions/insights/alternatives to consider when working with someone dealing with low-back pain.

In No Particular Order

1) Except for this one. This is super important.

I’ll kick things off with the grandiose, off-kilter statement that if something hurts…don’t do it.

https://www.youtube.com/watch?v=a1Y73sPHKxw


Fucking profound, right?

Dr. Stuart McGill will advocate for provocative tests/screens to be performed – slump test, toe touch, McKenzie drills, etc – in order to figure out the root cause or possible source of someone’s back pain.

The stark contrast should be done outside of that window. It’s imperative as a coach, trainer, clinician, wizard, to demonstrate pain-free movement to the client/athlete. The objective should be to mute or pump the brakes on pain and start to mold more of a “movement quality” campaign.

Dr. McGill often refers to this as “spinal hygiene.”

2) Speaking of Dr. McGill

You should read his book Ultimate Back Fitness Performance. Specifically pages 1-325.

Spoiler Alert: it’s 325 pages long.

A more “user-friendly” text would be his latest book, Back Mechanic.

3) Back to “spinal hygiene.”

The good Doc refers to this as:

“The daily upkeep of your back. It includes your recovery exercise routine as well as changes to your existing daily motions all day long. Success in removing back pain requires removal of the movement flaws that cause tissue stress.”

This could refer to something as simple and innocuous as teaching someone how to sit in a chair properly, or even how to stand up from a chair.

As counterintuitive as it seems, those who have more flexion-based back pain will feel more comfortable in flexion. Likewise, those with extension-based back pain will feel at home in extension.

It’s weird.

So, often, taking the time to clean up activities and endeavors outside of the gym will be of most benefit.

As the saying goes: “we as trainers/coaches have 1-2 hours to “fix” things, and the client/athlete has 23 hours to mess it up.”

Other things to consider:

  • Walking. This is an excellent fit for those with low-back pain. It’s just important to make sure they’re not defaulting in forward head posture and a slouched posture. McGill refers to this as the “mall strolling” pattern. One should be more upright and swing the arms from the shoulders (and not the elbows). This provokes more of a “pertubation” to the body helping to build spinal stability.
  • Grooving more remedial hip-hinge patterns like I discussed in THIS article. Getting someone to dissociate hip movement from lumbar movement is a game-changer..
  • Pigging back on the above, the hip hinge creeps its way into EVERYDAY things like brushing one’s teeth or bending over to pick something up off the ground (golfer’s lift). Anything that can be done to spare the spine (discs) and make it less sensitive to pain is a win – no matter how trivial the activity.

4) Synchronous Movement

Learning to “lock” the ribcage to the pelvis is another key element to managing back pain. The abdominal brace is of relevance here. Basically the entire core musculature – not just any one muscle (ahem, transverse abdominus (drawing in method) – needs to work in concert and fire synchronously to spare the spine and offer more spinal stability.

One drill in particular that hammers the point home is the Wall Plank Rotation.


Here an abdominal brace is adopted and the objective is to “rotate” the entire body as one unit, locking the ribcage to the pelvis. Many will inevitably rotate through their lumbar spine and then the upper torso will follow suite.

5) Neutral Spine – Always (But Not Really)

The spine IS meant to move.

Neutral spine is paramount, but it benefits trainees to tinker with end-ranges of motions (in both flexion and extension) if for nothing else to “teach” the body to know how to get out of those compromising positions – especially when under load.

During our workshops together, Dean Somerset will often demonstrate to the trainees how squatting into deeper hip flexion (unloaded, and to the point where butt wink happens) can be of benefit to some people. The notion of learning where a precarious position is (and how to get out of it) is valuable.

I’ll use the simple Cat-Camel drill to teach people that it’s okay to allow the spine move.


Also of Note: I’d argue we’ve been so programmed into thinking that all spinal flexion is bad and that a baby seal dies every time we do it, that it’s caused a phenomenon referred to as reverse posturing.

The idea that more and more people are now “stuck” in extension, and thus at the mercy of a whole spectrum of other back issues (spondy, etc).

You can read more about that HERE.

Suffice it to say: we can’t discount Rule #1…helping to build improved spinal endurance/stability.

Plain ol’ vanilla planks come into the picture here.

This:

Not This:

This:

  • Keeping people honest and accountable on proper position (not “hanging” on passive restraints and dipping into excessive lumbar extension) is kinda of important.
  • Rule of thumb is to be able to hold a prone plank 120s, side plank (per side) for 90s. McGill will note it’s a RED FLAG if there’s a huge discrepancy between right/left sides.
  • I prefer more of an RKC style once someone is ready. This helps to build more bodily tension, to the point where everything – quads, abs, glutes, eye lids, everything – are firing. Ten seconds is torture when done right.

However, we can always graduate to less vomit in my mouthish exercises. As much as planks are baller and part of the equation to helping solve someone’s back pain, they’re about as exciting as watching a NASCAR race.

6) A few favs include:

Elbow Touches

https://www.youtube.com/watch?v=AUgz2U65KPc


Progressing lower and lower towards the ground.

Farmer Carries – all of them


Offset Loaded Exercises


I love offset loaded exercises for a variety of reasons. But most germane to this conversation is the fact that there’s a heavy rotary stability component when performing them.

Getting people moving and performing more traditional strength & conditioning drills – assuming they’re pain free and of high movement quality – will help to get them out of “patient mode,” and more excited to stick to the plan.

7) A Few Other Ideas to Consider

Don’t be an a-hole and marry yourself to the idea that everyone HAS to deadlift from the floor and that everyone HAS to pull conventionally.

The only thing people HAVE to do is sign up for my newsletter. (wink, wink, nudge, nudge)

Sometimes we have to set our egos aside and do what’s best for the client/athlete and what’s the best fit for them. I think the trap bar deadlift is a wonderful tool for people with a history of low back pain.

To steal a quote from Dr. John Rusin:

Without sending you back to Physics 101, the forward position of the barbell causes a less than optimal moment arm to stabilize the core position in neutral while moving some serious loads off the floor.

During the traditional deadlift, the center of mass (barbell) falls in front of your body, therefore causing the axis of rotation of the movement to be farther away from the load itself.  This all translates into increased shearing forces at the joints of the lumbar spine, putting all the structures, including intervertebral discs and ligaments at increased risk of injury with faulty mechanics of movement.”

The trap bar deadlift results in a better torso position for most people and less shear load in the spine. For anyone with a history of low back pain this is a no-brainer.

Use an incline bench rather than a flat bench when programming pressing movements. It’s just an easier scenario for most people and less “wonky” of a position to get in and out of.

Too, program more standing exercise variations – standing 1-arm cable rows, pull-throughs, landmine presses, Sparta kicks to the chest.

Categoriescoaching Exercise Technique Program Design Strength Training

Row, Row, Row Your Back

I hated P.E. class. I was a skinny, weird and uncoordinated kid.

I was the one who got picked on in the changing rooms about my lack of size, and we’re just not talking about muscles.

Whenever P.E. class was on my schedule, I dreaded it.  I’d rather go to the dentist to get a tooth pulled or talk about my confused teenage feelings.

Our masochistic P.E teacher liked to put us through a series of fitness tests every few months to determine our grades. As far as I was concerned, showing up was an A.

One of the many tests was an isometric chin up hold for time. You were to hold the top position of a chin up for as long as possible.  On this particular testing day, as soon as my name was called, the knives came out.

“You won’t last 10 seconds, McLean. You’re as weak as piss.”  (That’s Australian for not strong and bad tasting beer.)

As I stepped up to the bar, I had a little extra incentive and was determined to prove my doubter wrong.  I willed myself to a 40-second hold which was not bad for a weakling. I even got the nods of approval from the high school meatheads.

Ever since then I could always do a chin up.    

In the gym, chin ups/pull ups are still great test of your relative body strength.  You’ll never hear someone ask “How much to you row, dude?” However, you will hear in gyms around the world “How much do you bench?”

Not everyone can do a chin up (although it should be a goal), but everyone needs to build upper back strength because in today’s society we’re constantly looking down at our smart phones, tablets and computers.

Furthermore, we sit too much and move too little.

Over time this can wreak havoc on upper back strength, posture and spine. For instance, every inch our ears are forward from our shoulders (forward head posture) you increase the weight of the head on the spine by an additional 10 pounds. (Kapandji, Physiology of Joints, Vol. 3).

And while there’s no scientific correlation, forward head posture also increases one affinity for douchiness.

Upper back strength also plays a huge role in the big lifts such as squats, deadlifts and even the bench press, which is big deal for hardcore gym goers and for the everyday desk jockey who wants to look better naked.

That’s reason enough to include some old school and new age rows into your routine. Your back and biceps will thank you, and the chest will just have to wait its turn.

Old School Rows

1) Barbell Bent Over Row

This is the godfather of rows. Not only does this strengthen your upper back, shoulders, biceps and grip, it’s the perfect accessory exercise for improving your deadlift. Bent over row mimics the hip hinge, and holding this for time with help improve your lower/upper back endurance. More importantly, it will improve your ability to keep a neutral spine while pulling heavy.


The classic cues of shoulders down, chest up, grow tall or shoulders away from the ears work here. If you feel this movement in your lower back or upper traps, you’re missing something and should check your form.

Note From TG: Check out THIS baller post by Harold Gibbons dissecting a ingenious drill – the hamstring bridge hold – to help people learn to “feel” the hamstrings during a bent over row.

Programming – I’ve found doing this for strength (low reps 3-5 and more sets 5-6) will help improve your ability to pull from the floor and to keep a neutral spine under heavy loads.

If you’ve never done sets of 20 reps before, you don’t know what you’re missing.

2) Single Arm Dumbbell Rows

There’s a multitude of variations to choose from. From the classic single arm bench supported variety to this excellent variation from Eric Bach of Bach Performance.

Or this one from Tony himself:


Dumbbell rows in general are perfect for ironing out strength imbalances that often exist between sides and you’ll get some additional core work in the form of lateral stability.

Let’s face it, you cannot get enough core work.

Keeping the spine in neutral and not rowing with the upper traps is the key here. Please don’t go extremely heavy and short arm the weight because you’re not fooling anybody. It’s almost as bad as knee bend squats or poorly performed pushups.

Note From TG: Another point to consider is pinning or “glueing” the shoulder blade(s) in place. The scapulae should move around the ribcage, not stay in place. Read THIS for more information.

Programming – I prefer programming these for higher reps (8-15 range) and lower sets (2-4). Pairing these in a super set with any press variation or including these in a metabolic circuit works well.

Running the rack to murder the upper back is fantastic, if you’re a fan of pain.

New Age Rows

1) TRX Rows

Dan John sums up why we need to do TRX rows:

“TRX single arm and double arm rows target an area of the body that often gets missed or ignored. The whole upper back/rear shoulder area is probably the most underdeveloped area of people I’ve worked with.”

The beauty of the TRX is you can adjust the intensity simply by adjusting the foot position closer or further away from the anchor point. This makes this exercise accessible to almost everybody.

Here’s how to set up for a single arm row, one of my personal favorites.

Keeping your shoulders down and chest up and not shrugging your upper traps to pull yourself towards the handles is the key here, too.

Also, try the Hinge Row (which “nudges” a bit more upward rotation in the shoulders)


Or, if you’re really feeling fancy pants you can try this variation, which, technically, isn’t a TRX row, but uses the TRX so whateves:


Programming – TRX rows are a great change of pace from weighted rows and I’d recommend training these for higher reps (12-20) and fewer sets (2-4). The TRX makes exercise transition simple, so including rows in a superset or a circuit works like a charm. 

If you’re looking to burn out the back and pump up the biceps, TRX mechanical drop sets are perfect.

2) Single Arm Landmine Row

Single arm landmine exercises such as the row will help reduce joint stress while maximizing shoulder tension and stabilization. In my experience you can use more weight than the traditional dumbbell/cable row set up without any undue stress.

The set-up and cues are similar to a barbell bent over row. A good hip hinge and a neutral spine are essential.

The landmine allows you to row from a variety of positions and grips which is great for hitting the upper back from different angles.


Programming – Holding the end of the barbell instead of the dumbbell will provide a greater grip challenge.

Use the same programming guidelines as for the dumbbell rows. Or if you’re hating life, include them in a landmine complex, like this one courtesy of Ben Bruno.


Wrapping Up

Just because you cannot see the upper back, shouldn’t mean the chest gets all the love. Keeping the upper back strong is necessity for good posture and healthy shoulders.  Upper strength will help improve your deadlift, squat and bench numbers.

If that’s not reason enough, rows work the biceps. They’re always in need of extra attention.

Author’s Bio

Shane “The Balance Guy” McLean, is an A.C.E Certified Personal Trainer working deep in the heart of Dallas, Texas.

No, Shane doesn’t wear a cowboy hat or boots.  After being told that his posture blows by Eric Cressey, he has made it his mission to rid the world of desk jockeys and have fun while doing so.

After all exercise is fun and never a “work” out.

You can follow Shane on Twitter HERE, and Facebook HERE.

Categoriescoaching personal training Program Design

“How Much Weight Should I Be Using?”

As a fitness professional part of the job description is the ability to answer questions. Specifically those questions posed by your athletes and clients.

This makes sense given, outside of their primary care practitioner, you’re the person your clients are trusting with their health and well-being.

Granted, you’re not curing cancer or writing prescriptions for irritable bowel syndrome or anything3. But it stands to reason that as a personal trainer or strength coach you’re numero Uno when it comes to being most people’s resource for health & fitness information.

You’re it.

You’re the go to.

And like or not…You’re “the guy (or girl)” whenever someone says “I gotta a guy (or girl)” whenever they’re asked a fitness or health related question.

Stuff like:

“Does putting a stick of butter in my coffee make it healthier?”

“Will intermittent fasting help me lose 20 lbs of fat while also increasing my squat by 55 lbs AND give me x-ray vision?”

“Is it normal not to be able to feel the left side of my face after performing last night’s WOD? Also, it stings when I pee.”

I don’t know about you, but it’s a “challenge” I don’t take lightly.

I want to be a reliable and valuable source of information for my clients. They have (a lot of) questions, and I want to be able to answer them to the best of my ability.

I don’t know everything.4 I’m not a pompous a-hole who’s afraid to say “I don’t know.”

It’s rare when I get stumped with a question, but when I do I’m fortunate to have a long-list of people I can reach out to to get the answer(s).

I know when to stay in my lane and refer out when needed. You want to train for a figure competition? Not my strong suit. You need some manual therapy? Definitely not my strong suit. That irritable bowel problem mentioned above? Don’t worry, I gotta guy.

Most questions I receive are generally un-original in nature and something I can handle on the spot.

One question I get on an almost weekly basis, while inert and mundane (but altogether apropos), is this:

How much weight should I be using?”

It’s a very relevant question to ask. And one that, unfortunately, takes a little time to answer.

To be honest whenever I’m asked this question two things inevitably happen:

1) The theme music from Jaws reverberates in my head.5

2) The smart aleck in me wants nothing more than to respond with “all of it.”

That would be the dick move, though.

Like I said: it’s a very relevant question and one that many, many people have a hard time figuring out on their own.

As it happens I was asked this question last week by a client of mine during his training session. It wasn’t asked with regards to that particular session per se. Rather, he was curious about how much weight he should be using on the days he wasn’t working with me in person.

NOTE: the bulk of my clients train with me “x” days per week at the studio and also “x” number of days per week on their own at their regular gym. I write full programming that they follow whether they’re working with me in person or not. Because I’m awesome.

When working with people in person I have this handy protocol I like to call “coaching” where I’m able to give them instant feedback on a set-by-set basis.

I’ll tell them to increase/decrease/or maintain weight on any given exercise as I see fit.

Sometimes I even give them a sense of autonomy and allow them to choose how much weight to use.

The idea is to give them a maximal training effect using the minimum effective dose without causing harm or pain.

Challenge people, encourage progressive overload, but not to the point where they feel like they’re going to shit a kidney.

Pretty self-explanatory stuff.

Where things get tricky is when people are on their own and don’t have someone telling them what to do.

What then?

Here Are Some Options/Suggestions/Insights/WhatHaveYou

1) Write That Shit Down

In the case of my client above, when he asked “how much weight should I be using?” I responded with “how much weight did you use last week?”
[Crickets chirping]

He hadn’t been keeping track of anything.

He’d simply been putting a check-mark when he completed a set, and then moved on.

I, of course, was like “nooooooooooooo.”

I can’t blame him. It was on ME for not being clearer on the importance of writing things down and being more meticulous with tracking everything.

But the fix was/is easy: write down what you did, and try to do “more work” the following week.

I realize we like to overcomplicate things, but that’s part of the problem.

Write shit down. Really, it’s that simple.

2) What Is “Do More Work?”

What does that even mean? Do more work?

It means that in order for the body to adapt, you need to give it a stimulus and then nudge it, over time, to do more work. There are numerous ways to do this in the weight room, but for the sake of simplicity we can think of “more work” as more sets/reps or load.

Do the math. If you’re keeping track of things take your total sets and reps (and the weight you lifted) and figure out your total tonnage.

Try to increase that number week by week.

One strategy I like is something I call the 2-Rep Window.

If I prescribe 10 repetitions for a given exercise, what I really mean is 8-10 repetitions.

If someone picks a weight and they can easily perform more than 10 on every set, they’re going too light. If they can’t perform at least 8, they’re going too heavy.

The idea is to fall within the 2-Rep Window with each set and to STAY WITH THE SAME WEIGHT until the highest number within the range is hit for ALL sets.

**I’d rather someone cut a set short a rep or two rather than perform technically flawed reps or worse, miss reps.

If I have someone performing a bench press for 3 sets of 10 repetitions it may look something like this:

Week 1:

Set 1: 10 reps

Set 2: 8 reps

Set 3: 8 reps

Week 2:

Set 1: 10 reps

Set 2: 10 reps

Set 3: 9 reps

Once they’re able to hit ALL reps on ALL sets, they’re then given the green light to increase the weight and the process starts all over again.

Another simple approach is one I stole from strength coach Paul Carter.

Simply prescribe an exercise and say the objective is to perform 3×10 or 15 (30-45 total reps) with “x” amount of weight. The idea is to overshoot their ability-level and force them to go heavier, but within reason.

They stay with the same weight until they’re able to hit the upper rep scheme within the prescribed number of sets.

It’s boring, but it works.

Another layer to consider is something brought up by Cincinnati-based coach, PJ Striet:

“I’ve went over and above in my program notes to explain this subject. I used to just give 2 rep brackets, and, like you pointed out here, told clients to increase weight when they could achieve the high end of the range on all sets, and then drop back down to the lower end of the bracket and build back up again.

The problem though, as I soon figured out, was that people were doing say, 4 sets of 8 (bracket being 6-8) with a weight they could have probably gotten 15 reps with on their 4th set. This isn’t doing anything/isn’t enough of a stimulus. This isn’t meaningful progression. Feasibly, one could run a 12+ week cycle in the scenario above before the 4 sets of 8 actually became challenging. And this was on me because I should have realized most people will take the path of least resistance (literally).

Now, in my notes, I tell clients to do as many AMRAP on the final set of to gauge how much to progress. If the bracket is 4×6-8, and they get 8-8-8-9, weight selection is pretty good and a 2-5% increase and dropping back down to 6 reps is going to be a good play and productive. If they get 8-8-8-20, there is a problem and I should either stab myself in the eye for being a crap coach or schedule a lobotomy for the client.”

Brilliant.

3) Challenging Is Subjective

I feel much of the confusion, though, is people understanding what’s a challenging weight and what should count as a set.

Many people “waste” sets where they’re counting their warm-up/build-ups sets as actual sets, and thus stagnating their progress.

A few ideas on this matter:

  • I like to say something to the effect of “If your last rep on your last set feels the same as your first rep on your first set, you’re going too light.”
  • Using a Rate of Perceived Exertion (RPE) scale is useful here. Give them some criteria using a scale of 1-10. A “1” being “super easy” and “10” being “who do you think I am, Wolverine?” Ask them to be in the 7-8 RPE range for ALL sets.

And That’s It

There’s a ton of trial-and-error involved here, but it’s your job as the fitness professional and coach to educate your clients on the matter.

It’s important to consider context and everyone’s starting point, of course…comfort level, ability, past/current injury history, goals, etc.

However, beginners are typically going to have a much harder time differentiating “how much weight to use” compared to advanced lifters. There’s definitely a degree of responsibility on the trainer and coach to take the reigns on this matter.

But the sooner they realize it’s not rocket science, that there are some simple strategies that can be implemented to make things less cumbersome (and maybe even more importantly, that there’s a degree of personal accountability involved), the sooner things will start to click.

Categoriescoaching Program Design Strength Training

Two Dudes Talking Core Training

Regulars to this site are very familiar with the name Mike Robertson. He’s a good friend, but also a coach I respect immensely.

Not only does he produce top-notch athletes who are seemingly bulletproof, but he’s also someone who continuously churns out quality content that helps elevate the strength and conditioning/fitness community.

He also has impeccable taste in old-school hip-hop music.

His latest resource, Complete Core Training, is available starting today. It’s, well, a complete resource on core training. It’s not about six-pack abs or showcasing the latest core exercises that have people balancing on BOSU balls while juggling chainsaws.

It’s a system on how to set people up for success.

Mike was kind enough to take some time to talk some shop and discuss “core training” with me below. Enjoy!

Two Dudes Talking Core Training

TG: Mike, answer this: what in the name of infomercial hell is “the core?” And why should a whole manual be dedicated to it?

MR: Great question – and if someone can tell me, then that would be great….

In all seriousness, the core is literally everything from the feet to the head, because it all ties together, right? But that’s probably not the answer you’re looking for, either.

For our purposes, I define the core as a box:

  • You’ve got the diaphragm on the top,
  • The pelvic floor on the bottom,
  • The abdominals (transverse abdominus, internal obliques, external obliques, and rectus abdominus) on the front,
  • The IO’s, EO’s6, and quadratus lumborum (QL) on the sides, and
  • You’ve got the QL, erectors and multifidi on the back.

This is such a tricky answer, though, because no matter how I answer, someone hates me.

But I guess I’m okay with that at this point

TG: The cliche question here is to pop off your most common core mistakes people make. What do you feel people do right?

MR: First and foremost, you have to know that I live in a bubble at this point.

I don’t train in a commercial gym.

The people I’m surrounded by are generally high-level coaches, and are making strides to get the most out of their clients and athletes.

So with regards to doing things right, I think most are on the right path.

They’re focusing more on core stability versus creating movement at the core.

They’re realizing that flexion isn’t a bad thing, at least with regards to having that mobility through the spine and pelvis.

And they’re including core training in almost all (if not all) of their programs.

So when you factor all that in, it’s probably making quite a difference.

TG: Okay, I lied….NOW you can tell us the most common mistakes people make.

MR: Again, I’m around fairly high-level people so when it comes to mistakes, the devil is often in the details.

First off, I’m not sure most truly respect how important position is. For instance, almost every time I coach a core exercise now, we’re going to exhale to set a better position.

But often, we sell people short – what might seem like enough of an exhale simply is not. So we have to really drive a full exhale to set good position, especially with our more toned up bros and broettes.


Another mistake that I see is always leaving the core training to the end of the program. But before I get too deep here, I should probably let you in on a bit of my bias and philosophy…

I firmly believe that the core is a (if not THE) weak link with our clients and athletes. Therefore, it’s something that we have to address and multiple levels across the program.

So just throwing in some “ab work” at the end of a session isn’t enough. If it’s truly a weak link, we need to address it throughout the programming, both in the warm-up and the actually lifting portion. This comes largely through sound exercise selection, progression and regression.

Note from TG: this is why I LOVE deadbugs so much. Not only do most people do them incorrectly, but they can be injected into any portion of a training program to fit the needs of the athlete/client.

So if I could just get everyone to cue their clients into a better starting position time and again, and address the core at multiple times throughout the training session, I’d be a happy camper.

TG: The meatheads out there will say all someone has to do is squat and deadlift and that’s all the core work they need. I think this is a very narrow-minded, nay, moronic approach. I assume you agree. Why is this not a smart or ideal line of thinking?

MR: We’re in firm agreement here. First off, let me throw this back at you…

How many people walking in on Day 1 would you say have great posture, or can hold great position in their training sessions?

Probably none, or next to none, right?

So why do we assume that loading these people up with heavy squats and deadlifts that they’re magically going to “fix” their positional issues?

I’m sorry, but it just doesn’t happen.

Instead, we need to often rebuild our clients and athletes. Again, it happens on multiple levels throughout the program.

Instead of a back squat, maybe we front squat. Or even better, 2-KB front squat.

Instead of throwing in a ton of work for the posterior chain, we actually teach them to load their anterior chain more effectively. (I’m going to get roasted for this, but it’s something I’ll explore in more depth at a later time).

Note from TG: Here, here! We’ve been over-programmed to think that it’s ALL about posterior chain, ALL the time, that I find many trainees have lost the ability to recruit their quads. I’ve been programming more leg extensions recently for some of my clients. How you like dem apples, internet?!

We need to get some isolated core training in the program, just to teach our athletes how to actually use muscles like their obliques and TVA (not via draw-ins), to help control their pelvis and lumbar spine.

We start doing things like that, then posture starts to clean up and we can hold position.

And when we can hold position with entry-level exercises, then we can start getting bigger bang from there.

TG: Love it Mike. I’m totally on par with you. Complete Core Training – 10 second elevator pitch. Go – 

My goal was to take my entire approach to core training and give it to trainers and coaches who want to get more out of their programming and coaching.

Like you mentioned above, even the best coaches and trainers out there are looking for ways to get better. This is something that I’ve studied in depth for years, constantly seeking ways to get better results, and most importantly, to create lasting change in how my clients move and feel.

So Complete Core Training isn’t just a random collection of exercises – it’s a complete training system, where I cover everything from the anatomy of the core, to the mechanics of coaching and cuing, and of course, how to program most effectively.

I think it’s a really solid program, and one that’s going to help trainers and coaches across the world get better results with their clients and athletes.

But I’m also willing to admit I may be just a wee bit biased….;o)

Complete Core Training is ON SALE all this week at 50% off the original price.

CategoriesExercise Technique Program Design Strength Training

13 Ways to Improve Your Deadlift, FAST!

You could say I like to write about deadlifts. Well that, and zombies. Or zombies fighting ninjas. Or how adorable my cat is, which has nothing to do with zombies.

Oh, and speaking of cats……cats vs. zombies.

But mostly I like to write about deadlifts.7

In my latest article that went up on T-Nation today, I break down 13 quick-n-dirty tips that many people can incorporate TODAY and see immediate improvement in their lift.

Check it out and let me know what you think.

Continue Reading….

CategoriesProgram Design Strength Training

The Over Warm-Up: And How It Can Help You Lift More Weight

The warm-up.

Lets be honest: most of you reading either skip it altogether or discreetly brush it to the side as something you know you should be doing, but, you know, don’t.

I’m not here to judge. I do it too.

I don’t feel I need to sit here like an overbearing parent and type out all the reasons why you should be doing a thorough warm-up prior to training. But I will anyways.

A warm-up:

  • Improves alignment and posture.
  • Allows for additional and opportune times to address and tackle “problematic areas” such as the thoracic spine (lack of rotation and/or extension), hips (it takes a crowbar to squat past 90 degrees), glutes (you don’t have any), and ankles (the cement blocks we wear for shoes – not to mention high-heels – place us in a constant state of plantar-flexion, thus compromising our ability to dorsiflex).
  • Helps to increase core temperature and promotes blood flow…which helps improve flexibility/extensibility of muscles.
  • Get the nervous system primed and ready to go.
  • Gets you jacked. Just kidding.8

All that said – and despite many, many, MANY – smart people telling us how important it is…people still tend to skimp on their warm-up.

NOTE: HERE is an article I wrote a few years ago on “The Perfect Warm-Up?” As well as THIS one I wrote for STACK.

This video was part of the article linked to above. I only post it NOW for Eric Cressey’s EPIC video-bomb. Wait for it…..

Long story short: including a warm-up prior to training is a smart use of training time, will help to offset many of the poor sitting (and standing) positions we tend to be stuck in on a daily basis, and it only takes maybe 10 minutes.

DO IT!

The Over-Warm-Up

So now that we’ve established that you’re not going to warm-up, lets discuss the concept of the over warm-up, a term popularized by strength coach and powerlifter Paul Carter.

You’re TOTALLY going to be down for this…so keep reading!

For any uppity strength and conditioning snobs reading this can also, technically, be referred to as Post-Activation Potentiation.

Rather than attempt to define what Post-Activation Potentiation (PAP) is, I’ll defer to Bret Contreras:

“PAP is a phenomena by which muscular performance characteristics are acutely enhanced as a result of their contractile history. The underlying principle surrounding PAP is that heavy loading prior to explosive activity induces a high degree of CNS stimulation which results in greater motor unit recruitment lasting anywhere from five to thirty minutes.”

Traditionally, PAP is performed by utilizing a close to max-effort lift (think: bench press, squat, deadlift, arm wrestling a Terminator) followed suit with an explosive activity with the same “pattern” (think: medicine ball throw, vertical jump, 10-40 yd sprint, high-tailing it to local florist when you forget it’s your anniversary).

To take advantage of the phenomena most strength coaches agree that PAP is best utilized using the “lift something heavy then perform a similar explosive movement after” approach.

NOTE: I’d encourage you to read Bret Contreras’s full article HERE on PAP if you really want to dive into the nitty-gritty stuff.

However, for strength purposes I’ve found using a similar approach useful. Essentially you’ll take your “main” movement of the day – squat, bench press, deadlift – and extend your warm-up/build-up sets so that you work above your intended, scheduled work load.

So, for example, lets say you’re performing squats today and your program calls for 4×4 @ 75% of your 1RM. For the sake of argument lets say your 1RM is 350 lbs.

1) 75% of 350 = 262 lbs (rounded up to 265).

2) A traditional warm-up may look like this:

1×8 @ 40% (140 lb)

1×6 @ 50% (175 lb)

1×5 @ 60% (210 lb)

1×2 @ 70% (245 lb)

4×4@ 75% (265 lb)


3) The OVER warm-up will look like this:

1×8 @ 40% (140 lb)

1×6 @ 50% (175 lb)

1×5 @ 60% (210 lb)

1×2 @ 70% (245 lb)

1-3×1 @ 80-85% (280-300 lb)

4×4@ 75% (265 lb)

So in this case the objective is to hit a weight above or past the intended work sets to “potentiate” the nervous system, and thus (hopefully) making them feel easier/lighter.

The idea is to ENSURE your “over warm-up weight” is one you KNOW you can crush. Meaning, it’s not close to a 1RM and bar speed should still be, well, speedy.

Something else to consider is that this should only be utilized when you’re using sub-maximal weight with your work sets (60-80% of 1RM). DO NOT attempt this when you know you’re working at percentages higher than that.

I mean, you could…it just (probably) won’t end well.

Also, this isn’t something you’re going to want to perform long-term. Maybe use it for a block (3-6 weeks) and then revert to something else.

Give it a try and let me know what you think.

CategoriesProduct Review Program Design

The Single Biggest Mistake Most People Make With Their Training Programs

Full Disclosure: Today is a repurposed post written last year and coincides with Eric Cressey placing his resource, High Performance Handbook, on sale this week for $30 off the regular price.

Sale notwithstanding, it’s still a good post. You should read it.

The Single Biggest Mistake People Make With Their Training Programs

I want to tell you about a friend of mine. Lets call him Matt Damon.

For the record, no, Matt Damon isn’t his real name. In fact this friend I’m referring to doesn’t even exist (or star in any Jason Bourne movies).

Rather, he serves as a metaphor for many of you reading this post.

You see Matt is like many of you who, unknowingly or not, repeats the same mistake time and time again when it comes to his (or her!) training.

To his credit, “Matt” makes it a point to ensure the bulk of his training revolves around the compound lifts.

Instead of an “arms and shoulders day, “ he performs a chin-up day; instead of a “hamstring and anterior tibialis day,” he performs a deadlift day; and well, you get the idea.

Likewise, while he generally prefers to lift weights 3-4 times per week, he’s not immune to stepping outside that bubble, understands that variety is the spice of life, and enjoys doing other things. Every now and then he’ll attend the Bikram yoga class or spin class or hell, he’s even been known to spend an afternoon hiking or playing Ultimate Frisbee.

At the end of the day, though, his heart and passion lies in the gym and tossing around some iron.

But here’s the thing: he loves to lift weights. That’s what he eats, drinks and breaths. He spends a lot of his free time reading fitness websites like T-Nation.com, Men’s Health, or various blogs (even this one!)9, and he’s been doing it for a few years now.

Yet, he’s never been really happy with his results.

Matt hasn’t sniffed a PR in months (if not longer), he always seems to have some kind of nagging injury – a tweaked shoulder here, a dinged up knee there – and he can’t remember the last time he looked in the mirror and thought to himself, “are those my pecs or a steel plate I have on my chest?

He’s more or less spinning his wheels.

Does this sound vaguely familiar? Can you relate?  What the hell is he/you doing wrong?

It’s certainly not lack of effort or desire.

I’ll Tell You What’s Wrong

You know that popular saying, “The best program is the one you’re not doing?”

Well, I think a more cogent saying should be,

The best program is the one you’re not doing, and the one you’ll actually follow for more than a week at a time.”

In other words: Far too many people tend to fall in the trap of program hopping.

One week Matt wants to focus on fat loss, only to do a complete 180 after reading an article the following week talking about a kick-ass Smolov squat cycle.

Then, inevitably, he’ll join his local CrossFit box and do that for a few weeks. That is, of course, until he’s done so many kipping pull-ups and burpees that he hates life or can’t feel the right side of his face.

Which ever comes first.

And then he’ll come across yet another program that promises to add four inches to his biceps, 50 lbs to his bench press, and help him speak fluent Mandarin in a month.

Oh, but wait – two weeks into that program he forgets he promised his girlfriend he’d train for a 5K with her scheduled later next month.

Shit. Goodbye gainz.

You get the point. And I have a fair assumption that, while the above example(s) are a bit exaggerated, many of you reading are sitting their with your tail between your legs.

Many begin an exercise program (whichever it may be), only to follow it for a week, or worse, days, and don’t get immediate results…then blame everything on the program.

Guilty as charged, right?

Program hopping can have a number of detrimental effects:

1.  You never give the body the chance to truly adapt to anything. While it’s a good thing to NOT perform the same things over and over again for months on end (which a lot of trainees make a mistake of doing); the same can be said for switching things up too often.

More to the point: There’s a distinct lack of skill development. You never get “good” or develop proficient at doing anything.

It’s a pendulum that’s swung either too far to the left (not changing anything) or too for to the right (program hopping), and what most people need is to swing it back to the middle.

2.  Moreover, with program hopping, it makes it much more of a challenge to gauge actual progress.

As noted above, if one week you’re performing a deadlift specialization program only to switch gears three weeks later to follow a bench press specialization program, how the heck do you expect to measure progress?

I don’t know if there’s such a thing as program hopping Adderall, but I will say that for most people, most of the time, what will help them most is a program that will give them structure.

Something that will lock them in and keep their focus for more than a week at a time.

A program that will give them purpose, a goal. Results!

Boom, Goes the Dynamite

A few years ago my good friend, business partner, and long-time training partner, Eric Cressey, released his flagship resource Show and Go.

To say it was a popular program and a huge success would be an understatement. It helped countless people nail personal records they never thought possible, take their physiques to another stratosphere, not to mention helped thousands to learn to move better and feel like a million bucks.

As much as the programming was top-notch, I think the biggest benefit was that it held people accountable and kept them on track for an extended period of time.

It gave them focus!

And like magic, people finally attained results.

A few years later Eric released his second digital training program, The High Performance Handbook.

It’s everything Show and Go was/is, but 10x better.

For movie buffs out there reading, it’s like this: The Godfather was the shiz. But the Godfather II? Well, that mofo slapped you in the face and called you it’s daddy.

High Performance Handbook is The Godfather Part II (<– Eric, you have my permission to use that as a blurb).

It’s been a very popular program, one of the best selling programs on the internet since its initial release, and it’s currently on SALE at $30 off the regular price.

NOTE: I recognize everyone who’s anyone in the industry is highlighting the sale today (and all this week for that matter10.) on their respective blogs and websites.

And rightfully so…it’s an awesome program.

But unlike everyone else, I’ve actually seen the program performed in the flesh and KNOW how well it works.

1. First off, The High Performance Handbook allows anyone who purchases it to customize the program to fit their body-type. There’s a self-assessment component that no other training program has implemented before.

Rather than provide a cookie-cutter program – which, lets be honest, is how things have to be done over the internet when you have limited (if any) actual face time with people – Eric made it a priority that people would be able to modify the program based off their body type, exercise frequency, as well as equipment availability. So, in many ways, this is as NON-cookie cutter of an internet program as you can get.

2. This is about as close as anyone is going to get to training at Cressey Sports Performance without actually stepping foot in Cressey Sports Performance.  The templates used and the exercises provided have been tested (and proven to work) time and time again, and are the EXACT same protocols we use to turn people into tanks on a daily basis.

3. Speaking of exercises:  Eric filmed over 200+ videos for this product, including all the coaching cues and bullet points we use with our athletes and clients at the facility.  That’s over three hours of content on its own.

4. Lastly, there are some pretty sweet bonuses involved from fellow Cressey Sports Performance coaches Miguel Aragoncillo and Andrew Zomberg

In all,  you’ll have the option of purchasing the Gold Package (which includes the Nutrition Guide) for $30 off the regular price, or the Silver Package (no Nutrition Guide) for $30 off the regular price as well.

I tried convincing Eric into tossing in a 5×7 picture of me flexing to help sweeten the pot, but he didn’t bite. Pfffft, whatever.

Both options are a steal considering you’re getting 16 weeks of programming with Eric coaching you every step of the way.

The sale’s almost over. Act now. You won’t be sorry.

—-> The High Performance Handbook<—-

CategoriesProgram Design Strength Training Uncategorized

Intensity = Lift More Weight NOT Lift Weight More

Today’s guest post comes courtesy of strength coach, nutritionist, and researcher, Mike Sheridan. Mike’s written for this site before. His article Is Running Natural? was a big hit and sparked some friendly debate.

This time around he cracks the whip on what the term “intensity” really means.

Enjoy!

Intensity = Lift More Weight NOT Lift Weight More

Other than the word functional, ‘intensity’ is one of the most misunderstood terms in fitness.  The reason you’re picturing a sweaty out-of-breath person ready to run to the bathroom and puke at any moment, is because we’ve been taught to associate intensity with exhaustion…

…and insanity!

The actual definition of intensity is pushing your muscles to their maximum capacity within the designated training variables.  Which means choosing a weight that’s optimal for the given rep range (not too light or heavy) and executing the movement with the proper form and tempo.

For example:

Sets

Reps

Tempo

DB Bench Press

4

6 – 8

3010

Note: the numbers “3010” underneath tempo do actually mean something.

3 = 3s lowering
0 = no pause
1 = 1s explosive concentric/overcoming movement
0 = no pause

If the form and tempo is not there, the weight is too heavy, or exercise choice too challenging.  Prompting the trainee to lower the load, or regress to an easier variation of the movement.

Conversely, if the form and tempo are clean, and the trainee is not challenged on the last few reps, they’re encouraged to raise the weight.

This is called ‘progression,’ and it forms the basis of ‘progressive resistance training.’ Also known as, the thing a good chunk of the population thinks they’re taking part in, when they fire up a couple giant circuits of burpee to med ball twist to skipping rope to kettlebell swing to push up to…

Muscle Confusion right?

Along with progression, rest determines the intensity of the workout. But not to the point of exhaustion or depletion that’s common in warehouses and living rooms across the country.

Sets

Reps

Tempo

Rest

DB Bench Press

4

6 – 8

3010

90sec

Yes, this type of intensity can have you slightly out of breath (especially if you’re super-setting, or pairing two exercises – usually training antagonistic muscle groups – together), but it’s very different than aerobic fatigue.

Instead of tiring you to the point where you can’t do anything, it’s pushing your muscles to their maximum capacity, and giving them adequate rest to perform in a specific training zone.

Although our obsession with exhaustive training has everyone believing we should be exercising continuously, any qualified fitness professional understands that the work-to-rest ratio determines the training zone. 

And despite the ‘rest makes you weak’ mantra from aerobic instructors, or the ‘no pain no gain’ philosophy of many CrossFitters, we start training a different energy system when rest is too short.

We’re not trying to exhaust the muscle, we’re trying to strengthen and improve it. 

When we perform an endless number of muscle contractions (repetitions), we end up building muscular endurance as opposed to hypertrophy or strength.

And start training aerobically, instead of anaerobically.

Compromising our ability to build strength and muscle, and facilitating an overall loss in power and explosiveness.  Whether it’s resistance training or not.

Even though shorter rest periods produce a larger hormonal response and more metabolic stress, while longer rest periods allow for more weight to be lifted on subsequent sets, there is still a minimum threshold for proper recovery.

If rest periods are too short, the number of reps declines, the weight lifted declines, and so does the total workout volume.

A 2013 review published in the journal Sports Medicine analyzing research on hypertrophy, concluded that rest periods longer than 1 minute are preferable for maintaining optimal workloads while maintaining some metabolic stress.

So, although metabolic stress is one of the main drivers of hypertrophy, we still need to recover between sets. 

Otherwise, any increase in exercise byproducts and growth hormone that gets our muscles all pumped up, is balanced by decreases in mechanical tension and strength capacity.

We don’t want our rest period at a point where it’s difficult to perform as much ‘work’ as would be possible with slightly longer rest.  Which means keeping it high enough to maximize the number of successful reps over multiple sets, while still experiencing adequate metabolic stress to stimulate hypertrophy.

Anything below this threshold and we’re turning strength training into endurance training.  And anything above that, and we’ll struggle to put on muscle.

As illustrated in the chart above, the magic seems to happen between 90 and 180sec of recovery between sets.

Maximizing hypertrophy (metabolic stress) without sacrificing strength (mechanical tension) on the low end, and maximizing strength without minimizing hypertrophy on the high end.

Plus, it’s maximizing muscle-building hormones (testosterone, IGF-1, gH), with high volume and intensity, while minimizing the muscle-burning hormones (cortisol) associated with excessively short rest periods.  AKA Cardio!

You can definitely bring ‘intensity’ to your workouts, but it’s not achieved by doing things faster or longer.  Bringing intensity is nailing your rest, and selecting a challenging weight that you can perform with proper form and tempo.

Don’t shorten the rest, or do extra sloppy reps, like the exhausted exerciser.  And don’t do partial reps with a weight that’s too heavy, like a bro with an ego. 

That’s not intensity, it’s stupidity!

Author’s Bio

Mike Sheridan has been advising on nutrition and fitness for nearly a decade. He developed an obsession for research early in his career as he noticed the immense gap between the scientific evidence and the message to the public.

Mike has helped a tremendous amount of people lose the fat and keep it off without counting calories, doing cardio, or sacrificing their health. His success is due in large part to his philosophy that ‘Transformation Starts With Education;’ not just showing his clients what to do, but teaching them why.

To learn more about training ‘smart’ not ‘hard,’ check out Mike’s new book 1% Fitness.  Where, in addition to showing you how to maximize your training results with a minimal commitment to exercise, he delivers 14 weeks of workouts that you can view and track on your smartphone.

CategoriesProgram Design

The Pros and Cons of Percentage Based Training

Structuring training programs off of pre-set percentages has it’s advantages and disadvantages.

For some it provides accountability, structure, a sense of built-in auto-regulation, and I’m pretty sure I read somewhere it increases the likelihood members of the opposite sex11 will want to hang out with you by 413%.

Don’t argue, it’s science.

For others, percentage based training can be a double-edged sword: with loading parameters either too easy or too aggressive for some.

In my latest article over on T-Nation I break things down and and discuss why percentage based training may (or may not) be a good fit for you.

Continue Reading……